1
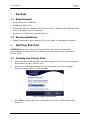
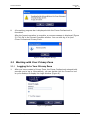
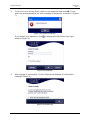
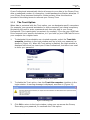
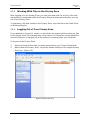
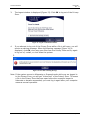
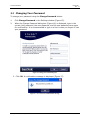
Cruzer Professional
User Guide
May 2007
Cruzer Professional
User Guide
Rev. 1.0
Table of Contents
1. System .......................................................................................4
1.1
Requirements ......................................................................4
1.2
Recommendations ................................................................4
2. Getting Started ............................................................................4
2.1
Creating the Privacy Zone......................................................4
2.2
Working with Your Privacy Zone .............................................6
2.2.1 Logging In to Your Privacy Zone ....................................6
2.2.2 The Trust Option .........................................................8
2.2.3 Working With Files in the Privacy Zone ...........................9
2.2.4 Logging Out of Your Privacy Zone ..................................9
3. Customizing Your Settings ........................................................... 11
3.1
Desktop ............................................................................ 11
3.2
Changing Your Password ..................................................... 12
3.3
Changing the Size of the Privacy Zone................................... 13
4. Frequently Asked Questions FAQs)................................................ 14
© 2007 SanDisk® Corporation
2
May 2007
Cruzer Professional
User Guide
Rev. 1.0
The Cruzer Pro application enables you to create and access a password-protected
secure area, called a Privacy Zone, on your Cruzer Professional Drive. Messages
and prompts guide you through setting up Cruzer Professional with your password
and customizing the Privacy Zone to suit your personal and business needs for
securing your information.
The combination of enhanced hardware with a high-speed USB 2.0 interface
enables you to start working immediately and easily secure all your confidential
data.
This text summarizes the procedures, and also includes some important Frequently
Asked Questions (FAQs).
© 2007 SanDisk® Corporation
3
May 2007
Cruzer Professional
1.
User Guide
Rev. 1.0
System
1.1 Requirements
•
At least Pentium II 266 MHz
•
900KB free disk space
•
Operating Systems: Windows 2000 Service Pack 4 , Windows XP, Windows 2003
Server, Windows Vista (all editions)
•
Access to your main drive (usually drive C)
1.2 Recommendations
•
2.
Graphic accelerator that supports 24-bit color depth for best-quality graphics
Getting Started
CAUTION! When you create your Privacy Zone, the Cruzer Professional is
formatted and ALL data will be lost. Back up your files before you create your
Privacy Zone.
2.1 Creating the Privacy Zone
1.
Select the removable disk drive that was assigned to your Cruzer Professional,
and double click the CruzerPro icon.
2.
Select your preferred language from the dropdown list in the Language
Selector window (Figure 1) and click OK.
Figure 1: Language Selection Window
3.
Click OK to continue after you have read the Cruzer Pro Welcome window
(Figure 2).
© 2007 SanDisk® Corporation
4
May 2007
Cruzer Professional
User Guide
Rev. 1.0
Figure 2: Welcome Message
4.
When the Format window is displayed (Figure 3), enter the following
information in the relevant fields:
a. Your password (required)
b. The same password to confirm (required)
c. A hint to remind you of your password (optional)
Figure 3: Format Window
5.
Move the Cruzer Pro slide bar (up or down) to designate the size of your new
Privacy Zone. When you have set the Privacy Zone size, click OK.
6.
The Privacy Zone maximum size is limited. The larger of either 1MB or 1% of
the total capacity of your Cruzer Professional is kept free to store the
CruzerPro application, future upgrades, and future applications without
hindering operation.
7.
A warning message is displayed (Figure 4) to the effect that formatting the
disk will erase the data. To proceed with the format operation, click OK.
© 2007 SanDisk® Corporation
5
May 2007
Cruzer Professional
User Guide
Rev. 1.0
Figure 4: Format Warning Window
8.
A formatting progress bar is displayed while the Cruzer Professional is
formatted.
After the format operation is complete, a success message is displayed (Figure
5). Click OK in the Format Complete window. You can now log in to your
Cruzer Professional Privacy Zone.
Figure 5: Format Complete Message
2.2 Working with Your Privacy Zone
2.2.1
1.
Logging In to Your Privacy Zone
After you have created a Privacy Zone, the Cruzer Professional automatically
prompts you to log in. Alternatively, you can double click the CruzerPro icon
on your desktop to display the Login window (Figure 6).
Figure 6: Login Window
© 2007 SanDisk® Corporation
6
May 2007
Cruzer Professional
2.
User Guide
Rev. 1.0
To log in to your Privacy Zone, type in your password and click OK. If you
enter the wrong password, an error message is displayed, as shown in (Figure
7).
Figure 7: Password Error Message
If you forget your password, click
window (Figure 8).
to display the Hint field in the Login
Figure 8: Password Hint
3.
After logging in successfully, Cruzer Professional displays a confirmation
message (Figure 9).
Figure 9: Successful Login
© 2007 SanDisk® Corporation
7
May 2007
Cruzer Professional
User Guide
Rev. 1.0
Cruzer Professional automatically blocks all access to your data in the Privacy Zone
after a predefined number of consecutive, invalid password verification attempts. If
your Privacy Zone becomes blocked for further access, follow the directions
provided in the dialog boxes to reformat your Privacy Zone.
2.2.2
The Trust Option
When data is protected with the Trust option, you can designate specific computers
(for example, your personal workstation or home computer) as trusted computers,
eliminating the need to enter a password each time you plug in your Cruzer
Professional. This is particularly convenient, for example, if you use your USB Flash
Drive frequently at a specific workstation, or if you back up your USB Flash Drive on
your computer on a regular basis.
1.
To designate this workstation as a trusted computer, select the Trust this
computer checkbox in the Login window and log in with your password, as
shown in (Figure 10). When the Trust option is enabled, the Login window is
displayed each time you insert your Cruzer Professional, but there is no need
to enter your password.
Figure 10: Implementing the Trust Option
2.
To disable the Trust option, clear the Trust this computer checkbox in the
Login window. A warning message is displayed, as shown in (Figure 11).
Figure 11: Revoking Trust
3.
Click OK to return to the Login window, where you can access the Privacy
Zone using your password, or reactivate the Trust option.
© 2007 SanDisk® Corporation
8
May 2007
Cruzer Professional
2.2.3
User Guide
Rev. 1.0
Working With Files in the Privacy Zone
After logging in to the Privacy Zone, you can open and work on any file. Files that
are worked on and saved within the Privacy Zone are protected even after you log
out of the Privacy Zone.
To unprotect a file that resides in the Privacy Zone, copy the file to the Public Zone
in Windows Explore.
2.2.4
Logging Out of Your Privacy Zone
If you attempt to log out of, restart, or shut down the system while working on files
in the Privacy Zone, file changes may not be saved. It is therefore recommended to
close all files prior to logging out of the system or shutting down your computer.
To log out of the Privacy Zone:
1.
Save and close all files that you have opened from your Cruzer Professional.
2.
When inside the Privacy Zone, log out by double clicking on the Logout Privacy
Zone icon. (Figure 12).
Figure 12: Privacy Zone View
© 2007 SanDisk® Corporation
9
May 2007
Cruzer Professional
3.
User Guide
Rev. 1.0
The Logout window is displayed (Figure 13). Click OK to log out of the Privacy
Zone.
Figure 13: Logout Confirmation Window
4.
If you attempt to log out of the Privacy Zone while a file is still open, you will
receive a warning message. When the Warning message (Figure 14) is
displayed, click OK, close any open files from the Privacy Zone and try again
to log out of, restart, or shut down the system.
5.
Figure 14: Close Files Warning Message
Note: If the system moves to Hibernate or Suspend mode while you are logged in
to the Privacy Zone, you will get “kicked out” of the Privacy Zone. To access
a file in the Privacy Zone that was open before the computer began to
hibernate or became suspended, you must log in again after your computer
resumes normal operation.
© 2007 SanDisk® Corporation
10
May 2007
Cruzer Professional
3.
User Guide
Rev. 1.0
Customizing Your Settings
3.1 Desktop
1.
To customize Cruzer Professional for your desktop, click Settings in the Login
window (see Figure 6). The Settings window is displayed (Figure 15).
Figure 15: Settings Window
2.
3.
Select any of the options listed (a tool tip for each option is displayed as your
mouse passes over it), including:
o
No login confirmation
o
No logout confirmation
o
No welcome window on startup
o
Language selection
Click OK to activate the options selected.
© 2007 SanDisk® Corporation
11
May 2007
Cruzer Professional
User Guide
Rev. 1.0
3.2 Changing Your Password
To change your password using the Change Password button:
1.
Click Change Password in the Settings window (Figure 15).
2.
When the Change Password dialog box (Figure 16) is displayed, type in the
current (old) password, the new password, and the new password once again
for confirmation. It is recommended to type in a hint in case you forget or lose
your password.
Figure 16: Change Password Dialog Box
3. Click OK. A confirmation message is displayed (Figure 17).
Figure 17: New Password Confirmation Message
© 2007 SanDisk® Corporation
12
May 2007
Cruzer Professional
User Guide
Rev. 1.0
3.3 Changing the Size of the Privacy Zone
Caution! Changing the size of your Privacy Zone requires formatting your Cruzer
Professional, causing ALL secured and non-secured data to be lost.
To change the size of the Privacy Zone:
1.
Click Format in the Settings window. The Format window is displayed, as
shown in (Figure 3).
2.
Enter the new password and confirm it by entering it a second time.
3.
Enter a hint in case you forget your password.
4.
Set the new size of your Privacy Zone using the slide bar.
5.
Click Format. The Cruzer Professional Format Warning window is displayed, as
shown in (Figure 4).
6.
Click OK to reformat your Cruzer Professional and create a new Privacy Zone.
To remove the Privacy Zone:
1.
Set the size of your Privacy Zone to 0% using the slide bar.
2.
Click Format. A message is displayed (Figure 18) warning you that your
DiskOnKey will not have a Privacy Zone.
Figure 18: Removing the Privacy Zone
3.
Click Yes. The Format Warning window is displayed, as shown in Figure 3.
© 2007 SanDisk® Corporation
13
May 2007
Cruzer Professional
User Guide
Rev. 1.0
4.
FAQs
Q:
How do I check which version of Cruzer Professional I’m using?
A:
The simplest way is to right click the CruzerPro icon on your device, and then
click Properties>Version.
Q:
How do I upgrade Cruzer Professional to the newest version?
A:
Download the zipped file from the web to your desktop, unzip it and copy the
.exe file to your Cruzer Professional. Launch it from by double-clicking the
CruzerPro icon. Do not use the shortcut you may have created on your desktop or
the quick launch bar, since this will launch the old version.
Q:
How do I know if I'm working in my Privacy Zone or in the Public Zone?
A:
The background color in your root file folder or in your Cruzer Professional
icon is orange when you are in your Privacy Zone. (This visual indication is not seen
if you have selected a classic folder view on your computer.)
Q:
How do I switch between the Public Zone and my Privacy Zone?
A:
Launch the CruzerPro application from your device. If you are prompted for
your password, this means that you are currently in the Public Zone. To switch to
your Privacy Zone, enter your password and click OK. If you see a prompt asking
you for logout confirmation from your Privacy Zone, this means that you are
working in your Privacy Zone. To switch, click OK. To remain logged in to your
Privacy Zone, click Cancel.
Q:
I accidentally deleted CruzerPro from my device. How can I access data in
my Privacy Zone?
A:
Download a new copy of CruzerPro from the web to your Cruzer Professional.
The Privacy Zone that you designated previously will be accessible.
Q:
Can I use more than one Cruzer Professional simultaneously?
A:
Yes.
Q:
Can I use my Cruzer Professional when logged on without administrator
privilege?
A:
Yes
Q:
Does my Cruzer Professional support Windows ReadyBoost™?
A:
Yes
© 2007 SanDisk® Corporation
14
May 2007
Cruzer Professional
Q:
User Guide
Rev. 1.0
What's the smallest / largest amount of flash I can use for ReadyBoost?
A:
You need a minimum of 230 MB free capacity for OS approval, and can use
up to 4 GB.
Q:
Will I still be able to use my device as a simple storage device when using
ReadyBoost?
A:
Yes, however the amount of storage space available depends on how much
space is allocated for ReadyBoost. i.e. if you allocate the entire device capacity for
ReadyBoost you will not be able to use the device for storage.
© 2007 SanDisk® Corporation
15
May 2007
Cruzer Professional
User Guide
Rev. 1.0
SanDisk® Corporation general policy does not recommend the use of its products in life support applications where
in a failure or malfunction of the product may directly threaten life or injury. Per SanDisk Terms and Conditions of
Sale, the user of SanDisk products in life support applications assumes all risk of such use and indemnifies SanDisk
against all damages. See “Disclaimer of Liability.”
This document is for information use only and is subject to change without prior notice. SanDisk Corporation
assumes no responsibility for any errors that may appear in this document, nor for incidental or consequential
damages resulting from the furnishing, performance or use of this material. No part of this document may be
reproduced, transmitted, transcribed, stored in a retrievable manner or translated into any language or computer
language, in any form or by any means, electronic, mechanical, magnetic, optical, chemical, manual or otherwise,
without the prior written consent of an officer of SanDisk Corporation.
All parts of the SanDisk documentation are protected by copyright law and all rights are reserved.
SanDisk and the SanDisk logo are registered trademarks of SanDisk Corporation. CompactFlash is a U.S.
registered trademark of SanDisk Corporation.
Product names mentioned herein are for identification purposes only and may be trademarks and/or registered
trademarks of their respective companies.
© 2007 SanDisk Corporation. All rights reserved.
SanDisk products are covered or licensed under one or more of the following U.S. Patent Nos. 5,070,032;
5,095,344; 5,168,465; 5,172,338; 5,198,380; 5,200,959; 5,268,318; 5,268,870; 5,272,669; 5,418,752; 5,602,987.
Other U.S. and foreign patents awarded and pending.
Lit. No. Revision x.x Rev. 1.0
Revision History
Month 2007
xx/07
Printed in U.S.A.
Revision 1.0—initial release
© 2007 SanDisk® Corporation
16
May 2007