1
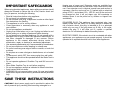
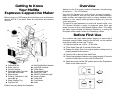
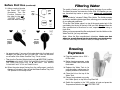
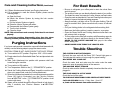
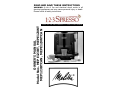
READ AND SAVE THESE INSTRUCTIONS
WARNING: A risk of fire and electrical shock exists in all
electrical appliances and may cause personal injury or death.
Please follow all safety instructions.
OWNER’S MANUAL
Model Nos. MEPE123BT, MEPE123WT
MEP123BTCAN, MEPE123WTCAN
STATE OF THE ART ESPRESSO • CAPPUCCINO MAKER
IMPORTANT SAFEGUARDS
When using electrical appliances, basic safety precautions should
always be followed to reduce the risk of fire, electric shock and
injury to persons, including the following:
• Read all instructions before using appliance.
• Do not touch hot surfaces or parts.
• Do not immerse cord, plug, or appliance in water or other liquid.
See instructions for cleaning.
• This appliance is not for use by children.
• Close supervision is necessary when any appliance is used
near children.
• Do not use appliance unattended.
• Unplug from outlet when not in use. Unplug and allow to cool
before putting on or taking off parts and before cleaning.
• Do not operate any damaged appliance. Do not operate with a
damaged cord or plug or after the appliance malfunctions, or
has been dropped or damaged in any manner. Return
appliance to the nearest authorized service center for
examination, repair, or electrical or mechanical adjustment.
• Use accessory attachments only if recommended by manufacturer.
• Do not use outdoors or while standing in a damp area.
• Do not let cord hang over edge of table or counter, or touch hot
surfaces.
• Do not place on or near a hot gas or electric burner, or in a heated
oven.
• To disconnect, switch OFF, then remove plug from wall outlet.
• This appliance should not be operated before the Water Tank is
filled.
• Do not operate appliance if Overflow Tray and Grill are not in
place.
• Allow Water Overflow Tray to cool before emptying.
• Do not use appliance except as indicated in these instructions.
• Avoid contact with hot steam.
• WARNING: Do not remove bottom cover. No user serviceable
parts inside. Repair must be done by authorized service personnel
only.
tripping over a longer cord. Extension cords are available from
local hardware stores and may be used if care is exercised in their
use. If an extension cord is required, special care and caution is
necessary. Also the cord must be: (1) marked with an electrical
rating of 125 V., and at least 13 A., 1625 W., and (2) the cord must
be arranged so that it will not drape over the countertop or
tabletop where it can be pulled on by children or tripped over
accidentally.
POLARIZED PLUG: This appliance has a polarized plug, (one
blade is wider than the other). As a safety feature to reduce the
risk of electric shock, this plug is intended to fit in a polarized
outlet only one way. If the plug does not fit fully in the outlet,
reverse the plug. If it still does not fit, contact a qualified
electrician. Do not attempt to defeat this safety feature.
ELECTRIC POWER: If the electric circuit is overloaded with other
appliances, your appliance may not operate properly. It should be
operated on a separate electrical circuit from other appliances.
SAVE THESE INSTRUCTIONS
CAUTION: A short power supply cord is provided to reduce the
risk of personal injury resulting from becoming entangled in or
2
3
Getting to Know
Your Melitta
Espresso-Cappuccino Maker
Before using your 123 Spresso for the first time, you must become
familiar with all of the parts. Read all instructions and cautions
carefully.
18.
17.
1.
16.
15.
14.
4.
13.
12.
10.
11.
5.
9.
7.
6.
8.
1.
2.
3.
4.
5.
6.
7.
8.
Coffee Pod Slot
Water Tank Lid
Function Selector
Detachable Water Tank with
removable filter holder
Steam Nozzle
Frothing Attachment with
removable tip
Water Overflow Tray
Cup Rest Grill
9.
10.
11.
12.
13.
14.
15.
16.
17.
18.
Welcome to the 21st century method of espresso, the technology
of the future — The 123 Spresso.
Your new 123 Spresso is so quick to brew, so easy to prepare –
there’s no guesswork. Now you can brew true Italian espressos,
lattés, mochas, and cappuccinos with no clumsy handles or filter
baskets, no wet, messy coffee grounds to dispose of. Just pure
coffee enjoyment.
The secret of great espresso is to start with superb coffee. Your
123 Spresso includes a supply of single-use pods. Each pod
brews one shot of pure, dark-roasted Arabica coffee. This coffee
has been custom-roasted by Malongo Rambouts, a century-old
European coffee roaster known for outstanding coffees.
Before First Use
2.
3.
Overview
Your machine was hand tested before shipping to ensure that it
functioned correctly. Before using for the first time, run the machine
once without coffee to rinse it out. To do so:
1. Plug the machine into a 120V ~ 60 Hz outlet.
2. Fill the Water Tank with 16 ounces of fresh water.
3. Replace the Water Tank to its original position, making sure it is
properly seated on the machine.
4. Close the Lid on the top of the Water Tank.
5. Place a heat resistant container or cup (approximately 10 ounces)
under the Coffee Spout, on top of the Cup Rest Grill.
6. Switch the machine to the “ON” position and turn the Temperature
Switch to the coffee cup icon.
Red Flag/Overflow Indicator
Used Pod Container
Coffee Spout
Temperature Switch
Green “GO” Light
ON/OFF Switch with Light
Infusion System
Coffee Pod
Cup Warmer
Hood
Product may vary slightly from illustration.
4
5
Before First Use
Filtering Water
(continued)
7. After a couple of minutes
the Green “GO” Light
illuminates. Turn the
Function Selector (on
the side) to the
“COFFEE CUP”. This
starts the water flowing.
Green
“GO”
Light
Function
Selector
COFFEE
position
Function
Selector
NEUTRAL
position
• Let approximately 2 ounces of hot water drain into the heat proof
container you placed on the Cup Rest Grill. There will be some
run-off water in the Water Overflow Tray. This is normal.
• Then turn the Function Selector back to the “NEUTRAL” position.
CAUTION: YOU MUST STOP THE WATER FLOW BY TURNING
THE FUNCTION SELECTOR TO
“NEUTRAL.” THE WATER
FLOW DOES NOT STOP AUTOMATICALLY.
8. When the water stops flowing from the coffee spout, carefully
dispose of hot water in the cup and the Water Overflow Tray. Your
123 Spresso is now ready to use.
•
6
•
The quality of water you use directly affects the taste of your coffee.
The better the water, the better the coffee. With 123 Spresso you can
use household tap water or spring water. Never use carbonated
water.
We’ve included a “universal” Water Filter Holder. The Holder accepts
commonly available cylinder-type filters, allowing you to use the brand
of your personal preference.
To use the Filter Holder, place it on top of the empty water tank. It fits
comfortably into the top of the tank. Add your filter. Always follow the
filter manufacturer’s directions for use, especially when using a
fresh filter.
When you have prepared the filter and placed it into the Holder on the
Water Tank Lid, you may add water.
Again, follow the filter manufacturer’s directions. Make sure that
water has actually flowed into the tank before you start brewing.
Filter flow rates vary from brand to brand, so always check first.
Brewing
Espresso
1. Plug the machine into a 120V ~
60 Hz outlet.
2. Before brewing espresso, make
sure the Water Tank is filled with
fresh water.
3. Replace the Water Tank to its
original position, making sure it is
properly seated on the machine.
4. Close the Lid on the top of the
Water Tank.
5. Place a heat resistant cup under
the Coffee Spout, on top of the Cup Rest Grill.
6. Switch the machine to the “ON” position to heat and press the
Temperature Switch to the
“COFFEE CUP”.
7
Brewing Espresso
(continued)
7. When the Green “GO”
Light illuminates, flip the
Function Selector (on the
side of the machine) to
“COFFEE CUP”.
MAKE SURE THE GREEN
“GO” LIGHT IS ILLUMINATED
BEFORE PLACING COFFEE
POD INTO THE MACHINE.
Function
Selector
COFFEE
position
8. Place one Pod into the Coffee Pod
Slot. The Pod will drop down automatically into the machine and the infusion
process begins.
9. Almost immediately, freshly brewed
espresso pours directly into your cup.
NOTE: If you prefer a strong, robust cup of coffee, brew one
ounce shots. If you prefer milder coffee, use more
water to suit your taste.
Let the coffee brew for approximately 10 - 15 seconds.
10. Turn the Function Selector to the
• “NEUTRAL” Position.
IMPORTANT! You can brew
espresso shots one after
another. Always wait for the
Green “GO” Light. That’s the
signal to brew.
11. When brewing is completed, the
Coffee Pod will fall into the Used
Pod Container and 123 Spresso
will automatically set up to brew
the next coffee.
Function
Selector
NEUTRAL
position
CAUTION: YOU MUST STOP THE WATER FLOW BY TURNING
THE FUNCTION SELECTOR TO
“NEUTRAL.” THE
WATER FLOW DOES NOT STOP AUTOMATICALLY.
•
8
Prepare Cappuccinos,
Lattés, Mochas, Macchiatos
and More!
The steam function can be used to make hot milk for cafe latté or to
make froth for cappuccino.
1. Place your cup of espresso on the 123 Spresso handy Cup
Warmer. This will help keep the coffee warm.
2. Press the ON/OFF Switch to the “ON” position.
3. To prepare steam for froth, turn the Temperature Switch to
the
“STEAM/FROTH” Position.
4. Slide Frothing Attachment onto Steam Nozzle as far as possible.
The Frothing Attachment fits snugly over the Steam Nozzle.
Always turn small pressure relief hole so that it is pointed
backwards, facing the machine. Swivel the frothing tube outward,
away from the machine and towards you.
Adjust the Frothing Attachment so that it fits down into a heat proof
cup or handled frothing pitcher with cold milk.
5. Fill the frothing pitcher 1/3 to 1/2 full with cold milk.
6. When the machine has heated to the correct temperature and is
ready to froth milk, the Green “GO” Light will illuminate.
Function
Selector
STEAM/FROTH
position
•
7. Turn the Function Selector from “NEUTRAL” to the
“STEAM/
FROTH” Position.
8. The machine will automatically begin to release steam.
9
Cappuccino/Coffee Drinks
(continued)
9. When making froth for cappuccino, hold the Frothing
Attachment below the surface of the cold milk. Do not touch the
bottom of the pitcher with the Frothing Attachment. While frothing,
move the pitcher in a circular motion then up and down for best
results. This allows the steam to mix with air to create rich, creamy
froth. Foam should be dense with small, closely packed bubbles
for rich taste and long-lasting foam.
10. Wipe the Frothing Attachment with a clean, damp cloth.
11. To complete your cup of cappuccino, take the cup of espresso
from the Cup Warmer, pour 1 ounce of steamed milk into
espresso and spoon the froth on top of the coffee.
For the final touch, sprinkle cinnamon, nutmeg, chocolate
shavings, cocoa powder, etc. on top of the froth.
See Espresso Terms and Expresso Recipes in the back of this
manual.
10
Care and Cleaning Instructions
Before cleaning or removing parts, unplug the machine and allow to
cool completely.
Hint: When the Overflow Tray is full, the red flag will pop up to
alert you it needs to be emptied. Make sure the machine is
fully cooled. Simply pull tray straight out and pour out into
your sink until it is empty. Clean and slide back into
machine securely.
Used Pod
Container
DISPOSE OF USED COFFEE PODS AFTER EVERY DAY’S USE.
The Used Pod Container slides out easily so you can dispose of
the used pods in your garden (they’re biodegradable) or in a
waste receptacle.
1. The Detachable Water Tank, Water Overflow Tray and Cup
Rest Grill can be washed in hot, soapy water. Rinse and use a
soft cloth to dry.
2. Wipe down the external parts with a soft cloth or sponge. Do not
use harsh abrasive cleaners or brushes as they may scratch the
surface.
3. Occasionally the Infusion System will need to be brushed out.
Lift Hood and gently brush coffee grounds out from the housing.
A soft toddler’s toothbrush is ideal for this purpose.
4. If the Steam Nozzle/Frothing Attachment is used, remove
frothing attachment and separate frothing tip from frothing
attachment by turning counter-clockwise. Wash in hot,
soapy water. Rinse by running water over and through both
pieces and dry. Replace tip back on to attachment by
turning clockwise. Place Steam Nozzle in position with the
small pressure relief hole turned towards the machine.
11
Care and Cleaning Instructions (continued)
For Best Results
5. If Steam Nozzle seems blocked, see Purging Instructions.
6. If it is necessary to wash the Infusion System, please use the
following steps:
a. Open the Hood.
b. Unlock the Infusion System by turning the lock counterclockwise.
c. Pull the Infusion System out gently.
d. Rinse the Infusion System with water.
e. Re-assemble the Infusion System gently.
f. Turn the lock clockwise.
g. Close the Hood.
NOTE: This unit will not work correctly if the Hood is not closed
properly.
Any servicing requiring disassembly other than the above
cleaning must be performed by an authorized service center.
• Be sure to refrigerate your coffee pods to retain the robust flavor
and rich aroma.
• The quality of water you use directly affects the taste of your coffee.
The better the water, the better the coffee. Always use fresh water.
• Clean the parts as described in Care and Cleaning Instructions periodically to ensure the freshest tasting espresso.
• Always use fresh, cold skim milk or 2% milk when frothing. This will
result in wonderful froth. (Never use whole milk, cream, or half-andhalf.)
• Chill your frothing pitcher in the refrigerator before making froth.
• Make sure the frothing pitcher is metal or ceramic, never glass.
• Clean the Steam Nozzle and Frothing Attachment after each use
with a damp cloth or sponge.
• To flavor cappuccino either with mocha or with flavored syrups such
as vanilla or almond, add them directly to the brewed coffee —
NEVER TO THE COFFEE MACHINE. Add syrup to the coffee
before adding froth.
• ORDER MORE PODS TODAY! Call 1-800-233-9054.
Purging Instructions
If you have made several consecutive cups and frothed/steamed milk,
carefully use the following steps to purge the steam nozzle.
CAUTION: STEAM IS HOT. AVOID CONTACT WITH HOT STEAM.
1. Turn machine to OFF position. Plug into a 120V ~ 60 Hz outlet.
2. Empty water from the Detachable Water Tank and place back into
position.
3. Slide Froth Attachment into position with pressure relief hole
turned facing the machine.
4. Turn machine to ON position.
5. Turn Temperature Switch to the
“STEAM/FROTH” position.
6. Swivel the Frothing Attachment inward, toward the machine and
place a dry paper towel under the Frothing Attachment.
7. When the machine has heated to the correct temperature and the
Green GO Light is illuminated, turn the Function Selector
from “NEUTRAL” to the
“STEAM/FROTH” position. Avoid
contact with steam.
8. Steam will be pushed through the Steam Nozzle to help clean it.
After 5 seconds, turn Function Selector to “NEUTRAL”
position.
•
•
12
Trouble Shooting
THE COFFEE IS NOT HOT ENOUGH
Pre-heat the cups, wait until the Green “GO” Control Light goes on.
This indicates the machine is hot enough for proper brewing.
NO COFFEE WILL COME OUT
Check the water level and make sure the valve under the water
reservoir is open by pressing the top of the reservoir.
THE MACHINE WON’T TURN ON
Check to make sure the Hood is completely closed and that the unit is
plugged in.
THE PUMP MAKES A LOT OF NOISE
Check the level of the water.
TO PURCHASE ADDITIONAL PODS & REPLACEMENT PARTS:
Call 1-800-233-9054 Monday - Friday 9am - 5pm CST
or, Order via the Internet: www.salton-maxim.com
13
Espresso Terms
Espresso Recipes
Espresso
Café Galliano
Espresso is made when the heart of the coffee flavor is extracted
under pressure. A single serving or “shot” is 1 to 1 1/2 ounces.
This serves as the basis for other types of coffee drinks.
Place 1 tablespoon of galliano liqueur into demitasse cup. Fill
with espresso, Garnish with a twist of lemon peel.
Latte
Brew a large quantity of espresso and freeze it into ice cubes.
Make another large quantity of espresso and chill it. In very
tall glasses, place several espresso cubes and a scoop of
coffee ice cream. Pour in chilled espresso. Dust with nutmeg.
Make a serving of espresso and add 2-3 ounces of steamed milk.
Cappuccino
Make a serving of espresso, add 1 ounce of steamed milk then
top with 1 ounce of frothed milk.
Macchiato
Make a serving of espresso and top with 1 to 2 tablespoons of
frothed milk.
Iced Espresso
Irish Coffee
A standard size coffee mug should be used. Fill mug 2/3 full with
espresso. To each cup, add 2 tablespoons of Irish Whiskey.
Generously top with whipped cream.
Espresso Rum
Mocha
Place 1 tablespoon of rum into demitasse cup.
Fill with espresso, top with whipped cream and stir with a
cinnamon stick.
Dissolve 1 tablespoon of cocoa or chocolate in 1 ounce of
frothed milk and stir into one serving of espresso.
Café Chocolate
Americano
Combine equal parts of espresso with hot chocolate.
Top with sweetened whipped cream. Garnish generously with
chocolate shavings and sprinkle with cinnamon.
This espresso drink is similar in taste to American drip coffee.
Dilute a serving of hot espresso with hot water to preserve the
espresso flavor. It does not mean over-extraction of espresso.
Latteccino
This drink combines the consistency of a latte and a cappuccino.
It is a frothier latte or a milkier cappuccino.
Flavored Espresso
Add 1 teaspoon of flavored coffee syrup such as Irish Cream,
French Vanilla or Hazelnut to a serving of espresso and adjust to
taste.
14
Café Tia Maria
Place 1 tablespoon of Tia Maria liqueur into demitasse cup.
Fill with espresso, garnish with hot frothy milk.
Café Anisette
Place 1 tablespoon anisette liqueur into demitasse cup.
Fill with espresso, garnish with a twist of lemon peel.
Café Grand Mariner
Place 1 tablespoon of Grand Marnier into a demitasse cup.
Fill with espresso, garnish with whipped cream and sprinkle
with orange peel.
15
NOTES
NOTES
16
17
NOTES
NOTES
16
17
IMPORTANT NOTICE
If any parts are missing or defective,
DO NOT return this product.
Please call our Customer Service Department for assistance.
800-233-9054 Monday - Friday 9:00 am - 5:00 pm CST
Thank You
LIMITED ONE YEAR WARRANTY
Warranty: This Melitta‚ product is warranted by Salton, Inc. to be free from defects in materials
or workmanship for a period of (1) year from the original purchase date. This product warranty
covers only the original consumer purchaser of the product.
Warranty Coverage: This warranty is void if the product has been damaged by accident in
shipment, unreasonable use, misuse, neglect, improper service, commercial use, repairs by
unauthorized personnel, normal wear and tear, improper assembly, installation or maintenance
abuse or other causes not arising out of defects in materials or workmanship. This warranty is
effective only if the product is purchased and operated in the USA, and does not extend to any
units which have been used in violation of written instructions furnished with the product or to
units which have been altered or modified or to damage to products or parts thereof which have
had the serial number removed, altered, defaced or rendered illegible.
Implied Warranties: ANY IMPLIED WARRANTIES WHICH THE PURCHASER MAY HAVE
ARE LIMITED IN DURATION TO ONE (1) YEAR FROM THE DATE OF PURCHASE. Some
states do not allow limitations on how long an implied warranty lasts, so the above limitation
may not apply to you.
Warranty Performance: During the above one-year warranty period, a product with a
defect will be either repaired or replaced with a reconditioned comparable model (at our
option) when the product is returned to the Repair Center, or the purchase price refunded.
The repaired or replacement product will be in warranty for the balance of the one-year
warranty period and an additional one-month period. No charge will be made for such repair
or replacement.
Service and Repair: Should the appliance malfunction, you should first call toll-free
1 (800) 233-9054 between the hours of 9:00 am and 5:00 pm Central Standard Time and
ask for CONSUMER SERVICE stating that you are a consumer with a problem. Please refer
to models number MEPE123BT/MEPE123BTCAN when you call.
In-Warranty Service (USA): For an appliance covered under the warranty period, no charge
is made for service or postage. Call for return authorization (1 800 233-9054).
Out-of Warranty Service: A flat rate charge by model is made for out-of-warranty service.
Include $ 15.00 (U.S.) for return shipping and handling. We will notify you by mail of the amount
of the charge for service and require you to pay in advance for the repair or replacement.
For Products Purchased in the USA, but Used in Canada: You may return the product
insured, packaged with sufficient protection, and postage and insurance prepaid to the USA
address listed below. Please note that all customs duty / brokerage fees, if any, must be
paid by you and we will require you to pay the cost of customs duty / brokerage fees to us
in advance of our performing any service.
18
19
To contact us, please write to,
call, or email:
Salton, Inc.
P.O. Box 6916
Columbia, MO 65205-6916
1(800) 233-9054
To return the appliance, ship to:
Attn: Repair Center
Salton, Inc.
708 South Missouri Street
Macon, MO 63552
Email: [email protected]
Limitation of Remedies: No representative or person is authorized to assume for Salton,
Inc. any other liability in connection with the sale of our products. There shall be no claims
for defects or failure of performance or product failure under any theory of tort, contract or
commercial law including, but not limited to negligence, gross negligence, strict liability,
breach of warranty and breach of contract. Repair, replacement or refund shall be the sole
remedy of the purchaser under this warranty, and in no event shall Salton be liable for
any incidental or consequential damages, losses or expenses. Some states do not
allow the exclusion or limitation of incidental or consequential damages, so the above
limitation or exclusion may not apply to you.
Legal Rights: This warranty gives you specific legal rights, and you may also have other
rights which vary from state to state.
For more information on Salton products:
Visit our website: www.salton-maxim.com
© 2003 Salton, Inc.
All Rights Reserved
P/N 60481Rev 5/03
Printed in China
20
LISEZ ET CONSERVEZ CES INSTRUCTIONS
AVERTISSEMENT : Tout appareil électrique présente un risque
d’incendie et de choc électrique, pouvant provoquer des
blessures graves ou mortelles. Veuillez observer toutes les
mesures de sécurité.
ETAT DE LA CAFETIERE A EXPRESSO ET CAPPUCINO
GUIDE D'UTILISATION
Modèle nos MEPE123BT, MEPE123WT
MEP123BTCAN, MEPE123WTCAN
Risk During Shipment: We cannot assume responsibility for loss or damage during
incoming shipment. For your protection, carefully package the product for shipment and
insure it with the carrier. Be sure to enclose the following items with your appliance: any
accessories related to your problem, your full return address and daytime phone number, a
note describing the problem you experienced, a copy of your sales receipt or other proof of
purchase to determine warranty status. C.O.D. shipments cannot be accepted.
21