1
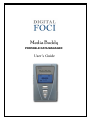
Media Buddy PORTABLE DATA MANAGER User’s Guide Media Buddy User’s Guide Digital Foci, Inc. reserves the right to make improvements and/or changes to the products and programs described in this User’s Guide at any time without notice. Please read the entire User’s Guide before operating the device. Digital Foci, Inc. assumes no responsibility for errors or omissions in this User’s Guide. Nor does Digital Foci, Inc. make any commitment to update the information contained herein. ©2004 Digital Foci, Inc. All rights reserved. This publication is intended for sole use by the owner of the associated device. Neither this publication nor any part of this publication may be printed and distributed, electronically distributed, reproduced, translated, or reduced to any other electronic medium or machine readable form without the prior written permission of Digital Foci, Inc. Digital Foci, Inc., 3111 Via Mondo, Rancho Dominguez, CA 90221-5414 Trademarks Media Buddy and Digital Foci are trademarks of Digital Foci, Inc. All names and products mentioned within this document are registered trademarks of their respective companies. Page 1 Revision 2.4 Media Buddy User’s Guide Limited Warranty As the original purchaser of this product, you received these warranties from Digital Foci, Inc. Your Media Buddy (hereafter referred to as “Device”) will be free from defects in material and workmanship and will perform in substantial compliance with your user documentation accompanying the Device for 1 year from the purchase date providing proper use of the Device. Your warranty rights will be honored so long as you read and follow your user documentation for all aspects of operating the Device. Any unauthorized or improper use of the Device may cause your warranty to become void. If there is a problem or defect with your Device, please contact Digital Foci, Inc. at [email protected]. Disclaimer This limited warranty is the only warranty Digital Foci, Inc. makes for the Device. To the extent allowed by Law, no other warranty applies, whether expressed, implied, or statutory, including any warranty of merchantability, of fitness for a particular purpose, or of non-infringement. This warranty does not cover accidental damage, wear and tear, or consequential or incidental loss. Under no conditions is Digital Foci, Inc. liable for loss of, or damage to, a computer; nor loss of, or damage to, programs, records, or data; nor any consequential or incidental damages, even if Digital Foci, Inc. has been informed of their possibility. Additional Rights Some states or countries do not allow exclusion or limitation of incidental or consequential damages, or limitations on the length of an implied warranty, so the above limitations or exclusions may not apply to you. This warranty gives you specific legal rights, and you may also have other rights which vary from state to state or country to country. Page 2 Revision 2.4 Media Buddy User’s Guide Caring for Your Media Buddy To keep Media Buddy in good condition and working properly, follow these simple guidelines: • Do not drop, jar, bump, shock, or expose Media Buddy to severe vibration while data is being transferred. • Do not leave Media Buddy under direct sunlight, in a parked car, or in other situations where the temperature may be above 140°F (60°C). • To prevent risk of short circuit and damage, do not expose Media Buddy to liquids, precipitation, or moisture. • To avoid the risk of electric shock, do not use the AC adapter with an extension cord or other outlet unless the plug can be properly inserted. • To avoid bodily injury or damage to internal components, do not take apart Media Buddy. • Take special care when inserting and removing the memory cards. • Never force the USB cable if it does not plug in smoothly. Instead, examine the head of the cable to make sure that the plug orientation is correct. • Run file management tools such as Scan Disk and Disk Defragmenter periodically to keep Media Buddy performing at its best. • Do not operate or store Media Buddy in dusty environments. • Remember to keep Media Buddy fully charged so that it is ready to use. • Store Media Buddy in its protective case when not in use. Page 3 Revision 2.4 Media Buddy User’s Guide Table of Contents 1. 2. Welcome! _____________________________________________________________6 1.1. Supported Memory Card Formats _________________________________________ 6 1.2. System Requirement _____________________________________________________ 6 1.3. Package Contents________________________________________________________ 7 Getting Started with Media Buddy__________________________________________8 2.1. How you can use Media Buddy ____________________________________________ 8 2.2. Media Buddy layout _____________________________________________________ 9 2.3. Powering Media Buddy__________________________________________________ 10 2.3.1. Charging the battery __________________________________________________________ 10 2.3.2. Power Indicator LED _________________________________________________________ 10 2.3.3. Power On /Off_______________________________________________________________ 10 2.3.4. Battery Saving Feature ________________________________________________________ 10 2.3.5. Low Battery Warning _________________________________________________________ 10 2.4. Menu structure ________________________________________________________ 11 2.5. Navigating the directory structure_________________________________________ 12 2.5.1. Play/Enter and Stop/Cancel buttons ______________________________________________ 12 2.5.2. Scroll Up and Scroll Down buttons ______________________________________________ 12 2.6. Screen layout __________________________________________________________ 13 2.7. Using Memory Cards on Media Buddy _____________________________________ 14 2.7.1. Inserting memory cards into Media Buddy_________________________________________ 14 2.7.2. Removing memory cards from Media Buddy_______________________________________ 15 2.8. 3. Using Media Buddy with your computer ___________________________________ 16 2.8.1. Connecting Media Buddy to your computer________________________________________ 16 2.8.2. Safely removing Media Buddy from your computer _________________________________ 17 Using Media Buddy as a Portable Picture Storage Device______________________18 3.1. Copying files from memory cards to Media Buddy ___________________________ 18 3.1.1. Copying an entire memory card _________________________________________________ 18 3.1.2. Copying a specific folder or file _________________________________________________ 19 3.2. Understanding the folder names assigned by Media Buddy ____________________ 21 3.3. Stopping the copy operation ______________________________________________ 21 Page 4 Revision 2.4 Media Buddy User’s Guide 3.4. 4. Deleting files from Media Buddy __________________________________________ 22 Using Media Buddy as a Portable Hard Drive _______________________________23 4.1. Transferring files between Media Buddy and your computer___________________ 23 5. Using Media Buddy as a Memory Card Reader ______________________________24 6. Using Media Buddy as a Data Bridge ______________________________________24 7. Using Media Buddy as a MP3 player ______________________________________24 7.1. Playing MP3 files on Media Buddy ________________________________________ 24 7.2. Storing MP3 playlist on Media Buddy______________________________________ 25 8. Technical Tips and Tricks _______________________________________________26 8.1. Driver installation ______________________________________________________ 26 8.1.1. Windows 98/SE and Windows 2000 driver installation _______________________________ 26 8.1.2. Installation instructions for Macintosh OS 8.6 and 9.x________________________________ 26 8.2. Renaming hard drive and memory card labels ______________________________ 26 8.3. Multi-language and long file name support _________________________________ 28 8.4. Reset button and device error messages ____________________________________ 28 8.5. Formatting Media Buddy ________________________________________________ 28 9. Frequently Asked Questions _____________________________________________30 10. Troubleshooting and Technical Support __________________________________31 10.1.1. General issues ____________________________________________________________ 31 10.1.2. Windows related issues _____________________________________________________ 32 10.1.3. Mac OS related issues ______________________________________________________ 32 10.1.4. Linux related issues ________________________________________________________ 33 11. Appendix___________________________________________________________34 11.1. Technical Specifications _________________________________________________ 34 11.2. FCC Compliance _______________________________________________________ 35 Page 5 Revision 2.4 Media Buddy User’s Guide 1. Welcome! Congratulations on purchasing your new Media Buddy Portable Data Manager. Media Buddy is: A portable photo storage device for storing your valuable photos on the road without the need of a computer. A portable hard drive for backing up important files from your computer. A multi-format memory card reader for accessing data on the memory cards used in your digital camera, MP3 player, mobile phone and PDA. A data bridge for transferring large files between computers and from any digital device that utilizes memory cards. A MP3 player for storing and listening to your favorite MP3 files. 1.1. Supported Memory Card Formats The Media Buddy Portable Data Manager has been tested to support the following memory card formats: CompactFlash® (CFTM) MicroDriveTM / CompactFlash 2 (CF Type-II) SmartMediaTM (SM) MultiMedia CardTM (MMC) SD Card (SDTM) Memory StickTM, MS PRO, and MS Duo 1.2. System Requirement Computer running any of the following operating systems: o Windows® 98/SE*, Windows 2000*, Windows ME, Windows XP Home, Windows XP Professional o Macintosh™ OS 9.x* and OS 10.01 or higher o Linux® OS kernel versions 2.4.x or higher * One available USB port CD-ROM drive is required for device driver installation. Page 6 Revision 2.4 Media Buddy User’s Guide 1.3. Package Contents Before using your device, check that your package contains the following items: Media Buddy 2.5” hard drive (Pre-installed), optional Li-Ion battery (Pre-installed) USB cable AC/DC adapter 100~240 V Earphones Carrying case User's Guide Quick Start Guide Resource Disc Warranty Card Page 7 Revision 2.4 Media Buddy User’s Guide 2. Getting Started with Media Buddy 2.1. How you can use Media Buddy 1) Portable Photo Storage Device • You can use Media Buddy to copy photos and videos from your digital camera memory card. • This will free up valuable storage space on the memory card so you can keep taking pictures. • Also, when vacationing with friends and family, you can get your own copy of their pictures so you’ll never miss any memories. 2) Portable Hard Drive • You can access all the contents on Media Buddy by connecting it to your computer with an USB cable. • Media Buddy will appear on your computer as a hard drive and you’ll have full access to all of the pictures, music, files, programs, and other data stored on Media Buddy. • Since you can freely move and copy files between Media Buddy and your computer hard drive, it’s a great backup and data management tool. 3) Multi-format Memory Card Reader • Once Media Buddy is connected to your computer, it also becomes a memory card reader. • You can use the memory card slots on Media Buddy to access all popular memory card formats. 4) Data Bridge • With Media Buddy’s large storage capacity and ability to access various computer platforms, you can easily transfer large files between computers even if they run different operating systems. 5) MP3 Player • Media Buddy can playback MP3 files that are stored internally or on memory cards. Page 8 Revision 2.4 Media Buddy User’s Guide 2.2. Media Buddy layout Page 9 Revision 2.4 Media Buddy User’s Guide 2.3. Powering Media Buddy 2.3.1. Charging the battery Prior to using Media Buddy for the first time, please ensure that you use the AC adapter to charge the battery for at least 4 hours. It will take at most 4 hours depending on the status of the battery to fully recharge Media Buddy. On a full charge, Media Buddy is capable of about 1.6 hours of continuous usage. 2.3.2. Power Indicator LED Green: Media Buddy is powered on. Red: Media Buddy is charging. Orange: Media Buddy is powered on and charging. The battery indicator on the screen will flash to show that it is charging. Note: If Media Buddy is off and plugged into the AC Adapter and the LED is not lit, the battery is fully charged. 2.3.3. Power On/Off To turn on Media Buddy, press and hold the On/Off Button for 1 second and release. The power LED will light up green and the operating system will initialize the hard drive. To turn off the device, press and release the On/Off Button. The hard drive will go to sleep mode first and then the power will shut off. 2.3.4. Battery Saving Feature After 10 seconds of inactivity, the backlight will dim. After 2 minutes of inactivity, Media Buddy will automatically shutoff. 2.3.5. Low Battery Warning When Media Buddy is low on battery, the battery indicator icon will show no bars and flash as shown in the diagram to the right. Page 10 Revision 2.4 Media Buddy User’s Guide 2.4. Menu structure The following diagram shows the menu structure and operational flow of Media Buddy. MODE Select Detail Screen: FILE Mode – HD DEVICE Select: FILE Mode Detail Screen: FILE Mode – Card Detail Screen: MP3 Mode – HD DEVICE Select: MP3 Mode Detail Screen: MP3 Mode – Card Page 11 Revision 2.4 Media Buddy User’s Guide 2.5. Navigating the directory structure Navigating through Media Buddy is simple. There are only 2 sets of buttons that you will need to use. 2.5.1. Play/Enter and Stop/Cancel buttons The Play/Enter button is used to select the highlighted menu option or enter into the highlighted directory folder. The Stop/Cancel button is used to exit out of the current menu option or out of the current directory folder and return to the previous option or folder. 2.5.2. Scroll Up and Scroll Down buttons The Scroll Up and Scroll Down buttons are used to move the cursor to highlight the desired menu option and to browse through the folders and files. Page 12 Revision 2.4 Media Buddy User’s Guide 2.6. Screen layout The following diagrams describe the screen layout of the Detail Screen for both FILE Mode and MP3 Mode. File Mode Detail Screen File mode Hard drive capacity Battery indicator Available devices Directory level Selected device File/Folder name File/Folder date File/Folder time File/Folder size Scroll bar Auto Key action File extension (DIR for folder) MP3 Mode Detail Screen MP3 mode MP3 file name Playing time MP3 file date Volume setting MP3 file size Play/Pause status Repeat setting Page 13 Revision 2.4 Media Buddy User’s Guide 2.7. Using memory cards on Media Buddy 2.7.1. Inserting memory cards into Media Buddy Media Buddy has 3 different memory card slots, each designed to support a specified set of memory card formats. (Reference Section 2.2. Media Buddy layout.) Next to each card slot, you can see the text labels of the memory card format for the corresponding slot: (1) CF: supports CompactFlash Type-I and Type-II and MicroDrive formats. (2) SD/MMC/MS: supports SD Card, MultiMedia Card, Memory Stick, MS PRO, and MS Duo formats. (3) SM: supports the SmartMedia format. • For all cards except SmartMedia, insert the memory card into its designated slot with label side facing up. • For SmartMedia cards, insert the memory card with the gold connector side facing up. • MS Duo cards can be inserted without using an adapter. Since the MS Duo is narrower than regular MS cards, take special care to center the MS Duo when inserting. When inserting memory cards, push the card in gently until you feel a slight ‘click’ when the memory card connectors make contact with Media Buddy. Once the memory card is properly inserted, Media Buddy will display an icon in the upper left corner of its screen to indicate that the card is connected. The icons are displayed as CF, SD (includes MMC), MS, or SM depending on the corresponding format of the inserted memory card. Warning: Take special care to insert the correct memory card type in its designated slot. If the memory card does not slide in easily, double-check that you are inserting it in the correct slot and in the correct manner. Page 14 Revision 2.4 Media Buddy User’s Guide 2.7.2. Removing memory cards from Media Buddy To safely remove memory cards from Media Buddy, take special precaution to ensure that there is no data being written to or read from the memory card. Removing Memory Cards in Windows: • From Windows Explorer, right click on the icon of the card to be removed and select 'Eject'. Warning: DO NOT remove memory cards or unplug the device while memory cards are being accessed. Removing memory cards during data transmission may crash your computer and cause data loss. Page 15 Revision 2.4 Media Buddy User’s Guide 2.8. Using Media Buddy with your computer 2.8.1. Connecting Media Buddy to your computer Connect Media Buddy to your computer via the included USB cable. Once connected, your computer will automatically recognize* Media Buddy and show four devices on your computer: • One hard drive • Three removable devices (one corresponding to each of the memory card slots) You can access these four devices just as you would any other device on your computer. * For Windows 98SE, Windows 2000, and MacOS 8.6 and 9.x, device drivers from the Resource Disc must be installed before the computer can recognize Media Buddy. See Section 8.1 Driver installation for instructions on how to install the drivers. On Windows, the four devices will be displayed like this: Note: 1) The drive letters may vary based on your particular computer configuration. 2) The ‘HardDrive’ and ‘Removable Disk’ label may vary based on each unique device and can be renamed. (See 8.2 Renaming hard drive and memory card labels.) 3) The devices will be listed in the following order. Drive letter assignments may vary. (E:) Media Buddy Hard Drive (F:) CF memory card slot (G:) SM memory card slot (H:) SD/MMC/MS memory card slot Page 16 Revision 2.4 Media Buddy User’s Guide 2.8.2. Safely removing Media Buddy from your computer To properly remove Media Buddy, disable the device before unplugging it from the computer. The method to disable the device will vary based on the operating system of your computer. Refer to the instruction manual of your computer for details on how to do this. Disabling devices in Windows: 1. Locate the ‘Safely Remove Hardware’ icon in the icon tray at the lower right-hand corner of your computer screen. You can move the mouse pointer over the icons until you see the ‘Safely Remove Hardware’ label. 2. Double-click on this icon to open the ‘Safely Remove Hardware’ window. 3. Select the hardware device named “USB Mass Storage Device”. 4. Click on the Stop button and a confirmation window will appear. 5. Click OK at the confirmation window to confirm the action. 6. Close the ‘Safely Remove Hardware’ window by clicking on the Close button. 7. Now it is safe to unplug Media Buddy from your computer. Note: Media Buddy is designed to automatically shut down when unplugged from the computer. Warning: Unplugging Media Buddy before properly disabling the device increases the risk of disrupting data transmission between Media Buddy and your computer and may crash your computer and cause data loss. Page 17 Revision 2.4 Media Buddy User’s Guide 3. Using Media Buddy as a Portable Picture Storage Device Bring Media Buddy everywhere you go so you can copy pictures directly from your digital camera memory card to Media Buddy whenever you need. This will free up limited memory card space and allow you to keep taking precious pictures. Keep in mind that, Media Buddy isn’t limited to just digital pictures; it can store any type of digital data. After copying your pictures or other data to Media Buddy, you can access those files stored on Media Buddy by connecting it to a computer. 3.1. Copying files from memory cards to Media Buddy Media Buddy provides you with two methods of copying files from memory cards: • You can copy an entire memory card with the simple, one-touch AutoCOPY function, or • You can select a specific folder or file to be copied. Warning: DO NOT remove memory cards when data is being transmitted. Removing memory cards during data transmission may crash your computer and cause data loss. 3.1.1. Copying an entire memory card 1. Insert the memory card into the appropriate card slot. Verify on the screen that the corresponding icon for the inserted card is displayed. 2. Make sure that Media Buddy is at the <MODE Select> screen and that FILE Mode is highlighted. Press the Auto Key button to begin the copy operation. Page 18 Revision 2.4 Media Buddy User’s Guide 3. During data transfer, make note of the following screen information: Copy progress indicator Target folder Current file copy status Number of files copied 4. Upon completion, you will see the following confirmation screen: Total files copied 5. Press the Play/Enter button to confirm this and return to the previous screen. Note: If multiple memory cards are inserted in Media Buddy when the Auto Key button is pressed, Media Buddy will copy each memory card in succession, creating a different folder for each memory card. 3.1.2. Copying a specific folder or file 1. Insert the memory card into the appropriate card slot. Verify on the screen that the corresponding icon for the inserted card is displayed. 2. From the <MODE Select> screen, select FILE Mode by pressing the Play/Enter button with FILE Mode highlighted. Page 19 Revision 2.4 Media Buddy User’s Guide 3. From the <DEVICE Select> screen, select the memory card containing the folder and/or file(s) you want to copy. 4. Locate the folder or file you want to copy by navigating through the memory card directory. 5. When you find the folder or file you want to copy, press the Auto Key button to make the copy. 6. When the copy is complete, you will see the confirmation screen. Note: If you copy multiple folders and files in succession from the same card without removing it, all the copied contents will be placed in the same folder. Note: If you try to copy the same file twice into the same folder, you will see the -FILE EXISTS- warning and the file will not be copied. Page 20 Revision 2.4 Media Buddy User’s Guide 3.2. Understanding the folder names assigned by Media Buddy Each time you use the copy function on Media Buddy, a new folder will be created to store your copied files. The folder names are made up of 2 pieces of information. The first two characters will be letters indicating the type of memory card used. The next 4 characters will be sequential numbers starting from ‘0001’ that show the order in which the folders were created. These letter prefixes correspond to the memory card types: CF = CompactFlash SD = Secure Digital (includes MMC) SM = SmartMedia MS = Memory Stick For example: HD\MS0038 38th folder created of this format Memory Stick format 3.3. Stopping the copy operation You can stop the copy operation in the middle of the copy process. To do this: 1. Press the Stop/Exit button while the copy operation is in progress. 2. You will see the following screen to confirm that the copy was stopped before completion. 3. Press the Play/Enter button to confirm this and return to the previous screen. Note: When the copy operation is stopped before completion, the files that have already been copied will remain on Media Buddy. To remove these files, you will have to delete them manually. Page 21 Revision 2.4 Media Buddy User’s Guide 3.4. Deleting files from Media Buddy When accessing the hard drive on Media Buddy, you can choose to delete specific folders and files. 1. Select FILE Mode on the <MODE Select> screen by pressing the Play/Enter button. 2. Select HD Device on the <DEVICE Select> screen. 3. Locate the folder or file you wish to delete. Folder or file to be deleted Indicates folder or file extension 4. Press the Auto Key button to delete the selected folder or file. 5. The screen will display the -FILE DELETE- screen and prompt you to confirm. 6. Press the Play/Enter button to confirm and delete. 7. Upon completion you will see the confirmation screen. Press the Play/Enter button to confirm and return to the previous screen. Note: The File Delete function only applies to data stored on Media Buddy. To delete files from memory cards, connect Media Buddy to your computer and delete the files using your computer. Page 22 Revision 2.4 Media Buddy User’s Guide 4. Using Media Buddy as a Portable Hard Drive When connected to your computer via USB cable, Media Buddy becomes a portable hard drive. You can use it just like the hard drive on your computer to manage and backup your important data. 4.1. Transferring files between Media Buddy and your computer It is recommended that you always use the AC adapter when connecting Media Buddy to your computer. Note: Media Buddy can operate from its battery power when connected to your computer. However, there is a risk of running out of battery power during operation. This will cause Media Buddy to automatically shutdown. Automatic shutdown during data transfer may cause data loss either on Media Buddy or your computer hard drive. If you choose to connect Media Buddy to your computer without plugging in the AC adapter, it is safest if Media Buddy is fully charged. 1. Connect Media Buddy to your computer as described in Section 2.8.1. Connecting Media Buddy to your computer. 2. Media Buddy will display an USB icon at the top of its screen to indicate that it is connected to your computer. 3. Now you can access the contents on Media Buddy, in the same way you use the hard drive on your computer to copy and transfer files. Note: When the device is connected to the computer through the USB cable, the buttons on the device will be disabled. Warning: While data is being transferred between the Media Buddy and your computer, DO NOT disconnect the USB cable, and DO NOT remove any memory card from its slot. Unplugging the device or removing memory cards while data is being transferred may crash your computer and cause data loss. For instructions on properly disconnecting Media Buddy from your computer, reference Section 2.8.2. Safely removing Media Buddy from your computer. Page 23 Revision 2.4 Media Buddy User’s Guide 5. Using Media Buddy as a Memory Card Reader In addition to using Media Buddy to copy your memory card contents on the go, you can also use Media Buddy as a memory card reader for your computer. When Media Buddy is connected to your computer via USB cable, the three memory card slots are each mapped to your computer as a Removable Disk. Media Buddy lets you access data on the memory cards from your digital camera, MP3 player, mobile phone, or PDA. Refer to Section 2.7 Using memory cards on Media Buddy and Section 2.8 Using Media Buddy with your computer for detailed instructions. 6. Using Media Buddy as a Data Bridge Media Buddy can be used as a data bridge to transport data in many different scenarios such as: 1. Transporting files from one computer to another when you don’t have a network connection or access to email. 2. Transporting large files from one computer to another when using the network or email is not practical. 3. Transporting files from one computer to another computer that uses a different operating system. 7. Using Media Buddy as a MP3 player You can use Media Buddy to playback MP3 files that you have stored on Media Buddy or from memory cards. 7.1. Playing MP3 files on Media Buddy 1. From the <MODE Select> screen select MP3 Mode. 2. From the <DEVICE Select> screen select the device containing the MP3 files that you wish to play. 3. After selecting the device, locate the desired directory folder. • In MP3 Mode, Media Buddy will only show MP3 files. If there are no MP3 files in the selected directory, Media Buddy will display - No File - on its screen. • Media Buddy will only show the MP3 files in the specific directory selected. Page 24 Revision 2.4 Media Buddy User’s Guide 4. Select the MP3 file that you wish to play and press the Play/Enter button. • Use the Volume Up and Volume Down buttons to adjust the volume. The maximum volume setting is 32. • To toggle between pause and play, press the Play/Enter button. • Use the Auto Key button to toggle the Repeat Setting between repeating a single file and repeating all files in the selected directory folder. o If the Repeat Setting icon is not displayed, the device will repeat the current file. o If the Repeat Setting icon is displayed, the device will repeat all the MP3 files in the selected directory folder. MP3 file name Sample rate Current playing time Playback bit rate Repeat setting Volume setting Total playing time Note: Playing MP3 files stored on Media Buddy requires operating the internal hard drive. This places significant drain on the battery. To get longer battery life when listening to your MP3 files, play from memory card instead. 7.2. Storing MP3 playlist on Media Buddy You can organize your MP3 playlists by creating different folders containing your favorite MP3 files. • You can transfer files directly from a memory card by using the Media Buddy memory card copy function as described in Section 3.1. Copying files from memory cards to Media Buddy. • Or, you can transfer MP3 files from your computer and actively manage the MP3 file folders with your computer as described in Section 4.1 Transferring files between Media Buddy and your computer. Page 25 Revision 2.4 Media Buddy User’s Guide 8. Technical Tips and Tricks 8.1. Driver installation To use Media Buddy as a portable hard drive connected to computers running Windows 98/SE, Windows 2000 and Mac OS 8.6 and 9.x, driver installation is required for proper operation. 8.1.1. Windows 98/SE and Windows 2000 driver installation 1. Close all programs running on your computer. 2. Insert the Resource Disc into the CD-ROM drive. 3. Double-click on My Computer and locate the ‘Driver’ folder on the Resource Disc. 4. From within the ‘Win98’ folder, find and run ‘Setup.exe’ to begin driver installation. 5. Click Next and follow the installation instructions. 6. Restart your computer after installation is completed. 7. Connect Media Buddy to your computer with the USB cable and let your computer run through the installation process. 8.1.2. Installation instructions for Macintosh OS 8.6 and 9.x 1. Close all programs running on your computer. 2. Insert the Resource Disc into the CD-ROM drive. 3. Locate ‘Mac OS Installer’ within the ‘Driver/Mac’ folder on the Resource Disc and follow the installation instructions. 4. Restart your computer after installation is completed. 8.2. Renaming hard drive and memory card labels You can rename the Media Buddy hard drive and memory cards inserted in its memory card slots to further personalize your Media Buddy. This makes it easier to find the Media Buddy hard drive and memory cards when Media Buddy is connected to your computer. To do this: 1. Connect Media Buddy to your computer. Refer to Section 2.8.1. Connecting Media Buddy to your computer for instructions on how to do this. Page 26 Revision 2.4 Media Buddy User’s Guide 2. Use your computer’s file management program to rename the volume label of the device you would like to rename. This will vary based on the operating system of your computer. For Windows: 1) Open Windows Explorer. 2) Locate and right-click on the device you want to rename. 3) Select Rename from the list. 4) Type in your desired name and press Enter. Note: At step #3, you can also select Properties instead of Rename. Windows Example: In this case here, Media Buddy’s hard drive is named ‘MediaBuddy’ The inserted Compact Flash card is named ‘CF Card’ The inserted SmartMedia card is named ‘SM Card’ The inserted SD Card is named ‘SD Card’ Note: For memory cards, the renaming will apply to the specific memory card. So if you rename a particular memory card ‘My Card’ that name will be applied to that memory card only. If you take out ‘My Card’ and insert the same type of memory card, it may have a different name. Page 27 Revision 2.4 Media Buddy User’s Guide 8.3. Multi-language and long file name support Media Buddy can support multi-language and long file names on its display. The default set-up for your Media Buddy will support these features. In the case that this set-up was changed and you would like to reinstall these features, follow the following steps: 1. Turn on Media Buddy and connect it to your computer via USB cable. 2. Insert the Resource Disc into your computer CD-ROM drive. 3. On the Resource Disc, locate the file ‘Gdfont.gd3’ in the ‘Multi-Language Display’ folder. 4. Copy the ‘Gdfont.gd3’ file into the root location of the Media Buddy hard drive. Note: The root location is the highest directory level in the hard drive. 5. Multi-language and long file name support is now enabled. 8.4. Reset button and device error messages Media Buddy has a Reset button on its right side, just below the USB jack. For safety purposes, the Reset button is sunk under the case and requires a sharp pointy object, such as a paper clip, to press. In the case that Media Buddy encounters an error and hangs, press the Reset button to restart Media Buddy. 8.5. Formatting Media Buddy Media Buddy is provided to you pre-formatted and ready to use. It is strongly recommended that you DO NOT format Media Buddy. Warning: Formatting Media Buddy will erase all data stored on Media Buddy. In the case that you need to format Media Buddy, the procedure will vary by the operating system. Please refer to your operating system's instruction manual for more information on the formatting procedure. Mac users: • In Mac OS, you can format with the Erase Disk option in the Finder's Special menu. Media Buddy cannot be formatted with the Mac OS X's Disk Utility. Linux users: • In Linux, a partition must be created with fdisk, and then formatted with mkfs.msdos. Page 28 Revision 2.4 Media Buddy User’s Guide Windows users (for hard drives under 32 GB): 1. Confirm that Media Buddy is connected to your computer. 2. Locate the Media Buddy hard drive icon through Windows Explorer and right-click on the icon. 3. Select Format from the list. 4. Under ‘File system’ select FAT32. 5. Under ‘Volume label’ type the hard drive name you want to assign to Media Buddy. 6. Click Start. (Note: It is recommended to leave ‘Quick Format’ unchecked.) Windows 2000/XP users (for hard drives over 32 GB): Under Windows 2000 and Windows XP, formatting 32 GB and larger Media Buddy hard drives require the use of a special utility included on the Resource Disc named ‘FDiskAP’. FDiskAP Instructions: (1) Confirm that Media Buddy is connected to your computer (2) Enter Media Buddy hard drive letter assignment (3) Click Get Information (5) Select desired file system (FAT32 is recommended) (4) Confirm the information (7) Leave boxes unchecked (6) Type desired hard drive (8) Click START (9) After the FDiskAP process finishes, click OK to confirm and close the FDiskAP window (10) Disconnect Media Buddy to complete the formatting operation * The Media Buddy hard drive letter assignment is shown on Windows Explorer next to its corresponding icon. Page 29 Revision 2.4 Media Buddy User’s Guide 9. Frequently Asked Questions Why does Media Buddy sometimes take longer than expected to copy just one file with the single file copy function? If a single file copy is your first operation after turning on Media Buddy, Media Buddy must scan through and validate the entire folder structure before the file can be copied. This may take extra time. You can avoid this by performing an AutoCOPY function before the single file copy. Can Media Buddy receive power from the USB port? No, it can’t. Unless the AC adapter is plugged in Media Buddy, it will rely on its battery for power. My computer only has USB 1.1 ports available. Can Media Buddy still be connected? Yes, Media Buddy is backward compatible with USB 1.1. What is the purpose of the Reset button on Media Buddy? In case Media Buddy hangs, you can reset it via the Reset button. Your data on the hard drive will not be affected. Why is the date for the folders created through the Media Buddy memory card copy function not accurate? Media Buddy does not have a built-in real time clock. How are the folders and files listed on Media Buddy? The folders and files are sorted by internal memory locations. They may not be listed alphabetically or by date. What happens when Media Buddy runs out of hard drive space during a copy? Media Buddy shows an error message and aborts the copy when space runs out. Can I format Media Buddy with file systems other than FAT or FAT-32 (i.e., NTFS / HFS / HFS + / EXT2)? No, data transfer from memory cards to hard drive is compatible only with the FAT and FAT-32 file systems. On the Mac OS, this is called ‘DOS format’. Does Media Buddy work with Linux? Are any special drivers needed? USB disks are supported in Linux kernel 2.4.x. USB drivers are included in kernel 2.4.18 or later. Also, there are USB packages available for kernels prior to 2.4.x versions. Page 30 Revision 2.4 Media Buddy User’s Guide How do I install/replace a new battery? 1. Loosen and remove the four screws on the back of Media Buddy. 2. Remove the back cover. 3. Remove or place the battery into the upper slot. 4. Attach the connector for the battery with the wire attached to Media Buddy. 5. Replace the back cover and tighten the four screws. 10. Troubleshooting and Technical Support 10.1.1.General issues Refer to the following advice for using and troubleshooting your Media Buddy. Media Buddy is connected to my computer and the removable drives are recognized and displayed, but I cannot access files from the memory cards. Make sure the hard drive on the device and the memory cards are formatted to the FAT or FAT-32 file systems. If they are not, you can reformat the memory cards, but this will cause you to lose any existing data on the formatted memory card. Media Buddy is connected to my computer and the removable drives are recognized, but the memory card contents do not appear on my computer screen after I insert the memory card into Media Buddy. Try refreshing the screen. Click the ‘View’ menu and select ‘Refresh’ or press ‘F5’ on the keyboard. I cannot transfer data from my memory card to my Media Buddy. At the end of the transfer, an ERROR READING icon is flashing. Your memory card may not be formatted correctly. To fix this problem, format your memory card with your digital camera (or its original device) and try again. When disconnecting Media Buddy from my computer, I get a message saying that the device was disconnected in an unsafe way. The device was not disabled before it was disconnected from your computer. See Section 2.8.2. Safely removing Media Buddy from your computer for instructions. I tried to disable Media Buddy with the instructions in Section 2.8.2. Safely removing Media Buddy from your computer, but my computer tells me that I can’t. Your computer may still be accessing the Media Buddy hard drive or its memory card slots. Close all windows and programs and try again. If that is unsuccessful, shut down your computer and remove Media Buddy after the computer is turned off. Page 31 Revision 2.4 Media Buddy User’s Guide I cannot make a back-up larger than 4 GB, although my Media Buddy has more than 4 GB of free space. The FAT-32 file system only allows a maximum of 4 GB of data processing at a time. Split the data to be backed up into segments smaller than 4 GB each. 10.1.2.Windows related issues In Windows 98/2000, the New Hardware Installation Wizard cannot find a suitable driver from the Windows 98 CD ROM. Media Buddy might have been connected to the computer before the driver is installed. Make sure the driver is installed before the device is connected. Only one removable drive appears (corresponding to the SD/MMC/MS memory card slot) in Windows 2000. Media Buddy was connected to the computer before the driver was installed. Install the driver first and then update the driver of the device in Device Manager from the Windows 2000 Control Panel. I have formatted the hard drive in Windows 2000 but the computer still cannot detect the hard drive. Windows 2000 cannot format a new hard disk without a Partition Table. Use the computer’s disk utility program to create a Partition Table, then format. In Windows 98/2000, a red/yellow caution mark is shown next to the Media Buddy entry in the Device Manager. The driver has not been installed correctly. Reinstall the driver, or select ‘Update driver’ in the ‘Properties’ window of the Media Buddy device. 10.1.3.Mac OS related issues When I connect/eject the Media Buddy in Mac OS X, the volume does not appear on the desktop. Move the mouse. Sometimes the FAT volumes do not refresh on Mac OS X until after the mouse is moved. I formatted the Media Buddy hard drive with the Mac OS X Disk Utility but Windows does not recognize the volume. The FAT-32 format made by the Mac OS X Disk Utility does not work with Windows. Formatting must be done in Mac OS 9 or Windows. Page 32 Revision 2.4 Media Buddy User’s Guide My Mac is OS X 10.0.x and I frequently have problems with my Media Buddy. Mac OS 10.0.x does not adequately support FAT volumes. Upgrade your Mac OS to 10.1 or later. 10.1.4.Linux related issues I want to format my Media Buddy hard drive under Linux, but I cannot find the mkfs.msdos command. Either install the Dos-Utils package or format the partition with Windows or Mac OS 9. I have formatted the Media Buddy under Windows, but I cannot mount the volume in Linux with the mount/dev/sdd1 command. A different volume format called Superfloppy (not including a partition) is made by Windows. To mount a Superfloppy volume in Linux, a partition number must not be specified in the device name: mount/dev/sdd. Technical Support Contact If you are still having troubles using your Media Buddy, please contact Digital Foci, Inc. technical support at [email protected]. Page 33 Revision 2.4 Media Buddy User’s Guide 11. Appendix 11.1. Technical Specifications Model No. MEB - 300 Supported memory cards CompactFlash I & II, MicroDrive, SmartMedia, MultiMedia Card, SD Card, Memory Stick, MS PRO, MS Duo Hard drive capacity Up to 80GB (2.5” HDD) LCD screen 2.4” LCD screen with backlight Computer interface USB 2.0 (compatible with USB 1.1) Transfer rate USB 2.0: up to 480 Mbps USB 1.1: up to 12 Mbps Music format support MP3 Audio output Stereo analog Line-Out/earphone 3.5mm jack Battery power 850mAh built-in Li-Ion rechargeable battery Battery life 1.6 hours minimum at continuous usage External power 12V/1.5A DC in; 110 – 240V AC to DC adapter Supply voltage 9V-18V Supplying current Working: 12V (360mA), Standby: 175mA File system support Standard FAT 12/16/32 OS compatibility Windows 98/SE, 2000, ME, XP Home/Pro Macintosh OS 8.6 and higher Linux OS kernel versions 2.4.x and higher Dimensions (L x W x H) 5.8” x 3.4” x 1” (147 x 86 x 25mm) Weight 8.3 oz. (235g) without hard drive Operating temperature 32°F ~ 158°F (0°C ~ 70°C) Storage temperature -40°F ~ 158°F ( -40°C ~ 70°C) Humidity 90% RH Page 34 Revision 2.4 Media Buddy User’s Guide 11.2. FCC Compliance FCC Rules and Regulations – Part 15 This device complies with Part 15 of the FCC Rules. Operation is subject to the following conditions: 1. This device may not cause harmful interference. 2. This device must accept any interference received, including interference that may cause undesired operations. The device has been tested and verified to be within the energy emission limits for Class B digital devices as defined in Part 15 of the FCC Rules. These limits are designed to provide reasonable protection against harmful interference in a residential situation. This device generates, uses, and can radiate radio frequency energy and, if not installed and used in accordance with the instructions, may cause harmful interference to radio communications. Installed correctly, it probably will not interfere with your radio or TV. However, we do not guarantee the absence of interference. If you modify the device in any way, without approval from Digital Foci, Inc., your device may violate FCC regulations. Violation of FCC regulations may cause the FCC to void your rights to use the modified device. If you suspect this device is causing interference, power off and on the device while your radio or TV is showing interference. If the interference disappears when you turn the device off and reappears when you turn the device on, something in the device is causing interference. To reduce interference, try these suggestions: • Change the direction of the radio or TV antenna. • Increase the separation between the device and radio or TV. • Connect the device into an outlet on a circuit different from that to which the radio or TV is connected. If these suggestions don’t help, consult your computer dealer or an experienced radio/TV technician for more suggestions. Page 35 Revision 2.4 3111 Via Mondo, Rancho Dominguez, CA 90221 Copyright 2005 Digital Foci, Inc. All rights reserved.