1
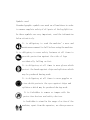
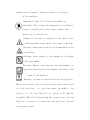
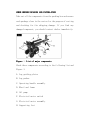
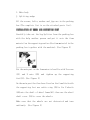
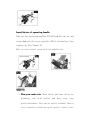
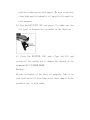
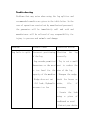
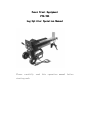
Power Trust Equipment
PTEPTE-7ES
Log Splitter Operation Manual
Please carefully read this operation manual before
starting work
Thank you for purchasing this 7-Ton Electric Log
Splitter. Please carefully read this operation manual and
strictly observe these instructions for the safely of you
and the personnel around you. In this manner, you will enjoy
long and satisfactory use of this product.
GENERAL SAFETY RULES
Warning:
All the operation and use of the machine may have some risk
but the carefulness and caution taken in use can remarkably
reduce the risk of personal injury. The negligence of basic
safety precautions can result in injury of operator or
damage of property.
1. Read and
fully understand the
operation manual,
including the operation and scope of application as well
as potential hazards.
2. Check for any damaged parts. Before further use, you
should check protection device or damaged part to ensure
the Log Splitter can have normal operation and finish
intended duty. Check the function of motion parts and
check whether the part of fixing device is broken or
cracked, or other conditions that may have negative
effect on the operating performance do the machine. Must
repair and change protective device or damaged part as
required.
3. Before starting maintenance work, switch off the power
and do so even when changing the spare parts such sa wedge,
chisel or cutting bar.
4. Should keep the protective device in the state of
readiness for work.
5. If required, you should wear ear protection, eye
protection / goggles. visor and work gloves.
6. Drugs, alcohol and medicine. Never operate this machine
under the influence of alcohol and some medicines.
7. Never stand on the machine .Otherwise there will be risk
of be injury when falling.
8. Never operate this machine without supervision. Switch
off power supply. Never turn off the machine until till
ram completely stops.
9. When calibrating or changing the parts or working on the
machine, should pull the power plug of the outlet.
10.
Make sure that the cord is fully protected and ensure
no damage from assembly or material.
11.
Should keep a safe distance between your hands and
the log, and between the pusher and the wedge. If the
splitter is turned on, never put the hand onto the motion
parts of machine.
12.
Never wear ornaments or loose clothes, which can be
entangled with the log splitter.
ELECTRICAL CONNECTION
Connect the power cord to a standard power supply via an
approved plug or suitable protective and isolated switch.
The power should meet specifications stated on the name
plate.
Extension cord
If the extension cord is applied we recommend connecting
a moisture-proof plug and keeping this plug away from
moisture.
This cord will produce a voltage drop, which can hamper the
electrical motor from giving a full power and reduce the
machines performance. Therefore, the cord must satisfy the
following specifications:
Length: 0-10 meters
Diameter of cord: 2.5 square millimeters.
Never use extension cord exceeding 10 meters.
If in doubt, please inquire a qualified electrician. Never
make electrical repair by yourself.
Symbols used
Standard graphic symbols are used on all machines in order
to ensure complete safety of all parts of the Log Splitter.
As these symbols are very important, read the information
below attentively.
It is obligatory to read the machine’s user and
maintenance manual in full before using the machine.
It is obligatory to wear safety footwear at all times to
provide protection against the risk of logs
accidentally falling on feet.
It is obligatory at all times to wear gloves which
protect the hands against chips and splinters which
may be produced during work.
It is obligatory at all times to wear goggles or
visor which protects the eyes against chips and
splinters which may be produced during work.
It is forbidden to remove or tamper with the
protection devices and safety devices.
is forbidden to stand in the range of action of the
machine, apart from the operator, no other person or
animal may be present within a radius of 5 meters
of the machine.
Dumping of used oil in the environment is
forbidden. The oil must be disposed of according to
current legislation in the country where this
operation is carried out.
Danger of cutting or crushing of the hand: never
touch hazardous areas while the wedge is moving.
Warning: always pay attention to the movement of the
log pusher.
Warning: never remove a log trapped in the wedge
with your hands.
Warning: Before carrying out any maintenance or
operation described in this manual, disconnect the
plug of the machine.
Warning: voltage as indicated on the rating plate.
How to use control rod to vary the speed: when control rod
at first position, i.e. position under the middle, the
velocity of the Log Splitter is faster with smaller
strength. When fully depressing the control rod, the Log
Splitter’s velocity is slower but can split the log with
the biggest power.
SPECLAL WARNINGS WHEN USING THE LOG SPLITTER
Using this powerful tool may create special hazards. Take
particular care to safeguard yourself and those around you.
Hydraulic systems
Never operate this tool if there is a hazard presented by
hydraulic system. Before using the splitter, check for
hydraulic leaks. Be sure the tool and your work area are
clean and free of oil spills. Hydraulic fluid can create
hazards, causing you to slip and fall, or your hands to slip
while using the machine or be a fire hazard.
Electrical Safety.
Never operate this tool if there is an electrical hazard.
Never operate an electrical tool in wet conditions. Never
operate this tool with an improper electrical cord or
extension cord. Never operate this tool unless you are
plugged into a properly grounded outlet, which supplies
specified power and is protected by a 16 Amp circuit
breaker.
Physical Hazards
Log Splitting creates special hazards. Never operate this
tool unless you are wearing proper safety gloves, hard-toed
shoes and the approved eye protection. Be careful of the
splinters that will be produced, to avoid puncture injury
and potential jamming of the tool. Never try to split logs,
which are too large or small to fit properly within the tool.
Never attempt to split logs containing nails, wire or other
debris. Clean up as you work : accumulated split wood and
wood chips can create a hazardous work environment. Never
continue to work in a cluttered work area, which may cause
you to slip, trip or fall. Keep onlookers away from this
tool and never allow unauthorized persons to operate this
tool.
NOTICE:
No list of warnings are all-inclusive. The operator must
supply common sense, and operate this tool in a safe manner.
FEATURES OF THIS LOG SPLITTER
1. Portable,
Portable Small size, lightweight and built-in wheels
make it easy to deliver this powerful tool to the work
site.
2. Powerful.7-ton
power delivered by a beefy 30mm hydraulic
owerful
ram will make short work of your log splitting task.
3. Ele
Electric Powered.
Powered Convenient and reliable electric
powered hydraulic system avoids the expense and hassle
of maintaining a small gas engine. Just plug it in and
start splitting.
4. Hydraulic Ram.
Ram Powerful hydraulic ram splits log in a
safe controlled manner, without axes, sledge or wedge.
5. 2-Hand Safety Control.
Control Built-in safety design keeps your
hands away from the log and splitter during operation.
6. Durable Steel Construc
Construction.
tion Welded steel construction
and enclosed hydraulic ram make this a tough, durable
tool you’ll use for years.
MAIN SPECIFICATIONS
Electrical
Motor:
110 vol
volts
2800rpm
2.2horsepower(2200 Watts
Watts)
Max.force:
Log size
Capacity:
Ram
7tons
520mm(length)
(50-300)mm(diameter)
400mm
Travel
Ram
Diameter:
30mm
Hydraulic
Oil
2.9liters
Capacity:
Overall
Dimensions:
Net Weight:
980mm(length)*275mm
(width)*520cm(height)
47kgs
Special safety regulations for the Log Splitter Warning:
This powerful log splitter may cause special hazards. Pay
special attention to protect yourself and those around you.
Must observe basic safety precautions to reduce risk of
injury. Please carefully read this operation manual before
starting work.
1. This machine must be always be used by one operator only.
2. Never split the logs bigger than the specified log size
capacity. The log is not permitted to have nails, which
may jump up or damage the machine. The log end surface
must be cut level and all the branches must be removed
of the trunk. Should split be the log along the direction
of vein. Never put the log vertically onto the Log
Splitter because this may damage the Log Splitter.
3. The operator must handle the control device with both
hands and never use other means to operate the control
device.
4. The Log Splitter must be operated by the adults who have
read this operation manual only. Anybody not reading
this manual is forbidden to use this Log Splitter.
5. Position the machine on a support of 60-75cm high, free
from any objects that could prevent complete freedom of
movement for the operator while working. Therefore we
recommend using a special Log Splitter Platform. Never
operate the machine on the ground because this may raise
the risk of the injury to the face due to the splinter
or rubbish-and make the operation difficult.
6. Never split 2 logs at one time otherwise the log may jump
up. This is dangerous!
7. Never put or change log when machine in running because
this is very dangerous.
8. When the machine is running any people or animals must
be at least 5 meters away from the machine.
9. Never tamper with the protective device of Log Splitter
or work without the protective device.
10. In order to split hard log, never force the Log Splitter
for over 5 seconds. The superheated oil may damage the
machine under pressure. In this case, should suspend the
machine and turn the log by 90 degrees and then start
splitting again. If the log can’t be split then, this
means the log hardness exceeds the capacity of the
machine and must be put off the splitter. In this way the
machine will not be damaged.
11. Never leave the running machine unintended. If not
working, you should stop the machine and unplug the
power.
12. Never use this machine near a natural gas, gasoline tank
or other flammable materials.
13. Never open switch box or electrical motor cover. If
needed, contact a qualified electrician.
14. Make sure that the machine and cord are kept away from
the water. Take care to handle the cord. Never yank or
tear the power cord. Keep the cord away from high
temperature, oil and sharp objects.
Recommended log size
Log size capacity:
520mm(length)*(50-300)mm(diameter)reference.
1. The specified diameter of the log is just for
reference.
If a fine log has knot or the log fiber is too hard, it
would be very difficult to split.
If the fiber of a bigger log is smooth and loose, the
splitter may also split it.
2. Never use the cam pressure to force the Log Splitter
to split super hard log for over 5 seconds. The
superheated oil can damage the machine under pressure.
It is important that if the log can’t be split the first
time, then stop the machine and turn the log by 90 degrees
and then start splitting. If the log can’t be split still,
this means the log hardness exceeds the capacity of the
machine and must pick out the log. In this way the machine
will not be damaged.
Recommended
Recommended hydraulic oil
We recommend the use of the following hydraulic oil for the
hydraulic ram:
SHELL TELLUS T22
ARAL VITAM G122
SP ENGERGOL HCP22
MOBIL DAT11
Or equivalent oils
Never use other kinds of oils.
CHECK BEFORE UNCASING AND INSTALLATION
Take out all the components from the packing box and ensure
each package clear in the carton for the purpose of sorting
and checking for the shipping damage. If you find any
damaged component, you should contact dealer immediately.
Figure 1: List of major components
components
Check these components according to the following list and
Figure 1.
A. Log guiding plates
B. Log pusher
C. Operating handle assembly
D. Wheel and frame
E. Oil pump
F. Electrical motor switch
G. Electrical motor assembly
H. Supporting feet
I. Main body
J. Splitting wedge
All the screws, bolts, washer and jigs are in the packing
box.(The complete list is on the attached parts list).
INSTALLATION
INSTALLATION OF WHEEL AND SUPPORTING FEET
Carefully take out the Log Splitter from the packing box
with the help another person and put it onto the foam
material on the supporting surface(the foam material in the
packing box together with the machine).(See Figure 2)
Put the main part on the foam material and fix with 2 screws
(21) and 2 nuts (20) and tighten up the supporting
feet(19).(See Figure 3)
On the main part that has been fixed on the foam block with
the supporting feet use safetv ring (59)to fix 2 wheels
(60)onto the shaft of wheel frame(61).then use the wheel
shaft cover (58)to cover the wheels.
Make sure that the wheels are not obstructed and turn
uniformly. (See Figure 3)
Installation of operating handle
Take out the operating handles (54/55)from the carton, and
screw them onto the receiving hole (52)of the handles, then
tighten up.(See Figure 4)
Bolt on rod control cover with included bolts.
OPERATON
1. Plan your work site.
site Work safely and save effort by
planning your work before and have your logs
positioned where they can be easily reached. Have a
site located to stack the split wood or load it onto
a nearby truck or other carrier.
2. Prepare
Prepare the logs for splitting.
splitting This splitter
accommodates logs up to 520mm in length. When cutting
up limbs and large sections, do not cut sections any
longer than the specified length. Do not attempt to
split green logs. Dry, seasoned logs spilt much more
easily, and will not jam as frequently as green wood
(moisture).
3. Route the power cord.
cord Locate an appropriate power
outlet and secure an adequate extension cord, if
needed. Route the cord from the splitter to the power
source in a way that safeguards against tripping on
the cord or the cord becoming damaged during the work
session. Be sure to avoid wet conditions.
4. Position Splitter Securely.
Securely. Be sure the splitter is
positioned firmly on level, solid supporting platform,
60-70cm high. without any objects on it .which could
prevent complete freedom of movement for the operator
while working. Never operate the machine on the ground
because this may raise the risk of the injury to the
face due to the splinter or rubbish and make the
operation difficult .Therefore we recommend using a
special Log Splitter platform. If necessary, block the
wheels with wedges to prevent them from rolling.
5. Open th
the Air Bleed.
Bleed. (A in Figure 5).Loosen the BLEED
SCREW (14) 3-4 turns whenever the splitter is being
used Retighten this screw when you are finished.
6. Place log onto Splitter.
Splitter. Place the log onto the
splitter. Lengthwise and lying flat on the Main Body
(I in Figure 1).The log should lie flat on the Splitter
and be cradled by the Log guiding plates (A in Figure
1).Never attempt to split a log at an angle .Be sure
the Wedge (J in Figure 1) and Log Pusher (B in Figure
1) will contact the log squarely on the ends.
7. Two hand operation. Depress the Electric Motor start
Switch (Point F in Figure 1) with one hand, Wait a few
seconds as the motor spins up and creates pressure in
the Hydraulic pump. Then when it is safe to do so,
depress the Operating Handles (C in Figure 1).The Log
Pusher (B in Figure 1) will compress the log, pushing
it against the Wedge (J in Figure 1), splitting the
log. Once the log is split, release both of the
Operating Handles (C in Figure 1): this will allow the
Log Pusher(B in Figure 1) to retract.
Warning: If the log does not split immediately, do not
force it by maintaining the
the th
thrust for more than a few
seconds. This can damage the tool. It is better to try
repositioning the log on the splitter, or setting the log
aside.
8. Stack as you work. This will provide a safer work are,
by keeping it uncluttered, and avoid the danger of
tripping. Or damaging the power cord.
9. Remember to retighten the BLEED SCREW (Pos.14 in
FIGURE 5) when you are finished.
.
HOW TO FREE A JAMMED LOG
1. Release both controls, so that the LOG PUSHER (B in
Figure 1) will be fully retracted.
2. Insert a triangular wedge of wood under the log and
activate the log pusher to push the wedge under the
jammed log.
3. Repeat this process using progressively large wedges.
Until the jammed log is freed.
Warning: Never hammer on the jammed log,
log, or place your
hands near the log when
when attempting to free it.
When attemp
attempting
mpting to free the jamm
jammed log,
log, never ask other
people to tamper with the machine for help.
When the supporting feet is blocked, never attempt to
take it out by striking with a tool. This may break the
motor assembly.
Sharpening
Sharpening the Wedge
1. After long periods of operation, and when required;
sharpen the wedge using a fine-toothed file and carefully
removing and burrs of flat spots on the edge.
Warning!
Be sure to unplug the power before any maintenance work!
Changing the Hydraulic
Hydraulic Oil
(The quantity of the hydraulic oil and recommended type
have been indicated on page 5).
1. Make sure the LOG PUSHER (B in Figure 1) is fully
retracted.
2. Unscrew the DIP STICK(10)and remove it together with
O-type oil seal(11).(Figure 6)
3. Position a container under the Log Splitter that will
hold at least 4 liters of oil .Then tilt the machine to
empty the oil into the container.
4. Tilt the Log Splitter the other way, with the oil
Fill/Drain Port (in Figure 7) up. Using a clean funnel
pour the hydraulic Oil into the hydraulic oil cylinder
with the volume specified at page 4 (Be sure to use only
clean high quality hydraulic oil specifically made for
this purpose).
5. Clean the DIP STICK (10) and insert it to make sure the
oil level is between the two marks on the dipstick.
6 . Clean the DIPSTICK (10) and o-Type Seal(11) and
re-install. Be careful not to damage the threads of the
aluminum OLY CYLINDER COVER.
Warning!
Be sure to dispose of the dirty oil properly. Take it to
your local waste oil-recycling center. Never dump it on the
ground or mix it with trash.
TroubleTrouble-shooting
Problems that may arise when using the log splitter and
recommended remedies are given in the table below. In the
case of operations carried out by unauthorized personnel,
the guarantee will be immediately null and void and
manufacturer will be relieved of any responsibility for
injury to persons and animals and damage.
Problem
Probable cause
Corrective action
Log fails to split -Incorrect positioning -Position
of the Log
the
log
correctly.
- Log exceeds permitted - Try to cut a small
dimensions or the wood part to reduce the
is too hard for the size of the log
capacity of the machine - Sharpen the wedge,
- Wedge does not cut
check for burrs or
- Oil leak; Hydraulic nicks,
pressure too low
file
if
the
leak
necessary
-
Locate
using
a
piece
of
cardboard or wood
- Contact your dealer
Log
Pusher/Can Air in the circuit
Check oil level. Fill
advances jerkily or
oil if necessary.
with strong upward
If problem remains,
vibrations
contact your dealer.
Oil leaks from the Leakage from the tank Check that the bleed
Cams or from other Seals worn
screw
external points
unscrewed
has
been
before
using the machine.
Contact your dealer.
Parts Diagram
Log Splitter Parts List
No
Name
1
Hexagonal nut(M14)2
2
Hexagonal nut(thin)(M14)
4
3
Hammer ram
1
4
Spring
1
5
O-ring oil seal
1
6
Piston
1
7
O-ring oil seal
1
8
Square piston ring
1
9
Oil cylinder casing
1
10
Dip stick
1
11
O-ring oil seal
oil seal
12
Teflon seal ring
1
13
O-ring oil seal
oil seal
14
Bleed screw (M3*10)
Oty
1
15
Oil cylinder cover
1
16
Screw stud
2
17
Philips screw(M6*20)
2
18
Carrying handle
1
19
Supporting foot
1
20
Nut(M6)
4
21
Screw(M6*14)
2
22/23 Rubber supporter for electrical motor 1
24
Switch dust shield
1
25
Switch
1
26
Switch seat
1
27
Nut(M8)
1
28
Fixing washer
1
29
Capacitor
1
30
Dustproof rubber sealing ring
1
31
Capacitor casing
1
32
Philips screw
8
33
Cord and plug
1
34
Screw (M8*30)
3
35
Ring spring (8mm)
9
36
Washer (8mm)
13
37
O-ring oil seal
2
38
Screw (8 mm)
1
39
Nut (M8)
1
40
Oil pump cover
1
41
Electrical motor assembly
1
42/44 Screw (M8*30)
4
43
Log guiding plate
2
45
Main body
1
46
Plastic sheath plate
2
47
Log pusher assembly
1
48
O-ring oil seal
1
49
Oil cylinder cover-front
1
50
Spring
1
51
Fixing screw(M8*30)
1
52
Handle seat
1
53
Valve knob
1
54
Handle bar
1
55
Handle
1
56
Nut (M8)
2
57
Brass shim
4
58
Wheel axle cover
2
59
Shaft fixation hook
2
60
Rubber wheel
2
61
Wheel frame
1
62
Support plate
1
63
Washer (10 mm)
2
64
Spring
1
65
Protection hood
1
PLEASE READ THE FOLLOWING CAREFULLY
THE MANUFACTURER AND/OR DISTRIBUTOR HAS PROVIDED THE PARTS
DIAGRAM IN THIS MANUAL AS A REFERENCE TOOL ONLY.NEITHER THE
MANUFACTURER NOR DISTRIBUTOR MAKES ANY REPRESENTATION OR
WARRANTY OF ANY KIND TO THE BUYER THAT HE OR SHE IS
QUALIFIED TO MAKE ANY REPAIRS TO THE PRODUCT OR THAT HE OR
SHE IS QUALIFIED TO REPLACE ANY PARTS
OF THE PRODUCT .IN
FACT,THE MANUFACTURER AND/OR DISTRIBUTOR EXPRESSLY STATES
THAT ALL REPAIRS AND PARTS REPLACEMENTS SHOULD BE
UNDERTAKEN BY CERTIFIEDAND LICENSED TECHNICIANS AND NOT
BY THE BUYER. THE BUYER ASSUMES ALL RISK AND LIABILITY
ARISING OUT OF HIS OR HER REPAIRS TO THE ORIGINAL PRODUCT
OR REPLACEMENT PARTS THERETO, OR ARISING OUT OF HIS OR HER
INSTALLATION OF REPLACEMENT PARTS THERHTO.