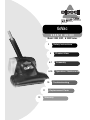
1
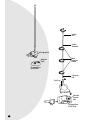
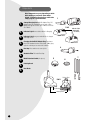
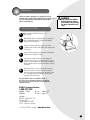
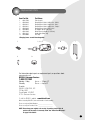
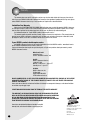
GoVac
USER’S GUIDE
Model 3300, 3301, & 3302 Series
3
Safety Instructions
4
Product View
5-7
Assembly
8-10
10
11
12
Operations / Maintenance
Troubleshooting
Replacement Parts
Warranty
Thanks for buying a BISSELL® GoVac
We’re glad you purchased a BISSELL GoVac. Everything we know
about floor care and cleaning went into the design and construction of this
handy appliance.
Your BISSELL GoVac is well made, and we back it with a limited
one-year warranty. We also stand behind it with a knowledgeable, dedicated
Consumer Service Department, so, should you ever have a problem, you’ll
receive fast, considerate assistance.
My great-grandfather invented the floor sweeper in 1876. Today,
BISSELL is a global leader in the design, manufacture, and service of high
quality homecare products like your BISSELL GoVac.
Thanks again, from all of us at BISSELL.
Mark J. Bissell
President and Chief Executive Officer
2
IMPORTANT SAFETY INSTRUCTIONS
When using an electrical appliance, basic
precautions should be observed, including
the following:
■
■
Use only manufacturer’s recommended
attachments - use of attachments not provided or
sold by BISSELL may cause fire, electric shock
or injury.
■
Use only the DC adapter supplied by BISSELL to
recharge your GoVac.
■
Use charger unit only in standard electrical
outlet (120v - 60hz).
■
Keep openings free of dust, lint, hair, etc.
■
Disconnect GoVac from DC adapter before maintenance or cleaning.
■
Be extra careful when cleaning stairs.
READ ALL INSTRUCTIONS
BEFORE USING YOUR GOVAC.
WARNING: To reduce the risk of
fire, electric shock, or injury:
■
Store indoors.
■
Do not expose to rain.
■
Do not immerse or use on wet surfaces.
■
Do not handle with wet hands.
■
Do not use GoVac if it has been dropped, damaged,
left outdoors or dropped into water - return it to a
Service Center.
■
■
■
■
■
■
■
■
■
■
Do not use for any purpose other than described
in this User’s Guide.
This portable hand vacuum contains
rechargeable nickel cadmium batteries. Do
Do not use with damaged charging base.
not incinerate batteries or they will explode
Do not damage the charging cord. Never carry or
when exposed to high temperatures.
pull by the cord, use cord as a handle, close door
on cord, or pull cord around sharp edges or cor- Battery cell leaks can occur under extreme
conditions. If battery cell liquid comes in
ners. Keep cord away from heated surfaces.
contact with the skin:
Do not use an extension cord. Charging base
■
Wash immediately with soap and water.
cord or DC adapter should plug directly into
Then . . .
electrical outlet.
■
Neutralize with a mild acid such as
Do not put any object into appliance openings, or
vinegar or lemon juice.
restrict air flow.
If battery cell liquid gets into the eyes:
■
Flush immediately with clean water for a
Do not use without filter in place.
minimum of 10 minutes.
Do not expose hair, loose clothing, fingers or body
■
Seek medical attention.
parts to openings or moving parts.
Do not use with any opening blocked.
Do not pick up hot, burning or smoking objects such
as cigarettes, matches or hot ashes.
WARNING: The Power Cord on this product
contains lead, a chemical known to the State
Do not pick up flammable or combustible materials
of California to cause birth defects or other
(lighter fluid, gasoline, kerosene, etc.) or use in the
reproductive harm.
presence of explosive liquids or vapor.
WASH HANDS AFTER HANDLING.
Do not use appliance in an enclosed space filled
with vapors given off by oil base paint, paint
thinner, some moth proofing substances, flammable
dust, or other explosive or toxic vapors.
■
Do not pick up toxic material (chlorine bleach,
ammonia, drain cleaner, gasoline, etc.).
■
Do not allow to be used as a toy. Close attention
is necessary when used by or near children.
SAVE THESE INSTRUCTIONS.
This model is for household use only.
3
Handle
Grip
Handle
Assembly
Charging Port
Metal
Extension
Handle
Indicator
Light
Charging Base
(back View)
D-Shaped
End
Dust Cup
Electrical
Contact
Post
Plug
4
Charging Base
(Front View)
How To Use This Guide
This User’s Guide has been designed to help you get the most
satisfaction from the rechargeable BISSELL GoVac Cordless
Sweeper. Enclosed you’ll find assembly instructions, tips for all
cleaning tasks, safety precautions, plus maintenance and
troubleshooting instructions.
Please read this Guide thoroughly before using your BISSELL
GoVac. Pay particular attention to the Product View, assembly
instructions and part names. Following the Guide will greatly
enhance your ability to get the best performance from your
BISSELL GoVac for many years.
How to Assemble the BISSELL GoVac
The BISSELL GoVac requires very little assembly. Remove it from
the box and check it against the illustration to familiarize yourself
with the components listed. The exploded view drawing with part
names will also be helpful if you should need to order a part at a
later time. Remember, components of your GoVac may vary
depending on the model you purchased.
WARNING:
Electric/electronic appliances
should not be subjected to extreme
temperatures or high humidity. Do
not store the BISSELL GoVac in
bathing areas or close to stoves,
furnaces or radiators.
Quick and Easy Assembly
1.
Assemble the Handle by screwing together three (3)
Metal Extension Handles. Place the colored Handle
Grip on top of the metal extension assembly and twist
clockwise until secure. Screw the D-shaped End into the
bottom of the Metal Extension Handle assembly.
2.
Place bottom D-shaped End into the D-shaped opening
at the top of the BISSELL GoVac. Push firmly until the
button at the bottom “clicks” into place in the opening.
3.
Position GoVac in Charging Base (if so equipped), making sure that the GoVac Charging Port fits securely over
the Electrical Contact Post on the Charging Base.
4.
Tip:
Fully charge unit
before using. (See
Charging the
battery page 7.
Plug the Charging Base cord into a standard electrical
outlet. The Indicator Light will glow red, showing that the
unit is charging.
Note: If you purchased Model 3301, the Charging
Base is replaced by a Charging Cord with
Transformer Plug. The Transformer plugs into
standard electrical outlet (120v-60hz); plug the
opposite end into the port on the motor side of
your GoVac. Your GoVac is now charging.
5
Components
Note: Components may vary depending on which
GoVac model you purchased. Some models
include a convenient Charging Base, while other
simply plug into a grounded outlet.
1.
2.
1
Storage/Charging Base with DC Adapter Plug - DC
Adapter plugs into standard electrical outlet (120v 60hz); plug opposite end into port on Motor side of BISSELL GoVac.
2&3
Indicator Light Glows red when GoVac is Charging.
Indicator Light
(depending
on model)
3300 Series
3.
Indicator Light Glows green when GoVac is charged
and ready for use.
4.
Charging Cord with DC Adapter Plug Transformer
plugs into standard electrical outlet (120v - 60hz): plug
opposite end into port on motor side of GoVac.
3302 Series
4
5.
6.
7.
8.
9.
Dust Cup Press and turn to securely lock.
Washable Filter Fits inside Dust Cup.
Metal Extension Handle (five pieces).
7
5
6
Rotating Brush.
Dust Blade.
Bottom View
8&9
Dust Blade
Rotating Brush
6
Charging The Battery
Your GoVac may be stored in the Charging Base whenever it is not
in use. When GoVac is charging, it may become warm to the
touch. This is normal, and no cause for concern. Here are some
things to remember about charging:
When completely charged, your GoVac provides over 12
minutes of full cleaning power.
1.
2.
3.
4.
5.
When charging for the first time, allow to charge
uninterrupted for at least 24 hours. Thereafter, a 6 - 8
hour charge will renew the GoVac battery.
Model 3300 features a single red Indicator Light. This
light does not go off when the GoVac is fully charged.
Unplugging the Charging Base cord from the wall outlet
after 6 - 8 hours will extend the life of the battery.
Model 3302 [Fast Charger] features a red and a green
Indicator Light. When in charge mode, the red light will
glow. When the battery is fully charged and ready for
use, the red light will go out and the green light will
glow - usually in 3 hours.
Important Note: If you purchased a 3302 GoVac
unit equipped with the fast charger, you should let
the vacuum cool down before placing into
the charging base. The charger features a heat
sensitive device that will indicate to the vacuum
that it is already charged. The unit will take
longer to charge if placed in the base while warm.
Decreased operating time may indicate that the battery
has built up a charging resistance. To recharge, first
completely exhaust the battery, recharge it, then exhaust
it again before recharging a second time. This procedure
may be required more than once. If your battery still
fails to recharge, or does not hold a charge of normal
duration, call:
BISSELL Consumer Services
1-800-237-7691
Monday - Friday
8 a.m. — 10 p.m. ET
Saturday
9 a.m. — 8 p.m. ET
Or visit our website @ www.bissell.com
NOTE: Charging Bases are not interchangeable
between models.
7
How To Use Your BISSELL GoVac
Your GoVac is a quick and easy way to clean up around the house,
inside the car or truck, or in the workroom.
Release the BISSELL GoVac from the Charging Base by
lifting it straight up and out.
1.
2.
3.
4.
Tip back the Handle into typical use position and your
BISSELL GoVac turns on by itself. To turn BISSELL GoVac
off, return Handle to upright position.
To clean stairs, vehicles or small areas, detach the
Handle by depressing the button where the bottom of the
Handle slides into the BISSELL GoVac and pull the entire
Handle assembly out. Use the BISSELL GoVac by holding
the built-in hand grip.
When done, replace the Handle (if detached) and place
the BISSELL GoVac in the Charging Base. Make certain
red charging light is on when GoVac is in place.
Note: For Model 3301, simply remove the
charging Plug from the port at the motor side of
the BISSELL GoVac, and use as above.
8
Off
On
Maintenance
The key to maximum performance is emptying the Dirt Cup
frequently and cleaning the Filter. Emptying the Dirt Cup after each
use, and cleaning the Filter periodically, will help your GoVac
operate at peak efficiency.
WARNING:
Never operate the BISSELL
GoVac without the Filter in
place. Doing so may damage
the motor and void the warranty.
To Empty your Filter
1.
Make sure that the BISSELL GoVac is in the
“OFF” position.
2.
With BISSELL GoVac facing away from you, grasp Dust
Cup in right hand and turn it toward you (toward the
back of the BISSELL GoVac).
3.
Carry the Dust Cup, with filter in place, to a waste
container. Remove Filter, empty debris, then replace Filter
in Dust Cup.
4.
Replace Dust Cup by placing it in position and turning it
away from you until it fits securely.
5.
6.
Clean exterior surfaces with a soft cloth dampened
with water only. Do not use a strong detergent or other
cleaner - this may damage the finish. Always unplug the
BISSELL GoVac from the electrical outlet before cleaning
the surface.
After heavy usage, you may clean the Filter by gently
rinsing it in a bowl of water and mild dish detergent.
Rinse thoroughly under running water and make certain
it is completely dry before replacing it. You may also
purchase replacement Filters.
Use only BISSELL Filters in the BISSELL GoVac. If
the Filter becomes damaged or becomes too dirty to
wash, you may purchase new filters by calling BISSELL
Consumer Services.
BISSELL Consumer Services
1-800-237-7691
Monday - Friday
Saturday
8 a.m. — 10 p.m. ET
9 a.m. — 8 p.m. ET
Or write:
BISSELL HOMECARE, INC
PO Box 3606
Grand Rapids MI 49501
ATTN: Consumer Services
Or visit the BISSELL website - www.bissell.com
9
See the following instructions to dispose of the batteries after they have exceeded the battery life.
An adult must always remove and dispose of the batteries.
WARNING: This product contains a nickel-cadmium (Ni-Cd) rechargeable
battery pack. According to Federal and State regulations, removal and proper
disposal of Ni-Cd batteries is required. For removal of the battery pack in your
BISSELL GoVac, see instructions below:
1. IMPORTANT: Unplug charger.
8 Screws
2. Remove handle and dust cup.
3. Remove (8) Phillips head screws on the bottom cover as shown in picture.
4. Separate top and bottom cover by applying outward force as shown in picture.
5. Remove wire connectors from the battery pack.
6. Keep Battery Pack together - DO NOT separate individual batteries.
For specific disposal instructions of batteries, please contact:
RBRC (Rechargeable Battery Recycling Corporation) 1-800-822-8837 or
visit the website: www.rbrc.com
7. Discard remainder of product.
Caution: Opening the unit will destroy the appliance and invalidate the warranty.
Troubleshooting
Reduced Suction/No Suction.
Possible Causes
1
Filter is full
Remedies
1
Empty debris from Filter and clean.
Not Powered/Underpowered.
Possible Causes
1
BISSELL GoVac not charged thoroughly
Remedies
1
2
3
Check for red light on GoVac when it is in Charging Base
Is GoVac correctly seated in Charging Base.
Is cord completely connected at wall outlet.
If suggested solutions for this or any function of the BISSELL GoVac do not correct the problem, call BISSELL
Consumer Services.
10
Replacement Parts
Item Part No.
Part Name
1
2
3
4
5
6
7
8
9
Filter (2 pack)
Charging Base Model 3300 Series - White*
Charging Base Model 3300 Series - Blue*
Charging Base Model 3300 Series - Purple*
Charging Base Model 3302 Series*
DC Adapter (Model 3301 only)
Metal Extension Handle (4 Sections)
Handle Grip (White only)
Dust Cup
603-3540
603-0420
603-0421
603-0422
603-0430
603-0010
603-4480
603-4481
603-0660
*Charging bases are not interchangeable.
1
2, 3, 4, 5
6
7
9
8
For information about repairs or replacement parts, or questions about
your warranty, call:
BISSELL Consumer Services
1-800-237-7691
Monday - Friday
Saturday
8 a.m. — 10 p.m. ET
9 a.m. — 8 p.m. ET
Or write:
BISSELL HOMECARE, INC
PO Box 3606
Grand Rapids MI 49501
ATTN: Consumer Services
Or visit the BISSELL website - www.bissell.com
When contacting BISSELL, have model number of unit available.
Please record your Model Number: ___________________
Please record your Purchase Date: ___________________
NOTE: Please keep your original sales receipt. It provides proof of date of
purchase in the event of a warranty claim. See "About Your Warranty"
on page 12 for details.
11
Warranty
This warranty gives you specific legal rights, and you may also have other rights which may vary from state to
state. If you need additional instruction regarding this warranty or have questions regarding what it may cover, please
contact BISSELL Consumer Services by e-mail, telephone, or regular mail as described below.
Limited One Year Warranty
Subject to the *EXCEPTIONS AND EXCLUSIONS identified below, upon receipt of the product, BISSELL Homecare,
Inc. will repair or replace (with new or remanufactured components or products), at BISSELL’s option, free of charge
from the date of purchase by the original purchaser, for one year any defective or malfunctioning part.
See information below on "If your BISSELL product should require service."
This warranty applies to product used for personal, and not commercial or rental service. This warranty does not
apply to fans or routine maintenance components such as filters, belts, or brushes. Damage or malfunction caused
by negligence, abuse, or use not in accordance with the User's Guide is not covered.
If your BISSELL product should require service:
Call BISSELL Consumer Services at the number listed below or visit the BISSELL website - www.bissell.com to
locate a BISSELL Authorized Service Center in your area.
If you need information about repairs or replacement parts, or if you have questions about your warranty, contact
BISSELL Consumer Services.
Website or E-mail:
www.bissell.com
Use the “Customer Services” tab.
Or Call:
BISSELL Consumer Services
1-800-237-7691
Monday - Friday 8 a.m. - 10 p.m. ET
Saturday 9 a.m. - 8 p.m. ET
Or Write:
BISSELL Homecare, Inc.
PO Box 3606
Grand Rapids MI 49501
ATTN: Consumer Services
BISSELL HOMECARE INC. IS NOT LIABLE FOR INCIDENTAL OR CONSEQUENTIAL DAMAGES OF ANY NATURE
ASSOCIATED WITH THE USE OF THIS PRODUCT. BISSELL’S LIABILITY WILL NOT EXCEED THE PURCHASE
PRICE OF THE PRODUCT.
Some states do not allow the exclusion or limitation of incidental or consequential damages, so the above limitation
or exclusion may not apply to you.
*EXCEPTIONS AND EXCLUSIONS FROM THE TERMS OF THE LIMITED WARRANTY
THIS WARRANTY IS EXCLUSIVE AND IN LIEU OF ANY OTHER WARRANTIES EITHER
ORAL OR WRITTEN. ANY IMPLIED WARRANTIES WHICH MAY ARISE BY OPERATION
OF LAW, INCLUDING THE IMPLIED WARRANTIES OF MERCHANTABILITY AND
FITNESS FOR A PARTICULAR PURPOSE, ARE LIMITED TO THE ONE YEAR DURATION
FROM THE DATE OF PURCHASE AS DESCRIBED ABOVE.
Some states do not allow limitations on how long an implied
warranty lasts, so the above limitation may not apply to you.
12
©2003 BISSELL Homecare, Inc
Grand Rapids, Michigan
All rights reserved. Printed in China
Part Number 603-5890
Rev 08/03
Visit our website at:
www.bissell.com