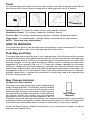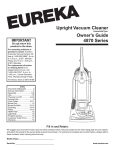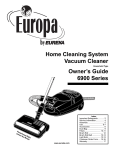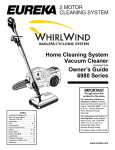
1
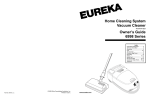
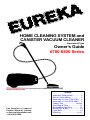
HOME CLEANING SYSTEM and
CANISTER VACUUM CLEANER
Household Type
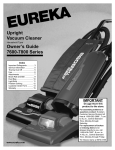
Owner’s Guide
6700-6800 Series
www.eureka.com
Index
For location of nearest
Eureka Warranty Station
or Service Information call
1-800-282-2886.
Important Safeguards ............. 2
Service Information ................. 4
Assembly & Use 6750-6799 ... 5
Assembly & Use 6820-6899 ... 6
Order Form .................... Online
Dust Bag & Filter ................... 11
Disposable Dust Bag ............ 12
Brush Roll & Belt .................. 13
Light Bulb .............................. 13
Warranty .......................... 14-15
IMPORTANT SAFEGUARDS
When using an electrical appliance, basic precautions should always be followed,
including the following:
READ ALL INSTRUCTIONS BEFORE USING THIS VACUUM CLEANER.
WARNING
To reduce the risk of fire, electric shock, or injury:
• Do not use outdoors or on wet surfaces.
• Do not leave vacuum cleaner when plugged in. Turn off the switch and unplug the
electrical cord when not in use and before servicing.
• Do not allow to be used as a toy. Close attention is necessary when used by or
near children.
• Use only as described in this manual. Use only manufacturer’s recommended
attachments.
• The hose contains electrical wires. Do not use if damaged, cut, or punctured. Avoid
picking up sharp objects.
• Always turn off this appliance before connecting or disconnecting either hose or
motorized nozzle.
• Do not use with damaged cord or plug. If vacuum cleaner is not working as it
should, has been dropped, damaged, left outdoors, or dropped into water, return it
to a service center before using.
• Do not pull or carry by cord, use cord as a handle, close door on cord, or pull cord
around sharp edges or corners. Do not run vacuum cleaner over cord. Keep cord
away from heated surfaces.
• Do not use extension cords or outlets with inadequate current carrying capacity.
• Turn off all controls before unplugging.
• Do not unplug by pulling on cord. To unplug, grasp the plug, not the cord.
• Do not handle plug or vacuum cleaner with wet hands.
• Hold plug when rewinding onto cord reel. Do not allow plug to whip when rewinding.
• Do not put any object into openings. Do not use with any opening blocked; keep
free of dust, lint, hair, and anything that may reduce airflow.
• This vacuum cleaner creates suction and contains a revolving brush roll. Keep
hair, loose clothing, fingers, and all parts of body away from openings and moving
parts.
• Do not pick up anything that is burning or smoking, such as cigarettes, matches or
hot ashes.
• Do not use without dust bag or filter(s) in place.
• Belt pulleys can become hot during normal use. To prevent burns, avoid touching
the belt pulley when servicing the drive belt.
• Use extra care when cleaning on stairs.
• Do not use to pick up flammable or combustible liquids such as gasoline, or use in
areas where they may be present.
• Store your cleaner indoors in a cool, dry area.
• Keep your work area well lighted.
• Unplug electrical appliances before vacuuming them.
SAVE THESE INSTRUCTIONS
2
CONSEILS DE SÉCURITÉ
Lors de l’utilisation d’un appareil électrique, quelques précautions élémentaires doivent
être observées, incluant les suivantes:
LISEZ TOUTES LES INSTRUCTIONS AVANT D’UTILISER VOTRE ASPIRATEUR.
AVERTISSEMENT
Pour réduire le risque de feu, de choc électrique, ou de blessure:
• Ne pas utiliser à l’extérieur ou sur des surfaces mouillées.
• Fermez le commutateur et débranchez l’appareil lorsque vous ne l’utilisez pas ou
avant le nettoyage ou l’entretien.
• Ne permettez pas qu’il soit utilisé comme jouet. Une attention particulière est
nécessaire lorsque utilisé par ou prés d’un enfant.
• Suivez les recommandations d’utilisation de ce manuel. Utilisez uniquement les
accessoires recommandés par le fabriquant.
• Le tuyau contient des fils électriques et ne doit pas être utilisé s’il est abîmé, coupé
ou percé. Eviter de ramasser les objets aigus.
• Eteindre toujours l’appareil avant de connecter ou de déconnecter le tuyau ou la
lance motorisée.
• Ne pas utiliser si le cordon ou la fiche sont endommagés. Si l’aspirateur ne fonctionne
pas comme il le devrait, s’il a été échappe, s’il est endommagé, s’il a été laissé à
l’extérieur ou ´chappe dans l’eau, retournez-le à un centre de service avant d’utiliser.
• Ne pas le tirer ou le transporter par le cordon, ne pas utiliser le cordon un guise de
poignée. Ne pas fermer une porte sur le cordon ou tirer le cordon sur des coins ou
bordures pointus. Ne pas circuler sur le cordon avec l’aspirateur. Tenir le cordon à
distance des surfaces chauffantes.
• Ne pas utiliser des rallonges ou des prises qui n’ont pas de capacité suffisante pour
transporte le courant.
• Fermer tous les contrôles avant de débrancher.
• Ne pas débrancher en tirant sur le cordon. Pour débrancher, tenez la fiche et non le
cordon.
• Ne pas manipuler la fiche ou l’aspirateur avec les mains mouillées.
• Tenir la fiche lorsque vous rebobinez le cordon électrique. Ne pas permettre que la
fiche batte l’air.
• Ne pas rien insérer dans les ouvertures. Ne pas utiliser si des ouvertures sont
bloquées; assurez-vous qu’elles soient dégagées de poussière, mousse, cheveux
ou toute autre chose qui pourrait réduire le passage de l’air.
• Cet aspirateur crée de la succion et contient un rouleau-brosse tournant. Tenir les
parties mobiles et les ouvertures loin des cheveux, du linge, des doigts et de toute
partie du corps.
• Ne pas ramasser des objets qui brûlent ou fument comme les cigarettes, allumettes
ou cendres chaudes.
• N’utilisez pas sans le sac de poussière en place.
• Les poulies du courroie peuvent devenir chaudes pendant l’utilisation normale. Pour
prévenir des brûlures, évitez de touché la poulie du courroie lorsque vous réparez la
courroie.
• Portez une attention particulière lorsque vous nettoyez les escaliers.
• Ne pas utiliser pour ramasser des liquides inflammables ou combustibles comme de
l’essence. Ne pas utiliser dans les endroits où ces liquides pourraient être présents.
• Entreposez votre aspirateur à l’intérieur dans un endroit propre et sec.
• Maintenez un bon éclairage à l’endroit où vous travaillez.
• Débrancher les appareils électrique avant de les balayer.
CONSERVEZ CES INSTRUCTIONS 3
To reduce the risk of electric shock, this appliance has a polarized plug (one blade is
wider than the other). The plug will fit in a polarized outlet only one way. If the plug does
not fit fully in the outlet, reverse the plug. If it still does not fit, contact a qualified electrician to install the proper outlet. Do not change the plug in any way.
Afin de réduire le risque de choc électrique, cet appareil est muni d’une fiche polarisée (une des lames est plus large). Cette fiche ne peut être insérée dans une prise
polarisée que d’une seule façon. Si la fiche ne peut être insérée dans la prise, retourner
la fiche. Si la fiche ne peut toujours pas être insérée dans la prise, faire installer une
prise adéquate par un électricien qualifié. Ne pas modifier la fiche.
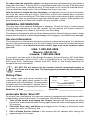
GENERAL INFORMATION
The bag may have become dislodged in shipping. Check the bag to insure proper
seating before attempting to use the cleaner. Do not operate the cleaner without a
dust bag. Damage may result to the motor (see Dust Bag).
The cleaner is designed to pick up dirt and dust particles. Avoid picking up hard or sharp
objects with the cleaner to avoid bag breakage, hose clogging, or possible motor damage.
Service Information
The instructions in this booklet serve as a guide to routine maintenance. For additional
service information telephone our toll free number for the nearest Eureka Authorized
Warranty Station. You should know the model, type and serial numbers when
you call:
USA: 1-800-282-2886
Mexico: 254 23 52
Canada: 1-800-282-2886
If you prefer, you can write to The Eureka Company, Service Division, 807 North Main
Street, Bloomington, Illinois 61701, USA. In Canada write to The Eureka Company,
866 Langs Drive, Cambridge, Ontario N3H 2N7. Refer to The Eureka Warranty for
complete service information.
DO NOT OIL the motors (in the canister and the motorized nozzle) or
the brush roll at any time. The bearings are permanently lubricated and
sealed.
Rating Plate
The model, type and serial numbers are
indicated on the rating plate located on the
underneath side of the cleaner. For prompt and
complete service information, always refer to
these numbers when inquiring about service.
Model No. & Type _________________
MODEL
TYPE
VOLTS
SERIAL NO.
AMPS.
HOUSEHOLD TYPE
HERTZ
SERVICE INFORMATION: 1-800-282-2886
THE EUREKA COMPANY
BLOOMINGTON, ILLINOIS 61701
Serial No. _____________________
Automatic Motor Shut-Off
To protect from overheating, this vacuum cleaner is equipped with a thermostat which
automatically shuts off the motor if it overheats. Should this happen:
1. Turn off the switch and unplug the cleaner because the thermostat will allow
the cleaner to automatically start running again when the motor cools (approximately
30 minutes);
2. Check the hose, bag, and filters as a clogged hose, full bag, or dirty filters could
cause the motor to overheat; and
3. Call a Eureka Service Station if the cleaner will not operate after cooling for
approximately 30 minutes.
4
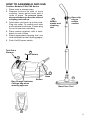
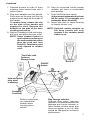
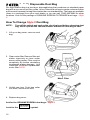
HOW TO ASSEMBLE AND USE
Canister Models 6750-6799 Series
1. Place tools in storage area.
2. Depress buttons on side of hose
coupling; insert swivel hose until it
locks in place. To remove hose,
depress buttons on the side of hose
coupling and pull up.
3. Twist lower cord hook up to free cord.
Plug into outlet. To rewind cord, twist
quick release hook down. Fasten plug
to cord to prevent unwinding.
4
Attach
wands and
cleaning
tool
Open slip
ring to
reduce
suction
4. Place wands together with a twist;
attach to end of hose.
5. Select appropriate cleaning tool, see
tools illustrated on the following pages.
6. Push On/Off power switch.
Tool-Pak ®
Storage
n
6
Power Switch
1
n
2
Swivel
Hose
5
Button
Bag Change Indicator
Change bag when
warning appears.
Bare Floor Tool
3
5
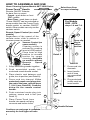
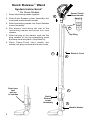
HOW TO ASSEMBLE AND USE
Home Cleaning System Models 6877-6899 Series
Power-Touch ® Handle
12
Remote ON/OFF Selector
for bare floor or carpet
Carpet - push down on front
*Off - middle
Bare Floor - push down on back
Select bare floor
or carpet cleaning.
For Models
6820 - 6876
*Power ON/OFF can be controlled on
some models from the Power-Touch
handle switch or canister ON/OFF
switch. Other models can only use the
canister switch.
steps 1-4 and 7-9.
6
Remote Speed Control (on some
models)
Regardless of the speed of the
canister motor, slide to reduce or
increase power as needed.
Vacuum Control (on
some models)
Cleaning suction is
reduced by pushing
lever to LOW position.
Place lever at High
position to increase
suction for carpet
cleaning. Available
on models without
Remote
Speed
1
Control.
1. Snap interlocking wands together.
5
6. Place Power-Touch hose
handle into wands until plug
connects and button locks.
7
Detail C
Detail B
7. Press cord into
channels.
4
8. Insert handle
end of hose
into assembled
wands.
9. Plug motorized
nozzle cord into
hose handle.
4. Press cord into channel. If the
motorized nozzle cord plugs into
the end of the hose, refer to steps
7, 8 & 9 (see Detail B). Continue
below for the remote control
handle.
5. Push motorized nozzle plug into
retainer; secure cord in slot (see
Detail C).
Open slip
ring to
reduce
suction.
8
2. Push assembled wands into
motorized nozzle handle socket.
3. Place electric cord between cord
guide; turn to position (see Detail A).
9
Detail A
2
3
10 Handle Release
Continue on next page to complete
assembly for both types of hose.
6
Continued
7. Depress buttons on side of hose
coupling; insert swivel hose until it
locks in place.
10. Step on motorized nozzle handle
release; pull back to comfortable
work position.
8. Plug short adapter cord into handle.
Push down on the plug until the clip
snaps over the ridge on the inside of
the handle.
To remove hose, release the clip
on the side of the handle and
unplug the cord. Depress the
buttons on the side of the hose
coupling and pull up.
11. Push On/Off canister switch.
(A thermostat automatically shuts
off the motor if it overheats, see
Automatic Motor Shut-Off).
9. Step on Cordaway ® cord reel button,
pull cord, and place plug into outlet.
NOTE: Some cleaners feature a
quick release cord wrap on
the underneath side rather
than the cord reel (see
Detail D). Twist lower cord
hook upward to release
cord.
12. Select bare floor or carpet cleaning
on remote control, only.
NOTE: Optional remote controls on
the hose handle will only
operate if the canister power
switch is on.
*Tool-Pak ® with
Optional
Storage Cover
Detail D
ON/OFF
11 Switch
7
Buttons
Hold and guide
plug when
rewinding
8
9
Cordaway ®
Cord Reel
Refer to rating plate
(on underside of
cleaner) when
inquiring about
service.
Bag Change Indicator
Change bag when warning
appears. Fine substances block air
passage and cause indicator to
move across window when bag
does not appear to be full. Bag
should be changed for maximum
performance.
7
Quick Release™ Wand
System Instructions*
* On Some Models
1. Snap interlocking wands together.
6
2. Slide Quick Release Lower Assembly into
motorized nozzle handle socket.
Power-Touch
Hose Handle
l
Detail A
n
n
3. Slide interlocking wands into Quick Release
Lower Assembly.
5
l
4. Run electric cord along the rear of the
interlocking wands and press into cord
retainer.
Top Plug
5. Slide top plug of the electric cord into the
plug retainer of the top interlocking wand
and snap cord into place. (See Detail A)
6. Place Power-Touch hose handle into
wands until plug connects and button locks.
1
Step here
and
pull up
to release
l
n
4
n
n
Quick
Release
Lower
Assembly
3
k
2
n
l
8
Electric Cord
Handle Socket
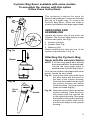
Cyclonic Bag Saver available with some models.
To assemble the cleaner with this option
follow these instructions.
This accessory reduces the need for
frequent bag changes. It does not eliminate
the use of a paper bag. To remove the
Cyclonic Bag Saver, follow the steps in
reverse and reattach the large upper wand.
Fig. 1
1
3
UNPACKING AND
ASSEMBLING
2
Fig. 1a
Fig. 2a
Attaching the Cyclonic Bag
Saver onto the vacuum cleaner
Button
Fig. 2b
Tab &
Slot
Unpack and check that all the parts are
included. The Cyclonic Bag Saver consists
of three main parts, see Fig.1:
1. Cyclonic Housing
2. Cyclone Dust Cup
3. Retaining Clip
Attach retaining clip onto the rear of the
cyclonic cup as shown in Fig. 1a.
Handle
NOTE: If the two long wands have already
been assembled to the powerhead,
remove the long upper wand to
assemble the Cyclonic Bag Saver.
Your vacuum cleaner is equipped with three
wands. Locate the short wand.
Fig. 2a Line up the small hole at the top of
the short wand with the arrow on
the front of the cyclonic housing.
Push the short wand into the top of
the cyclonic housing until button
clicks into place. (You may need to
rotate the wand slightly.)
Fig. 2b Attach the cyclonic dust cup onto the
cyclonic housing. Place the slot in
the cyclonic dust cup over the tab
on the cyclonic housing. Then grasp
the handle on the cyclonic dust cup,
and pivot the cyclonic dust cup up
and over the ledge on the cyclonic
housing.
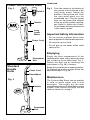
9
Power-Touch Handle Units
Fig. 3
Detail A
Nozzle
MAX
MAX
Long
Lower
Wand
Power Cord
Continued
Fig. 3 Push the nozzle at the bottom of
the cyclone unit into the top of the
long lower wand. Adjust the
position of the cyclone unit. Push
the long lower wand into the
powerhead unit. Plug the power
cord into the power cord retainer
at the top of the cyclonic housing,
see Detail A. Attach the PowerTouch handle following instructions
in the owner’s guide.
Important Safety Information
- Do not vacuum surfaces which have
been subjected to inflammable solvents.
- Do not pick up any liquid.
- Do not pick up hot ashes which could
cause a fire.
Emptying
Powerhead
Unit
Standard
Handle
Units
Power Cord
Empty the dust compartment of the
cassette after each use or when the dust
cup is filled up to the MAX level, Fig. 3.
Detach the dust cup by following the
instructions in Fig. 2b in reverse.
Empty the contents into a waste container.
To reattach the dust cup again follow the
described steps in Fig. 2b.
Short Wand
Maintenance
Fig. 3
Nozzle
MAX
MAX
Powerhead
Unit
10
The Cyclonic Bag Saver can be washed
in cold or warm water and a mild
detergent. Thoroughly dry the dust
compartment with a soft towel before using
it again. If the cyclone unit clogs, use the
vacuum cleaner to unclog it.
Tools
To use cleaning tools, attach directly to end of hose or use with a straight wand. Attach
the circular end of tool to hose or wand with a twisting motion until it is secure.
Dusting Brush
Upholstery Nozzle
Crevice Tool
Floor Brush
Dusting brush. For furniture, blinds, books, lamp shades, shelves.
Upholstery nozzle. For curtains, draperies, cushions, fabrics.
Crevice tool. For corners, baseboards, between cushions, sliding door tracks.
Floor brush. For paneled walls, ceilings, beams, polished floors, and linoleum.
NOTE: Tools may vary with models.
HOW TO MAINTAIN
The instructions given in this booklet serve as a guide to routine maintenance. To avoid
unnecessary service calls, check the bag and motor filter often.
Dust Bag and Filter
The paper bag and motor filter play a very important role in the efficiency of the vacuum
cleaner. The purpose of the paper bag is to trap dirt. But at the same time, the paper bag
must be porous enough to allow air to pass through. If the paper bag or the motor filter
become clogged, no air can pass through the cleaner and no cleaning can take place
regardless of how powerful the unit is. To keep the cleaner operating at maximum
efficiency, change the dust bag frequently and clean the filter as needed. Some fine
particles can restrict airflow very quickly and will decrease performance even before the
bag appears to be full. For that reason, when vacuuming carpet fresheners or cleaners,
powder, plaster dust, or similar fine substances, the bag may need to be changed and
the filter cleaned more often.
Bag Change Indicator
(featured on some models)
To remind you to change the bag, some models feature
a Bag Change Indicator. The Indicator, which is located
on the canister lid, moves across the window as the
airflow through the bag is decreased. Certain types of
fine particles like powder, plaster dust, or fine road dust
Bag Change
can restrict airflow very quickly and will decrease
Indicator
performance even before the bag appears to be full.
Therefore, when the warning color appears, the cleaner’s performance is lower and the
dust bag should be changed to restore maximum performance. If a clean dust bag does
not restore maximum performance, check for obstructions in the hose or wands.
Check the Bag Change Indicator before each use by turning the cleaner on before
attaching the cleaner hose.
11
Disposable Dust Bag
Our high filtration bag is a two-layer, disposable bag that combines our standard paper
bag with a non-woven air filter inside. Use a Filteraire dust bag to create a cleaner indoor
environment because the bag filters better than our standard bag. The bags are available
(three in a package) from your local dealer, or you can call 1-800-282-2886 for other
locations. Look for the package of GENUINE EUREKA FILTERAIRE dust bags – Style
V.
How To Change Style V Dust Bag
NOTE:
Turn off the switch and unplug the electrical cord before changing dust
bag. Never operate the vacuum cleaner without the dust bag or filter.
1. Lift up on bag cover; remove used
bag.
2. Clean motor filter. Remove filter and
shake vigorously or rinse under
warm running water. Filter must be
completely dry before reinstalling
to prevent motor damage. Use
GENUINE EUREKA replacement
motor filter 54131.
Motor Filter
3. Unfold new bag. Push bag collar
into track; secure over inlet.
4. Replace bag cover.
Ask for the GENUINE EUREKA dust bags – Style V
GENUINE
Look for the
12
EUREKA PRODUCT
symbol.
Brush Roll
The rotating brush roll sweeps and combs the carpet nap. Keep the brush roll free from
hair and threads so it will continue brushing. When the bristles of the brush roll no longer
touch a piece of cardboard held across the bottom plate, the brush roll is ineffective
because the bristles no longer touch the carpet nap. To maintain the most effective
cleaning, the brush roll should be replaced with a new one.
Brush Roll Belt and Light Bulb
The brush roll belt on the motorized nozzle drives the brush roll to agitate, sweep, and
comb the carpet nap. The belt should be checked regularly to be sure that it is in good
condition. Replace the belt if it is stretching, cracking, or slipping. Cut away any hair or
thread wound around the brush roll or belt pulley because the buildup could cause the
belt to rotate unevenly.
How to Replace Worn Belt or Light Bulb
Turn off the switch and unplug the electrical cord before replacing belt or
bulb. Pulleys can become hot during normal use. To prevent injury, avoid
touching the pulleys when servicing the drive belt.
{
2. Lift out brush roll and discard used
belt.
{
Replace light bulb, if necessary.
Use GENUINE EUREKA 15 watt
replacement bulb, 48815.
Continue to step 2 to change belt.
Skip to step 7 to replace hood.
{
1. Remove four screws from bottom
side. Turn unit over; pull up on hood
to remove.
{
Note:
Motor Pulley
3. Put new belt around brush roll pulley
first; then the motor pulley.
{
4. Place left end cap into the base.
5. Pull right end down to seat end cap.
6. Rotate brush roll 1/2 turn to make
sure belt is self-centered onto the
brush roll pulley.
GENUINE
Look for the
EUREKA PRODUCT
symbol.
Use GENUINE EUREKA replacement belt, 58065.
{
7. Position hood; secure with screws
(see Item 1 above).
Brush Roll Pulley
13
THE EUREKA LIMITED WARRANTY
What This Warranty Covers
Your Eureka cleaner is warranted to be free from all defects in material and workmanship in normal household use for a period of one year. The warranty is granted only to the
original purchaser and members of his or her immediate household. The warranty is subject to the following provisions.
What This Warranty Does Not Cover
• Parts of the cleaner that require replacement under normal use, such as disposable dust bags, filters, drive belts, light bulbs, and brush roll bristles.
• Damages or malfunctions caused by negligence, abuse, or use not in accordance with the Owner’s Guide.
• Defects or damages caused by unauthorized service or the use of other than Genuine Eureka parts.
What The Eureka Company Will Do
The Eureka Company will, at its option, repair or replace a defective cleaner or cleaner part that is covered by this warranty. As a matter of warranty policy, the Eureka Company
will not refund the consumer’s purchase price.
Warranty Registration
Please fill out and return the warranty registration card accompanying your cleaner.
Obtaining Warranty Service
To obtain warranty service you must return the defective cleaner or cleaner part along with proof of purchase to any Eureka Authorized Warranty Station.
You will find the nearest location in the Yellow Pages, under “Vacuum Cleaners–Service and Repair.” Be certain that the Warranty Station is “Eureka Authorized.”
For the location of the nearest Eureka Authorized Warranty Station or for service information, telephone toll free:
USA: 1-800-282-2886
Mexico: 254 23 52
Canada: 1-800-282-2886
If you prefer, you can write to The Eureka Company, Service Division, 807 North Main Street, Bloomington, Illinois 61701, USA. In Canada write to The Eureka Company, 866 Langs
Drive, Cambridge, Ontario N3H 2N7.
If it is necessary to ship the cleaner outside your community to obtain warranty repair, you must pay the shipping charges to the Eureka Authorized Warranty Station.
Return shipping charges will be paid by the Warranty Station. When returning parts for repair, please include the model, type, and serial numbers from the data plate on the cleaner.
Further Limitations and Exclusions
Any warranty that may be implied in connection with your purchase or use of the cleaner, including any warranty of Merchantability or any warranty for Fitness For A Particular
Purpose is limited to the duration of this warranty. Some states do not allow limitations on how long an implied warranty lasts, so the above limitations may not apply to you.
Your relief for the breach of this warranty is limited to the relief expressly provided above. In no event shall Eureka be liable for any consequential or incidental damages you may
incur in connection with your purchase or use of the cleaner. Some states do not allow the exclusion or limitation of incidental or consequential damages, so the above limitation or
exclusion may not apply to you.
This warranty gives you specific legal rights. You may also have other rights which vary by state.
GENUINE
EUREKA PRODUCT
Questions & Answers about Genuine Eureka Products
Q: Why should I use only Genuine Eureka paper bags, belts, and parts in my Eureka vacuum cleaner?
A: Using Genuine Eureka Products, which are made to our exacting specifications and engineered with emphasis on quality, performance, and customer satisfaction,
ensures the long life and cleaning efficiency of your vacuum cleaner. Overall, this saves you money and helps to keep your home clean.
Q: How can I be sure I am using only Genuine Eureka products in my vacuum cleaner?
A: Typically, packaged products and paper bags can be identified by a “Genuine Eureka Product” symbol (see illustration above). For further identification assistance,
you may call our toll-free number, 1-800-282-2886, for the location of a nearby Eureka Authorized Warranty Station.
Q: Are there any differences between “made to fit” or “imitation” and Genuine Eureka paper bags, belts, and parts?
A: Yes, there are some very important differences in materials, quality, and reliability. Many customers have mistakenly purchased “imitation” paper bags and parts
while thinking they purchased genuine. Unfortunately, many of these customers discovered the differences after they experienced related difficulties.
For Genuine Eureka Value, Accept No Imitations!
THE EUREKA COMPANY
Household Warranty
abs 190
Bloomington, Illinois 61701
(s59648)
Part No. 70227 (3/00)
© 1999 White Consolidated Industries, Inc.
Printed in U.S.A.