1
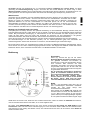
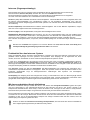
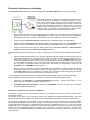
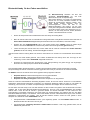
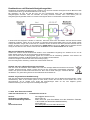
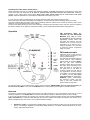
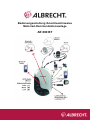
Bedienungsanleitung /Anschlusshinweise
Motorrad-Kommunikationsanlage
AE 600 BT
Verwendungszweck
Die Kommunikationsanlage AE 600 BT ist für die Sprach-Kommunikation zwischen Motorradfahrer und -Beifahrer
vorgesehen. Dabei ist der Fahreranschluss für ein Helmset mit Bluetooth (wie z.B. BT Rider, BT Intercom, BT 2 oder
andere normgerechte Bluetooth Headsets) und der Beifahreranschluss für eine verdrahtete verdrahtete HelmSprechgarnitur OHS 500 oder CHS 300 vorgesehen. Alternativ kann auch ein verdrahtetes Headset (nicht im
Lieferumfang) anstelle eines Bluetooth Headsets für den Fahrer benutzt werden.
Es ist sogar möglich, zusätzlich zu einem Bluetooth Headset ein weiteres verdrahtetes Headset (für eine dritte Person in
einem Beiwagen) einzustecken, sodass eine 3 Wege-Sprechverbindung (mit leichten Einschränkungen in der
Lautstärke zwischen Fahrer und 3. Person) zustande kommt.
Das Gerät ermöglicht eine Voll-Duplex- Sprechverbindung vom Fahrer zum Beifahrer und umgekehrt.
Ein eingebautes Mono UKW Radio lässt sich zum Rundfunkempfang zuschalten. Die Sprechverbindung hat Vorrang
gegenüber dem Radioempfang: beim Sprechen wird die Radiolautstärke entsprechend abgesenkt.
Darüber hinaus sind folgende Geräte zusätzlich anschließbar:
•
•
•
•
•
Externer MP-3, CD/DVD Player Lautsprecherausgang über 3.5 mm Klinkenbuchse (anstelle des
eingebauten Radios)
Audio-Informationen eines drahtgebundenen Navigations-Systems, sofern es über einen Audioausgang
mit 3.5 mm Normbuchse verfügt.
Ein PMR 446 Funkhandy oder ein anderes Handfunkgerät / Walkie Talkie wie z.B. LPD, dabei können
Fahrer und Beifahrer sprechen und hören, eine Sprechtaste für den Fahrer (oder den Beifahrer) wird zur
Befestigung z.B. am Motorradlenker mitgeliefert.
Bluetooth GSM Handy (sofern auf automatische Rufannahme geschaltet) für den Fahrer (ältere Handy’s
ohne Bluetooth können alternativ auch verdrahtet (über die Handy-Buchse, Kabel als Option erhältlich)
angeschlossen werden).
Bluetooth Navigationsgerät (In diesem Fall wird ein evtl. vorhandenes Handy am Navi angeschlossen
und das Intercom Gerät wiederum wie ein Bluetooth Kopfhörer am Navigationsgerät)
Das Gerät wird mit 3 Stück Mikro-Batterien AAA (Alkali oder wiederaufladbar) unabhängig vom Fahrzeugbordnetz
betrieben. (Batterien sind nicht im Lieferumfang enthalten). Die DC Buchse dient zum Aufladen der eingesetzten Akkus
über Steckerlader 230 V (Bestellnummer MW 903) oder das mitgelieferte DC Ladekabel (für 12 V Bordnetze).
Normenkonformität
Die Motorrad-Kommunikationsanlage erfüllt die europäischen EMV-Normen, wie EN 55 013:2001 + A1:2003
(Radio), EN 301 489-01 V.1.6.1, EN 301 489-05 V 1.3.1, EN 301 489-07 V 1.3.1 (EMV für PMRFunksprechgeräte- und Zubehör und GSM Zubehör), EN 300 328 V 6.1.1 and EN 301 489-17 (Breitband
SRD für den Adapter zu Bluetooth-Geräten), EN 55022:2006, EN 55024:1998 mit A1+A2(2003) die WEEE und RoHS
Direktiven (in Deutschland Elektrogerätegesetz) und EN 60065:2002 (elektrische Sicherheit) und trägt das CE- Zeichen.
Anschlussbedingungen für Zusatzgeräte
Alle mitgelieferten Kabel und die zugehörigen Buchsen am Gerät sind farblich zueinander passend gekennzeichnet (rot
= PMR Funkkabel, grün = PTT Sendetaste, blau = Handy bzw. Funkkabel 2.5 mm Stereo)
Funkgeräteanschluss
Der Funkanschluss des AE 600 BT passt auf die meisten Handfunkgeräte, die eine 2.5 mm / 3.5 mm
Buchsenkombination haben, wie z.B. ALBRECHT Tectalk Pro, ALAN 443, ALAN 456 R, MIDLAND G6, G7, G8, G 12.
M48 oder M 99. Funkgeräte mit 2.5 mm Stereostecker, wie z.B. Tectalk FM +, Tectalk Smart, ALAN 777, ALAN K1,
Midland G 5-R1 sind über einen separat erhältlichen Adapter 29254 anschließbar. Die beiden FunkgeräteAnschlußnormen 2.5 mm (Mikrofon) + 3.5 mm (Hörer) oder 2.5 mm Stereo (Mikro + Hörer) werden auch von vielen
anderen Sprechfunkgeräten unterstützt. Sprachgesteuerter Funkbetrieb (VOX) ist technisch nicht vorgesehen, da einmal
der Fahrgeräuschpegel die bei Funk (im Gegensatz zum Handy) notwendigen extremen Anforderungen an die
Spracherkennung nicht ermöglicht, und andererseits die Sprechtastenbedienung das einzige Unterscheidungskriterium
zwischen Funk- und Handy darstellt. Die Lautstärke der Funkübertragung stellen Sie bitte am Funkgerät ein!
Beim Benutzen von Funkgeräten und Handy’s am AE 600 BT empfehlen wir, das eingebaute UKW- Radio ausgeschaltet
zu lassen. Die räumliche Nähe von Funkgerät, Handy und Intercombox zueinander auf dem Motorrad erlaubt keine
ausreichende Trennung, sodass der Radioempfang möglicherweise beim Funkbetrieb oder Telefonieren gestört werden
kann.
MP-3/DVD/CD
Normstecker 3.5 mm Stereo (9). Das Radio schaltet bei Einstecken des Kabels ab. Eine Stereowiedergabe ist allerdings
nicht möglich, beide Kopfhörer geben das gleiche Signal in Mono wieder. Verwenden Sie zum Anschluss den
Kopfhörerausgang Ihres Gerätes, die Lautstärke stellen Sie mit dem Regler des MP-3, CD/DVD Player’s ein.
Navigation
Die Navi-Buchse (für Normstecker 3.5 mm Stereo) ist für Navigationsgeräte gedacht, die über eine Kopfhörer- oder
Lautsprecherbuchse verfügen. (8). Bei eingehenden Audio-Informationen wird das Radio bzw. CD/MP3 leise geschaltet.
Die Lautstärke stellen Sie bitte am Navigationsgerät ein.
Sollten Sie ein Navigationsgerät mit Bluetooth benutzen und gleichzeitig auch noch ein Bluetooth Handy anschliessen
wollen, dann sollte das Navigerät nur über die Bluetooth Schnittstelle an das Intercomsystem angebunden werden (siehe
weiter unten).
Mobiltelefon (Handy) / Bluetooth Navigationssysteme
Von einem Bluetooth GSM Handy oder einem Navigationssystem wird das Intercom System AE 600 BT wie ein
Bluetooth Headset (mit Headset Protokoll) erkannt und verbunden. Handy’s müssen von der Programmierung her
„automatische Rufannahme“ gestatten und entsprechend eingestellt sein, und werden wie mit einem externen
Bluetooth Headset benutzt.
Einbau- und Anschlusshinweise
Einsetzen der Helmsets
Für das Fahrerset beachten Sie bitte die Unterlagen, die Sie zu Ihrem Bluetooth Helm bzw. Bluetooth - Helmeinbauset
bekommen haben.
Das drahtgebundene Beifahrer Helmset besteht aus je zwei flachen, gepolsterten Hörern zum Einsetzen in den
Motorradhelm, einem Mikrofon zum Anbringen in Mundnähe mit Schwanenhals am Helm.
Falls Sie auch ein Funkgerät anschließen, benötigen Sie noch die mitgelieferte wasserdichte Sprechtaste, die man in
Handreichweite z.B. am Lenkrad, aber auch am Handschuh anbringen kann.
Verwenden Sie für den Beifahrer (Sozius) das Spiralkabel und für den Fahrer das normale Kabel bzw. das
Antennenkabel, da die Leitung an der „Fahrerbuchse“ gleichzeitig als Radio-Antenne dient. Achten Sie beim
Anschließen auch auf die Beschriftung an Ihrem Zentralgerät.
Zur Montage dienen selbstklebende Klebestreifen zum Einkleben der Hörer im Helm und bei der Sprechtaste ein
längenverstellbares Klettband. Die Klebestreifen haben auf der einen Seite (Schutzfolie abziehen) eine Klebefläche, auf
der anderen Seite einen Klettverschluss, so dass die Hörer sehr leicht haften und immer wieder abgenommen und
eingesetzt werden können. Motorradfahrer, die zum Anbringen der Sprechtaste nur beschränkten Platz z.B. auf einer
Metallplatte am Lenker haben, können das Klettband auch entfernen und die Taste mit Klebestreifen direkt aufkleben.
Montieren Sie die Hörer so im Helm, dass Sie noch einen geringen seitlichen Abstand zu den Ohren haben. Setzen Sie
die Hörer jedoch nicht so ein, dass sie vollständig über den Ohren sitzen, denn dann können Sie eventuell das übrige
Verkehrsgeschehen nicht mehr akustisch wahrnehmen (laut STVO dürfen Sie keine, beide Ohren akustisch voll
abdichtende Kopfhörer benutzen, da Sie dann unter Umständen nicht mehr Hupen und andere Signale hören können).
Beachten Sie bitte, dass Sie beim Einsetzen der Hörer keinerlei Veränderungen an dem Motorradhelm vornehmen.
Es ist von der ECE Zulassung der Motorradhelme her nicht erlaubt, innerhalb des Helms Material abzutragen, um z.B.
eine Vertiefung für den Hörer zu schaffen. Befestigen Sie das Mikrofon mit dem Schwanenhals so, dass das Mikrofon
immer in Mundnähe positioniert ist. Vor Anpressen des Klebestreifens die Klebestelle gut säubern (z.B. mit Alkohol,
keineswegs aber mit Lösungsmitteln). Drücken Sie die Klebestelle fest an, und beachten Sie, dass Klebestreifen ihre
endgültige Festigkeit erst nach einigen Stunden erreichen.
Die Sprechtaste und das Funkgerätekabel benötigen Sie nur, wenn Sie ein Funksprechgerät zusätzlich betreiben
möchten. Für die Grundfunktionen Intercom zwischen Fahrer und Beifahrer oder Radio/MP-3 hören brauchen Sie die
Sprechtaste nicht, es genügt, die beiden Hörer einzustecken.
Headset für eine dritte Person
Da das AE 600 BT zusätzlich zum fahrerseitigen Bluetooth-Gerät noch über eine Buchse für ein verdrahtetes Headset
verfügt, kann dort auch ein verdrahtetes Headset gleichberechtigt zum Fahrer angeschlossen werden. Somit ist bei
Beiwagenmaschinen auch ein zusätzliches Headset für eine dritte Person technisch anschließbar (ist jedoch nicht im
Lieferumfang enthalten)
Über dieses Headset kann man Voll-Duplex mit dem Beifahrer sprechen und mit leichten Lautstärkeeinschränkungen
auch mit dem Fahrer.
Unterbringen des Zentralgeräts
Der beste Unterbringungsplatz ist in einer Seitentasche des Tankrucksacks oder in einer Außentasche Ihrer
Motorradkombination. Für einen optimalen Radioempfang muss das mitgelieferte Antennenkabel in die Fahrerbuchse
eingesteckt werden. Wird an dieser Buchse ein Headset eingesteckt, so übernimmt das Kabel die Antennenfunktion
automatisch gleich mit.. Bitte rollen Sie das Antennenkabel nicht auf, sondern führen Sie es unaufgerollt z:B. in der
Kleidung am Rücken entlang.. Aufgerollte/aufgewickelte Kabel können die Empfangsqualität des integrierten Radios
erheblich verschlechtern.
Stromversorgung / Batterien einsetzen
Setzen Sie 3 Micro-Batterien oder Akkus (AAA) in das Batteriefach polungsrichtig ein. Beim Betrieb mit NiMH-Akkus
haben Sie eine Lademöglichkeit auch unterwegs über die DC-IN-Buchse an Ihrem 12V Bordnetz (10,8V – 15,6V).
Verwenden Sie nur das beiliegende bzw. im Fachhandel erhältliche Ladekabel aus unserem Hause, da dieses
gleichzeitig als Ladestrombegrenzung fungiert. Versuchen Sie nie normale Batterien auf diesem Weg zu laden
(Explosionsgefahr). Betreiben Sie Ihr Gerät nie allein (ohne Akkus) über die DC-In-Buchse, da diese Buchse nur zum
Laden gedacht ist und ohne eingesetzte Akkus das Gerät nicht dauerhaft gegen Überspannung schützen kann.
Warnhinweise:
Verwenden Sie nie aufladbare und nicht aufladbare Batterien gemischt. Benutzen Sie nur Batterien oder Akkus
jeweils der gleichen Sorte, mischen Sie auch bitte nicht leere und volle Batterien. Verwenden Sie bei AkkuBetrieb nur welche, der neuesten Generation; insbesondere beim Laden über Ihr Bordnetz. Entsorgen Sie
gebrauchte Batterien nur bei den Sammelstellen im Fachhandel (achten Sie auf die unterschiedlichen
Sammelbehälter für Batterien und Akkus). Batterien und Akkus sind Sondermüll, sie dürfen nicht mit dem
normalen Hausmüll entsorgt werden. Werfen Sie keine Batterien oder Akkus ins Feuer, oder schließen Sie die
Pole von Batterien oder Akkus kurz: es besteht Explosions- Brand- und Verletzungsgefahr.
Montage von Funkgerät und/ oder Handy
Funksprechgerät und Handy erreichen ihre optimale Abstrahlung nur bei freistehender Montage. Werden Handy und
Funkgerät gleichzeitig benutzt, sollten beide so weit wie möglich voneinander und vom Zentralgerät entfernt angebracht
werden. Bei provisorischer Unterbringung in Jackentaschen, bei der die Reichweite sehr stark eingeengt sein wird,
achten Sie bitte darauf, dass sich Handy oder Funkgerät nie zusammen mit dem Zentralgerät in der gleichen
Jackentasche befinden. Die Geräte könnten sich beim Senden untereinander unerwünscht beeinflussen.
Wenn Sie kein Handy oder Funkgerät benutzen, brauchen Sie die zugehörigen Kabelsets auch nicht einzustecken.
Die Steckverbindungen zu den Helmsets (schwarz) und zur Fahrer-Sprechtaste (gelb) sind wasserdicht und
verwechslungssicher. Stecken Sie die Stecker so zusammen, dass die Markierungen aufeinander zeigen.
Bis auf die Nutzung eines evtl. angeschlossenen Handys sind Fahrer und Beifahreranschlüsse gleichberechtigt. HandyAnrufe können nur am Fahrer- Headset entgegengenommen werden. Soll dagegen der Beifahrer anstelle des Fahrers
telefonieren können, dann vertauschen Sie bitte Fahrer- und Beifahrerheadsets vor Fahrtantritt!
Bedienung
Einschalten
Radio (1), Intercom-Teil (3) und die beiden
Bluetooth Module für Handy und Fahrer lassen
sich getrennt einschalten und betreiben. So
brauchen Sie nur die Teile einzuschalten, die Sie
auch benutzen. Bitte beachten Sie beim
Abschalten, dass Radio und Intercom-Teil beide
ausgeschaltet sind! Die rote AE 600 LED oder
eine evtl. noch blinkende Bluetooth-LED zeigt den
eingeschalteten Zustand an.
Die im folgenden beschriebenen Funktionen
gelten für verdrahtete Headsets ebenso wie
für ein angeschlossenes Bluetooth Headset.
Bevor Sie ein Bluetooth Headset nutzen
können, müssen Sie es zuerst mit der AE 600
BT Anlage „pairen“. Dazu lesen Sie weiter
unten den Abschnitt über das Fahrerheadset.
Radio
Das Ein- und Ausschalten erfolgt über den mit
dem Lautstärkeregler verbundenen RändelradSchalter
Das
Radio
verfügt
über
(1).
automatischen Sendersuchlauf.
Dazu drücken Sie die SCAN / UP Taste (2). Der
Suchlauf startet und sucht den UKW Bereich von
ca. 87.4 MHz (untere Grenze) an bis 108 MHz
(obere Grenze) nach empfangswürdigen Signalen
ab. Bei jedem ausreichend starken Signal stoppt
der Suchlauf automatisch.
Gefällt Ihnen der Sender nicht, lassen Sie den Suchlauf weitersuchen, indem Sie wieder die SCAN/UP-Taste drücken,
usw. Der Suchlauf startet dann an der Stelle, wo er vorher aufgehört hatte.
Die untere Taste RESET/DOWN benutzen Sie, wenn Sie den Suchlauf an den Anfang des UKW Bandes wieder
zurücksetzen wollen und einen neuen Suchlaufvorgang von unten aus starten wollen. Dabei setzt ein Tastendruck den
UKW Empfang an den Anfang des Bandes zurück, den Suchlauf können Sie dann mit der anderen Taste SCAN/ UP
wieder nach oben starten.
Intercom (Gegensprechanlage)
Zum Einstellen des Intercoms zwischen Fahrer und Beifahrer dient ein Schiebeschalter mit 4 Positionen (3).
Die linke Position, Intercom Aus (OFF), benutzen Sie, wenn Sie nur Radio hören wollen.
Die Sprechverbindung wird über Kreuz aufgebaut: vom Fahrermikrofon zum Beifahrerhörer und umgekehrt.
Von unten nach oben wählen Sie die 3 verschiedenen Intercom Einstellungen:
Position L (Low): Motorradbetrieb bei höheren Geschwindigkeiten. Die beiden Mikrofone sind so eingestellt, dass auch
bei höheren Geschwindigkeiten eine Verständigung möglich ist. Die Einstellung berücksichtigt auch, dass Sie
automatisch bei höheren Umgebungsgeräuschen lauter sprechen und verhindert eine damit verbundene Übersteuerung
der Verbindung.
Position M (Medium): Motorradbetrieb bei mittleren Geschwindigkeiten: Hier ist das Mikrofon empfindlicher, reagiert
aber auch schon möglicherweise eher auf Nebengeräusche
Position H (High): Hohe Empfindlichkeit, für langsame Geschwindigkeit oder im Stand
Automatische Stummschaltung: Beim Sprechen wird ein evtl. eingeschaltetes Radio oder der CD/MP3 Player
automatisch leiser geschaltet. Damit Wind- und Fahrgeräusche nicht ebenfalls den Radioempfang stummschalten,
müssen sie in den Positionen 1 und 2 mit einer der Geschwindigkeit angepassten höheren Lautstärke sprechen.
Kurz nachdem Sie aufgehört haben, zu sprechen, wird der Radioempfang bzw. der CD /MP-3 Player wieder automatisch
lauter.
Benutzen Sie das Radio bitte möglichst nur im Intercom Betrieb und nicht, wenn Sie auch noch Handy und /
oder Sprechfunkgerät gleichzeitig angeschlossen haben und benutzen.
Funkbetrieb über das Intercom- System
Fahrer und Beifahrer können bei einem angeschlossenen Funkgerät (z.B. PMR 446) beide den Funkverkehr auf dem
gewählten Kanal empfangen und auch sprechen. Zum Sprechen muss derjenige, der die Sprechtaste hat, diese
drücken, auch wenn der Mitfahrer zu einem entfernten Gesprächspartner sprechen möchte.
In einer der 3 Schalterstellungen des Intercoms können Sie auch über Funk mit anderen Funkteilnehmern sprechen.
Stecken Sie das Funkkabel (rot 3,5mm Stecker) in die Buchse „PMR-Funk“ (5) und die Sendetaste (PTT, grün) in die
Buchse (6) des Zentralgeräts und die beiden Klinkenstecker des Funkkabels in das Funkgerät. Testen Sie zunächst das
Funkgerät bei Empfang mit kleiner Lautstärke und stellen dann bei Bedarf höher.
Zum Sprechen drücken Sie bitte Ihre Sprechtaste. Die Mikrofonlautstärke zum Funkgerät wird automatisch den 3
verschiedenen Empfindlichkeitsstufen mit angepasst. Nach dem Sprechen lassen Sie die Sprechtaste wieder los. Ein
integriertes Geräuschfilter sorgt für nebengeräuscharme Verbindungen beim Sprechen und bestmögliche
Sprachverständlichkeit.
Funkempfang: Der Empfang durch das Funkgerät hat Vorrang vor dem Radio bzw. dem CD / MP3 Player (9). Sobald
ein eingehendes Funkgespräch die Rauschsperre Ihres Funkgeräts öffnet, wird der Radioempfang automatisch leiser
geregelt. Bei wieder ruhigem Funkkanal regelt sich der Radioempfang wieder auf den alten Wert ein.
Mit einem verdrahteten Handy telefonieren
Bei älteren verdrahteten Handy’s stecken Sie den 3.5 mm Stecker des Handy-Anschlusskabels (gehört als Option
nicht zum Lieferumfang) in die entsprechende Buchse (7) des Intercoms und den 2.5 mm „Stereo“ Stecker in die
entsprechende Headset Buchse Ihres Handy’s. Passt der Stecker nicht, besorgen Sie sich bitte im Handy-ZubehörFachhandel einen passenden Adapter. Programmieren Sie das Handy auf automatische Rufannahme.
Einen eingehenden Anruf hören Sie dann in beiden Kopfhörern. Wie auch beim Funk, haben eingehende Anrufe Vorrang
vor Radio und CD / MP 3 Player. Beantworten können Sie den Anruf über das Fahrermikrofon. Sprechen Sie dabei bitte
mindestens so laut, wie es der Schalterstellung entspricht. Die richtige Lautstärke haben Sie dann erreicht, wenn der
Radioempfang beim Sprechen gerade leise wird.
Drücken Sie bitte beim Telefonieren keineswegs die Sprechtaste, denn das würde Ihre Antwort unmittelbar an
das Funkgerät (falls angeschlossen) anstelle des Handy’s leiten!
Bluetooth-Fahrerhelmset anschließen
Ein Bluetooth-Helmset verbinden Sie über das eingebaute Fahrer-Headset-Modul (12) mit der Sprechanlage.
Beim ersten Benutzen von Helmset und Sprechanlage müssen Sie Ihr
Helmset zunächst mit der AE600 BT Sprechanlage „bekannt machen“,
denn beide Geräte müssen erkennen, dass sie zusammengehören.
Lesen Sie bitte in der Bedienungsanleitung des Helmsets, wie Sie beim
Helmset den Pairingzustand einstellen. Dieser Zustand ist bei den
meisten Geräten eine Zeitspanne von ca. 2 Minuten, wo das AE 600 BT
versuchen kann, ein Helmset in der Nachbarschaft zu finden. Bei den
meisten Geräten blinken dabei LEDs abwechselnd in 2 Farben.
•
Bevor Sie beim AE 600 BT den Pairing-Mode beim Fahrer-Modul starten, achten Sie darauf, dass alle Bluetooth
Module beim AE 600 BT zunächst ausgeschaltet sein müssen (keine der Bluetooth-LED’s darf blinken).
(Notfalls ausschalten durch mindestens 3 Sekunden drücken auf die betreffende Taste unter den Modulen.)
•
Schalten Sie jetzt das Bluetooth Helmset entsprechend der Herstelleranleitung in den Pairing-Mode.
•
Schalten Sie das Fahrermodul (rechtes Bluetooth-Modul) in den Pairing Mode. Dazu Taste HEADSET länger
drücken. Nach ca. 3 Sekunden hat sich das Handy-Modul zunächst eingeschaltet ( 3 x grünes Blinken).
•
Lassen Sie aber jetzt nicht die Taste los, sondern halten Sie die Taste für mindestens 3 weitere Sekunden
gedrückt, bis die LED anfängt, abwechselnd rot-grün zu blinken.
Jetzt sind beide Geräte im Pairing Mode und tauschen Informationen zur sicheren und verschlüsselten Kommunikation
aus.
•
Haben sich beide Geräte gefunden, dann erlischt das Blinken bei beiden Geräten. Entweder schalten sich jetzt
beide Geräte automatisch ein (Gesprächszustand), oder sie schalten zunächst in den StandBy Zustand. In
diesem Fall müssen Sie die Verbindung zum Helmset jetzt noch mit der HEADSET -Taste von Hand
einschalten (eingeschaltet bedeutet, dass die LED am Fahrermodul des AE 600 BT permanent grün leuchtet).
Je nach Fabrikat des Helmsets und je nach Protokoll (als Headset oder Handsfree-Gerät) kann es notwendig
sein, bei einem der beteiligten Geräte (oder bei beiden, das müssen Sie ausprobieren) einmal kurz die
Gesprächs- bzw. die HEADSET -Taste zu drücken.
•
Einen PIN Code wie sonst üblich brauchen (und können) Sie nicht eingeben, da weder Headset noch AE 600
BT über eine Tastatur wie bei Telefonen verfügen. Das Fahrermodul im AE 600 BT kennt die üblichen PIN
Codes 0000, 1234 und 1111 von Headsets und „probiert“ diese nacheinander beim Pairingvorgang automatisch
durch. Headsets mit anderen PIN Codes können nicht verwendet werden!
Nun sind beide Geräte miteinander bekannt, und beim nächsten Mal ist lediglich ein/oder Ausschalten notwendig.
Die Sprechanlage verhält sich gegenüber dem Headset so, als wäre sie ein einfaches Bluetooth Handy.
•
Umschalten vom Gesprächs- in den Bereitschaftszustand (StandBy):
drücken. LED blinkt in längeren Abständen jeweils kurz grün.
•
Vollständiges Abschalten des Moduls: Drücken Sie die HEADSET -Taste am AE 600 BT etwa 3 Sekunden
lang, bis die LED 3 x rot aufleuchtet
Headset Taste jeweils 1 x kurz
Wesentlicher Unterschied zum normalen Handybetrieb
Ein Bluetooth Headset an einer Sprechanlage verhält sich grundsätzlich anders als ein direkt mit einem Telefon
verbundenes Headset.
Ein Headset am AE 600 BT muss während der ganzen Fahrt permanent im Gesprächszustand bleiben, denn sonst
könnten Sie weder Navi- Durchsagen, noch Radio / Musik oder gelegentliche Durchsagen über das Funkgerät hören.
Bei einem Handy hingegen wird ein Gespräch immer durch einen Anruf oder einen Wählvorgang (am Handy) gestartet.
Die beteiligten Komponenten können daher solange im StandBy Mode warten, bis ein Anruf hereinkommt. Daher
brauchen Bluetooth Komponenten im Telefonbetrieb nicht ständig im Gesprächszustand zu sein. Auch die maximale
Gesprächsdauer des verwendeten Headsets ist entscheidend, wie lange Sie mit der Intercomanlage verbunden sein
können. Für den Motorradbetrieb geeignete Headsets, wie z.B. BT Rider , BT Intercom oder BT 2, müssen daherneben der Wind- und Geräuschfestigkeit- auch eine wesentlich stärkere Stromversorgung haben als einfache Büro- oder
Telefonheadsets.
Bluetooth-Handy für den Fahrer anschließen
Ein Bluetooth-Handy verbinden Sie über das
eingebaute Handy/Navi-Modul (11), das linke
Bluetooth Modul, mit der Sprechanlage.
Beim ersten Benutzen von Handy und Sprechanlage
müssen Sie Ihr Handy ebenfalls zunächst mit der
AE600 BT Sprechanlage „bekannt machen“, denn
beide Geräte müssen erkennen, dass sie
zusammengehören. Lesen Sie bitte in der
Bedienungsanleitung des Handy’s, wie Sie beim
Handy den Pairingzustand einstellen. Dieser Zustand
ist bei den meisten Handy’s eine Zeitspanne von ca. 2
Minuten, wo das Handy versucht, andere „BluetoothGeräte“ in der Nachbarschaft zu finden.
•
Starten Sie entsprechend der Herstellerinformation des Handy den Pairing-Mode.
•
Beim AE 600 BT starten Sie nun ebenfalls den Pairing-Mode beim Handy-Modul. Zunächst starten Sie bitte mit
beiden Bluetooth Modulen ausgeschaltet (keine der Bluetooth-LED’s darf blinken, siehe letzte Seite).
•
Schalten Sie das Handy/Navi-Modul (11) in den Pairing Mode. Dazu (HANDY- Taste am Modul länger
drücken. Nach ca. 3 Sekunden hat sich das Handy-Modul zunächst eingeschaltet (grünes Blinken).
•
Lassen Sie aber jetzt nicht die Taste los, sondern halten Sie die Taste für mindestens 2-3 weitere Sekunden
gedrückt, bis die LED anfängt, abwechselnd rot-grün zu blinken.
Jetzt sind beide Geräte im Pairing Mode und tauschen Informationen zur sicheren und verschlüsselten Kommunikation
aus.
•
Haben sich beide Geräte gefunden, dann meldet der Bildschirm des Handy Ihnen dies und fragt, ob eine
Verbindung zu dem Gerät AE600 GSM hergestellt werden soll.
•
Antworten Sie entsprechend den Anweisungen in der Handy-Anleitung und geben Sie ggf. den angefragten
PIN-Code beim Handy ein (beim AE 600 BT ist das 0000).
Nun sind beide Geräte miteinander bekannt, und beim nächsten Mal ist lediglich ein/oder Ausschalten notwendig.
Die Sprechanlage AE 600 BT verhält sich technisch gegenüber dem Handy so, als wäre sie ein einfaches Headset.
Die HANDY- Taste am AE 600 BT hat bei einem gepairten Handy folgende Funktionen:
•
•
•
Gespräch ablehnen: während des Klingelns 2 sec lang gedrückt halten
Gespräch beenden: während des Gesprächs kurz drücken
Gespräch zum Handy zurückgeben: während des Gesprächs 2 sec lang drücken
Damit Sie nicht beim Motorradfahren übermäßig abgelenkt werden, ist beim AE 600 BT ansonsten nur automatische
Rufannahme ankommender Gespräche vorgesehen. Für abgehende Gespräche halten Sie bitte an und wählen die
Verbindung, wie sonst auch, am Telefon. Die Sprechanlage verhält sich also lediglich wie ein Headset zum Handy.
Da sich leider nicht alle Handy’s und nicht alle Headsets in allen Punkten normgerecht nach der Bluetooth Konvention
verhalten, gibt es bei vielen Bluetooth-Geräten Einschränkungen, die man in den Kompatibilitätslisten der Hersteller
erfahren kann. Unser AE 600 BT benutzt 2 getrennte Module und benutzt absichtlich nur die minimal für eine
Funkverbindung notwendigen Funktionen und sichert damit ein Zusammenwirken mit praktisch allen auf dem Markt
befindlichen Bluetooth-Handy’s und Headsets. Dies kommt letztlich auch der Verkehrssicherheit zugute, wenn sie keine
überladenen Funktionstasten am Headset oder AE 600 BT bedienen müssen. Sofern Sie nicht gerade in einem
Gespräch sind, arbeitet die Taste HANDY/NAVI auch für:
•
Handy/Navi-Modul in Bereitschaft schalten (und umgekehrt) jeweils 1 x kurz HANDY/ NAVI drücken. In
Bereitschaft blinkt die LED ab und zu kurz grün.
•
Handy/Navi-Modul vollständig abschalten: HANDY/ NAVI mindestens 3 Sek. lang gedrückt halten, bis die
LED 3 x rot geleuchtet hat.
Kombinationen mit Bluetooth-Navigationsgeräten
Mit Bluetooth ausgestattete Navigationsgeräte verstehen sich meist als zentrales Steuergerät für einen Bluetooth Helm
und übernehmen auch ggf. die Steuerfunktionen für ein Handy.
Bei Verbindung mit dem AE 600 BT kann sich Ihre Sprechanlage daher über das Handy/Navi Modul am
Navigationsgerät anmelden. Falls Sie ebenfalls ein Handy benutzen möchten, dann muss dieses jetzt am
Navigationsgerät angemeldet werden. Es entsteht somit folgende Kette von miteinander verbundenen Geräten:
In dieser Kette sind insgesamt 4 Geräte zu verbinden. Damit sich beim ersten Anschließen nicht die falschen Geräte
miteinander verbinden, sollten Sie nur die jeweils zu pairenden Geräte eingeschaltet lassen und die anderen Geräte
solange abschalten. Fangen Sie mit dem Navi an, verbinden Sie den AE 600 mit dem Navi (das Navi betrachtet das AE
600 BT, als wäre es ein Headset mit der Bezeichnung AE600 GSM und der Pin Nr. 0000), danach verbinden Sie das
Handy mit dem Navi und zum Schluss verbinden Sie das Helmset mit dem Headset Modul des AE 600 BT.
Was tun bei Bluetooth Problemen?
Schalten Sie zunächst einmal alle Bluetooth Geräte in Ihrer unmittelbaren Umgebung aus. Schalten Sie nun nur die
beiden Geräte wieder ein, bei der Sie das Problem beobachtet hatten.
Sofern die beiden Geräte ordnungsgemäß gepairt sind, müsste sich die Verbindung spätestens nach Drücken der
Gesprächstaste (entweder am Bluetoothgerät bzw. am AE 600 BT) wieder aufbauen.
Ist das nicht möglich, versuchen Sie einen neuen Pairingvorgang.
Erst nach erfolgreicher Verbindung schalten Sie weitere Geräte wieder ein.
Hinweis zum evtl. späteren Entsorgen des Geräts
Nach den neuen EU Richtlinien dürfen defekte oder nicht mehr benötigte elektronische Geräte nicht mit dem
normalen Hausmüll entsorgt werden, sondern können bei den kommunalen Sammelstellen abgegeben
werden. Das Symbol auf dem Gerät weist darauf hin. Bevor Sie ein Gerät entsorgen, entnehmen Sie bitte
die Batterien und geben diese getrennt bei den Alt-Batterie-Sammelstellen ab.
Hinweis zur gesetzlichen Gewährleistung
Nach dem Europäischen Gewährleistungsrecht leistet Ihr Fachhändler auf in den EU Staaten erworbene Geräte 2 Jahre
Gewährleistung. Sollte es ein Problem geben mit Ihrem Gerät, wenden Sie sich bitte an Ihren Händler bzw. an die
Serviceanschrift, die Ihr Händler Ihnen angibt. Bei Rücksendungen bitten wir Sie, eine möglichst genaue
Fehlerbeschreibung und eine Kopie Ihres Kaufbelegs beizufügen.
© 2008 Alan Electronics GmbH
www.alan-electronics.de / www.albrecht-online.de
Service:
Reparaturen und Ersatzteile:
Technische Beratungs-Hotline:
Fax
Service-Download:
[email protected],
06103 9481-22
0900 1234 222 (0.69 Euro/Minute aus dem deutschen Festnetz,
1.49 Euro/Min aus deutschen Mobilfunknetzen) ,
06103-9481-60
www.hobbyradio.de, www.alan-albrecht.info
Operating manual / Hints for connection
Motorbike communication system
AE 600 BT
Purpose for use
The communication system AE 600 BT has been designed for speech communication between motorbike driver and
passenger. To achieve this you use one Bluetooth helmet set (like BT Rider, BT Intercom or BT2) and the supplied
wired helmet speaker set OHS 500 or CHS 300 which has to be fitted into already existing closed or open helmets (the
microphone with it’s thin and flexible boom can be installed at both kinds of helmets). As optional solution, a wired helmet
set can also be used as driver headset . It is as well possible to connect a wired headset for a third person parallel to the
passenger’s wired and driver’s Bluetooth headset to enable a three-way communication
The set gives you the opportunity for duplex communication between driver and passenger and vice versa.
The integrated Mono FM radio can be switched over to radio reception. The talking connection has priority to radio
reception: while talking the radio volume will be automatically decreased.
Furthermore the following equipment can be connected:
•
•
•
•
•
external MP-3 or CD/DVD player via 3.5 mm jack plug
voice guidance via 3,5 mm jack plug from navigation system with audio output
a radio with PMR 446 or LPD standard for driver and passenger in connection with supplied transmit
(push-to-talk) key
Bluetooth GSM mobile phone (automatic incoming call switching mode must be active) for driver
(alternative solution: wired headset for driver or third person as optional accessory item).
Bluetooth Navigator System (in that case there is a chain connection cellular phone to navigator and
navigator to AE 600 BT)
The set is being operated with 3 x AAA size Alkaline or rechargeable NiCd/ NiMH batteries independent from vehicle
power supply (not supplied with the intercom). The DC charge socket is provided for charging the inserted NiMH
batteries via wall charger MW903 (not supplied) or via 12 V cigarette lighter charging cable (supplied)
Declaration of Conformity
The motorbike communication system fits in conformity with the European EMC standards, such as EN 55
013:2001 + A1:2003 (Radio), EN 301 489-01 V.1.6.1, EN 301 489-05 V 1.3.1, EN 301 489-07 V 1.3.1, EN
300 328 V6.1.1 and EN 301 489-17 (for broadband SRD-Adapters to Bluetooth devices), EN 55022:2006,
EN 55024:1998 with A1+A2(2003), WEEE / RoHS, EN 60065:2002 + A1 (2006) (electric safety) and it
carries the CE- mark. The actual EC declaration of conformity can be downloaded from www.hobbyradio.de
Conditions for accessory connection
Radio connection (red colour coded cable and socket)
The radio connection of the AE 600 BT fits to most of PMR with 2.5 mm / 3.5 mm plug combination such as Albrecht
Tectalk PRO series, ALAN 443, ALAN 456R, HP 446, HP 450, Midland G 6, G 7 / G 8 / G 12 / M48 or M 99. The
universal duo plug (2.5 mm for microphone and 3.5 mm for the ear set) is being supported by many other radios. It is
not intended to use the VOX-function because of the high level of surrounding noise does not allow a perfect speech
switching, which is essential for simplex 2 way radio communication (different from duplex GSM use!). Some smaller
size radios like Tectalk FM +, Tectalk Smart, ALAN 777, ALAN K1, Midland G5-R1 are using now more and more a
2.5 mm stereo socket instead of a duo plug. For such radios you will need an additional adapter 29254.
Our Intercom set does not support VOX operation on the radio channels because this is not well suitable for motorbike
communication
PTT (Push - To - Talk switch)
Insert the green marked cable plug of the PTT into the green marked PTT socket.
Use the PTT button to talk via PMR 446 radio and use the microphone without pressing the knob for GSM phone
communication.
In cases where 2 way radio or/and cellular phones shall be used, we recommend not to use the built in FM radio
broadcast receiver. On most motor bike installations, the close distance between the radio receiver and the cellular
phone or to a more powerful PMR transceiver cannot provide interference-free coexistence of broadcast receiver and
radio communication /cellular phones among each other. Interferences cannot be excluded.
MP-3/Music CD/ DVD
3.5 mm stereo plug (9). The radio is being switched off, when the cable is being inserted. Use the Headphone-Output of
the unit for this feature. The volume shall be adjusted by the volume control of the MP-3/Musik CD-Player.
Navigator voice announcements
3.5 mm stereo plug for navigators with wired audio outputs. The radio volume is being turned lower, during
announcements are coming from navigations system. Please adjust the volume at the navigator!
If you should have a navigator with Bluetooth , then You can connect the cellular phone directly to the navigator and the
navigator’s audio to the AE 600 BT system’s GSM phone HANDY module.
GSM mobile phone with Bluetooth
A cellular phone (or a Bluetooth navigational system) regards the AE 600 BT like a Bluetooth headset with Bluetooth
headset protocol. A cellular phone must allow automatic call reception.
Hints for installation and connection
Fitting of helmet sets:
For the driver’s Bluetooth headset please refer to the user documentation supplied with Your Bluetooth helmet set.
The wired helmet set consist of two flat padded ear sets to be inserted in the helmet, a microphone with a flexible thin
boom to be installed close to your mouth.
If You intend to use a PMR 446 2-way radio, You will need the supplied waterproof transmit talk button which can be
fixed within reach of the handle-bar or at your glove.
Please use the coiled cable set for the passenger’s wired headset and for the driver (as option) only a straight cable set,
because this cable works at the same time as antenna for the broadcast radio. If no such headset is connected, the
supplied antenna cable should be inserted into the driver’s headset socket.
Supplied are two self-adhesive pads for fitting the earphones in the helmet and a velcro tape adjustable in length to
install the talk button. These adhesive pads do have an adhesive surface on one side (remove protective foil), on the
other side there is a velcro clasp so that ear sets can be easily installed or removed for adjustment or cleaning. Bikers
with only limited space to install the talk button i. e. on a metal plate at the handle bars may remove the velcro tape and
stick the talk button with adhesive pads directly to the desired location.
Please fix the ear sets with still a small gap between the ears and the helmet. Your ears should not be completely
covered by the ear set because then you might not be able to listen to the surrounding noise of traffic (due to Road
Traffic Act you may not use headsets that completely cover your ears because you might overhear honking or other
signals).
Please do not carry out any technical modifications at the helmet before installing the headset. The ECE standard for
motorbike helmets does not permit to flatten the material inside the helmet i. e. to make space for the ear set. Fix the
microphone so, that it is always close to your mouth with the supplied adhesive pad. Before fixing the adhesive pads
thoroughly clean the desired location (i.e. with alcohol, but do not use any solvent). Press tightly and remember that it
takes several hours until the final strength has been achieved.
You need the talk button only in case you want to operate an additional PMR radio or another Walkie Talkie. You do not
need the talk button for the basic intercom function between driver and passenger or radio/MP3. As long as only
Intercom is used, the cables for PMR radio, the talk button and / or GSM phone cable do not need to be inserted. This
makes basic installation very simple- just plug in the headphone (s) , and that’s it!
Headset for a third person
As option we supply an additional headset cable (straight cable type) which can be used if 2 passengers are on board. It
allows full duplex communication to the passenger and a slightly restricted duplex communication path to the driver.
Where to locate the central unit
The best place for location of the central unit is inside or close to the tank knap sack or in the outside-pocket of your
biker-suit. If plugged in, the headset cable leading to the driver simultaneously serve as the radio antenna (use the
spiralled cable only for pillion) . Lead the driver headset or the antenna cable along your back under the biker-suit to get
best results of the FM radio.
Power supply / Inserting of batteries
Open the battery lid at the bottom of the central unit. Insert 3 batteries or rechargeable batteries size AAA (Micro). Pay
attention to the correct position of the battery poles. It is possible to recharge rechargeable batteries form the electrical
power (10,8V – 15,6V) of your motor cycle (10). Use only the supplied 12 V DC charging cable of ALBRECHT or the
230 V wall charger MW 903; it is especially designed to limit the charging-current. Do not try to recharge normal
batteries instead accumulations. Do not use the AE 600 BT powered from your motor cycle (10,8V – 15,6V) without
any rechargeable batteries, because the DC In socket is only designed as charging socket.
Warning:
Never use batteries and rechargeable batteries mixed in the battery compartment. Only use batteries or
rechargeable batteries of the same kind, and never mix full and empty batteries. Dispose of used batteries only
at the authorized collecting points at special dealers. Pay attention to the different containers for batteries and
rechargeable batteries. Batteries and rechargeable batteries are special waste, they may not be disposed of with
household garbage. Never throw batteries or rechargeable batteries into any fire, never short-circuit the poles of
batteries or rechargeable batteries: Danger of fire, explosion or injury may occur!
Installing the radio and/or mobile phone
Radio and mobile phone do only achieve their maximum radiation if installed detached from surroundings. If being used
at the same time both should be as far apart as possible from each other and from the central unit. Temporary
storage in your pockets does reduce range. Never place radio, mobile phone and /or central unit in the same
pocket, undesired interferences, especially from GSM while transmission may occur.
If you do not use a radio or mobile phone You simply unplug the cable sets and leave them at home!
The connections to the helmet sets (black) are waterproof. Connect the plugs with the markings facing each other.
The other supplied cable sets have colour rings as marking, while the sockets at the central unit have the same colour
markings, so you can easily find the correct sockets.
Except for the cellular phone port, driver and passenger connections are equivalent. Phone calls can only be accepted at
the driver’s headset. If You intend to change the situation, just exchange the headsets before starting the tour.
Operation
FM broadcast radio (1),
intercom (3) and Bluetooth
Modules (11), (12) for driver
and passenger can be powered
separately. Please make sure
that radio and intercom are both
switched off if not used. The red
LED light is on if Intercom unit is
ready for operation. You need only
to power the device components
which You need!
FM broadcast radio
Switching on/off is done with the
volume setting integrated in the
rotary potentiometer (1).
The radio has automatic frequency
search function. Start automatic
station search by pressing SCAN /
UP key (2). The automatic
frequency search will now scan the
FM radio range beginning at the
lower limit close to 87.4 MHz to
the upper end at 108 MHz for
receiving signals and will stop at
any signal which is strong enough
for reception. Once having stopped
at a station, you may restart again
from this position by pressing the
SCAN/UP button consequently.
The frequency search will stop
when it has once reached the
upper frequency range limit.
To reset the radio for a new full frequency search, use the lower key RESET/DOWN. This will reset the frequency to
the lower limit 87.4 MHz. Press now the SCAN/UP button to start frequency search again in upwards direction.
Intercom
The intercom communication quality between driver and pillion depends on the environmental noise and the correct
sensitivity adjustment. The AE 600 BT has a special noise reduction electronic filter that improve the sound quality.
If you do not need the intercom (in case that you only want to listen to broadcast radio) use the down position, Intercom
(OFF). AE 600 BT has a 4 position slide switch (3). The intercom enables a full duplex conversation: from driver's mic to
pillion's headphones and vice versa. You may select 3 different settings:
•
Position L (Low): For high speed motorbike driving. The mic sensitivity is rather low to avoid excessive noise
pick-up. The setting is adjusted to normal biker's talking behaviour: You speak automatically louder if you are in
a noisy, high speed environment.
•
Position M (Medium): For medium speed. The mic is now more sensitive, but may react to wind and engine
noise in higher speed situations.
•
Position H (High): High sensitivity, for low speed and other applications. The mic reacts to normal voice
volume.
Automatic FM radio and music muting
A speech detection circuit with an integrated noise filter will reduce (mute) the radio, MP-3 player automatically, as soon
as you start speaking to your partner and if the voice will be loud enough. Depending on the switch position (L, M or H)
the muting starts at different speech loudness points, which ensures that the radio muting does not react to wind and
engine noise. It is a good idea to make a voice training to speak as loud as the mute switch requests: this will be the
optimum sound level point for the intercom.
A short moment after you stop talking, the radio or MP-3 volume will automatically reach the former value again.
Please do not use the FM broadcast radio if You have a cellular phone or PMR 446 radio connected for operation.
2-way radio conversation
Any voice communication can also be transmitted via 2-way radios like PMR 446 or other suitable radios. PMR 446 can
provide a communication range to up to 5 km under optimum conditions (radio mounted on the motor bike for free-space
radiation). All you need is to plug the supplied red marked PMR cable in the PMR connection (5), the 2.5 mm plug into
the microphone and the 3.5 mm plug into the speaker/phone sockets of your radio. Connect also the push-to-talk key
supplied with the AE 600 BT system with the green marked socket (6). Please use the same switch position (L, M or H )
as for intercom. Because some commercial radio models can provide a very high loudness volume, you should initially
check with lower receiving volume and increase only if necessary.
We recommend to fix the push-to-talk (PTT) switch with velcro tape at the handle bar of the motor bike. If you like to
speak over the radio channel, press the PTT button and release when you want to listen again (without the PTT button
only the use of the intercom is possible!) Driver or passenger can use the PTT button. If the PTT button is been mounted
on the motor bike’s handle bar, the driver must use the PTT button also when the passenger wants to speak over the
radio (or reverse, if the passenger has the PTT button!). The MIC loudness to the radio is automatically adapted by
selection of H, L, or M switch position, same as for intercom use. The receiving volume should be adjusted at the 2-way
radio.
2-way radio receiving
Radio receiving has priority against broadcast or MP-3 player audio. Incoming radio communications from other stations
will automatically mute the FM broadcast radio and MP-3 player. After the radio channel becomes quiet again, the
volume of the FM broadcast or MP3 player audio will be increased again.
Wired GSM phone at AE 600 BT
Insert the 3.5 mm multiple jack of the optional (not supplied!) blue marked GSM cable into the GSM phone socket (7) of
the central unit and the 2.5 mm stereo plug into the handsfree socket of your mobile phone. If the plug should not fit, use
an adapter, offered in most mobile phone accessory shops (the 2.5 mm stereo plug system is a quasi-standard for
handsfree kits). Please program your mobile phone to automatic incoming call switching!
You will hear an incoming phone call in the headphones. Phone calls have priority against FM broadcast radio and MP3
and will mute these devices. AE 600 BT has been designed to let answer the incoming calls only from driver's headset.
The driver is the only one that can talk on the phone, the passenger can only listen to the conversation.
In case the passenger is supposed to use the phone instead of the driver please exchange the relevant connections
before starting your trip!
Please do not use the push-to-talk key PTT (if installed) during mobile phone conversations, because this would
automatically switch your microphone to the 2 way radio instead to the mobile phone!
Connecting a Bluetooth Driver Headset
For connecting a Bluetooth Helmet Set you can use the built in Headset module (12)
Before first use of Helmet and AE 600 BT both devices must be paired
together as Bluetooth units belonging together.
Please see the user manual of your Bluetooth helmet, how to enter
the pairing mode at the Helmet’s side. Most Bluetooth devices allow a
2 minutes period to find a suitable other Bluetooth unit in the
neighbourhood. Most of the devices will flash during this period rapidly
or with two colours, for example red-green.
Before starting any procedure, all Bluetooth modules at the AE 600 BT must be switched off ( this means all Bluetooth
LEDs must be off and shall not flash. Each of the modules at the AE 600 BT has it’s own button, which works as on-off
switch, as talk button or disconnect button as well. We also call it Bluetooth button. If one of the modules should be still
on or in standby mode, switch it off by at least 3 seconds pressing the Bluetooth knob of the module.
•
Now start the pairing mode at the driver’s helmet set according to the user information of the helmet
manufacturer.
•
Switch the headset module at the right side of the AE 600BT into pairing mode. Press HEADSET
key longer. After appr. 3 seconds the module will switch on first and blinks 3 x green.
•
Do not release the button now- keep it pressed for 3 more seconds until the LED starts flashing
red-green
Now both devices are in the pairing mode, this means they search for suitable other devices and exchange
data and encryption details.
•
As soon as both devices have found each other, the dual-colour flashing will stop at both units. In
most cases, both units will now automatically switch into connection (= talk) status, or into a
standby mode. In that case it may be necessary to press the HEADSET key shortly (less than 1
second). Talk status means that the LED of the headset module will be permanently green.
(Depending on the protocol version which is used by the helmet set, it can be necessary to start the
communication link by pressing the Bluetooth button 1 x shortly at the helmet side or / and the AE
600 BT side. If necessary, you should try which button needs to be pressed to start a continuous
communication link.
•
It is not necessary to enter a PIN code for the helmet-to-headset-module coupling, because the
headset module knows the usually used PIN codes 0000, 1234 or 1111. The headset modules will
test subsequently all of these PIN code and connects automatically with the correct one. Helmet sets
with other codes cannot be used!
Now both devices know each other. Both units memorize the pairing procedure. When connecting the next
time, it is only necessary to switch both units on. The module in the AE 600 BT has the behaviour like a
cellular phone for the helmet set.
•
Completely switching off : Press the HEADSET key at the AE600 BT about 3 seconds, until the
LED will flash 3 x red.
Important difference between AE 600 BT Intercom box and Cellular phone coupling
A Bluetooth headset or helmet set has a different behaviour when coupled directly to a cellular phone or to the AE 600
BT Intercom. When used with the AE 600 BT, the helmet set must be permanently in the talk (=connected) status,
because otherwise it is not possible to transmit Navigator announcements, Radio music or PMR 446 radio
communications to the helmet set.
If You use a cellular phone, any call is initiated by a ringing procedure or dialling procedure. All components can remain
in a standby mode or even a sleep (power save) mode until a call starts.
Because of this difference, the maximum talk time is the most important parameter for a good helmet set.
Motor bike helmet sets like our BT Rider, BT Intercom or BT 2 do not only provide a good noise and wind reduction, but
also a good battery capacity.
Connecting a Bluetooth Cellular Phone to AE 600 BT
For connecting a Bluetooth Cellular Phone you can use the built in Handy/ Navi module (11)
Before first use of cellular phone and AE 600
BT both devices must be paired together as
Bluetooth units belonging together.
Please see the user manual of your cellular
phone, how to enter the pairing mode at the
phone’s side. Most Bluetooth phones allow a 2
minutes period to find a suitable other Bluetooth
unit in the neighbourhood. All telephones show
the Bluetooth devices search on their display.
Before starting any procedure, all Bluetooth modules at the AE 600 BT must be switched off ( this means all Bluetooth
LEDs must be off and shall not flash. Each of the modules at the AE 600 BT has it’s own button, which works as on-off
switch, as talk button or disconnect button as well. Because this is a multi-function switch, we also call it Bluetooth
button.
•
Now start the pairing mode at the cellular phone according to the user information of the phone manufacturer.
•
Switch the Handy/ Navi module at the left side of the AE 600BT into the pairing mode. Press HANDY / NAVI
key longer. After appr. 3 seconds the module will first switch on and blinks 3 x green.
•
Do not release the button now- keep it pressed for 2-3 more seconds until the LED starts flashing red-green
Now both devices are in the pairing mode, this means they search for suitable other devices and exchange data and
encryption details.
•
As soon as both devices have found each other, the dual-colour flashing will stop at the Handy/Navi module. In
most cases, both units will now automatically switch into connection (= talk) status, or into a standby mode.
In that case it may be necessary to press the HANDY key shortly (less than 1 second). Talk status means that
the LED of the handy module will be permanently green. Depending on the protocol version which is used by
the phone, it can be necessary to start the communication link by a keyboard command at the cellular phone
(follow the instructions on the display) or / and press the HANDY button at the AE 600 BT side. If necessary,
you should try which button needs to be pressed to start a continuous communication link.
•
It will be necessary to enter a PIN code for the Handy/Navi module at the cellular phone. If requested in the
display, enter 1234 as PIN code.
Now both devices know each other. Both units memorize the pairing procedure. When connecting the next time, it is only
necessary to switch both units on. The Handy/ Navi module in the AE 600 BT has the behaviour like a simple Bluetooth
headset for a cellular phone.
The HANDY/NAVI key at AE 600 BT has following functions together with a paired cellular phone:
•
•
•
Reject an incoming call - Press button during ringing for at least 2 seconds
Terminate phone conversation - Press button during conversation shortly
Transfer a phone call back to the cellular phone - Press for at least 2 seconds during the conversation
To be not disturbed during driving, we recommend to use automatic call accept (programmed at the cellular phone)
For outgoing calls better drive to a parking lot and dial the call from the phone. Not all phone manufacturers have
implemented all possible features into their Bluetooth modules, so it can happen that a specific phone requests different
button functions or rejects button functions. In our concept we are using two totally independent Bluetooth modules for
Handy/Navi and headset coupling, which should ensure the best possible compatibility with almost all helmet sets and
cellular phones. If You are not in talk mode, you can use the Handy/Navi button for:
•
Switching into standby mode and back to connect mode: press 1 x for about 1 second , LED will flash green
from time to time
•
Completely switching off - Press the HANDY key at the AE600 BT at least about 3 seconds, until the LED
will flash 3 x red.
Combinations with Bluetooth Navigational Systems
Bluetooth-equipped navigators regard themselves as control unit for the Bluetooth helmet and the cellular
phone as well. To connect the AE 600 BT Intercom system to navigators, the Handy/Navi Module of the AE
600 BT shall be used. A cellular phone then shall be connected directly to the navigator. The result is a chain
of following Bluetooth devices:
This chain must connect totally 4 Bluetooth devices. When pairing so many devices together, there is a big
risk that the wrong devices try to pair to each other. To avoid such problems, we recommend to switch off all
Bluetooth devices, which are just not used for the pairing process.
In the above chain, start with the Navigator. Connect the navigator with the AE 600 BT first. The navigator
regards the AE 600 BT as a “headset” with the device name AE600GSM and the PIN No. 0000.
In the next step You connect the cellular phone to the navigator, and at the end connect the AE 600 BT
Headset Module with the Bluetooth Helmet.
Troubleshooting for Bluetooth connections
If You have a problem with any Bluetooth connection, switch off all Bluetooth devices in the surrounding.
Now switch only the devices on, which had the problem before. Under the condition, that the two units are
still paired, they should establish a connection automatically after switching on or after pressing the Bluetooth
key of one or both device(s) . If this is not possible, try a new pairing procedure.
Electronic Waste Disposal: If you should not need the Intercom any more or if it should become defective
and cannot be repaired, the new European WEEE directive does not allow any more to dispose it via your
household trash bin. Please dispose electronic items only at the local electronic waste collecting stations, and
remove batteries before disposal.
European warranty regulations
European regulations request that Your distributor grants 2 years of warranty for Your AE 600 BT (European
laws apply).
In case of a problem, please contact the distributor or ask him for the address of an authorized repair shop. If
You return any AE 600 BT, please add a problem description and a copy of your sales receipt.
© 2008
Alan UK Ltd
Unit 2, Callenders, Paddington Drive, Swindon, Wiltshire.
SN5 7YW
Telephone:
00 44 (0) 1793 882 431
Fax :
00 44 (0) 1793 882 432
For technical assistance contact:
[email protected]