1
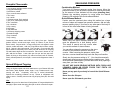
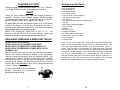
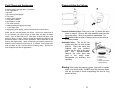
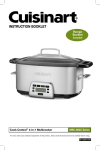
/
Pressure Cooker
Use and Care Instructions
Model PC104
For information or assistance
call 514-842-8691
EURO-PRO Corporation
178 West Service Rd.
Champlain, NY 12919
CAUTION!
Read all instructions in this book before using.
Be sure you understand all operating instructions before using
the pressure cooker.
IMPORTANT SAFEGUARDS
To reduce the risk of personal injury or damage to property,
follow basic safety precautions when using this appliance,
including the following:
1. Read all instructions carefully.
2. Do not touch hot surfaces. Use handles or knobs.
3. Close supervision is necessary when the pressure cooker
is used near children.
4. Do not place the pressure cooker in a heated oven.
5. Extreme caution must be used when moving a pressure
cooker containing hot liquids.
6. Do not use the pressure cooker for other than intended
use.
7. This appliance cooks under pressure. Improper use may
result in scalding injury. Make certain unit is properly
closed before operating.
8. Do not fill the unit over 2/3 full. When cooking foods that
expand during cooking such as rice and dried vegetables,
do not fill the unit over 1/2 full. Cooker is marked with 2/3
(MAX) fill lines.
9. Do not cook foods such as applesauce, cranberries, pearl
barley, oatmeal or other cereals, split peas, pasta and
rhubarb in the pressure cooker. These foods tend to
foam, froth and sputter and may block the pressure
release device.
10. Always check the pressure release devices for clogging
before each use.
11. Do not attempt to open cover until internal pressure has
been reduced.
12. Do not use this pressure cooker for pressure frying with oil
or shortening.
13. Never operate the cooker under pressure without any liquid
inside. Do not allow the cooker to boil dry.
SAVE THESE INSTRUCTIONS
FOR HOUSEHOLD USE ONLY
Rev. 1101A
Main Components
/
FIVE (5) YEAR LIMITED WARRANTY
EURO-PRO CORPORATION warrants this product to be free from defects in material and
workmanship for a period of five (5) years from the date of purchase when utilized for normal
household use.
If your appliance fails to operate properly while in use under normal household conditions within
the warranty period, return the complete appliance and accessories, freight prepaid to:
U.S. EURO-PRO Corporation, 178 West Service Rd., Champlain, N.Y. 12919.
Canada: EURO-PRO Corporation, 4400 Bois Franc, St. Laurent, Quebec, H4S 1A7
If the appliance is found by EURO-PRO to be defective in material or workmanship, EURO-PRO
will repair or replace it free of charge. Proof of purchase date and $14.95 to cover the cost of
return shipping and handling must be included.*
The liability of EURO-PRO Corporation is limited solely to the cost of the repair or replacement of
the unit at our option. This warranty does not cover the sealing ring, molded handles, nor does it
cover damage resulting from misuse, abuse, negligence, accidents, overheating, improper repair,
commercial use, or failure to follow instructions included. This limited warranty does not cover
damage due to faulty packaging or mishandling in transit.
This warranty is extended to the original purchaser of the unit and excludes all other legal and/or
conventional warranties. The responsibility of EURO-PRO Corporation if any, is limited to the
specific obligations expressly assumed by it under the terms of the limited warranty. In no event is
EURO-PRO Corporation liable for incidental or consequential damages of any nature whatsoever.
Some states do not permit the exclusion or limitation of incidental or consequential damages, so
the above may not apply to you.
This warranty gives you specific legal rights, and you may also have other rights which vary from
state to state.
8 Qt. Pot
*Important: Carefully pack item to avoid damage in shipping. Be sure to include proof
of purchase date and to attach tag to item before packing with your name, complete
address and phone number with a note giving purchase information, model number and
what you believe is the problem with item. We recommend you insure the package (as
damage in shipping is not covered by your warranty). Mark the outside of your package
“ATTENTION CUSTOMER SERVICE”.
yyyyyyyyyyyyyyyyyyyyyyyyyyyyyyyyyyyyyyyyyyyyyyyyyyyyyyyyyyyyyyyyyyyy
OWNERSHIP REGISTRATION CARD
3.5 Qt. Pot
Tempered Glass Lid
Features:
• Pressure Selector Dial for 3 internal pressure settings.
• Quick Pressure Release.
• Cool Touch Handle.
• Encapsulated Thermic Base for superior heat distribution, 18/10 stainless steel
body for strength, lasting beauty and easy care.
• Handle Lock Release Mechanism for one handed opening and closing of lid.
The mechanism design prevents the lid from being opened when any pressure
exists inside of the unit.
1
Please fill out and mail the product registration card within ten (10) days of purchase in order to
validate the foregoing Limited Warranty. The registration will enable us to contact you in the
unlikely event of a product safety notification. By returning this card you acknowledge to have
read and understood the instructions for use, and warnings set forth in the accompanying
instructions.
RETURN TO EURO-PRO CORPORATION, 178 WEST SERVICE RD., CHAMPLAIN, N.Y. 12919
IN CANADA: 4400 Bois Franc, St. Laurent, QUEBEC, H4S 1A7
______________________________________________________________________
Appliance model
______________________________________________________________________
Date purchased
Name of store
______________________________________________________________________
Owner’s name
______________________________________________________________________
Address
City
State/Prov.
Zip/Postal Code
Printed in Portugal
Tips for cooking in your new pressure cooker:
Meats & Poultry:
When adapting recipes for braised meats, allow 20 minutes cooking time per pound
of meat. Use 1 cup liquid for the first pound and ½ cup for each additional pound.
For steam-roasting poultry and meats, brown first in oil for better appearance.
Rice:
When cooking rice and grains, add 1 Tbs. butter or oil per cup to reduce foaming and
clogging the pressure valve.
Since rice doubles in size when cooked, be sure to use only half as much uncooked
rice as the cooker’s capacity allows. For example, never cook more than 1 ¾ cups
raw rice in the 3 ½ qt. pressure pan and no more than 4 cups raw rice in the 8 qt.
pressure pan.
Because rice will be slightly sticky when cooked in a pressure cooker, it is best to use
a slow release method. For example, allow cooling naturally or else slowly releasing
pressure one level at a time.
To prevent burning, use a heat diffuser if available, or bring to pressure on a
medium-high heat setting.
Beans:
Although it is not necessary to pre-soak beans for pressure-cooking, there are some
advantages. Since the gas-inducing properties of beans are water soluble, soaking
reduces their effects. Always drain the soaking water from the beans and cook with
fresh water. Soaking also cuts down the cooking time and keeps the bean skins from
separating from the flesh.
If you don’t have time to soak the beans overnight, use the Hot Soaking Method:
Use 5 cups water for every 8 oz. dried beans, pressure cook on low pressure for 3
minutes, remove from heat source and let stand 1-4 hours.
Always use at least 2 Tbs. of oil when cooking beans to reduce sputtering.
Always use the natural or slow release method to reduce pressure.
Clean lid and vents thoroughly after cooking rice or beans.
Desserts:
USING FOR THE FIRST TIME
Please read these instructions carefully before using the
cookware for the first time.
• Before first use, wash the pressure cooker and lightly oil the seal ring.
• Put at least 1 1/2 cups of water/liquid in the pot with the food. Never
fill the pot more than two-thirds full.
• Lock the lid.
• Turn pressure selector to the desired pressure: (I) Low, (II) Medium,
(III) High. See cooking chart on page 3 for guidance.
• Turn the heat source to high until the pressure reaches the desired
setting. Once the cooker has reached its intended pressure, a red
dot will appear in the pressure indicator window. As pressure builds
up, it is normal for a small amount of steam to be released from
around the edges of the cooker and handles. Also at this time, you
may hear a hissing sound. This is normal. Reduce the heat to the
minimum required to maintain pressure.
• Set a timer for precise timing. See cooking chart on page 3 as a
guide.
• When the cooking time is complete, release the pressure by using
either of the methods described on page 6 in this manual.
• Slowly and carefully turn the pressure selector dial “in steps” to the
“Open” position (0) and unlock the lid by pulling the handle and lifting
the lid up. Open the lid away from you.
• NEVER USE FORCE TO OPEN THE COOKER. NEVER OPEN
THE LID TOWARDS YOUR FACE.
• After use, wash, rinse and dry all parts. Lightly oil the seal. Store the
lid upside down on the pot.
• All components of the pressure cooker set are dishwasher safe
EXCEPT the pressure cooker lid.
Many desserts can be pressure-cooked, especially those that use eggs/and or are
cooked over a hot water bath, such as custards, bread puddings and cheesecakes.
Use a dish that easily fits inside pressure cooker allowing 1 inch of space around the
edge. The larger pressure cooker works best for this.
Seal the dish completely with foil to keep liquid from seeping into the dessert. Soak
up any moisture on top of foil before removal.
For easy removal, place dish inside steamer basket or, make a sling out of aluminum
foil.
25
2
COOKING TIME CHART
Use the cooking times on this chart as guidelines. Actual times will
vary depending upon the amount of ingredients in the cooker and
your individual preferences. Start timing when desired pressure is
reached.
PRESSURE
SELECTOR
FOOD
COOKING TIME
(Min)
RELEASE STANDING TIME
METHOD
(Min)
VEGETABLES - Add 1 1/2 cups water, use Steamer Basket on Steamer Support and time precisely
A rtichokes
M edium
III
6
Q uic k
A sparagus
M edium stems
II
1 1/ 2
Q uic k
-
Beans (green)
Whole
I
2
Q uic k
-
B roccoli (flo rets) Stems cut to 1"
Cabbage (1/2)
-
I
2
Q uic k
-
Cut into quarters
I
6
C o mbina tio n
4
-
2" pieces
II
4
Q uic k
1/4" slices
II
2
Q uic k
-
Cauliflower
Flo rets
I
3
Q uic k
-
Co rn
On cob
I
6
Carrots
large,
quartered
Halved
lengthwise
Po tato
P otato, sweet
III
8
III
10
Q uic k
-
C o mbina tio n
5
C o mbina tio n
3
M EA T, P OULTRY A ND FISH - When adapting standard recipes,use 1/2 amo unt of water used with co nventio nal coo king
B eef
Chicken
Po rk
Shellfish
Stews
III
16- 20
N a tural
Ro asts
III
40- 50
N a tural
10-2 0
Whole
II
18- 25
N a tural
10-2 0
-
10-2 0
P arts
II
8- 15
Q uic k
B oneless
II
5- 7
Q uic k
-
Ro asts
III
15- 25
N a tural
-
B oneless
II
7- 10
Q uic k
-
M ussels/Clams
I
3- 6
Q uic k
-
Shrimps/Prawns
I
2- 8
Q uic k
-
1" Steaks
I
5- 8
Q uic k
-
Fish
Linguini with Clam Sauce
2 Tbs. good olive oil
2 Tbs. butter
7 cloves garlic, minced
¾ cup chopped fresh basil
2 tsp. Oregano
½ tsp. Crushed red pepper
2 bottles clam juice (8 oz. each)
1 lg.can diced tomatoes (29 oz.)
1 can tomato sauce (8 oz.)
¾ cup white wine
1 cup hot water
1 box linguine (1 lb.)
3 cans chopped clams (6 1/2 oz. each)
grated parmesan cheese
Open all cans and drain all liquid together with the clam juice, tomato sauce
and water in a large measuring cup. Heat olive oil and butter over medium
heat in 31/2 qt. pressure pan. Gently sauté garlic, careful not to over brown,
about 1 minute. Add basil, oregano, red pepper and tomatoes and cook
together about 30 seconds. Add liquids. Add broken pasta and stir,
separating noodles, for about 1 minute. Secure lid, bring to medium
pressure (II). When steam starts to escape vent, reduce heat to medium
and cook 6 minutes. Quickly release steam one level at a time. Remove
lid. Gently stir to separate noodles. Add clams, cover with glass lid and
simmer for 1 minute. Toss together and serve with Parmesan cheese and
garlic bread.
RICE - A lways add at least one tablespoo n o f oil or butter to reduce fo am
White - use 1/3 to 1/2 less water than
in normal recipe
III
3
B rown - use 1/4 to 1/2
less than in no rmal recipe
III
15
Risotto
III
5
C o mbina tio n
C o mbina tio n
Q uic k
7
10
-
DRIED B EANS - No pre-so aking required - use 6 cups of water for each two cups o f beans - add at
least one tablespo on o f o il or butter. Quick release under cold water o nly.
Split peas or other small beans
I
14- 18
Navy beans or o ther
medium bean
I
30- 32
Kidney beans or other
large bean
I
35- 40
3
Q uic k
-
C o mbina tio n
3
C o mbina tio n
5
24
Barbeque Pork Pull-Apart
3 ½ lb. pork shoulder blade roast
1 can or bottle beer (16 oz.)
1 cup water
1 Tbs. liquid smoke
1 tsp. onion salt
1 tsp. Kosher salt
1 tsp. coarse ground pepper
1 bottle (18 oz.) barbeque sauce (your favorite brand)
Pour beer, water and the next 4 seasonings into 31/2 qt. pressure pan. Stir
and allow bubbles to subside. Add washed pork roast. Secure lid, bring to
maximum pressure (III). Reduce heat to medium and cook 1 hour 15
minutes. Release pressure. Remove roast from pan and place onto a cutting
board. Discard liquid in pan. Remove bone and any large fat portions from
roast. Using two large forks, shred meat; or chop if you prefer. You may
serve the meat as is, drizzle barbeque on each serving, or return meat to pan
and add barbeque sauce, mixing well. Cover with glass lid and cook on low.
Serve on buns. Serve with additional sauce, dill pickle slices and thinly sliced
onion, if desired.
Cheesy Garlic Mashed Potatoes
10 medium white potatoes, halved
3 cloves garlic, peeled whole
3 tsp. salt
1 tsp. coarse-ground black pepper
½ stick butter, melted
¾ cup half-and-half, warmed
1 cup shredded sharp cheddar
Place halved potatoes, garlic and 2 tsp. salt into the 8 qt. pressure pan. Just
cover with warm water. Secure lid and bring to highest pressure (III) over
high heat. Reduce heat to medium and cook 7 minutes. Release pressure
one level at a time until lid can be removed. Drain potatoes. Place cooked
potatoes into a medium mixing bowl and add
the remaining salt, pepper, butter and half-and-half. Using the medium
speed of your Bravetti 300 watt hand mixer, whip to desired consistency
adding more half-and-half if needed. Add cheese and mix in on lowest
speed. Adjust salt and pepper to taste.
23
USING YOUR PRESSURE COOKER
It is essential that you read this instruction manual and keep it handy
when cooking with your pressure cooker. This manual will answer
any questions that you might have on safety, operation and timing.
PLEASE NOTE: The Pressure Cooker cannot reach pressure
unless the Lid is properly closed, the operating
pressure has been selected and sufficient liquid
has been added.
PLEASE NOTE : Before using the pressure cooker for the first
time, wash all the parts with hot water, rinse and
dry them. Remove the seal from the rim of the
lid. Oil it lightly with vegetable oil before cooking
for the first time and after each use. (DO NOT
use any other type of oil or vegetable fat.) This
facilitates locking.
OPENING YOUR PRESSURE COOKER
To open the pressure cooker, make
sure that the Pressure Selector Dial is
on “0” setting and all pressure has been
released. Unlock the lid by pulling the
handle and lifting the lid up. (See
illustration 1)
CLOSING YOUR PRESSURE COOKER
Before closing the pressure cooker
ALWAYS CHECK THE VALVES.
Using the vapor key provided, press the
Automatic Valve from inside the lid to
see that it moves freely up and down.
To close the pressure cooker, place the
lid on the body and push the handle
down you will feel the lock engage.
(See illustration 2.)
4
ADDING INGREDIENTS & LIQUIDS
When cooking, always use a minimum of 1
1/2 cups of liquid.
You may fill the
pressure cooker up to a maximum of 2/3
full. This includes liquids and ingredients,
(see illustration 3).
Honey Blueberry Rice Pudding
2/3
Max. Liquid
When cooking foods which produce foam
or expand greatly such as peas, rice or
beans, the pressure cooker should not be
filled more than 1/2 full, (see illustration 4).
To reduce foam, add one tablespoon of
butter or oil to the pressure cooker prior to
cooking.
Min. Liquid
A “Maximum Fill” mark has been
embossed into your pressure cooker at
the 2/3 level.
NEVER OVERFILL THE PRESSURE COOKER
5
1 cup white rice, long- or short-grain
2 ¼ cup water
1 cinnamon stick
1” vanilla bean
½ tsp. Salt
2 Tbs. Butter
1/3 cup honey
½ cup granulated sugar
1 cup half & half
3 lg. Egg yolks
½ cup blueberries
¼ tsp. Vanilla extract
In 3 1/3 qt. Pressure pan, combine rice, water, salt, cinnamon stick and
vanilla bean. Secure lid. Over medium-high heat, bring to highest pressure
(III). Reduce heat and cook 8 minutes. Release steam one level at a time
until no pressure remains and you can remove the lid. Remove cinnamon
stick and vanilla bean and add butter sugar and honey. Stir gently. Beat half
& half together with the egg yolks in small bowl. Add ro rice mixture along
with the blueberries and vanilla. Cook over medium heat for 3 minutes or
until mixture just comes to a simmer. Spoon pudding into individual serving
dishes, sprinkle cinnamon on top. Cover and refrigerate or eat warm.
Variation
Substitute golden raisins for the blueberries; or leave plain.
22
Pumpkin Cheesecake
1 cup cinnamon graham cracker crumbs
½ cup granulated sugar
½ stick butter, melted
16 oz. cream cheese, softened
1 Tbs. butter
1 tsp. vanilla
1 cup brown sugar, firmly packed
1 can (16 oz.) solid-pack pumpkin
2 Tbs. cornstarch
1 tsp. cinnamon
¾ tsp. nutmeg
3 large eggs
2 cups hot water
1 pint heavy whipping cream
½ powdered sugar
½ tsp. cinnamon
¼ tsp. nutmeg
Generously butter bottom and sides of 8” spring form pan. Sprinkle
graham cracker crumbs and sugar evenly on bottom of pan; drizzle
butter overall. Set pan aside. In large mixing bowl, mix together cream
cheese, vanilla and butter. Add next 5 ingredients and continue mixing.
Mix in 1 egg at a time until smooth. Pour into pan. Cover top with wax
paper and then completely cover entire pan with aluminum foil crimping
top and bottom edges to seal out moisture. Place riser in bottom of 8 qt.
pan; add the hot water. Lower cake pan into pot and set atop riser.
Attach lid, bring to full pressure (III), reduce heat and cook 45 minutes.
Slowly release pressure, remove pan, uncover and refrigerate at least 3
hours.
Spiced Whipped Topping
Using the highest speed and whisk attachment to your Bravetti 300 watt
hand mixer, whisk together cream, sugar, ¼ tsp. cinnamon and ¼ tsp.
nutmeg until thick. Completely cover top of cooled cheesecake.
Sprinkle the remaining cinnamon on top. Return to refrigerator until
ready to serve. Carefully remove outer ring of spring form pan, slice and
enjoy!
RELEASING PRESSURE
Combination Method:
Turn heat off. Remove pressure cooker from burner. Allow the
pressure cooker to cool off and the pressure to naturally decrease
for the amount of time indicated on the recipe (standing time).
Release the remaining pressure by using either the Natural
Steaming-Off method or the Quick-release Method.
Quick-Release Method:
Caution must be exercised when using this method as a large
volume of steam will escape from pressure selector dial and may
cause a scalding injury if your face or any other part of the body is
in front of this valve when steam is being released.
When using the Quick Release Method, you
must be prepared for a loud hissing sound.
This sound is normal and only occurs when
you use this method of steam release.
You can either release the pressure on the stove
or take it to the pressure cooker to the sink or
counter. When removing the pressure cooker from
the stove, use two hands and only touch the Stay cool handles.
Slowly turn the pressure setting to “0” . You should momentarily
stop at each interim pressure setting before reaching zero. Once
all of the steam had escaped, you can remove the lid by opening it
away from your face or body.
DO NOT USE QUICK RELEASE METHOD WITH FOODS LIKE
LEGUMES, GRAIN OR OTHER FOODS THAT FROTH OR
WHEN COOKER IS VERY FULL.
Never put any part of your body in front of the Quick Release
Valve.
Never force the lid open.
Never open the lid towards your face.
Hint:
Make a sling out of an aluminum foil strip (about 24” long and doubled for
strength) to place under the spring form pan to aid in removal of hot pan.
21
6
STARTING TO COOK
All American Pot Roast
To begin cooking, set the Pressure Selector on “I” low, “II” Medium
or “III” High. Bring the cooker up to pressure at high heat.
TIMING
Timing for most recipes begins after the desired pressure is
reached. However, some recipes indicate that timing starts
immediately upon closure of lid. If this is the case, do not wait for
the red pressure indicator dot to appear before timing.
Be aware that it can take the pressure cooker up to 15 minutes to
achieve full pressure if it is full and the contents are cold. If
practical, some ingredients (water, stock, etc.), can be pre-heated
before adding them to the pressure cooker.
WHEN THE PRESSURE SELECTOR IS SET AT “0” - No
pressure - the pot will act as a normal stockpot, without any
pressure and may be used with the tempered glass cover.
RELEASING PRESSURE & REMOVING THE LID
NEVER FORCE THE LID OPEN.
NEVER OPEN THE LID TOWARDS YOUR FACE.
NEVER OPEN THE PRESSURE COOKER ABRUPTLY.
NEVER OPEN THE PRESSURE COOKER WITH THE LID
TOWARDS YOU.
After the cooking time ends, you can use either the quick-release
method, the natural steaming-off method or the combination
method to release the pressure from the pressure cooker. See
cooking chart on page 3 for the recommended pressure release
method for the type of food that you are preparing. Once the
pressure is fully released, you may then remove the lid. For safety
reasons, the lid will not open if there is any pressure whatsoever
in the pot. Never force the lid open.
3-4 lb. Round Roast
2 Tbs. vegetable oil
½ cup good red wine
1 clove garlic, minced
1 medium onion, coarsely chopped
1 Tbs. Worcestershire sauce
1 Tbs. ketchup
1 Tbs. Better Than Bouillon beef bouillon base
1 tsp. salt
1 tsp. coarse ground black pepper
1 tsp. celery salt
hot water
½ lb. Baby carrots
10 small red potatoes
1 lb. Whole medium mushrooms
3 stalks celery, cut into 1” pieces
1 Tbs. cornstarch
1 cup cold water
Heat oil in 8 qt. pot to medium-low. Using long tongs, carefully brown roast
about 1 minute on each side and end. Remove roast and set aside. Add
wine and scrape bottom with spatula. Add onion and garlic, simmer 1
minute. Add next the next 6 ingredients; stir. Place roast back in pan and
just cover with hot water. Put on lid, bring to highest pressure (III) and cook
50 minutes. Release pressure, remove lid and add vegetables. Replace lid
and bring to medium pressure (II), reduce heat and cook 15 minutes.
Release pressure slowly, remove lid and stir gently. Bring to a gentle boil. In
a small bowl or cup mix cornstarch and water together, pour into liquid
around roast. Reduce heat and simmer slowly until gravy thickens.
To open the lid after all of the pressure is
released, unlock the lid by pulling the
handle and lifting the lid up.
6
7
19
Perfect Green Beans
NATURAL STEAMING OFF
Turn the heat off. Allow the pressure to fall naturally, then open
the Pressure Cooker. This method is recommended for frothing
foods or foods that expand greatly such as beans and rice.
1 lb. Bag frozen whole green beans
3 Tbs. butter
2 cloves garlic, finely minced
½ tsp. salt
½ tsp. ground black pepper
1 cup hot water
Combination Method:
Melt butter on medium in 3 ½ qt. pressure pan. Add garlic, salt and pepper
and sir for 30 seconds being careful not to brown the garlic. Add frozen
green beans; toss to cover with butter. Pour water around beans. Increase
heat to high, secure lid. Bring to medium pressure (II) and cook 3 minutes.
Quickly release pressure, remove lid and toss with fork.
Hint: To use fresh green beans, increase cooking time by 1 minutes.
Buttery Corn-on-the-Cob
4 – 12 ears of fresh corn, husk and silk removed
1 stick butter
2 tsp. salt
¼ tsp. granulated sugar
cool water to cover
In 8 qt. pressure pot, melt butter in 1 cup water. Add salt, sugar and corn.
Just cover with cool water. Attach lid, bring to highest pressure (III), reduce
heat and cook 6 minutes. Quickly release pressure; remove lid. Use long
tongs and carefully remove corn.
Turn the heat off. Allow the pressure cooker to cool off and the
pressure to naturally decrease for the amount of time indicated on
the recipe (standing time). Release the remaining pressure by
using either the natural Steaming-Off method or the Quick
Release method.
Quick Release Method:
Caution must be exercised when using this
method as a large volume of steam will
escape from pressure selector dial and may
cause a scalding injury if your face or any
other part of your body is in front of this
valve when steam is being released.
When using the Quick release method, you
must be prepared for a loud hissing sound.
This sound is normal and only occurs when
you use this method of steam release.
7
You can either release the pressure on the stove or take it to the
sink or a counter. When removing the pressure cooker from the
stove, use two hands and only touch the stay cool handles.
Slowly turn the pressure setting to “0”. You should momentarily
stop at each interim pressure setting before reaching zero. Once
all the steam has escaped, you can remove the lid by opening it
away from your face or body.
DO NOT USE THIS METHOD WITH FOODS LIKE LEGUMES,
GRAIN OR OTHER FOODS THAT FROTH OR WHEN THE
PRESSURE COOKER IS VERY FULL.
Never put any part of your body in front of the Quick release
Valve.
Never force the lid open.
Never open the lid towards your face.
20
8
CLEANING AND STORAGE
Sunday Roast
Cleaning:
Body - Clean the body of the pressure cooker like any other
stainless steel pot. Either run it through the dishwasher
or wash it by hand. Do not use a scouring pad or any
abrasive cleaner as they may scratch the surfaces.
To remove stubborn stains and accumulated
discoloration, add the juice of half a lemon mixed with 2
cups of water to the pressure cooker. Cook at maximum
pressure for 5 minutes. Remove from heat, cool to
reduce pressure, wash with hot, soapy water and rinse.
Lid -
Seal -
The lid should be washed with hot, soapy water and
rinsed. The lid and seal should NEVER be placed in the
dishwasher.
Remove the rubber seal. Wash and oil after each use.
Replace seal with a Genuine Replacement Seal every
six (6) months.
Valves - The valves do not have to be cleaned after each use
unless they have become clogged. If you use your
pressure cooker often, you may want to clean your
valves on a regular basis. A good rule of thumb, is to
clean the top portion of the pressure valve monthly.
Clean the automatic valve only if it gets clogged or does
not move freely.
Cleaning the Valves:
Before you can clean the valves,
you must remove the plastic cover,
by pressing on the edges. The
plastic cover lifts from the lid. (See
illustration 8.)
9
3-4 lb. Round Roast
2 Tbs. vegetable oil
1 Tbs. balsamic vinegar
½ cup good red wine
1 clove garlic, minced
1 medium onion, coarsely chopped
1 Tbs. Worcestershire sauce
1 Tbs. ketchup
1 Tbs. Better Than Bouillon beef bouillon base
1 tsp. salt
1 tsp. coarse ground black pepper
1 tsp. celery salt
hot water
Gravy
3 Tbs. butter
2 Tbs. flour
3 cups strained stock
3 Tbs. cream or whole milk
Heat oil in 8 qt. pot to medium-low. Using long tongs, carefully brown roast
about 1 minute on each side and end. Remove roast and set aside. Add
vinegar and wine and scrape bottom with spatula. Add onion and garlic,
simmer 1 minute. Add next the next 6 ingredients, stir. Place roast back in
pan and just cover with hot water. Put on lid, bring to highest pressure (III)
and cook 50 minutes. Release pressure, remove lid and place roast on
platter to rest. Strain liquid; reserving 3 cups.
To make to gravy, use 3 ½ qt. pan. Melt butter on medium-low. Sprinkle in
flour and mix to a paste. Slowly add liquid, stirring constantly, reduce heat.
Simmer until thickened, stir in cream or milk.
Slice roast and pour gravy over all. Serve with garlic smashed potatoes.
8
18
Pork Chops and Applesauce
Disassembling the Valves:
4 medium pork loin chops about ½ inch thick
3 Tbs. vegetable oil
1 tsp. salt
1 tsp. coarse ground pepper
3 Tbs. butter
1 shallot, finely chopped
1 clove garlic, minced
2 tsp. balsamic vinegar
1 Tbs. dried rosemary
1 heaping tablespoon light brown sugar
1 ½ cups apple cider
2 large granny smith apples, peeled, cored and cut into thick slices
Wash, pat dry, salt and pepper pork chops. Heat oil on medium-low in
3½ qt. pressure pan; brown chops on both sides and drain on paper
towels. Pour off about half the oil. Add butter, shallots and garlic; cook
gently for about 1 minute. Add the vinegar and scrape the bottom of the
pan with a spatula. Add the next 3 ingredients. Place chops back in pan
and top with apple slices. Attach lid and bring to medium pressure (II).
Reduce heat to medium-low and cook for 15 minutes. Remove pan from
heat and allow to rest 5 minutes before releasing steam. Remove lid,
plate chops and top with the applesauce.
9
Pressure Selector Valve: Pulling up on tab (1) allows the valve
cover to snap off. Remove the valve assembly and rinse with
hot, soapy water. Allow to dry and then reassemble. Do
NOT disassemble the stem or bottom portion of the valve as
it is factory sealed.
Automatic Valve: Turn the lid over
making sure that it is in the locked
position. Place the vapor key
supplied with your pressure
cooker into the slots on the valve
and
turn
counterclockwise.
Remove the valve parts and
rinse in hot, soapy water.
Reassemble by reversing this
operation.
10
1 - Vapor Key
2 - Aluminum Cap
3 - O-Ring
4 - Safety Valve Stem &
Spring Assembly
Storing: After using the pressure cooker, store with lid upside-
down over the pot body. Do NOT store the pressure cooker
with the lid closed to avoid compressing the seal for long
periods of time.
17
10
TROUBLE SHOOTING
Cooker Cannot be Closed
• You have tried to put the lid on with the contents already boiling.
• The seal may be too dry and needs to be oiled slightly.
The Pressure Selector Does Not Rise
• Check the time that you started heating the pot. If the pot is full
and the contents are cold, it can take up to 20 minutes to come to
full pressure.
• Check to see that the pressure selector is not at “0”.
If the above two points are not the cause of the problem, stop
cooking immediately. Cool the pressure cooker down completely
before opening and check the following:
• There may not be enough liquid in the pressure cooker. You will need
at least 1 1/2 cups of liquid in order to reach full pressure. Add the
recommended amount of liquid.
• The unit may have been overfilled and there is not sufficient room for
the air to circulate and create pressure. Remove some of the ingredients
that you are cooking.
• The pressure cooker is not closed properly. Repeat the closing
operation. Check to see if the seal is dirty or damaged. Remove and
clean the seal. Be sure to oil it after washing. Replace the seal with a
new one if necessary.
• The automatic valve is dirty or blocked. Dismantle the valve, clean and
reassemble it following the maintenance instructions.
• The o-ring of the valve nut is damaged and should be replaced.
• The safety valve is not working and should be replaced.
Small Amount of Steam Escaping From the Automatic Valve
• This is not a problem because the pressure indicator is relieving
any excess pressure. Water droplets may also appear.
Great Northern Bean Soup
16 oz. dried great northern beans
10 cups water
2 Tbs. Oil
8 oz. ham cubes
7 cups water
1 small onion, chopped fine
1 cup celery ribs and leaves, sliced
1 cup carrots, chopped
2 bay leaves
1 tsp. Coarse ground black pepper
2 tsp. Kosher salt
3 dashes Tabasco
1 cup instant mashed potato flakes
Place dried beans and 10 cups water into 8 qt. pressure pan. Cover with
pressure lid, bring to maximum pressure (III) for 3 minutes. Remove from
heat and allow to sit for 1 hour. Remove lid; drain and rinse beans.
Dry the pan completely and heat oil over medium heat. Add ham cubes
and brown lightly for about 1 minute. Add the water and scrape the
bottom of the pan with a spatula to loosen any ham bits. Add the rinsed
beans and the remaining ingredients, except for potato flakes, replace lid
and cook under medium pressure (II) for 30 minutes. Release pressure
slowly and remove lid. Check to make sure that the beans are tender; if
not, replace lid and cook under medium pressure (II) another 10 minutes.
When beans are tender, stir in the potato flakes. Cover with glass lid and
allow to cook on low 5 minutes. If a thicker soup is desired, use ½ cup
more potato flakes.
Hint: Always rinse beans and discard water after soaking, this will reduce
the gas-inducing properties of the beans. Otherwise, add a product called
Beano to the recipe.
Constant Amount of Steam Escaping From the Automatic Valve
• The heat is too high. Turn down the heat.
• The automatic valve is dirty. Follow the cleaning instructions .
• The safety valve is not working and should be replaced.
11
16
Quick ‘n Easy Chicken Noodle Soup (Version 2)
2 Tbs. Olive Oil
1 Tbs. Butter
1 Medium Onion (coarsely chopped)
6 cups canned chicken broth
3-4 lbs. cubed, boneless, skinless chicken breast
2 tsp. kosher salt
1 tsp. Ground black pepper
1 tsp. Thyme
2 tsp. Poultry seasoning
1 Tbs. Dried parsley
1 ¼ cup chopped celery
1 ¼ cup chopped carrots
8 oz. wide egg noodles
Heat olive oil and butter over medium heat in 8 qt. Pressure pan; add onion
and lightly brown. Add chicken broth and the next 6 ingredients. Attach lid
and bring to highest pressure (III) ; reduce heat and cook 10 minutes.
Release pressure, remove lid and add the celery and carrots. Replace
pressure lid, bring to pressure on the highest setting (III), reduce heat to
medium and cook for 6 minutes. Release pressure and remove lid. Bring
to a rolling boil and add 8 oz. wide noodles. Stir and continue boiling for 7
minutes or until noodles are tender.
TROUBLE SHOOTING continued
Cooker Cannot Be Opened After Cooking
• If cooling has been too slow, a slight vacuum may have been
created. Heat the pressure cooker again with the pressure selector in
its open position “0” until steam comes out of the automatic valve.
Release the steam and then open the lid.
• There is still pressure inside the pressure cooker and the safety lock
may still be engaged. Wait another two minutes and try again.
• If the safety valve has locked open, it must be reset. To reset
the valve, wait until all the steam has escaped and the pressure
cooker has completely cooled down. Press the pin of the automatic
valve with the eraser end of a pencil. Pull the handle and try to open
the lid.
NEVER FORCE THE LID OPEN!
COOKING TIPS AND HINTS
• Always use a tablespoon or more of oil, butter or margarine when
cooking rice or legumes. It helps control foaming.
• Legumes (lentils, chick peas, kidney beans, etc.) may be soaked in
water before cooking which will decrease cooking time.
• Use the combination method of releasing pressure (see instructions)
when preparing dense vegetable like potatoes that need additional
heat penetration without pressure to finish cooking the center of the
food.
ADAPTING FAVORITE RECIPES
To convert recipes for cooking with pressure, a good rule of thumb
is that when you set the cooker to “III” High on the Pressure
Selector Dial, your cooking time will be cut by two-thirds (30
minutes normal cooking time = 10 minutes in the High Speed).
15
12
Recipes courtesy of Alison Dubois from her upcoming cookbook,
“Yum! Recipes from the Bravetti Kitchen.”
Chicken & Vegetable Risotto
3-4 lb. Whole Fryer Chicken
2 Tbs. Olive Oil
1 Tbs. Butter
1 Medium Onion (coarsely chopped)
6 cups canned chicken broth
1 ¼ cup chopped celery
1 ¼ cup chopped carrots
½ lb. Sliced mushrooms
¼ cup chopped parsley
2 tsp. kosher salt
1 tsp. Ground black pepper
1 ¾ cup risotto
¾ cup Parmesan cheese
Wash, pat dry, lightly salt and pepper chicken inside and out. Place chicken
into steamer basket so that the handle is running lengthwise to the chicken;
set aside. Heat olive oil and butter over medium heat in 8 qt. Pressure pan;
add onion and lightly brown. Add chicken broth. Lower the steamer basket
with chicken into the pot. Attach lid and bring to highest pressure (III);
reduce heat and cook 5 minutes per pound. Release pressure one stage at
a time until no pressure remains and the lid can be opened. Remove
steamer basket with chicken and allow to cool until you can easily handle the
chicken. Remove the bones and skin from the chicken and discard.
Cut chicken into bite size pieces and return to the broth. Allow the mixture to
come to a gentle boil and add the rest of the ingredients. Replace pressure
lid, bring to pressure, over medium high heat, to the highest setting (III),
reduce heat to medium and cook for 7 minutes. Remove pan from heat and
let stand 10 minutes. Release pressure, remove lid, stir gently with fork,
replace lid and allow to rest another 5 minutes before serving.
Chicken Noodle Soup (Version 1)
3-4 lb. Whole Fryer Chicken
2 Tbs. Olive Oil
1 Tbs. Butter
1 Medium Onion (coarsely chopped)
6 cups canned chicken broth
1 ¼ cup chopped celery
1 ¼ cup chopped carrots
2 tsp. kosher salt
1 tsp. Ground black pepper
1 tsp. Thyme
1 Tbs. Dried parsley
8 oz. wide egg noodles
Wash, pat dry, lightly salt and pepper chicken inside and out. Place chicken
into steamer basket so that the handle is running lengthwise to the chicken;
set aside. Heat olive oil and butter over medium heat in 8 qt. Pressure pan;
add onion and lightly brown. Add chicken broth. Lower the steamer basket
with chicken into the pot. Attach lid and bring to highest pressure (III);
reduce heat and cook 5 minutes per pound. Release pressure one stage at
a time until no pressure remains and the lid can be opened. Remove
steamer basket with chicken and allow to cool until you can easily handle the
chicken. Remove the bones and skin from the chicken and discard.
Cut chicken into bite size pieces and return to the broth. Allow the mixture to
come to a gentle boil and add the rest of the ingredients except the noodles.
Replace pressure lid, bring to pressure on the highest setting (III), reduce
heat to medium and cook for 6 minutes. Release pressure and remove lid.
Bring to a rolling boil and add 8 oz. wide noodles. Stir and continue boiling
for 7 minutes or until noodles are tender.
Hint: For a quicker version, replace whole chicken with 3-4 lbs. boneless,
skinless chicken breast. Cook as directed in paragraph 1, then jump to
paragraph 2!
13
14