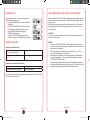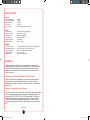
1
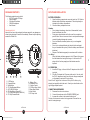
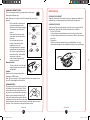
Model CD-102
Portable CD Player
User Manual
cdmanual - JH 2009.08.27.indd 1
8/27/2009 12:14:45 PM
Model CD-102 Portable CD Player
Thank you for purchasing the Califone® Model CD-102 Portable CD
Player.
We encourage you to visit our website www.califone.com to register your
product for its warranty coverage, to sign up to receive our
newsletter, download our catalog, and learn more about the complete
line of Califone audio visual products, including portable and installed
wireless PA systems, multimedia players and recorders, headphones
and headsets, computer peripheral equipment, visual presentation
products and language learning materials.
califone.com
1
cdmanual - JH 2009.08.27.indd 2-3
8/27/2009 12:14:46 PM
IMPORTANT SAFETY INSTRUCTIONS
Before using this product, read the instruction manual for important safety
information. Please retain this manual for future reference and warranty
information.
Troubleshooting & Servicing
Do not attempt to service or repair the device yourself. Refer all servicing
to qualified service personnel. Do not attempt to modify the device in any
way. Doing so could invalidate your warranty.
Moisture and heat sources
Do not use this apparatus near water (for example, sinks, baths, pools) or
expose it to rain, moisture, dripping or splashing liquids. Do not expose
the unit to high temperatures, high humidity or direct sunlight.
Cleaning
When cleaning the device, please use a soft, dry cloth. Never use
benzene, paint-thinner, or other chemicals on the device.
Location
Place the device in stable location, so it will not fall causing damage to
the device or bodily harm.
Intended use
The product may only be used with the original parts intended for it. The
product may only be used in closed and dry rooms. The intended use
includes adherence to the specified installation instructions. The
manufacturer accepts no liability for damage arising due to improper use.
IMPORTANT
This device complies with Part 15 of the FCC Rules. Operation is subject
to the following two conditions:
(1) This device may not cause harmful interference, and (2) this device
must accept any interference received, including interference that may
cause undesired operation.
The CD circuitry may cause interference to nearby radios. To prevent
interference, either switch the CD player off or move away from the
affected radio.
NOTE: This equipment has been tested and found to comply within the
limits for a class B digital device, pursuant to Part 15 of the FCC Rules.
These limits are designed to provide reasonable protection against
harmful interference in a residential installation. This equipment
generates, uses and can radiate radio frequency energy and, if not
installed and used in accordance with the instructions, may cause
harmful interference to radio communications. However, there is no
guarantee that interference will not occur in a particular installation. If this
equipment does cause harmful interference to radio or television
reception, which can be determined by turning the equipment off and on,
the user is encouraged to try to correct the interference by one or more of
the following measures:
•
•
•
•
Reorient or relocate the receiving antenna.
Increase the separation between the equipment and receiver.
Connect the equipment into an outlet on a circuit different from
that to which the receiver is connected.
Consult the dealer or an experienced radio / TV technician for
help.
SAFETY CERTIFICATION
This Compact Disc Player is made and tested to meet safety standards
of the FCC, requirements and compliance with safety performance of
the U.S. Department of Health and Human Services, and also with FDA
Radiation Performance Standards 21 CFR Subchapter J.
INVISIBLE LASER R ADIA TION W HEN OPEN A ND
INTERLOCK F AILED OR
DEFE AT ED. A VOID D IRECT EXPOSURE T O
LASER BEAM .
cdmanual - JH 2009.08.27.indd 4-5
LASER SAFETY
This unit employsan optical laser beam system in the CD mechanism,
designed with built-in safeguards. Do not attempt to disassemble;
refer to qualified service personnel. Exposure to this invisible laser
light beam may be harmful to the human eye.
THIS IS A CLASS-1 LASER PRODUCT. USE OF CONTROLS,
OR ADJUSTMENTS OR PROCEDURES OTHER THAN THOSE
SPECIFIED HEREIN, MA Y RESULT IN HAZARDOUS LASE R
LIGHT BEAM EXPOSURE.
califone.com
califone.com
2
3
8/27/2009 12:14:46 PM
PACKAGE CONTENTS
SETUP AND INSTALLATION
The following materials are included.
• CD-102 Portable CD Player
• Power Adapter
• 2 Alkaline AA batteries
• 3060AV Headphone
• User Manual
BATTERY OPERATION
1. Open the battery compartment cover and insert two “AA” alkaline
batteries inside the battery compartment. Follow the polarity as
indicated in the battery compartment.
2. Close the battery compartment cover.
Caution:
• Do not attempt to recharge, short-circuit, disassemble, heat or
throw the batteries into a fire.
• During store when batteries will not be used for an extended
period of time. Be sure to remove them to avoid possible damage
caused by battery leakage and corrosion.
• Do not mix alkaline, standard (carbon-zinc), or rechargeable
batteries.
• Do not try to recharge batteries not intended to be recharged;
they can overheat and rupture. (Follow the battery manufacturer’s
directions).
• Dispose of old batteries properly in accordance with local laws.
Low Battery
When the battery indicator appears in the LCD panel, this means
that the batteries are losing their charge. In this case the CD
player will not function properly and the batteries must be
replaced.
Unpacking the Unit
Inspect the unit once the packaging has been opened for any damage occurred during shipping & contact us immediately. Please keep the packing
material for further use.
1.
2.
3.
4.
5.
6.
7.
8.
LCD Display
Program Button
Mode Button
CD Skip Backward Button
ANTI-SHOCK Button
CD Stop Button (Power Off )
CD Play/Pause Button (Power On)
CD Skip Forward Button
cdmanual - JH 2009.08.27.indd 6-7
1.
2.
3.
4.
5.
6.
7.
8.
9. Battery Door
10. Earphone Jack
11. Volume Control
12. CD Door Open Switch
13. Bass Boost Switch
14. Hold Switch
15. DC Input Jack
AC OPERATION
1. Insert the DC plug, at the end of the AC adapter cord into the DC
input jack.
2. Plug the AC adapter into AC power outlet socket. Use only with
the 6V AC adapter and make sure the local voltage corresponds
on the adapter’s required AC input voltage.
Note: If the AC plug of this unit does not fit in your AC outlet, a plug
adapter (not supplied) should be used. Consult your local dealer on the
type of plug adapter required.
CONNECTING HEADPHONES
1. Decrease the volume to minimum.
2. Connect the earphones to the PHONES (GREEN) jack.
3. Increase the volume to the desired listening level.
Caution: Avoid excessive volume for long periods of time as this can
result in hearing damage.
califone.com
califone.com
4
5
8/27/2009 12:14:47 PM
HANDLING COMPACT DISCS
This unit is designed to play only compact discs bearing the
following identification logo.
Other discs may not conform to the CD standard and may not play
properly.
• Dirty, scratched or warped discs
INSERT WITH
PRESS THE CLAWS
may cause skipping or noise.
THE LABEL
AT THE CENTER OF
FACING UP.
THE DISC CASE.
• Handle the disc only by the edges.
To keep clean, do not touch its
surface.
PRESS THE
LIFT OUT WITHOUT
DISC GENTLY
TOUCHING THE
TO INSERT IT.
• Discs should be stored in their
RECORDED SURFACE.
cases after use to avoid serious
scratches.
INCORRECT
• Do not expose disc to direct
sunlight, high humidity, high
temperature, dust, etc.
CORRECT
INCORRECT
Prolonged exposure to extreme
temperatures can warp the disc.
• Do not stick or write anything on
FROM THE CENTER TO THE EDGE
either side of disc. Sharp writing
instruments or the inks
used in some felttip pens may
damage its surface
Remove the disc
• To pick up the disc, hold the edge
and gently press the center pivot
as illustrated.
Caution:
Wait for the disc to stop rotating before
pressing the OPEN button.
Note: This unit can play 3” (8cm) single CDs without an adapter. Do not
use a CD single adapter for these discs.
MAINTENANCE
CLEANING THE CABINET
Wipe with a soft cloth. If the cabinet is very dirty, dampen the cloth with a
weak solution of neutral detergent and water, and then wipe clean.
CLEANING THE LENS
A dirty lens will cause sound skipping and if the lens is very dirty, the CD
may not work. Open the disc cover and clean the lens as below:
• Dust or Dry Particles
Using a camera lens brush/blower, blow on the lens several times
and wipe it lightly with the brush to remove dust. Blow on the lens one
more time.
• Fingerprints
If the lens cannot be cleaned by using a brush/blower, use a dry
cotton swab starting from the middle and working to the outside edge.
CLEANING DISCS
Finger prints should be carefully wiped from
the surface of disc with a soft cloth. Unlike
conventional records, compact discs have
no grooves to collect dust and microscopic
debris, so gently wiping them with a soft
cloth should remove most particles. Wipe in
a straight motion from the center to the edge.
Never use thinner, benzine, record cleaner or anti-static spray on a compact disc. Such chemicals can damage its plastic surface.
cdmanual - JH 2009.08.27.indd 8-9
califone.com
califone.com
6
7
8/27/2009 12:14:48 PM
BASIC DISC PLAY
LCD DISPLAY INFORMATION
This CD-player can play Audio Discs such as CD-Recordables and CDRewritables.
DO not try to play a CD-ROM, CDi, VCD, DVD or computer CD.
1. Connect the earphones to the PHONES (GREEN) socket.
2. Press the OPEN button to open the CD compartment lid.
3. Adjust the VOLUME to minimum.
4. Insert the disc with the label side facing up.
5. Close the lid securely until a click is heard.
6. Press the PLAY button to start playing.
WHEN POWER IS ON
If a disc is in, auto adjustment starts.
During adjustment, display shows - -.
To Emphasize the bass sound
Set the BASS BOOST switch to the ON position.
Note: The bass boost performance will depend on
the VOLUME control setting.
HOLD Switch
This switch prevents accidental selection of an unwanted
function during Playback or Stop mode. In the HOLD
“ON” position, no function button on the unit can be
operated (except OPEN). Moving the switch to the “OFF”
position will allow the unit to return to normal operation.
Turning Power on and off
This unit has no ON/OFF switch. To turn on and off, press the following
buttons.
To turn on: Press >II PLAY/PAUSE (playback starts).
To turn off: Press STOP button once for standby mode.
Press STOP button twice to turn off the power.
Auto power-off function
When the unit is stopped (standby mode) for approximately 30 seconds,
the power will automatically turn off.
•
If no disc is in, disc is displayed.
Put the disc in and close the lid.
Auto adjustment starts.
•
If the lid is open, display shows OPEN.
Closing the lid starts auto adjustment.
•
If unable to read TOC then Er is displayed.
Note: TOC means Table Of Contents.
•
When TOC data has been read, display
shows TOC for 1 second.
•
To turn on anti-shock press ANTI-SHOCK
key play, ANTI-SHOCK will start. To turn
anti-shock off press ANTI-SHOCK key again,
the will disappear on the display.
TO PLAY FROM STOP CONDITION
• Press the PLAY/PAUSE button. The display
changes to 01 00:00 and starts play.
•
When the memory is full, stops flashing.
TO STOP
Press the STOP button. This will stop play and
the TOC will be displayed.
TO PAUSE
Press the PLAY/PAUSE button and the pause
on/off button alternately. When the unit is
paused, the time display will flash.
cdmanual - JH 2009.08.27.indd 10-11
califone.com
califone.com
8
9
8/27/2009 12:14:48 PM
REPEAT/PLAY MODES
Every time the MODE button is pressed, the corresponding mode
appears in the display window.
INTRO PLAY
1. Press the MODE button three times; INTRO
will display.
2. Press the PLAY/PAUSE button, starts INTRO
play from track no.01.
3. Select INTRO mode during play; INTRO starts
flashing.
• Press the PLAY/PAUSE button. Flashing will
stop and INTRO play will start from track no.
01.
• Press >>I to play the current track. Flashing
will stop, and INTRO play will start from next
track.
• Press I<<. Flashing will stop and INTRO play
will start from current track.
PROGRAM PLAY
This allows selected tracks on the disc to be played in any desired
order.
Shown on the LCD display. The
current track on the disc will be
repeated.
Shown on the LCD display. All
tracks on the disc will be
repeated.
NOTE: In normal mode, none of the above mode symbols will be
shown in the display.
NORMAL PLAYBACK
During normal playback a
indicator
appears on the display when the batteries
need to be changed.
califone.com
10
cdmanual - JH 2009.08.27.indd 12-13
To set the program play
• Programming can be set in the STOP mode or normal play mode.
1. Press the PROG button; PROGRAM will start
flashing.
2. Press I<< or >>I to select the desired track.
3. When the desired track is displayed, press
the PROG button to register. The track No.
display changes to 00 again.
4. Repeat steps 2 and 3 to program the order of
more tracks. Up to 20 tracks can be
programmed into memory.
To complete programming and start playback
Press the PLAY/PAUSE button. PROGRAM will
stop flashing and playback will begin.
To clear programming
• Register 00 on the first program track.
• Open the door.
• Power Off
califone.com
11
8/27/2009 12:14:48 PM
RANDOM PLAY
USING ANTI-SHOCK (ESP) PROTECTION FEATURE
Enables all the tracks on a disc to be played in a
Random(Shuffle) sequence.
1. Press the MODE button four times; RANDOM
will display.
2. Press the PLAY/PAUSE button. The Track No.
is selected at random and will begin to play.
3. To select RANDOM mode during play,
RANDOM starts flashing.
• Press the PLAY/PAUSE button I<< or >>I.
Flashing will stop and RANDOM play will begin.
When activated the Anti-Shock (ESP) system immediately begins to store
a buffer of sound data in the memory. The ESP indicator flashes until the
memory is full.
When the laser loses tracking due to mechanical shock, the CD reading
will be interrupted, but the audio playback will remain stead due to the
memory buffer.
SEARCH FUNCTION
NOTES
• When the “ANTI-SHOCK (ESP)” mode is operating, the battery consumption is higher because the disc rotates faster than normal and the
memory circuit is activated.
• When the digital anti-shock function is switched “ON” or “OFF”, the
sound will be interrupted. This is normal.
• Remember that conditions such as dirty, scratched or warped discs
may cause skipping or noise, thereby affecting performance of the
“ANTI-SHOCK (ESP)” system.
• Skip protection greatly reduces or eliminates skipping during activity
such as walking/running/driving. During such use, it’s best to hold the
compact disc player with the OPEN switch facing upward.
Locating a Particular track
To go back to the beginning of the
current or a previous track
Press I<< lightly and repeatedly.
To go to beginning of the following
track
Press >>I lightly and repeatedly.
Locating a Particular Point in a track
To search backward at high speed
Keep I<< depressed.
To search forward at high speed
Keep >>I depressed.
CAUTION
If the unit is subject to excessive and continuous repeated shocks, it will
cause the sound to skip.
Low level audio will be heard during the search process to assist in locating
the correct point in the track.
cdmanual - JH 2009.08.27.indd 14-15
califone.com
califone.com
12
13
8/27/2009 12:14:48 PM
SPECIFICATIONS
PICK UP
Laser diode Material:
Properties Wavelength:
Emission duration:
Laser output:
Error correction:
GaAlAs
λ=780mm
continuous
<44.6 µW
Cross-interleave Reed-solomon code
AUDIO
D/A conversion:
Frequency response:
Wow and flutter:
No. of Channels:
Output level Phones:
Bass boost effect:
DAC with four times oversampling
20-20,000Hz (+1/-3 dB)
Below measurable limits
2 Channels (Stereo)
15mW (32Ω)
(100Hz) + 6 dB
GENERAL
Power requirements:
Power adapter plug type:
Power consumption:
Dimension Approx.:
Weight Approx.:
2 “AA” alkaline batteries OR 6VDC 300 mA power adapter
EIAJ, center hole φ 1.7mm, outside φ 4.0mm
0.8W (DC 3V) under normal conditions
144 x 140 x 27 mm
200g not including battery
WARRANTY
Califone warrants this product to be free from defective material and
workmanship for one year from the purchase date. Our “Project Intercept”
Customer Satisfaction program will replace defective parts and repair
malfunctioning equipment under this warranty when the defect occurs
under normal use.
All Damage Claims Must Be Made With the Freight Carrier
Notify the freight carrier immediately if you observe any damage to the
shipping carton or product. Repack the unit in the carton and await
inspection by the carrier’s claim agent. Notify your dealer of the pending
freight claim.
Returning Your Unit for Service or Repairs
Should your unit require service, contact our Customer Service Department
online at califone.com/techsupport or via email [email protected] or
by phone at 800-722-0500 / 818-407-2400 to first obtain an RA (Return
Authorization) number before returning it to Califone. The unit must be
returned to our factory via prepaid transportation only after the factory
issues an RA number, which must be clearly written on the outside of the
box.
califone.com
14
cdmanual - JH 2009.08.27.indd 16-17
8/27/2009 12:14:48 PM
Califone® International, Inc.
1145 Arroyo Avenue, #A
San Fernando, CA 91340 USA
Toll Free 800.722.0500 | Toll Free Fax 877.402.2248
International Customers call 818.407.2400 or Fax 818.407.2405
califone.com
Califone CD-102 Rev 01 0810
cdmanual - JH 2009.08.27.indd 18
8/27/2009 12:14:48 PM