1
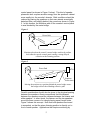
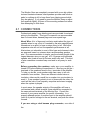
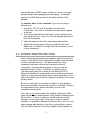
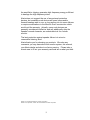
ALESIS
Monitor One
Reference Manual
TABLE OF CONTENTS
CHAPTER 1: ABOUT THE MONITOR ONE
1.0
A LITTLE HISTORY ............................................... 2
CHAPTER 2: INSTALLATION
2.0
2.1
2.2
SPEAKER PLACEMENT........................................ 4
CONNECTIONS .................................................... 7
POWER AND PROTECTION .................................. 8
CHAPTER 3: SPECIFICATIONS AND SERVICE
3.0
3.1
SPECIFICATIONS................................................. 1 0
3.0A Architectural and Engineering Specifications...........11
MAINTENANCE /REPAIR INFORMATION .............. 1 0
3.1A Cleaning...........................................................................10
3.1B Service .............................................................................11
CHAPTER 1: ABOUT THE
MONITOR ONE
Your new Alesis Monitor One™ Studio Reference Monitors will
deliver accurate mixes in near-field digital and analog studio
monitoring applications. The Monitor Ones offer wide frequency
response, accurate transient reproduction, clear imaging and high
power handling capability and were designed by experts with
decades of experience in professional loudspeaker design.
This speaker system uses a proprietary 6.5" high-power low
frequency driver with a special mineral-filled polypropylene cone,
a highly damped linear rubber surround and a 1.5" diameter voice
coil wound on a high-temperature Kapton former. The 1" high
frequency driver employed has a soft natural silk dome and is
ferrofluid cooled. The system's crossover network uses low
dielectric loss non-polarized capacitors and an oversized low-loss
low frequency inductor. Rear panel connections are made via 5way binding posts suited to large diameter wires as well as
banana plugs.
The cabinet design uses Alesis' exclusive SuperPort™ speaker
venting technology. Most small speakers used for near-field
monitoring give disappointing results in their lowest frequency
range. They are either sealed (which limits the amount of air the
driver can move) or have an undersized vent whose function at
low frequencies and high acoustic output is nullified by the effect
of turbulence in the restricted port tube. The Monitor One's large
folded SuperPort overcomes this limitation by minimizing vent
turbulence at high air velocities, thereby ensuring that the
enclosure tuning remains stable, the acoustic output remains
linear during heavy low frequency attack transients, and that the
reactive load above and below box resonance seen by the driving
amplifier does not dynamically shift in frequency. This all
translates to tighter bass with higher definition.
The Monitor One's 4 ohm load impedance takes advantage of
today's modern professional amplifiers which are generally capable
of a 1-3 dB increase in output power with 4 ohm loads over their 8
ohm ratings. The result is a similar increase in the Monitor One's
acoustic output over conventional 8 ohm monitors.
Reliable handling of this additional acoustic output is ensured by
the Monitor One's substantial power handling capability. Typical
near-field monitors are rated at 50-60 watts maximum whereas the
Monitor One carries a 120 watt continuous power rating and has
1
been successfully tested to over 200 watts using the industry
standard EIA-426A method. This a rugged speaker system
designed for serious professional use.
Covered with a non-slip rubber textured laminate for stable
mounting, the Monitor Ones come in a mirror image left/right pair
for symmetrical horizontal mounting.
1.0 A LITTLE HISTORY
In the early days of recording, most recording studios used big
monitor speakers almost exclusively. Unfortunately, they also
required high powered amplifiers and expensive acoustic
treatment (often poorly done) of the entire control room. Still, a
well-constructed big monitoring system really was impressive to
listen to, a fact not overlooked by the studio owners who wanted to
impress the record company executives who paid for the big
studio's time. These big systems had big level control knobs, and
clients enjoyed "cranking-up" the volume.
Fortunately, recording engineers and producers eventually
learned that this was not the best way to accurately mix music
because it wasn't the way people listened to their radios, cassettes
and CD players (metalheads excepted). Also, big monitor systems
and the costs for the required control room acoustic treatments
were going through the roof (no pun intended), particularly beyond
the budget limits of smaller project and home studios which were
growing in numbers. A new way of accurate monitoring was
needed: near-field monitoring.
Near-field monitors, by their definition, are intended for
mounting close to the listener. The idea here is to improve the
direct acoustic path between the speaker and the listener by
making it shorter, thereby giving less opportunity for the always
present indirect (reflected) sounds to get back in and muddle
things up. With near-field monitoring, the surrounding acoustic
environment becomes a much less significant factor in
establishing the monitor system's sound character.
A good set of small monitors properly placed in a reasonably
non-reverberant room and powered by a 100-watt amplifier will
yield surprisingly accurate results at budget prices. Carried to
another studio, the same monitor should also provide repeatable
results. In fact, some recording engineers carry their own
speakers around because they know how they will sound in
almost any room. Now, even the big studios use smaller speakers
2
to augment their big monitoring systems, and near-field monitors
have become proven tools in the recording business.
3
CHAPTER 2: INSTALLATION
Like any speaker system, your Monitor Ones will work best
when properly positioned in a suitable acoustic environment.
Achieving proper speaker placement is usually straightforward,
but even with near-field monitors, speaker placement and the
acoustics of the listening room itself are too often overlooked and
can become significant contributors to an inaccurate and
uninspiring monitoring environment.
Please take a moment to read this information carefully. It will
help you to get the most use and enjoyment from your new Alesis
monitors.
2.0 SPEAKER PLACEMENT
While near-field monitors are more forgiving of the
surrounding room acoustics, it is always prudent to optimize the
listening environment whenever possible. First, the user should
be aware of the effect that the size of the listening room can have
on low frequency response. In general, the smaller the room, the
stronger the bottom end will be, although placement within a
larger room can also make a difference. This has to do with the
way low-frequency waves travel in closed spaces. If you find your
monitor system to be either light or heavy on the bottom, try
moving them around within your listening room. Also, because the
Monitor One's SuperPort tube is located at the rear, position the
monitors at least six inches away from anything that would block it.
You should avoid locating your Monitor Ones near reflective
surfaces such as glass, tile, large open walls or table tops. Still,
many rooms used for recording have these surfaces, so the best
way to deal with them is to place the monitors out in the room
away from reflective walls, windows and sizable objects.
Even with these reflective surfaces separated from the
monitoring position, typical mixing situations usually still have the
top surface of the mixing board to deal with. Unfortunately, the
board itself can be a major source of reflections and the additional
acoustic conduction into the board can affect your monitor's
amplitude and phase response. Speaker placement on the
console's meter bridge provides for two clear acoustic paths
between the speakers and the recording engineer which results in
undesirable comb filtering effects and poor imaging. The first path is
the direct one, and the second is via a reflection off the mixer main
4
control panel (as shown in Figure 1 below). This kind of speaker
placement also couples acoustic energy from the speaker's cabinet
more readily into the console's chassis. Both conditions should be
reduced by placing the speakers on their own stands acoustically
detached from, and slightly behind, the console as shown in Figure
2. In this location, the reflective path off the console's control panel
is now blocked by the meter bridge.
Figure 1
Direct Path
Re
flec
tion
Monitors placed on the console’s meter bridge can directly radiate
back onto the console control panel causing a strong delayed
reflection at the listening position
Figure 2
Direct Path
voids
ath A
—6”—
Minimum
ole
Cons
tP
Direc
Random
Reflections
Moving the monitors to a position behind the meter bridge causes
the bridge to block the offending reflective path
Careful consideration should also be given to the physical spacing
between the speakers. Alesis recommends that the distance
between the speakers equal the distance between the listener and
either speaker. In other words, the listener and the two speakers
are at the three corners of a triangle having equal- length sides.
Figure 3 shows this concept. Note that both speakers are turned
in somewhat, so that the prime listening position is directly out in
front of each speaker. Applications that require monitoring by
5
more than one engineer are accommodated by a smaller rotation
of the cabinets. This will widen the prime listening position
somewhat.
Figure 3
Ri
or
gh
nit
o
ft M
tM
on
ito
Le
r
The speakers and
listener should be at
the three corners of
a triangle having
equal length sides
Prime Listening Position
Alesis has designed the Monitor Ones for horizontal mounting.
This keeps their height profile as low as possible to minimize the
recording engineer's visual obstructions. Your Monitor Ones are
supplied as a symmetrical left-right pair, and if used this way,
should be installed with the soft dome high frequency drivers
towards the outsides of the triangle. The high frequency driver
should be on the left side of the left monitor and on the right side of
the right monitor (see Figure 4 below). Of course, the traditional
method of mounting the speakers with the high frequency drivers
at the top is perfectly acceptable too.
Figure 4
TM
TM
The high frequency driver should be on the left side
of the left monitor and on the right side of the right monitor
6
The Monitor Ones are completely covered with a non-slip rubber
textured laminate whereas other speakers provide small stick-on
pads (or nothing at all) to keep them from slipping around while
they are playing. If you need to move the Monitor Ones or adjust
their position slightly, lift them off the mounting surface first rather
than attempting to slide them.
2.1 CONNECTIONS
Professional grade 5-way binding posts are provided for external
wiring to the amplifier. This type of connector can accommodate
bare or tinned wires, banana plugs and even spade lugs.
About Wire: A lot of hype and confusion exists about the type of
speaker wires to use, most of it created by the wire manufacturers
themselves in an effort to have a unique story to tell. While this
expensive wire will not hurt the speaker's performance at all,
Alesis does not subscribe to most of this hype and chooses to take
an approach based on science when recommending speaker
wire. Our recommendation is simple; use the shortest length of the
largest diameter wire you can get. #12-14 gauge multi-stranded
speaker wire found at most hi-fi stores works very well. This kind
of wire resembles oversized lamp cord and is very easy to work
with.
Before connecting the speakers, make sure your amplifier is
turned OFF before making connections to it. Be sure you get the +
terminals of the speakers wired to the + terminals of the amplifier.
To help you do this, most speaker cable has a way to tell one
conductor from another. Some use different-colored wires or
insulation; others mold a small line or marker into one insulator to
mark it. If one speaker's polarity is out of phase with the other, the
result will be loss of low frequency response and stereo imaging
when the system is played.
In most cases, the speaker outputs of the amplifier will have a
red terminal and a black terminal; these should be connected to
the same-colored terminals of the Monitor One. Consult the
manual of your power amplifier for specific information. In a
properly-phased system, a positive input to the amplifier should
result in a positive voltage on the red terminal, and push the driver
forward.
If you are using a dual banana plug connector, one side of
the
7
plug usually has a "GND" marker molded on it so you can keep
polarity straight after unplugging and replugging. In standard
practice, the GND side connects to the black terminal of the
speaker.
To connect wires to the terminals if you are not using a
banana plug:
1. Strip about 1/2" (15 mm) of insulation from the ends
of each wire. If the wire is stranded, twist the strands together
at the end.
2. Turn the red and black terminal caps counter-clockwise until
they reach their limit. As you do, the hole through the terminal
post will be exposed.
3. Insert the wires into the holes, observing proper polarity.
4. Tighten the terminal caps so that they hold the wire firmly.
Make sure no insulation is caught inside the terminal, to avoid
a loose connection.
2.2 POWER AND PROTECTION
Alesis recognizes that professional speakers need to be strong to
survive, so the Monitor One is designed to handle twice the power
of other near-field monitors. This was achieved by using
proprietary high power drivers and oversized crossover
components, choices made principally to offer the user an
extended margin of safety. Therefore, an amplifier with a
100 watt power rating into 4 ohms, like the Alesis RA-100™
Reference Amplifier, is recommend for most monitoring situations.
Higher or lower power amplifiers may be used, depending on the
size of the listening room and the engineer's preference for normal
working levels.
Be sure to verify that your amplifier is rated for 4 ohm speakers.
Some older amplifiers are not and may fail if overloaded. Alesis is
not responsible for any failures caused by the use of an
inproperly-rated amplifier.
Also, there is no situation where an amplifier rated beyond 200
watts should ever be used because of the danger of damaging the
Monitor One. To do so is asking for trouble and will void your
warranty. On the other hand, if you use too small of a power
amplifier, it is possible to damage the Monitor One if you run it into
heavy clipping and distortion in an effort to get sufficient volume.
This can lead to failures of both the amplifier and the speaker, as
8
the amplifier’s clipping generates high frequency energy sufficient
to damage the high frequency driver.
Alesis does not suggest the use of any external protection
devices, but considers such devices as fuses, lamps and/or
thermal breakers safe to use, so long as they do not cause failures
or require modifications to the Monitor One's construction which
would void the warranty. Actually, many such devices are
generally considered ineffective and can additionally alter the
speaker's sound character, an undesirable trait for a studio
monitor.
The best protection against speaker failure is to mix at a
reasonable listening level.
Alesis thanks you for choosing our products. We value any
comments you may have about this monitor system, this manual,
your Alesis dealer and about our factory service. Please take a
minute now to fill out your warranty card and tell us what you think.
®Alesis is a registered trademark of Alesis Corporation.
Monitor One, SuperPort, and RA-100 are trademarks of Alesis Corporation
9
CHAPTER 3: SPECIFICATIONS AND
SERVICE
3.0 SPECIFICATIONS
Drivers:
6.5" low frequency, 1"
silk dome high frequency
2.5 kHz, 2nd-order filters
(12 dB per octave)
45 Hz - 18 kHz, ±3
Crossover:
Frequency Response:
dB
Power Handling:
120 watts program, 200
watts peak (using EIA426A method)
4 ohms
88 dB SPL @ 1 watt and
1 meter on axis
Rubber textured laminate
over 5/8" MDF with
Alesis SuperPort on rear
Nominal Impedance:
Sensitivity:
Cabinet:
Dimensions:
8.5"D
Weight:
15"W x 9.25"H x
15 lb. each
3.0A Architectural and Engineer's Specifications
The loudspeaker cabinets shall each contain a 6.5" low frequency
and a 1" silk dome high frequency driver, and be equipped with a
passive crossover network with a crossover frequency of 2.5 kHz.
The low frequency driver shall have a mineral-filled polypropylene
cone, a damped linear rubber surround and a 1.5" diameter voice
coil wound on a high-temperature Kapton former. The high
frequency driver shall be ferrofluid cooled. The crossover network
shall consist of a low-pass section feeding the 6.5" driver and a
high-pass section connected to the 1" driver, with 2nd-order filters
in each section using low dielectric loss non-polarized capacitors
and an oversized low-loss low frequency inductor. Each cabinet
shall be equipped with two 5-way binding posts for electrical
connection to an amplifier recessed into the back of the cabinet.
These posts shall accept heavy-gauge wire, standard banana
plugs, or spade lugs.
The cabinet shall be constructed of 5/8" thick MDF and be
10
covered in a dark grey rubber textured laminate. The cabinet shall
have a large folded vent port tuned to extend the response of the
low-frequency driver, using Thiele-Small parameter calculations
adjusted for the effects of turbulence in the port during high-power
operation. The cabinet shall measure 15" wide, 9.25" high, and
8.5" deep, and weigh 15 pounds (Metric specification: 38.1 cm x
23.5 cm x 21.6 cm, 6.8 kilograms).
Each assembly shall exhibit a frequency response from 45 Hz to
18 kHz, plus or minus 3 dB. Its impedance shall be 4 ohms, and
be capable of handling 120 watts program material or 200 watts
peak input using the EIA-426A testing method. It shall generate
an 88 dB sound pressure level, measured at 1 meter with a 1 watt
power input.
The loudspeakers shall be the Monitor One Studio Reference
Monitors from Alesis Corporation.
3.1 MAINTENANCE/REPAIR
INFORMATION
3.1A Cleaning
The cabinet surfaces of the Monitor One are covered with a
textured rubber laminate. Clean these surfaces when necessary
with a lint-free cloth dampened in warm soapy water. To preserve
the textured finish, don't rub hard on the surface. Do not attempt to
clean the cabinet with a brush (which may damage the surface) or
a sponge (which may leave small crumbs in the texture).
Do not attempt to clean either of the drivers.
The Monitor Ones require no periodic maintenance.
3.1B Service
Before sending the Monitor Ones in for repair, make sure they are
faulty and that the problem isn't being caused by something else
in the system. Distortion or noise may be caused by a defective
amplifier, preamp, cable, equalizer etc., or a loose connection in
the system. Connect the Monitor Ones to a system that is known to
be working properly to check whether the monitors have
malfunctioned.
Should service become necessary, YOU MUST FIRST CONTACT
ALESIS TO OBTAIN A RETURN AUTHORIZATION NUMBER
BEFORE RETURNING THE UNIT TO ALESIS OR AN
AUTHORIZED ALESIS SERVICE FACILITY. If the unit is to be
11
repaired under warranty, you must provide a copy of the original
sales receipt as evidence of date of purchase. Repairs will be
made under warranty only after Alesis or an Authorized Service
Center has determined in its sole discretion through inspection
that the failure was not the result of overpowering, abuse, power
surges, or defective components ahead of the Monitor One.
OPENING THE MONITOR ONE OR ALTERING ANY OF ITS
COMPONENTS WILL VOID THE FACTORY WARRANTY. To
obtain repair after the warranty period, contact your dealer or
Alesis.
Outside the United States, contact your local distributor for
repair information.
12