1
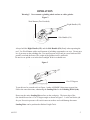
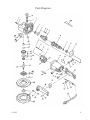
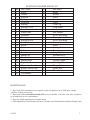
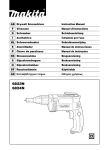
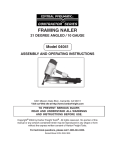
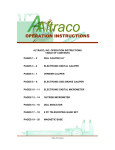
CHICAGO
7” ELECTRIC POLISHER / SANDER
MODEL 41213
ASSEMBLY and OPERATING
INSTRUCTIONS
®
3491 Mission Oaks Blvd. Camarillo, CA 93011
Copyright © 1999 by Harbor Freight Tools®. All Rights reserved. No portion of this
manual or any artwork contained herein may be reproduced in any shape or form
without the express written consent of Harbor Freight Tools.
For Technical Questions and replacement parts, please Call 1-800-444-3353
Please visit our WebSite
at
www.harborfreight.com
Specifications
Voltage & Watts
Amps
RPM
Arbor diameter
Spindle thread
Wheel diameter
110 volts, 850 watts, 60Hz, Single Phase
6 amps / no load 2.0 / with load 2.5 / start up 3.6
2 Speeds (2800 / 3300)
7/8”
5/8” – 11
6 – 3 / 4”
Warning!!!
Read all instructions before charging or operating the tool.
Save This Manual. You will need it for safety guidelines, operating instructions, and parts
list. Keep your invoice with this manual and record your invoice number here
_________________________ for future reference.
Rules For Safe Operation
Work Area
1. Keep Work Area Clean. Cluttered areas invite accidents.
2. Consider Work Environment. Do not use power tools in damp or wet locations. Do not
expose to rain. Do not use tools in presence of flammable liquids or gases.
3. Keep Children Away. All children should be kept away from work area. Do not let them
handle tools or electrical cords.
4. Store Idle Equipment. When not in use store tools in a high, dry, locked location.
Personal Safety
5. Dress Properly. Do not wear loose clothing or jewelry that can be caught in moving parts and
cause personal injury. Wear protective hair covering to protect long hair. Rubber gloves and non skid
footwear are recommended when working outdoors.
6. Protect Your Eyes, Ears, and Lungs. Wear safety glasses. Wear a dust mask. Use a full
face mask if you are producing metal filings or wood chips. Wear hearing protection during extended periods of operation. Safety equipment is available at Harbor Freight Tools.
7. Stay Alert. Concentrate on what you are doing. Use common sense. Do not operate while
under the influence of drugs or alcohol. Read warning labels on prescription medication to determine
if the medication will impair your judgment or reflexes.
#41213
2
8. Guard Against Electric Shock. Prevent body contact with grounded surfaces such as pipes,
refrigerator enclosures, radiators, and ranges.
9. Disconnect Tools. Disconnect tools when not in use.
10. Do Not Overreach. Keep proper footing and balance at all times. Do not reach over
machines that are running.
11. Avoid Accidental Starting. Never carry a power tool with a finger on the trigger.
Tool Care And Use
12. Check For Damaged Parts. Before using a tool check for damaged parts. If found,
determine whether or not the tool will operate properly and perform its intended function. Check for
alignment of moving parts, binding of moving parts, breakage of moving parts, mounting, or any
other condition that might affect operation. Any damaged part should be serviced or replaced by an
authorized service center, unless otherwise stated elsewhere in this manual. Do not use the tool if
switch does not turn on and off properly.
13. Maintain Tools With Care Follow instructions for lubricating or changing accessories.
Inspect tool or charger cords before using. If a cord is damaged have it repaired by an authorized
service center. Keep handles dry, clean, and free from oil and grease.
14. Secure Work. Use clamps or a vise to hold your work. It is safer than using your hands and
frees both hands to operate the tool.
15. Do Not Force The Tool. It will do a better job and be safer to operate when used at the rate
it was designed for.
16. Use The Right Tool. Do not force a small tool or attachment to do the work of a larger,
heavy duty tool. Do not use the tool for a purpose for which it was not intended.
17. Replacement Parts And Accessories. When servicing use only identical replacement parts
or accessories. Approved parts and accessories are available at Harbor Freight Tools.
Voltage Warning
Before connecting any power tool to a power source (receptacle, outlet) make sure the voltage
supplied is the same as specified on the name plate on the tool. A power source with a voltage
greater than specified on the tool can result in SERIOUS INJURY to the user, and damage the tool.
If in doubt, DO NOT PLUG IN THE TOOL and ask a qualified, certified technician.
Extension Cords
An extension cord should not be used unless absolutely necessary. Make sure that the pins on the
plug of the extension cord are the same number, size and shape as those on the tool. If an extension
cord is to be used outdoors, make sure that it is designated W-A on the cord jacket. Round jacketed
extension cords listed by Underwriters Laboratory (UL) are preferable.
AMP RATING TOTAL EXTENSION CORD(S) LENGHT IN FEET
25 50 75 100 125 150 175 200
0-10.0
18 18 16 16 14 14 12 12
10.1-13.0
16 16 14 14 14 12 12 12
13.1-15
14 14 12 12 12 12 12 -15.1-18
12 12 12 12 12 12 -- -#41213
REV 06/05
A
W
G
3
Assembly
IMPORTANT
Carefully inspect the condition of the accessory before use and check the accessory continually
during use. If any damage is noted, stop immediately and replace the accessory with an undamaged
one. Harbor Freight Tools cannot be held responsible for damage caused by using a damaged
accessory on this tool.
See Figure 1
Attach the Side Handle (#34) to the Cabinet (#16). Hold the Polisher upside down resting in your
hand with your finger on the Stop Pin (# 3) . Depress the Stop Pin (# 3) so that the
Output Shaft (#42) won’t turn. Insert the knobs protruding from the end of the Wrench (#49) into
the recessed holes on the Flange Nut (#47). Loosen and remove the Flange Nut (#47) by turning it
counterclockwise. Set the Polishing Wheel (#46) on the Output Shaft ( #42). Replace the
Flange Nut (#47). Make sure you are depressing the Stop Pin (#3) while using the
Wrench (#49) to tighten the Flange Nut (#47) by turning it clockwise until firmly in place. Wrap
one of the Wool Bonnets ( two provided ) on top of the Polishing Wheel (#46). Tie it securely using
the drawstring. Make sure to tuck any excess string inside the Bonnet.
Figure 1
Flange Nut (# 47)
Polishing Wheel (#46 )
Output Shaft (# 42)
Stop Pin (#3)
Side Handle (# 34)
#41213
REV 06/05
Cabinet (#16)
4
OPERATION
Warning!!
Never mount a grinding wheel and use as a disc grinder.
Figure 2
Wool Bonnet (Two Provided)
Right Handle (#21)
Side Handle (#34)
Always hold the Right Handle (#21) and the Side Handle (#34) firmly when operating the
tool. Use Wool Bonnet with a small amount of polishing compound or car wax. Do not put a
lot of pressure on the polishing disc. Too much pressure will result in a poor finish and will
possibly overload the motor. The weight of the polisher itself is sufficient.
Do not wax or polish a car in the direct sunlight. Work in a shaded area.
Figure 3
15 to 25 Degrees
To use this tool as a sander refer to Figure 1 under ASSEMBLY directions on page four.
Follow the same directions, substituting the Sanding Disc for the Polishing Wheel (#46).
Do not use the entire Sanding Disc surface on the workpeice. The inner edge of the
disc should be used at a 15 to 25 degree angle as shown in Figure 3. Let the tool do the job
for you. Excessive pressure will result in uneven surfaces and could damage the motor.
Sanding Discs can be purchased at Harbor Freight Tools.
# 41213
5
Parts Diagram
# 41213
6
No
1
2
3
4
5
6
7
8
9
10
11
12
13
14
15
16
17
18
19
20
21
22
23
24
25
ELECTRIC POLISHER PARTS LIST
Part Name
No
Part Name
Screw
26
Brand
Washer
27
Washer
Stop Pin
28
Screw
Spring
29
Screw
Gear Box
30
Screw
Bearing
31
Cord Clip
Bearing Cover
32
Cord Armor
Screw
33
Cord
Pinion Gear
34
Side Handle
Armature
35
Axle Check Ring
Bearing
36
Bearing
Bearing Screw
37
Axle Check Ring
Fan Guide
38
Gear
Screw
39
Screw
Stator
40
Bearing Cover
Cabinet
41
Bearing
Brand
42
Output shaft
Brush Cap
43
Woodruff Key
Brush
44
Screw
Brush Holder
45
Packing Gland
Right Handle
46
Polishing Wheel
Alternation Switch
47
Flange Nut
Rubber Switch Cap
48
Fleece Pad
Switch
49
Wrench
Left Handle
MAINTENANCE
1. Inspect all of the mounting screws regularly as the unit produces up to 3400 rpms causing
vibration. Tighten if necessary.
2. Inspect the carbon Alternation Switch (#22) every six months. If it looks worn, have it replaced
by an authorized service representative.
3. Keep any liquid materials away from the motor.
4. After repeated use, Wool Bonnets will wear. Purchase new Wool Bonnets at Harbor Freight Tools.
# 41213
7