1
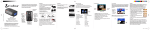
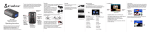
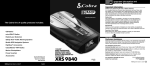
Printed in China Part No. 480-890-P Version C
Thank you for purchasing Cobra’s maximum performance
radar/laser/camera detector.
The Cobra SPX 7800BT works with
iPod® touch (5th Generation)
iPod® touch (4th Generation)
iPhone® 5
iPhone® 4S
iPhone® 4
Android™ smartphones running OS 2.1 or higher
Controls and
Connections
Windshield Bracket
Mounting Slot
SPX 7800BT
Maximum Performance
Radar/Laser/Camera Detector
Operating Instructions
NOTE: This device complies with part 15 of FCC rules: Operation is subject to the following
two conditions: (1) This device may not cause harmful interference, and (2) This device must
accept any interference received including interference that may cause undesired operation.
CAUTION: Modifications or parts not approved by Cobra Electronics Corporation may
violate FCC Rules and void authority to operate this equipment.
This device complies with Industry Canada licence-exempt RSS standard(s). Operation is
subject to the following two conditions: (1) this device may not cause interference, and (2)
this device must accept any interference, including interference that may cause undesired
operation of the device.
Le présent appareil est conforme aux CNR d’Industrie Canada applicables aux appareils
radio exempts de licence. L’exploitation est autorisée aux deux conditions suivantes : (1)
l’appareil ne doit pas produire de brouillage, et (2) l’utilisateur de l’appareil doit accepter tout
brouillage radioélectrique subi, même si le brouillage est susceptible d’en compromettre le
fonctionnement.
SPX7800BT_MANL_SML.indd 1
12V Power Jack
Power/Volume
Control
• Press to turn power On and Off.
• Push forward
or pull back to adjust volume.
Dim/ Button
• Adjusts the display
brightness.
• In Menu mode,
steps backward
through available settings selection.
Menu/Save Button
• Press once to enter Menu Mode.
• Press again to save settings.
Mute/Set Button
• Press once to manually mute audio alerts.
• In Menu mode, press to save selected settings.
City/ Button
• Switches between
Highway and City
filtering modes.
• In Menu mode, steps forward through
settings selection.
Mounting
Types of Screens
Powering
Your detector should be mounted on the windshield or dashboard of
your vehicle. Two mounting options are included:
Suction Cup Mount –
This is the best option for portability and moving the detector from car to car. Make sure to
thoroughly clean the suction cups and windshield mounting area to insure a tight seal.
Hook and Loop Fastener–
Included for dashboard mounting.
Suction Cup Mount
Hook & Loop Fastener
Your detector should be mounted so that it is oriented
parallel to the road.
1. Menu/Settings Screen
Plug in your detector using the included
cigarette lighter adapter.
Note: the adapter includes a USB port that
can be used to charge your smartphone or
tablet using the manufacturer’s charging
cable.
User and Alert Settings are available for customizing your
detector. When Menu is pressed, you will see the screen shown
below (Active mode icon will be enlarged/highlighted).
Turn your detector on/off by pressing the
Power/Volume switch on the side of the
unit. The unit will light up.
User
Settings
USB Port
Avoid blocking the detector’s view by windshield wiper
blades or dark tinting at the top of the windshield.
Note: Do not attempt to bend the mount while the detector
is attached.
Alert
Settings
12V Power Jack
Incorrect Positions
The suction cup mount comes standard bent at
a 45° angle. The metal is designed to bend
without breaking. Adjust the angle so when
mounted the detector is level with the road.
No connection to phone.
Connected to phone.
3. Alert Screens
Radar bands consist of X-band, K-band, Ka-band, and Ku-band. With
Radar signals, the signal strength meter shows signal strength of the
radar gun as well as relative proximity to the source. With Ka-band,
you will also be notified of the actual Ka-band radar gun frequency
being used.
12V Cigarette Lighter Adapter
Windshield
Correct Position
2. Standby Screens
Power/Volume Control
User Settings
For customizing settings for:
Alert Settings
For customizing settings for:
• City/Highway Filtering
• X-Band
• IntelliMute/IntelliMute Pro
• K-Band
• Auto Mute
• Ka-Band
• Tone/Voice
• Ku-Band
• Color Theme
• POP Detection
• Display Timer
• VG-2 RDD
• Smart Power
• Spectre RDD
• Factory Default
• Safety Alert
• Low Car Voltage
Note: Pressing Mute button while connected to an iPhone®/
Android™ smartphone will toggle between these two screens.
Compass Heading: Automatically displays GPS-based heading
when connected to a smartphone*. If a GPS signal cannot be received
through your smartphone,
will be displayed.
Vehicle Speed: Automatically displays your current vehicle speed
using your smartphone GPS. If a GPS signal cannot be received
through your smartphone,
will be displayed.
City/Highway Indicator: Shows curent filtering mode.
Signal Strength
• Level 1=
Weakest Signal
• Level 5=
Strongest Signal
Frequency
Ka Band Alert
With Laser signals, you will always receive full alert and pulse rate
(PPS) of the corresponding laser gun being used.
Laser
Pulse
Rate
*Works with iPhone and Android
smartphones. Internet connection
and data plan usage required.
IntelliMute®continued
Quad-level IntelliSheild™ False Signal Rejection: Highway Mode
provides full immediate response to all signals detected. Use this
mode when you are driving on interstate highways.
Automatic door openers operate in X and K-band frequencies. To
minimize unwanted false alerts in an urban environment where these
sources exist, use one of the City Filtering Modes below:
• City X: automatically mutes X-band audible alert until signal strength reaches level 3 or above.
• City X+K: combined with City X, automatically mutes K-band audible alert until signal strength reaches level 2 or above.
• City Plus X+K+Ka: combined with City X+K,
adds filtering to Ka-band.
• City MAX: Maximum filtering against urban false signal sources.
•IntelliMute Engine RPM Activation Point Not Set.
The City modes can also be adjusted by pressing the City button
for 2 seconds.
Vehicle Battery Voltage: Displays your car battery voltage and
automatically warns you if this drops below 11.9V.
IntelliMute Indicator:
Indicates status of IntelliMute.
See IntelliMute section
for details.
Settings
IntelliMute®: IntelliMute allows you to avoid audible alerts you
don’t need to hear because you are stopped or moving slowly. By
sensing the RPMs of your engine, IntelliMute knows when you are
at low speed and automatically mutes alerts. You can set your preferred engine RPM activation point and/or turn on/off IntelliMute by
following simple steps that appear on your unit screen, under User
Settings and then IntelliMute.
•IntelliMute On/Above Set Engine RPM Activation Point.
•IntelliMute On/Below Set Engine RPM Activation Point.
Note: IntelliMute may not work with some vehicles,
especially hybrids or EVs because the detector cannot sense
the engine RPMs. In such case, Quad-level IntelliShield City Filtering or Auto Mute can help reduce unwanted audible alerts.
IntelliMute® Pro: IntelliMute Pro prevents detection by radar
detector detectors (RDDs) such as VG-2, Spectre I and Spectre
IV when traveling at slower speeds. It is intended for use by
experienced users only.
When IntelliMute Pro is turned On and engine RPMs are below
the IntelliMute Pro Activation Point, your detector’s radar detection circuits are turned Off to prevent detection by RDDs.
IntelliMute Pro cannot be turned on until IntelliMute is turned
on and set. The IntelliMute Pro icon will appear in the display
when IntelliMute Pro is On and the Activation Point has been set.
Whenever engine RPMs are below the Activation Point, the arrow
points down with the “i” blinking. When RPMs are above the
Activation Point the arrow points up with the “i” blinking.
Auto Mute Mode
When Auto Mute is On, the audio volume of all alerts is automatically reduced after 4 seconds. The signals will remain muted for as
long as the signal is detected. When Auto Mute is Off, the alerts will
sound at full volume for as long as the signal is detected. The factory
setting for Auto Mute is On.
Voice or Tone Mode
You can set your detector to sound alerts and confirm menu settings with either a Voice or a Tone Alert. Voice Alert provides voice
messages in addition to tones. Tone Alert provides tones only. The
factory setting is Voice Alert.
Illumination
The display illumination intensity can be adjusted to suit driving
conditions with five levels and Dark Mode:
• Factory default is Bright, then Display Timeout after 1 minute.
• Dark to blank the screen for discreet use. In this mode, alerts will sound but not show. (The display scanner bar will move slowly back and forth near the bottom of the screen to indicate the unit is turned On).
You can adjust the illumination by pressing the Dim button and then
use the
and
buttons to step through the levels.
Dim/
Button
Customizable Display Colors
Your detector includes the Color Theme feature that allows you to
customize the display screen color scheme to match your car’s dash
illumination: Multi-Color, Red, Blue, Orange, White or Green.
The factory setting is Multi-Color.
7/25/13 1:51 PM
Settings continued
Display Timeout
Your detector has a Display Timeout mode. When Display Timeout
is turned On (factory default is 1 minute), the screen will change to
Dark from Bright, Dim, or Dimmer after the time interval selected
in Menu mode. The Display Timeout setting can be changed so the
display is always On. In Display Timeout mode, the display scanner
bar will move slowly back and forth near the bottom of the screen to
indicate the unit is turned On and detecting.
Note: While at the Dark level under timer control, any alert will turn
the display back on at the last brightness setting (Bright, Dim or
Dimmer). Touching any button will also turn On the display.
SmartPower Mode
Your detector includes the SmartPower feature that, when turned
On, will put the unit into Low Power mode 15 minutes after the car’s
engine has been turned Off.
Before SmartPower enters Low Power mode, you will hear three
beeps and SmartPower will flash on the display. To return the unit
to Normal Power mode and exit Low Power mode, start the car,
press any button or turn the unit Off and then On again. The factory
setting is SmartPower On.
Car Battery Low Voltage Warning
In addition to displaying system voltage, your detector can provide a
warning that battery voltage is low so that timely steps can be taken
to correct the problem. The Car Battery Low alert is triggered when
the voltage drops below 11.9 volts. Following the alert, the unit
enters SmartPower mode to avoid further draining your car battery.
Detection
Your detector is capable of detecting the following signals in addition
to X, K, Ka, Ku-Band and Laser signals.
Instant-On Signals: Your detector is designed to detect Instant-On
speed monitoring signals, which can suddenly appear at full strength
on your detector’s signal strength indicator.
POP Detection: Your detector is designed to detect single pulse mode
radars. These radars are designed to have a low probability of detection.
You should note that these radar guns have a much shorter range while in
this mode.
VG-2, Spectre 1, & IV+: Police use radar detector detectors (RDDs) to
spot users of radar detectors in a commercial vehicle. Your detector is able
to identify signals from VG-2, Spectre I, and Spectre IV RDDs and can provide alerts when any of these or similar devices are in use near your vehicle.
You can choose whether you want to be alerted to VG-2, Spectre I, & IV
RDD signals.
Safety Alert Traffic Warning System: FCC-approved Safety Alert transmitters emit microwave radar signals that indicate the presence of a safetyrelated concern. Depending on the frequency of the signal emitted, it can
indicate a speeding emergency vehicle or train, or a stationary road hazard.
Because these microwave signals are within the K band frequency, most
conventional radar detectors will detect Safety Alert signals as standard K
band radar. Your detector, however, is designed to differentiate between
standard K band and Safety Alert signals, and give separate alerts for each.
When you receive such an alert, please watch for emergency vehicles ahead
of you, on cross streets and behind you. If you see an emergency vehicle approaching, please pull over to the right side of the road and allow it to pass.
Strobe Alert: Special strobes mounted on the light bars of authorized
emergency vehicles (fire trucks, police cars, ambulances) automatically
change traffic signals as the vehicle approaches an intersection. These
strobes and the special strobe detectors located on the traffic signals,
introduced fairly recently by 3M and Tomar, are already in use in more
than 1000 cities nationwide. Cobra’s exclusive Strobe Alert detector will
detect these special strobes and give an emergency vehicle alert.
When you receive such an alert, please watch for an approaching emergency vehicle and pull over to allow it to pass. To inquire about coverage
in your area, contact your local fire and police departments.
Responding to Alerts*:
Recommended Response
FULL ALERT
Press Scan for Devices and/or wait for the Device list to populate
and then select iRadar.
To download the app you must enter the iTunes
Store or Google Play and search for “Cobra
iRadar”. Follow the onscreen instructions to
download and install the Cobra iRadar app.
When your detector is properly
paired and connected to your phone
the Bluetooth icon on your display
will show.
Tone sounds one time
only.
Probably a false alarm, but
Exercise caution
possibly pulsed radar, Spectre
I or IV+ or VG-2 nearby.
Cobra iRadar® App
Tone instantly begins
repeating rapidly.
Radar, Spectre I or IV+
or VG-2 nearby has been
activated suddenly.
The iRadar app is what separates Cobra from any
other detectors out there.
Tone repeats slowly as
you approach a hill or
bridge, then speeds up
sharply as you reach it.
Probably police radar beyond FULL ALERT
the hill or bridge.
Tone repeats slowly
for a short period.
Probably a false alarm.
Exercise caution
Any type of laser alert.
Laser alerts are
never false alarms.
FULL ALERT
Any Safety Alert.
You are nearing an
Exercise caution
emergency vehicle, railroad
crossing or road hazard
(construction, accident, etc.).
Make sure to check out the Tutorial for a full
explanation of app features. The Tutorial can be
accessed from the Menu.
Information on specific settings and explanations of
radar bands can be found by pressing the
buttons in the settings menus.
Location-based
Alert type
In order to pair your detector to your smartphone, go to the
Bluetooth Settings Menu on your phone/tablet. For most devices
this is found by pressing; Settings u Bluetooth.
Downloading the App
Interpretation
Probably police radar.
FULL ALERT
Pairing/Connecting with Your Detector
Pairing can take up to 30 seconds. If you are prompted to “Accept
password to pair” press Confirm. When iRadar is properly paired
“Connected” will be shown on iOS products and “Paired but not
connected” will be shown on Android products.
Description
Tone repeats slowly at
first, then speeds up
rapidly.
*These alerts can be turned on or off within the Alert Settings branch of the Menu.
SPX7800BT_MANL_SML.indd 2
AURA® Location-based Alerts (LBAs) and
iRadar Community
Your detector is capable of providing you with LBAs and
iRadar Community threat sharing data when connected
to iPhone or Android phones. The detector uses the GPS
in your smartphone to connect to and obtain the latest
LBA’s and alert you to them. Vehicle speed and compass
headings use your phone’s GPS as well. Follow these steps
to enable these features.
For more information on pairing with
Bluetooth devices consult your phone’s
owners manual.
If you are having trouble initializing or maintaining your
Bluetooth connection completely turn off your smartphone and
detector device, wait 30 seconds, and then turn them back on.
Now that you are paired with iRadar app you’re ready to start
receiving AURA® and Threat Center Alerts.
Size of the icons for different alert types will become progressively
larger as you approach the Location-based Alerts (LBA) Area.
The alert types are:
Photo-enforced Areas (Red-light & Speed Cameras)
Known Speed Trap Areas
Caution Areas (High Accident Areas)
LBAs will start as you approach the actual location. If both a radar
and Location-based alerts happen at the same time, both will be
displayed side by side.
iRadar Community
Product and Customer Service
For any questions, please call 773-889-3087 for assistance.
When you, or any other iRadar user, detects a radar or laser signal
the alert information is anonymously sent to Cobra’s cloud servers.
Within seconds, that information is processed and displayed on your
map as part of a Threat Area.
For any questions about operating or installing this new Cobra product, or if
parts are missing…PLEASE CALL COBRA FIRST…do not return this product
to the store. See customer assistance below.
Should you encounter any problems with this product, or not understand
its many features, please refer to this owner’s manual. If you require further
assistance after reading this manual, Cobra Electronics offers the following
customer assistance services:
For Assistance in the U.S.A.
Automated Help Desk English only. 24 hours a day, 7 days a week 773-8893087 (phone).
Customer Assistance Operators English and Spanish.
8:00 a.m. to 5:30 p.m. Central Time Mon. through Fri. (except holidays)
773-889-3087 (phone).
Questions English and Spanish. Faxes can be received at
773-622-2269 (fax).
Technical Assistance English only. www.cobra.com (on-line: Frequently
Asked Questions).
English and Spanish: [email protected] (e-mail).
For Assistance Outside the U.S.A. Contact Your Local Dealer
As you approach a specific Threat Area you
will hear a short beep and then the app will
indicate the Cobra’s assessment of the reliability of the threat.
High-Threat Area means multiple reports
have confirmed a legitimate threat in the
area recently.
Medium or Low-Threat Area means signals
have been detected but have either not been
confirmed or have not been reported lately.
Paying attention to threat areas will allow you to be warned of
potential threats before you enter radar detection range. Community Radar/Laser alert sharing means that you have an entire
network of users working to keep you and your wallet safe.
Threat Area Alert
Threat Area alerts will be displayed on the
screen. The Detection Scanner will stop
moving and become a solid bar that will blink.
You can report to the iRadar Community when
you see an active police speed enforcement by
pressing the MENU button for 2 seconds.
If this product should require factory service, please call Cobra before sending the product. This will ensure the fastest turn-around time on any repair.
If Cobra asks that the product be sent to its factory, the following must be
furnished to have the product serviced and returned:
1. For Warranty Repair include some form of proof-of-purchase, such as
a mechanical reproduction or carbon of a sales receipt. Make sure the
date of purchase and product model number are clearly readable. If the
originals are sent, they cannot be returned;
2. Send the entire product;
3. Enclose a description of what is happening with the product. Include a
typed or clearly printed name and address of where the product is to be
returned, with phone number (required for shipment);
4. Pack product securely to prevent damage in transit. If possible, use the
original packing material;
5. Ship prepaid and insured by way of a traceable carrier such as United
Parcel Service (UPS) or Priority Mail to avoid loss in transit to: Cobra Factory Service, Cobra Electronics Corporation, 6500 West Cortland Street,
Chicago, Illinois 60707 U.S.A.;
6. If the product is in warranty, upon receipt of the product it will either be
repaired or exchanged depending on the model. Please allow approximately 3 - 4 weeks before contacting Cobra for status. If the product is
out of warranty, a letter will automatically be sent with information as to
the repair charge or replacement charge.
Trademark Acknowledgment
Cobra®, AURA® , Cobra iRadar®, DigiView®, EasySet®, Extra Sensory Detection®, IntelliMute®,
IntelliMute® Pro, IntelliShield®, LaserEye®, Nothing Comes Close to a Cobra®, Safety Alert®
Traffic Warning System, Strobe Alert®, VG-2 Alert®, Xtreme Range Superheterodyne® and the
snake design are registered trademarks of Cobra Electronics Corporation, USA.
Cobra Electronics Corporation™, 14 Band™, 15 Band™, Extreme Bright DataGrafix™, IntelliLink™, IntelliScope™, IntelliView™, Revolution™ Series, SmartPower™, Spectre Alert™, SuperXtreme Range Superheterodyne™, S-XRS™, UltraBright™, and Voice Alert™ are trademarks of
Cobra Electronics Corporation, USA.
Opticom™ is a trademark of 3M Corporation. 20-20™ and Ultra-Lyte™ are trademarks of Laser
Technology, Inc. ProLaser™ and ProLaser III™ are trademarks of Kustom Signals, Inc. Bee III™ and
Pop™ are a trademarks of MPH Industries. Stalker™ LIDAR is a trademark of Applied Concepts,
Inc. Spectre I™ and Spectre IV+™ are trademarks of Stealth Micro Systems Pty. Ltd.
SpeedLaser™ is a trademark of Laser Atlanta, LLC. Interceptor VG-2™ is a trademark of
TechniSonic Industries LTD. Tomar® is a registered trademark of TOMAR Electronics, Inc.
iPhone® and iPod® touch are trademarks of Apple, Inc, registered with the U.S. and
other countries.
The Bluetooth® word mark is a registered trademark owned by Bluetooth SIG, Inc. and any
use of such marks by Cobra Electronics Corporation is under license. Other trademarks and
trade names are those of their respective owners.
Android™ is a trademark of Google, Inc. Use of this trademark is subject to Google permission.
Limited 1-Year Warranty
For Products Purchased in the U.S.A.
Cobra Electronics Corporation warrants that its Cobra Radar/Laser Detectors,
and the component parts thereof, will be free of defects in workmanship and
materials for a period of one year from the date of first consumer purchase.
This warranty may be enforced by the first consumer purchaser, provided that
the product is utilized within the U.S.A.
Cobra will, without charge, repair or replace, at its option, defective Radar/Laser
Detectors, products or component parts upon delivery to the Cobra Factory Service
Department, accompanied by proof of the date of first consumer purchase, such as
a duplicated copy of a sales receipt.
You must pay any initial shipping charges required to ship the product for warranty
service, but the return charges will be at Cobra’s expense, if the product is repaired or
replaced under warranty.
This warranty gives you specific rights, and you may also have other rights
which vary from state to state.
Exclusions: This limited warranty does not apply:
1. To any product damaged by accident.
2. In the event of misuse or abuse of the product or as a result of
unauthorized alterations or repairs.
3. If the serial number has been altered, defaced or removed.
4. If the owner of the product resides outside the U.S.A.
All implied warranties, including warranties of merchantability and fitness for
a particular purpose are limited in duration to the length of this warranty.
Cobra shall not be liable for any incidental, consequential or other damages;
including, without limitation, damages resulting from loss of use or cost
of installation.
Some states do not allow limitations on how long an implied warranty lasts
and/or do not allow the exclusion or limitation of incidental or consequential
damages, so the above limitations may not apply to you.
7/25/13 1:51 PM