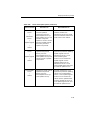
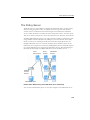
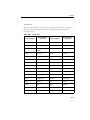
1
OfficeScan 10
TM
For Enterprise and Medium Business
Administrator’s Guide
es
Endpoint Security
Trend Micro Incorporated reserves the right to make changes to this document and to
the products described herein without notice. Before installing and using the software,
please review the readme files, release notes, and the latest version of the applicable user
documentation, which are available from the Trend Micro Web site at:
http://www.trendmicro.com/download
Trend Micro, the Trend Micro t-ball logo, OfficeScan, Control Manager, Damage
Cleanup Services, eManager, InterScan, Network VirusWall, ScanMail, ServerProtect,
and TrendLabs are trademarks or registered trademarks of Trend Micro, Incorporated.
All other product or company names may be trademarks or registered trademarks of
their owners.
Copyright © 1998-2009 Trend Micro Incorporated. All rights reserved.
Document Part No. OSEM104050/90318
Release Date: April 2009
Protected by U.S. Patent No. 5,623,600; 5,889,943; 5,951,698; 6.119,165
The user documentation for Trend Micro OfficeScan introduces the main features of
the software and installation instructions for your production environment. Read
through it before installing or using the software.
Detailed information about how to use specific features within the software are available
in the online help file and the online Knowledge Base at Trend Micro’s Web site.
Trend Micro always seeks to improve its documentation. If you have questions,
comments, or suggestions about this or any Trend Micro document, please contact us at
[email protected].
Please evaluate this documentation on the following site:
http://www.trendmicro.com/download/documentation/rating.asp
Contents
Contents
Preface
OfficeScan Documentation ............................................................................xvi
Audience ...........................................................................................................xvii
Document Conventions ................................................................................xvii
Terminology ....................................................................................................xviii
Chapter 1: Introducing OfficeScan
About OfficeScan ........................................................................................... 1-2
New in this Release ......................................................................................... 1-2
Key Features and Benefits ............................................................................. 1-5
The OfficeScan Server ................................................................................... 1-7
The OfficeScan Client .................................................................................... 1-9
Smart Scan Server ......................................................................................... 1-10
Chapter 2: Getting Started with OfficeScan
The Web Console ........................................................................................... 2-2
Security Summary ........................................................................................... 2-5
The OfficeScan Client Tree ......................................................................... 2-11
Client Tree General Tasks ...................................................................... 2-12
Advanced Search Options ................................................................. 2-13
Client Tree Specific Tasks ...................................................................... 2-13
OfficeScan Domains .................................................................................... 2-20
Security Compliance ..................................................................................... 2-22
i
Trend Micro™ OfficeScan™ 10 Administrator’s Guide
Section 1: Protecting Networked Computers
Chapter 3: Installing the OfficeScan Client
Installation Requirements .............................................................................. 3-2
Installation Methods .....................................................................................3-11
Installing from the Web Install Page .....................................................3-13
Initiating Browser-based Installation ................................................3-15
Installing with Login Script Setup ..........................................................3-15
Installing with Client Packager ...............................................................3-18
Client Packager Settings .....................................................................3-20
Deploying an MSI Package Using Active Directory ......................3-23
Deploying an MSI Package Using Microsoft SMS .........................3-24
Installing from the OfficeScan Web Console ......................................3-27
Installing from a Client Disk Image ......................................................3-29
Using Vulnerability Scanner ....................................................................3-30
Installing the OfficeScan Client ........................................................3-34
Managing General Settings ................................................................3-36
Running Vulnerability Scan ................................................................3-40
Creating a Scheduled Task .................................................................3-42
Configuring Other Vulnerability Scanner Settings .........................3-43
Migrating to the OfficeScan Client .............................................................3-44
Migrating from Other Endpoint Security Software ............................3-44
Migrating from ServerProtect Normal Servers ....................................3-45
Post-installation .............................................................................................3-48
Recommended Post-installation Tasks .................................................3-49
Uninstalling the Client ..................................................................................3-50
Uninstalling the Client from the Web Console ...................................3-50
Running the Client Uninstallation Program .........................................3-51
Manually Uninstalling the Client ............................................................3-52
ii
Contents
Chapter 4: Keeping Protection Up-to-Date
OfficeScan Components and Programs ...................................................... 4-2
Antivirus Components .............................................................................. 4-2
Damage Cleanup Services Components ................................................ 4-5
Anti-spyware Components ....................................................................... 4-6
Firewall Components ................................................................................ 4-6
Web Reputation Component ................................................................... 4-6
Behavior Monitoring Components ......................................................... 4-7
Programs ..................................................................................................... 4-8
Update Overview .......................................................................................... 4-10
OfficeScan Server Update ........................................................................... 4-13
Server Update Source .............................................................................. 4-15
Proxy for Server Update .................................................................... 4-16
Server Component Duplication ........................................................ 4-16
Server Update Methods .......................................................................... 4-19
Scheduled Update ............................................................................... 4-19
Manual Update .................................................................................... 4-20
Server Update Logs ................................................................................. 4-20
Smart Scan Server Update ........................................................................... 4-21
Server Update Settings ............................................................................ 4-21
Client Update ................................................................................................. 4-23
Updating from the OfficeScan Server and Custom Sources ............. 4-24
Customized Update Source ............................................................... 4-25
Standard Update Source ..................................................................... 4-26
Client Update Methods ........................................................................... 4-27
Automatic Update ............................................................................... 4-27
Manual Update .................................................................................... 4-31
Update Privileges ................................................................................. 4-33
Proxy for Client Component Update .............................................. 4-34
Client Update Logs .................................................................................. 4-35
Client Update Notification ..................................................................... 4-35
Component Rollback .............................................................................. 4-36
Update Agents ............................................................................................... 4-37
Update Agent System Requirements .................................................... 4-37
Update Agent Configuration .................................................................. 4-38
iii
Trend Micro™ OfficeScan™ 10 Administrator’s Guide
Update Source for Update Agents .........................................................4-39
Update Agent Customized Update Source ......................................4-39
Update Agent Standard Update Source ...........................................4-41
Update Agent Component Duplication ...........................................4-42
Update Methods for Update Agents .....................................................4-42
Component Update Summary .....................................................................4-43
Chapter 5: Protecting Computers from Security Risks
About Security Risks ....................................................................................... 5-2
Viruses and Malware .................................................................................. 5-2
Spyware and Grayware .............................................................................. 5-4
How Spyware/Grayware Gets into a Network ................................5-5
Potential Risks and Threats ................................................................. 5-6
Guarding Against Spyware/Grayware ............................................... 5-7
Scan Methods ................................................................................................... 5-8
Smart Scan Source ....................................................................................5-15
Standard List ........................................................................................5-16
Custom Lists ........................................................................................5-17
Scan Types ......................................................................................................5-19
Real-time Scan ...........................................................................................5-19
Manual Scan ..............................................................................................5-21
Scheduled Scan .........................................................................................5-22
Scan Now ...................................................................................................5-23
Initiating Scan Now ............................................................................5-24
Settings Common to All Scan Types ..........................................................5-25
Scan Criteria ..............................................................................................5-25
Scan Exclusions ........................................................................................5-27
Scan Actions ..............................................................................................5-30
Virus/Malware Scan Actions .............................................................5-30
Spyware/Grayware Scan Actions ......................................................5-40
Scan-related Privileges ..................................................................................5-43
Global Scan Settings .....................................................................................5-43
Security Risk Notifications ...........................................................................5-44
Administrator Notification Settings ......................................................5-44
iv
Contents
Security Risk Notifications for Administrators ................................... 5-45
Security Risk Notifications for Client Users ........................................ 5-46
Security Risk Logs ......................................................................................... 5-48
Virus/Malware Logs ................................................................................ 5-48
Spyware/Grayware Logs ........................................................................ 5-54
Spyware/Grayware Restore Logs .......................................................... 5-56
Outbreak Protection ..................................................................................... 5-57
Outbreak Criteria and Notifications ..................................................... 5-57
Outbreak Prevention ............................................................................... 5-60
Outbreak Prevention Policies ................................................................ 5-61
Limit/Deny Access to Shared Folders ............................................ 5-61
Block Ports ........................................................................................... 5-62
Deny Write Access to Files and Folders ......................................... 5-63
Disabling Outbreak Prevention ............................................................. 5-64
Device Control .............................................................................................. 5-65
Device Control Logs ............................................................................... 5-67
Chapter 6: Protecting Computers from Web-based Threats
About Web Threats ........................................................................................ 6-2
Web Reputation .............................................................................................. 6-2
Location Awareness ....................................................................................... 6-3
Web Reputation Policies ................................................................................ 6-3
Approved URLs .............................................................................................. 6-5
Proxy for Web Reputation ............................................................................ 6-5
Web Threat Notifications for Client Users ................................................. 6-6
Web Reputation Logs ..................................................................................... 6-7
v
Trend Micro™ OfficeScan™ 10 Administrator’s Guide
Chapter 7: Using the OfficeScan Firewall
About the OfficeScan Firewall ...................................................................... 7-2
Firewall Policies and Profiles ......................................................................... 7-4
Firewall Policies .......................................................................................... 7-5
Adding and Modifying a Firewall Policy ............................................ 7-7
Editing the Firewall Exception Template .......................................... 7-9
Firewall Profiles ........................................................................................7-12
Adding and Editing a Firewall Profile ..............................................7-14
Firewall Privileges ..........................................................................................7-16
Firewall Violation Notifications for Client Users .....................................7-16
Firewall Logs ..................................................................................................7-17
Testing the OfficeScan Firewall ..................................................................7-18
Disabling the OfficeScan Firewall ..............................................................7-19
Section 2: Managing the OfficeScan Server and
Clients
Chapter 8: Managing the OfficeScan Server
Role-based Administration ............................................................................ 8-2
User Roles .................................................................................................... 8-2
Adding and Modifying a Custom Role .............................................. 8-5
User Accounts ............................................................................................. 8-6
Adding and Modifying a User Account ............................................. 8-7
Adding One or Several Active Directory Accounts ......................... 8-9
Trend Micro Control Manager ....................................................................8-10
Reference Servers ..........................................................................................8-14
System Event Logs ........................................................................................8-15
Managing Logs ...............................................................................................8-16
Log Maintenance ......................................................................................8-18
Licenses ...........................................................................................................8-19
vi
Contents
OfficeScan Database Backup ...................................................................... 8-21
OfficeScan Web Server Information ......................................................... 8-23
Web Console Password ............................................................................... 8-23
Quarantine Manager ..................................................................................... 8-24
Server Tuner .................................................................................................. 8-25
The World Virus Tracking Program .......................................................... 8-28
Chapter 9: Managing Clients
Computer Location ........................................................................................ 9-2
Gateway Settings Importer ....................................................................... 9-4
Client Privileges and Other Settings ............................................................ 9-5
Roaming Privilege ...................................................................................... 9-6
Scan Privileges ............................................................................................ 9-7
Scheduled Scan Privileges ......................................................................... 9-8
OfficeScan Firewall Privileges ................................................................ 9-10
Mail Scan Privileges ................................................................................. 9-12
Toolbox Privilege ..................................................................................... 9-14
Proxy Configuration Privilege ................................................................ 9-14
Component Update Privileges ............................................................... 9-15
Client Uninstallation ................................................................................ 9-15
Client Unloading ...................................................................................... 9-15
Update Settings ........................................................................................ 9-15
Web Reputation Setting .......................................................................... 9-16
Scheduled Scan Setting ............................................................................ 9-16
Client Security ........................................................................................... 9-17
POP3 Email Scan Settings ...................................................................... 9-17
Client Console Access Restriction ......................................................... 9-17
Restart Notification ................................................................................. 9-17
Global Client Settings ................................................................................... 9-18
Scan Settings ............................................................................................. 9-18
Scheduled Scan Settings .......................................................................... 9-23
Firewall Log Settings ............................................................................... 9-25
Alert Settings ............................................................................................. 9-25
OfficeScan Service Restart ..................................................................... 9-26
vii
Trend Micro™ OfficeScan™ 10 Administrator’s Guide
Client Self-protection ...............................................................................9-27
Reserved Disk Space ................................................................................9-28
Network Virus Log Consolidation ........................................................9-29
Virus/Malware Log Bandwidth Setting ................................................9-29
Automatic Proxy Configuration .............................................................9-29
Client Grouping ........................................................................................9-30
Client Connection with Servers ..................................................................9-30
Required Actions ......................................................................................9-35
Client-Server Connection Verification ..................................................9-37
Connection Verification Logs ................................................................9-38
Client Proxy Settings .....................................................................................9-39
Internal Proxy ...........................................................................................9-39
External Proxy ..........................................................................................9-40
Client Mover ..................................................................................................9-41
Touch Tool .....................................................................................................9-42
Client Information ........................................................................................9-43
Importing and Exporting Client Settings ..................................................9-44
Managing Inactive Clients ............................................................................9-45
Section 3: Providing Additional Protection
Chapter 10: Policy Server for Cisco NAC
About Policy Server for Cisco NAC ..........................................................10-2
Components and Terms ...............................................................................10-2
Cisco NAC Architecture ..............................................................................10-6
The Client Validation Sequence ..................................................................10-7
The Policy Server ..........................................................................................10-9
Policy Server Policies and Rules ...........................................................10-10
Rule Composition ...................................................................................10-10
Default Rules ...........................................................................................10-12
Policy Composition ................................................................................10-15
viii
Contents
Default Policies ...................................................................................... 10-16
Synchronization ........................................................................................... 10-17
Certificates ................................................................................................... 10-17
The CA Certificate ................................................................................. 10-19
Policy Server System Requirements ......................................................... 10-19
Cisco Trust Agent (CTA) Requirements ................................................. 10-20
Supported Platforms and Requirements ................................................. 10-21
Policy Server for NAC Deployment ........................................................ 10-23
Cisco Secure ACS Server Enrolment .................................................. 10-24
CA Certificate Installation .................................................................... 10-24
Cisco Trust Agent Deployment ........................................................... 10-26
Deploying CTA During OfficeScan Server Installation ............. 10-26
Deploying CTA from the OfficeScan Web Console ................... 10-27
Cisco Trust Agent Installation Verification .................................. 10-30
Policy Server for Cisco NAC Installation .......................................... 10-30
Policy Server SSL Certificate Preparation .......................................... 10-33
ACS Server Configuration .................................................................... 10-35
Policy Server for Cisco NAC Configuration ..................................... 10-35
Policy Server Configuration from OfficeScan .............................. 10-36
Summary Information for a Policy Server .................................... 10-36
Policy Server Registration ................................................................ 10-38
Rules .................................................................................................... 10-38
Policies ................................................................................................ 10-38
Client Validation Logs ...................................................................... 10-39
Client Log Maintenance ................................................................... 10-39
Administrative Tasks ........................................................................ 10-39
ix
Trend Micro™ OfficeScan™ 10 Administrator’s Guide
Chapter 11: Configuring OfficeScan with Third-party
Software
Overview of Check Point Architecture and Configuration ....................11-2
OfficeScan Integration ............................................................................11-3
Check Point for OfficeScan Configuration ...............................................11-4
SecureClient Support Installation ...............................................................11-6
Chapter 12: Getting Help
Troubleshooting Resources .........................................................................12-2
Case Diagnostic Tool ...............................................................................12-2
OfficeScan Server Logs ...........................................................................12-2
Server Debug Log Using LogServer.exe ..........................................12-3
Installation Logs ..................................................................................12-4
Component Update Log ....................................................................12-5
Client Packager Log ............................................................................12-5
ServerProtect Normal Server Migration Tool Log ........................12-6
VSEncrypt Log ....................................................................................12-6
Control Manager MCP Agent Log ...................................................12-6
Virus Scan Engine Log .......................................................................12-8
Outbreak Logs .....................................................................................12-8
World Virus Tracking Log .................................................................12-9
OfficeScan Client Logs ............................................................................12-9
Client Debug Log using LogServer.exe ...........................................12-9
Fresh Installation Log .......................................................................12-10
Upgrade/Hot Fix Log ......................................................................12-10
Damage Cleanup Services Log ........................................................12-10
Mail Scan Log .....................................................................................12-10
Client Connection Log .....................................................................12-11
Client Update Log .............................................................................12-11
Outbreak Prevention Log ................................................................12-11
OfficeScan Firewall Log ...................................................................12-12
Web Reputation and POP3 Mail Scan Log ...................................12-13
Transport Driver Interface (TDI) Log ...........................................12-14
x
Contents
Contacting Trend Micro ............................................................................ 12-15
Technical Support .................................................................................. 12-15
The Trend Micro Knowledge Base ..................................................... 12-16
TrendLabs ............................................................................................... 12-17
Security Information Center ................................................................. 12-17
Sending Suspicious Files to Trend Micro ........................................... 12-18
Documentation Feedback .................................................................... 12-18
Appendix A: Glossary
Index
xi
Trend Micro™ OfficeScan™ 10 Administrator’s Guide
xii
List of Tables
List of Tables
Table P-1. OfficeScan documentation . . . . . . . . . . . . . . . . . . . . . . . . . . . . . . . . . . .xvi
Table P-2. Document conventions . . . . . . . . . . . . . . . . . . . . . . . . . . . . . . . . . . . . xvii
Table P-3. OfficeScan terminology . . . . . . . . . . . . . . . . . . . . . . . . . . . . . . . . . . . .xviii
Table 1-1. Client features . . . . . . . . . . . . . . . . . . . . . . . . . . . . . . . . . . . . . . . . . . . . 1-9
Table 1-1. Comparison between Smart Scan Server types . . . . . . . . . . . . . . . . . 1-12
Table 2-1. OfficeScan Web console URLs . . . . . . . . . . . . . . . . . . . . . . . . . . . . . . 2-3
Table 2-2. Client management tasks. . . . . . . . . . . . . . . . . . . . . . . . . . . . . . . . . . . 2-14
Table 2-3. Computer protection status . . . . . . . . . . . . . . . . . . . . . . . . . . . . . . . . 2-24
Table 3-4. Windows 2000 . . . . . . . . . . . . . . . . . . . . . . . . . . . . . . . . . . . . . . . . . . . . 3-2
Table 3-5. Windows XP/2003, 32-bit version. . . . . . . . . . . . . . . . . . . . . . . . . . . . 3-4
Table 3-6. Windows XP/2003, 64-bit version. . . . . . . . . . . . . . . . . . . . . . . . . . . . 3-5
Table 3-7. Windows Vista, 32-bit and 64-bit versions. . . . . . . . . . . . . . . . . . . . . . 3-7
Table 3-8. Windows 2008, 32-bit version . . . . . . . . . . . . . . . . . . . . . . . . . . . . . . . 3-8
Table 3-9. Windows 2008, 64-bit version . . . . . . . . . . . . . . . . . . . . . . . . . . . . . . . 3-9
Table 3-10. Installation methods . . . . . . . . . . . . . . . . . . . . . . . . . . . . . . . . . . . . . 3-11
Table 3-11. Client package types . . . . . . . . . . . . . . . . . . . . . . . . . . . . . . . . . . . . . 3-18
Table 3-12. Network administration . . . . . . . . . . . . . . . . . . . . . . . . . . . . . . . . . . 3-30
Table 3-13. Network topology and architecture . . . . . . . . . . . . . . . . . . . . . . . . . 3-31
xi
Trend Micro™ OfficeScan™ 10 Administrator’s Guide
Table 3-14. Software/Hardware specifications . . . . . . . . . . . . . . . . . . . . . . . . . . 3-32
Table 3-15. Domain structure . . . . . . . . . . . . . . . . . . . . . . . . . . . . . . . . . . . . . . . 3-32
Table 3-16. Network traffic . . . . . . . . . . . . . . . . . . . . . . . . . . . . . . . . . . . . . . . . . 3-33
Table 3-17. Network size . . . . . . . . . . . . . . . . . . . . . . . . . . . . . . . . . . . . . . . . . . . 3-33
Table 3-18. Security products checked by Vulnerability Scanner. . . . . . . . . . . . 3-36
Table 3-19. DHCP settings in the TMVS.ini file . . . . . . . . . . . . . . . . . . . . . . . . .3-41
Table 4-20. Server-client update options. . . . . . . . . . . . . . . . . . . . . . . . . . . . . . . 4-10
Table 4-21. Smart Scan Server update process . . . . . . . . . . . . . . . . . . . . . . . . . . 4-12
Table 4-22. Components downloaded by the OfficeScan server. . . . . . . . . . . . 4-13
Table 4-1. Server component duplication scenario. . . . . . . . . . . . . . . . . . . . . . . 4-17
Table 4-23. OfficeScan components stored by the client. . . . . . . . . . . . . . . . . . 4-23
Table 4-24. Event-triggered update options . . . . . . . . . . . . . . . . . . . . . . . . . . . . .4-29
Table 4-25. Proxy settings used during client component update . . . . . . . . . . . 4-34
Table 4-26. Update Agent system requirements . . . . . . . . . . . . . . . . . . . . . . . . . 4-37
Table 5-27. Comparison between conventional scan and smart scan . . . . . . . . . 5-8
Table 5-28. Scan types . . . . . . . . . . . . . . . . . . . . . . . . . . . . . . . . . . . . . . . . . . . . . 5-19
Table 5-29. Un-notified client scenarios . . . . . . . . . . . . . . . . . . . . . . . . . . . . . . . .5-24
Table 5-30. Trend Micro recommended scan actions against
viruses/malware . . . . . . . . . . . . . . . . . . . . . . . . . . . . . . . . . . . . . . . . . . . 5-32
Table 5-31. Quarantine directory . . . . . . . . . . . . . . . . . . . . . . . . . . . . . . . . . . . . . 5-34
xii
List of Tables
Table 5-2. Files that OfficeScan can decrypt and restore . . . . . . . . . . . . . . . . . . 5-36
Table 5-32. Restore parameters . . . . . . . . . . . . . . . . . . . . . . . . . . . . . . . . . . . . . . 5-39
Table 5-33. Token variables for security risk notifications . . . . . . . . . . . . . . . . . 5-45
Table 5-34. Token variables for outbreak notifications . . . . . . . . . . . . . . . . . . . 5-59
Table 5-35. Device permissions . . . . . . . . . . . . . . . . . . . . . . . . . . . . . . . . . . . . . . 5-65
Table 7-36. Default firewall policies. . . . . . . . . . . . . . . . . . . . . . . . . . . . . . . . . . . . 7-5
Table 7-37. Default firewall policy exceptions. . . . . . . . . . . . . . . . . . . . . . . . . . . . 7-9
Table 9-38. Compressed file scenarios and results . . . . . . . . . . . . . . . . . . . . . . . 9-21
Table 9-39. Online client icons. . . . . . . . . . . . . . . . . . . . . . . . . . . . . . . . . . . . . . . 9-31
Table 9-40. Offline client icons . . . . . . . . . . . . . . . . . . . . . . . . . . . . . . . . . . . . . . 9-32
Table 9-41. Roaming client icons . . . . . . . . . . . . . . . . . . . . . . . . . . . . . . . . . . . . . 9-34
Table 10-42. Policy Server for Cisco NAC components. . . . . . . . . . . . . . . . . . . 10-2
Table 10-43. Terms related to Policy Server for Cisco NAC . . . . . . . . . . . . . . . 10-4
Table 10-44. Default rules. . . . . . . . . . . . . . . . . . . . . . . . . . . . . . . . . . . . . . . . . . 10-12
Table 10-45. Default policies . . . . . . . . . . . . . . . . . . . . . . . . . . . . . . . . . . . . . . . 10-16
Table 10-46. Cisco NAC certificates . . . . . . . . . . . . . . . . . . . . . . . . . . . . . . . . . 10-17
Table 10-47. Supported platforms and requirements . . . . . . . . . . . . . . . . . . . . 10-21
Table 11-48. SCV file parameter names and values. . . . . . . . . . . . . . . . . . . . . . . 11-5
Table A-49. Trojan ports . . . . . . . . . . . . . . . . . . . . . . . . . . . . . . . . . . . . . . . . . . A-11
xiii
Trend Micro™ OfficeScan™ 10 Administrator’s Guide
xiv
Preface
Preface
Welcome to the Trend Micro™ OfficeScan™ Administrator’s Guide. This document
discusses getting started information, client installation procedures, and OfficeScan
server and client management.
Topics in this chapter:
• OfficeScan Documentation on page xvi
•
Audience on page xvii
•
Document Conventions on page xvii
•
Terminology on page xviii
xv
Trend Micro™ OfficeScan™ 10 Administrator’s Guide
OfficeScan Documentation
OfficeScan documentation includes the following:
TABLE P-1.
OfficeScan documentation
D OCUMENTATION
D ESCRIPTION
Installation and
Upgrade Guide
A PDF document that discusses requirements and
procedures for installing the OfficeScan server, and
upgrading the server and clients
Administrator’s
Guide
A PDF document that discusses getting started
information, client installation procedures, and
OfficeScan server and client management
Trend Micro Smart
Scan for OfficeScan
Getting Started
Guide
A PDF document that helps users understand smart
scan concepts, prepare the environment needed to use
smart scan, and manage smart scan clients
Help
HTML files compiled in WebHelp or CHM format that
provide "how to's", usage advice, and field-specific
information. The Help is accessible from the
OfficeScan server, client, and Policy Server consoles,
and from the OfficeScan Master Setup.
Readme file
Contains a list of known issues and basic installation
steps. It may also contain late-breaking product
information not found in the Help or printed
documentation
Knowledge Base
An online database of problem-solving and
troubleshooting information. It provides the latest
information about known product issues. To access the
Knowledge Base, go to the following Web site:
http://esupport.trendmicro.com/support
Download the latest version of the PDF documents and readme at:
http://www.trendmicro.com/download
xvi
Preface
Audience
OfficeScan documentation is intended for the following users:
•
OfficeScan Administrators: Responsible for OfficeScan management, including
server and client installation and management. These users are expected to have
advanced networking and server management knowledge.
•
Cisco NAC administrators: Responsible for designing and maintaining security
systems with Cisco NAC servers and Cisco networking equipment. They are
assumed to have experience with this equipment.
•
End users: Users who have the OfficeScan client installed on their computers. The
computer skill level of these individuals ranges from beginner to power user.
Document Conventions
To help you locate and interpret information easily, the OfficeScan documentation uses
the following conventions:
TABLE P-2.
Document conventions
C ONVENTION
D ESCRIPTION
ALL CAPITALS
Acronyms, abbreviations, and names of certain commands
and keys on the keyboard
Bold
Menus and menu commands, command buttons, tabs,
options, and tasks
Italics
References to other documentation or new technology
components
TOOLS > C LIENT
TOOLS
A "breadcrumb" found at the start of procedures that helps
users navigate to the relevant Web console screen.
Multiple breadcrumbs means that there are several ways
to get to the same screen.
<Text>
Indicates that the text inside the angle brackets should be
replaced by actual data. For example, C:\Program
Files\<file_name> can be C:\Program Files\sample.jpg.
xvii
Trend Micro™ OfficeScan™ 10 Administrator’s Guide
TABLE P-2.
Document conventions (Continued)
C ONVENTION
D ESCRIPTION
Provides configuration notes or recommendations
Note: text
Tip: text
Provides best practice information and Trend Micro
recommendations
WARNING! text
Provides warnings about activities that may harm
computers on your network
Terminology
The following table provides the official terminology used throughout the OfficeScan
documentation:
TABLE P-3.
OfficeScan terminology
TERMINOLOGY
xviii
D ESCRIPTION
Client
The OfficeScan client program
Client computer or
endpoint
The computer where the OfficeScan client is installed
Client user (or user)
The person managing the OfficeScan client on the
client computer
Server
The OfficeScan server program
Server computer
The computer where the OfficeScan server is
installed
Preface
TABLE P-3.
OfficeScan terminology (Continued)
TERMINOLOGY
D ESCRIPTION
Administrator (or
OfficeScan
administrator)
The person managing the OfficeScan server
Console
The user interface for configuring and managing
OfficeScan server and client settings
The console for the OfficeScan server program is
called "Web console", while the console for the client
program is called "client console".
Security risk
The collective term for virus/malware,
spyware/grayware, and Web threats
Product service
Includes Antivirus, Damage Cleanup Services, and
Web Reputation and Anti-spyware —all of which are
activated during OfficeScan server installation
OfficeScan service
Services hosted by Microsoft Management Console
(MMC). For example, ofcservice.exe, the OfficeScan
Master Service.
Program
Includes the OfficeScan client, Cisco Trust Agent,
and Plug-in Manager
Components
Responsible for scanning, detecting, and taking
actions against security risks
Client installation
folder
The folder on the computer that contains the
OfficeScan client files. If you accept the default
settings during installation, you will find the
installation folder at any of the following locations:
C:\Program Files\Trend Micro\OfficeScan Client
C:\Program Files (x86)\Trend Micro\OfficeScan
Client
xix
Trend Micro™ OfficeScan™ 10 Administrator’s Guide
TABLE P-3.
OfficeScan terminology (Continued)
TERMINOLOGY
Server installation
folder
D ESCRIPTION
The folder on the computer that contains the
OfficeScan server files. If you accept the default
settings during installation, you will find the
installation folder at any of the following locations:
C:\Program Files\Trend Micro\OfficeScan
C:\Program Files (x86)\Trend Micro\OfficeScan
For example, if a particular file is found under
\PCCSRV on the server installation folder, the full
path to the file is:
C:\Program Files\Trend
Micro\OfficeScan\PCCSRV\<file_name>.
xx
Smart scan client
An OfficeScan client that has been configured to use
smart scan
Conventional scan
client
An OfficeScan client that has been configured to use
conventional scan
Chapter 1
Introducing OfficeScan
Topics in this chapter:
• About OfficeScan on page 1-2
•
New in this Release on page 1-2
•
Key Features and Benefits on page 1-5
•
The OfficeScan Server on page 1-7
•
The OfficeScan Client on page 1-9
•
Smart Scan Server on page 1-10
1-1
Trend Micro™ OfficeScan™ 10 Administrator’s Guide
About OfficeScan
Trend Micro™ OfficeScan™ protects enterprise networks from malware, network
viruses, Web-based threats, spyware, and mixed threat attacks. An integrated solution,
OfficeScan consists of a client program that resides at the endpoint and a server
program that manages all clients. The client guards the endpoint and reports its security
status to the server. The server, through the Web-based management console, makes it
easy to set coordinated security policies and deploy updates to every client.
OfficeScan is powered by the Trend Micro Smart Protection Network, a next generation
cloud-client infrastructure that delivers security that is smarter than conventional
approaches. Unique in-the-cloud technology and a lighter-weight client reduce reliance
on conventional pattern downloads and eliminate the delays commonly associated with
desktop updates. Businesses benefit from increased network bandwidth, reduced
processing power, and associated cost savings. Users get immediate access to the latest
protection wherever they connect—within the company network, from home, or on the
go.
New in this Release
Trend Micro™ OfficeScan™ includes the following new features and enhancements:
Smart Scan
Smart scan moves security capabilities from the endpoint to the cloud. An integral part
of the Trend Micro Smart Protection Network, smart scan provides the following
benefits:
1-2
•
Provides fast, real-time security status lookup capabilities in the cloud
•
Reduces the overall time it takes to deliver protection against emerging threats
•
Reduces network bandwidth consumed during pattern updates. The bulk of pattern
definition updates only need to be delivered to the cloud and not to many
endpoints.
•
Reduces the cost and overhead associated with corporate-wide pattern deployments
•
Lowers kernel memory consumption on endpoints. Consumption increases
minimally over time.
Introducing OfficeScan
For smart scan deployment information, refer to the Trend Micro Smart Scan for
OfficeScan Getting Started Guide.
Active Directory Integration
OfficeScan leverages Microsoft™ Active Directory™ services to enforce security
compliance within the organization. By polling Active Directory regularly, OfficeScan
can detect computers without security software and install the client to the computer.
OfficeScan also allows you to assign Web console access privileges to users by using
their Active Directory accounts.
See the following topics for details:
•
Security Compliance on page 2-22
•
Role-based Administration on page 8-2
Role-based Administration
Role-based administration lets you delegate Web console management tasks to other
administrators and allows non-administrators to view Web console items. Start by
creating user roles with certain access privileges to OfficeScan Web console functions
and then assign these roles to users. Manage users by creating custom user accounts or
using existing Active Directory accounts.
Single sign-on support enables users to log on to the OfficeScan Web console from
Trend Micro Control Manager™.
See Role-based Administration on page 8-2 for details.
Behavior Monitoring
Behavior monitoring controls access to external storage devices and network resources,
regulating potential avenues for data leakage or malware infection. Behavior monitoring
also enhances endpoint protection by keeping security-related processes always up and
running, and protecting OfficeScan client files and registry keys.
Behavior monitoring offers the following features:
•
Device Control on page 5-65
•
Client Self-protection on page 9-27
1-3
Trend Micro™ OfficeScan™ 10 Administrator’s Guide
Platform Support
This product release supports server and client installations on Windows Server™ 2008
and virtualization applications such as VMware™.
See Installation Requirements on page 3-2 for a list of client installation requirements and
the Installation and Upgrade Guide for a list of server installation requirements.
Product Enhancements
This product release includes the following enhancements:
Performance Control
Performance Control allows efficient use of CPU resources by performing the following
during scanning:
•
Checks the CPU usage level configured on the OfficeScan Web console and the
actual CPU consumption on the computer
•
Adjusts the scanning speed if:
•
The CPU usage level is Medium or Low
•
Actual CPU consumption exceeds a certain threshold
For details, see CPU Usage on page 5-27.
Scheduled Scan enhancements
Users with the scheduled scan privileges can postpone, skip, and stop Scheduled Scan.
For details, see Scheduled Scan Privileges on page 9-8.
Granular Web reputation settings
Configure Web reputation policies and assign them to one, several, or all OfficeScan
clients. See Web Reputation Policies on page 6-3 for details.
1-4
Introducing OfficeScan
Key Features and Benefits
OfficeScan provides the following features and benefits:
Security Risk Protection
OfficeScan protects computers from security risks by scanning files and then
performing a specific action for each security risk detected. An overwhelming number
of security risks detected over a short period of time signals an outbreak. To contain
outbreaks, OfficeScan enforces outbreak prevention policies and isolates infected
computers until they are completely risk-free.
OfficeScan uses smart scan to make the scanning process more efficient. This
technology works by offloading a large number of signatures previously stored on the
local computer to a Smart Scan Server. Using this approach, the system and network
impact of the ever-increasing volume of signature updates to endpoint systems is
significantly reduced.
For information about smart scan and how to deploy it to clients, see the Trend Micro
Smart Scan for OfficeScan Getting Started Guide.
Web Reputation
Web reputation technology integrated into OfficeScan proactively protects client
computers within or outside the corporate network from malicious and potentially
dangerous Web sites. Web reputation breaks the infection chain and prevents
downloading of malicious code.
Damage Cleanup Services
Damage Cleanup Services™ cleans computers of file-based and network viruses, and
virus and worm remnants (Trojans, registry entries, viral files) through a fully-automated
process. To address the threats and nuisances posed by Trojans, Damage Cleanup
Services does the following:
•
Detects and removes live Trojans
•
Kills processes that Trojans create
•
Repairs system files that Trojans modify
•
Deletes files and applications that Trojans drop
1-5
Trend Micro™ OfficeScan™ 10 Administrator’s Guide
Because Damage Cleanup Services runs automatically in the background, you do not
need to configure it. Users are not even aware when it runs. However, OfficeScan may
sometimes notify the user to restart their computer to complete the process of removing
a Trojan.
OfficeScan Firewall
The OfficeScan firewall protects clients and servers on the network using stateful
inspections, high performance network virus scans, and elimination. Create rules to
filter connections by IP address, port number, or protocol, and then apply the rules to
different groups of users.
Note:
You can install, configure, and use the OfficeScan firewall on Windows XP computers
that also have Windows Firewall enabled. However, manage policies carefully to avoid
creating conflicting firewall policies and producing unexpected results. For example, if
you configure one firewall to allow traffic from a certain port but the other firewall
blocks traffic from the same port, OfficeScan blocks the traffic. See the Microsoft
documentation for details on Windows Firewall.
Security and Policy Enforcement
OfficeScan provides seamless integration of the Cisco™ Trust Agent, enabling the most
effective policy enforcement within a Cisco Self-Defending Network. OfficeScan also
includes a Policy Server for automated communication with Cisco Access Control
Servers. When integrated with Trend Micro™ Network VirusWall™ or any Network
Admission Control (NAC) device, OfficeScan can check clients trying to enter the
network and then remedy, redirect, restrict, deny, or permit access. If a computer is
vulnerable or becomes infected, OfficeScan can automatically isolate it and its network
segments until all computers update or cleanup is complete.
Centralized Management
A Web-based management console gives administrators transparent access to all clients
and servers on the network. The Web console coordinates automatic deployment of
security policies, pattern files, and software updates on every client and server. And with
Outbreak Prevention Services, it shuts down infection vectors and rapidly deploys
attack-specific security policies to prevent or contain outbreaks before pattern files are
available. OfficeScan also performs real-time monitoring, provides event notification,
1-6
Introducing OfficeScan
and delivers comprehensive reporting. Administrators can perform remote
administration, set customized policies for individual desktops or groups, and lock client
security settings.
Plug-in Manager and Plug-in Programs
Plug-in programs, along with new product versions, service packs, and patches, are
designed to add new features and security capabilities into OfficeScan, and enhance the
product's performance. Plug-in Manager facilitates the installation, deployment, and
management of plug-in programs.
The OfficeScan server downloads Plug-in Manager and plug-in programs, including new
versions of the programs, from the Trend Micro ActiveUpdate server.
The OfficeScan Server
The OfficeScan HTTP-based server is the central repository for all client configurations,
security risk logs, and updates.
The server performs two important functions:
•
Installs, monitors, and manages OfficeScan clients
•
Downloads most of the components needed by clients. The OfficeScan server
downloads components from the Trend Micro ActiveUpdate server and then
distributes them to clients.
Note:
Some components are downloaded by Smart Scan Servers. See Smart Scan Server
on page 1-10 for details.
1-7
Trend Micro™ OfficeScan™ 10 Administrator’s Guide
The OfficeScan server
downloads components from the
ActiveUpdate server.
Internet
OfficeScan
server
Web console
Manage the OfficeScan
server and clients through
the Web console.
OfficeScan clients
FIGURE 1-1.
How the OfficeScan server works
The OfficeScan server is capable of providing real-time, bidirectional communication
between the server and clients. Manage the clients from a browser-based Web console,
which you can access from virtually anywhere on the network. The server communicates
with the client (and the client with the server) through Hypertext Transfer Protocol
(HTTP).
1-8
Introducing OfficeScan
The OfficeScan Client
Protect Windows computers from security risks by installing the OfficeScan client on
each computer. The client provides three methods of scanning: Real-time Scan,
Scheduled Scan, and Manual Scan.
The client reports to the parent server from which it was installed. Configure clients
clients to report to another server by using the Client Mover tool. The client sends
events and status information to the server in real time. Examples of events are
virus/malware detection, client startup, client shutdown, start of a scan, and completion
of an update.
Key Client Features
The OfficeScan client features available on a computer depend on the computer’s
operating system.
TABLE 1-1.
Client features
F EATURE
W INDOWS O PERATING S YSTEMS
2000
XP/
S ERVER
2003
(32- BIT )
XP/
S ERVER
2003
(64- BIT )
2008
V ISTA
Manual Scan,
Real-time Scan, and
Scheduled Scan
Yes
Yes
Yes
Yes
Yes
Component update
(manual and
scheduled update)
Yes
Yes
Yes
Yes
Yes
Update Agent
Yes
Yes
Yes
Yes
Yes
Web reputation
Yes
Yes
Yes
Yes
Yes
Microsoft Outlook
mail scan
Yes
Yes
No
No
No
POP3 mail scan
Yes
Yes
Yes
Yes
Yes
1-9
Trend Micro™ OfficeScan™ 10 Administrator’s Guide
TABLE 1-1.
Client features (Continued)
F EATURE
W INDOWS O PERATING S YSTEMS
2000
XP/
S ERVER
2003
(32- BIT )
XP/
S ERVER
2003
(64- BIT )
2008
V ISTA
OfficeScan firewall
Yes
Yes
Yes
Yes
Yes
Damage Cleanup
Services
Yes
Yes
Yes
Yes
Yes
Support for Cisco
NAC
Yes
Yes
No
No
No
Plug-in Manager
Yes
Yes
Yes
No
Yes
Roaming mode
Yes
Yes
Yes
Yes
Yes
SecureClient support
Yes
Yes
No
No
No
Smart Scan Server
The smart scan solution makes use of lightweight patterns that work together to provide
the same protection provided by conventional anti-malware and anti-spyware patterns.
These patterns originate from the Trend Micro ActiveUpdate server and are made
available to Smart Scan Servers and the OfficeScan server.
A Smart Scan Server hosts the Smart Scan Pattern. This pattern is updated hourly and
contains majority of the pattern definitions. Smart scan clients do not download this
pattern. Clients verify potential threats against the pattern by sending scan queries to the
Smart Scan Server. In the smart scan solution, clients send identification information
determined by Trend Micro technology to Smart Scan Servers. Clients never send the
entire file and the risk of the file is determined using the identification information.
Note:
1-10
The other pattern used in the smart scan solution, called Smart Scan Agent Pattern, is
hosted on the client update source (the OfficeScan server or a customized update
source) and downloaded by clients.
Introducing OfficeScan
There are no component download overlaps between the Smart Scan Server and the
OfficeScan server because each server downloads a specific set of components. A Smart
Scan Server only downloads the Smart Scan Pattern while the OfficeScan server
downloads all the other components. See OfficeScan Components and Programs on page 4-2
for more information on components.
Trend Micro
Global Smart Scan Server
Trend Micro
ActiveUpdate
server
OfficeScan
server +
Local Smart
Scan Server
(integrated)
Local Smart
Scan Server
(standalone)
External
smart scan
client
Internal smart scan clients
CORPORATE NETWORK
>> Smart Scan Pattern update
>> Scan query
>> Smart Scan Agent Pattern update
FIGURE 1-2.
The Trend Micro smart scan solution
1-11
Trend Micro™ OfficeScan™ 10 Administrator’s Guide
Smart Scan Server Types
The Smart Scan Server to which a client connects depends on the client’s location.
Internal smart scan clients connect to a local Smart Scan Server, while external smart scan
clients connect to the Trend Micro Global Smart Scan Server. The following table provides a
comparison between the two Smart Scan Server types:
TABLE 1-1.
Comparison between Smart Scan Server types
B ASIS OF
C OMPARISON
Availability
L OCAL S MART S CAN S ERVER
TREND M ICRO G LOBAL
S MART S CAN S ERVER
Available for internal clients,
which are clients that meet
the location criteria specified
on the OfficeScan Web
console.
Available for external clients,
which are clients that do not
meet the location criteria
specified on the OfficeScan
Web console.
See Computer Location on
page 9-2 for details on
location criteria.
1-12
Purpose
Designed and intended to
localize scan operations to
the corporate network to
optimize efficiency
A globally scaled
Internet-based infrastructure
that provides smart scan
services to users who do not
have immediate access to
their corporate network
Server
administrator
OfficeScan administrators
install and manage these
servers
Trend Micro maintains this
server
Pattern update
source
Trend Micro ActiveUpdate
server
Trend Micro ActiveUpdate
server
Client
connection
protocols
HTTP and HTTPS
HTTPS
Chapter 2
Getting Started with OfficeScan
Topics in this chapter:
• The Web Console on page 2-2
•
Security Summary on page 2-5
•
The OfficeScan Client Tree on page 2-11
•
OfficeScan Domains on page 2-20
•
Security Compliance on page 2-22
2-1
Trend Micro™ OfficeScan™ 10 Administrator’s Guide
The Web Console
The Web console is the central point for monitoring OfficeScan throughout the
corporate network. The console comes with a set of default settings and values that you
can configure based on your security requirements and specifications. The Web console
uses standard Internet technologies, such as Java, CGI, HTML, and HTTP.
Use the Web console to do the following:
•
Manage clients installed on networked computers
•
Group clients into logical domains for simultaneous configuration and management
•
Set scan configurations and initiate manual scan on a single or multiple networked
computers
•
Configure notifications about security risks on the network and view logs sent by
clients
•
Configure outbreak criteria and notifications
•
Delegate Web console administration tasks to other OfficeScan administrators by
configuring roles and user accounts
Opening the Web Console
Open the Web console from any computer on the network that has the following
resources:
2-2
•
300MHz Intel™ Pentium™ processor or equivalent
•
128MB of RAM
•
At least 30MB of available disk space
•
Monitor that supports 800 x 600 resolution at 256 colors or higher
•
Microsoft Internet Explorer™ 6.0 or higher
Getting Started with OfficeScan
On the Web browser, type one of the following in the address bar based on the type of
OfficeScan server installation:
TABLE 2-1.
OfficeScan Web console URLs
I NSTALLATION TYPE
URL
Without SSL on a
default site
http://<OfficeScan server>/OfficeScan
Without SSL on a
virtual site
http://<OfficeScan server>:<SSL port number>/
OfficeScan
With SSL on a default
site
https://<OfficeScan server>/OfficeScan
With SSL on a virtual
site
https://<OfficeScan server>:<SSL port number>/
OfficeScan
Note:
If you upgraded from a previous version of OfficeScan, Web browser and proxy
server cache files may prevent the OfficeScan Web console from loading properly.
Clear the cache memory on the browser and on any proxy servers located between the
OfficeScan server and the computer you use to access the Web console.
Logon Account
During OfficeScan server installation, Setup creates a root account and prompts you to
type the password for this account. When opening the Web console for the first time,
type "root" as the user name and the root account password. If you forget the password,
contact your support provider for help in resetting the password.
Define user roles and set up user accounts to allow other users to access the Web
console without using the root account. When users log on to the console, they can use
the user accounts you have set up for them. For more information, see Role-based
Administration on page 8-2.
2-3
Trend Micro™ OfficeScan™ 10 Administrator’s Guide
The Web Console Banner
The banner area of the Web console provides you the following options:
FIGURE 2-1.
Web console banner area
<account name>: Click the account name (for example, root) to modify details for the
account, such as the password
Log Off: Logs you off from the Web console
Help
2-4
•
What’s New: Opens a page with a list of new features included in the current
product release
•
Contents and Index: Opens the OfficeScan Server Help
•
Knowledge Base: Opens the Trend Micro Knowledge Base, where you can view
FAQs and updated product information, access customer support and register
OfficeScan
•
Security Info: Displays the Trend Micro Security Information page, where you can
read about the latest security risks
•
Sales: Displays the Trend Micro sales Web page, where you can contact your
regional sales representative
•
Support: Displays the Trend Micro support Web page, where you can submit
questions and find answers to common questions about Trend Micro products
•
About: Displays a page that contains an overview of the product and tells you how
to check the version of components
Getting Started with OfficeScan
Security Summary
The Summary screen appears when you open the OfficeScan Web console or click
Summary in the main menu. View the current status of your product licenses and the
overall security risk protection, and take action on items that require immediate
intervention, such as outbreaks or outdated components.
Tip: Refresh the screen periodically to get the latest information.
Product License Status
View the status of your product licenses in this section.
FIGURE 2-2.
Summary screen - Product License Status section
Reminders display during the following instances:
If you have a full version license
•
60 days before a license expires
•
During the product’s grace period. The duration of the grace period may vary by
region. Please verify the grace period with your Trend Micro representative.
•
When the license expires and grace period elapses. During this time, you will not be
able to obtain technical support or perform component updates. The scan engines
will still scan computers using out-of-date components. These out-of-date
components may not be able to protect you completely from the latest security risks.
If you have an evaluation version license
•
14 days before a license expires
•
When the license expires. During this time, OfficeScan disables component updates,
scanning, and all client features.
2-5
Trend Micro™ OfficeScan™ 10 Administrator’s Guide
If you have obtained an Activation Code, renew a license by going to Administration >
Product License.
Networked Computers
The All tab displays the following information:
FIGURE 2-3.
2-6
Summary screen - "All" tab
•
The connection status of all OfficeScan clients with the OfficeScan server
•
The number of detected security risks
•
The computers where the security risks were detected
Getting Started with OfficeScan
The Conventional Scan tab displays the following information:
FIGURE 2-4.
Summary screen - Conventional Scan tab
•
The connection status of conventional scan clients with the OfficeScan server
•
The number of detected security risks
•
The computers where the security risks were detected
2-7
Trend Micro™ OfficeScan™ 10 Administrator’s Guide
The Smart Scan tab displays the following information:
FIGURE 2-5.
Summary screen - Smart Scan tab
•
The connection status of smart scan clients with the OfficeScan server
•
The connection status of online smart scan clients with Smart Scan Servers
Note:
Only online clients can report their connection status with Smart Scan Servers.
If clients are disconnected from a Smart Scan Server, restore the connection by
performing the steps in A Client Cannot Connect to a Smart Scan Server on page 9-36.
2-8
•
The number of detected security risks
•
The computers where the security risks were detected
•
A list of Smart Scan Servers
•
The number of clients connected to each Smart Scan Server. Clicking the number
opens the client tree where you can manage client settings.
•
For each Smart Scan Server, a link that launches the server’s console
•
A More link (if you have clients connecting to more than two Smart Scan Servers)
that opens a screen where you can:
•
View all the local Smart Scan Servers to which clients connect and the number
of clients connected to each server. Clicking the number opens the client tree
where you can manage client settings.
•
Launch a server’s console by clicking the link for the server
Getting Started with OfficeScan
Top 10 Security Risk Statistics
A link on the Detection Status table opens a screen containing top 10 security risk
statistics.
FIGURE 2-6.
Top 10 Security Risks screen
Tasks on this screen:
•
View detailed information about a security risk by clicking the security risk name.
•
View the overall status of a particular computer by clicking the computer name.
•
View security risk logs for that computer by clicking View corresponding to a
computer name.
•
Reset the statistics in each table by clicking Reset Count.
2-9
Trend Micro™ OfficeScan™ 10 Administrator’s Guide
Outbreak Status
The Outbreak Status table provides the status of any current security risk outbreaks and
the last outbreak alert.
FIGURE 2-7.
Summary screen - Outbreak Status section
View outbreak details by clicking the date/time link of the alert. Reset the status of the
outbreak alert information and immediately enforce outbreak prevention measures
when OfficeScan detects an outbreak.
Components and Programs
The Update Status tables contain available components and programs that protect
networked computers from security risks.
FIGURE 2-8.
Summary screen - Components and Program section
View the current version for each component. Under the Outdated column, view the
number of clients with outdated components. If there are clients that need to be
updated, click the number link to start the update.
2-10
Getting Started with OfficeScan
For each program, view the clients that have not been upgraded by clicking the number
link corresponding to the program.
Note:
To upgrade Cisco Trust Agent, go to Cisco NAC > Agent Deployment.
The OfficeScan Client Tree
The Java-based client tree displays all the clients (grouped into OfficeScan Domains)
that the server currently manages. Clients are grouped into domains so you can
simultaneously configure, manage, and apply the same configuration to all domain
members.
The client tree displays in the main frame when you access certain functions from the
main menu.
FIGURE 2-9.
OfficeScan client tree
2-11
Trend Micro™ OfficeScan™ 10 Administrator’s Guide
Client Tree General Tasks
Below are the general tasks you can perform when the client tree displays:
•
2-12
Click the root icon
to select all domains and clients. When you select the root
icon and then choose a task above the client tree, a screen for configuring settings
displays. On the screen, choose from the following general options:
•
Apply to All Clients: Applies settings to all existing clients and to any new
client added to an existing/future domain. Future domains are domains not yet
created at the time you configure the settings.
•
Apply to Future Domains Only: Applies settings only to clients added to
future domains. This option will not apply settings to new clients added to an
existing domain.
•
To select multiple, adjacent domains or clients, click the first domain or client in the
range, hold down the SHIFT key, and then click the last domain or client in the
range.
•
To select a range of non-contiguous domains or clients, hold down the CTRL key
and then click the domains or clients that you want to select.
•
Search for a client to manage by specifying the client name in the Search for
computers text box. A list of matching client names will appear highlighted in the
client tree. For more search options, click Advanced Search.
•
After selecting a domain, the client tree table expands to show the clients belonging
to the domain and all the columns containing relevant information for each client.
To view only a set of related columns, select an item in Client tree view.
•
Update view: Shows all the components and programs
•
Antivirus view: Shows antivirus components
•
Firewall view: Shows firewall components
•
Anti-spyware view: Shows anti-spyware components
•
Smart Scan view: Shows the scan method used by clients (conventional or
smart scan) and smart scan components
•
View all: Shows all columns
•
Rearrange columns by dragging the column titles to different positions in the client
tree. OfficeScan automatically saves the new column positions.
•
Sort clients based on column information by clicking the column name.
Getting Started with OfficeScan
•
Refresh the client tree by clicking
.
•
View client statistics below the client tree, such as the total number of clients,
number of smart scan clients, and number of conventional scan clients.
Advanced Search Options
Search for clients based on the following criteria:
•
Basic: Includes basic information about the computers such as IP address,
operating system and MAC address.
Note:
Searching by IP segment requires a portion of an IP address starting with the
first octet. The search returns all computers with IP addresses containing that
entry. For example, typing 10.5 returns all computers in the IP address range
10.5.0.0 to 10.5.255.255.
Searching by MAC address requires a MAC address range in hexadecimal
notation, for example, 000F3E341D51.
•
Component versions: Select the check box next to the component name, narrow
down the criteria by selecting "Earlier than" or "Earlier than and including", and
type a version number. The current version number displays by default.
•
Status: Includes client settings and real-time status
Click Search after specifying the search criteria. A list of computer names that meet the
criteria appear in the client tree.
Client Tree Specific Tasks
The client tree displays when you access certain screens on the Web console. Above the
client tree are menu items specific to the screen you have accessed. These menu items
allow you to perform specific tasks, such as configuring client settings or initiating client
tasks. To perform any of the tasks, first select the task target (either the root icon which
will apply settings to all clients, one or several domains, or one or several clients) and
then select a menu item.
2-13
Trend Micro™ OfficeScan™ 10 Administrator’s Guide
Networked Computers > Client Management
Manage general client settings on this screen.
FIGURE 2-10. Client Management screen
Tasks:
TABLE 2-2.
Client management tasks
M ENU B UTTON
Status
Tasks
TASK
View detailed client information. For details, see Client
Information on page 9-43.
• Run Manual Scan on client computers. For details, see
Initiating Scan Now on page 5-24.
• Uninstall the client. For details, see Uninstalling the
Client from the Web Console on page 3-50.
• Restore spyware/grayware components. For details,
see Spyware/Grayware Restore on page 5-42.
2-14
Getting Started with OfficeScan
TABLE 2-2.
Client management tasks (Continued)
M ENU B UTTON
Settings
TASK
• Choose from the available scan methods. For details,
see Scan Methods on page 5-8.
• Configure settings for each scan type. For details, see
the following topics:
• Manual Scan on page 5-21
• Real-time Scan on page 5-19
• Scheduled Scan on page 5-22
• Scan Now on page 5-23
• Assign clients as Update Agents. For details, see
Update Agent Configuration on page 4-38.
• Configure client privileges and other settings. For
details, see Client Privileges and Other Settings on page
9-5.
• Configure Web reputation policies. For details, see
Web Reputation Policies on page 6-3.
• Configure device control settings. For details, see
Device Control on page 5-65.
• Configure the spyware/grayware approved list. For
details, see Spyware/Grayware Approved List on page
5-41.
• Import and export client settings. For details, see
Importing and Exporting Client Settings on page 9-44.
2-15
Trend Micro™ OfficeScan™ 10 Administrator’s Guide
TABLE 2-2.
Client management tasks (Continued)
M ENU B UTTON
Logs
TASK
View the following logs:
• Virus/Malware Logs on page 5-48
• Spyware/Grayware Logs on page 5-54
• Firewall Logs on page 7-17
• Web Reputation Logs on page 6-7
• Device Control Logs on page 5-67
Manage logs. For details, see Log Maintenance on page
8-18.
2-16
Manage Client
Tree
Manage OfficeScan domains. For details, see OfficeScan
Domains on page 2-20.
Export
Export a list of clients to a comma-separated value (.csv)
file
Getting Started with OfficeScan
Networked Computers > Outbreak Prevention
Task: Specify and activate outbreak protection settings.
FIGURE 2-11. Outbreak Prevention screen
Updates > Networked Computers > Manual Update > Manually Select
Clients
Task: Initiate manual update on clients.
FIGURE 2-12. Component Update screen
2-17
Trend Micro™ OfficeScan™ 10 Administrator’s Guide
Updates > Rollback > Synchronize with Server
Task: Perform component rollback.
FIGURE 2-13. Rollback screen
2-18
Getting Started with OfficeScan
Logs > Networked Computer Logs > Security Risks
View and manage logs on this screen.
FIGURE 2-14. Security Risk Logs screen
Tasks:
•
•
View the following logs:
•
Virus/Malware Logs
•
Spyware/Grayware Logs
•
Firewall Logs
•
Web Reputation Logs
•
Device Control Logs
Perform log maintenance.
2-19
Trend Micro™ OfficeScan™ 10 Administrator’s Guide
Cisco NAC > Agent Deployment
Task: Perform Cisco Trust Agent Deployment.
FIGURE 2-15. Agent Deployment screen
OfficeScan Domains
A domain in OfficeScan is a group of clients that share the same configuration and run
the same tasks. By grouping clients into domains, you can simultaneously configure,
manage, and apply the same configuration to all domain members.
For ease of management, group clients based on their departments or the functions they
perform. Also group clients that are at a greater risk of infection to apply a more secure
configuration to all of them.
By default, OfficeScan simulates network domains. The domain and client names in the
client tree have the same names as the domain and computer names on the network.
OfficeScan also assigns clients based on the domain structure of the network. Delete or
rename the domains that OfficeScan created for you, create a new domain, or transfer
clients from one domain to another.
2-20
Getting Started with OfficeScan
To add a domain:
P ATH : N ETWORKED C OMPUTERS > C LIENT M ANAGEMENT > M ANAGE C LIENT TREE > A DD
D OMAINS
1.
Type a name for the domain you want to add.
2.
Click Add. The new domain appears in the client tree.
To delete a domain or client:
P ATH : N ETWORKED C OMPUTERS > C LIENT M ANAGEMENT > M ANAGE C LIENT TREE > R EMOVE
D OMAIN /C LIENT
1.
To delete a domain, delete or move all clients under it. To move clients to other
domains, drag and drop them to the destination domains.
2.
When the domain is empty, click Remove Domain/Client.
3.
To delete a client, click Remove Domain/Client. If you select a domain, clicking
Remove Domain/Client deletes all clients under the domain.
Note:
Although a deleted client no longer appears in the client tree, it is not uninstalled
from the client computer. The OfficeScan client can still perform
server-dependent tasks, such as updating components. However, the server is
unaware of the existence of the client and therefore cannot send configurations
or notifications to the client.
To rename a domain:
P ATH : N ETWORKED C OMPUTERS > C LIENT M ANAGEMENT > M ANAGE C LIENT TREE > R ENAME
D OMAIN
1.
Type a new name for the domain.
2.
Click Rename. The new domain name appears in the client tree.
2-21
Trend Micro™ OfficeScan™ 10 Administrator’s Guide
To move a client:
P ATH : N ETWORKED C OMPUTERS > C LIENT M ANAGEMENT > M ANAGE C LIENT TREE > M OVE
C LIENT
1.
Select whether to move clients to another domain or OfficeScan server.
a.
Tip:
b.
2.
To move clients to another domain, select Move selected client(s) to
another domain, choose the domain from the drop-down list, and decide
whether or not to apply the settings of the new domain to the clients.
Alternatively, drag and drop the client to another domain in the client tree.
To move clients to another OfficeScan server, enter the server name and
HTTP port number under Move selected client(s) to another OfficeScan
Server.
Click Move.
Security Compliance
Security Compliance leverages Microsoft Active Directory™ services to determine the
security status of computers on the network. After querying Active Directory, the Web
console displays the security status of computers. The security status can be any of the
following:
•
Managed by the OfficeScan server
•
Managed by another OfficeScan server
•
No OfficeScan client program installed
•
Unreachable
To use Security Compliance, ensure that the OfficeScan server computer is a member of
an Active Directory domain.
To enforce security compliance, perform the following tasks:
2-22
1.
Define the Active Directory Scope and Query.
2.
Check unprotected computers from the Active Directory Query Result.
3.
Perform OfficeScan Client Installation.
4.
Configure Scheduled Query.
Getting Started with OfficeScan
Active Directory Scope and Query
When using Security Compliance for the first time, define the Active Directory scope,
which includes Active Directory objects that the OfficeScan server will query on
demand or periodically. After defining the scope, start the query process.
To configure the Active Directory scope and start the query process:
P ATH : S ECURITY C OMPLIANCE
1.
On the Active Directory Scope section, click Define.
2.
In the screen that opens, the Active Directory structure displays. Select the objects
to query.
Tip:
3.
If querying for the first time, select an object with less than 1000 accounts and
then record how much time it took to complete the query. Use this data as your
performance benchmark.
Under Advanced Settings, specify ports used by OfficeScan servers to
communicate with clients. Setup randomly generates the port number during
OfficeScan server installation.
Tip:
To view the communication port used by the OfficeScan server, go to
Networked Computers > Client Management and select a domain. Check
the IP Address column. The port number displays after the IP address. Keep a
record of port numbers for your reference.
a.
Click Specify ports.
b.
Type the port number and click Add. Repeat this step until you have all the
port numbers you want to add.
c.
Click Save.
2-23
Trend Micro™ OfficeScan™ 10 Administrator’s Guide
4.
Choose whether to check a computer’s connectivity using a particular port number.
When connection is not established, OfficeScan immediately treats the computer as
unreachable. The default port number is 135.
Tip:
5.
Enabling this setting speeds up the Active Directory query. When connection to
a computer cannot be established, the OfficeScan server no longer needs to
perform all the other connection verification tasks before treating a computer as
unreachable.
To save the Active Directory scope and start the query, click Save and re-assess.
To save the settings only, click Save only.
The Security Compliance screen displays with the result of the query.
Note:
The query may take a long time to complete, especially if the query scope is
broad. Do not perform another query until the Security Compliance screen
displays the result. Otherwise, the current query session terminates and the query
process restarts.
Active Directory Query Result
The Security Status section classifies computers as follows:
TABLE 2-3.
Computer protection status
S TATUS
2-24
D ESCRIPTION
Managed by this
OfficeScan server
The OfficeScan clients installed on the computers are
managed by the OfficeScan server. Clients are either
online, offline, or roaming, and run either this OfficeScan
version or an earlier version.
Managed by
another
OfficeScan server
The OfficeScan clients installed on the computers are
managed by another OfficeScan server. Clients are online
and run either this OfficeScan version or an earlier
version.
No OfficeScan
client installed
The OfficeScan client is not installed on the computer.
Getting Started with OfficeScan
TABLE 2-3.
Computer protection status (Continued)
S TATUS
Unreachable
D ESCRIPTION
The OfficeScan server cannot connect to the computer
and therefore cannot determine whether there is no client
installed on the computer or, if a client is installed,
whether the client is managed by another OfficeScan
server or is unmanaged.
Note: The OfficeScan server database contains a list of
clients that the server manages. If the client
computer is unreachable but the OfficeScan server
detects that it is managing the client installed on
the computer, the computer’s status is "Managed
by this OfficeScan server".
Recommended tasks:
1.
On the Security Status section, click a number link to display all affected
computers in the client tree.
2.
Use the search and advanced search functions to search and display only the
computers that meet the search criteria.
If you use the advanced search function, specify the complete name for the
following items:
•
Computer name
•
OfficeScan server name
•
OfficeScan domain name
•
Active Directory tree
Use the wildcard character (*) if unsure of the complete name.
OfficeScan will not return a result if the name is incomplete and the wildcard
character is not specified.
3.
To save the list of computers to a file, click Export.
4.
For clients managed by another OfficeScan server, use the Client Mover tool to
have these clients managed by the current OfficeScan server. For more information
about this tool, see Client Mover on page 9-41.
2-25
Trend Micro™ OfficeScan™ 10 Administrator’s Guide
OfficeScan Client Installation
Before installing the client, take note of the following:
1.
Record the logon credentials for each computer. OfficeScan will prompt you to
specify the logon credentials during installation.
2.
The OfficeScan client will not be installed on a computer if:
3.
•
The OfficeScan server is installed on the computer.
•
The computer runs Windows XP Home, Windows Vista™ Home Basic, and
Windows Vista Home Premium. If you have computers running these
platforms, choose another installation method. See Installation Methods on page
3-11 for details.
If the target computer runs Windows Vista Business, Enterprise, or Ultimate
Edition, perform the following steps on the computer:
a.
Enable a built-in administrator account and set the password for the account.
b.
Disable the Windows firewall.
c.
Click Start > Programs > Administrative Tools > Windows Firewall with
Advanced Security.
d. For Domain Profile, Private Profile, and Public Profile, set the firewall state to
"Off".
e.
4.
Open Microsoft Management Console (click Start > Run and type
services.msc) and start the Remote Registry service. When installing the
OfficeScan client, use the built-in administrator account and password.
If there are Trend Micro or third-party endpoint security programs installed on the
computer, check if OfficeScan can automatically uninstall the software and replace
it with the OfficeScan client. For a list of endpoint security software that
OfficeScan automatically uninstalls, open the following files in <Server installation
folder>\PCCSRV\Admin. You can open these files using a text editor such as
Notepad.
•
tmuninst.ptn
•
tmuninst_as.ptn
If the software on the target computer is not included in the list, manually uninstall
it first. Depending on the uninstallation process of the software, the computer may
or may not need to restart after uninstallation.
2-26
Getting Started with OfficeScan
To install the OfficeScan client:
P ATH : S ECURITY C OMPLIANCE
1.
Click Install on top of the client tree.
If an earlier OfficeScan client version is already installed on a computer and you
click Install, the installation will be skipped and the client will not be upgraded to
this version. To upgrade the client, see Update Settings on page 9-15.
2.
Specify the administrator logon account for each computer and click Log on.
OfficeScan starts installing the client on the target computer.
3.
View the installation status.
Scheduled Query
OfficeScan can automatically query Active Directory based on a schedule.
To configure the query schedule:
P ATH : S ECURITY C OMPLIANCE
1.
Click Settings on top of the Security Compliance client tree.
2.
Enable scheduled query.
3.
Specify the schedule. If you specify the 31st of each month and the month has less
than 31 days, the assessment happens on the last day of the month.
4.
To save the schedule, click Save only. To query without saving the schedule, click
Query Now.
2-27
Trend Micro™ OfficeScan™ 10 Administrator’s Guide
2-28
Section 1
Protecting Networked
Computers
Trend Micro™ OfficeScan™ 10 Administrator’s Guide
Chapter 3
Installing the OfficeScan Client
Topics in this chapter:
• Installation Requirements on page 3-2
•
Installation Methods on page 3-11
•
Migrating to the OfficeScan Client on page 3-44
•
Post-installation on page 3-48
•
Uninstalling the Client on page 3-50
3-1
Trend Micro™ OfficeScan™ 10 Administrator’s Guide
Installation Requirements
The OfficeScan client can be installed on computers running the following platforms:
•
Windows 2000
•
Windows XP/2003, 32-bit version
•
Windows XP/2003, 64-bit version
•
Windows Vista, 32-bit and 64-bit versions
•
Windows 2008, 32-bit version
•
Windows 2008, 64-bit version
TABLE 3-4.
R ESOURCE
Operating
system
Windows 2000
R EQUIREMENT
• Windows 2000 with Service Pack 4
• Windows 2000 Professional with Service Pack 4
• Windows 2000 Server with Service Pack 4
• Windows 2000 Advanced Server with Service Pack 4
• OfficeScan supports client installation on guest Windows
2000 operating systems hosted on the following
virtualization applications:
• Microsoft Virtual Server 2005 R2 with Service Pack 1
• VMware™ ESX™/ESXi Server 3.5 (Server Edition)
• VMware Server 1.0.3 or later (Server Edition)
• VMware Workstation and Workstation ACE Edition 6.0
3-2
Installing the OfficeScan Client
TABLE 3-4.
Windows 2000 (Continued)
R ESOURCE
Hardware
R EQUIREMENT
Processor
300MHz Intel™ Pentium™ or equivalent
RAM
256MB minimum, 512MB recommended
Available disk space
350MB minimum
Others
Monitor that supports 800 x 600 resolution at 256 colors or
higher
3-3
Trend Micro™ OfficeScan™ 10 Administrator’s Guide
TABLE 3-5.
Windows XP/2003, 32-bit version
R ESOURCE
Operating
system
R EQUIREMENT
• Windows XP Professional with Service Pack 2 or later
• Windows XP Home with Service Pack 3 or later
• Windows Server™ 2003 (Standard, Enterprise,
Datacenter, and Web Editions) with Service Pack 2 or later
• Windows Server 2003 R2 (Standard, Enterprise, and
Datacenter Editions) with Service Pack 2 or later
• Windows Storage Server 2003
• OfficeScan supports client installation on guest Windows
XP/2003 operating systems hosted on the following
virtualization applications:
• Microsoft Virtual Server 2005 R2 with Service Pack 1
• VMware ESX/ESXi Server 3.5 (Server Edition)
• VMware Server 1.0.3 or later (Server Edition)
• VMware Workstation and Workstation ACE Edition 6.0
Hardware
Processor
300MHz Intel Pentium or equivalent
AMD™ 64 or Intel 64 processor architectures
RAM
256MB minimum, 512MB recommended
Available disk space
350MB minimum
Others
Monitor that supports 800 x 600 resolution at 256 colors
3-4
Installing the OfficeScan Client
TABLE 3-5.
Windows XP/2003, 32-bit version (Continued)
R ESOURCE
Others
R EQUIREMENT
• Microsoft Internet Explorer 6.0 or later if performing Web
setup
• Disable Simple File Sharing on Windows XP computers
so users can successfully install the OfficeScan client
program (see the Windows documentation for
instructions).
TABLE 3-6.
R ESOURCE
Operating
system
Windows XP/2003, 64-bit version
R EQUIREMENT
• Windows XP Professional with Service Pack 2 or later
• Windows Server 2003 (Standard, Enterprise, Datacenter,
and Web Editions) with Service Pack 2 or later
• Windows Server 2003 R2 (Standard, Enterprise, and
Datacenter Editions) with Service Pack 2 or later
• Windows Storage Server 2003
• OfficeScan supports client installation on guest Windows
XP/2003 operating systems hosted on the following
virtualization applications:
• VMware ESX/ESXi Server 3.5 (Server Edition)
• VMware Server 1.0.3 or later (Server Edition)
• VMware Workstation and Workstation ACE Edition 6.0
3-5
Trend Micro™ OfficeScan™ 10 Administrator’s Guide
TABLE 3-6.
Windows XP/2003, 64-bit version (Continued)
R ESOURCE
Hardware
R EQUIREMENT
Processor
• Intel x64 processor
• AMD64 processor
RAM
256MB minimum, 512MB recommended
Available disk space
350MB minimum
Others
Monitor that supports 800 x 600 resolution at 256 colors
Others
• Microsoft Internet Explorer 6.0 or later if performing Web
setup
• Disable Simple File Sharing on Windows XP computers
so users can successfully install the OfficeScan client
program (see the Windows documentation for
instructions).
3-6
Installing the OfficeScan Client
TABLE 3-7.
Windows Vista, 32-bit and 64-bit versions
R ESOURCE
Operating
system
R EQUIREMENT
• Windows Vista™ Business Edition with Service Pack 1 or
later
• Windows Vista Enterprise Edition with Service Pack 1 or
later
• Windows Vista Ultimate Edition with Service Pack 1 or
later
• Windows Vista Home Premium Edition with Service Pack 1
or later
• Windows Vista Home Basic Edition with Service Pack 1 or
later
• OfficeScan supports client installation on guest Windows
Vista operating systems hosted on the following
virtualization applications:
• VMware ESX/ESXi Server 3.5 (Server Edition)
• VMware Server 1.0.3 or later (Server Edition)
• VMware Workstation and Workstation ACE Edition 6.0
Hardware
Processor
• 800MHz Intel Pentium or equivalent
• AMD64 or Intel 64 processor architectures
RAM
1GB minimum, 1.5GB recommended
Available disk space
350MB minimum
Others
Monitor that supports 800 x 600 resolution at 256 colors
3-7
Trend Micro™ OfficeScan™ 10 Administrator’s Guide
TABLE 3-7.
Windows Vista, 32-bit and 64-bit versions (Continued)
R ESOURCE
Others
TABLE 3-8.
R EQUIREMENT
Windows Internet Explorer 7.0 or later if performing Web
setup
Windows 2008, 32-bit version
R ESOURCE
Operating
system
R EQUIREMENT
• Windows Server 2008 (Standard, Enterprise, Datacenter
and Web Editions) with Service Pack 1 or later
• OfficeScan supports client installation on guest Windows
2008 operating systems hosted on the following
virtualization applications:
• VMware ESX/ESXi Server 3.5 (Server Edition)
• VMware Server 1.0.3 or later (Server Edition)
• VMware Workstation and Workstation ACE Edition 6.0
OfficeScan cannot be installed if Windows 2008 runs on the
Server Core or Hyper-V™ environment.
Hardware
Processor
• Minimum 1GHz Intel Pentium or equivalent, 2GHz
recommended
• AMD64 and Intel 64 processor architectures
RAM
512MB minimum, 2GB recommended
Available disk space
350MB minimum
Others
Monitor that supports 800 x 600 resolution at 256 colors
3-8
Installing the OfficeScan Client
TABLE 3-8.
Windows 2008, 32-bit version (Continued)
R ESOURCE
Others
TABLE 3-9.
R EQUIREMENT
Windows Internet Explorer 7.0 or later if performing Web
setup
Windows 2008, 64-bit version
R ESOURCE
Operating
system
R EQUIREMENT
• Windows Server 2008 (Standard, Enterprise, Datacenter
and Web Editions) with Service Pack 1 or later
• OfficeScan supports client installation on guest Windows
2008 operating systems hosted on the following
virtualization applications:
• VMware ESX/ESXi Server 3.5 (Server Edition)
• VMware Server 1.0.3 or later (Server Edition)
• VMware Workstation and Workstation ACE Edition 6.0
OfficeScan cannot be installed if Windows 2008 runs on the
Server Core or Hyper-V environment.
Hardware
Processor
• Minimum 1.4GHz Intel Pentium or equivalent, 2GHz
recommended
• AMD64 and Intel 64 processor architectures
RAM
512MB minimum, 2GB recommended
Available disk space
350MB minimum
Others
Monitor that supports 800 x 600 resolution at 256 colors
3-9
Trend Micro™ OfficeScan™ 10 Administrator’s Guide
TABLE 3-9.
Windows 2008, 64-bit version (Continued)
R ESOURCE
Others
R EQUIREMENT
Windows Internet Explorer 7.0 or later if performing Web
setup
Compatibility List
OfficeScan is compatible with the following third-party products:
3-10
•
Citrix XenApp™ Server 4.5 & 5.0 (32-bit and 64-bit)
•
Microsoft ActiveSync™ 4.2, 4.5
•
Microsoft Cluster Server 2000
•
Microsoft Cluster Server 2003
•
Microsoft Office 2000, XP, 2003
•
Microsoft SQL Server™ 7.0, 2000, 2008
•
Microsoft Systems Management Server (SMS) 2003 with Service Pack 2 or later
•
Nortel VPN Client™ (with limitations)
•
Outlook Mail Scan supports Microsoft Office Outlook™ 2000, 2002, 2003, 2007
•
POP3 Mail Scan supports the following email programs:
•
Becky! Internet Mail 2.0
•
Eudora™ 6.2
•
Microsoft Outlook Express 6.0
•
Microsoft Office Outlook 2000, 2002, 2003, 2007
•
Mozilla Thunderbird™ 1.5, 2.0
•
Netscape™ 7.2
•
Windows Mail (for Windows Vista only)
•
Foxmail 5.0, 6.0
•
Terminal Services on Windows 2000, 2003, and 2008
•
Windows Mobile Device Center 6 (32-bit)
•
Windows Mobile Device Center 6.1 (32-bit and 64-bit)
•
Windows Server 2008 Failover Clusters
•
Windows XP Tablet PC Edition with Service Pack 2
Installing the OfficeScan Client
Installation Methods
This section provides a summary of the different client installation methods to perform
fresh installation of the OfficeScan client. All installation methods require local
administrator rights on the target computers.
TABLE 3-10.
Installation methods
I NSTALLATION M ETHOD /
O PERATING S YSTEM
S UPPORT
D EPLOYMENT C ONSIDERATIONS
WAN
DEPLOYMENT
Web install page
CENTRALLY
MANAGED
REQUIRES
USER
INTERVENTION
REQUIRES
IT
RESOURCE
MASS
DEPLOYMENT
BANDWIDTH
CONSUMED
No
No
Yes
No
No
High
No
No
Yes
Yes
No
High, if
installations start
at the
same
time
No
No
Yes
Yes
No
Low, if
scheduled
Yes
Yes
Yes/No
Yes
Yes
Low, if
scheduled
Supported on all operating
systems
Login Script Setup
Supported on all operating
systems
Client Packager
Supported on all operating
systems
Client Packager (MSI
package deployed
through Microsoft SMS)
Supported on all operating
systems
3-11
Trend Micro™ OfficeScan™ 10 Administrator’s Guide
TABLE 3-10.
Installation methods (Continued)
I NSTALLATION M ETHOD /
O PERATING S YSTEM
S UPPORT
D EPLOYMENT C ONSIDERATIONS
WAN
DEPLOYMENT
Client Packager (MSI
package deployed
through Active Directory)
CENTRALLY
MANAGED
REQUIRES
USER
INTERVENTION
REQUIRES
IT
RESOURCE
MASS
DEPLOYMENT
Yes
Yes
Yes/No
Yes
Yes
High, if
installations start
at the
same
time
No
Yes
No
Yes
No
High
No
No
No
Yes
No
Low
Supported on all operating
systems
From the OfficeScan
Web console
BANDWIDTH
CONSUMED
Supported on all operating
systems except:
• Windows Vista Home
Basic and Home
Premium Editions
• Windows XP Home
Edition
Client disk image
Supported on all operating
systems except:
• Windows Vista
• Windows 2008
• 64-bit platforms
3-12
Installing the OfficeScan Client
TABLE 3-10.
Installation methods (Continued)
I NSTALLATION M ETHOD /
O PERATING S YSTEM
S UPPORT
D EPLOYMENT C ONSIDERATIONS
WAN
DEPLOYMENT
Trend Micro Vulnerability Scanner (TMVS)
No
CENTRALLY
MANAGED
Yes
REQUIRES
USER
INTERVENTION
No
REQUIRES
IT
RESOURCE
Yes
MASS
DEPLOYMENT
No
BANDWIDTH
CONSUMED
High
Supported on all operating
systems except:
• Windows Vista Home
Basic and Home
Premium Editions
• Windows XP Home
Edition
Installing from the Web Install Page
Users can install the client program from the Web install page if you installed the
OfficeScan server to a computer running the following platforms:
•
Windows 2000 Server
•
Windows Server 2003 with Internet Information Server (IIS) 6.0 or Apache 2.0.x
To install from the Web install page, you need the following:
•
•
Internet Explorer with the security level set to allow ActiveX™ controls. The
required versions are as follows:
•
5.0 on Windows 2000
•
6.0 on Windows XP/Server 2003
•
7.0 on Windows Vista/2008
Administrator privileges on the computer
3-13
Trend Micro™ OfficeScan™ 10 Administrator’s Guide
Send the following instructions to users to install the OfficeScan client from the Web
install page. To send a client installation notification through email, see Initiating
Browser-based Installation on page 3-15.
To install from the Web install page:
1.
Log on to the computer using a built-in administrator account.
2.
If installing to a computer running Windows XP, Vista, and 2008, perform the
following steps:
3.
a.
Launch Internet Explorer and add the OfficeScan server URL (such as
https://<OfficeScan server name>:4343/officescan) to the list of trusted
sites. In Windows XP Home, access the list by going to Tools > Internet
Options > Security tab, selecting the Trusted Sites icon, and clicking Sites.
b.
Modify the Internet Explorer security setting to enable Automatic prompting
for ActiveX controls. On Windows XP, go to Tools > Internet Options >
Security tab, and click Custom level.
Open an Internet Explorer window and type one of the following:
•
OfficeScan server with SSL:
https://<OfficeScan server name>:<port>/officescan
•
OfficeScan server without SSL:
http://<OfficeScan server name>:<port>/officescan
4.
Click the link on the logon page.
5.
In the new screen that displays, click Install Now to start installing the OfficeScan
client. The client installation starts. Allow ActiveX control installation when
prompted. The OfficeScan client icon appears in the Windows system tray after
installation.
Note:
3-14
For a list of icons that display on the system tray, see Client Connection with Servers
on page 9-30.
Installing the OfficeScan Client
Initiating Browser-based Installation
Set up an email message that instructs users on the network to install the OfficeScan
client. Users click the client installer link provided in the email to start the installation.
Before you install clients:
•
Check the client installation requirements.
•
Identify which computers on the network currently do not have protection against
security risks. Perform the following tasks:
•
Run the Trend Micro Vulnerability Scanner. This tool analyzes computers for
installed antivirus software based on an IP address range you specify. For
details, see Using Vulnerability Scanner on page 3-30.
•
Query Active Directory. For details, see Security Compliance on page 2-22.
To initiate browser-based installation:
P ATH : N ETWORKED C OMPUTERS > C LIENT I NSTALLATION > B ROWSER - BASED
1.
Modify the subject line of the email message if necessary.
2.
Click Create Email. The default mail program opens.
3.
Send the email to the intended recipients.
Installing with Login Script Setup
Login Script Setup automates the installation of the OfficeScan client to unprotected
computers when they log on to the network. Login Script Setup adds a program called
AutoPcc.exe to the server login script.
AutoPcc.exe installs the client to unprotected computers and updates program files and
components. Computers must be part of the domain to be able to use AutoPcc through
login script.
Client Installation
AutoPcc.exe automatically installs the OfficeScan client to an unprotected Windows
2000/Server 2003 computer when the computer logs on to the server whose login
scripts you modified. However, AutoPcc.exe does not automatically install the client to
Windows XP/Vista/2008 computers. Users need to connect to the server computer,
navigate to \\<server computer name>\ofcscan), right-click AutoPcc.exe, and select
Run as administrator.
3-15
Trend Micro™ OfficeScan™ 10 Administrator’s Guide
For remote desktop installation using AutoPcc.exe:
•
The computer must be run in Mstsc.exe /console mode. This forces the
AutoPcc.exe installation to run in session 0.
•
Map a drive to the "ofcscan" folder and execute AutoPcc.exe from that point.
Program and Component Updates
AutoPcc.exe updates the program files and the antivirus, anti-spyware, and Damage
Cleanup Services components.
The Windows 2000/Server 2003/2008 Scripts
If you already have an existing login script, Login Script Setup appends a command that
executes AutoPcc.exe. Otherwise, OfficeScan creates a batch file called ofcscan.bat that
contains the command to run AutoPcc.exe.
Login Script Setup appends the following at the end of the script:
\\<Server_name>\ofcscan\autopcc
Where:
•
<Server_name> is the computer name or IP address of the OfficeScan server
computer
•
"ofcscan" is the OfficeScan directory on the server
•
"autopcc" is the link to the autopcc executable file that installs the OfficeScan client
Login script location (through a net logon shared directory):
3-16
•
Windows 2000 server: \\Windows 2000 server\system
drive\WINNT\SYSVOL\domain\scripts\ofcscan.bat
•
Windows Server 2003: \\Windows 2003 server\system
drive\windir\sysvol\domain\scripts\ofcscan.bat
•
Windows Server 2008: \\Windows 2008 server\system
drive\windir\sysvol\domain\scripts\ofcscan.bat
Installing the OfficeScan Client
To add AutoPcc.exe to the login script using Login Script Setup:
1.
On the computer you used to run the server installation, click Programs > Trend
Micro OfficeScan Server <Server Name> > Login Script Setup from the
Windows Start menu.
The Login Script Setup utility loads. The console displays a tree showing all
domains on the network.
2.
Locate the server whose login script you want to modify, select it, and then click
Select. Ensure that the server is a primary domain controller and that you have
administrator access to the server. Login Script Setup prompts you for a user name
and password.
3.
Type the user name and password. Click OK to continue.
The User Selection screen appears. The Users list shows the profiles of users that
log on to the server. The Selected users list shows the user profiles whose login
script you want to modify.
4.
To modify the login script for a user profile, select the user profile from the Users
list, and then click Add.
5.
To modify the login script of all users, click Add All.
6.
To exclude a user profile that you previously selected, select the name from the
Selected users list, and click Delete.
7.
To reset your choices, click Delete All.
8.
Click Apply when all target user profiles are in the Selected users list.
A message informs you that you have modified the server login scripts successfully.
9.
Click OK. Login Script Setup returns to its initial screen.
10. To modify the login scripts of other servers, repeat steps 2 to 4.
11. To close Login Script Setup, click Exit.
3-17
Trend Micro™ OfficeScan™ 10 Administrator’s Guide
Installing with Client Packager
Client Packager can compress Setup and update files into a self-extracting file, which you
can then send to users using conventional media such as CD-ROM. When users receive
the package, all they have to do is run the Setup program on the client computer.
Client Packager is especially useful when deploying the client program or components to
clients in low-bandwidth remote offices. OfficeScan clients you install using Client
Packager report to the server where the Setup package was created.
Client Packager requires the following:
•
350MB free disk space
•
Windows Installer 2.0 (to run an MSI package)
To create a package using Client Packager:
1.
On the OfficeScan server computer, browse to <Server installation
folder>\PCCSRV\Admin\Utility\ClientPackager.
2.
Double-click ClnPack.exe to run the tool. The Client Packager console opens.
3.
Select the type of package you want to create.
TABLE 3-11.
Client package types
P ACKAGE TYPE
3-18
D ESCRIPTION
Setup
Select Setup to create the package as an executable file. The package installs the OfficeScan client program with the components currently
available on the server. If the target computer has
an earlier OfficeScan client version installed, running the executable file upgrades the client.
Update
Select Update to create a package that contains
the components currently available on the server.
The package will be created as an executable file.
Use this package if there are issues updating components on a client computer.
Installing the OfficeScan Client
TABLE 3-11.
Client package types (Continued)
P ACKAGE TYPE
MSI
4.
5.
D ESCRIPTION
Select MSI to create a package that conforms to
the Microsoft Installer Package format. The package also installs the OfficeScan client program
with the components currently available on the
server. If the target computer has an earlier OfficeScan client version installed, running the MSI file
upgrades the client.
Configure the following settings (some settings are only available if you select a
particular package type):
•
Windows Operating System Type
•
Scan Method
•
Silent Mode
•
Update Agent
•
Force Overwrite with Latest Version
•
Disable Prescan (Only for Fresh Installation)
•
Outlook Mail Scan
•
Check Point SecureClient Support
•
Components
Next to Source file, ensure that the location of the ofcscan.ini file is correct. To
modify the path, click
to browse for the ofcscan.ini file. By default, this file is in
the <Server installation folder>\PCCSRV folder of the OfficeScan server.
6.
In Output file, click
to specify the location where you want to create the client
package and the file name (for example, ClientSetup.exe).
7.
Click Create. When Client Packager finishes creating the package, the message
"Package created successfully" appears. To verify successful package creation, check
the output directory you specified.
8.
Deploy the package.
3-19
Trend Micro™ OfficeScan™ 10 Administrator’s Guide
Package deployment guidelines:
1.
Send the package to users and ask them to run the client package on their
computers by double-clicking the .exe or .msi file.
WARNING! Send the package only to users whose OfficeScan client will report to
the server where the package was created.
2.
If you have users who will install the .exe package on computers running Windows
Vista and 2008, instruct them to right-click the .exe file and select Run as
administrator.
3.
If you created an .msi file, deploy the package by performing the following tasks:
•
Use Active Directory or Microsoft SMS. See Deploying an MSI Package Using
Active Directory on page 3-23 or Deploying an MSI Package Using Microsoft SMS on
page 3-24.
•
Launch the MSI package (on the command prompt) and silently install the
OfficeScan client to a remote computer running Windows XP, Vista, and 2008.
Client Packager Settings
Windows Operating System Type
Select the operating system for which you want to create the package. Ensure that you
only deploy the package to computers that run the operating system type. Create
another package to deploy to another operating system type.
Scan Method
Select the scan method for the package. See Scan Methods on page 5-8 for details.
The components included in the package depend on the scan method you have selected.
For details, see Client Update on page 4-23.
Before selecting the scan method, take note of the following guidelines to help you
deploy the package efficiently:
3-20
Installing the OfficeScan Client
•
If you will use the package to upgrade a client to this OfficeScan version, check the
domain level scan method on the Web console. On the console, go to Networked
Computers > Client Management, select the client tree domain to which the
client belongs, and click Settings > Scan Methods. The domain level scan method
should be consistent with the scan method for the package.
•
If you will use the package to perform fresh installation of the OfficeScan client,
check the client grouping setting. On the Web console, go to Networked
Computers > Global Client Settings. Verify if the NetBIOS/Active
Directory/DNS domain to which the target computer belongs exists on the client
tree. If the domain exists, check the scan method configured for the domain. If the
domain does not exist, check the root level scan method (select the root icon
on
the client tree and click Settings > Scan Methods). The domain or root level scan
method should be consistent with the scan method for the package.
•
If you will use the package to update components on a client using this
OfficeScan version, check the scan method configured for the client tree
domain to which the client belongs. The domain level scan method should be
consistent with the scan method for the package.
Silent Mode
This option creates a package that installs on the client computer in the background,
unnoticeable to the client and without showing an installation status window. Enable
this option if you plan to deploy the package remotely to the target computer.
Update Agent
This option assigns Update Agent privileges to the client on the target computer.
Update Agents help the OfficeScan server deploy components to clients. For details, see
Update Agents on page 4-37.
If you enable the Update Agent option:
1.
Use the Scheduled Update Configuration Tool to enable and configure scheduled
updates for the agent. For details, see Update Methods for Update Agents on page 4-42.
3-21
Trend Micro™ OfficeScan™ 10 Administrator’s Guide
2.
The OfficeScan server that manages the Update Agent will not be able to
synchronize or deploy the following settings to the agent:
•
Update Agent privilege
•
Client scheduled update
•
Update from Trend Micro ActiveUpdate server
•
Updates from other update sources
Therefore, deploy the client package only to computers that will not be managed by
an OfficeScan server. Afterwards, configure the Update Agent to get its updates
from an update source other than an OfficeScan server, such as a custom update
source. If you want the OfficeScan server to synchronize settings with the Update
Agent, do not use Client Packager and choose a different client installation method
instead.
Force Overwrite with Latest Version
This option overwrites component versions on the client with the versions
currently available on the server. Enable this option to ensure that components on
the server and client are synchronized.
Disable Prescan (Only for Fresh Installation)
If the target computer does not have the OfficeScan client installed, the package first
scans the computer for security risks before installing the client. If you are certain that
the target computer is not infected with security risks, disable prescan.
If prescan is enabled, Setup scans for virus/malware in the most vulnerable areas of the
computer, which include the following:
•
Boot area and boot directory (for boot viruses)
•
Windows folder
•
Program files folder
Outlook Mail Scan
This option installs the Outlook Mail Scan program, which scans Microsoft Outlook™
mailboxes for security risks. For details, see Outlook Mail Scan on page 9-13.
3-22
Installing the OfficeScan Client
Check Point SecureClient Support
This tool adds support for Check Point™ SecureClient™ for Windows
2000/XP/Server 2003. SecureClient verifies the Virus Pattern version before allowing
connection to the network. For details, see Overview of Check Point Architecture and
Configuration on page 11-2.
Note:
SecureClient does not verify the virus pattern versions on clients using smart scan.
Components
Select the components to include in the package. For details, see OfficeScan
Components and Programs on page 4-2.
Deploying an MSI Package Using Active Directory
Take advantage of Active Directory features to deploy the MSI package simultaneously
to multiple client computers. For instructions on creating an MSI file, see Installing with
Client Packager on page 3-18.
To deploy an MSI package using Active Directory:
1.
Open the Active Directory console.
2.
Right-click the Organizational Unit (OU) where you want to deploy the MSI
package and click Properties.
3.
In the Group Policy tab, click New.
4.
Choose between Computer Configuration and User Configuration, and open
Software Settings below it.
Tip:
Trend Micro recommends using Computer Configuration instead of User
Configuration to ensure successful MSI package installation regardless of
which user logs on to the computer.
5.
Below Software Settings, right-click Software installation, and then select New
and Package.
6.
Locate and select the MSI package.
3-23
Trend Micro™ OfficeScan™ 10 Administrator’s Guide
7.
Select a deployment method and then click OK.
•
Assigned: The MSI package is automatically deployed the next time a user logs
on to the computer (if you selected User Configuration) or when the computer
restarts (if you selected Computer Configuration). This method does not
require any user intervention.
•
Published: To run the MSI package, inform users to go to Control Panel,
open the Add/Remove Programs screen, and select the option to add/install
programs on the network. When the OfficeScan client MSI package displays,
users can proceed to install the client.
Deploying an MSI Package Using Microsoft SMS
Deploy the MSI package using Microsoft System Management Server (SMS) if you have
Microsoft BackOffice SMS installed on the server. For instructions on creating an MSI
file, see Installing with Client Packager on page 3-18.
The SMS server needs to obtain the MSI file from the OfficeScan server before it can
deploy the package to target computers.
•
Local: The SMS server and the OfficeScan server are on the same computer.
•
Remote: The SMS server and the OfficeScan server are on different computers.
Known issues when installing with Microsoft SMS
•
"Unknown" appears in the Run Time column of the SMS console.
•
If the installation was unsuccessful, the installation status may still show that the
installation is complete on the SMS program monitor. For instructions on how to
verify if the installation was successful, see Post-installation on page 3-48.
The following instructions apply if you use Microsoft SMS 2.0 and 2003.
To obtain the package locally:
3-24
1.
Open the SMS Administrator console.
2.
On the Tree tab, click Packages.
3.
On the Action menu, click New > Package From Definition. The Welcome
screen of the Create Package From Definition Wizard appears.
4.
Click Next. The Package Definition screen appears.
5.
Click Browse. The Open screen appears.
Installing the OfficeScan Client
6.
Browse and select the MSI package file created by Client Packager, and then click
Open. The MSI package name appears on the Package Definition screen. The
package shows "Trend Micro OfficeScan Client" and the program version.
7.
Click Next. The Source Files screen appears.
8.
Click Always obtain files from a source directory, and then click Next.
The Source Directory screen appears, displaying the name of the package you want
to create and the source directory.
9.
Click Local drive on site server.
10. Click Browse and select the source directory containing the MSI file.
11. Click Next. The wizard creates the package. When it completes the process, the
name of the package appears on the SMS Administrator console.
To obtain the package remotely:
1.
On the OfficeScan server, use Client Packager to create a Setup package with an
.exe extension (you cannot create an .msi package). See Installing with Client Packager
on page 3-18 for details.
2.
On the computer where you want to store the source, create a shared folder.
3.
Open the SMS Administrator console.
4.
On the Tree tab, click Packages.
5.
On the Action menu, click New > Package From Definition. The Welcome
screen of the Create Package From Definition Wizard appears.
6.
Click Next. The Package Definition screen appears.
7.
Click Browse. The Open screen appears.
8.
Browse for the MSI package file. The file is on the shared folder you created.
9.
Click Next. The Source Files screen appears.
10. Click Always obtain files from a source directory, and then click Next. The
Source Directory screen appears.
11. Click Network path (UNC name).
12. Click Browse and select the source directory containing the MSI file (the shared
folder you created).
13. Click Next. The wizard creates the package. When it completes the process, the
name of the package appears on the SMS Administrator console.
3-25
Trend Micro™ OfficeScan™ 10 Administrator’s Guide
To distribute the package to target computers:
1.
On the Tree tab, click Advertisements.
2.
On the Action menu, click All Tasks > Distribute Software. The Welcome
screen of the Distribute Software Wizard appears.
3.
Click Next. The Package screen appears.
4.
Click Distribute an existing package, and then click the name of the Setup
package you created.
5.
Click Next. The Distribution Points screen appears.
6.
Select a distribution point to which you want to copy the package, and then click
Next. The Advertise a Program screen appears.
7.
Click Yes to advertise the client Setup package, and then click Next. The
Advertisement Target screen appears.
8.
Click Browse to select the target computers. The Browse Collection screen
appears.
9.
Click All Windows NT Systems.
10. Click OK. The Advertisement Target screen appears again.
11. Click Next. The Advertisement Name screen appears.
12. In the text boxes, type a name and your comments for the advertisement, and then
click Next. The Advertise to Subcollections screen appears.
13. Choose whether to advertise the package to subcollections. Choose to advertise the
program only to members of the specified collection or to members of
subcollections.
14. Click Next. The Advertisement Schedule screen appears.
15. Specify when to advertise the client Setup package by typing or selecting the date
and time.
If you want Microsoft SMS to stop advertising the package on a specific date, click
Yes. This advertisement should expire, and then specify the date and time in the
Expiration date and time list boxes.
16. Click Next. The Assign Program screen appears.
3-26
Installing the OfficeScan Client
17. Click Yes, assign the program, and then click Next.
Microsoft SMS creates the advertisement and displays it on the SMS Administrator
console.
18. When Microsoft SMS distributes the advertised program (that is, the OfficeScan
client program) to target computers, a screen displays on each target computer.
Instruct users to click Yes and follow the instructions provided by the wizard to
install the OfficeScan client to their computers.
Installing from the OfficeScan Web Console
Install the OfficeScan client remotely to one or several computers connected to the
network. Ensure you have administrator rights to the target computers to perform
remote installation. Remote installation does not install the OfficeScan client on a
computer already running the OfficeScan server.
Note:
This installation method cannot be used on computers running Windows XP Home,
and Windows Vista Home Basic and Home Premium Editions (32-bit and 64-bit
versions).
To install from the OfficeScan Web console:
1.
If the computer does not run Windows Vista, skip this step. If running Windows
Vista Business, Enterprise, or Ultimate Edition, perform the following steps:
a.
Enable a built-in administrator account and set the password for the account.
b.
Click Start > Programs > Administrative Tools > Windows Firewall with
Advanced Security.
c.
For Domain Profile, Private Profile, and Public Profile, set the firewall state to
"Off".
d. Open Microsoft Management Console (click Start > Run and type
services.msc) and start the Remote Registry service. When installing the
OfficeScan client, use the built-in administrator account and password.
2.
In the Web console, click Networked Computers > Client Installation >
Remote.
3-27
Trend Micro™ OfficeScan™ 10 Administrator’s Guide
3.
Select the target computers.
•
The Domains and Computers list displays all the Windows domains on the
network. To display computers under a domain, double-click the domain name.
Select a computer, and then click Add.
•
If you have a specific computer name in mind, type the computer name in the
field on top of the page and click Search.
OfficeScan prompts you for the target computer’s user name and password. Use an
administrator account user name and password to continue.
4.
Type the user name and password, and then click Log in. The target computer
appears in the Selected Computers table.
5.
Repeat steps 3 and 4 to add more computers.
6.
Click Install when you are ready to install the client to target computers. A
confirmation box appears.
7.
Click Yes to confirm that you want to install the client to the target computers. A
progress screen appears as the program files copy to each target computer.
When OfficeScan completes the installation to a target computer, the computer name
disappears in the Selected Computers list and appears in the Domains and
Computers list with a red check mark.
When all target computers appear with red check marks in the Domains and
Computers list, you have completed remote installation.
Note:
3-28
If you install to multiple computers, OfficeScan records any unsuccessful installation
in the logs, but it will not postpone the other installations. You do not have to
supervise the installation after you click Install. Check the logs later to see the
installation results.
Installing the OfficeScan Client
Installing from a Client Disk Image
Disk imaging technology allows you to create an image of an OfficeScan client using
disk imaging software and make clones of it to other computers on the network.
Each client installation needs a Globally Unique Identifier (GUID) so that the server
can identify clients individually. Use an OfficeScan program called ImgSetup.exe to
create a different GUID for each of the clones.
Note:
This installation method cannot be used on computers running Windows Vista and
2008.
To create a disk image of an OfficeScan client:
1.
Install the OfficeScan client on a computer.
2.
Copy ImgSetup.exe from <Server installation folder>\PCCSRV\Admin\
Utility\ImgSetup folder to this computer.
3.
Run ImgSetup.exe on this computer. This creates a RUN registry key under
HKEY_LOCAL_MACHINE.
4.
Create a disk image of the OfficeScan client using the disk imaging software.
5.
Restart the clone. ImgSetup.exe automatically starts and creates one new GUID
value. The client reports this new GUID to the server and the server creates a new
record for the new client.
WARNING! To avoid having two computers with the same name in the OfficeScan
database, manually change the computer name or domain name of the
cloned OfficeScan client.
3-29
Trend Micro™ OfficeScan™ 10 Administrator’s Guide
Using Vulnerability Scanner
Use Vulnerability Scanner to detect installed antivirus solutions, search for unprotected
computers on the network, and install OfficeScan™ clients to computers. To determine
if computers are protected, Vulnerability Scanner pings ports normally used by antivirus
solutions.
Vulnerability Scanner Functions
Vulnerability Scanner performs the following functions:
•
Monitor the network for Dynamic Host Configuration Protocol (DHCP) requests
so that when computers first log on to the network, Vulnerability Scanner can
determine their status.
•
Ping computers on the network to check their status and retrieve their computer
names, platform versions, and descriptions.
•
Determine the antivirus solutions installed on the network. Vulnerability scanner
can detect Trend Micro™ products and third-party antivirus solutions (including
Norton AntiVirus™ Corporate Edition and McAfee™ VirusScan™ ePolicy
Orchestrator™).
•
Send scan results through email or export results to a comma-separated value (CSV)
file.
Considerations When Using Vulnerability Scanner
To help you decide whether to use Vulnerability Scanner, consider the following:
Network Administration
TABLE 3-12.
Network administration
S ETUP
3-30
E FFECTIVENESS OF VULNERABILITY S CANNER
Administration with strict
security policy
Very effective. Vulnerability Scanner reports
whether or not all computers have antivirus software installed.
Administrative responsibility distributed across
different sites
Moderately effective
Installing the OfficeScan Client
TABLE 3-12.
Network administration (Continued)
S ETUP
E FFECTIVENESS OF VULNERABILITY S CANNER
Centralized administration
Moderately effective
Outsource service
Moderately effective
Users administer their
own computers
Not effective. Because Vulnerability Scanner scans
the network for antivirus installation, it is not feasible to have users scan their own computers.
Network Topology and Architecture
TABLE 3-13.
Network topology and architecture
S ETUP
E FFECTIVENESS OF VULNERABILITY S CANNER
Single location
Very effective. Vulnerability Scanner allows you to
scan an entire IP segment and install OfficeScan
client easily on the LAN.
Multiple locations with
high speed connection
Moderately effective
Multiple locations with
low speed connection
Not effective. You need to run Vulnerability Scanner on each location and OfficeScan client installation must be directed to a local OfficeScan server.
Remote and isolated
computers
Not effective. Vulnerability Scanner cannot scan
computers not connected to the network.
3-31
Trend Micro™ OfficeScan™ 10 Administrator’s Guide
Software/Hardware Specifications
TABLE 3-14.
Software/Hardware specifications
S ETUP
E FFECTIVENESS OF VULNERABILITY S CANNER
Windows NT-based
operating systems
Very effective. Vulnerability Scanner can easily
install the OfficeScan client remotely to computers
running NT-based operating systems, except Windows XP Home.
Mixed operating systems
Moderately effective. Vulnerability Scanner can
only install to computers running Windows
NT-based operating systems.
Desktop management
software
Not effective. Vulnerability Scanner cannot be used
with desktop management software. However, it
can help track the progress of OfficeScan client
installation.
Domain Structure
TABLE 3-15.
Domain structure
S ETUP
3-32
E FFECTIVENESS OF VULNERABILITY S CANNER
Microsoft Active Directory
Very effective. Specify the domain administrator
account in Vulnerability Scanner to allow remote
installation of the OfficeScan client.
Workgroup
Not effective. Vulnerability Scanner may have difficulty installing to computers using different administrative accounts and passwords.
Novell™ Directory Service
Not effective. Vulnerability Scanner requires a
Windows Domain account to install the OfficeScan
client.
Peer-to-peer
Not effective. Vulnerability Scanner may have difficulty installing to computers using different administrative accounts and passwords.
Installing the OfficeScan Client
Network Traffic
TABLE 3-16.
Network traffic
S ETUP
E FFECTIVENESS OF VULNERABILITY S CANNER
LAN connection
Very effective
512 Kbps
Moderately effective
T1 connection and
higher
Moderately effective
Dialup
Not effective. It will take a long time to finish installing the OfficeScan client.
Network Size
TABLE 3-17.
Network size
S ETUP
E FFECTIVENESS OF VULNERABILITY S CANNER
Very large enterprise
Very effective. The bigger the network, the more
Vulnerability Scanner is needed for checking OfficeScan client installations.
Small and medium business
Moderately effective. For small networks, Vulnerability Scanner can be an option to install the OfficeScan client. Other client installation methods may
prove much easier to implement.
3-33
Trend Micro™ OfficeScan™ 10 Administrator’s Guide
User Tasks
Perform the following tasks from Vulnerability Scanner:
•
Installing the OfficeScan Client on page 3-34
•
Managing General Settings on page 3-36
•
Running Vulnerability Scan on page 3-40
•
Creating a Scheduled Task on page 3-42
•
Configuring Other Vulnerability Scanner Settings on page 3-43
Launching Vulnerability Scanner on Another Computer
You can launch Vulnerability Scanner on a computer other than the OfficeScan server
computer. Ensure that the other computer runs Windows 2000, 2003, and 2008. You
cannot launch the tool on Windows XP, Vista, or from Terminal Server.
To launch Vulnerability Scanner on another computer:
1.
Connect to the OfficeScan server computer.
2.
Copy the TMVS folder in <Server installation folder>\PCCSRV\Admin\Utility to
the other computer.
3.
After copying the TMVS folder, double-click TMVS.exe.
Installing the OfficeScan Client
Vulnerability Scanner can install the OfficeScan client to remote computers. However,
Vulnerability Scanner will not install the client if:
3-34
•
The remote computer already has the OfficeScan server or other antivirus products
installed.
•
The remote computer runs Windows XP Home, Windows Vista Home Basic, and
Windows Vista Home Premium.
Installing the OfficeScan Client
To install OfficeScan client with Vulnerability Scanner:
1.
If running Windows Vista Business, Enterprise, or Ultimate Edition, perform the
following steps:
a.
Enable a built-in administrator account and set the password for the account.
b.
Click Start > Programs > Administrative Tools > Windows Firewall with
Advanced Security.
c.
For Domain Profile, Private Profile, and Public Profile, set the firewall state to
"Off".
d. Open Microsoft Management Console (click Start > Run and type
services.msc) and start the Remote Registry service. When installing the
OfficeScan client, use the built-in administrator account and password.
2.
3.
If running Windows XP Professional (32-bit or 64-bit version), perform the
following steps:
a.
Open Windows Explorer and click Tools > Folder Options.
b.
Click the View tab and disable Use simple file sharing (Recommended).
Navigate to the TMVS folder and double-click TMVS.exe. The Trend Micro
Vulnerability Scanner console appears.
Note:
On the OfficeScan server computer, the TMVS folder is located in <Server
installation folder>\PCCSRV\Admin\Utility. If you copied the TMVS folder to
another computer, navigate to the TMVS folder on that computer.
4.
Click Settings.
5.
Under OfficeScan server settings, type the OfficeScan server name and port
number.
6.
Select Auto-Install OfficeScan client on unprotected computers.
7.
Click OK to begin checking the computers on the network and begin OfficeScan
client installation.
3-35
Trend Micro™ OfficeScan™ 10 Administrator’s Guide
Managing General Settings
To configure and manage the following Vulnerability Scanner settings, navigate to
<Server installation folder>\PCCSRV\Admin\Utility\TMVS and double-click
TMVS.exe:
Product Query
Select the products to check on the network. To prevent false alarms, select all check
boxes. Click Settings next to the product name to verify the port number that
Vulnerability Scanner will check.
Manually configure the port settings for each product (except ServerProtect™ for
Windows and Linux™ and McAfee™ VirusScan™ ePolicy Orchestrator™).
How Vulnerability Scanner checks security products:
TABLE 3-18.
Security products checked by Vulnerability Scanner
P RODUCT
OfficeScan client
D ESCRIPTION
Vulnerability Scanner uses the OfficeScan client port to
check if OfficeScan client is installed. It also checks if
the TMListen.exe process is running. It retrieves the port
number automatically if executed from its default location
If you launched TMVS on computer other than the OfficeScan server, check and then use the other computer's
communication port.
3-36
Trend Micro Internet Security™
(PC-cillin)
Vulnerability Scanner uses port 40116 to check if Trend
Micro Internet Security is installed.
ServerProtect for
Windows
Vulnerability Scanner uses RPC endpoint to check if
SPNTSVC.exe is running. It returns information including
operating system, and Virus Scan Engine, Virus Pattern
and product versions. Vulnerability Scanner cannot
detect the ServerProtect Information Server or the
ServerProtect Management Console.
Installing the OfficeScan Client
TABLE 3-18.
Security products checked by Vulnerability Scanner (Continued)
P RODUCT
D ESCRIPTION
ServerProtect for
Linux
If the target computer does not run Windows, Vulnerability Scanner checks if it has ServerProtect for Linux
installed by trying to connect to port 14942.
ScanMail™ for
Microsoft
Exchange™
Vulnerability Scanner loads the Web page http://ipaddress:port/scanmail.html to check for ScanMail installation. By default, ScanMail uses port 16372. If ScanMail
uses a different port number, specify the port number.
Otherwise, Vulnerability Scanner cannot detect ScanMail
for Exchange.
InterScan™ family
Vulnerability Scanner loads each Web page for different
products to check for product installation.
• InterScan Messaging Security Suite 5.x:
http://localhost:port/eManager/cgi-bin/eManager.htm
• InterScan eManager 3.x:
http://localhost:port/eManager/cgi-bin/eManager.htm
• InterScan VirusWall™ 3.x:
http://localhost:port/InterScan/cgi-bin/interscan.dll
PortalProtect™
Vulnerability Scanner loads the Web page http://localhost:port/PortalProtect/index.html to check for product
installation.
Norton Antivirus™
Corporate Edition
Vulnerability Scanner sends a special token to UDP port
2967, the default port of Norton Antivirus Corporate Edition RTVScan. The computer with this antivirus product
replies using a special token type. Since Norton Antivirus
Corporate Edition communicates by UDP, the accuracy
rate is not guaranteed. Furthermore, network traffic may
influence UDP waiting time.
3-37
Trend Micro™ OfficeScan™ 10 Administrator’s Guide
TABLE 3-18.
Security products checked by Vulnerability Scanner (Continued)
P RODUCT
D ESCRIPTION
McAfee VirusScan
ePolicy Orchestrator
Vulnerability Scanner sends a special token to TCP port
8081, the default port of ePolicy Orchestrator for providing connection between the server and client. The computer with this antivirus product replies using a special
token type. Vulnerability Scanner cannot detect the
standalone McAfee VirusScan.
Protocols
Vulnerability Scanner detects products and computers using the following protocols:
•
RPC: Detects ServerProtect for NT
•
UDP: Detects Norton AntiVirus Corporate Edition clients
•
TCP: Detects McAfee VirusScan ePolicy Orchestrator
•
ICMP: Detects computers by sending ICMP packets
•
HTTP: Detects OfficeScan clients
•
DHCP: If it detects a DHCP request, Vulnerability Scanner checks if antivirus
software has already been installed on the requesting computer.
Method for Retrieving Computer Descriptions
Quick retrieval retrieves only the computer name. Normal retrieval takes longer to
complete since it retrieves both domain and computer information. If you select
Normal retrieval, set Vulnerability Scanner to try to retrieve computer descriptions, if
available.
3-38
Installing the OfficeScan Client
Notifications
To automatically send the results to yourself or to other administrators in your
organization, select Email results to the system administrator, and then click
Configure to specify email settings.
1.
In To, type the email address of the recipient.
2.
In From, type an email address to let the recipient know who sent the message.
3.
In SMTP server, type the SMTP server address. For example, type
smtp.company.com. The SMTP server information is required.
4.
In Subject, type a new subject for the message or accept the default subject.
5.
Click OK.
6.
Choose to display a notification on unprotected computers. Click Customize to
configure the notification message. In the Notification Message screen, type a new
message or accept the default message. Click OK.
Vulnerability Scan Results
Save the scan results to a comma-separated value (CSV) file. To change the default
folder for saving the CSV file, click Browse, select a target folder on the computer or on
the network, and then click OK.
Ping Settings
Enable Vulnerability Scanner to ping computers on the network to get their status. To
specify how Vulnerability Scanner will send packets to the computers and wait for
replies, select Allow Vulnerability Scanner to ping computers on your network to
check their status, and then accept the default settings or type new values in the
Packet size and Timeout text boxes.
Vulnerability Scanner can also detect the type of operating system using ICMP OS
fingerprinting.
3-39
Trend Micro™ OfficeScan™ 10 Administrator’s Guide
OfficeScan Server Settings
Type the OfficeScan server name and port number. Vulnerability Scanner can
auto-install the OfficeScan client on unprotected computers.
Click Install to Account to configure the account. In the Account Information screen,
type a user name and password that permits installation. Click OK.
Vulnerability Scanner can also send logs to the OfficeScan server.
Running Vulnerability Scan
Run Vulnerability Scan on multiple computers by specifying a range of IP addresses.
Vulnerability Scan can also run on computers requesting IP addresses from a DHCP
server. Vulnerability Scanner listens on port 67 (DHCP Server listening port for DHCP
requests). If it detects a DHCP request, Vulnerability Scanner can check for the
presence of antivirus software on the requesting computer.
To run a manual vulnerability scan on a range of IP addresses:
1.
Navigate to <Server installation folder>\PCCSRV\Admin\Utility\TMVS and
double-click TMVS.exe. The Trend Micro Vulnerability Scanner console appears.
2.
Under Manual Scan, type the IP address range of the computers you want to
check.
Note:
3.
Click Start. The vulnerability scan results appear in the Results table under the
Manual Scan tab.
Note:
4.
3-40
Vulnerability Scanner only supports a class B IP address range, for example,
168.212.1.1 to 168.212.254.254.
MAC address information does not display in the Results table if the computer
runs Windows 2008.
To save the results to a comma-separated value (CSV) file, click Export, locate the
folder where you want to save the file, type the file name, and click Save.
Installing the OfficeScan Client
To run a vulnerability scan on computers requesting IP addresses from a DHCP
server:
1.
Configure DHCP settings in the TMVS.ini file found under the following folder:
<Server installation folder>\PCCSRV\Admin\Utility\TMVS.
TABLE 3-19.
DHCP settings in the TMVS.ini file
S ETTING
D ESCRIPTION
DhcpThreadNum=x
Specify the thread number for DHCP mode. The
minimum is 3, maximum is 100. The default value is
3.
DhcpDelayScan=x
This is the delay time in seconds before checking
the requesting computer for installed antivirus software.
The minimum is 0 (do not wait), maximum is 600.
The default value is 60.
LogReport=x
0 disables logging, 1 enables logging.
Vulnerability Scanner sends the results of the scan
to the OfficeScan server and the logs display in the
System Event Logs screen of the Web console.
OsceServer=x
This is the OfficeScan server's IP address or DNS
name.
OsceServerPort=x
This is the Web server port on the OfficeScan
server.
2.
Navigate to <Server installation folder>\PCCSRV\Admin\Utility\TMVS and
double-click TMVS.exe. The Trend Micro Vulnerability Scanner console appears.
3.
In the Results table, click the DHCP Scan tab.
Note:
The DHCP Scan tab is not available on computers running Windows 2008.
3-41
Trend Micro™ OfficeScan™ 10 Administrator’s Guide
4.
Click Start. Vulnerability Scanner begins listening for DHCP requests and
performing vulnerability checks on computers as they log on to the network. When
it detects an unprotected computer and verifies that the computer's IP address
belongs to the defined IP address range, Vulnerability Scanner runs remote
installation to install the OfficeScan client.
5.
To save the results to a comma-separated value (CSV) file, click Export, locate the
folder where you want to save the file, type the file name, and click Save.
Creating a Scheduled Task
Scheduling tasks in Vulnerability Scanner allows you to periodically check the network
for installed antivirus solutions. This is a convenient way of running tasks automatically,
without having to configure Vulnerability Scanner every time.
To create a scheduled task:
1.
Navigate to <Server installation folder>\PCCSRV\Admin\Utility\TMVS and
double-click TMVS.exe. The Trend Micro Vulnerability Scanner console appears.
2.
In the Results table, click the DHCP Scan tab.
Note:
3.
3-42
The DHCP Scan tab is not available on computers running Windows 2008.
Under Scheduled Scan, click Add/Edit. The Scheduled Scan screen appears.
Configure the following:
•
Name: Type a name for the scheduled scan.
•
IP address range: Type the IP address range of the computers you want to
check.
•
Start time: Type or select the time when the scan will run. Use the 24-hour
clock format.
•
Frequency: Select how often the scan will run. Choose from daily, weekly, or
monthly.
•
Settings: Click Use current settings to use existing settings, or click Modify
settings. If you click Modify settings, click Settings to change the
configuration.
4.
Click OK. The scheduled scan you created appears under Scheduled Scan.
5.
To execute the scheduled scan immediately, click Run Now.
Installing the OfficeScan Client
Configuring Other Vulnerability Scanner Settings
Some Vulnerability Scanner settings can be configured only from the TMVS.ini file.
To modify settings on the TMVS.ini file:
1.
Navigate to <Server installation folder>\PCCSRV\Admin\Utility\TMVS and
open TMVS.ini. using a text editor such as Notepad.
2.
To set the number of computers that Vulnerability Scanner simultaneously pings,
change the value for EchoNum. Specify a value between 1 and 64.
For example, type EchoNum=60 if you want Vulnerability Scanner to ping 60
computers at the same time.
3.
To set the number of computers that Vulnerability Scanner simultaneously checks
for antivirus software, change the value for ThreadNumManual. Specify a value
between 8 and 64.
For example, type ThreadNumManual=60 if you want Vulnerability Scanner to
check 60 computers for antivirus software at the same time.
4.
To set the number of computers that Vulnerability Scanner simultaneously checks
for antivirus software when running scheduled tasks, change the value for
ThreadNumSchedule. Specify a value between 8 and 64.
For example, type ThreadNumSchedule=60 if you want Vulnerability Scanner to
check 60 computers for antivirus software at the same time whenever it runs a
scheduled task.
5.
Save TMVS.ini.
Note:
See Server Debug Log Using LogServer.exe on page 12-3 for information on how to
collect debug logs for Vulnerability Scanner.
3-43
Trend Micro™ OfficeScan™ 10 Administrator’s Guide
Migrating to the OfficeScan Client
Migrate endpoint security software installed on a target computer to the OfficeScan
client.
Migrating from Other Endpoint Security Software
When you install the OfficeScan client, the installation program checks for any Trend
Micro or third-party endpoint security software installed on the target computer. The
installation program can automatically uninstall the software and replace it with the
OfficeScan client.
For a list of endpoint security software that OfficeScan automatically uninstalls, open
the following files in <Server installation folder>\PCCSRV\Admin. Open these files
using a text editor such as Notepad.
•
tmuninst.ptn
•
tmuninst_as.ptn
If the software on the target computer is not included in the list, manually uninstall it
first. Depending on the uninstallation process of the software, the computer may or may
not need to restart after uninstallation.
Client Migration Issues
• If automatic client migration is successful but a user encounters problems with the
OfficeScan client right after installation, restart the computer.
•
3-44
If the OfficeScan installation program proceeded to install the OfficeScan client but
was unable to uninstall the other security software, there will be conflicts between
the two software. Uninstall both software, and then install the OfficeScan client
using any of the installation methods discussed in Installation Methods on page 3-11.
Installing the OfficeScan Client
Migrating from ServerProtect Normal Servers
The ServerProtect™ Normal Server Migration Tool is a tool that helps migrate
computers running Trend Micro ServerProtect Normal Server to OfficeScan client.
The ServerProtect Normal Server Migration Tool shares the same hardware and
software specification as the OfficeScan server. Run the tool on Windows 2000, 2003,
and 2008 computers.
When uninstallation of the ServerProtect Normal server is successful, the tool installs
the OfficeScan client. It also migrates the scan exclusion list settings (for all scan types)
to the OfficeScan client.
While installing the OfficeScan client, the migration tool client installer may sometimes
time out and notify you that the installation was unsuccessful. However, the client may
have been installed successfully. Verify the installation on the client computer from the
OfficeScan Web console.
Migration is unsuccessful under the following circumstances:
•
If the remote client cannot use the NetBIOS protocol
•
If ports 455, 337, and 339 are blocked
•
If the remote client cannot use the RPC protocol
•
If the Remote Registry Service stops
Note:
The ServerProtect Normal Server Migration Tool does not uninstall the Control
Manager™ agent for ServerProtect. For instructions on how to uninstall the agent,
refer to the ServerProtect and/or Control Manager documentation.
To use the ServerProtect Normal Server Migration tool:
1.
On the OfficeScan server computer, open <Server installation folder>\PCCSRV\
Admin\Utility\SPNSXfr and copy the files SPNSXfr.exe and SPNSX.ini to
<Server installation folder>\PCCSRV\Admin.
2.
Double click the SPNSXfr.exe file to open the tool. The Server Protect Normal
Server Migration Tool console opens.
3-45
Trend Micro™ OfficeScan™ 10 Administrator’s Guide
3.
Select the OfficeScan server. The path of the OfficeScan server appears under
OfficeScan server path. If it is incorrect, click Browse and select the PCCSRV
folder in the directory where you installed OfficeScan.
To enable the tool to automatically find the OfficeScan server again the next time
you open the tool, select the Auto Find Server Path check box (selected by
default).
4.
Select the computers running ServerProtect Normal Server on which to perform
the migration by clicking one of the following under Target computer:
•
Windows Network tree: Displays a tree of domains on the network. To select
computers using this method, click the domains on which to search for client
computers.
•
Information Server name: Search by Information Server name. To select
computers by this method, type the name of an Information Server on the
network in the text box. To search for multiple Information Servers, insert a
semicolon ";" between server names.
•
Certain Normal Server name: Search by Normal Server name. To select
computers by this method, type the name of a Normal Server on the network
in the text box. To search for multiple Normal Servers, enter a semicolon ";"
between server names.
•
IP range search: Search by a range of IP addresses. To select computers by
this method, type a range of class B IP addresses under IP range.
Note:
3-46
If a DNS server on the network does not respond when searching for
clients, the search stops responding. Wait for the search to time out.
5.
Select to include computers running Windows Server 2003 in the search.
6.
Select to restart computers running Windows Server 2003. For the migration to
complete successfully on these computers, the computer must restart. Selecting this
check box ensures that it automatically restarts. If you do not select the Restart
after installation check box, restart the computer manually after migration.
7.
Click Search. The search results appear under ServerProtect Normal Servers.
Installing the OfficeScan Client
8.
9.
Click the computers on which to perform the migration.
a.
To select all computers, click Select All.
b.
To deselect all computers, click Unselect All.
c.
To export the list to a comma-separated value (CSV) file, click Export to CSV.
If logging on to the target computers requires a user name and password, do the
following:
a.
Select the Use group account/password check box.
b.
Click Set Logon Account. The Enter Administration Information window
appears.
c.
Type the user name and password.
Note:
Use the local/domain administrator account to log on to the target computer. If
you log on with insufficient privileges, such as "Guest" or "Normal user", you
will not be able to perform installation.
d. Click OK.
e.
Click Ask again if logon is unsuccessful to be able to type the user name
and password again during the migration process if you are unable to log on.
10. Click Migrate.
11. If the computer runs Windows Server 2003, restart the computer to complete the
migration.
3-47
Trend Micro™ OfficeScan™ 10 Administrator’s Guide
Post-installation
After completing the installation, verify the following:
OfficeScan client shortcut
The Trend Micro OfficeScan Client shortcuts appear on the Windows Start menu on
the client computer.
FIGURE 3-16. OfficeScan client shortcut
Programs list
Trend Micro OfficeScan Client is listed on the Add/Remove Programs list on the
client computer’s Control Panel.
OfficeScan client services
The following OfficeScan client services display on Microsoft Management Console:
•
OfficeScan NT Listener
•
OfficeScan NT Firewall (if the firewall was enabled during installation)
•
OfficeScan NT Proxy Service
•
OfficeScanNT RealTime Scan
•
Trend Micro Unauthorized Change Prevention Service (only for computers running
an x86 type processor)
Client installation logs
The client installation log, OFCNT.LOG, exist on the following locations:
3-48
•
%windir% for all installation methods except MSI package installation
•
%temp% for the MSI package installation method
Installing the OfficeScan Client
Recommended Post-installation Tasks
Trend Micro recommends performing the following post-installation tasks:
Component Updates
Notify clients to update their components to ensure that they have the most up-to-date
protection from security risks.
See Client Update on page 4-23 for details.
Test Scan Using the EICAR Test Script
The European Institute for Computer Antivirus Research (EICAR) developed the
EICAR test script as a safe way to confirm proper installation and configuration of
antivirus software. Visit the EICAR Web site for more information:
http://www.eicar.org
The EICAR test script is an inert text file with a .com extension. It is not a virus and
does not contain any fragments of viral code, but most antivirus software react to it as if
it were a virus. Use it to simulate a virus incident and confirm that email notifications
and virus logs work properly.
WARNING! Never use real viruses to test an antivirus product.
To perform a test scan:
1.
Enable Real-time Scan on the client.
2.
Copy the following string and paste it into Notepad or any plain text editor:
X5O!P%@AP[4\PZX54(P^)7CC)7>$EICAR-STANDARD-ANTIVIRUS-TESTFILE!$H+H*
3.
Save the file as EICAR.com to a temp directory. OfficeScan immediately detects the
file.
3-49
Trend Micro™ OfficeScan™ 10 Administrator’s Guide
4.
To test other computers on the network, attach the EICAR.com file to an email
message and send it to one of the computers.
Tip:
Trend Micro recommends packaging the EICAR file using compression
software (such as WinZip) and then performing another test scan.
Uninstalling the Client
There are two ways to uninstall the OfficeScan program from the clients:
•
Uninstalling the Client from the Web Console on page 3-50
•
Running the Client Uninstallation Program on page 3-51
If the client also has a Cisco Trust Agent (CTA) installation, uninstalling the OfficeScan
client program may or may not remove the agent. This depends on the settings you
configured when you deployed the agent. For more information, see Deploying the Cisco
Trust Agent on page 10-28.
If the Cisco Trust Agent exists after you uninstall the OfficeScan client, manually
remove it from the Add/Remove Programs screen.
If the client cannot be uninstalled using the above methods, manually uninstall the client.
For details, see Manually Uninstalling the Client on page 3-52.
Uninstalling the Client from the Web Console
Uninstall the client program from the Web console. Perform uninstallation only if you
encounter problems with the program and then reinstall it immediately to keep the
computer protected from security risks.
To uninstall the client from the Web console:
3-50
1.
On the OfficeScan Web console main menu, click Networked Computers >
Client Management. The client tree displays.
2.
In the client tree, select the clients to uninstall.
3.
Click Tasks > Client Uninstallation.
4.
In the Client Uninstallation screen, click Initiate Uninstallation. The server sends
a notification to the clients.
Installing the OfficeScan Client
5.
Check the notification status and verify if there are clients that did not receive the
notification.
a.
Click Select Un-notified Computers and then Initiate Uninstallation to
immediately resend the notification to un-notified clients.
b.
Click Stop Uninstallation to prompt OfficeScan to stop notifying clients
currently being notified. Clients already notified and already performing
uninstallation ignore this command.
Running the Client Uninstallation Program
If you granted users the privilege to uninstall the client program, instruct them to run
the client uninstallation program from their computers.
This procedure requires users to specify the uninstallation password. Ensure that you
share the password only to users that will run the uninstallation program and change the
password immediately if it has been divulged to other users. You can also disable the
password on computers where the client will be uninstalled. For details, see Client
Privileges and Other Settings on page 9-5.
To run the client uninstallation program:
1.
On the Windows Start menu, click Programs > Trend Micro OfficeScan Client
> Uninstall OfficeScan Client.
You can also perform the following steps:
2.
a.
Click Control Panel > Add or Remove Programs.
b.
Locate Trend Micro OfficeScan Client and click Change.
c.
Follow the on-screen instructions.
If prompted, type the uninstallation password. OfficeScan notifies the user of the
uninstallation progress and completion. The user does not need to restart the client
computer to complete the uninstallation.
3-51
Trend Micro™ OfficeScan™ 10 Administrator’s Guide
Manually Uninstalling the Client
Perform manual uninstallation only if you encounter problems uninstalling the client
from the Web console or after running the uninstallation program.
To perform manual uninstallation:
1.
Log on to the client computer using an account with Administrator privileges.
2.
Right-click the OfficeScan client icon on the system tray and select Unload
OfficeScan. If prompted for a password, specify the unload password then click
OK.
Note:
3.
Disable the password on computers where the client will be unloaded. For
details, see Client Privileges and Other Settings on page 9-5.
If the unload password was not specified, stop the following services from
Microsoft Management Console:
•
OfficeScan NT Listener
•
OfficeScan NT Firewall
•
OfficeScanNT RealTime Scan
•
OfficeScan NT Proxy Service
•
Trend Micro Unauthorized Change Prevention Service (if the computer runs
an x86 type platform)
4.
Click Start > Programs, right-click Trend Micro OfficeScan Client, and click
Delete.
5.
Open Registry Editor (regedit.exe).
WARNING! The next steps require you to delete registry keys. Making incorrect
changes to the registry can cause serious system problems. Always
make a backup copy before making any registry changes. For more
information, refer to the Registry Editor Help.
3-52
Installing the OfficeScan Client
6.
Delete the following registry keys:
If there are no other Trend Micro products installed on the computer:
•
HKEY_LOCAL_MACHINE\SOFTWARE\TrendMicro
For 64-bit computers:
HKEY_LOCAL_MACHINE\SOFTWARE\Wow6432node\Trend Micro
If there are other Trend Micro products installed on the computer, delete the following keys only:
•
HKEY_LOCAL_MACHINE\SOFTWARE\TrendMicro\NSC
•
HKEY_LOCAL_MACHINE\SOFTWARE\TrendMicro\OfcWatchDog
For 64-bit computers:
HKEY_LOCAL_MACHINE\SOFTWARE\Wow6432node\Trend
Micro\OfcWatchDog
•
HKEY_LOCAL_MACHINE\SOFTWARE\TrendMicro\PC-cillinNTCorp
For 64-bit computers:
HKEY_LOCAL_MACHINE\SOFTWARE\Wow6432node\Trend
Micro\PC-cillinNTCorp
7.
8.
Delete the following registry keys/values:
•
HKEY_LOCAL_MACHINE\SOFTWARE\Microsoft\Windows\CurrentVersio
n\Uninstall\OfficeScanNT
•
OfficeScanNT Monitor (REG_SZ) under
HKEY_LOCAL_MACHINE\SOFTWARE\Microsoft\Windows\CurrentVe
rsion\Run
Delete all instances of the following registry keys in the following locations:
Locations:
•
HKEY_LOCAL_MACHINE\SYSTEM\CurrentControlSet\Services
•
HKEY_LOCAL_MACHINE\SYSTEM\ControlSet001\Services
•
HKEY_LOCAL_MACHINE\SYSTEM\ControlSet002\Services
•
HKEY_LOCAL_MACHINE\SYSTEM\ControlSet003\Services
3-53
Trend Micro™ OfficeScan™ 10 Administrator’s Guide
Keys:
9.
•
ntrtscan
•
tmcfw
•
tmcomm
•
TmFilter
•
Tmlisten
•
tmpfw
•
TmPreFilter
•
TmProxy
•
tmtdi
•
VSApiNt
•
tmlwf (For Windows Vista/2008 computers)
•
tmwfp (For Windows Vista/2008 computers)
•
tmactmon
•
TMBMServer
•
tmevtmgr
Close Registry Editor.
10. Click Start > Settings > Control Panel and double-click System.
11. Click the Hardware tab and then click Device Manager.
12. Click View > Show hidden devices.
13. Expand Non-Plug and Play Drivers and then uninstall the following devices:
3-54
•
tmcomm
•
tmactmon
•
tmevtmgr
•
Trend Micro Filter
•
Trend Micro PreFilter
•
Trend Micro TDI Driver
•
Trend Micro VSAPI NT
•
Trend Micro Unauthorized Change Prevention Service
•
Trend Micro WFP Callout Driver (For Windows Vista/2008 computers)
Installing the OfficeScan Client
14. Uninstall the Common Firewall Driver.
a.
Right-click My Network Places and click Properties.
b.
Right-click Local Area Connection and click Properties.
c.
On the General tab, select Trend Micro Common Firewall Driver and click
Uninstall.
On Windows Vista computers, do the following:
a.
Right-click Network and click Properties.
b.
Click Manage network connections.
c.
Right-click Local Area Connection and click Properties.
d. On the Networking tab, select Trend Micro NDIS 6.0 Filter Driver and
click Uninstall.
15. Restart the client computer.
16. If there are no other Trend Micro products installed on the computer, delete the
Trend Micro installation folder (typically, C:\Program Files\Trend Micro). For
64-bit computers, the installation folder can be found under C:\Program Files
(x86)\Trend Micro.
17. If there are other Trend Micro products installed, delete the following folders:
•
<Client installation folder>
•
The BM folder under the Trend Micro installation folder (typically,
C:\Program Files\Trend Micro\BM)
3-55
Trend Micro™ OfficeScan™ 10 Administrator’s Guide
3-56
Chapter 4
Keeping Protection Up-to-Date
Topics in this chapter:
• OfficeScan Components and Programs on page 4-2
•
Update Overview on page 4-10
•
OfficeScan Server Update on page 4-13
•
Smart Scan Server Update on page 4-21
•
Client Update on page 4-23
•
Update Agents on page 4-37
•
Component Update Summary on page 4-43
4-1
Trend Micro™ OfficeScan™ 10 Administrator’s Guide
OfficeScan Components and Programs
OfficeScan makes use of components and programs to keep client computers protected
from the latest security risks. Keep these components and programs up-to-date by
running manual or scheduled updates.
In addition to the components, OfficeScan clients also receive updated configuration
files from the OfficeScan server. Clients need the configuration files to apply new
settings. Each time you modify OfficeScan settings through the Web console, the
configuration files change.
Components are grouped as follows:
•
Antivirus Components
•
Damage Cleanup Services Components
•
Anti-spyware Components
•
Firewall Components
•
Web Reputation Component
•
Behavior Monitoring Components
•
Programs
Antivirus Components
Virus Patterns
The virus pattern available on a client computer depends on the scan method the client
is using. For information about scan methods, see Scan Methods on page 5-8.
Conventional Scan
The pattern used during conventional scan, called Virus Pattern, contains information
that helps OfficeScan identify the latest virus/malware and mixed threat attack. Trend
Micro creates and releases new versions of the Virus Pattern several times a week, and
any time after the discovery of a particularly damaging virus/malware.
Tip: Trend Micro recommends scheduling automatic updates at least weekly, which is the
default setting for all shipped products.
4-2
Keeping Protection Up-to-Date
Download the Virus Pattern and other OfficeScan pattern files from the following Web
site, where you can also find the current version, release date, and a list of all the new
virus definitions included in the file:
http://www.trendmicro.com/download/pattern.asp
Smart Scan
When in smart scan mode, OfficeScan clients use two lightweight patterns that work
together to provide the same protection provided by conventional anti-malware and
anti-spyware patterns.
A Smart Scan Server hosts the Smart Scan Pattern. This pattern is updated hourly and
contains majority of the pattern definitions. Smart scan clients do not download this
pattern. Clients verify potential threats against the pattern by sending scan queries to the
Smart Scan Server.
The client update source (OfficeScan server or customized update source) hosts the
Smart Scan Agent Pattern. This pattern is updated daily and contains all the other
pattern definitions not found on the Smart Scan Pattern. Clients download this pattern
from the update source using the same methods for downloading other OfficeScan
components.
The OfficeScan client, using the Smart Scan Agent Pattern and advanced filtering
technology, can verify whether a file is infected without sending scan queries to the
Smart Scan Server. The client only sends scan queries if it cannot determine the risk of
the file during scanning. A client that cannot verify a file’s risk locally and is unable to
connect to a Smart Scan Server after several attempts:
•
Flags the file for verification
•
Temporarily allows access to the file
When connection to a Smart Scan Server is restored, all the files that have been flagged
are re-scanned. The appropriate scan action is then performed on files that have been
confirmed as infected.
4-3
Trend Micro™ OfficeScan™ 10 Administrator’s Guide
Virus Scan Engine
At the heart of all Trend Micro products lies the scan engine, which was originally
developed in response to early file-based computer viruses. The scan engine today is
exceptionally sophisticated and capable of detecting different types of viruses and
malware. The scan engine also detects controlled viruses that are developed and used for
research.
Rather than scanning every byte of every file, the engine and pattern file work together
to identify the following:
•
Tell-tale characteristics of the virus code
•
The precise location within a file where the virus resides
OfficeScan removes virus/malware upon detection and restores the integrity of the file.
International computer security organizations, including ICSA (International Computer
Security Association), certify the Trend Micro scan engine annually.
Updating the Scan Engine
By storing the most time-sensitive virus/malware information in the virus patterns,
Trend Micro minimizes the number of scan engine updates while keeping protection
up-to-date. Nevertheless, Trend Micro periodically makes new scan engine versions
available. Trend Micro releases new engines under the following circumstances:
4-4
•
Incorporation of new scanning and detection technologies into the software
•
Discovery of a new, potentially harmful virus/malware that the scan engine cannot
handle
•
Enhancement of the scanning performance
•
Addition of file formats, scripting languages, encoding, and/or compression
formats
Keeping Protection Up-to-Date
Virus Scan Driver
The Virus Scan Drive monitors user operations on files. Operations include opening or
closing a file, and executing an application. There are three versions for this driver. One
version is for Windows 2000 and its name is TmFilter.sys. The other two versions,
TmXPFlt.sys and TmPreFlt.sys, are for operating systems other than Windows 2000.
TmXPFlt.sys is used for real-time configuration of the Virus Scan Engine and
TmPreFlt.sys for monitoring user operations.
Note:
This component does not display on the console. To check its version, navigate to
<Server installation folder>\PCCSRV\Pccnt\Drv. Right-click the .sys file, select
Properties, and go to the Version tab.
IntelliTrap Pattern
The IntelliTrap Pattern detects real-time compression files packed as executable files.
IntelliTrap Exception Pattern
The IntelliTrap Exception Pattern contains a list of "approved" compression files.
Damage Cleanup Services Components
Virus Cleanup Engine
The Virus Cleanup Engine scans for and removes Trojans and Trojan processes. This
engine supports 32-bit and 64-bit platforms.
Virus Cleanup Template
The Virus Cleanup Template is used by the Virus Cleanup Engine to identify Trojan
files and processes so the engine can eliminate them.
4-5
Trend Micro™ OfficeScan™ 10 Administrator’s Guide
Anti-spyware Components
Spyware Pattern
The Spyware Pattern identifies spyware/grayware in files and programs, modules in
memory, Windows registry and URL shortcuts.
Spyware Scan Engine
The Spyware Scan Engine scans for and performs the appropriate scan action on
spyware/grayware. This engine supports 32-bit and 64-bit platforms.
Spyware Active-monitoring Pattern
Spyware Active-monitoring Pattern is used for real-time spyware/grayware scanning.
Only conventional scan clients use this pattern.
Smart scan clients use the Smart Scan Agent Pattern for real-time spyware/grayware
scanning. Clients send scan queries to a Smart Scan Server if the risk of the scan target
cannot be determined during scanning.
Firewall Components
Common Firewall Driver
The Common Firewall Driver is used with the Common Firewall Pattern to scan client
computers for network viruses. This driver supports 32-bit and 64-bit platforms.
Common Firewall Pattern
Like the Virus Pattern, the Common Firewall Pattern helps OfficeScan identify virus
signatures, unique patterns of bits and bytes that signal the presence of a network virus.
Web Reputation Component
URL Filtering Engine
The URL Filtering Engine facilitates communication between OfficeScan and the Trend
Micro URL Filtering Service. The URL Filtering Service is a system that rates URLs and
provides rating information to OfficeScan.
4-6
Keeping Protection Up-to-Date
Behavior Monitoring Components
Behavior Monitoring Driver
This kernel mode driver monitors system events and passes them to Behavior
Monitoring Core Service for policy enforcement.
Behavior Monitoring Core Service
This user mode service has the following functions:
•
Provides rootkit detection
•
Regulates access to external devices
•
Protects files, registry keys, and services
Behavior Monitoring Configuration Pattern
The Behavior Monitoring Driver uses this pattern to identify normal system events and
exclude them from policy enforcement.
Digital Signature Pattern
This pattern contains a list of valid digital signatures that are used by the Behavior
Monitoring Core Service to determine whether a program responsible for a system
event is safe.
Policy Enforcement Pattern
The Behavior Monitoring Core Service checks system events against the policies in this
pattern.
4-7
Trend Micro™ OfficeScan™ 10 Administrator’s Guide
Programs
Client Program
The OfficeScan client program provides the actual protection from security risks.
Cisco Trust Agent
The Cisco Trust Agent enables communication between the client and routers that
support Cisco NAC. This agent will only work if you install Policy Server for Cisco
NAC.
Hot Fixes, Patches, and Service Packs
After an official product release, Trend Micro often develops the following to address
issues, enhance product performance, or add new features:
•
Hot Fix
•
Patch
•
Security Patch
•
Service Pack
Your vendor or support provider may contact you when these items become available.
Check the Trend Micro Web site for information on new hot fix, patch, and service
pack releases:
http://www.trendmicro.com/download
All releases include a readme file that contains installation, deployment, and
configuration information. Read the readme file carefully before performing installation.
Hot Fix and Patch History
When the OfficeScan server deploys hot fix or patch files to OfficeScan clients, the
client program records information about the hot fix or patch in Registry Editor. You
can query this information for multiple clients using logistics software such as Microsoft
SMS, LANDesk™, or BigFix™.
Note:
4-8
This feature does not record hot fixes and patches that are deployed only to the
server.
Keeping Protection Up-to-Date
This feature is available starting in OfficeScan 8.0 Service Pack 1 with patch 3.
•
Clients upgraded from version 8.0 Service Pack 1 with patch 3 or later record installed
hot fixes and patches for versions 8 and 10.
•
Clients upgraded from versions earlier than 8.0 Service Pack 1 with patch 3 record
installed hot fixes and patches for version 10 only.
Information is stored in the following keys:
•
HKEY_LOCAL_MACHINE\SOFTWARE\TrendMicro\PC-cillinNTCorp\
CurrentVersion\HotfixHistory\<Product version>
•
For computers running x64 type platforms:
HKEY_LOCAL_MACHINE\SOFTWARE\Wow6432Node\TrendMicro\
PC-cillinNTCorp\CurrentVersion\HotfixHistory\<Product version>
Check for the following keys:
•
Key: HotFix_installed
Type: REG_SZ
Value: <Hot fix or patch name>
•
Key: HotfixInstalledNum
Type: DWORD
Value: <Hot fix or patch number>
4-9
Trend Micro™ OfficeScan™ 10 Administrator’s Guide
Update Overview
All component updates originate from the Trend Micro ActiveUpdate server. When
updates are available, the OfficeScan server and Smart Scan Server (local or global) download
the updated components. There are no component download overlaps between the two
servers because each one downloads a specific set of components.
Note:
You can configure both the OfficeScan server and Smart Scan Server to update from
a source other than the Trend Micro ActiveUpdate server. To do this, you need to set
up a custom update source. If you need assistance setting up this update source,
contact your support provider.
OfficeScan Server and Client Update
The OfficeScan server downloads most of the components that clients need. The only
component it does not download is the Smart Scan Pattern, which is downloaded by a
Smart Scan Server.
If an OfficeScan server manages a large number of clients, updating may utilize a
significant amount of server computer resources, affecting the server’s stability and
performance. To address this issue, OfficeScan has an Update Agent feature that allows
certain clients to share the task of distributing updates to other clients.
The following table describes the different component update options for the
OfficeScan server and clients, and recommendations when to use them:
TABLE 4-20.
Server-client update options
U PDATE O PTION
D ESCRIPTION
R ECOMMENDATION
ActiveUpdate
server
The OfficeScan server
receives updated
components from the
Trend Micro ActiveUpdate
server (or other update
source) and initiates
component update on
clients.
Use this method if there are no
low-bandwidth sections
between the OfficeScan server
and clients.
|
OfficeScan
server
|
Clients
4-10
Keeping Protection Up-to-Date
TABLE 4-20.
Server-client update options (Continued)
U PDATE O PTION
D ESCRIPTION
R ECOMMENDATION
ActiveUpdate
server
The OfficeScan server
receives updated
components from the
ActiveUpdate server (or
other update source) and
initiates component
update on clients. Clients
acting as Update Agents
then notify clients to
update components.
If there are low-bandwidth
sections between the
OfficeScan server and clients,
use this method to balance the
traffic load on the network.
Update Agents receive
updated components
directly from the
ActiveUpdate server (or
other update source) and
notifies clients to update
components.
Use this method only if you
experience problems updating
Update Agents from the
OfficeScan server or from
other Update Agents.
OfficeScan clients receive
updated components
directly from the
ActiveUpdate server (or
other update source).
Use this method only if you
experience problems updating
clients from the OfficeScan
server or from Update Agents.
|
OfficeScan
server
|
Update Agents
|
Clients
ActiveUpdate
server
|
Update Agents
|
Clients
ActiveUpdate
server
|
Clients
Under most circumstances,
Update Agents receive
updates faster from the
OfficeScan server or from
other Update Agents than from
an external update source.
Under most circumstances,
clients receive updates faster
from the OfficeScan server or
from Update Agents than from
an external update source.
4-11
Trend Micro™ OfficeScan™ 10 Administrator’s Guide
Smart Scan Server Update
A Smart Scan Server downloads the Smart Scan Pattern. Smart scan clients do not
download this pattern. Clients verify potential threats against the pattern by sending
scan queries to the Smart Scan Server.
Note:
See Smart Scan Server on page 1-10 for more information about Smart Scan Servers and
Smart Scan Server Update on page 4-21 for server update details.
The following table describes the update process for Smart Scan Servers.
TABLE 4-21.
Smart Scan Server update process
U PDATE P ROCESS
D ESCRIPTION
ActiveUpdate server
The Global Smart Scan Server receives updates from
the Trend Micro ActiveUpdate server. Smart scan
clients that are not connected to the corporate
network send scan queries to the Global Smart Scan
Server.
|
Global Smart Scan
Server
ActiveUpdate server
|
Local Smart Scan
Server
4-12
A local Smart Scan Server (integrated or standalone)
receives updates from the Trend Micro ActiveUpdate
server. Smart scan clients that are connected to the
corporate network send scan queries to the local
Smart Scan Server.
Keeping Protection Up-to-Date
OfficeScan Server Update
The OfficeScan server downloads the following components and deploys them to
clients:
TABLE 4-22.
Components downloaded by the OfficeScan server
C OMPONENT
D ISTRIBUTION
C ONVENTIONAL
S CAN C LIENTS
S MART S CAN
C LIENTS
Smart Scan Agent Pattern
No
Yes
Virus Pattern
Yes
No
Virus Scan Engine
Yes
Yes
Virus Scan Driver
Yes
Yes
IntelliTrap Pattern
Yes
Yes
IntelliTrap Exception Pattern
Yes
Yes
Virus Cleanup Engine
Yes
Yes
Virus Cleanup Template
Yes
Yes
Spyware Pattern
Yes
Yes
Spyware Scan Engine
Yes
Yes
Spyware Active-monitoring Pattern
Yes
No
Common Firewall Driver
Yes
Yes
Common Firewall Pattern
Yes
Yes
URL Filtering Engine
Yes
Yes
Behavior Monitoring Driver
Yes
Yes
4-13
Trend Micro™ OfficeScan™ 10 Administrator’s Guide
TABLE 4-22.
Components downloaded by the OfficeScan server (Continued)
C OMPONENT
D ISTRIBUTION
C ONVENTIONAL
S CAN C LIENTS
S MART S CAN
C LIENTS
Behavior Monitoring Core Service
Yes
Yes
Behavior Monitoring Configuration
Pattern
Yes
Yes
Digital Signature Pattern
Yes
Yes
Policy Enforcement Pattern
Yes
Yes
To enable the server to deploy the updated components to clients, configure automatic
update settings. If automatic update is disabled, the server downloads the updates but
does not deploy them to the clients. For details, see Automatic Update on page 4-27.
View the current versions of components on the Web console’s Summary screen, and
determine the number of clients with updated and outdated components.
Trend Micro releases pattern files regularly to keep client protection current. Since
pattern file updates are available regularly, OfficeScan uses a mechanism called
component duplication that allows faster downloads of pattern files. See Server
Component Duplication on page 4-16 for more information.
If you use a proxy server to connect to the Internet, use the correct proxy settings to
download updates successfully.
4-14
Keeping Protection Up-to-Date
Server Update Source
Configure the OfficeScan server to download components from the Trend Micro
ActiveUpdate server or from another source.
After the server downloads any available updates, it can automatically notify clients to
update their components based on the settings you specified in Updates > Networked
Computers > Automatic Update. If the component update is critical, let the server
notify the clients at once by going to Updates > Networked Computers > Manual
Update.
Note:
If you do not specify a deployment schedule or event-triggered update settings in
Updates > Networked Computers > Automatic Update, the server will download
the updates but will not notify clients to update.
To configure the server update source:
P ATH : U PDATES > S ERVER > U PDATE S OURCE
1.
Select the location from where you want to download component updates.
If you choose ActiveUpdate server, ensure that the server has Internet connection
and, if you are using a proxy server, test if Internet connection can be established
using the proxy settings. For details, see Proxy for Server Update on page 4-16.
If you choose a custom update source, set up the appropriate environment and
update resources for this update source. Also ensure that there is functional
connection between the server computer and this update source. If you need
assistance setting up an update source, contact your support provider.
Note:
2.
The OfficeScan server uses component duplication when downloading
components from the update source. See Server Component Duplication on page 4-16
for details.
Click Save.
4-15
Trend Micro™ OfficeScan™ 10 Administrator’s Guide
Proxy for Server Update
Configure server programs hosted on the server computer to use proxy settings when
downloading updates from the Trend Micro ActiveUpdate server. Server programs
include the OfficeScan server and the integrated Smart Scan Server.
To configure proxy settings:
P ATH : A DMINISTRATION > P ROXY S ETTINGS > E XTERNAL P ROXY
TAB
1.
On the OfficeScan Server Computer Updates section, select the check box to
enable the use of a proxy server.
2.
Specify the proxy protocol, server name or IP address, and port number.
3.
If the proxy server requires authentication, type the user name and password in the
fields provided.
4.
Click Save.
Server Component Duplication
When the latest version of a full pattern file is available for download from the Trend
Micro ActiveUpdate server, 14 "incremental patterns" also become available.
Incremental patterns are smaller versions of the full pattern file that account for the
difference between the latest and previous full pattern file versions. For example, if the
latest version is 175, incremental pattern v_173.175 contains signatures in version 175
not found in version 173 (version 173 is the previous full pattern version since pattern
numbers are released in increments of 2. Incremental pattern v_171.175 contains
signatures in version 175 not found in version 171.
To reduce network traffic generated when downloading the latest pattern, OfficeScan
performs component duplication, a component update method where the OfficeScan
server or Update Agent downloads only incremental patterns. See Update Agent
Component Duplication on page 4-42 for information on how Update Agents perform
component duplication.
4-16
Keeping Protection Up-to-Date
Component duplication applies to the following components:
•
Virus Pattern
•
Smart Scan Agent Pattern
•
Virus Cleanup Template
•
IntelliTrap Exception Pattern
•
Spyware Pattern
•
Spyware Active-monitoring pattern
Component Duplication Scenario
To explain component duplication for the server, refer to the following scenario:
TABLE 4-1.
Server component duplication scenario
Full patterns on
the OfficeScan
server
Current version: 171
Latest version on
the ActiveUpdate
server
173.175
171.175
169.175
167.175
165.175
163.175
161.175
159.175
157.175
155.175
153.175
151.175
149.175
147.175
1.
Other versions available:
169
167
165
163
161
159
The OfficeScan server compares its current full pattern version with the latest
version on the ActiveUpdate server. If the difference between the two versions is 14
or less, the server only downloads the incremental pattern that accounts for the
difference between the two versions.
Note:
If the difference is more than 14, the server automatically downloads the full
version of the pattern file and 14 incremental patterns.
To illustrate based on the example:
•
The difference between versions 171 and 175 is 2. In other words, the server
does not have versions 173 and 175.
•
The server downloads incremental pattern 171.175. This incremental pattern
accounts for the difference between versions 171 and 175.
4-17
Trend Micro™ OfficeScan™ 10 Administrator’s Guide
2.
The server merges the incremental pattern with its current full pattern to generate
the latest full pattern.
To illustrate based on the example:
3.
•
On the server, OfficeScan merges version 171 with incremental pattern
171.175 to generate version 175.
•
The server has 1 incremental pattern (171.175) and the latest full pattern
(version 175).
The server generates incremental patterns based on the other full patterns available
on the server. If the server does not generate these incremental patterns, clients that
missed downloading earlier incremental patterns automatically download the full
pattern file, which will consequently generate more network traffic.
To illustrate based on the example:
•
Because the server has pattern versions 169, 167, 165, 163, 161, 159, it can
generate the following incremental patterns:
169.175
163.175
161.175
159.175
The server does not need to use version 171 because it already has the
incremental pattern 171.175.
•
The server now has 7 incremental patterns:
•
4-18
165.175
•
171.175
4.
167.175
169.175
167.175
165.175
163.175
161.175
159.175
The server keeps the last 7 full pattern versions (versions 175, 171, 169, 167,
165, 163, 161). It removes any older version (version 159).
The server compares its current incremental patterns with the incremental patterns
available on the ActiveUpdate server. The server downloads the incremental
patterns it does not have.
Keeping Protection Up-to-Date
To illustrate based on the example:
•
•
The ActiveUpdate server has 14 incremental patterns:
173.175
171.175
169.175
167.175
165.175
163.175
161.175
159.175
157.175
155.175
153.175
151.175
149.175
147.175
161.175
159.175
The OfficeScan server has 7 incremental patterns:
171.175
•
173.175
•
5.
169.175
167.175
165.175
163.175
The OfficeScan server downloads an additional 7 incremental patterns:
157.175
155.175
153.175
151.175
149.175
147.175
The server now has all the incremental patterns available on the ActiveUpdate
server.
The latest full pattern and the 14 incremental patterns are made available to clients.
Server Update Methods
Update OfficeScan server components manually or by configuring an update schedule.
To enable the server to deploy the updated components to clients, configure automatic
update settings. If automatic update is disabled, the server downloads the updates but
does not deploy them to the clients. For details, see Automatic Update on page 4-27.
Manual Update
When an update is critical, perform manual update so the server can obtain the updates
immediately. See Manual Update on page 4-20 for details.
Scheduled Update
The OfficeScan server connects to the update source during the scheduled day and time
to obtain the latest components. See Scheduled Update on page 4-19 for details.
Scheduled Update
Configure the OfficeScan server to regularly check its update source and automatically
download any available updates. Because clients normally get updates from the server,
using scheduled update is an easy and effective way of ensuring that protection against
security risks is always current.
4-19
Trend Micro™ OfficeScan™ 10 Administrator’s Guide
To configure server update schedule:
P ATH : U PDATES > S ERVER > S CHEDULED U PDATE
1.
Select Enable scheduled update of the OfficeScan server.
2.
Select the components to update.
3.
Specify the update schedule. For daily, weekly, and monthly updates, the period of
time is the number of hours during which OfficeScan will perform the update.
OfficeScan updates at any given time during this time period.
4.
Click Save.
Manual Update
Manually update the components on the OfficeScan server after installing or upgrading
the server and whenever there is an outbreak.
To update the server manually:
P ATH : U PDATES > S ERVER > M ANUAL U PDATE
C LICK "U PDATE S ERVER N OW "
ON THE
W EB
CONSOLE ' S MAIN MENU
1.
Select the components to update.
2.
Click Update. The server downloads the updated components.
Server Update Logs
Check the server update logs to determine if there are problems updating certain
components. Logs include component updates for the OfficeScan server.
To keep the size of logs from occupying too much space on the hard disk, manually
delete logs or configure a log deletion schedule. For more information about managing
logs, see Managing Logs on page 8-16.
To view server update logs:
P ATH : L OGS > S ERVER U PDATE L OGS
4-20
1.
Check the Result column to see if there are components that were not updated.
2.
To save logs to a comma-separated value (CSV) file, click Export to CSV. Open the
file or save it to a specific location. A CSV file usually opens with a spreadsheet
application such as Microsoft Excel.
Keeping Protection Up-to-Date
Smart Scan Server Update
This section discusses how to update components in the integrated Smart Scan Server.
For details on updating components in a standalone server, see the Trend Micro Smart
Scan for OfficeScan Getting Started Guide.
The Smart Scan Server downloads the Smart Scan Pattern. Clients verify potential
threats against the pattern by sending scan queries to the Smart Scan Server. Clients do
not download the Smart Scan Pattern.
Note:
The other pattern used in the smart scan solution, called Smart Scan Agent Pattern, is
hosted on the client update source (the OfficeScan server or a customized update
source) and downloaded by clients.
Trend Micro updates the Smart Scan Pattern hourly. Like the OfficeScan server, the
Smart Scan Server also uses a mechanism called component duplication that allows faster
downloads of the pattern file. See Server Component Duplication on page 4-16 for more
information.
Server Update Settings
Configure the Smart Scan Server to download the Smart Scan Pattern from the Trend
Micro ActiveUpdate server or from another source. Manually update the pattern or
configure an update schedule.
To configure server update settings:
P ATH : S MART S CAN > I NTEGRATED S ERVER
1.
2.
Select to use the Integrated Smart Scan Server. If you do not select the check box:
•
The Trend Micro Smart Scan Server service (iCRCService.exe) stops.
•
The integrated server stops updating components from the ActiveUpdate
server.
•
Clients will not be able to send scan queries to the integrated server.
Use the information under Server Address when configuring the Smart Scan
Server list. For details about the list, see Smart Scan Source on page 5-15.
Clients can connect to the integrated server using HTTP and HTTPS protocols.
HTTPS allows for a more secure connection while HTTP uses less bandwidth.
4-21
Trend Micro™ OfficeScan™ 10 Administrator’s Guide
When clients connect using a specific protocol, they identify the integrated server
by its server address.
Tip:
Clients managed by another OfficeScan server can also connect to the
integrated server. On the other OfficeScan server’s Web console, add the
integrated server’s address to the Smart Scan Server list.
3.
View the Smart Scan Pattern version. To update the pattern manually, click Update
Now. The update result displays on top of the screen.
4.
To update the pattern automatically, enable scheduled updates and configure the
update schedule.
5.
Select the location from where you want to download component updates.
If you choose ActiveUpdate server, ensure that the server has Internet connection
and, if you are using a proxy server, test if Internet connection can be established
using the proxy settings. See Proxy for Server Update on page 4-16 for details.
If you choose a custom update source, set up the appropriate environment and
update resources for this update source. Also ensure that there is functional
connection between the server computer and this update source. If you need
assistance setting up an update source, contact your support provider.
6.
4-22
Click Save.
Keeping Protection Up-to-Date
Client Update
To ensure that clients stay protected from the latest security risks, update client
components regularly. Before updating the clients, check if their update source has the
latest components. For information on how to update the typical update source
(OfficeScan server), see OfficeScan Server Update on page 4-13.
The following table lists all components that clients store on computers and the
components in use when using a particular scan method. The update source for each
component is the OfficeScan server or a custom update source.
Note:
A Smart Scan Server downloads the Smart Scan Pattern, but this pattern is not
distributed to clients. The pattern is used when smart scan clients send scan queries to
the Smart Scan Server.
TABLE 4-23.
OfficeScan components stored by the client
C OMPONENT
AVAILABILITY
C ONVENTIONAL
S CAN C LIENTS
S MART S CAN
C LIENTS
Smart Scan Agent Pattern
No
Yes
Virus Pattern
Yes
No
Virus Scan Engine
Yes
Yes
Virus Scan Driver
Yes
Yes
IntelliTrap Pattern
Yes
Yes
IntelliTrap Exception Pattern
Yes
Yes
Virus Cleanup Engine
Yes
Yes
Virus Cleanup Template
Yes
Yes
4-23
Trend Micro™ OfficeScan™ 10 Administrator’s Guide
TABLE 4-23.
OfficeScan components stored by the client (Continued)
C OMPONENT
AVAILABILITY
C ONVENTIONAL
S CAN C LIENTS
S MART S CAN
C LIENTS
Spyware Pattern
Yes
Yes
Spyware Scan Engine
Yes
Yes
Spyware Active-monitoring Pattern
Yes
No
Common Firewall Driver
Yes
Yes
Common Firewall Pattern
Yes
Yes
URL Filtering Engine
Yes
Yes
Behavior Monitoring Driver
Yes
Yes
Behavior Monitoring Core Service
Yes
Yes
Behavior Monitoring Configuration
Pattern
Yes
Yes
Digital Signature Pattern
Yes
Yes
Policy Enforcement Pattern
Yes
Yes
Updating from the OfficeScan Server and Custom Sources
Clients can obtain updates from various sources, such as the OfficeScan server or a
customized update source.
To configure the client update source:
P ATH : U PDATES > N ETWORKED C OMPUTERS > U PDATE S OURCE
4-24
1.
Select whether to update from the standard update source (OfficeScan server) or a
customized update source.
2.
Click Notify All Clients.
Keeping Protection Up-to-Date
Customized Update Source
Aside from the OfficeScan server, clients can update from custom update sources.
Custom update sources help reduce client update traffic directed to the OfficeScan
server and allows clients that cannot connect to the OfficeScan server to get timely
updates. Specify the custom update sources on the Customized Update Source List,
which can accommodate up to 1024 update sources.
Tip: Trend Micro recommends assigning some clients as Update Agents and then adding
them to the list.
To configure the customized updated source list:
P ATH : U PDATES > N ETWORKED C OMPUTERS > U PDATE S OURCE
1.
Select Customized Update Source and click Add.
2.
In the screen that displays, type a range of client IP addresses that will receive
updates from an update source.
3.
Specify the update source. You can select an Update Agent if one has been assigned
or type the URL of a specific source.
4.
Click Save.
5.
Edit an update source by clicking the IP range link. Modify the settings in the
screen that displays and click Save.
6.
Remove an update source from the list by selecting the check box and clicking
Delete.
7.
To move an update source, click the up or down arrow. You can only move one
source at a time.
After you have set up and saved the list, the update process proceeds as follows:
1.
A client updates from the first entry on the list.
2.
If unable to update from the first entry, the client updates from the second entry,
and so on.
3.
If unable to update from all entries, the client checks if the option Update from
OfficeScan server if all customized sources are not available or not found is
enabled. If enabled, the client updates from the OfficeScan server.
4-25
Trend Micro™ OfficeScan™ 10 Administrator’s Guide
If the option is disabled, the client then tries connecting directly to the Trend Micro
ActiveUpdate server if any of the following is true:
4.
•
In Networked Computers > Client Management > Settings > Privileges
and Other Settings > Other Settings tab > Update Settings, the option
Clients download updates from the Trend Micro ActiveUpdate Server is
enabled.
•
The ActiveUpdate server
(http://osce10-p.activeupdate.trendmicro.com/activeupdate) is not included in
the Customized Update Source List.
If unable to update from all possible sources, the client quits the update process.
Standard Update Source
The OfficeScan server is the standard update source for clients. If you configure clients
to update directly from the OfficeScan server, the update process proceeds as follows:
1.
The client obtains updates from the OfficeScan server.
2.
If unable to update from the OfficeScan server, the client tries connecting directly
to the Trend Micro ActiveUpdate server if any of the following is true:
•
In Networked Computers > Client Management > Settings > Privileges
and Other Settings > Other Settings tab > Update Settings, the option
Clients download updates from the Trend Micro ActiveUpdate Server is
enabled.
•
The ActiveUpdate server
(http://osce10-p.activeupdate.trendmicro.com/activeupdate) is the first entry
in the Customized Update Source List.
Tip:
3.
4-26
Place the ActiveUpdate server at the top of the list only if you experience
problems updating from the OfficeScan server. When clients update
directly from the ActiveUpdate server, significant bandwidth is consumed
between the network and the Internet.
If unable to update from all possible sources, the client quits the update process.
Keeping Protection Up-to-Date
Client Update Methods
Clients that update components from the OfficeScan server or a customized update
source can use the following update methods:
Automatic Update
Client update runs automatically when certain events occur or based on a schedule. For
details, see Automatic Update on page 4-27.
Manual Update
When an update is critical, use manual update to immediately notify clients to perform
component update. For details, see Manual Update on page 4-31.
Privilege-based Update
Users with update privileges have greater control over how the OfficeScan client on
their computers gets updated. For details, see Update Privileges on page 4-33.
Automatic Update
Automatic update relieves you of the burden of notifying all clients to update and
eliminates the risk of client computers not having up-to-date components.
In addition to components, OfficeScan clients also receive updated configuration files
during automatic update. Clients need the configuration files to apply new settings. Each
time you modify OfficeScan settings through the Web console, the configuration files
change. To specify how often configuration files are applied to clients, see step 3 below.
Note:
You can configure clients to use proxy settings during automatic update. See Proxy for
Client Component Update on page 4-34 for details.
4-27
Trend Micro™ OfficeScan™ 10 Administrator’s Guide
There are two types of automatic update:
Event-triggered Update
The server can notify online clients to update components after it downloads the latest
components, and offline clients when they restart and then connect to the server.
Optionally initiate Scan Now (manual scan) on client computers after the update.
Note:
If the OfficeScan server is unable to successfully send an update notification to clients
after it downloads components, it automatically resends the notification after 15
minutes. The server continues to send update notifications up to a maximum of five
times until the client responds. If the fifth attempt is unsuccessful, the server stops
sending notifications. If you select the option to update components when clients
restart and then connect to the server, component update will still proceed.
Schedule-based Update
Running scheduled updates is a privilege. You need to first select clients that will have
the privilege and these clients will then run updates based on the schedule.
Note:
4-28
To use schedule-based update with Network Address Translation, see Client Scheduled
Update with NAT on page 4-32.
Keeping Protection Up-to-Date
To update networked computer components automatically:
P ATH : U PDATES > N ETWORKED C OMPUTERS > A UTOMATIC U PDATE
1.
Select the events that will trigger component update.
TABLE 4-24.
Event-triggered update options
O PTION
D ESCRIPTION
Initiate component
update on clients
immediately after the
OfficeScan server
downloads a new
component
The server notifies clients to update as soon as it
completes an update. Frequently updated clients
only need to download incremental patterns, thus
reducing the time it takes to complete the update
(see Server Component Duplication on page 4-16 for
details about incremental patterns). However,
updating frequently may adversely affect the
server’s performance, especially if you have a
large number of clients updating at the same time.
If you have clients on roaming mode and you want
these clients to update as well, select Include
roaming client(s). See Roaming Clients on page
9-33 for details about roaming mode.
2.
Let clients initiate
component update
when they restart
and connect to the
OfficeScan server
(roaming clients are
excluded)
A client that missed an update immediately
downloads components when it establishes
connection with the server. A client may miss an
update if it is offline or if the computer where it is
installed is not up and running.
Perform Scan Now
after updating
(excluding roaming
clients)
The server notifies clients to scan after an
event-triggered update. Consider enabling this
option if a particular update is a response to a
security risk that has already spread within the
network.
Select how often clients with scheduled update privilege will perform scheduled
update.
If you have granted clients scheduled update privilege, proceed to the next step.
4-29
Trend Micro™ OfficeScan™ 10 Administrator’s Guide
If you have not granted clients scheduled update privilege, perform the following
steps first:
a.
Go to Networked Computers > Client Management and select the clients
that you want to have the privilege.
b.
Click Settings > Privileges and Other Settings.
Option 1: Under the Privileges tab, go to the Component Update Privileges
section. You will see the Enable scheduled update option.
Option 2: Under the Other Settings tab, go to the Update Settings section.
You will see another Enable scheduled update option.
If you want to give client users the ability to enable or disable scheduled update
on the client console, enable options 1 and 2. After you save the settings,
updates will run on the client computer as scheduled. Scheduled updates will
only stop running when a client user right-clicks the OfficeScan icon on the
system tray and selects Disable scheduled update.
If you want scheduled update to always run and prevent client users from
disabling scheduled update, enable option 1 and disable option 2.
c.
3.
Save the settings.
Configure the schedule.
a.
If you select Minute(s) or Hour(s), you have the option to Update client
configurations only once per day. If you do not select this option, the
OfficeScan client retrieves both the updated components and any updated
configuration files available on the server at the interval specified. If you select
this option, OfficeScan updates only the components at the interval specified,
and the configuration files once per day.
Tip:
4-30
Trend Micro often updates components; however, OfficeScan
configuration settings probably change less frequently. Updating the
configuration files with the components requires more bandwidth and
increases the time OfficeScan needs to complete the update. For this
reason, Trend Micro recommends selecting updating client configurations
only once per day.
Keeping Protection Up-to-Date
b.
4.
If you select Daily or Weekly, specify the time of the update and the time
period the OfficeScan server will notify clients to update components. For
example, if the start time is 12pm and the time period is 2 hours, OfficeScan
randomly notifies all online clients to update components from 12pm until
2pm. This setting prevents all online clients from simultaneously connecting to
the server at the specified start time, significantly reducing the amount of
traffic directed to the server.
Click Save.
Offline clients will not be notified. Offline clients that become online after the time
period expires can still update components if you selected Let clients initiate
component when they restart... under Event-triggered Update. Otherwise, they
update components on the next schedule or if you initiate manual update.
Manual Update
Update client components manually when client components are severely out-of-date
and whenever there is an outbreak. Client components become severely out-of-date
when the client is unable to update components from the update source for an extended
period of time.
In addition to components, OfficeScan clients also receive updated configuration files
automatically during manual update. Clients need the configuration files to apply new
settings. Each time you modify OfficeScan settings through the Web console, the
configuration files change.
To update clients manually:
P ATH : U PDATES > N ETWORKED C OMPUTERS > M ANUAL U PDATE
1.
The components currently available on the OfficeScan server and the date these
components were last updated display on top of the screen. Ensure the
components are up-to-date before notifying clients to update.
Note:
Manually update any outdated components on the server. See Manual Update on
page 4-20 for details.
4-31
Trend Micro™ OfficeScan™ 10 Administrator’s Guide
2.
Choose the clients you want to update. Update clients with outdated components
or select specific clients from the client tree.
•
Select clients with outdated components: The server searches for clients
whose component versions are earlier than the versions on the server and then
notifies these clients to update. If you want the server to also search for
roaming clients with functional connection to the server, select Include
roaming client(s). Click Initiate Update.
•
Manually select clients: After selecting this option, click Select. In the client
tree that opens, choose the clients to update and then click Initiate
Component Update on top of the client tree.
The server starts notifying each client to download updated components. To check the
notification status, go to the Updates > Summary screen.
Client Scheduled Update with NAT
The following issues may arise if the local network uses NAT:
•
Clients appear offline on the Web console.
•
The OfficeScan server is not able to successfully notify clients of updates and
configuration changes.
Work around these issues by deploying updated components and configuration files
from the server to the client with a scheduled update.
Perform the following steps:
1.
2.
Before installing OfficeScan client on client computers:
a.
Configure the client update schedule in Updates > Networked Computers
> Automatic Update > Schedule-based Update.
b.
Grant clients the privilege to enable scheduled update in Networked
Computers > Client Management > Settings > Privileges and Other
Settings > Privileges tab > Component Update Privilege.
If OfficeScan clients already exist on client computers:
a.
4-32
Grant clients the privilege to perform "Update Now" in Networked
Computers > Client Management > Settings > Privileges and Other
Settings > Privileges tab > Component Update Privileges.
Keeping Protection Up-to-Date
b.
Instruct users to manually update components on the client computer (by
right-clicking the OfficeScan icon in the system tray and clicking "Update
Now") to obtain the updated configuration settings.
When clients update, they will receive both the updated components and the
configuration files.
Update Privileges
Grant client users certain privileges, such as performing manual updates and enabling
scheduled update. For details, see Component Update Privileges on page 9-15.
To grant update privileges to clients:
1.
Go to Networked Computers > Client Management.
2.
On the client tree, select the clients that will have the update privileges.
3.
Click Settings > Privileges and Other Settings and under the Privileges tab, go
to the Component Update Privileges section.
4.
In addition to the update privileges, configure update-related settings for clients by
clicking the Other Settings tab and going to the Update Settings section. For
details, see Update Settings on page 9-15.
4-33
Trend Micro™ OfficeScan™ 10 Administrator’s Guide
Proxy for Client Component Update
OfficeScan clients can use proxy settings during automatic update or if they have the
privilege to perform "Update Now".
TABLE 4-25.
Proxy settings used during client component update
U PDATE
M ETHOD
Automatic
update
For details,
see Automatic
Update on
page 4-27.
P ROXY S ETTINGS U SED
U SAGE
• Automatic proxy settings.
• OfficeScan clients will first
For details, see Automatic
Proxy Configuration on page
9-29.
• Internal proxy settings.
For details, see Internal
Proxy on page 9-39.
use automatic proxy
settings to update
components.
• If automatic proxy settings
are not enabled, internal
proxy settings will be
used.
• If both are disabled,
clients will not use any
proxy settings.
Update Now
(For details,
see
Component
Update
Privileges on
page 9-15)
4-34
• Automatic proxy settings.
For details, see Automatic
Proxy Configuration on page
9-29.
• User-configured proxy
settings. You can grant
client users the privilege
to configure proxy
settings. For details, see
Proxy Configuration Privilege
on page 9-14.
• OfficeScan clients will first
use automatic proxy
settings to update
components.
• If automatic proxy settings
are not enabled,
user-configured proxy
settings will be used.
• If both are disabled, or if
automatic proxy settings
are disabled and client
users do not have the
required privilege, clients
will not use any proxy
when updating
components.
Keeping Protection Up-to-Date
Client Update Logs
Check the client update logs to determine if there are problems updating the Virus
Pattern on clients.
Note:
In this product version, only logs for Virus Pattern updates can be queried from the
Web console.
To keep the size of logs from occupying too much space on the hard disk, manually
delete logs or configure a log deletion schedule. For more information about managing
logs, see Managing Logs on page 8-16.
To view client update logs:
P ATH : L OGS > N ETWORKED C OMPUTER L OGS > C OMPONENT U PDATE
1.
To view the number of client updates, click View under the Progress column. In
the Component Update Progress screen that displays, view the number of clients
updated for every 15-minute interval and the total number of clients updated.
2.
To view clients that have updated the Virus Pattern, click View under the Details
column.
3.
To save logs to a comma-separated value (CSV) file, click Export to CSV. Open the
file or save it to a specific location. A CSV file usually opens with a spreadsheet
application such as Microsoft Excel.
Client Update Notification
OfficeScan notifies client users when the following update-related events occur:
•
The Virus Pattern remains outdated after a certain number of days.
•
A hot fix installation requires a computer restart to load a new kernel mode driver
version.
For more information, see Alert Settings on page 9-25.
4-35
Trend Micro™ OfficeScan™ 10 Administrator’s Guide
Component Rollback
Rollback refers to reverting to the previous version of the Virus Pattern, Smart Scan
Agent Pattern, and Virus Scan Engine. If these components do not function properly,
roll them back to their previous versions. OfficeScan retains the current and the
previous versions of the Virus Scan Engine, and the last five versions of the Virus
Pattern and Smart Scan Agent Pattern.
Note:
Only the above-mentioned components can be rolled back.
OfficeScan uses different scan engines for clients running 32-bit and 64-bit platforms.
You need to roll back these scan engines separately. The rollback procedure for all types
of scan engines is the same.
To roll back the Virus Pattern, Smart Scan Agent Pattern, and Virus Scan
Engine:
P ATH : U PDATES > R OLLBACK
1.
2.
4-36
Click Synchronize with Server under the appropriate section.
a.
In the client tree that displays, select the clients with components that need to
be rolled back.
b.
Click Roll back. Click Back at the bottom of the screen to return to the
Rollback screen.
If an older version pattern file exists on the server, roll back the pattern file for both
the client and the server by clicking Rollback Server and Client Versions.
Keeping Protection Up-to-Date
Update Agents
To distribute the task of deploying components to OfficeScan clients, assign some
OfficeScan clients to act as Update Agents, or update sources for other clients. This
helps ensure that clients receive component updates in a timely manner without
directing a significant amount of network traffic to the OfficeScan server.
If the network is segmented by location and the network link between segments
experiences a heavy traffic load, assign at least one Update Agent on each location.
Update Agent System Requirements
Clients acting as Update Agents must have the following requirements:
TABLE 4-26.
Update Agent system requirements
R ESOURCE
R EQUIREMENT
Operating
system
Windows 2000, XP, Server 2003, Server 2008, Vista
Hardware
Processor
800MHz Intel Pentium or equivalent
RAM
• 512MB minimum, 1GB recommended (Windows 2000, XP,
Server 2003)
• 1GB minimum, 1.5GB recommended (Windows Vista,
Server 2008)
Available disk space
700MB
An Update Agent may unsuccessfully obtain and deploy
components because of insufficient disk space. Assign clients
with sufficient disk space as Update Agents.
Others
Monitor that supports 800 x 600 resolution at 256 colors or
higher
4-37
Trend Micro™ OfficeScan™ 10 Administrator’s Guide
TABLE 4-26.
Update Agent system requirements (Continued)
R ESOURCE
R EQUIREMENT
Dependent on the computer's hardware specifications
Update
request
capacity
Update Agent Configuration
Update Agent configuration is a 2-step process:
1.
Assign a client as an Update Agent.
2.
Specify the clients that will update from this Update Agent.
Note:
The number of concurrent client connections that a single Update Agent can
handle depends on the hardware specifications of the computer.
To assign a client as an Update Agent:
P ATH : N ETWORKED C OMPUTERS > C LIENT M ANAGEMENT > S ETTINGS > U PDATE A GENT S ET TINGS
1.
Select Clients can act as Update Agents.
2.
Click Save.
To specify the clients that will update from an Update Agent:
P ATH : U PDATES > N ETWORKED C OMPUTERS > U PDATE S OURCE > C USTOMIZED U PDATE
S OURCE L IST
4-38
1.
Click Add. In the screen that displays, type a range of client IP addresses.
2.
In the Update agent field, select the Update Agent you wish to assign to the
clients.
3.
Click Save.
Keeping Protection Up-to-Date
Update Source for Update Agents
Update Agents can obtain updates from various sources, such as the OfficeScan server
or a customized update source. Configure the update source from the Web console’s
Update Source screen.
To configure the update source for the Update Agent:
P ATH : U PDATES > N ETWORKED C OMPUTERS > U PDATE S OURCE
1.
Select whether to update from the update agent standard update source (OfficeScan
server) or update agent customized update source.
2.
Click Notify All Clients.
Update Agent Customized Update Source
Aside from the OfficeScan server, Update Agents can update from custom update
sources. Custom update sources help reduce client update traffic directed to the
OfficeScan server. Specify the custom update sources on the Customized Update
Source List, which can accommodate up to 1024 update sources. See Customized Update
Source on page 4-25 for steps to configure the list.
After you have set up and saved the list, the update process proceeds as follows:
1.
The Update Agent updates from the first entry on the list.
2.
If unable to update from the first entry, the agent updates from the second entry,
and so on.
3.
If unable to update from all entries, the agent checks if the option Update from
OfficeScan server if all customized sources are not available or not found is
enabled. If enabled, the agent updates from the OfficeScan server.
If the option is disabled, the agent then tries connecting directly to the Trend Micro
ActiveUpdate server if any of the following is true:
•
In Networked Computers > Client Management > Settings > Privileges
and Other Settings > Other Settings tab > Update Settings, the option
Clients download updates from the Trend Micro ActiveUpdate Server is
enabled.
•
The ActiveUpdate server
(http://osce10-p.activeupdate.trendmicro.com/activeupdate) is not included in
the Customized Update Source List.
4-39
Trend Micro™ OfficeScan™ 10 Administrator’s Guide
4.
If unable to update from all possible sources, the Update Agent quits the update
process.
The update process is different if the option Update agent: always update from
standard update source (OfficeScan server) is enabled and the OfficeScan server
notifies the agent to update components. The process is as follows:
1.
The agent updates directly from the OfficeScan server and disregards the update
source list.
2.
If unable to update from the server, the agent tries connecting directly to the Trend
Micro ActiveUpdate server if any of the following is true:
•
In Networked Computers > Client Management > Settings > Privileges
and Other Settings > Other Settings tab > Update Settings, the option
Clients download updates from the Trend Micro ActiveUpdate Server is
enabled.
•
The ActiveUpdate server
(http://osce10-p.activeupdate.trendmicro.com/activeupdate) is the first entry
in the Customized Update Source List.
Tip:
3.
4-40
Place the ActiveUpdate server at the top of the list only if you experience
problems updating from the OfficeScan server. When clients update directly
from the ActiveUpdate server, significant bandwidth is consumed between the
network and the Internet.
If unable to update from all possible sources, the Update Agent quits the update
process.
Keeping Protection Up-to-Date
Update Agent Standard Update Source
The OfficeScan server is the standard update source for Update Agents. If you
configure agents to update directly from the OfficeScan server, the update process
proceeds as follows:
1.
The Update Agent obtains updates from the OfficeScan server.
2.
If unable to update from the OfficeScan server, the agent tries connecting directly
to the Trend Micro ActiveUpdate server if any of the following is true:
•
In Networked Computers > Client Management > Settings > Privileges
and Other Settings > Other Settings tab > Update Settings, the option
Clients download updates from the Trend Micro ActiveUpdate Server is
enabled.
•
The ActiveUpdate server
(http://osce10-p.activeupdate.trendmicro.com/activeupdate) is the first entry
in the Customized Update Source List.
Tip:
3.
Place the ActiveUpdate server at the top of the list only if you experience
problems updating from the OfficeScan server. When Update Agents update
directly from the ActiveUpdate server, significant bandwidth is consumed
between the network and the Internet.
If unable to update from all possible sources, the Update Agent quits the update
process.
4-41
Trend Micro™ OfficeScan™ 10 Administrator’s Guide
Update Agent Component Duplication
Like the OfficeScan server, Update Agents also use component duplication when
downloading components. See Server Component Duplication on page 4-16 for details on
how the server performs component duplication.
The component duplication process for Update Agents is as follows:
1.
The Update Agent compares its current full pattern version with the latest version
on the update source. If the difference between the two versions is 14 or less, the
Update Agent downloads the incremental pattern that accounts for the difference
between the two versions.
Note:
If the difference is more than 14, the Update Agent automatically downloads the
full version of the pattern file.
2.
The Update Agent merges the incremental pattern it downloaded with its current
full pattern to generate the latest full pattern.
3.
The Update Agent downloads all the remaining incremental patterns on the update
source.
4.
The latest full pattern and all the incremental patterns are made available to clients.
Update Methods for Update Agents
Update Agents use the same update methods available to regular clients. For details, see
Client Update Methods on page 4-27.
You can also use the Scheduled Update Configuration tool to enable and configure
scheduled updates on an Update Agent that was installed using Client Packager.
Note:
4-42
This tool is not available if the Update Agent was installed using other installation
methods. See Installation Methods on page 3-11 for more information.
Keeping Protection Up-to-Date
To use the Scheduled Update Configuration tool:
1.
On the Update Agent computer, navigate to <Client installation folder>.
2.
Double-click SUCTool.exe to run the tool. The Schedule Update Configuration
Tool console opens.
3.
Select Enable Scheduled Update.
4.
Specify the update frequency and time.
5.
Click Apply.
Component Update Summary
P ATH : U PDATES > S UMMARY
The Web console provides an Update Summary screen that informs you of the overall
component update status and lets you update outdated components. If you enable
server scheduled update, the screen will also show the next update schedule.
Refresh the screen periodically to view the latest component update status.
Note:
To view component updates on the integrated Smart Scan Server, go to Smart Scan
> Integrated Server.
Update Status for Networked Computers
If you initiated component update to clients, view the following information in this
section:
•
Number of clients notified to update components.
•
Number of clients not yet notified but already in the notification queue. To cancel
the notification to these clients, click Cancel Notification.
Components
In the Update Status table, view the update status for each component that the
OfficeScan server downloads and distributes.
For each component, view its current version and the last update date. Click the number
link to view clients with out-of-date components. Manually update clients with
out-of-date components.
4-43
Trend Micro™ OfficeScan™ 10 Administrator’s Guide
4-44
Chapter 5
Protecting Computers from Security
Risks
Topics in this chapter:
• About Security Risks on page 5-2
•
Scan Methods on page 5-8
•
Scan Types on page 5-19
•
Settings Common to All Scan Types on page 5-25
•
Scan-related Privileges on page 5-43
•
Global Scan Settings on page 5-43
•
Security Risk Notifications on page 5-44
•
Security Risk Logs on page 5-48
•
Outbreak Protection on page 5-57
•
Device Control on page 5-65
5-1
Trend Micro™ OfficeScan™ 10 Administrator’s Guide
About Security Risks
Security risk is the collective term for viruses/malware and spyware/grayware.
OfficeScan protects computers from security risks by scanning files and then
performing a specific action for each security risk detected. An overwhelming number
of security risks detected over a short period of time signals an outbreak, which
OfficeScan can help contain outbreaks by enforcing outbreak prevention policies and
isolating infected computers until they are completely risk-free. Notifications and logs
help you keep track of security risks and alerts you if you need to take immediate action.
Viruses and Malware
Tens of thousands of virus/malware exist, with more being created each day. Computer
viruses today can cause a great amount of damage by exploiting vulnerabilities in
corporate networks, email systems and Web sites.
OfficeScan protects computers from the following virus/malware types:
Joke Program
A joke program is a virus-like program that often manipulates the appearance of things
on a computer monitor.
Trojan Horse Program
A Trojan horse is an executable program that does not replicate but instead resides on
computers to perform malicious acts, such as opening ports for hackers to enter. This
program often uses a Trojan Port to gain access to computers. An application that
claims to rid a computer of viruses when it actually introduces viruses to the computer is
an example of a Trojan program. Traditional antivirus solutions can detect and remove
viruses but not Trojans, especially those already running on the system.
5-2
Protecting Computers from Security Risks
Virus
A virus is a program that replicates. To do so, the virus needs to attach itself to other
program files and execute whenever the host program executes.
•
ActiveX malicious code: Code that resides on Web pages that execute ActiveX™
controls
•
Boot sector virus: A virus that infects the boot sector of a partition or a disk
•
COM and EXE file infector: An executable program with .com or .exe extension
•
Java malicious code: Operating system-independent virus code written or
embedded in Java™
•
Macro virus: A virus encoded as an application macro and often included in a
document
•
VBScript, JavaScript, or HTML virus: A virus that resides on Web pages and
downloads through a browser
•
Worm: A self-contained program or set of programs able to spread functional
copies of itself or its segments to other computers, often through email
Test Virus
A test virus is an inert file that is detectable by virus scanning software. Use test viruses,
such as the EICAR test script, to verify that the antivirus installation scans properly.
Packer
Packers are compressed and/or encrypted Windows or Linux™ executable programs,
often a Trojan horse program. Compressing executables makes packers more difficult
for antivirus products to detect.
Probable Virus/Malware
Suspicious files that have some of the characteristics of virus/malware are categorized
under this virus/malware type. For details about probable virus/malware, see the
following page on the Trend Micro online Virus Encyclopedia:
http://www.trendmicro.com/vinfo/virusencyclo/default5.asp?VName=POSSIBLE_V
IRUS
5-3
Trend Micro™ OfficeScan™ 10 Administrator’s Guide
Network Virus
A virus spreading over a network is not, strictly speaking, a network virus. Only some
virus/malware types, such as worms, qualify as network viruses. Specifically, network
viruses use network protocols, such as TCP, FTP, UDP, HTTP, and email protocols to
replicate. They often do not alter system files or modify the boot sectors of hard disks.
Instead, network viruses infect the memory of client computers, forcing them to flood
the network with traffic, which can cause slowdowns and even complete network failure.
Because network viruses remain in memory, they are often undetectable by conventional
file I/O based scanning methods.
The OfficeScan firewall works with the Common Firewall Pattern to identify and block
network viruses. See About the OfficeScan Firewall on page 7-2 for details.
Others
"Others" include viruses/malware not categorized under any of the virus/malware
types.
Spyware and Grayware
Spyware and grayware refer to applications or files not classified as viruses or Trojans,
but can still negatively affect the performance of the computers on the network.
Spyware and grayware introduce significant security, confidentiality, and legal risks to an
organization. Spyware/Grayware often performs a variety of undesired and threatening
actions such as irritating users with pop-up windows, logging user keystrokes, and
exposing computer vulnerabilities to attack.
OfficeScan protects computers from the following spyware/grayware types:
Spyware
Spyware gathers data, such as account user names, passwords, credit card numbers, and
other confidential information, and transmits it to third parties.
Adware
Adware displays advertisements and gathers data, such as Web surfing preferences, used
for targeting future advertising at the user.
5-4
Protecting Computers from Security Risks
Dialer
A dialer changes client Internet settings and can force a computer to dial pre-configured
phone numbers through a modem. These are often pay-per-call or international
numbers that can result in a significant expense for an organization.
Joke Program
Joke programs cause abnormal computer behavior, such as closing and opening the
CD-ROM tray and displaying numerous message boxes.
Hacking Tool
A hacking tool helps hackers enter a computer.
Remote Access Tool
A remote access tool helps hackers remotely access and control a computer.
Password Cracking Application
This type of application helps decipher account user names and passwords.
Others
"Others" include potentially malicious programs not categorized under any of the
spyware/grayware types.
How Spyware/Grayware Gets into a Network
Spyware/Grayware often gets into a corporate network when users download legitimate
software that have grayware applications included in the installation package. Most
software programs include an End User License Agreement (EULA), which the user has
to accept before downloading. Often the EULA does include information about the
application and its intended use to collect personal data; however, users often overlook
this information or do not understand the legal jargon.
5-5
Trend Micro™ OfficeScan™ 10 Administrator’s Guide
Potential Risks and Threats
The existence of spyware and other types of grayware on the network have the potential
to introduce the following:
Reduced Computer Performance
To perform their tasks, spyware/grayware applications often require significant CPU
and system memory resources.
Increased Web Browser-related Crashes
Certain types of grayware, such as adware, often display information in a browser frame
or window. Depending on how the code in these applications interacts with system
processes, grayware can sometimes cause browsers to crash or freeze and may even
require a computer restart.
Reduced User Efficiency
By needing to close frequently occurring pop-up advertisements and deal with the
negative effects of joke programs, users become unnecessarily distracted from their
main tasks.
Degradation of Network Bandwidth
Spyware/Grayware applications often regularly transmit the data they collect to other
applications running on or outside the network.
Loss of Personal and Corporate Information
Not all data spyware/grayware applications collect is as innocuous as a list of Web sites
users visit. Spyware/Grayware can also collect user credentials, such as those used to
access online banking accounts and corporate networks.
Higher Risk of Legal Liability
If computer resources on the network are hijacked, hackers may be able to utilize client
computers to launch attacks or install spyware/grayware on computers outside the
network. The participation of network resources in these types of activities could leave
an organization legally liable to damages incurred by other parties.
5-6
Protecting Computers from Security Risks
Guarding Against Spyware/Grayware
There are many ways to prevent the installation of spyware/grayware to a computer.
Trend Micro suggests adhering to the following standard practices:
•
•
Configure all types of scans (Manual Scan, Real-time Scan, Scheduled Scan, and
Scan Now) to scan for and remove spyware/grayware files and applications. See
Scan Types on page 5-19 for more information.
Educate client users to do the following:
•
Read the End User License Agreement (EULA) and included documentation
of applications they download and install on their computers.
•
Click No to any message asking for authorization to download and install
software unless client users are certain both the creator of the software and the
Web site they view are trustworthy.
•
Disregard unsolicited commercial email (spam), especially if the spam asks
users to click a button or hyperlink.
•
Configure Web browser settings that ensure a strict level of security. Configure Web
browsers to prompt users before installing ActiveX controls. To increase the
security level for Internet Explorer™, go to Tools > Internet Options > Security
and move the slider to a higher level. If this setting causes problems with Web sites
you want to visit, click Sites..., and add the sites you want to visit to the trusted sites
list.
•
If using Microsoft Outlook, configure the security settings so that Outlook does not
automatically download HTML items, such as pictures sent in spam messages.
•
Do not allow the use of peer-to-peer file-sharing services. Spyware and other
grayware applications may be masked as other types of files that users may want to
download, such as MP3 music files.
•
Periodically examine the installed software on client computers and look for
applications that may be spyware or other grayware. If you find an application or file
that OfficeScan cannot detect as grayware but you think is a type of grayware, send
it to Trend Micro at:
http://subwiz.trendmicro.com/SubWiz
TrendLabs will analyze the files and applications you submit.
•
Keep Windows operating systems updated with the latest patches from Microsoft.
See the Microsoft Web site for details.
5-7
Trend Micro™ OfficeScan™ 10 Administrator’s Guide
Scan Methods
OfficeScan clients can use either conventional scan or smart scan when scanning for
security risks.
Conventional Scan
Conventional scan is the scan method used in all earlier OfficeScan versions. A
conventional scan client stores all OfficeScan components on the client computer and
scans all files locally.
Smart Scan
Smart scan is a next-generation, in-the-cloud based endpoint protection solution. At the
core of this solution is an advanced scanning architecture that leverages threat signatures
that are stored in-the-cloud.
Scan Methods Compared
The following table provides a comparison between these two scan methods:
TABLE 5-27.
Comparison between conventional scan and smart scan
B ASIS OF
C OMPARISON
Availability
5-8
C ONVENTIONAL
S CAN
Available in this
and all earlier
OfficeScan
versions
S MART S CAN
Available starting in this OfficeScan
version
Protecting Computers from Security Risks
TABLE 5-27.
Comparison between conventional scan and smart scan (Continued)
B ASIS OF
C OMPARISON
Scanning
behavior
C ONVENTIONAL
S CAN
The conventional
scan client
performs scanning
on the local
computer.
S MART S CAN
• The smart scan client performs
scanning on the local computer.
• If the client cannot determine the
risk of the file during the scan, the
client verifies the risk by sending a
scan query to a Smart Scan Server.
• Using advanced filtering
technology, the client "caches" the
scan query result. The scanning
performance improves because the
client does not need to send the
same scan query to the Smart Scan
Server.
• If a client cannot verify a file’s risk
locally and is unable to connect to
any Smart Scan Server after
several attempts:
• The client flags the file for
verification.
• The client allows temporary
access to the file.
• When connection to a Smart Scan
Server is restored, all the files that
have been flagged are re-scanned.
The appropriate scan action is then
performed on files that have been
confirmed as infected.
Components
in use and
updated
All components
available on the
update source,
except the Smart
Scan Agent Pattern
All components available on the update
source, except the Virus Pattern and
Spyware Active-monitoring Pattern
5-9
Trend Micro™ OfficeScan™ 10 Administrator’s Guide
TABLE 5-27.
Comparison between conventional scan and smart scan (Continued)
B ASIS OF
C OMPARISON
C ONVENTIONAL
S CAN
Typical
update source
OfficeScan server
S MART S CAN
OfficeScan server
Switching From Conventional Scan to Smart Scan
If you are switching clients from conventional scan to smart scan, take note of the
following:
1. Product license
To use smart scan, ensure that you have activated the licenses for the following services
and that the licenses are not expired:
•
Antivirus
•
Web Reputation and Anti-spyware
2. Smart Scan Servers
Smart scan clients connect to a Smart Scan Server to send scan queries and verify a file’s
risk against the Smart Scan Pattern. The Smart Scan Server to which a client connects
depends on the client’s location. Internal clients connect to a local Smart Scan Server,
while external clients connect to the Trend Micro Global Smart Scan Server.
Global Smart Scan Server
If connection to the Global Smart Scan Server requires proxy authentication, specify
authentication credentials. For details, see External Proxy on page 9-40.
5-10
Protecting Computers from Security Risks
Local Smart Scan Server
OfficeScan provides two types of local Smart Scan Servers. Both servers have the same
functions.
•
Integrated: Setup includes an integrated Smart Scan Server that installs on the
same computer where the OfficeScan server installed.
If you installed the integrated server during OfficeScan server installation,
configure the update settings for this server and ensure the server has the latest
updates. For details on updating this server, see Smart Scan Server Update on page
4-21.
If you want clients to connect to this server through a proxy server, configure proxy
settings. For details, see Internal Proxy on page 9-39.
Tip:
•
Consider disabling the OfficeScan firewall on the server computer. When
enabled, the OfficeScan firewall may affect the integrated server’s performance.
For information on disabling the OfficeScan firewall, see Disabling the OfficeScan
Firewall on page 7-19.
Standalone: A standalone Smart Scan Server installs on a VMware server. The
standalone server has a separate management console and is not managed from the
OfficeScan Web console.
If you have not set up any of these servers, install them first before switching clients to
smart scan. Refer to the Trend Micro Smart Scan for OfficeScan Getting Started Guide for
information on reactivating the integrated server, and installing and managing the
standalone server.
Tip: Trend Micro recommends installing multiple servers for failover purposes. Clients that
are unable to connect to a particular server will try to connect to the other servers you
have set up.
5-11
Trend Micro™ OfficeScan™ 10 Administrator’s Guide
3. Smart Scan Server list
Add the Smart Scan Servers you have set up to the Smart Scan Server list. Clients refer
to the list to determine which Smart Scan Server to connect to. The client tries
connecting to other servers on the list if it cannot connect to a particular server.
For details on configuring the list, see Smart Scan Source on page 5-15.
4. Computer location settings
OfficeScan includes a location awareness feature that identifies the client computer’s
location and determines whether the client connects to the global or a local Smart Scan
Server. This ensures that clients remain protected regardless of their location.
To configure location settings, see Computer Location on page 9-2.
5. OfficeScan server
Ensure that clients can connect to the OfficeScan server. Only online clients will be
notified to switch to smart scan. Offline clients get notified when they become online.
Roaming clients are notified when they become online or, if the client has scheduled
update privileges, when scheduled update runs.
Also verify that the OfficeScan server has the latest components because smart scan
clients need to download the Smart Scan Agent Pattern from the server. To update
components, see OfficeScan Server Update on page 4-13.
6. Other Trend Micro products
If you have Trend Micro™ Network VirusWall™ Enforcer installed:
•
Install a hot fix (build 1047 for Network VirusWall Enforcer 2500 and build 1013
for Network VirusWall Enforcer 1200).
•
Update the OPSWAT engine to version 2.5.1017 to enable the product to detect a
client’s scan method.
7. Number of clients to switch
Switching a relatively small number of clients at a time allows efficient use of OfficeScan
server and Smart Scan Server resources. These servers can perform other critical tasks
while clients change their scan methods.
5-12
Protecting Computers from Security Risks
8. Timing
When switching to smart scan for the first time, clients need to download the full
version of the Smart Scan Agent Pattern from the OfficeScan server. The Smart Scan
Pattern is only used by smart scan clients.
Consider switching during off-peak hours to ensure the download process finishes
within a short amount of time. Also consider switching when no client is scheduled to
update from the server. Also temporarily disable "Update Now" on clients and re-enable
it after the clients have switched to smart scan.
9. Client tree settings
Scan method is a granular setting that can be set on the root, domain, or individual client
level. When switching to smart scan, you can:
•
Create a new client tree domain and assign smart scan as its scan method. Any client
you move to this domain will use smart scan.
Note:
When you move the client, enable the setting Apply settings of new domain to
selected clients.
•
Select a domain and configure it to use smart scan. Conventional scan clients
belonging to the domain will switch to smart scan.
•
Select one or several conventional scan clients from a domain and then switch them
to smart scan.
Note:
Any changes to the domain’s scan method overrides the scan method you have
configured for individual clients.
5-13
Trend Micro™ OfficeScan™ 10 Administrator’s Guide
Switching From Smart Scan to Conventional Scan
When you switch clients back to conventional scan, consider the following:
1. Number of clients to switch
Switching a relatively small number of clients at a time allows efficient use of OfficeScan
server and Smart Scan Server resources. These servers can perform other critical tasks
while clients change their scan methods.
2. Timing
When switching back to conventional scan, clients will likely download the full version
of the Virus Pattern and Spyware-active Monitoring Pattern from the OfficeScan server.
These pattern files are only used by conventional scan clients.
Consider switching during off-peak hours to ensure the download process finishes
within a short amount of time. Also consider switching when no client is scheduled to
update from the server. Also temporarily disable "Update Now" on clients and re-enable
it after the clients have switched to smart scan.
3. Client tree settings
Scan method is a granular setting that can be set on the root, domain, or individual client
level. When switching to conventional scan, you can:
•
Create a new client tree domain and assign conventional scan as its scan method.
Any client you move to this domain will use conventional scan.
Note:
•
Select a domain and configure it to use conventional scan. Smart scan clients
belonging to the domain will switch to conventional scan.
•
Select one or several smart scan clients from a domain and then switch them to
conventional scan.
Note:
5-14
When you move the client, enable the setting Apply settings of new domain to
selected clients.
Any changes to the domain’s scan method overrides the scan method you have
configured for individual clients.
Protecting Computers from Security Risks
To change the scan method:
P ATH : N ETWORKED C OMPUTERS > C LIENT M ANAGEMENT > S ETTINGS > S CAN M ETHODS
1.
Select to use conventional scan or smart scan.
2.
If you selected domain(s) or client(s) on the client tree, click Save to apply settings
to the domain(s) or client(s). If you selected the root icon
following options:
, choose from the
•
Apply to All Clients: Applies settings to all existing clients and to any new
client added to an existing/future domain. Future domains are domains not yet
created at the time you configure the settings.
•
Apply to Future Domains Only: Applies settings only to clients added to
future domains. This option will not apply settings to new clients added to an
existing domain.
Smart Scan Source
When in smart scan mode, the OfficeScan client first scans for security risks locally. If
the client cannot determine the risk of the file during the scan, the client connects to a
Smart Scan Server.
The Smart Scan Server the client connects to depends on the client computer’s location.
Internal clients connect to local Smart Scan Servers (integrated or standalone), while
external clients connect to the Global Smart Scan Server. For details in configuring
location settings, see Computer Location on page 9-2.
You can configure clients to use proxy settings when connecting to the Global Smart
Scan Server. For details, see External Proxy on page 9-40.
If you have installed local Smart Scan Servers, configure the Smart Scan Server list on
the OfficeScan Web console. An internal client picks a server from the list if it needs to
send scan queries. If a client is unable to connect to the first server, it picks another
server on the list, and so on.
Tip: Assign a standalone Smart Scan Server as the primary scan source and the integrated
server as a backup. This reduces the scan query traffic directed to the computer that
hosts the OfficeScan server and integrated server. The standalone server can also
process more scan queries.
5-15
Trend Micro™ OfficeScan™ 10 Administrator’s Guide
To configure the Smart Scan Server list:
P ATH : S MART S CAN > S CAN S OURCE > I NTERNAL C LIENTS
1.
Select whether clients will use the standard list or custom lists.
2.
Click Notify All Clients. Smart scan clients automatically refer to the list you have
configured.
Standard List
The standard list is used by all internal smart scan clients. You can configure clients to
use proxy settings when connecting to the Smart Scan Servers on the list. For details, see
Internal Proxy on page 9-39.
To configure the standard list:
P ATH : S MART S CAN > S CAN S OURCE > I NTERNAL C LIENTS
1.
Click the standard list link.
2.
In the screen that opens, click Add and specify the Smart Scan Server’s address (in
URL format).
To obtain the Smart Scan Server address:
•
For the integrated Smart Scan Server, open the OfficeScan Web console and go
to Smart Scan > Integrated Server.
•
For the standalone Smart Scan Server, open the standalone server's console and
go to the Summary page.
Tip:
5-16
Because the integrated Smart Scan Server and the OfficeScan server run on the
same computer, the computer’s performance may reduce significantly during
peak traffic for the two servers. To reduce the traffic directed to the OfficeScan
server computer, assign a standalone Smart Scan Server as the primary scan
source and the integrated server as a backup source.
3.
Click Test Connection to verify if connection to the server can be established.
Click Save when the test connection is successful.
4.
Click the link under Smart Scan Server Address to modify the server’s address.
Protecting Computers from Security Risks
5.
6.
To open the console of a local Smart Scan Server, click Launch console.
•
For the integrated Smart Scan Server, the server’s configuration screen displays.
•
For standalone Smart Scan Servers and the integrated Smart Scan Server of
another OfficeScan server, the console logon screen displays.
To delete an entry, select the check box for the server and click Delete.
7.
To export the list to a .dat file, click Export and then click Save.
8.
If you have exported a list from another server and want to import it to this screen,
click Import and locate the .dat file. The list loads on the screen.
9.
On top of the screen, select whether clients will refer to the servers in the order in
which they appear on the list or randomly. If you select Order, use the arrows under
the Order column to move servers up and down the list.
10. Click Save.
Custom Lists
If you select custom lists, specify a range of IP addresses for a custom list. If a client’s IP
address is within the range, the client uses the custom list.
To configure custom lists:
P ATH : S MART S CAN > S CAN S OURCE > I NTERNAL C LIENTS
1.
Click Add.
2.
In the screen that opens, specify the following:
3.
•
IP address range
•
Proxy settings clients will use to connect to the local Smart Scan Servers
Specify the Smart Scan Server’s address (in URL format).
5-17
Trend Micro™ OfficeScan™ 10 Administrator’s Guide
To obtain the Smart Scan Server address:
•
For the integrated Smart Scan Server, open the OfficeScan Web console and go
to Smart Scan > Integrated Server.
•
For the standalone Smart Scan Server, open the standalone server's console and
go to the Summary page.
Tip:
Because the integrated Smart Scan Server and the OfficeScan server run on the
same computer, the computer’s performance may reduce significantly during
peak traffic for the two servers. To reduce the traffic directed to the OfficeScan
server computer, assign a standalone Smart Scan Server as the primary scan
source and the integrated server as a backup source.
4.
Click Test Connection to verify if connection to the server can be established.
Click Save when the test connection is successful.
5.
To open the console of a local Smart Scan Server, click Launch console.
•
For the integrated Smart Scan Server, the server’s configuration screen displays.
•
For standalone Smart Scan Servers and the integrated Smart Scan Server of
another OfficeScan server, the console logon screen displays.
6.
To delete an entry, click the icon under Delete.
7.
Select whether clients will refer to the servers in the order in which they appear on
the list or randomly. If you select Order, use the arrows under the Order column to
move servers up and down the list.
8.
Click Save.
9.
Back in the Smart Scan Source screen, select whether to refer to the standard list if
the client is unable to connect to any server on the custom list.
10. To modify an IP address range and its corresponding custom list, click the link
under IP Range.
11. To export the custom lists to a .dat file, click Export and then click Save.
12. If you have exported custom lists from another server and want to import them to
this screen, click Import and locate the .dat file. The lists load on the screen.
5-18
Protecting Computers from Security Risks
Scan Types
OfficeScan provides the following scan types to protect client computers from security
risks:
TABLE 5-28.
Scan types
S CAN TYPE
Real-time Scan
D ESCRIPTION
Automatically scans a file on the computer as it is received,
opened, downloaded, copied, or modified
See Real-time Scan on page 5-19 for details.
Manual Scan
A user-initiated scan that scans a file or a set of files
requested by the user
See Manual Scan on page 5-21 for details.
Scheduled Scan
Automatically scans files on the computer based on the
schedule configured by the administrator or end user
See Scheduled Scan on page 5-22 for details.
Scan Now
An administrator-initiated scan that scans files on one or
several target computers
See Scan Now on page 5-23 for details.
Real-time Scan
Real-time Scan is a persistent and ongoing scan. Each time a file is received, opened,
downloaded, copied, or modified, Real-time Scan scans the file for security risks. If
OfficeScan detects no security risk, the file remains in its location and users can proceed
to access the file. If OfficeScan detects a security risk, it displays a notification message,
showing the name of the infected file and the specific security risk.
Note:
To modify the notification message, open the Web console and go to Notification >
Client User Notifications.
5-19
Trend Micro™ OfficeScan™ 10 Administrator’s Guide
Configure and apply Real-time Scan settings to one or several clients and domains, or to
all clients that the server manages.
To configure Real-time Scan settings:
P ATH : N ETWORKED C OMPUTERS > C LIENT M ANAGEMENT > S ETTINGS > R EAL - TIME S CAN
S ETTINGS
1.
On the Target tab, select the check boxes to enable real-time scanning for
virus/malware and spyware/grayware. If you disable virus/malware scanning,
spyware/grayware scanning also becomes disabled.
Note:
2.
During a virus outbreak, Real-time Scan cannot be disabled (or will automatically
be enabled if initially disabled) to prevent the virus from modifying or deleting
files and folders on client computers.
Configure the following scan criteria:
•
User Activity on Files that will trigger Real-time Scan
•
Files to Scan
•
Scan Settings
3.
Specify scan exclusions.
4.
Click the Action tab to configure the scan actions OfficeScan performs on detected
security risks.
5.
If you selected domain(s) or client(s) on the client tree, click Save to apply settings
to the domain(s) or client(s). If you selected the root icon
following options:
5-20
, choose from the
•
Apply to All Clients: Applies settings to all existing clients and to any new
client added to an existing/future domain. Future domains are domains not yet
created at the time you configure the settings.
•
Apply to Future Domains Only: Applies settings only to clients added to
future domains. This option will not apply settings to new clients added to an
existing domain.
Protecting Computers from Security Risks
Manual Scan
Manual Scan is an on-demand scan and starts immediately after a user runs the scan on
the client console. The time it takes to complete scanning depends on the number of
files to scan and the client computer's hardware resources.
Configure and apply Manual Scan settings to one or several clients and domains, or to all
clients that the server manages.
To configure Manual Scan settings:
P ATH : N ETWORKED C OMPUTERS > C LIENT M ANAGEMENT > S ETTINGS > M ANUAL S CAN S ET TINGS
1.
On the Target tab, configure the following scan criteria:
•
Files to Scan
•
Scan Settings
•
CPU Usage
2.
Specify scan exclusions.
3.
Click the Action tab to configure the scan actions OfficeScan performs on detected
security risks.
4.
If you selected domain(s) or client(s) on the client tree, click Save to apply settings
to the domain(s) or client(s). If you selected the root icon
following options:
, choose from the
•
Apply to All Clients: Applies settings to all existing clients and to any new
client added to an existing/future domain. Future domains are domains not yet
created at the time you configure the settings.
•
Apply to Future Domains Only: Applies settings only to clients added to
future domains. This option will not apply settings to new clients added to an
existing domain.
5-21
Trend Micro™ OfficeScan™ 10 Administrator’s Guide
Scheduled Scan
Scheduled Scan runs automatically on the appointed date and time. Use Scheduled Scan
to automate routine scans on the client and improve scan management efficiency.
Configure and apply Scheduled Scan settings to one or several clients and domains, or to
all clients that the server manages.
To configure Scheduled Scan settings:
P ATH : N ETWORKED C OMPUTERS > C LIENT M ANAGEMENT > S ETTINGS > S CHEDULED S CAN
S ETTINGS
1.
On the Target tab, select the check boxes to enable scanning for virus/malware
and spyware/grayware. If you disable virus/malware scanning, spyware/grayware
scanning also becomes disabled.
2.
Configure the following scan criteria:
•
Schedule
•
Files to Scan
•
Scan Settings
•
CPU Usage
3.
Specify scan exclusions.
4.
Click the Action tab to configure the scan actions OfficeScan performs on detected
security risks.
5.
If you selected domain(s) or client(s) on the client tree, click Save to apply settings
to the domain(s) or client(s). If you selected the root icon
following options:
5-22
, choose from the
•
Apply to All Clients: Applies settings to all existing clients and to any new
client added to an existing/future domain. Future domains are domains not yet
created at the time you configure the settings.
•
Apply to Future Domains Only: Applies settings only to clients added to
future domains. This option will not apply settings to new clients added to an
existing domain.
Protecting Computers from Security Risks
Scan Now
Scan Now is initiated remotely by an OfficeScan administrator through the Web console
and can be targeted to one or several client computers.
Configure and apply Scan Now settings to one or several clients and domains, or to all
clients that the server manages.
To configure Scan Now settings:
P ATH : N ETWORKED C OMPUTERS > C LIENT M ANAGEMENT > S ETTINGS > S CAN N OW S ETTINGS
1.
On the Target tab, select the check boxes to enable scanning for virus/malware
and spyware/grayware. If you disable virus/malware scanning, spyware/grayware
scanning also becomes disabled.
2.
Configure the following scan criteria:
•
Files to Scan
•
Scan Settings
•
CPU Usage
3.
Specify scan exclusions.
4.
Click the Action tab to configure the scan actions OfficeScan performs on detected
security risks.
5.
If you selected domain(s) or client(s) on the client tree, click Save to apply settings
to the domain(s) or client(s). If you selected the root icon
following options:
, choose from the
•
Apply to All Clients: Applies settings to all existing clients and to any new
client added to an existing/future domain. Future domains are domains not yet
created at the time you configure the settings.
•
Apply to Future Domains Only: Applies settings only to clients added to
future domains. This option will not apply settings to new clients added to an
existing domain.
5-23
Trend Micro™ OfficeScan™ 10 Administrator’s Guide
Initiating Scan Now
Initiate Scan Now on computers that you suspect to be infected.
To initiate Scan Now:
P ATH : N ETWORKED C OMPUTERS > C LIENT M ANAGEMENT > TASKS > S CAN N OW
S CAN N OW
SHORTCUT ( ON TOP OF THE MAIN MENU )
1.
To change the pre-configured Scan Now settings before initiating the scan, click
Settings. The Scan Now Settings screen opens. See Scan Now on page 5-23 for
details.
2.
In the client tree, select the clients that will perform scanning and then click
Initiate Scan Now. The server sends a notification to the clients.
Note:
If you do not select any client, OfficeScan automatically notifies all clients in the
client tree.
3.
Check the notification status and verify if there are clients that did not receive the
notification.
4.
Click Select Un-notified Computers and then Initiate Scan Now to immediately
resend the notification to un-notified clients.
Example: Total number of clients: 50
TABLE 5-29.
Un-notified client scenarios
C LIENT TREE
S ELECTION
5-24
N OTIFIED C LIENTS
( AFTER CLICKING
"I NITIATE S CAN N OW ")
U N - NOTIFIED C LIENTS
None (all 50 clients
automatically selected)
35 out of 50 clients
15 clients
Manual selection (45
out of 50 clients
selected)
40 out of 45 clients
5 clients + another 5
clients not included in
the manual selection
Protecting Computers from Security Risks
5.
Click Stop Notification to prompt OfficeScan to stop notifying clients currently
being notified. Clients already notified and in the process of scanning will ignore
this command.
6.
For clients already in the process of scanning, click Stop Scan Now to notify them
to stop scanning.
Settings Common to All Scan Types
For each scan type, configure three sets of settings: scan criteria, scan exclusions, and
scan actions. Deploy these settings to one or several clients and domains, or to all clients
that the server manages.
Scan Criteria
Specify which files a particular scan type should scan using file attributes such as file
type and extension. Also specify conditions that will trigger scanning. For example,
configure Real-time Scan to scan each file after it is downloaded to the computer.
User Activity on Files
Choose activities on files that will trigger Real-time Scan. Select from the following
options:
•
Scan files being created/modified: Scans new files introduced into the computer
(for example, after downloading a file) or files being modified
•
Scan files being retrieved: Scans files as they are opened
•
Scan files being created/modified and retrieved
For example, if the third option is selected, a new file downloaded to the computer will
be scanned and stays in its current location if no security risk is detected. The same file
will be scanned when a user opens the file and, if the user modified the file, before the
modifications are saved.
5-25
Trend Micro™ OfficeScan™ 10 Administrator’s Guide
Files to Scan
Select from the following options:
•
All scannable files: Scan all files
•
File types scanned by IntelliScan: Only scan files known to potentially harbor
malicious code, including files disguised by a harmless extension name. See
IntelliScan on page A-4 for details.
•
Files with certain extensions: Only scan files whose extensions are included in
the file extension list. Add new extensions or remove any of the existing extensions.
Scan Settings
Select one or more of the following options:
•
Scan network drive: Scans network drives or folders mapped to the client
computer during Manual Scan or Real-time Scan
•
Scan hidden folders: Allows OfficeScan to detect and then scan hidden folders on
the computer during Manual Scan
•
Scan compressed files: Allows OfficeScan to scan up to a specified number of
compression layers and skip scanning any excess layers. For example, if the
maximum is two layers and a compressed file to be scanned has six layers,
OfficeScan scans two layers and skips the remaining four.
Note:
5-26
OfficeScan treats Microsoft Office 2007 files in Office Open XML format as
compressed files. Office Open XML, the file format for Office 2007
applications, uses ZIP compression technologies. If you want files created using
these applications to be scanned for viruses/malware, you need to enable
scanning of compressed files.
•
Scan floppy disk during system shutdown: Scans any floppy disk for boot
viruses before shutting down the computer. This prevents any virus/malware from
executing when a user reboots the computer from the disk.
•
Enable IntelliTrap: Detects and removes virus/malware on compressed
executable files. See IntelliTrap on page A-5 for details.
•
Scan boot area: Scans the boot sector of the client computer’s hard disk for
virus/malware during Manual Scan, Scheduled Scan and Scan Now
Protecting Computers from Security Risks
CPU Usage
OfficeScan can pause after scanning one file and before scanning the next file. This
setting is used during Manual Scan, Scheduled Scan, and Scan Now.
Select from the following options:
•
High: No pausing between scans
•
Medium: Pause between file scans if CPU consumption is higher than 50%, and do
not pause if 50% or lower
•
Low: Pause between file scans if CPU consumption is higher than 20%, and do not
pause if 20% or lower
If you choose Medium or Low, when scanning is launched and CPU consumption is
within the threshold (50% or 20%), OfficeScan will not pause between scans, resulting
in faster scanning time. OfficeScan uses more CPU resource in the process but because
CPU consumption is optimal, computer performance is not drastically affected. When
CPU consumption begins to exceed the threshold, OfficeScan pauses to reduce CPU
usage, and stops pausing when consumption is within the threshold again.
If you choose High, OfficeScan does not check the actual CPU consumption and scans
files without pausing.
Schedule
Configure how often and what time Scheduled Scan will run. Select from the following
options and then select the start time:
•
Daily
•
Weekly
•
Monthly
Scan Exclusions
Configure scan exclusions to increase the scanning performance and skip scanning files
causing false alarms. When a particular scan type runs, OfficeScan checks the scan
exclusion list to determine which files on the computer will be excluded from both
virus/malware and spyware/grayware scanning.
5-27
Trend Micro™ OfficeScan™ 10 Administrator’s Guide
When you enable scan exclusion, OfficeScan will not scan a file under the following
conditions:
•
The file is found under a specific directory.
•
The file name matches any of the names in the exclusion list.
•
The file extension matches any of the extensions in the exclusion list.
Scan Exclusion List (Directories)
OfficeScan will not scan all files found under a specific directory on the computer. You
can specify a maximum of 250 directories.
You have the option to Exclude directories where Trend Micro products are
installed. If you select this option, OfficeScan automatically excludes the directories of
the following Trend Micro products from scanning:
•
ScanMail™ for Microsoft Exchange (all versions except version 7). If you use
version 7, add the following folders to the exclusion list:
\Smex\Temp
\Smex\Storage
\Smex\ShareResPool
•
ScanMail eManager™ 3.11, 5.1, 5.11, 5.12
•
ScanMail for Lotus Notes™ eManager NT
•
InterScan™ Messaging Security Suite
•
InterScan Web Security Suite
•
InterScan Web Protect
•
InterScan VirusWall 3.53
•
InterScan FTP VirusWall
•
InterScan Web VirusWall
•
InterScan E-mail VirusWall
•
InterScan NSAPI Plug-in
•
InterScan eManager 3.5x
If you have a Trend Micro product NOT included in the list, add the product directories
to the scan exclusion list.
5-28
Protecting Computers from Security Risks
Also configure OfficeScan to exclude Microsoft Exchange 2000/2003 directories by
going to Networked Computers > Global Client Settings > Scan Settings. If you
use Microsoft Exchange 2007, manually add the directory to the scan exclusion list.
Refer to the following site for scan exclusion details:
http://technet.microsoft.com/en-us/library/bb332342.aspx
Scan Exclusion List (Files)
OfficeScan will not scan a file if its file name matches any of the names included in this
exclusion list. If you want to exclude a file found under a specific location on the
computer, include the file path, such as C:\Temp\sample.jpg.
You can specify a maximum of 250 files.
Scan Exclusion List (File Extensions)
OfficeScan will not scan a file if its file extension matches any of the extensions included
in this exclusion list. You can specify a maximum of 250 file extensions. A period (.) is
not required before the extension.
For Real-time Scan, use an asterisk (*) as a wildcard character when specifying
extensions. For example, if you do not want to scan all files with extensions starting with
D, such as DOC, DOT or DAT, type D*.
For Manual Scan, Scheduled Scan, and Scan Now, use a question mark (?) or asterisk (*)
as a wildcard character.
Apply Scan Exclusion Settings to All Scan Types
OfficeScan allows you to configure scan exclusion settings for a particular scan type and
then apply the same settings to all the other scan types. For example:
On January 1, OfficeScan administrator Chris found out that there are a large number of
JPG files on client computers and realized that these files do not pose any security
threat. Chris added JPG in the file exclusion list for Manual Scan and then applied this
setting to all scan types. Real-time Scan, Scan Now, and Scheduled Scan are now set to
skip scanning .jpg files.
A week later, Chris removed JPG from the exclusion list for Real-time Scan but did not
apply scan exclusion settings to all scan types. JPG files will now be scanned but only
during Real-time Scan.
5-29
Trend Micro™ OfficeScan™ 10 Administrator’s Guide
Scan Actions
Specify the action OfficeScan performs when a particular scan type detects a security
risk. OfficeScan has a different set of scan actions for virus/malware and
spyware/grayware.
Virus/Malware Scan Actions
The scan action OfficeScan performs depends on the virus/malware type and the scan
type that detected the virus/malware. For example, when OfficeScan detects a Trojan
horse program (virus/malware type) during Manual Scan (scan type), it cleans (action)
the infected file.
For information on the different virus/malware types, see Viruses and Malware on page
5-2.
Scan Actions
The following are the actions OfficeScan can perform against viruses/malware:
Delete
OfficeScan deletes the infected file.
Quarantine
OfficeScan renames and then moves the infected file to a temporary quarantine
directory on the client computer located in <Client installation folder>\Suspect.
The OfficeScan client then sends quarantined files to the designated quarantine
directory. See Quarantine Directory on page 5-34 for details.
The default quarantine directory is on the OfficeScan server, under <Server installation
folder>\PCCSRV\Virus. OfficeScan encrypts quarantined files sent to this directory.
If you need to restore any of the quarantined files, use the VSEncrypt tool. For
information on using this tool, see Server Tuner on page 8-25.
5-30
Protecting Computers from Security Risks
Clean
OfficeScan cleans the infected file before allowing full access to the file.
If the file is uncleanable, OfficeScan performs a second action, which can be one of the
following actions: Quarantine, Delete, Rename, and Pass. To configure the second
action, go to Networked Computers > Client Management > Settings > {Scan
Type} > Action tab.
Rename
OfficeScan changes the infected file's extension to "vir". Users cannot open the
renamed file initially, but can do so if they associate the file with a certain application.
The virus/malware may execute when opening the renamed infected file.
Pass
OfficeScan performs no action on the infected file but records the virus/malware
detection in the logs. The file stays where it is located.
OfficeScan can only use this scan action when it detects any type of virus (except
"probable virus/malware") during Manual Scan, Scheduled Scan, and Scan Now.
OfficeScan cannot use this scan action during Real-time Scan because performing no
action when an attempt to open or execute an infected file is detected will allow
virus/malware to execute. All the other scan actions can be used during Real-time Scan.
For the "probable virus/malware" type, OfficeScan always performs no action on
detected files (regardless of the scan type) to mitigate false positive. If further analysis
confirms that probable virus/malware is indeed a security risk, a new pattern will be
released to allow OfficeScan to perform the appropriate scan action. If actually
harmless, probable virus/malware will no longer be detected.
For example:
OfficeScan detects "x_probable_virus" on a file named "123.exe" and performs no
action at the time of detection. Trend Micro then confirms that "x_probable_virus" is a
Trojan horse program and releases a new Virus Pattern version. After loading the
pattern's new version, OfficeScan will detect "x_probable_virus" as a Trojan program
and, if the action against such programs is "Clean", will clean "123.exe".
5-31
Trend Micro™ OfficeScan™ 10 Administrator’s Guide
Deny Access
This scan action can only be performed during Real-time Scan. When OfficeScan
detects an attempt to open or execute an infected file, it immediately blocks the
operation.
Users can manually delete the infected file.
Scan Action Options
When configuring the scan action, select from the following options:
Use ActiveAction
ActiveAction is a set of pre-configured scan actions for specific types of
viruses/malware. Use ActiveAction if you are not sure which scan action is suitable for
each type of virus/malware. With ActiveAction, you do not have to spend time
customizing the scan actions.
Note:
ActiveAction is not available for spyware/grayware scan.
The following table illustrates how ActiveAction handles each type of virus/malware:
TABLE 5-30.
Trend Micro recommended scan actions against
viruses/malware
V IRUS /
M ALWARE TYPE
R EAL - TIME S CAN
F IRST
A CTION
5-32
S ECOND
A CTION
M ANUAL S CAN /S CHEDULED
S CAN /S CAN N OW
F IRST
A CTION
S ECOND
A CTION
Joke program
Quarantine
N/A
Quarantine
N/A
Trojan horse
program
Quarantine
N/A
Quarantine
N/A
Virus
Clean
Quarantine
Clean
Quarantine
Test virus
Deny
Access
N/A
Pass
N/A
Protecting Computers from Security Risks
TABLE 5-30.
Trend Micro recommended scan actions against
viruses/malware (Continued)
V IRUS /
M ALWARE TYPE
R EAL - TIME S CAN
F IRST
A CTION
S ECOND
A CTION
M ANUAL S CAN /S CHEDULED
S CAN /S CAN N OW
F IRST
A CTION
S ECOND
A CTION
Packer
Quarantine
N/A
Quarantine
N/A
Others
Clean
Quarantine
Clean
Quarantine
Probable
virus/malware
Pass
N/A
Pass
N/A
Use the same action for all virus/malware types
Select this option if you want the same action performed on all types of virus/malware,
except probable virus/malware. For probable virus/malware, the action is always "Pass".
Use a specific action for each virus/malware type:
Manually select a scan action for each virus/malware type. For probable virus/malware,
no action is configurable and the action is always "Pass".
If you choose "Clean" as the first action, select a second action that OfficeScan
performs if cleaning is unsuccessful. If the first action is not "Clean", no second action
is configurable.
5-33
Trend Micro™ OfficeScan™ 10 Administrator’s Guide
Quarantine Directory
If the action for an infected file is "Quarantine", the OfficeScan client encrypts the file
and moves it to a temporary quarantine folder located in <Server installation
folder>\SUSPECT and then sends the file to the designated quarantine directory.
Accept the default quarantine directory, which is located on the OfficeScan server
computer, or specify a different directory by typing the location in URL, UNC path, or
absolute file path format.
Note:
You can restore encrypted quarantined files in case you need to access them in the
future. For details, see Restoring Encrypted Files on page 5-36.
Refer to the following table for guidance on when to use URL, UNC path, or absolute
file path:
TABLE 5-31.
Quarantine directory
Q UARANTINE
D IRECTORY
A directory on
the OfficeScan
server
computer
5-34
A CCEPTED
F ORMAT
E XAMPLE
URL
http://
<osceserver>
UNC path
\\<osceserver>\
ofcscan\Virus
N OTES
This is the default
directory.
Configure settings for
this directory, such as the
size of the quarantine
folder. For details, see
Quarantine Manager on
page 8-24.
Protecting Computers from Security Risks
TABLE 5-31.
Quarantine directory (Continued)
Q UARANTINE
D IRECTORY
A CCEPTED
F ORMAT
E XAMPLE
A directory on
another
OfficeScan
server
computer (if you
have other
OfficeScan
servers on the
network)
URL
http://
<osceserver2>
UNC path
\\<osceserver2>\
ofcscan\Virus
Another
computer on
the network
UNC path
\\<computer_
name>\temp
A different
directory on the
client computer
Absolute
path
C:\temp
N OTES
Ensure that clients can
connect to this directory.
If you specify an incorrect
directory, the OfficeScan
client keeps the
quarantined files on the
SUSPECT folder until a
correct quarantine
directory is specified. In
the server's
virus/malware logs, the
scan result is "Unable to
send the quarantined file
to the designated
quarantine folder".
If you use UNC path,
ensure that the
quarantine directory
folder is shared to the
group "Everyone" and
that you assign read and
write permission to this
group.
5-35
Trend Micro™ OfficeScan™ 10 Administrator’s Guide
Back Up Files Before Cleaning
If OfficeScan is set to clean an infected file, it can first back up the file. This allows you
to restore the file in case you need it in the future. OfficeScan encrypts the backup file to
prevent it from being opened, and then stores the file on the <Client installation
folder>\Backup folder.
To restore encrypted backup files, see Restoring Encrypted Files on page 5-36.
Display a Notification Message When Virus/Malware is Detected
When OfficeScan detects virus/malware during Real-time Scan and Scheduled Scan, it
can display a notification message to inform the user about the detection.
To modify the notification message, go to Notifications > Client User Notifications
> Virus/Malware tab.
Restoring Encrypted Files
To prevent infected from being opened, OfficeScan encrypts the file during the
following instances:
•
Before quarantining a file
•
When backing up a file before cleaning it
OfficeScan provides a tool that decrypts and then restores the file in case you need to
retrieve information from it. OfficeScan can decrypt and restore the following files:
TABLE 5-2.
Files that OfficeScan can decrypt and restore
F ILE
5-36
D ESCRIPTION
Quarantined files
on the client
computer
These files are found in the <Client installation
folder>\SUSPECT\Backup folder and are automatically
purged after 7 days. These files are also uploaded to the
designated quarantine directory on the OfficeScan server.
Quarantined files
on the designated
quarantine
directory
By default, this directory is located on the OfficeScan
server computer. For details, see Quarantine Directory on
page 5-34.
Protecting Computers from Security Risks
TABLE 5-2.
Files that OfficeScan can decrypt and restore (Continued)
F ILE
Backed up
encrypted files
D ESCRIPTION
These are the backup of infected files that OfficeScan
was able to clean. These files are found in the <Client
installation folder>\Backup folder. To restore these files,
users need to move them to the <Client installation
folder>\SUSPECT\Backup folder.
OfficeScan only backs up and encrypts files before
cleaning if you select Backup files before cleaning in
Networked Computers > Client Management >
Settings > {Scan Type} > Action tab.
WARNING! Restoring an infected file may spread the virus/malware to other files and
computers. Before restoring the file, isolate the infected computer and
move important files on this computer to a backup location.
To decrypt and restore files:
If the file is on the OfficeScan client computer:
1.
Open a command prompt and navigate to <Client installation folder>.
2.
Run VSEncode.exe by typing the following:
VSEncode.exe /u
This parameter opens a screen with a list of files found under <Client installation
folder>\SUSPECT\Backup.
3.
Select a file to restore and click Restore. The tool can only restore one file at a time.
4.
In the screen that opens, specify the folder where to restore the file.
5.
Click Ok. The file is restored to the specified folder.
Note:
6.
It might be possible for OfficeScan to scan the file again and treat it as infected
as soon as the file is restored. To prevent the file from being scanned, add it to
the scan exclusion list. See Scan Exclusions on page 5-27 for details.
Click Close when you have finished restoring files.
5-37
Trend Micro™ OfficeScan™ 10 Administrator’s Guide
If the file is on the OfficeScan server or a custom quarantine directory:
1.
If the file is on the OfficeScan server computer, open a command prompt and
navigate to <Server installation folder>\PCCSRV\Admin\Utility\VSEncrypt.
If the file is on a custom quarantine directory, navigate to <Server installation
folder>\PCCSRV\Admin\Utility and copy the VSEncrypt folder to the computer
where the custom quarantine directory is located.
2.
Create a text file and then type the full path of the files you want to encrypt or
decrypt.
For example, to restore files in C:\My Documents\Reports, type C:\My
Documents\Reports\*.* in the text file.
Quarantined files on the OfficeScan server computer are found under <Server
installation folder>\PCCSRV\Virus.
3.
Save the text file with an INI or TXT extension. For example, save it as
ForEncryption.ini on the C: drive.
4.
Open a command prompt and navigate to the directory where the VSEncrypt
folder is located.
5.
Run VSEncode.exe by typing the following:
VSEncode.exe /d /i <location of the INI or TXT file>
Where:
<location of the INI or TXT file> is the path of the INI or TXT file you created
(for example, C:\ForEncryption.ini).
5-38
Protecting Computers from Security Risks
6.
Use the other parameters to issue various commands.
TABLE 5-32.
Restore parameters
P ARAMETER
D ESCRIPTION
None (no parameter)
Encrypt files
/d
Decrypt files
/debug
Create a debug log and save it to the computer.
On the client computer, the debug log
VSEncrypt.log is created in the <Client installation
folder>.
/o
Overwrite an encrypted or decrypted file if it
already exists
/f <filename>
Encrypt or decrypt a single file
/nr
Do not restore the original file name
/v
Display information about the tool
/u
Launch the tool’s user interface
/r <Destination folder>
The folder where a file will be restored
/s <Original file name>
The file name of the original encrypted file
For example, type VSEncode [/d] [/debug] to decrypt files in the Suspect folder and
create a debug log. When you decrypt or encrypt a file, OfficeScan creates the decrypted
or encrypted file in the same folder. Before decrypting or encrypting a file, ensure that it
is not locked.
5-39
Trend Micro™ OfficeScan™ 10 Administrator’s Guide
Spyware/Grayware Scan Actions
The scan action OfficeScan performs depends on the scan type that detected the
spyware/grayware. While specific actions can be configured for each virus/malware
type, only one action can be configured for all types of spyware/grayware (for
information on the different type of spyware/grayware, see Spyware and Grayware on page
5-4). For example, when OfficeScan detects any type of spyware/grayware during
Manual Scan (scan type), it cleans (action) the affected system resources.
Scan Actions
The following are the actions OfficeScan can perform against spyware/grayware:
Clean
OfficeScan terminates processes or delete registries, files, cookies, and shortcuts
After cleaning spyware/grayware, OfficeScan clients back up spyware/grayware data,
which you can restore if you consider the spyware/grayware safe to access. See
Spyware/Grayware Restore on page 5-42 for details.
Pass
OfficeScan performs no action on detected spyware/grayware components but records
the spyware/grayware detection in the logs. This action can only be performed during
Manual Scan, Scheduled Scan, and Scan Now. During Real-time Scan, the action is
"Deny Access".
OfficeScan will not perform any action if the detected spyware/grayware is included in
the approved list. See Spyware/Grayware Approved List on page 5-41 for details.
Deny Access
OfficeScan denies access (copy, open) to the detected spyware/grayware components.
This action can only be performed during Real-time Scan. During Manual Scan,
Scheduled Scan, and Scan Now, the action is "Pass".
Display a Notification Message When Spyware/Grayware is Detected
When OfficeScan detects spyware/grayware during Real-time Scan and Scheduled Scan,
it can display a notification message to inform the user about the detection.
To modify the notification message, go to Notifications > Client User Notifications
> Spyware/Grayware tab.
5-40
Protecting Computers from Security Risks
Spyware/Grayware Approved List
OfficeScan provides a list of "approved" spyware/grayware, which contains files or
applications that you do not want treated as spyware or grayware. When a particular
spyware/grayware is detected during scanning, OfficeScan checks the approved list and
performs no action if it finds a match in the approved list.
Apply the approved list to one or several clients and domains, or to all clients that the
server manages. The approved list applies to all scan types, which means that the same
approved list will be used during Manual Scan, Real-time Scan, Scheduled Scan, and
Scan Now.
To add already detected spyware/grayware to the approved list:
P ATH : N ETWORKED C OMPUTERS > C LIENT M ANAGEMENT > L OGS > SPYWARE /G RAYWARE
L OGS > SPYWARE /G RAYWARE L OG C RITERIA > SPYWARE /G RAYWARE L OGS > A DD TO
A PPROVED L IST
L OGS > N ETWORKED C OMPUTER L OGS > S ECURITY R ISKS > V IEW L OGS > SPY WARE /G RAYWARE L OGS > SPYWARE /G RAYWARE L OG C RITERIA > SPYWARE /G RAY WARE L OGS > A DD TO A PPROVED L IST
1.
Specify if OfficeScan will apply the approved spyware/grayware only to the selected
client computers or to certain domain(s).
2.
Click Add. OfficeScan adds the spyware/grayware to the approved list found in
Networked Computers > Client Management > Settings >
Spyware/Grayware Approved List.
Note:
OfficeScan can accommodate a maximum of 1024 spyware/grayware in the
approved list.
To manage the spyware/grayware approved list:
P ATH : N ETWORKED C OMPUTERS > C LIENT M ANAGEMENT > S ETTINGS > SPYWARE /G RAYWARE
A PPROVED L IST
1.
On the Spyware/Grayware names table, select a spyware/grayware name. To
select multiple names, hold the Ctrl key while selecting.
You can also type a keyword in the Search field and click Search. OfficeScan
refreshes the table with the names that match the keyword.
2.
Click Add. The names move to the Approved List table.
5-41
Trend Micro™ OfficeScan™ 10 Administrator’s Guide
3.
To remove names from the approved list, select the names and click Remove. To
select multiple names, hold the Ctrl key while selecting.
4.
If you selected domain(s) or client(s) on the client tree, click Save to apply settings
to the domain(s) or client(s). If you selected the root icon
following options:
, choose from the
•
Apply to All Clients: Applies settings to all existing clients and to any new
client added to an existing/future domain. Future domains are domains not yet
created at the time you configure the settings.
•
Apply to Future Domains Only: Applies settings only to clients added to
future domains. This option will not apply settings to new clients added to an
existing domain.
Spyware/Grayware Restore
After cleaning spyware/grayware, OfficeScan clients back up spyware/grayware data.
Notify an online client to restore backed up data if you consider the data harmless.
Choose the spyware/grayware data to restore based on the backup time.
Note:
OfficeScan client users cannot initiate spyware/grayware restore and are not notified
about which backup data the client was able to restore.
To restore spyware/grayware:
P ATH : N ETWORKED C OMPUTERS > C LIENT M ANAGEMENT > TASKS > SPYWARE /G RAYWARE
R ESTORE
1.
To view the items to restore for each data segment, click View. A new screen
displays. Click Back to return to the previous screen.
2.
Select the data segments that you want to restore.
Note:
3.
5-42
For steps 1 and 2, you have the option to export the data to a comma-separated
value (CSV) file.
Click Restore. OfficeScan notifies you of the restoration status. Check the
spyware/grayware restore logs for a full report. See Spyware/Grayware Restore Logs on
page 5-56 for details.
Protecting Computers from Security Risks
Scan-related Privileges
Users with scan privileges have greater control over how files on their computers get
scanned.
Scan privileges allow users to perform the following tasks:
•
Configure Manual Scan, Scheduled Scan, and Real-time Scan settings. For details,
see Scan Privileges on page 9-7.
•
Postpone, stop, or skip Scheduled Scan. For details, see Scheduled Scan Privileges on
page 9-8.
•
Enable scanning of Microsoft Outlook and POP3 email messages for
virus/malware. For details, see Mail Scan Privileges on page 9-12.
Global Scan Settings
There are a number of ways global scan settings get applied to clients.
•
A particular scan setting can apply to all clients that the server manages or only to
clients with certain scan privileges. For example, if you configure the postpone
Scheduled Scan duration, only clients with the privilege to postpone Scheduled Scan
will use the setting.
•
A particular scan setting can apply to all or only to a particular scan type. For
example, on computers with both the OfficeScan server and client installed, you can
exclude the OfficeScan server database from scanning. However, this setting applies
only during Real-time Scan.
•
A particular scan setting can apply when scanning for either virus/malware or
spyware/grayware, or both. For example, assessment mode only applies during
spyware/grayware scanning.
To view global scan settings, see Scan Settings on page 9-18.
5-43
Trend Micro™ OfficeScan™ 10 Administrator’s Guide
Security Risk Notifications
OfficeScan comes with a set of default notification messages to inform you, other
OfficeScan administrators, and client users of detected security risks or any outbreak
that has occurred. Modify these messages to suit your requirements.
Administrator Notification Settings
When security risks are detected or when an outbreak occurs, OfficeScan administrators
can receive notifications through:
•
Email
•
Pager
•
SNMP Trap
•
Windows NT event log
For details about security risk notifications, see Security Risk Notifications for Administrators
on page 5-45. For details about outbreak notifications, see Outbreak Criteria and
Notifications on page 5-57.
Configure administrator notification settings to allow OfficeScan to successfully send
notifications through email, pager, and SNMP Trap.
To configure administrator notification settings:
P ATH : N OTIFICATIONS > A DMINISTRATOR N OTIFICATIONS > G ENERAL S ETTINGS
1.
Specify information in the fields provided.
2.
For the SMTP and SNMP Trap Server IP address fields, specify either an IP
address or computer name.
3.
Specify a port number between 1 and 65535.
4.
For the Pager field, the following characters are allowed:
0 to 9
#
*
,
5.
5-44
Specify a COM port between 1 and 16.
Protecting Computers from Security Risks
6.
Specify a community name that is difficult to guess.
7.
Click Save.
Security Risk Notifications for Administrators
Configure OfficeScan to send a notification when it detects a security risk, or only when
the action on the security risk is unsuccessful and therefore requires your intervention.
Note:
To configure notification settings that display on client computers, see Security Risk
Notifications for Client Users on page 5-46.
To configure security risk notifications for administrators:
P ATH : N OTIFICATIONS > A DMINISTRATOR N OTIFICATIONS > STANDARD N OTIFICATIONS
1.
In the Criteria tab, specify whether to send notifications when OfficeScan detects
virus/malware and spyware/grayware, or only when the action on these security
risks is unsuccessful.
2.
In the Email, Pager, SNMP Trap, and NT Event Log tabs:
a.
Enable notifications for virus/malware and spyware/grayware.
b.
For email notifications, specify the email recipients and accept or modify the
default subject.
c.
Accept or modify the default notification messages.
d. Use token variables to represent data in the Message and Subject fields.
TABLE 5-33.
Token variables for security risk notifications
VARIABLE
D ESCRIPTION
Virus/Malware detections
%v
Virus/Malware name
%s
Computer with virus/malware
%i
IP address of the computer
5-45
Trend Micro™ OfficeScan™ 10 Administrator’s Guide
TABLE 5-33.
Token variables for security risk notifications (Continued)
VARIABLE
D ESCRIPTION
%m
Domain of the computer
%p
Location of virus/malware
%y
Date and time of virus/malware detection
%a
Action performed on the security risk
%n
Name of the user logged on to the infected computer
Spyware/Grayware detections
e.
%s
Computer with spyware/grayware
%i
IP address of the computer
%m
Domain of the computer
%y
Date and time of spyware/grayware detection
%T
Spyware/Grayware and scan result
Click Save.
Security Risk Notifications for Client Users
OfficeScan can display notification messages on client computers immediately after
Real-time Scan and Scheduled Scan detect virus/malware and spyware/grayware.
Enable the notification message and optionally modify its content.
To enable the notification message:
P ATH : N ETWORKED C OMPUTERS > C LIENT M ANAGEMENT > S ETTINGS > {R EAL - TIME
S CHEDULED S CAN S ETTINGS } > A CTION TAB
1.
5-46
OR
Select to display a notification message when virus/malware or spyware/grayware is
detected.
Protecting Computers from Security Risks
2.
If you selected domain(s) or client(s) on the client tree, click Save to apply settings
to the domain(s) or client(s). If you selected the root icon
following options:
, choose from the
•
Apply to All Clients: Applies settings to all existing clients and to any new
client added to an existing/future domain. Future domains are domains not yet
created at the time you configure the settings.
•
Apply to Future Domains Only: Applies settings only to clients added to
future domains. This option will not apply settings to new clients added to an
existing domain.
To modify the content of the notification message:
P ATH : N OTIFICATIONS > C LIENT U SER N OTIFICATIONS
1.
Click the Virus/Malware tab or Spyware/Grayware tab.
2.
Modify the default messages in the text boxes provided.
3.
To display a notification message if a virus/malware originated from the client
user's computer:
a.
Select the check box under Virus/Malware Infection Source.
b.
Specify an interval for sending notifications.
c.
Optionally modify the default notification message.
Note:
4.
This notification message displays only if you enable Windows Messenger
Service. Check the status of this service in the Services screen (Control
Panel > Administrative Tools > Services > Messenger).
Click Save.
5-47
Trend Micro™ OfficeScan™ 10 Administrator’s Guide
Security Risk Logs
OfficeScan generates logs when it detects virus/malware or spyware/grayware, and
when it restores spyware/grayware.
To keep the size of logs from occupying too much space on the hard disk, manually
delete logs or configure a log deletion schedule. For more information about managing
logs, see Managing Logs on page 8-16.
Virus/Malware Logs
OfficeScan generates logs when it detects viruses and malware.
To view virus/malware logs:
P ATH : L OGS > N ETWORKED C OMPUTER L OGS > S ECURITY R ISKS > V IEW L OGS > V IRUS /M AL WARE L OGS
N ETWORKED C OMPUTERS > C LIENT M ANAGEMENT > L OGS > V IRUS /M ALWARE L OGS
1.
Specify log criteria and click Display Logs.
2.
View logs. Logs contain the following information:
3.
5-48
•
Date and time of virus/malware detection
•
Infected computer
•
Virus/Malware name
•
Infection source
•
Infected file
•
Scan type that detected the virus/malware
•
Virus/Malware Scan Results (if scan action was performed successfully or not)
•
Log details (Click View to see the details.)
To save the log to a comma-separated value (CSV) file, click Export to CSV. Open
the file or save it to a specific location. A CSV file usually opens with a spreadsheet
application such as Microsoft Excel.
Protecting Computers from Security Risks
Virus/Malware Scan Results
A. If Scan Action is Successful
The following results display if OfficeScan was able to perform the configured scan
action:
Deleted
•
First action is Delete and the infected file was deleted.
•
First action is Clean but cleaning was unsuccessful. Second action is Delete and the
infected file was deleted.
Quarantined
•
First action is Quarantine and the infected file was quarantined.
•
First action is Clean but cleaning was unsuccessful. Second action is Quarantine and
the infected file was quarantined.
Cleaned
An infected file was cleaned.
Renamed
•
First action is Rename and the infected file was renamed.
•
First action is Clean but cleaning was unsuccessful. Second action is Rename and the
infected file was renamed.
Access denied
•
First action is Deny Access and access to the infected file was denied when the user
attempted to open the file.
•
First action is Clean but cleaning was unsuccessful. Second action is Deny Access
and access to the infected file was denied when the user attempted to open the file.
•
Probable Virus/Malware was detected during Real-time Scan.
•
Real-time Scan may deny access to files infected with a boot virus even if the scan
action is Clean (first action) and Quarantine (second action). This is because
attempting to clean a boot virus may damage the Master Boot Record (MBR) of the
infected computer. Run Manual Scan so OfficeScan can clean or quarantine the file.
5-49
Trend Micro™ OfficeScan™ 10 Administrator’s Guide
Passed
•
First action is Pass. OfficeScan did not perform any action on the infected file.
•
First action is Clean but cleaning was unsuccessful. Second action is Pass so
OfficeScan did not perform any action on the infected file.
Passed a potential security risk
This scan result only displays when OfficeScan detects "probable virus/malware" during
Manual Scan, Scheduled Scan, and Scan Now. OfficeScan automatically uses Pass as the
scan action when it detects probable virus/malware. Refer to the following page on the
Trend Micro online Virus Encyclopedia for information about probable virus/malware
and how to submit suspicious files to Trend Micro for analysis.
http://www.trendmicro.com/vinfo/virusencyclo/default5.asp?VName=POSSIBLE_V
IRUS&VSect=Sn
B. If Scan Action is Unsuccessful
The following results display if OfficeScan was unable to perform the configured scan
action:
Unable to clean or quarantine the file
Clean is the first action. Quarantine is the second action, and both actions were
unsuccessful.
Solution: See "Unable to quarantine the file" below.
Unable to clean or delete the file
Clean is the first action. Delete is the second action, and both actions were unsuccessful.
Solution: See "Unable to delete the file" below.
Unable to clean or rename the file
Clean is the first action. Rename is the second action, and both actions were
unsuccessful.
Solution: See "Unable to rename the file" below.
5-50
Protecting Computers from Security Risks
Unable to quarantine the file/Unable to rename the file
Explanation 1
The infected file may be locked by another application, is executing, or is on a CD.
OfficeScan will quarantine/rename the file after the application releases the file or after
it has been executed.
Solution
For infected files on a CD, consider not using the CD as the virus may infect other
computers on the network.
Explanation 2
The infected file is in the Temporary Internet Files folder of the client computer. Since
the computer downloads files while you are browsing the Web, the Web browser may
have locked the infected file. When the Web browser releases the file, OfficeScan will
quarantine/rename the file.
Solution: None
Unable to delete the file
Explanation 1
The infected file may be contained in a compressed file and the Clean/Delete infected
files within compressed files setting in Networked Computers > Global Client
Settings is disabled.
Solution
Enable the Clean/Delete infected files within compressed files option. When
enabled, OfficeScan decompresses a compressed file, cleans/deletes infected files within
the compressed file, and then re-compresses the file.
Note:
Enabling this setting may increase computer resource usage during scanning and
scanning may take longer to complete.
Explanation 2
The infected file may be locked by another application, is executing, or is on a CD.
OfficeScan will delete the file after the application releases the file or after it has been
executed.
5-51
Trend Micro™ OfficeScan™ 10 Administrator’s Guide
Solution
For infected files on a CD, consider not using the CD as the virus may infect other
computers on the network.
Explanation 3
The infected file is in the Temporary Internet Files folder of the client computer. Since
the computer downloads files while you are browsing the Web, the Web browser may
have locked the infected file. When the Web browser releases the file, OfficeScan will
delete the file.
Solution: None
Unable to send the quarantined file to the designated quarantine folder
Although OfficeScan successfully quarantined a file in the \Suspect folder of the client
computer, it cannot send the file to the designated quarantine directory.
Solution
Determine which scan type (Manual Scan, Real-time Scan, Scheduled Scan, or Scan
Now) detected the virus/malware and then check the quarantine directory specified in
Networked Computers > Client Management > Settings > {Scan Type} > Action
tab.
If the quarantine directory is on the OfficeScan server computer or is on another
OfficeScan server computer:
5-52
1.
Check if the client can connect to the server.
2.
If you use URL as the quarantine directory format:
a.
Ensure that the computer name you specify after "http://" is correct.
b.
Check the size of the infected file. If it exceeds the maximum file size specified
in Administration > Quarantine Manager, adjust the setting to
accommodate the file. You may also perform other actions such as deleting the
file.
c.
Check the size of the quarantine directory folder and determine whether it has
exceeded the folder capacity specified in Administration > Quarantine
Manager. Adjust the folder capacity or manually delete files in the quarantine
directory.
Protecting Computers from Security Risks
3.
If you use UNC path, ensure that the quarantine directory folder is shared to the
group "Everyone" and that you assign read and write permission to this group. Also
check if the quarantine directory folder exists and if the UNC path is correct.
If the quarantine directory is on another computer on the network (You can only use
UNC path for this scenario):
1.
Check if the client can connect to the computer.
2.
Ensure that the quarantine directory folder is shared to the group "Everyone" and
that you assign read and write permission to this group.
3.
Check if the quarantine directory folder exists.
4.
Check if the UNC path is correct.
If the quarantine directory is on a different directory on the client computer (you can
only use absolute path for this scenario), check if the quarantine directory folder exists.
Unable to clean the file
Explanation 1
The infected file may be contained in a compressed file and the Clean/Delete infected
files within compressed files setting in Networked Computers > Global Client
Settings is disabled.
Solution
Enable the Clean/Delete infected files within compressed files option. When
enabled, OfficeScan decompresses a compressed file, cleans/deletes infected files within
the compressed file, and then re-compresses the file.
Note:
Enabling this setting may increase computer resource usage during scanning and
scanning may take longer to complete.
5-53
Trend Micro™ OfficeScan™ 10 Administrator’s Guide
Explanation 2
The infected file is in the Temporary Internet Files folder of the client computer. Since
the computer downloads files while you are browsing the Web, the Web browser may
have locked the infected file. When the Web browser releases the file, OfficeScan will
clean the file.
Solution: None
Explanation 3
The file may be uncleanable. For details and solutions, see Uncleanable File on page A-13.
Spyware/Grayware Logs
OfficeScan generates logs when it detects spyware and grayware.
To view spyware/grayware logs:
P ATH : L OGS > N ETWORKED C OMPUTER L OGS > S ECURITY R ISKS > V IEW L OGS > SPY WARE /G RAYWARE L OGS
N ETWORKED C OMPUTERS > C LIENT M ANAGEMENT > L OGS > SPYWARE /G RAYWARE
L OGS
5-54
1.
Specify log criteria and click Display Logs.
2.
View logs. Logs contain the following information:
•
Date and time of spyware/grayware detection
•
Affected computer
•
Spyware/Grayware name
•
Scan type that detected the spyware/grayware
•
Details about the spyware/grayware scan results (if scan action was performed
successfully or not)
•
Log details (Click View to see the details.)
3.
Add spyware/grayware you consider harmless to the spyware/grayware approved
list.
4.
To save the log to a comma-separated value (CSV) file, click Export to CSV. Open
the file or save it to a specific location. A CSV file usually opens with a spreadsheet
application such as Microsoft Excel.
Protecting Computers from Security Risks
Spyware/Grayware Scan Results
A. If Scan Action is Successful
The first level result is Successful, no action required. The second level results are as
follows:
Cleaned
OfficeScan terminated processes or deleted registries, files, cookies and shortcuts.
Passed
OfficeScan did not perform any action but logged the spyware/grayware detection for
assessment.
Access denied
OfficeScan denied access (copy, open) to the detected spyware/grayware components.
B. If Scan Action is Unsuccessful
The first level result is "Further action required". The second level results will have at
least one of the following messages:
Spyware/Grayware unsafe to clean
This message displays if the Spyware Scan Engine attempts to clean any single folder
and the following criteria are met:
•
Items to clean exceed 250MB.
•
The operating system uses the files in the folder. The folder may also be necessary
for normal system operation.
•
The folder is a root directory (such as C: or F:)
Solution: Contact your support provider for assistance.
Spyware/Grayware scan stopped manually. Please perform a complete scan.
A user stopped scanning before it was completed.
Solution: Run a Manual Scan and wait for the scan to finish.
5-55
Trend Micro™ OfficeScan™ 10 Administrator’s Guide
Spyware/Grayware cleaned, restart required. Please restart the computer.
OfficeScan cleaned spyware/grayware components but a computer restart is required to
complete the task.
Solution: Restart the computer immediately.
Spyware/Grayware cannot be cleaned.
Spyware/Grayware was detected on a CD-ROM or network drive. OfficeScan cannot
clean spyware/grayware detected on these locations.
Solution: Manually remove the infected file.
Spyware/Grayware scan result unidentified. Please contact Trend Micro
technical support.
A new version of the Spyware Scan Engine provides a new scan result that OfficeScan
has not been configured to handle.
Solution: Contact your support provider for help in determining the new scan result.
Spyware/Grayware Restore Logs
After cleaning spyware/grayware, OfficeScan clients back up spyware/grayware data.
Notify an online client to restore backed up data if you consider the data harmless.
Information about which spyware/grayware backup data was restored, the affected
computer, and the restore result are available in the logs.
To view spyware/grayware restore logs:
P ATH : L OGS > N ETWORKED C OMPUTER L OGS > SPYWARE /G RAYWARE R ESTORE
5-56
1.
Check the Result column to see if OfficeScan successfully restored the
spyware/grayware data.
2.
To save the log to a comma-separated value (CSV) file, click Export to CSV. Open
the file or save it to a specific location. A CSV file usually opens with a spreadsheet
application such as Microsoft Excel.
Protecting Computers from Security Risks
Outbreak Protection
An outbreak occurs when incidents of virus/malware or spyware/grayware detections
over a particular period of time exceed a certain threshold. There are several ways to
respond to and contain outbreaks in the network, including:
•
Enabling OfficeScan to monitor the network for suspicious activity
•
Blocking critical client computer ports and folders
•
Sending outbreak alert messages to clients
•
Cleaning up infected computers
Outbreak Criteria and Notifications
Define an outbreak by the number of security risk detections and the detection period.
After defining the outbreak criteria, configure OfficeScan to notify you and other
OfficeScan administrators of an outbreak so you can respond immediately.
You can receive notifications through:
•
Email
•
Pager
•
SNMP Trap
•
Windows NT event log
Configure administrator notification settings to allow OfficeScan to successfully send
notifications through email, pager, and SNMP Trap. For details, see Administrator
Notification Settings on page 5-44.
5-57
Trend Micro™ OfficeScan™ 10 Administrator’s Guide
To configure the outbreak criteria and notifications:
P ATH : N OTIFICATIONS > A DMINISTRATOR N OTIFICATIONS > O UTBREAK N OTIFICATIONS
N OTIFICATIONS > A DMINISTRATOR N OTIFICATIONS > O UTBREAK N OTIFICATIONS >
S HARED F OLDER S ESSION LINK
1.
In the Criteria tab, specify the number of detections and detection period for each
security risk.
Tip:
Trend Micro recommends accepting the default values in this screen.
OfficeScan sends a notification message when the number of detections is
exceeded. For example, if you specify 100, OfficeScan sends the notification after it
detects the 101st instance of a virus/malware.
2.
Enable OfficeScan to monitor the network for firewall violations and shared folder
sessions. Under Shared Folder Sessions, click the number link to view the
computers with shared folders and the computers accessing the shared folders.
3.
In the Email, Pager, SNMP Trap, and NT Event Log tabs:
a.
Enable notifications for virus/malware and spyware/grayware detections.
Note:
5-58
OfficeScan only reports firewall violation and shared folder session
outbreaks through email.
b.
For email notifications, specify the email recipients and accept or modify the
default email subject. Optionally select additional virus/malware and
spyware/grayware information to include in the email. You can include the
client/domain name, security risk name, date and time of detection, path and
infected file, and scan result.
c.
Accept or modify the default notification messages.
Protecting Computers from Security Risks
d. Use token variables to represent data in the Message and Subject fields.
TABLE 5-34.
Token variables for outbreak notifications
VARIABLE
D ESCRIPTION
Virus/Malware outbreaks
%CV
Total number of viruses/malware detected
%CC
Total number of computers with virus/malware
Spyware/Grayware outbreaks
%CV
Total number of spyware/grayware detected
%CC
Total number of computers with spyware/grayware
Firewall violation outbreaks
%A
Log type exceeded
%C
Number of firewall violation logs
%T
Time period when firewall violation logs accumulated
Shared folder session outbreaks
%S
%T
%M
4.
Number of shared folder sessions
Time period when shared folder sessions
accumulated
Time period, in minutes
Click Save.
5-59
Trend Micro™ OfficeScan™ 10 Administrator’s Guide
Outbreak Prevention
When an outbreak occurs, enforce outbreak prevention measures to respond to and
contain the outbreak. Configure prevention settings carefully because incorrect
configuration may cause unforeseen network issues.
To configure and activate outbreak prevention settings:
P ATH : N ETWORKED C OMPUTERS > O UTBREAK P REVENTION > START O UTBREAK P REVENTION
1.
2.
Enforce any of the following outbreak prevention policies:
•
Limit/Deny Access to Shared Folders
•
Block Ports
•
Deny Write Access to Files and Folders
Select the number of hours outbreak prevention will stay in effect. The default is 48
hours. You can manually restore network settings before the outbreak prevention
period expires.
WARNING! Do not allow outbreak prevention to remain in effect indefinitely. To
block or deny access to certain files, folders, or ports indefinitely,
modify computer and network settings directly instead of using
OfficeScan.
3.
Accept or modify the default client notification message.
Note:
To configure OfficeScan to notify you during an outbreak, go to Notifications
> Administrator Notifications > Outbreak Notifications.
4.
Click Start Outbreak Notification. The outbreak prevention measures you
selected display in a new window.
5.
Back in the client tree, check the OPP column. A check mark appears on
computers applying outbreak prevention measures.
OfficeScan records the following events in the system event logs:
5-60
•
Server events (initiating outbreak prevention and notifying clients to enable
outbreak prevention)
•
Client event (enabling outbreak prevention)
Protecting Computers from Security Risks
Outbreak Prevention Policies
When outbreaks occurs, enforce any of the following policies:
•
Limit/Deny Access to Shared Folders
•
Block Ports
•
Deny Write Access to Files and Folders
Limit/Deny Access to Shared Folders
During outbreaks, limit or deny access to shared folders on the network to prevent
security risks from spreading through the shared folders.
When this policy takes effect, users can still share folders but the policy will not apply to
the newly shared folders. Therefore, inform users not to share folders during an
outbreak or deploy the policy again to apply the policy to the newly shared folders.
To limit/deny access to shared folders:
P ATH : N ETWORKED C OMPUTERS > O UTBREAK P REVENTION > START O UTBREAK P REVENTION
> L IMIT /D ENY ACCESS TO SHARED FOLDERS
1.
Select from the following options:
•
Allow read access only: Limits access to shared folders
•
Deny Full Access
Note:
2.
The read access only setting does not apply to shared folders already configured
to deny full access.
Click Save. The Outbreak Prevention Settings screen displays again.
5-61
Trend Micro™ OfficeScan™ 10 Administrator’s Guide
Block Ports
During outbreaks, block vulnerable ports that viruses/malware might use to gain access
to client computers.
WARNING! Configure Outbreak Prevention settings carefully. Blocking ports that are
in use makes network services that depend on them unavailable. For
example, if you block the trusted port, OfficeScan cannot communicate
with the client for the duration of the outbreak.
To block vulnerable ports:
P ATH : N ETWORKED C OMPUTERS > O UTBREAK P REVENTION > START O UTBREAK P REVENTION
> B LOCK PORTS
1.
Select whether to Block trusted port.
2.
Select the ports to block under the Blocked Ports column.
a.
5-62
If there are no ports in the table, click Add. In the screen that opens, select the
ports to block and click Save.
•
All ports (including ICMP): Blocks all ports except the trusted port. If
you also want to block the trusted port, select the Block trusted port check
box in the previous screen.
•
Commonly used ports: Select at least one port number for OfficeScan to
save the port blocking settings.
•
Trojan ports: Blocks ports commonly used by Trojan horse programs.
See Trojan Port on page A-11 for details.
•
A port number or port range: Optionally specify the direction of the
traffic to block and some comments, such as the reason for blocking the
ports you specified.
•
Ping protocol (Reject ICMP): Click if you only want to block ICMP
packets, such as ping requests.
Protecting Computers from Security Risks
b.
To edit settings for the blocked port(s), click the port number.
c.
In the screen that opens, modify the settings and click Save.
d. To remove a port from the list, select the check box next to the port number
and click Delete.
3.
Click Save. The Outbreak Prevention Settings screen displays again.
Deny Write Access to Files and Folders
Viruses/Malware can modify or delete files and folders on the host computers. During
an outbreak, configure OfficeScan to prevent viruses/malware from modifying or
deleting files and folders on client computers.
To deny write access to files and folders:
P ATH : N ETWORKED C OMPUTERS > O UTBREAK P REVENTION > START O UTBREAK P REVENTION
> D ENY WRITE ACCESS TO FILES AND FOLDERS
1.
Type the directory path. When you finish typing the directory path you want to
protect, click Add.
Note:
Type the absolute path, not the virtual path, for the directory.
2.
Specify the files to protect in the protected directories. Select all files or files based
on specific file extensions. For file extensions, specify an extension that is not in the
list, type it in the text box, and then click Add.
3.
To protect specific files, under Files to Protect, type the full file name and click
Add.
4.
Click Save. The Outbreak Prevention Settings screen displays again.
5-63
Trend Micro™ OfficeScan™ 10 Administrator’s Guide
Disabling Outbreak Prevention
When you are confident that an outbreak has been contained and that OfficeScan
already cleaned or quarantined all infected files, restore network settings to normal by
disabling Outbreak Prevention.
To manually disable outbreak prevention:
P ATH : N ETWORKED C OMPUTERS > O UTBREAK P REVENTION > R ESTORE S ETTINGS
1.
To inform users that the outbreak is over, select Notify client users after
restoring the original settings.
2.
Accept or modify the default client notification message.
3.
Click Restore Settings.
Note:
If you do not restore network settings manually, OfficeScan automatically
restores these settings after the number of hours specified in Automatically
restore network settings to normal after __ hours on the Outbreak
Prevention Settings screen. The default setting is 48 hours.
OfficeScan records the following events in the system event logs:
4.
5-64
•
Server events (initiating outbreak prevention and notifying clients to enable
outbreak prevention)
•
Client event (enabling outbreak prevention)
After disabling outbreak prevention, scan networked computers for security risks to
ensure that the outbreak has been contained.
Protecting Computers from Security Risks
Device Control
OfficeScan provides a device control feature that regulates access to external storage
devices and network resources connected to computers. Device control helps prevent
data loss and leakage and, combined with file scanning, helps guard against security
risks.
Device Control is available only on computers running x86 type platforms.
To manage access to external devices:
P ATH : N ETWORKED C OMPUTERS > C LIENT M ANAGEMENT > S ETTINGS > D EVICE C ONTROL
1.
Select the check box to enable device control.
2.
Choose whether to block or allow the AutoRun function (autorun.inf) on USB
devices connected to the computer.
3.
Select the permissions for each device type.
TABLE 5-35.
Device permissions
P ERMISSIONS
Full access
Read and
write only
F ILES ON THE D EVICE
I NCOMING F ILES
Operations allowed: Copy,
Move, Open, Save, Delete,
Execute
Operations allowed: Save,
Move, Copy
Operations allowed: Copy,
Move, Open, Save, Delete
Operations allowed: Save,
Move, Copy
This means that a file can
be saved, moved, and
copied to the device.
Operation blocked:
Execute
Read and
execute only
Operations allowed: Copy,
Open, Execute
Operations blocked: Save,
Move, Copy
Operations blocked: Save,
Move, Delete
5-65
Trend Micro™ OfficeScan™ 10 Administrator’s Guide
TABLE 5-35.
Device permissions (Continued)
P ERMISSIONS
Read only
F ILES ON THE D EVICE
I NCOMING F ILES
Operations allowed: Copy,
Open
Operations blocked: Save,
Move, Copy
Operations blocked: Save,
Move, Delete, Execute
No access
Note:
Any attempt to access the
device or network resource
is automatically blocked.
Operations blocked: Save,
Move, Copy
The scanning function in OfficeScan complements and may override the device
permissions. For example, if the permission allows a file to be opened but
OfficeScan detects that the file is infected with malware, a specific scan action
will be performed on the file to eliminate the malware. If the scan action is
Clean, the file opens after it is cleaned. However, if the scan action is Delete, the
file is deleted.
4.
Select whether to display a notification message on the client computer when
OfficeScan detects unauthorized device access, which includes all operations that
OfficeScan blocks.
5.
If you selected domain(s) or client(s) on the client tree, click Save to apply settings
to the domain(s) or client(s). If you selected the root icon
following options:
5-66
, choose from the
•
Apply to All Clients: Applies settings to all existing clients and to any new
client added to an existing/future domain. Future domains are domains not yet
created at the time you configure the settings.
•
Apply to Future Domains Only: Applies settings only to clients added to
future domains. This option will not apply settings to new clients added to an
existing domain.
Protecting Computers from Security Risks
Device Control Logs
Clients log unauthorized device access instances and send the logs to the server. A client
that runs continuously aggregates the logs and sends them after a 24-hour time period.
A client that got restarted checks the last time the logs were sent to the server. If the
elapsed time exceeds 24 hours, the client sends the logs immediately.
To keep the size of logs from occupying too much space on the hard disk, manually
delete logs or configure a log deletion schedule. For more information about managing
logs, see Managing Logs on page 8-16.
To view device control logs:
P ATH : L OGS > N ETWORKED C OMPUTER L OGS > S ECURITY R ISKS > V IEW L OGS > D EVICE
C ONTROL L OGS
N ETWORKED C OMPUTERS > C LIENT M ANAGEMENT > L OGS > D EVICE C ONTROL L OGS
1.
Specify log criteria and click Display Logs.
2.
View logs. Logs contain the following information:
•
Date/Time unauthorized access was detected
•
Computer where external device is connected or where network resource is
mapped
•
Device type or network resource accessed
•
Target, which is the item on the device or network resource that was accessed
•
Accessed by, which specifies where access was initiated
•
Permissions set for the target
5-67
Trend Micro™ OfficeScan™ 10 Administrator’s Guide
5-68
Chapter 6
Protecting Computers from
Web-based Threats
Topics in this chapter:
• About Web Threats on page 6-2
•
Web Reputation on page 6-2
•
Location Awareness on page 6-3
•
Web Reputation Policies on page 6-3
•
Approved URLs on page 6-5
•
Proxy for Web Reputation on page 6-5
•
Web Threat Notifications for Client Users on page 6-6
•
Web Reputation Logs on page 6-7
6-1
Trend Micro™ OfficeScan™ 10 Administrator’s Guide
About Web Threats
Web threats encompass a broad array of threats that originate from the Internet. Web
threats are sophisticated in their methods, using a combination of various files and
techniques rather than a single file or approach. For example, Web threat creators
constantly change the version or variant used. Because the Web threat is in a fixed
location of a Web site rather than on an infected computer, the Web threat creator
constantly modifies its code to avoid detection.
In recent years, individuals once characterized as hackers, virus writers, spammers, and
spyware makers are now known as cyber criminals. Web threats help these individuals
pursue one of two goals. One goal is to steal information for subsequent sale. The
resulting impact is leakage of confidential information in the form of identity loss. The
infected computer may also become a vector to deliver phish attack or other
information capturing activities. Among other impacts, this threat has the potential to
erode confidence in Web commerce, corrupting the trust needed for Internet
transactions. The second goal is to hijack a user’s CPU power to use it as an instrument
to conduct profitable activities. Activities include sending spam or conducting extortion
in the form of distributed denial-of-service attacks or pay-per-click activities.
Web Reputation
OfficeScan leverages Trend Micro’s extensive Web security databases to check the
reputation of Web sites that users are attempting to access. The Web site’s reputation is
correlated with the specific Web reputation policy enforced on the computer.
Depending on the policy in use, OfficeScan will either block or allow access to the Web
site. Policies are enforced based on the client’s location.
6-2
Protecting Computers from Web-based Threats
Location Awareness
In many organizations, employees use both desktop and notebook computers to
perform their tasks. Since notebook computers connect to multiple networks and
employees physically carry them past the organization's premises, OfficeScan needs to
extend protection to these computers when they disconnect from the network. Web
Reputation Policies ensure client computers are protected regardless of location.
A client's location ("internal" or "external") dictates the policy applied to the computer.
You need to specify whether location is based on the client computer's gateway IP
address or the client's connection status with the OfficeScan server or any reference
server.
To configure location awareness settings, see Computer Location on page 9-2.
Web Reputation Policies
Web reputation policies dictate whether OfficeScan will block or allow access to a Web
site. To determine the appropriate policy to use, OfficeScan checks the client's location.
Location is based on either the client computer's gateway IP address or the client's
connection status with the OfficeScan server or any reference server.
A client's location is "internal" if:
•
The client’s gateway IP address matches any of the gateway IP addresses specified
on the Computer Location screen
•
If the client can connect to the OfficeScan server or any of the reference servers.
Otherwise, a client's location is "external".
6-3
Trend Micro™ OfficeScan™ 10 Administrator’s Guide
To configure a Web reputation policy:
P ATH : N ETWORKED C OMPUTERS > C LIENT M ANAGEMENT > S ETTINGS > W EB R EPUTATION
S ETTINGS
1.
Configure a policy for External Clients and Internal Clients.
2.
Select the check box to enable/disable the Web reputation policy.
Tip:
3.
Trend Micro recommends disabling Web reputation for internal clients if you
already use a Trend Micro product with the Web reputation capability, such as
InterScan Gateway Security Appliance.
Select from the available Web reputation security levels: High, Medium, or Low
The security levels determine whether OfficeScan will allow or block access to a
URL. For example, if you set the security level to Low, OfficeScan only blocks
URLs that are known to be Web threats. As you set the security level higher, the
Web threat detection rate improves but the possibility of false positives also
increases.
6-4
4.
To submit Web reputation feedback, use the provided URL. The URL opens the
Trend Micro Web Reputation Query system.
5.
Select whether to allow the OfficeScan client to send Web Reputation Logs to the
server. Allow clients to send logs if you want to analyze URLs being blocked by
OfficeScan and take the appropriate action on URLs you think are safe to access.
6.
Click Save.
Protecting Computers from Web-based Threats
Approved URLs
Approved URLs bypass Web Reputation policies. OfficeScan does not block these
URLs even if the Web Reputation policy is set to block them. Add URLs that you
consider safe to the approved URL list.
To configure the approved URL list:
P ATH : N ETWORKED C OMPUTERS > G LOBAL C LIENT S ETTINGS
1.
Go to the Web Reputation Approved URL List section and click the link below it.
2.
Select whether to configure the list for external or internal clients.
3.
Specify a URL in the text box.
4.
Select whether to approve the URL's subsites or only the Web page. If the URL is
www.example.com/update, OfficeScan approves all pages under this URL but will
not approve www.example.com.
5.
Click Add.
Repeat step 3 to step 5 until all the URLs you want to approve are included in the
list.
6.
Click Save.
Proxy for Web Reputation
Specify proxy server authentication credentials if you have set up a proxy server to
handle HTTP communication in your organization and authentication is required before
Web access is allowed. OfficeScan uses these credentials when connecting to the Trend
Micro reputation servers to determine if Web sites that users attempt to access are safe.
This OfficeScan version supports only one set of authentication credentials.
To configure the proxy settings, see External Proxy on page 9-40.
6-5
Trend Micro™ OfficeScan™ 10 Administrator’s Guide
Web Threat Notifications for Client Users
OfficeScan can display a notification message on a client computer immediately after it
blocks a URL that violates a Web reputation policy. You need to enable the notification
message and optionally modify the content of the notification message.
To enable the notification message:
P ATH : N ETWORKED C OMPUTERS > C LIENT M ANAGEMENT > S ETTINGS > P RIVILEGES
O THER S ETTINGS > O THER S ETTINGS TAB
AND
1.
Under Web Reputation Settings, select to display a notification when a Web site
is blocked.
2.
If you selected domain(s) or client(s) on the client tree, click Save to apply settings
to the domain(s) or client(s). If you selected the root icon
following options:
, choose from the
•
Apply to All Clients: Applies settings to all existing clients and to any new
client added to an existing/future domain. Future domains are domains not yet
created at the time you configure the settings.
•
Apply to Future Domains Only: Applies settings only to clients added to
future domains. This option will not apply settings to new clients added to an
existing domain.
To modify the content of the notification message:
P ATH : N OTIFICATIONS > C LIENT U SER N OTIFICATIONS > W EB R EPUTATION P OLICY V IOLA TIONS TAB
1.
Modify the default message in the text box provided.
Note:
2.
6-6
After the notification message displays on the client computer, another message
displays in the browser. The message informs users to report the URL to the
OfficeScan administrator if they think the URL is safe to access.
Click Save.
Protecting Computers from Web-based Threats
Web Reputation Logs
Configure both internal and external clients to send Web reputation logs to the server.
Do this if you want to analyze URLs that OfficeScan blocks and take appropriate action
on URLs you think are safe to access.
To keep the size of logs from occupying too much space on the hard disk, manually
delete logs or configure a log deletion schedule. For more information about managing
logs, see Managing Logs on page 8-16.
To view Web reputation logs:
P ATH : L OGS > N ETWORKED C OMPUTER L OGS > S ECURITY R ISKS > V IEW L OGS > W EB R EPU TATION L OGS
N ETWORKED C OMPUTERS > C LIENT M ANAGEMENT > L OGS > W EB R EPUTATION L OGS
1.
Specify log criteria and click Display Logs.
2.
View logs. Logs contain the following information:
3.
•
Date/Time OfficeScan blocked the URL
•
Computer where the user accessed the URL
•
Blocked URL
•
URL's risk level
•
Link to the Trend Micro Web Reputation Query system that provides more
information about the blocked URL
To save the log to a comma-separated value (CSV) file, click Export to CSV. Open
the file or save it to a specific location. A CSV file usually opens with a spreadsheet
application such as Microsoft Excel.
6-7
Trend Micro™ OfficeScan™ 10 Administrator’s Guide
6-8
Chapter 7
Using the OfficeScan Firewall
Topics in this chapter:
• About the OfficeScan Firewall on page 7-2
•
Firewall Policies and Profiles on page 7-4
•
Firewall Privileges on page 7-16
•
Firewall Violation Notifications for Client Users on page 7-16
•
Firewall Logs on page 7-17
•
Testing the OfficeScan Firewall on page 7-18
•
Disabling the OfficeScan Firewall on page 7-19
7-1
Trend Micro™ OfficeScan™ 10 Administrator’s Guide
About the OfficeScan Firewall
The OfficeScan firewall protects clients and servers on the network using stateful
inspection, high performance network virus scanning, and elimination. Through the
central management console, you can create rules to filter connections by IP address,
port number, or protocol, and then apply the rules to different groups of users.
The OfficeScan firewall includes the following key features and benefits:
Traffic Filtering
The OfficeScan firewall filters all incoming and outgoing traffic, providing the ability to
block certain types of traffic based on the following criteria:
•
Direction (inbound/outbound)
•
Protocol (TCP/UDP/ICMP)
•
Destination ports
•
Source and destination computers
Scanning for Network Viruses
The OfficeScan firewall also examines each packet for network viruses. For details, see
Network Virus on page 5-4.
Customizable Profiles and Policies
The OfficeScan firewall gives you the ability to configure policies to block or allow
specified types of network traffic. Assign a policy to one or more profiles, which you can
then deploy to specified OfficeScan clients. This provides a highly customized method
of organizing and configuring firewall settings for clients.
Stateful Inspection
The OfficeScan firewall is a stateful inspection firewall; it monitors all connections to
the client and remembers all connection states. It can identify specific conditions in any
connection, predict what actions should follow, and detect disruptions in a normal
connection. Therefore, effective use of the firewall not only involves creating profiles
and policies, but also analyzing connections and filtering packets that pass through the
firewall.
7-2
Using the OfficeScan Firewall
Intrusion Detection System
The OfficeScan firewall also includes an Intrusion Detection System (IDS). When
enabled, IDS can help identify patterns in network packets that may indicate an attack
on the client. The OfficeScan firewall can help prevent the following well-known
intrusions:
•
Too Big Fragment: A Denial of Service Attack where a hacker directs an oversized
TCP/UDP packet at a target computer. This can cause the computer's buffer to
overflow, which can freeze or reboot the computer.
•
Ping of Death: A Denial of Service attack where a hacker directs an oversized
ICMP packet at a target computer. This can cause the computer's buffer to
overflow, which can freeze or reboot the computer.
•
Conflicted ARP: A type of attack where a hacker sends an Address Resolution
Protocol (ARP) request with the same source and destination IP address to a
computer. The target computer continually sends an ARP response (its MAC
address) to itself, causing it to freeze or crash.
•
SYN Flood: A Denial of Service attack where a program sends multiple TCP
synchronization (SYN) packets to a computer, causing the computer to continually
send synchronization acknowledgment (SYN/ACK) responses. This can exhaust
computer memory and eventually crash the computer.
•
Overlapping Fragment: Similar to a Teardrop attack, this Denial of Service attack
sends overlapping TCP fragments to a computer. This overwrites the header
information in the first TCP fragment and may pass through a firewall. The firewall
may then allow subsequent fragments with malicious code to pass through to the
target computer.
•
Teardrop: Similar to an overlapping fragment attack, this Denial of Service attack
deals with IP fragments. A confusing offset value in the second or later IP fragment
can cause the receiving computer’s operating system to crash when attempting to
reassemble the fragments.
•
Tiny Fragment Attack: A type of attack where a small TCP fragment size forces
the first TCP packet header information into the next fragment. This can cause
routers that filter traffic to ignore the subsequent fragments, which may contain
malicious data.
•
Fragmented IGMP: A Denial of Service attack that sends fragmented IGMP
packets to a target computer, which cannot properly process the IGMP packets.
This can freeze or slow down the computer.
7-3
Trend Micro™ OfficeScan™ 10 Administrator’s Guide
•
LAND Attack: A type of attack that sends IP synchronization (SYN) packets with
the same source and destination address to a computer, causing the computer to
send the synchronization acknowledgment (SYN/ACK) response to itself. This can
freeze or slow down the computer.
Firewall Violation Outbreak Monitor
The OfficeScan firewall sends a customized notification message to specified recipients
when firewall violations exceed certain thresholds, which may signal an attack.
Client Firewall Privileges
Grant client users the privilege to view their firewall settings on the OfficeScan client
console. Also grant users the privilege to enable or disable the firewall, the Intrusion
Detection System, and the firewall violation notification message.
Firewall Policies and Profiles
The OfficeScan firewall uses policies and profiles to organize and customize methods
for protecting networked computers.
Tip: Multiple firewall installations on the same computer may produce unexpected results.
Consider uninstalling other software-based firewall applications on OfficeScan clients
before deploying and enabling the OfficeScan firewall.
The following steps are necessary to successfully use the OfficeScan firewall:
7-4
1.
Create a policy. The policy allows you to select a security level that blocks or allows
traffic on networked computers and enables firewall features.
2.
Add exceptions to the policy. Exceptions allow clients to deviate from a policy.
With exceptions, you can specify clients, and allow or block certain types of traffic,
despite the security level setting in the policy. For example, block all traffic for a set
of clients in a policy, but create an exception that allows HTTP traffic so clients can
access a Web server.
3.
Create and assign profiles to clients. A firewall profile includes a set of client
attributes and is associated with a policy. When a client matches the attributes
specified in the profile, the associated policy is triggered.
Using the OfficeScan Firewall
Firewall Policies
Firewall policies allow you to block or allow certain types of network traffic not
specified in a policy exception. A policy also defines which firewall features get enabled
or disabled. Assign a policy to one or multiple firewall profiles.
OfficeScan comes with a set of default policies, which you can modify or delete.
The default firewall policies are as follows:
TABLE 7-36.
Default firewall policies
P OLICY
N AME
S ECURITY
L EVEL
C LIENT
S ETTINGS
All access
Low
Enable
firewall
None
Use to allow
clients
unrestricted
access to the
network
Cisco Trust
Agent for
Cisco NAC
Low
Enable
firewall
Allow incoming
and outgoing
UDP traffic
through port
21862
Use when
clients have a
Cisco Trust
Agent (CTA)
installation
Communicati
on Ports for
Trend Micro
Control
Manager
Low
Enable
firewall
Allow all
incoming and
outgoing
TCP/UDP traffic
through ports 80
and 10319
Use when
clients have an
MCP agent
installation
ScanMail for
Microsoft
Exchange
console
Low
Enable
firewall
Allow all
incoming and
outgoing TCP
traffic through
port 16372
Use when
clients need to
access the
ScanMail
console
E XCEPTIONS
R ECOMMENDED
U SE
7-5
Trend Micro™ OfficeScan™ 10 Administrator’s Guide
TABLE 7-36.
P OLICY
N AME
InterScan
Messaging
Security
Suite (IMSS)
console
Default firewall policies (Continued)
S ECURITY
L EVEL
C LIENT
S ETTINGS
Low
Enable
firewall
E XCEPTIONS
Allow all
incoming and
outgoing TCP
traffic through
port 80
R ECOMMENDED
U SE
Use when
clients need to
access the
IMSS console
Also create new policies if you have requirements not covered by any of the default
policies.
All default and user-created firewall policies display on the firewall policy list on the Web
console.
To configure the firewall policy list:
P ATH : N ETWORKED C OMPUTERS > F IREWALL > P OLICIES
1.
To add a new policy, click Add. If a new policy you want to create has similar
settings with an existing policy, select the existing policy and click Copy.
To edit an existing policy, click the policy name.
A policy configuration screen appears. See Adding and Modifying a Firewall Policy on
page 7-7 for more information.
7-6
2.
To delete an existing policy, select the check box next to the policy and click Delete.
3.
To edit the firewall exception template, click Edit Exception Template. The
Exception Template Editor appears. See Editing the Firewall Exception Template on
page 7-9 for more information.
Using the OfficeScan Firewall
Adding and Modifying a Firewall Policy
Configure the following for each policy:
•
Security level: A general setting that blocks or allows all inbound and/or all
outbound traffic on the client computer
•
Firewall features: Specify whether to enable or disable the OfficeScan firewall, the
Intrusion Detection System (IDS), and the firewall violation notification message.
See Intrusion Detection System on page 7-3 for more information on IDS.
•
Policy exception list: A list of configurable exceptions that block or allow various
types of network traffic
To add a policy:
P ATH : N ETWORKED C OMPUTERS > F IREWALL > P OLICIES > A DD
N ETWORKED C OMPUTERS > F IREWALL > P OLICIES > C OPY
1.
Type a name for the policy.
2.
Select a security level. The selected security level will not apply to traffic that meet
the firewall policy exception criteria.
3.
Select the firewall features to use for the policy.
•
The firewall violation notification message displays when the firewall blocks an
outgoing packet. To modify the message, see To modify the content of the notification
message: on page 7-17.
•
Enabling all the firewall features grants the client users the privileges to
enable/disable the features and modify firewall settings in the client console.
WARNING! You cannot use the OfficeScan server Web console to override
client console settings that the user configures.
•
If you do not enable the features, the firewall settings you configure from the
OfficeScan server Web console display under Network card list on the client
console.
•
The information under Settings on the client console's Firewall tab always
reflects the settings configured from the client console, not from the server
Web console.
7-7
Trend Micro™ OfficeScan™ 10 Administrator’s Guide
4.
Under Exception, select the firewall policy exceptions. The policy exceptions
included here are based on the firewall exception template. See Editing the Firewall
Exception Template on page 7-9 for details.
•
Modify an existing policy exception by clicking the policy exception name and
changing the settings in the page that opens.
Note:
•
Click Add to create a new policy exception. Specify the settings in the page that
opens.
Note:
5.
The modified policy exception will only apply to the policy to be created. If
you want the policy exception modification to be permanent, you will need
to make the same modification to the policy exception in the firewall
exception template.
The policy exception will also apply only to the policy to be created. To
apply this policy exception to other policies, you need to add it first to the
list of policy exceptions in the firewall exception template.
Click Save.
To modify an existing policy:
P ATH : N ETWORKED C OMPUTERS > F IREWALL > P OLICIES > <P OLICY N AME >
1.
2.
7-8
Modify the following:
•
Policy name
•
Security level
•
Firewall features to use for the policy
•
Firewall policy exceptions to include in the policy
•
Edit an existing policy exception (click the policy exception name and
change settings in the page that opens)
•
Click Add to create a new policy exception. Specify the settings in the page
that opens.
Click Save to apply the modifications to the existing policy.
Using the OfficeScan Firewall
Editing the Firewall Exception Template
The firewall exception template contains policy exceptions that you can configure to
allow or block different kinds of network traffic based on the client computer's port
number(s) and IP address(es). After creating a policy exception, edit the policies to
which the policy exception applies.
Decide which type of policy exception you want to use. There are two types:
Restrictive
Blocks only specified types of network traffic and applies to policies that allow all
network traffic. An example use of a restrictive policy exception is to block client ports
vulnerable to attack, such as ports that Trojans often use.
Permissive
Allows only specified types of network traffic and applies to policies that block all
network traffic. For example, you may want to permit clients to access only the
OfficeScan server and a Web server. To do this, allow traffic from the trusted port (the
port used to communicate with the OfficeScan server) and the port the client uses for
HTTP communication.
Client listening port: Networked Computers > Client Management > Status. The port
number is under Basic Information.
Server listening port: Administration > Connection Settings. The port number is under
Connection Settings for Networked Computers.
OfficeScan comes with a set of default firewall policy exceptions, which you can modify
or delete.
TABLE 7-37.
Default firewall policy exceptions
E XCEPTION
N AME
A CTION
P ROTOCOL
P ORT
D IRECTION
DNS
Allow
TCP/UDP
53
Incoming and
outgoing
NetBIOS
Allow
TCP/UDP
137, 138,
139, 445
Incoming and
outgoing
7-9
Trend Micro™ OfficeScan™ 10 Administrator’s Guide
TABLE 7-37.
Default firewall policy exceptions (Continued)
E XCEPTION
N AME
A CTION
P ROTOCOL
P ORT
D IRECTION
HTTPS
Allow
TCP
443
Incoming and
outgoing
HTTP
Allow
TCP
80
Incoming and
outgoing
Telnet
Allow
TCP
23
Incoming and
outgoing
SMTP
Allow
TCP
25
Incoming and
outgoing
FTP
Allow
TCP
21
Incoming and
outgoing
POP3
Allow
TCP
110
Incoming and
outgoing
LDAP
Allow
TCP/UDP
389
Incoming and
outgoing
Note:
Default exceptions apply to all clients. If you want a default exception to apply only to
certain clients, edit the exception and specify the IP addresses of the clients.
The LDAP exception is not available if you upgrade from a previous OfficeScan
version. Manually add this exception if you do not see it on the exception list.
To add a policy exception:
P ATH : N ETWORKED C OMPUTERS > F IREWALL > P OLICIES > E DIT E XCEPTION TEMPLATE > A DD
7-10
1.
Type a name for the policy exception.
2.
Select the action OfficeScan will perform on network traffic (block or allow traffic
that meets the exception criteria) and the traffic direction (inbound or outbound
network traffic on the client computer).
Using the OfficeScan Firewall
3.
Select the type of network protocol: TCP, UDP, or ICMP.
4.
Specify ports on the client computer on which to perform the action.
5.
Select client computer IP addresses to include in the exception. For example, if you
select Deny all network traffic (Inbound and Outbound) and type the IP address
for a single computer on the network, then any client that has this exception in its
policy will not be able to send or receive data to or from that IP address.
6.
Click Save.
To edit a policy exception:
P ATH : N ETWORKED C OMPUTERS > F IREWALL > P OLICIES > E DIT E XCEPTION TEMPLATE >
<P OLICY E XCEPTION N AME >
1.
2.
Modify the following:
•
Policy exception name
•
Action OfficeScan will perform on network traffic and the traffic direction
•
Type of network protocol
•
Port numbers for the policy exception
•
Client computer IP addresses
Click Save.
To delete an entry:
P ATH : N ETWORKED C OMPUTERS > F IREWALL > P OLICIES > E DIT E XCEPTION TEMPLATE
1.
Select the check box(es) next to the exception(s) to delete.
2.
Click Delete.
To change the order of exceptions in the list:
P ATH : N ETWORKED C OMPUTERS > F IREWALL > P OLICIES > E DIT E XCEPTION TEMPLATE
1.
Select the check box next to the exception to move.
2.
Click Move up or Move down. The ID number of the exception changes to reflect
the new position.
To save the exception list settings:
P ATH : N ETWORKED C OMPUTERS > F IREWALL > P OLICIES > E DIT E XCEPTION TEMPLATE
Click one of the following save options:
7-11
Trend Micro™ OfficeScan™ 10 Administrator’s Guide
•
Save Template Changes: Saves the exception template with the current policy
exceptions and settings. This option only applies the template to policies created in
the future, not existing policies.
•
Save and Apply to Existing Policies: Saves the exception template with the
current policy exceptions and settings. This option applies the template to existing
and future policies.
Firewall Profiles
Firewall profiles provide flexibility by allowing you to choose the attributes that a client
or group of clients must have before applying a policy. Profiles include the following:
•
Associated policy: Each profile uses a single policy
•
Client attributes: Clients with one or more of the following attributes apply the
associated policy:
•
IP address: A client that has a specific IP address, an IP address that falls
within a range of IP addresses, or an IP address belonging to a specified subnet
•
Domain: A client that belongs to a certain OfficeScan domain
•
Computer: A client with a specific computer name
•
Platform: A client running a specific platform
•
Logon name: Client computers to which specified users have logged on
•
Client connection status: If a client is online or offline
Note:
•
User privileges: Allow or prevent client users from doing the following:
•
Changing the security level specified in a policy
•
Editing the exception list associated with a policy
Note:
7-12
A client is online if it can connect to the OfficeScan server or any of the
reference servers, and offline if it cannot connect to any server.
These privileges apply only to clients that match the attributes specified in the
profile. You can assign other firewall privileges to selected client users. See
Firewall Privileges on page 7-16 for details.
Using the OfficeScan Firewall
OfficeScan comes with a default profile named "All clients profile", which uses the "All
access" policy. You can modify or delete this default profile. You can also create new
profiles. All default and user-created firewall profiles, including the policy associated to
each profile and the current profile status, display on the firewall profile list on the Web
console. Manage the profile list and deploy all profiles to OfficeScan clients. OfficeScan
clients store all the firewall profiles to the client computer.
To configure the firewall profile list:
P ATH : N ETWORKED C OMPUTERS > F IREWALL > P ROFILES
1.
To add a new profile, click Add. To edit an existing profile, select the profile name.
A profile configuration screen appears. See Adding and Editing a Firewall Profile on
page 7-14 for more information.
2.
To delete an existing policy, select the check box next to the policy and click Delete.
3.
To change the order of profiles in the list, select the check box next to the profile to
move, and then click Move Up or Move Down.
OfficeScan applies firewall profiles to clients in the order in which the profiles
appear in the profile list. For example, if a client matches the first profile,
OfficeScan applies the actions configured for that profile to the client. OfficeScan
ignores the other profiles configured for that client.
Tip:
4.
The more exclusive a policy, the better it is at the top of the list. For example,
move a policy you create for a single client to the top, followed by those for a
range of clients, a network domain, and all clients.
To manage reference servers, click Edit Reference Server List.
Reference servers are computers that act as substitutes for the OfficeScan server
when it applies firewall profiles. A reference server can be any computer on the
network. OfficeScan makes the following assumptions when you enable reference
servers:
•
Clients connected to reference servers are online, even if the clients cannot
communicate with the OfficeScan server.
•
Firewall profiles applied to online clients also apply to clients connected to
reference servers.
See Reference Servers on page 8-14 for more information.
7-13
Trend Micro™ OfficeScan™ 10 Administrator’s Guide
5.
6.
To save the current settings and assign the profiles to clients:
a.
Select whether to Overwrite client security level/exception list. This option
overwrites all user-configured firewall settings.
b.
Click Assign Profile to Clients. OfficeScan assigns all profiles on the profile
list to all the clients.
c.
To save the current settings, click Save Profile List Changes.
To verify that you successfully assigned profiles to clients:
a.
Go to Networked Computers > Client Management. From the client tree
view drop-down box, select Firewall view.
b.
Ensure that a green check mark exists under the Firewall column in the client
tree. If the policy associated with the profile enables the Intrusion Detection
System, a green check mark also exists under the IDS column.
c.
Verify if the client applied the correct firewall policy. The policy appears under
the Firewall Policy column in the client tree.
Adding and Editing a Firewall Profile
Client computers may require different levels of protection. Firewall profiles allow you
to specify the client computers to which an associated policy applies, and grant client
users privileges to modify firewall settings. Generally, one profile is necessary for each
policy in use.
To add a profile:
P ATH : N ETWORKED C OMPUTERS > F IREWALL > P ROFILES > A DD
7-14
1.
Click Enable this profile to allow OfficeScan to deploy the profile to OfficeScan
clients.
2.
Type a name to identify the profile and an optional description.
3.
Select a policy for this profile.
4.
Specify the client computers to which OfficeScan applies the policy. Select
computers based on the following criteria:
•
IP address
•
Domain: Click the button to open, and select domains from, the client tree.
Using the OfficeScan Firewall
•
Computer name: Click the button to open, and select client computers from,
the client tree.
•
Platform
•
Logon name
•
Client connection status
5.
Select whether to grant users the privilege to change the firewall security level or
edit a configurable list of exceptions to allow specified types of traffic. See Adding
and Modifying a Firewall Policy on page 7-7 for more information about these options.
6.
Click Save.
To edit a profile:
P ATH : N ETWORKED C OMPUTERS > F IREWALL > P ROFILES > <P ROFILE N AME >
1.
Click Enable this profile to allow OfficeScan to deploy this profile to OfficeScan
clients.
Modify the following:
•
Profile name and description
•
Policy assigned to the profile
•
Client computers, based on the following criteria:
•
2.
•
IP address
•
Domain: Click the button to open the client tree and select domains from
there.
•
Computer name: Click the button to open the client tree and select client
computers from there.
•
Platform
•
Logon name
•
Client connection status
Privileges: Select whether to grant users the privilege to change the firewall
security level or edit a configurable list of exceptions to allow specified types of
traffic. See Adding and Modifying a Firewall Policy on page 7-7 for more
information about these options.
Click Save.
7-15
Trend Micro™ OfficeScan™ 10 Administrator’s Guide
Firewall Privileges
Grant users the following privileges:
•
View the Firewall tab on the client console
•
Enable or disable the OfficeScan firewall and firewall features
•
Allow the client to send firewall logs to the server
See OfficeScan Firewall Privileges on page 9-10 for details about these privileges.
Firewall Violation Notifications for Client Users
OfficeScan can display a notification message on a client computer immediately after the
OfficeScan firewall blocks outbound traffic that violated firewall policies. Grant users
the privilege to enable the notification message or enable the notification when you
configure a particular firewall policy. Optionally modify the content of the notification
message.
To configure a firewall policy, see Adding and Modifying a Firewall Policy on page 7-7.
To grant users the privilege to enable the notification message:
P ATH : N ETWORKED C OMPUTERS > C LIENT M ANAGEMENT > P RIVILEGES
> P RIVILEGES TAB
O THER S ETTINGS
1.
Under Firewall Settings, select to enable the OfficeScan firewall, the Intrusion
Detection System, and the firewall violation notification message.
2.
If you selected domain(s) or client(s) on the client tree, click Save to apply settings
to the domain(s) or client(s). If you selected the root icon
following options:
7-16
AND
, choose from the
•
Apply to All Clients: Applies settings to all existing clients and to any new
client added to an existing/future domain. Future domains are domains not yet
created at the time you configure the settings.
•
Apply to Future Domains Only: Applies settings only to clients added to
future domains. This option will not apply settings to new clients added to an
existing domain.
Using the OfficeScan Firewall
To modify the content of the notification message:
P ATH : N OTIFICATIONS > C LIENT U SER N OTIFICATIONS
1.
Click the Firewall Violations tab.
2.
Modify the default messages in the text box provided.
3.
Click Save.
Firewall Logs
Firewall logs available on the server are sent by clients with the privilege to send firewall
logs. Grant specific clients this privilege to monitor and analyze traffic on the client
computers that the OfficeScan firewall is blocking.
For information about firewall privileges, see OfficeScan Firewall Privileges on page 9-10.
To keep the size of logs from occupying too much space on the hard disk, manually
delete logs or configure a log deletion schedule. For more information about managing
logs, see Managing Logs on page 8-16.
To view firewall logs:
P ATH : L OGS > N ETWORKED C OMPUTER L OGS > S ECURITY R ISKS > V IEW L OGS > F IREWALL
L OGS
N ETWORKED C OMPUTERS > C LIENT M ANAGEMENT > L OGS > F IREWALL L OGS
1.
To ensure that the most up-to-date logs are available to you, click Notify Clients.
Allow some time for clients to send firewall logs before proceeding to the next step.
2.
Specify log criteria and click Display Logs.
3.
View logs. Logs contain the following information:
•
Date and time of firewall violation detection
•
Computer where firewall violation occurred
•
Remote host IP address
•
Local host IP address
•
Protocol
•
Port number
7-17
Trend Micro™ OfficeScan™ 10 Administrator’s Guide
4.
•
Description: Specifies the actual security risk (such as a network virus or IDS
attack) or the firewall policy violation
•
Direction: If inbound (Receive) or outbound (Send) traffic violated a firewall
policy
•
Process: The executable program or service running on the computer that
caused the firewall violation
To save the log to a comma-separated value (CSV) file, click Export to CSV. Open
the file or save it to a specific location. A CSV file usually opens with a spreadsheet
application such as Microsoft Excel.
Testing the OfficeScan Firewall
To help ensure that the OfficeScan firewall works properly, perform a test on a client or
group of clients.
WARNING! Test OfficeScan client program settings in a controlled environment only.
Do not perform tests on client computers connected to the network or to
the Internet. Doing so may expose client computers to viruses, hacker
attacks, and other risks.
To test the firewall:
1.
7-18
Create and save a test policy. Configure the settings to block the types of traffic you
want to test. For example, to prevent the client from accessing the Internet, do the
following:
a.
Set the security level to Low (allow all inbound/outbound traffic).
b.
Select Enable firewall and Notify users when a firewall violation occurs.
c.
Create an exception that blocks HTTP (or HTTPS) traffic.
2.
Create and save a test profile, selecting the clients to which you will test firewall
features. Associate the test policy with the test profile.
3.
Click Assign Profile to Clients.
4.
Verify the deployment.
a.
Click Networked Computers > Client Management.
b.
Select the domain to which a client belongs.
Using the OfficeScan Firewall
c.
Select Firewall view from the client tree view.
d. Check if there is a green check mark under the Firewall column of the client
tree. If you enabled the Intrusion Detection System for that client, check that a
green check mark also exists in the IDS column.
e.
Verify if the client applies the correct firewall policy. The policy appears under
the Firewall Policy column in the client tree.
5.
Test the firewall on the client computer by attempting to send or receive the type of
traffic you configured in the policy.
6.
To test a policy configured to prevent the client from accessing the Internet, open a
Web browser on the client computer. If you configured OfficeScan to display a
notification message for firewall violations, the message displays on the client
computer when an outbound traffic violation occurs.
Disabling the OfficeScan Firewall
You can disable the OfficeScan firewall on all or selected client computers.
To disable the OfficeScan firewall on selected computers:
Method A: Create a new policy and apply it to clients.
1.
Create a new policy that does not enable the firewall. For steps in creating a new
policy, see Adding and Modifying a Firewall Policy on page 7-7.
2.
Apply the policy to the clients.
Method B: Disable the firewall driver and service
1.
2.
Disable the firewall driver.
a.
Open Windows Network Connection Properties.
b.
Clear the Trend Micro Common Firewall Driver check box from the
network card.
Disable the firewall service.
a.
Open a command prompt and type services.msc.
b.
Disable OfficeScan NT Firewall from Microsoft Management Console
(MMC).
7-19
Trend Micro™ OfficeScan™ 10 Administrator’s Guide
To disable the OfficeScan firewall on all client computers:
7-20
1.
On the Web console, go to Administration > Product License > Additional
Services section.
2.
On the Firewall for networked computers row, click Disable.
Section 2
Managing the OfficeScan
Server and Clients
Trend Micro™ OfficeScan™ 10 Administrator’s Guide
Chapter 8
Managing the OfficeScan Server
Topics in this chapter:
• Role-based Administration on page 8-2
•
Trend Micro Control Manager on page 8-10
•
Reference Servers on page 8-14
•
System Event Logs on page 8-15
•
Managing Logs on page 8-16
•
Licenses on page 8-19
•
OfficeScan Database Backup on page 8-21
•
OfficeScan Web Server Information on page 8-23
•
Web Console Password on page 8-23
•
Quarantine Manager on page 8-24
•
Server Tuner on page 8-25
•
The World Virus Tracking Program on page 8-28
8-1
Trend Micro™ OfficeScan™ 10 Administrator’s Guide
Role-based Administration
Use the role-based administration feature to grant and control access to OfficeScan Web
console menu and submenu items. If there are multiple OfficeScan administrators in
your organization, this feature helps you delegate server management tasks to the
administrators and manage the menu items accessible to each administrator. In addition,
you can grant non-administrators "view only" access to the Web console.
Role-based administration involves the following tasks:
1.
Define user roles.
2.
Configure user accounts and assign a particular role to each user.
View Web console activities for all users from the system event logs. The following
activities are logged:
•
Logging on to the console
•
Password modification
•
Logging off from the console
•
Session timeout (user automatically gets logged off)
User Roles
A user role determines the Web console menu items accessible to a user. OfficeScan
comes with a set of built-in user roles that you cannot modify or delete. Add custom
roles if none of the built-in roles meet your requirement. Configure each custom role to
have "view" or "configure" access to specific Web console menu items and sub-items.
All built-in and custom roles display on the User Roles list on the Web console.
Note:
Access to specific OfficeScan domains on the client tree cannot be controlled for
each role. If the client tree is visible, all domains display.
The built-in roles are as follows:
Administrator
Users with the Administrator role can configure all menu items. Delegate this role to
other OfficeScan administrators or users with sufficient knowledge of OfficeScan.
8-2
Managing the OfficeScan Server
Power User
Delegate this role to administrators with specific administrative tasks on the Web
console.
1.
Users with the Power User role can configure the following menu items and
sub-items:
Networked Computers > Client Installation
This menu item provides users with two methods of installing the OfficeScan client.
For details, see Installing from the OfficeScan Web Console on page 3-27 and Initiating
Browser-based Installation on page 3-15.
Networked Computers > Firewall
This menu item allows users to manage firewall policies and profiles. For details, see
Firewall Policies and Profiles on page 7-4.
Logs
This menu item allows users to view and manage logs. For details, see Managing Logs
on page 8-16.
Scan Now (located on top of the main menu)
This menu items allows users to initiate Manual Scan on target computers. For
details, see Initiating Scan Now on page 5-24.
Client tree settings
Whenever the client tree displays, all settings visible to the user can be configured.
For details, see Client Tree Specific Tasks on page 2-13.
2.
3.
Users have no access to the following menu items:
•
Plug-in Manager
•
Administration > User Roles
•
Administration > User Accounts
Users have view access to all the other menu items.
8-3
Trend Micro™ OfficeScan™ 10 Administrator’s Guide
Guest User
Delegate this role to users who want to view the Web console for reference purposes.
1.
2.
Users with the Guest User role have no access to the following menu items:
•
Plug-in Manager
•
Administration > User Roles
•
Administration > User Accounts
Users have view access to all other menu items.
To configure the User Roles list:
P ATH : A DMINISTRATION > U SER R OLES
1.
To add a custom role, click Add. If a role you want to add has similar settings with
an existing custom role, select the role and click Copy.
To modify a custom role, click the role name.
A role configuration screen appears. See Adding and Modifying a Custom Role on page
8-5 for more information.
2.
To delete a custom role, select the check box next to the role and click Delete.
3.
To save custom roles to a .dat file, select the custom roles and click Export. If you
are managing another OfficeScan server, use the .dat file to import custom roles to
that server.
4.
If you have saved custom roles from a different OfficeScan server and want to
import those roles into the current OfficeScan server, click Import and locate the
.dat file containing the custom roles.
Note:
8-4
A role on the User Roles screen will be overwritten if you import a role with the
same name.
Managing the OfficeScan Server
Adding and Modifying a Custom Role
To add a custom role:
P ATH : A DMINISTRATION > U SER R OLES > A DD
A DMINISTRATION > U SER R OLES > C OPY
1.
Type a name for the role and optionally provide a description.
2.
On the Available Menu Items list, the Web console main menu and submenu items
display. Configure the role to have "view" or "configure" access to one or several
menu items.
Note:
If you select the check box under Configure, the check box under View is
automatically selected.
Only users with the built-in administrator role and those using the root account
created during OfficeScan installation can configure roles and accounts.
Custom roles can have "configure" access to Plug-in Manager or no access at all.
This is because Plug-in Manager is an independent program and OfficeScan does
not control its functions.
3.
Click Save. The new role displays on the User Roles list.
To modify a custom role:
P ATH : A DMINISTRATION > U SER R OLES > <R OLE N AME >
1.
2.
Modify the following:
•
Description
•
Accessible menu items
Click Save.
8-5
Trend Micro™ OfficeScan™ 10 Administrator’s Guide
User Accounts
Set up user accounts and assign a particular role to each user. The user role determines
the Web console menu items a user can view or configure.
During OfficeScan server installation, Setup automatically creates a built-in account
called "root". Users who log on using the root account can access all menu items. You
cannot delete the root account but you can modify account details, such as the password
and display name. If you forget the root account password, contact your support
provider for help in resetting the password.
Add custom accounts or Active Directory accounts. All user accounts display on the
User Accounts list on the Web console.
OfficeScan user accounts can be used to perform "single sign-on". Single sign-on allows
users to access the OfficeScan Web console from the Trend Micro Control Manager
console. For details, see the procedure below.
To configure the User Accounts list:
P ATH : A DMINISTRATION > U SER A CCOUNTS
1.
To add a custom or Active Directory account, click Add. To modify a custom
account, click the account name.
An account configuration screen appears. See Adding and Modifying a User Account on
page 8-7 for more information.
2.
To add one or several Active Directory accounts, click Add from Active
Directory. See Adding One or Several Active Directory Accounts on page 8-9 for more
information.
3.
To modify the role for one or several accounts, select the accounts and click
Change Role. On the screen that displays, select the new role and click Save.
4.
To enable or disable an account, click the icon under Enable.
Note:
5.
8-6
The root account cannot be disabled.
To delete an account, select the account and click Delete.
Managing the OfficeScan Server
To use OfficeScan user accounts in Control Manager:
Refer to the Control Manager documentation for the detailed steps.
1.
Create a new user account in Control Manager. When specifying the user name,
type the account name that appears on the OfficeScan Web console.
2.
Assign the new account "access" and "configure" rights to the OfficeScan server.
Note:
If a Control Manager user has "access" and "configure" rights to OfficeScan but
does not have an OfficeScan account, the user cannot access OfficeScan. The
user sees a message with a link that opens the OfficeScan Web console’s logon
screen.
Users who log on using Control Manager’s root account can access OfficeScan
even without an OfficeScan account.
Adding and Modifying a User Account
Assign Web console access privileges to users by adding their Active Directory accounts
to the User Accounts list.
To add a custom or Active Directory account:
P ATH : A DMINISTRATION > U SER A CCOUNTS > A DD
1.
Click Enable this account to allow users to use the account.
Note:
If you disable the account while the user is logged on, the account will be
disabled after the user logs out.
8-7
Trend Micro™ OfficeScan™ 10 Administrator’s Guide
2.
Select whether to add a custom account or an Active Directory account.
•
For custom account, type the user name, full name, and password (which you
need to confirm). Optionally type an email address for the account.
Note:
•
The email address is only used as reference. The owner of the email
account does not get an email notifying him or her of the account you
created.
For Active Directory account, specify the account name (user name or group),
and the domain to which the account belongs.
Include the complete account and domain names. OfficeScan will not return a
result if the account and domain names are incomplete.
All members belonging to a group get the same role. If a particular account
belongs to at least two groups and the role for both groups are different:
•
The permissions for both roles are merged. If a user configures a particular
setting and there is a conflict between permissions for the setting, the
higher permission applies.
•
All user roles display in the System Event logs. For example, "User
JohnDoe logged on with the following roles: Administrator, Power User".
3.
Select a role for the account.
4.
Click Save.
5.
If you added a custom account, send the account details to the user. If you added an
Active Directory account, inform the user to log on to the Web console using his or
her domain name and password.
6.
If the user’s computer runs Windows 2000, inform the user to install the following:
•
Microsoft patch KB890859
•
Microsoft patch KB924270
•
Windows 2000 Authorization Manager Runtime
Note:
8-8
Authorization Manager Runtime only supports English, French, German,
and Japanese language versions.
Managing the OfficeScan Server
To modify a custom account:
P ATH : A DMINISTRATION > U SER A CCOUNTS > <U SER N AME >
1.
Enable or disable the account using the check box provided.
Note:
2.
3.
Active Directory group accounts cannot be disabled. If you do not want users on
the group to access the Web console, delete the group from the user accounts
list.
Modify the following:
•
Full name
•
Password
•
Email address
•
Role
Click Save.
Adding One or Several Active Directory Accounts
To add one or several Active Directory accounts:
P ATH : A DMINISTRATION > U SER A CCOUNTS > A DD F ROM A CTIVE D IRECTORY
1.
Search for an account (user name or group) by specifying the user name and
domain to which the account belongs.
Use the wildcard character (*) to search for multiple accounts. If you do not specify
the wildcard character, include the complete account name. OfficeScan will not
return a result if the account name is incomplete.
2.
When OfficeScan finds a valid account, it displays the account name under User
and Groups. Click the forward icon (>) to move the account under Selected
Users and Groups.
8-9
Trend Micro™ OfficeScan™ 10 Administrator’s Guide
If you specify an Active Directory group, all members belonging to a group get the
same role. If a particular account belongs to at least two groups and the role for
both groups are different:
•
The permissions for both roles are merged. If a user configures a particular
setting and there is a conflict between permissions for the setting, the higher
permission applies.
•
All user roles display in the System Event logs. For example, "User JohnDoe
logged on with the following roles: Administrator, Power User".
3.
Select a role for the account.
4.
Click Save.
5.
Inform users to log on to the Web console using their respective domain names
and passwords.
6.
If the user’s computer runs Windows 2000, inform the user to install the following:
•
Microsoft patch KB890859
•
Microsoft patch KB924270
•
Windows 2000 Authorization Manager Runtime
Note:
Authorization Manager Runtime only supports English, French, German,
and Japanese language versions.
Trend Micro Control Manager
Trend Micro Control Manager™ is a central management console that manages Trend
Micro products and services, third-party antivirus and content security products at the
gateway, mail server, file server, and corporate desktop levels. The Control Manager
Web-based management console provides a single monitoring point for managed
products and services throughout the network.
8-10
Managing the OfficeScan Server
Control Manager allows system administrators to monitor and report on activities such
as infections, security violations, or virus entry points. System administrators can
download and deploy components throughout the network, helping ensure that
protection is consistent and up-to-date. Control Manager allows both manual and
pre-scheduled updates, and the configuration and administration of products as groups
or as individuals for added flexibility.
Supported Control Manager versions
This OfficeScan version supports Control Manager 5.0 and 3.5. Apply the latest patches
and critical hot fixes for these Control Manager versions to enable Control Manager to
manage OfficeScan. To obtain the latest patches and hot fixes, contact your support
provider or visit the Trend Micro Update Center at:
http://www.trendmicro.com/download
After installing OfficeScan, register it to Control Manager and then configure settings
for OfficeScan on the Control Manager management console. See the Control Manager
documentation for information on managing OfficeScan servers.
Control Manager integration in this OfficeScan release
This OfficeScan release includes the following features and capabilities when managing
OfficeScan servers from Control Manager:
•
•
The following information are available on the Control Manager console:
•
Behavior Monitoring Components and version information
•
Scan method (conventional or smart scan) used by clients
•
Client connection status with Smart Scan Servers
•
Smart Scan Server address (in URL format)
•
Smart Scan Agent Pattern information
The Smart Scan Agent Pattern can be updated from the Control Manager console.
8-11
Trend Micro™ OfficeScan™ 10 Administrator’s Guide
•
Replicate the following settings from one OfficeScan server to another from the
Control Manager console:
•
Scan settings for all scan types (Real-time Scan, Manual Scan, Scheduled Scan,
and Scan Now)
•
Client Privileges and Other Settings
•
Web Reputation Policies
•
Firewall Policies
•
Firewall Profiles
Note:
If these settings are replicated to an OfficeScan server where a particular service
license has not been activated, the settings will only take effect when the license
is activated. For example, if the Web Reputation and Anti-spyware license is not
activated, Web Reputation policies will be replicated to the OfficeScan server but
will only take effect upon the activation of the license.
To register OfficeScan to Control Manager:
P ATH : A DMINISTRATION > C ONTROL M ANAGER S ETTINGS
1.
Specify the entity display name, which is the name of the OfficeScan server that will
display in Control Manager. By default, entity display name includes the server
computer's host name and this product’s name (for example, Server01_OSCE).
Note:
8-12
In Control Manager, OfficeScan servers and other products managed by Control
Manager are referred to as "entities".
2.
Specify the Control Manager server FQDN or IP address and the port number to
use to connect to this server. Optionally connect with increased security using
HTTPS.
3.
If the IIS Web server of Control Manager requires authentication, type the user
name and password.
Managing the OfficeScan Server
4.
If you will use a proxy server to connect to the Control Manager server, specify the
following proxy settings:
•
Proxy protocol
•
Server FQDN or IP address and port
•
Proxy server authentication user ID and password
5.
Decide whether to use one-way communication or two-way communication port
forwarding, and then specify the IP address and port.
6.
To check whether OfficeScan can connect to the Control Manager server based on
the settings you specified, click Test Connection. Click Register if connection was
successfully established.
7.
If you change any of the settings on this screen after registration, click Update
Settings after changing the settings to notify the Control Manager server of the
changes.
8.
If you no longer want the Control Manager server to manage OfficeScan, click
Unregister.
To check the OfficeScan status on the Control Manager management console:
1.
Open the Control Manager management console.
To open the Control Manager console, on any computer on the network, open a
Web browser and type the following:
For Control Manager 3.5:
https://<Control Manager server name>/ControlManager
For Control Manager 5.0:
https://<Control Manager server name>/Webapp/login.aspx
Where <Control Manager server name> is the IP address or host name of the
Control Manager server
2.
In Main Menu, click Products.
3.
Select Managed Products from the list.
4.
Check if the OfficeScan server icon displays.
8-13
Trend Micro™ OfficeScan™ 10 Administrator’s Guide
Reference Servers
One of the ways the OfficeScan client determines which of the firewall profiles or Web
Reputation Policies to use is by checking its connection status with the OfficeScan
server. If an internal client (or a client within the corporate network) cannot connect to
the server, the client status becomes offline. The client then applies a firewall profile or
Web reputation policy intended for external clients. Reference servers address this issue.
A client that loses connection with the OfficeScan server will try connecting to
reference servers. If the client successfully establishes connection with a reference
server, it applies the firewall profile or Web reputation policy for internal clients.
Take note of the following:
•
Assign computers with server capabilities, such as a Web server, SQL server, or FTP
server, as reference servers. You can specify a maximum of 32 reference servers.
•
Clients connect to the first reference server on the reference server list. If
connection cannot be established, the client tries connecting to the next server on
the list.
•
OfficeScan clients only use reference servers when determining the firewall profile
or the Web reputation policy to use. Reference servers do not manage clients or
deploy updates and client settings. The OfficeScan server performs these tasks.
•
A client cannot send logs to reference servers or use them as update sources
To manage the reference server list:
P ATH : N ETWORKED C OMPUTERS > F IREWALL > P ROFILES > E DIT R EFERENCE S ERVER L IST
N ETWORKED C OMPUTERS > C OMPUTER L OCATION > E DIT R EFERENCE S ERVER L IST
1.
Select Enable the Reference Server list.
2.
To add a computer to the list, click Add.
a.
8-14
Specify the computer's IP address, name, or fully qualified domain name
(FQDN), such as:
•
computer.networkname
•
12.10.10.10
•
mycomputer.domain.com
Managing the OfficeScan Server
b.
Type the port through which clients communicate with this computer. Specify
any open contact port (such as ports 20, 23 or 80) on the reference server.
Note:
c.
To specify another port number for the same reference server, repeat steps
2a and 2b. The client uses the first port number on the list and, if
connection is unsuccessful, uses the next port number.
Click Save.
3.
To edit the settings of a computer on the list, click the computer name. Modify the
computer name or port, and then click Save.
4.
To remove a computer from the list, select the computer name and then click
Delete.
5.
To enable the computers to act as reference servers, click Assign to Clients.
System Event Logs
OfficeScan records events related to the server program, such as shutdown and startup.
Use these logs to verify that the OfficeScan server and services work properly.
To keep the size of logs from occupying too much space on the hard disk, manually
delete logs or configure a log deletion schedule. For more information about managing
logs, see Managing Logs on page 8-16.
To view system event logs:
P ATH : L OGS > S YSTEM E VENT L OGS
1.
Under Event Description, check for logs that need further action. OfficeScan logs
the following events:
OfficeScan Master Service and Database Server:
•
Master Service started
•
Master Service stopped successfully
•
Master Service stopped unsuccessfully
8-15
Trend Micro™ OfficeScan™ 10 Administrator’s Guide
Outbreak Prevention:
•
Outbreak Prevention enabled
•
Outbreak Prevention disabled
•
Number of shared folder sessions in the last <number of minutes>
Database backup:
•
Database backup successful
•
Database backup unsuccessful
Role-based Web console access:
2.
•
Logging on to the console
•
Password modification
•
Logging off from the console
•
Session timeout (user automatically gets logged off)
To save the log to a comma-separated value (CSV) file, click Export to CSV. Open
the file or save it to a specific location. A CSV file usually opens with a spreadsheet
application such as Microsoft Excel.
Managing Logs
OfficeScan keeps comprehensive logs about security risk detections, events, and
updates. Use these logs to assess your organization's protection policies and to identify
clients at a higher risk of infection or attack. Also use these logs to check client-server
connection and verify if component update was successful.
OfficeScan generates the following logs:
Security Risk Logs
OfficeScan generates logs when it detects virus/malware and spyware/grayware, and
when it restores spyware/grayware. For more information about security risk logs, see
the following topics:
8-16
•
Virus/Malware Logs on page 5-48
•
Spyware/Grayware Logs on page 5-54
•
Spyware/Grayware Restore Logs on page 5-56
Managing the OfficeScan Server
Firewall Logs
OfficeScan generates logs when it detects violations to firewall policies. For details, see
Firewall Logs on page 7-17.
Web Reputation Logs
OfficeScan generates logs when it blocks known or potentially malicious Web sites. For
details, see Web Reputation Logs on page 6-7.
Connection Verification Logs
OfficeScan generates connection verification logs to allow you to determine whether or
not the OfficeScan server can communicate with all of its registered clients. For details,
see Connection Verification Logs on page 9-38.
Component Update Logs
OfficeScan generates logs when the server and client perform component updates. View
the logs to verify that OfficeScan successfully downloaded the components required to
keep protection current. For more information about update logs, see the following
topics:
•
Server Update Logs on page 4-20
•
Client Update Logs on page 4-35
Device Control Logs
OfficeScan generates logs when the client detects unauthorized access to devices
connected to the client computer. Clients then send the logs to the server once per day.
For details, see Device Control Logs on page 5-67.
System Events Logs
OfficeScan generates system update logs to keep you informed about events that keep
the OfficeScan server functioning properly, such as database backup and master service
restart. For details, see System Event Logs on page 8-15.
8-17
Trend Micro™ OfficeScan™ 10 Administrator’s Guide
Debug Logs
Use debug logs to troubleshoot problems with the OfficeScan server and client. For
more information about debug logs, see the following topics:
•
OfficeScan Server Logs on page 12-2
•
OfficeScan Client Logs on page 12-9
Log Maintenance
To keep the size of logs from occupying too much space on the hard disk, manually
delete logs or configure a log deletion schedule from the Web console.
Note:
For debug logs, disable debug logging to stop collecting logs.
To delete logs based on a schedule:
P ATH : L OGS > L OG M AINTENANCE
1.
Select Enable scheduled deletion of logs.
2.
Select the log types to delete.
3.
Select whether to delete logs for all the selected log types or only logs older than a
certain number of days.
4.
Specify the log deletion frequency and time.
5.
Click Save.
To manually delete logs:
P ATH : L OGS > N ETWORKED C OMPUTER L OGS > S ECURITY R ISKS > D ELETE L OGS
N ETWORKED C OMPUTERS > C LIENT M ANAGEMENT > L OGS > D ELETE L OGS
8-18
1.
Select the log types to delete.
2.
Select whether to delete logs for all the selected log types or only logs older than a
certain number of days.
3.
Click Delete.
Managing the OfficeScan Server
Licenses
View, activate, and renew OfficeScan product service licenses on the Web console, and
enable/disable the OfficeScan firewall. The OfficeScan firewall is part of the Antivirus
service, which also includes support for Cisco NAC and outbreak prevention.
Note:
You can enable the OfficeScan firewall during installation. If you disable firewall,
OfficeScan hides all firewall features on the server and client.
Log off and then log on again to the Web console during the following instances:
•
After activating a license for the following product services:
•
Antivirus
•
Web Reputation and Anti-spyware
Note:
•
Re-logon is required to enable the full functionality of the service.
After enabling or disabling the OfficeScan firewall
To view license information:
P ATH : A DMINISTRATION > P RODUCT L ICENSE
A DMINISTRATION > P RODUCT L ICENSE > P RODUCT L ICENSE D ETAILS
A DMINISTRATION > P RODUCT L ICENSE > P RODUCT L ICENSE D ETAILS > P RODUCT
L ICENSE N EW A CTIVATION C ODE
1.
View license status summary, which appears on top of the screen.
Reminders about licenses display during the following instances:
If you have a full version license
•
During the product’s grace period. The duration of the grace period may vary
by region. Please verify the grace period with your Trend Micro representative.
•
When the license expires and grace period elapses. During this time, you will
not be able to obtain technical support or perform component updates. The
scan engines will still scan computers but will use out-of-date components.
These out-of-date components may not be able to protect you completely from
the latest security risks.
8-19
Trend Micro™ OfficeScan™ 10 Administrator’s Guide
If you have an evaluation version license
•
2.
When the license expires. During this time, OfficeScan disables component
updates, scanning, and all client features.
View license information. The License Information section provides you the
following information:
•
Services: Includes all the OfficeScan product services
•
Status: Displays either "Activated", "Not Activated" or "Expired". If a product
service has multiple licenses and at least one license is still active, the status that
displays is "Activated".
•
Version: Displays either "Full" or "Evaluation" version. If you have both full
and evaluation versions, the version that displays is "Full".
•
Expiration Date: If a product service has multiple licenses, the latest
expiration date displays. For example, if the license expiration dates are
12/31/2007 and 06/30/2008, 06/30/2008 displays.
Note:
3.
The version and expiration date of product services that have not been
activated are "N/A".
OfficeScan allows you to activate multiple licenses for a product service. Click the
product service name to view all the licenses (both active and expired) for that
service.
To activate or renew a license:
P ATH : A DMINISTRATION > P RODUCT L ICENSE
A DMINISTRATION > P RODUCT L ICENSE > P RODUCT L ICENSE D ETAILS
A DMINISTRATION > P RODUCT L ICENSE > P RODUCT L ICENSE D ETAILS > P RODUCT
L ICENSE N EW A CTIVATION C ODE
8-20
1.
Click the name of the product service.
2.
In the Product License Details screen that opens, click New Activation Code.
Managing the OfficeScan Server
3.
In the screen that opens, type the Activation Code and click Save.
Note:
4.
Register a service before activating it. Contact your Trend Micro representative
for more information about the Registration Key and Activation Code.
Back in the Product License Details screen, click Update Information to refresh
the screen with the new license details and the status of the service. This screen also
provides a link to the Trend Micro Web site where you can view detailed
information about your license.
OfficeScan Database Backup
The OfficeScan server database contains all OfficeScan settings, including scan settings
and privileges. If the server database becomes corrupted, you can restore it if you have a
backup. Back up the database manually at any time or configure a backup schedule.
When backing up the database, OfficeScan automatically helps defragment the database
and repairs any possible corruption to the index file.
Check the system event logs to determine the backup status. For more information, see
System Event Logs on page 8-15.
Tip: Trend Micro recommends configuring a schedule for automatic backup. Back up the
database during non-peak hours when server traffic is low.
WARNING! Do not perform the backup with any other tool or software. Configure
database backup from the OfficeScan Web console only.
8-21
Trend Micro™ OfficeScan™ 10 Administrator’s Guide
To back up the OfficeScan database:
P ATH : A DMINISTRATION > D ATABASE B ACKUP
1.
Type the location where you want to save the database. If the folder does not exist
yet, select Create folder if not already present. Include the drive and full
directory path, such as C:\OfficeScan\DatabaseBackup. By default, OfficeScan
saves the backup in the following directory: <Server installation
folder>\DBBackup
OfficeScan creates a subfolder under the backup path. The folder name indicates
the time of the backup and is in the following format: YYYYMMDD_HHMMSS.
OfficeScan preserves the 7 most recent backup folders, automatically deleting older
folder(s).
2.
If the backup path is on a remote computer (using a UNC path), type an
appropriate account name and the corresponding password. Ensure that the
account has write privileges on the computer.
3.
To configure a backup schedule:
a.
Select Enable scheduled database backup.
b.
Specify the backup frequency and time.
c.
To back up the database and save the changes you made, click Back Up Now.
To save only without backing up the database, click Save.
To restore the database backup files:
8-22
1.
Stop the OfficeScan Master Service.
2.
Overwrite the database files in <Server installation folder>\PCCSRV\HTTPDB
with the backup files.
3.
Restart the OfficeScan Master Service.
Managing the OfficeScan Server
OfficeScan Web Server Information
During OfficeScan server installation, Setup automatically sets up a Web server (IIS or
Apache Web server) that enables networked computers to connect to the OfficeScan
server. Configure the Web server to which networked computer clients will connect.
If you modify the Web server settings externally (for example, from the IIS management
console), replicate the changes in OfficeScan to ensure it maintains server-client
communication and to allow access to the Web console. For example, if you change the
IP address of the server for networked computers manually or if you assign a dynamic
IP address to it, you need to reconfigure the server settings of OfficeScan.
To configure connection settings:
P ATH : A DMINISTRATION > C ONNECTION S ETTINGS
1.
Type the domain name/IP address and port number of the Web server.
Note:
2.
The port number is the trusted port that the OfficeScan server uses to
communicate with OfficeScan clients.
Click Save.
Web Console Password
The screen for managing the Web console password (or the password for the root
account created during OfficeScan server installation) will only be accessible if the
server computer does not have the resources required to use role-based administration.
For example, if the server computer runs Windows 2000 and Authorization Manager
Runtime is not installed, the screen is accessible. If resources are adequate, this screen
does not display and the password can be managed by modifying the root account in the
User Accounts screen.
If you forget the console password and the OfficeScan server is registered to Control
Manager, log on to the Control Manager console using the root account and then
change the password. You can also change the password if you have a Control Manager
account that has access to the OfficeScan server.
If OfficeScan is not registered to Control Manager, contact your support provider for
instructions on how to gain access to the Web console.
8-23
Trend Micro™ OfficeScan™ 10 Administrator’s Guide
To change the Web console password:
P ATH : A DMINISTRATION > C ONSOLE P ASSWORD
1.
Type the current and new passwords in the text boxes provided.
Note:
The new password must have at least 1 and at most 128 alphanumeric characters.
2.
Confirm the new password.
3.
Click Save.
Quarantine Manager
Whenever the OfficeScan client detects a security risk and the scan action is quarantine,
it encrypts the infected file and then moves it to the local quarantine folder located in
<Client installation folder>\SUSPECT.
After moving the file to the local quarantine directory, the client sends it to the
designated quarantine directory. Specify the directory in Networked Computers >
Client Management > Settings > {Scan Type} > Action tab. Files in the designated
quarantine directory are encrypted to prevent them from infecting other files. See
Quarantine Directory on page 5-34 for more information.
If the designated quarantine directory is on the OfficeScan server computer, modify the
server’s quarantine directory settings from the Web console. The server stores
quarantined files in <Server installation folder>\PCCSRV\Virus.
Note:
8-24
If the OfficeScan client is unable to send the encrypted file to the OfficeScan server
for any reason, such as a network connection problem, the encrypted file remains in
the client quarantine folder. The client will attempt to resend the file when it connects
to the OfficeScan server.
Managing the OfficeScan Server
To configure quarantine directory settings:
P ATH : A DMINISTRATION > Q UARANTINE M ANAGER
1.
Accept or modify the default capacity of the quarantine folder and the maximum
size of an infected file that OfficeScan can store on the quarantine folder. The
default values display on the screen.
2.
Click Save Quarantine Settings.
3.
To remove all existing files in the quarantine folder, click Delete All Quarantined
Files.
Server Tuner
Use Server Tuner to optimize the performance of the OfficeScan server using
parameters for the following server-related performance issues:
Download
When the number of clients (including update agents) requesting updates from the
OfficeScan server exceeds the server's available resources, the server moves the client
update request into a queue and processes the requests when resources become
available. After a client successfully updates components from the OfficeScan server, it
notifies the server that the update is complete. Set the maximum number of minutes the
OfficeScan server waits to receive an update notification from the client. Also set the
maximum number of times the server tries to notify the client to perform an update and
to apply new configuration settings. The server keeps trying only if it does not receive
client notification.
Buffer
When the OfficeScan server receives multiple requests from clients, such as a request to
perform an update, the server handles as many requests as it can and puts the remaining
requests in a buffer. The server then handles the requests saved in the buffer one at a
time when resources become available. Specify the size of the buffer for events, such as
client requests for updates, and for client log reporting.
8-25
Trend Micro™ OfficeScan™ 10 Administrator’s Guide
Network Traffic
The amount of network traffic varies throughout the day. To control the flow of
network traffic to the OfficeScan server and to other update sources, specify the number
of clients that can simultaneously update at any given time of the day.
Server Tuner requires the following file: SvrTune.exe
To run Server Tuner:
P ATH : TOOLS > A DMINISTRATIVE TOOLS > S ERVER TUNER
1.
On the OfficeScan server computer, navigate to <Server installation folder>\
PCCSRV\Admin\Utility\SvrTune.
2.
Double-click SvrTune.exe to start Server Tuner. The Server Tuner console opens.
3.
Under Download, modify the following settings:
Timeout for client
Type the number of minutes for the OfficeScan server to wait to receive an update
response from clients. If the client does not respond within this time, the
OfficeScan server does not consider the client to have current components. When a
notified client times out, a slot for another client awaiting notification becomes
available.
Timeout for update agent
Type the number of minutes for the OfficeScan server to wait to receive an update
response from an Update Agent. When a notified client times out, a slot for another
client awaiting notification becomes available.
Retry count
Type the maximum number of times the OfficeScan server tries to notify a client to
perform an update or to apply new configuration settings.
Retry interval
Type the number of minutes the OfficeScan server waits between notification
attempts.
8-26
Managing the OfficeScan Server
4.
Under Buffer, modify the following settings:
Event Buffer
Type the maximum number of client event reports to the server (such as updating
components) that OfficeScan holds in the buffer. The connection to the client
breaks while the client request waits in the buffer. OfficeScan establishes a
connection to a client when it processes the client report and removes it from the
buffer.
Log Buffer
Type the maximum number of client log information reports to the server that
OfficeScan holds in the buffer. The connection to the client breaks while the client
request waits in the buffer. OfficeScan establishes a connection to a client when it
processes the client report and removes it from the buffer.
Note:
5.
If a large number of clients report to the server, increase the buffer size. A
higher buffer size, however, means higher memory utilization on the server.
Under Network Traffic, modify the following settings:
Normal hours
Click the radio buttons that represent the hours of the day you consider network
traffic to be normal.
Off-peak hours
Click the radio buttons that represent the hours of the day you consider network
traffic to be at its lowest.
Peak hours
Click the radio buttons that represent the hours of the day you consider network
traffic to be at its peak.
Maximum client connections
Type the maximum number of clients that can simultaneously update components
from both "other update source" and from the OfficeScan server. Type a maximum
number of clients for each of the time periods. When the maximum number of
connections is reached, a client can update components only after a current client
8-27
Trend Micro™ OfficeScan™ 10 Administrator’s Guide
connection closes (due to either the completion of the update or the client response
reaching the timeout value you specified in the Timeout for client or Timeout for
Update Agent field).
6.
Click OK. A prompt appears asking you to restart the OfficeScan Master Service.
Note:
7.
Only the service restarts, not the computer.
Click Yes to save the Server Tuner settings and restart the service. The settings take
effect immediately after restart.
Click No to save the Server Tuner settings but not restart the service. Restart the
OfficeScan Master Service or restart the OfficeScan server computer for settings to
take effect.
The World Virus Tracking Program
Send security risk scanning results to the World Virus Tracking Program to better track
trends in security risk outbreaks. Your participation in this program can benefit the
attempt to better understand the development and spread of security risks.
When you installed OfficeScan, the OfficeScan installer asks you whether or not you
want to participate in the World Virus Tracking Program. You can change the setting
from the Web console anytime.
To view the current Trend Micro virus map, visit the following site:
http://wtc.trendmicro.com/wtc/default.asp
To modify your participation in the program:
P ATH : A DMINISTRATION > W ORLD V IRUS TRACKING
8-28
1.
Select whether to join the program or to terminate your participation.
2.
Click Save.
Chapter 9
Managing Clients
Topics in this chapter:
• Computer Location on page 9-2
•
Client Privileges and Other Settings on page 9-5
•
Global Client Settings on page 9-18
•
Client Connection with Servers on page 9-30
•
Client Proxy Settings on page 9-39
•
Client Mover on page 9-41
•
Touch Tool on page 9-42
•
Client Information on page 9-43
•
Importing and Exporting Client Settings on page 9-44
•
Managing Inactive Clients on page 9-45
9-1
Trend Micro™ OfficeScan™ 10 Administrator’s Guide
Computer Location
OfficeScan provides a location awareness feature that determines the Web reputation
policy applied to clients and the Smart Scan Server clients connect to. OfficeScan clients
that can connect to the OfficeScan server or any of the reference servers are located
internally, which means:
•
These clients will apply the Web reputation policy for internal clients.
•
If these clients use smart scan, they will connect to a local Smart Scan Server.
If connection cannot be established, clients will apply the Web reputation policy for
external clients. If clients use smart scan, these clients will connect to the Trend Micro
Global Smart Scan Server.
Tip: Trend Micro recommends enforcing a stricter Web reputation policy on external clients.
Specify whether location is based on the client computer's gateway IP address or the
client's connection status with the OfficeScan server or any reference server.
Gateway IP address
If the client computer's gateway IP address matches any of the gateway IP addresses you
specified on the Computer Location screen, the computer's location is internal.
Otherwise, the computer's location is external.
Client connection status
If the OfficeScan client can connect to the OfficeScan server or any of the assigned
reference servers on the intranet, the computer's location is internal. Additionally, if a
computer outside the corporate network can establish connection with the OfficeScan
server/reference server, its location is also internal. If none of these conditions apply,
the computer's location is external.
To configure location settings:
P ATH : N ETWORKED C OMPUTERS > C OMPUTER L OCATION
1.
9-2
Choose whether location is based on Client connection status or Gateway IP
and MAC address.
Managing Clients
2.
If you choose Client connection status, decide if you want to use a reference
server. See Reference Servers on page 8-14 for details.
a.
b.
3.
If you did not specify a reference server, the client checks the connection status
with the OfficeScan server when the following events occur:
•
Client switches from roaming to normal (online/offline) mode.
•
Client switches from one scan method to another. See Scan Methods on
page 5-8 for details.
•
Client detects IP address change in the computer.
•
Client restarts.
•
Server initiates connection verification. See Client Connection with Servers on
page 9-30 for details.
•
Web reputation location criteria changes while applying global settings.
•
Outbreak prevention policy is no longer enforced and pre-outbreak
settings are restored.
If you specified a reference server, the client checks its connection status with
the OfficeScan server first, and then with the reference server if connection to
the OfficeScan server is unsuccessful. The client checks the connection status
every hour and when any of the above events occur.
If you choose Gateway IP and MAC address:
a.
Type the gateway IP address in the text box provided.
b.
Optionally type the MAC address. If you do not type a MAC address,
OfficeScan will include all the MAC addresses belonging to the specified IP
address.
c.
Click Add.
d. Repeat step a to step c until you have all the gateway IP addresses you want to
add.
e.
4.
Use the Gateway Settings Importer tool to import a list of gateway settings. See
Gateway Settings Importer on page 9-4 for details.
Click Save.
9-3
Trend Micro™ OfficeScan™ 10 Administrator’s Guide
Gateway Settings Importer
OfficeScan checks a computer's location to determine the Web reputation policy to use
and the Smart Scan Server to connect to. One of the ways OfficeScan identifies the
location is by checking the computer's gateway IP address and MAC address.
Configure the gateway settings on the Computer Location screen or use the Gateway
Settings Importer tool to import a list of gateway settings to the Computer Location
screen.
To use Gateway Settings Importer:
1.
Prepare a text file (.txt) containing the list of gateway settings. On each line, type an
IP address and optionally type a MAC address. Separate IP addresses and MAC
addresses by a comma. The maximum number of entries is 4096.
For example:
10.1.111.222,00:17:31:06:e6:e7
10.1.111.223
10.1.111.224,00:17:31:06:e6:e7
2.
On the server computer, go to <Server installation
folder>\PCCSRV\Admin\Utility\GatewaySettingsImporter and double-click
GSImporter.exe.
Note:
9-4
You cannot run the Gateway Settings Importer tool from Terminal Services.
3.
On the Gateway Settings Importer screen, browse to the file created in step 1 and
click Import.
4.
Click OK. The gateway settings display on the Computer Location screen and the
OfficeScan server deploys the settings to clients.
5.
To delete all entries, click Clear All. If you only need to delete a particular entry,
remove it from the Computer Location screen.
6.
To export the settings to a file, click Export All and then specify the file name and
type.
Managing Clients
Client Privileges and Other Settings
Grant users the privileges to modify certain settings and perform high level tasks on the
OfficeScan client.
Tip: To enforce uniform settings and policies throughout the organization, grant limited
privileges to users.
To configure privileges and other settings:
P ATH : N ETWORKED C OMPUTERS > C LIENT M ANAGEMENT > S ETTINGS > P RIVILEGES
O THER S ETTINGS
1.
2.
AND
Click the Privileges tab and configure the following user privileges:
•
Roaming Privilege
•
Scan Privileges
•
Scheduled Scan Privileges
•
OfficeScan Firewall Privileges
•
Mail Scan Privileges
•
Toolbox Privilege
•
Proxy Configuration Privilege
•
Component Update Privileges
•
Client Uninstallation
•
Client Unloading
Click the Other Settings tab and configure the following settings:
•
Update Settings
•
Web Reputation Setting
•
Scheduled Scan Setting
•
Client Security
•
POP3 Email Scan Settings
•
Client Console Access Restriction
•
Restart Notification
9-5
Trend Micro™ OfficeScan™ 10 Administrator’s Guide
3.
If you selected domain(s) or client(s) on the client tree, click Save to apply settings
to the domain(s) or client(s). If you selected the root icon
following options:
, choose from the
•
Apply to All Clients: Applies settings to all existing clients and to any new
client added to an existing/future domain. Future domains are domains not yet
created at the time you configure the settings.
•
Apply to Future Domains Only: Applies settings only to clients added to
future domains. This option will not apply settings to new clients added to an
existing domain.
Roaming Privilege
This privilege allows users to enable roaming mode. When in roaming mode, clients
cannot update components from, nor send logs to, the OfficeScan server. The
OfficeScan server also cannot manage roaming clients, including initiating tasks and
deploying client settings. See Roaming Clients on page 9-33 for details.
9-6
Managing Clients
Scan Privileges
These privileges allow users to configure their own Manual Scan, Real-time Scan and
Scheduled Scan settings by opening the client console and selecting Settings > {Scan
Type}.
FIGURE 9-17. Scan settings on the client console
The following settings are configurable:
•
Manual Scan: Files to Scan, Scan Settings, CPU Usage, Scan Exclusions, Scan
Actions
•
Real-time Scan: User Activity on Files, Files to Scan, Scan Settings, Scan Exclusions,
Scan Actions
•
Scheduled Scan: Schedule, Files to Scan, Scan Settings, CPU Usage, Scan
Exclusions, Scan Actions
9-7
Trend Micro™ OfficeScan™ 10 Administrator’s Guide
Scheduled Scan Privileges
Clients set to run Scheduled Scan can have the privileges to postpone and skip/stop
Scheduled Scan. To allow users to take advantage of these privileges, remind them about
the privileges you have granted them by configuring OfficeScan to display a notification
message before Scheduled Scan runs.
To display the notification message, go to Networked Computers > Client
Management > Settings > Privileges and Other Settings > Other Settings tab >
Scheduled Scan Settings and enable Display a notification before Scheduled Scan
occurs.
The notification message display minutes before Scheduled Scan runs. To configure the
number of minutes, go to Networked Computers > Global Client Settings >
Scheduled Scan Settings > Remind users of the Scheduled Scan __ minutes
before it runs.
Postpone Scheduled Scan
Users with the "Postpone Scheduled Scan" privilege can perform the following actions:
•
Postpone Scheduled Scan before it runs and then specify the postpone duration.
Scheduled Scan can only be postponed once.
•
If Scheduled Scan is in progress, users can stop scanning and restart it later. Users
then specify the amount of time that should elapse before scanning restarts. When
scanning restarts, all previously scanned files are scanned again. Scheduled Scan can
be stopped and then restarted only once.
Note:
9-8
The minimum postpone duration/elapsed time users can specify is 15 minutes.
The maximum is 12 hours and 45 minutes, which you can reduce by going to
Networked Computers > Global Client Settings > Scheduled Scan Settings
> Postpone Scheduled Scan for up to __ hours and __ minutes.
Managing Clients
Skip and Stop Scheduled Scan
Enabling this option allows users to perform the following actions:
•
Skip Scheduled Scan before it runs
•
Stop Scheduled Scan when it is in progress
To postpone/skip and stop Scheduled Scan on the client computer:
If Scheduled Scan has not started:
1.
Right-click the OfficeScan client icon on the system tray and select Scheduled
Scan Advanced Settings.
Note:
2.
Users do not need to perform this step if the notification message is enabled and
is set to display minutes before Scheduled Scan runs.
On the notification window that displays, select from the following options:
•
Postpone scanning for __ hours and __ minutes.
•
Skip this Scheduled Scan. The next Scheduled Scan runs on <date> at <time>.
If Scheduled Scan is in progress:
1.
Right-click the OfficeScan client icon on the system tray and select Scheduled
Scan Advanced Settings.
2.
On the notification window that displays, select from the following options:
•
Stop scanning. Restart the scan after __ hours and __ minutes.
•
Stop scanning. The next Scheduled Scan runs on <date> at <time>.
9-9
Trend Micro™ OfficeScan™ 10 Administrator’s Guide
OfficeScan Firewall Privileges
Firewall privileges allow users to configure their own firewall settings. All
user-configured settings cannot be overridden by settings deployed from the OfficeScan
server. For example, if the user disables Intrusion Detection System (IDS) and you
enable IDS on the OfficeScan server, IDS remains disabled on the client computer.
Display the Firewall Tab on the Client Console
The Firewall tab displays all firewall settings on the client and allows users with firewall
privileges to configure their own settings.
FIGURE 9-18. Firewall tab on the client console
9-10
Managing Clients
Allow Users to Enable/Disable the OfficeScan Firewall, the Intrusion
Detection System, and the Firewall Violation Notification Message
The OfficeScan firewall protects clients and servers on the network using stateful
inspection, high performance network virus scanning, and elimination. If you grant
users the privilege to enable or disable the firewall and its features, warn them not to
disable the firewall for an extended period of time to avoid exposing the computer to
intrusions and hacker attacks.
If you do not grant users the privileges, the firewall settings you configure from the
OfficeScan server Web console display under Network card list on the client console.
Allow Clients to Send Firewall Logs to the OfficeScan Server
Select this option to analyze traffic the OfficeScan firewall blocks and allows. If you
select this option, configure the log sending schedule in Networked Computers >
Global Client Settings > Firewall Log Settings section. The schedule only applies to
clients with the firewall log sending privilege.
To view firewall logs, see Firewall Logs on page 7-17.
9-11
Trend Micro™ OfficeScan™ 10 Administrator’s Guide
Mail Scan Privileges
When clients have the Mail Scan privileges, the Mail Scan tab displays on the client
console. Mail scan includes Outlook mail scan and POP3 mail scan.
FIGURE 9-19. Mail Scan tab on the client console
OfficeScan clients do not display mail scan results on the client console’s Logs screen
and do not send mail scan logs to the server. Outlook and POP3 mail scan logs are
stored in separate log files on the client computer. For details about mail scan logs, see
Mail Scan Log on page 12-10 and Web Reputation and POP3 Mail Scan Log on page 12-13.
9-12
Managing Clients
Outlook Mail Scan
When the Mail Scan tab displays on the client console, client users can immediately
configure Outlook mail scan settings and then run Manual Scan to scan Microsoft
Outlook email messages and attachments for viruses/malware.
Note:
Outlook mail scan does not scan for spyware/grayware.
Outlook mail scan is a user-initiated scan, which means that scanning only occurs when
users run Manual Scan from the Mail Scan tab. It does not scan email messages in real
time and cannot be configured to run automatically based on a schedule.
POP3 Mail Scan
POP3 mail scan checks email messages and attachments for viruses/malware in real
time, that is, as email messages are downloaded from the POP3 mail server. To display
the POP3 mail scan configuration options on the Mail Scan tab, go to Networked
Computers > Client Management > Settings > Privileges and Other Settings >
Other Settings tab and select Scan POP3 email.
Note:
POP3 mail scan does not scan for spyware/grayware.
POP3 mail scan only scans email messages in real time. Users cannot launch scanning
manually from the client console and scanning cannot be configured to run
automatically based on a schedule.
You cannot configure the action OfficeScan performs on viruses/malware from the
Web console. Users configure the action on the client console.
The POP3 mail scan program shares the OfficeScan NT Proxy Service (TMProxy.exe)
with the Web reputation program.
9-13
Trend Micro™ OfficeScan™ 10 Administrator’s Guide
Toolbox Privilege
When you enable this privilege, the Toolbox tab displays on the client console. The
Toolbox tab allows users to install Check Point SecureClient Support. OfficeScan
provides a tool that allows Check Point SecureClient to check if the client Virus Pattern
and Virus Scan Engine are current.
FIGURE 9-20. Toolbox tab on the client console
Proxy Configuration Privilege
This privilege allows client users to configure proxy settings. OfficeScan uses
user-configured proxy settings only on the following instances:
9-14
•
When clients perform "Update Now". See Component Update Privileges on page 9-15
for information on the "Update Now" feature.
•
When users disable, or OfficeScan cannot detect, automatic proxy settings. See
Automatic Proxy Configuration on page 9-29 for more information.
Managing Clients
Component Update Privileges
Update privileges allow client users to configure their own update settings.
Perform "Update Now"
Users with this privilege can update components on demand by right-clicking the
OfficeScan icon on the system tray and selecting Update Now. You can configure
clients to use proxy settings during "Update Now". See Automatic Proxy Configuration on
page 9-29 for details.
Enable Scheduled Update
This privilege allows clients users to enable/disable scheduled update. Although users
have the privilege to enable/disable scheduled update, they cannot configure the actual
schedule. You will have to specify the schedule in Updates > Networked Computers
> Automatic Update > Schedule-based Update.
Client Uninstallation
This privilege allows users to uninstall the OfficeScan client with or without a password.
To initiate silent client uninstallation from the Web console, go to Networked
Computers > Client Management > Tasks > Client Uninstallation.
Client Unloading
This privilege allows users to temporarily stop the OfficeScan client with or without a
password.
Update Settings
Clients Download Updates from the Trend Micro ActiveUpdate Server
When initiating updates, OfficeScan clients first get updates from the update source
specified on the Updates > Networked Computers > Update Source screen. If the
update is unsuccessful, the clients attempt to update from the OfficeScan server.
Selecting this option enables clients to attempt to update from the Trend Micro
ActiveUpdate server if the update from the OfficeScan server is unsuccessful.
9-15
Trend Micro™ OfficeScan™ 10 Administrator’s Guide
Enable Scheduled Update
Selecting this option forces the selected clients to always run scheduled update except
when users have the privilege to enable/disable scheduled update and the user disables
scheduled update. See Component Update Privileges on page 9-15 for details about the
privilege.
Specify the update schedule in Updates > Networked Computers > Automatic
Update > Schedule-based Update.
Clients Can Update Components but not Upgrade the Client Program or
Deploy Hot Fixes
This option allows component updates to proceed but prevents hot fix deployment and
client upgrade.
If you do not select this option, all clients simultaneously connect to the server to
upgrade or install a hot fix. This may significantly affect server performance if you have
a large number of clients. If you select this option, plan how to minimize the impact of
client upgrade or hot fix deployment on the server and then execute your plan.
Web Reputation Setting
OfficeScan displays a notification message on a client computer immediately after it
blocks a URL that violates a Web reputation policy. Optionally modify the content of
the notification message by going to Notifications > Client User Notifications >
Web Reputation Policy Violations tab.
Scheduled Scan Setting
When you enable this option, a notification message displays on the client computer
minutes before Scheduled Scan runs. Users are notified of the scan schedule (date and
time) and their Scheduled Scan privileges, such as postponing, skipping, or stopping
Scheduled Scan. For details about Scheduled Scan privileges, see Scheduled Scan Privileges
on page 9-8.
The number of minutes is configurable. To configure the number of minutes, go to
Networked Computers > Global Client Settings > Scheduled Scan Settings >
Remind users of the Scheduled Scan __ minutes before it runs.
9-16
Managing Clients
Client Security
This setting allows or restricts users from accessing OfficeScan client files and registries.
If you select High, the access permission settings of the OfficeScan folders, files, and
registries will be the same as the Program Files folder settings of client computers
running Windows 2000/XP/Server 2003.
Therefore, if the permissions settings (Security settings in Windows) of the Program
Files folder are set to allow full read/write access, selecting High still allows users full
read/write access to the OfficeScan client folders, files, and registries.
POP3 Email Scan Settings
When selected, this setting enables POP3 mail scan on the client console. This setting
only applies to clients with the mail scan privileges. See Mail Scan Privileges on page 9-12
for details.
Client Console Access Restriction
This setting disables client console access from the system tray or Windows Start menu.
The only way users can access the client console is by clicking PccNT.exe from the
<Client installation folder>. After configuring this setting, reload the client for the
setting to take effect.
This setting does not disable the OfficeScan client. The client runs in the background
and continues to provide protection from security risks.
Restart Notification
Select this option to display a message prompting users to restart the client computer to
finish cleaning infected files.
For Real-time Scan, the message displays after a particular security risk has been
scanned. For Manual Scan, Scheduled Scan, and Scan Now, the message displays once
and only after OfficeScan finishes scanning all the scan targets.
9-17
Trend Micro™ OfficeScan™ 10 Administrator’s Guide
Global Client Settings
OfficeScan applies global client settings to all clients or only to clients with certain
privileges.
To configure global client settings:
P ATH : N ETWORKED C OMPUTERS > G LOBAL C LIENT S ETTINGS
1.
2.
Configure the following settings:
•
Scan Settings
•
Scheduled Scan Settings
•
Approved URLs
•
Firewall Log Settings
•
Alert Settings
•
OfficeScan Service Restart
•
Client Self-protection
•
Reserved Disk Space
•
Network Virus Log Consolidation
•
Virus/Malware Log Bandwidth Setting
•
Automatic Proxy Configuration
•
Client Grouping
Click Save.
Scan Settings
Configure Scan Settings for Large Compressed Files
All clients managed by the server check the following settings when scanning
compressed files for virus/malware and spyware/grayware during Manual Scan,
Real-time Scan, Scheduled Scan, and Scan Now:
Do not Scan Files in the Compressed File if the Size Exceeds __ MB
OfficeScan does not scan any file that exceeds the limit.
9-18
Managing Clients
In a Compressed File, Scan Only the First __ Files
After decompressing a compressed file, OfficeScan scans the specified number of files
and ignores any remaining files, if any.
Scan Up to __ OLE Layer(s)
When a file contains multiple Object Linking and Embedding (OLE) layers, OfficeScan
scans up to the number of layers you specify and skips the remaining layers.
All clients managed by the server check this setting during Manual Scan, Real-time Scan,
Scheduled Scan, and Scan Now. Each layer is scanned for virus/malware and
spyware/grayware.
For example:
The number of layers you specify is 2. Embedded within a file is a Microsoft Word
document (first layer), within the Word document is a Microsoft Excel spreadsheet
(second layer), and within the spreadsheet is a JPG file (third layer). OfficeScan will scan
the Word document and Excel spreadsheet, and skip the JPG file.
Add Manual Scan to the Windows Shortcut Menu on Client Computers
When this setting is enabled, all clients managed by the server add a Scan with
OfficeScan client option to the right-click menu in Windows Explorer. When users
right-click a file or folder on the Windows desktop or in Windows Explorer and select
the option, Manual Scan scans the file or folder for virus/malware and
spyware/grayware.
Exclude the OfficeScan Server Database Folder from Real-time Scan
If the OfficeScan client and server exist on the same computer, the client will not scan
the server database for virus/malware and spyware/grayware during Real-time Scan.
Tip: Enable this setting to prevent database corruption that may occur during scanning.
9-19
Trend Micro™ OfficeScan™ 10 Administrator’s Guide
Exclude Microsoft Exchange Server Folders from Scanning
If the OfficeScan client and a Microsoft Exchange 2000/2003 server exist on the same
computer, OfficeScan will not scan the Exchange server folders for virus/malware and
spyware/grayware during Manual Scan, Real-time Scan, Scheduled Scan and Scan Now.
For Microsoft Exchange 2007 folders, you need to manually add the folders to the scan
exclusion list. For scan exclusion details, see the following Web site:
http://technet.microsoft.com/en-us/library/bb332342.aspx
See Scan Exclusions on page 5-27 for steps in configuring the scan exclusion list.
Clean/Delete Infected Files Within Compressed Files
When all clients managed by the server detect virus/malware within compressed files
during Manual Scan, Real-time Scan, Scheduled Scan and Scan Now, and the following
conditions are met, clients clean or delete the infected files.
•
"Clean" or "Delete" is the action OfficeScan is set to perform. Check the action
OfficeScan performs on infected files by going to Networked Computers >
Client Management > {Scan Type} > Action tab.
•
You enable this setting. Enabling this setting may increase computer resource usage
during scanning and scanning may take longer to complete. This is because
OfficeScan needs to decompress the compressed file, clean/delete infected files
within the compressed file, and then re-compress the file.
•
The compressed file format is supported. OfficeScan only supports certain
compressed file formats, including ZIP and Office Open XML, which uses ZIP
compression technologies. Office Open XML is the default format for Microsoft
Office 2007 applications such as Excel, PowerPoint, and Word.
Note:
Contact your support provider for a complete list of supported compressed file
formats.
For example, Real-time Scan is set to delete files infected with a virus. After Real-time
Scan decompresses a compressed file named abc.zip and detects an infected file 123.doc
within the compressed file, OfficeScan deletes 123.doc and then re-compresses abc.zip,
which is now safe to access.
9-20
Managing Clients
The following table describes what happens if any of the conditions is not met.
TABLE 9-38.
S TATUS OF
"C LEAN /
D ELETE
INFECTED FILES
WITHIN
COMPRESSED
FILES "
Enabled
Disabled
Compressed file scenarios and results
A CTION
O FFICE S CAN
IS SET TO
PERFORM
C OMPRESSED
FILE FORMAT
Clean or
Delete
Not supported
Clean or
Delete
Supported/Not
supported
Example:
def.rar contains
an infected file
123.doc.
Example:
abc.zip
contains an
infected file
123.doc.
R ESULT
OfficeScan encrypts def.rar
but does not clean, delete,
or perform any other action
on 123.doc.
OfficeScan does not clean,
delete, or perform any
other action on both
abc.zip and 123.doc.
9-21
Trend Micro™ OfficeScan™ 10 Administrator’s Guide
TABLE 9-38.
S TATUS OF
"C LEAN /
D ELETE
INFECTED FILES
WITHIN
COMPRESSED
FILES "
Enabled/
Disabled
Compressed file scenarios and results (Continued)
A CTION
O FFICE S CAN
IS SET TO
PERFORM
Not Clean or
Delete (in
other words,
any of the
following:
Rename,
Quarantine,
Deny Access
or Pass)
C OMPRESSED
FILE FORMAT
Supported/Not
supported
Example:
abc.zip
contains an
infected file
123.doc.
R ESULT
OfficeScan performs the
configured action
(Rename, Quarantine,
Deny Access or Pass) on
abc.zip, not 123.doc.
If the action is:
Rename: OfficeScan
renames abc.zip to abc.vir,
but does not rename
123.doc.
Quarantine: OfficeScan
quarantines abc.zip
(123.doc and all
non-infected files are
quarantined).
Pass: OfficeScan performs
no action on both abc.zip
and 123.doc but logs the
virus detection.
Deny Access: OfficeScan
denies access to abc.zip
when it is opened (123.doc
and all non-infected files
cannot be opened).
9-22
Managing Clients
Enable Assessment Mode
When in assessment mode, all clients managed by the server will log spyware/grayware
detected during Manual Scan, Scheduled Scan, Real-time Scan, and Scan Now but will
not clean spyware/grayware components. Cleaning terminates processes or deletes
registries, files, cookies, and shortcuts.
Trend Micro provides assessment mode to allow you to evaluate items that Trend Micro
detects as spyware/grayware and then take appropriate action based on your evaluation.
For example, detected spyware/grayware that you do not consider a security risk can be
added to the spyware/grayware approved list.
When in assessment mode, OfficeScan performs the following scan actions:
•
Pass: During Manual Scan, Scheduled Scan and Scan Now
•
Deny Access: During Real-time Scan
Note:
Assessment mode overrides any user-configured scan action. For example, even if you
choose "Clean" as the scan action during Manual Scan, "Pass" remains as the scan
action when the client is on assessment mode.
Scan for Cookies
Select this option if you consider cookies as potential security risks. When selected, all
clients managed by the server will scan cookies for spyware/grayware during Manual
Scan, Scheduled Scan, Real-time Scan, and Scan Now.
Scheduled Scan Settings
Only clients set to run Scheduled Scan will use the following settings. Scheduled Scan
can scan for virus/malware and spyware/grayware.
Remind Users of the Scheduled Scan __ Minutes Before it Runs
OfficeScan displays a notification message minutes before scanning runs to remind
users of the scan schedule (date and time) and any Scheduled Scan privilege you grant
them.
9-23
Trend Micro™ OfficeScan™ 10 Administrator’s Guide
The notification message can be enabled/disabled by going to Networked Computers
> Client Management > Settings > Privileges and Other Settings > Other
Settings tab > Scheduled Scan Settings. If disabled, no reminder displays.
Postpone Scheduled Scan for Up to __ Hour(s) and __ Minute(s)
Only users with the "Postpone Scheduled Scan" privilege can perform the following
actions:
•
Postpone Scheduled Scan before it runs and then specify the postpone duration.
•
If Scheduled Scan is in progress, users can stop scanning and restart it later. Users
then specify the amount of time that should elapse before scanning restarts. When
scanning restarts, all previously scanned files are scanned again.
The maximum postpone duration/elapsed time users can specify is 12 hours and 45
minutes, which you can reduce by specifying the number of hour(s) and/or
minute(s) in the fields provided.
Automatically Stop Scheduled Scan When Scanning Lasts More Than
__ Hour(s) and __ Minute(s)
OfficeScan stops scanning when the specified amount of time is exceeded and scanning
is not yet complete. OfficeScan immediately notifies users of any security risk detected
during scanning.
Skip Scheduled Scan When a Wireless Computer's Battery Life is Less
Than __ % and its AC Adapter is Unplugged
OfficeScan immediately skips scanning when Scheduled Scan launches if it detects that a
wireless computer's battery life is running low and its AC adapter is not connected to
any power source. If battery life is low but the AC adapter is connected to a power
source, scanning proceeds.
Resume a Missed Scheduled Scan
When Scheduled Scan did not launch because OfficeScan is not running on the day and
time of Scheduled Scan, scanning is launched when OfficeScan is running at the exact
time Scheduled Scan is set to run, regardless of the day.
9-24
Managing Clients
Firewall Log Settings
You can grant certain clients the privilege to send firewall logs to the OfficeScan server.
Configure the log sending schedule in this section. Only clients with the privilege to
send firewall logs will use the schedule.
See OfficeScan Firewall Privileges on page 9-10 for information on firewall privileges
available to selected clients.
Alert Settings
OfficeScan can display notifications during the following instances:
The Virus Pattern Remains Outdated After a Certain Number of Days
An alert icon displays on the Windows task bar to remind users to update the Virus
Pattern. All clients managed by the server will apply this setting.
Client Users Need to Restart their Computers to Load a Kernel Mode
Driver
After installing a hot fix or an upgrade package that contains a new version of a kernel
mode driver, the driver’s previous version may still exist on the computer. The only way
to unload the previous version and load the new one is to restart the computer. After
restarting the computer, the new version automatically installs and no further restart is
necessary.
The notification message displays immediately after a client computer installs the hot fix
or upgrade package.
9-25
Trend Micro™ OfficeScan™ 10 Administrator’s Guide
OfficeScan Service Restart
OfficeScan restarts client services that stopped responding unexpectedly and were not
stopped by a normal system process.
Configure the following settings to enable client services to restart:
Automatically Restart an OfficeScan Client Service if the Service Stops
OfficeScan restarts the following services:
•
OfficeScan NT Listener (tmlisten.exe): Receives commands and notifications
from the OfficeScan server and facilitates communication from the client to the
server
•
OfficeScanNT RealTime Scan (ntrtscan.exe): Performs Real-time, Scheduled,
and Manual scan on OfficeScan clients
•
OfficeScan NT Proxy Service (TmProxy.exe): Scans network traffic before
passing it to the target application.
Restart the Service After __ Minutes
When a service stops, OfficeScan waits a certain number of minutes before restarting
the service.
If the First Attempt to Restart the Service Fails, Retry __ Times
Specify the maximum retry attempts for restarting a service. Manually restart a service if
it remains stopped after the maximum retry attempts.
Reset the Restart Failure Count After __ Hours
If a service remains stopped after exhausting the maximum retry attempts, OfficeScan
waits a certain number of hours to reset the failure count. If a service remains stopped
after the number of hours elapses, OfficeScan restarts the service.
9-26
Managing Clients
Client Self-protection
Client self-protection provides ways for the OfficeScan client to protect the processes
and other resources required to function properly. Client self-protection helps thwart
attempts by programs or actual users to disable anti-malware protection.
Protect Files in the OfficeScan Client Installation Folder
To prevent other programs and even the user from modifying or deleting OfficeScan
files, OfficeScan locks the following files in the root <Client installation folder>:
•
All digitally-signed files with .exe, .dll, and .sys extensions
•
Some files without digital signatures, including:
•
bspatch.exe
•
bzip2.exe
•
INETWH32.dll
•
libcurl.dll
•
libeay32.dll
•
libMsgUtilExt.mt.dll
•
msvcm80.dll
•
MSVCP60.DLL
•
msvcp80.dll
•
msvcr80.dll
•
OfceSCV.dll
•
OFCESCVPack.exe
•
patchbld.dll
•
patchw32.dll
•
patchw64.dll
•
PiReg.exe
•
ssleay32.dll
•
Tmeng.dll
•
TMNotify.dll
•
zlibwapi.dll
9-27
Trend Micro™ OfficeScan™ 10 Administrator’s Guide
Protect OfficeScan Client Processes
OfficeScan blocks all attempts to terminate the following processes:
•
tmlisten.exe: Receives commands and notifications from the OfficeScan server
and facilitates communication from the client to the server
•
ntrtscan.exe: Performs Real-time, Scheduled, and Manual Scan on OfficeScan
clients
•
TmProxy.exe: Scans network traffic before passing it to the target application
•
TmPfw.exe: Provides packet level firewall, network virus scanning and intrusion
detection capabilities
•
TMBMSRV.exe: Regulates access to external storage devices and prevents
unauthorized changes to registry keys and processes
Note:
In this release, this setting can only be deployed to clients running x86 type
processors.
Protect OfficeScan Client Registry Keys
OfficeScan blocks all attempts to modify, delete, or add new entries under the following
registry keys and subkeys:
•
HKEY_LOCAL_MACHINE\SOFTWARE\TrendMicro\PC-cillinNTCorp\Current
Version
•
HKEY_LOCAL_MACHINE\SOFTWARE\TrendMicro\NSC
•
HKEY_LOCAL_MACHINE\SOFTWARE\TrendMicro\TMCSS
Note:
In this release, this setting can only be deployed to clients running x86 type
processors.
Reserved Disk Space
OfficeScan can allocate a certain amount of client disk space for hot fixes, pattern files,
scan engines, and program updates. OfficeScan reserves 60MB of disk space by default.
9-28
Managing Clients
Network Virus Log Consolidation
When you enable this option, OfficeScan clients only send network virus logs to the
server once every hour. For more information about network viruses, see Network Virus
on page 5-4.
Virus/Malware Log Bandwidth Setting
OfficeScan consolidates virus log entries when detecting multiple infections from the
same virus/malware over a short period of time. OfficeScan may detect a single
virus/malware multiple times, quickly filling the virus/malware log and consuming
network bandwidth when the client sends log information to the server. Enabling this
feature helps reduce both the number of virus/malware log entries made and the
amount of network bandwidth clients consume when they report virus log information
to the server.
Automatic Proxy Configuration
Manually configuring proxy settings may be a complicated task for many end users. Use
automatic proxy settings to ensure that correct proxy settings are applied without
requiring any user intervention.
When enabled, automatic proxy settings are the primary proxy settings when clients
update components either through automatic update or Update Now. For information
on automatic update and Update Now, see Client Update Methods on page 4-27.
If clients cannot connect using the automatic proxy settings, client users with the
privilege to configure proxy settings can use user-configured proxy settings. Otherwise,
connection using the automatic proxy settings will be unsuccessful.
Note:
Proxy authentication is not supported.
Automatically Detect Settings
OfficeScan automatically detects the administrator-configured proxy settings by DHCP
or DNS.
9-29
Trend Micro™ OfficeScan™ 10 Administrator’s Guide
Use Automatic Configuration Script
OfficeScan uses the proxy auto-configuration (PAC) script set by the network
administrator to detect the appropriate proxy server.
Client Grouping
This setting is used only during client installation. The installation program checks the
network domain to which a target computer belongs. If the domain name already exists
on the client tree, the client on the target computer will be grouped under that domain
and will apply the settings configured for the domain. If the domain name does not
exist, OfficeScan adds the domain on the client tree, groups the client under that
domain, and then applies the root settings to the domain and client.
Specify whether the installation program will check the NetBIOS, Active Directory, or
DNS domain name.
Client Connection with Servers
Icons on the client computer’s system tray indicate the client’s connection status with
the OfficeScan server and a Smart Scan Server (if the client uses smart scan).
Users need to take action when the icon indicates any of the following conditions:
•
Pattern has not been updated for a while.
•
Real-time Scan is disabled.
•
Real-time Scan service was stopped. OfficeScan uses the Real-time Scan Service not
only for Real-time Scan, but also for Manual Scan and Scheduled Scan. This means
that if the Real-time Scan service stops, the client computer becomes unprotected.
•
A smart scan client is not connected to any Smart Scan Server.
See Required Actions on page 9-35 for steps that users can take when any of these
conditions arise.
9-30
Managing Clients
Online Clients
Online clients maintain a continuous connection with the server. The OfficeScan server
can initiate tasks and deploy settings to these clients.
TABLE 9-39.
I CON
Online client icons
S CAN
M ETHOD
D ESCRIPTION
Conventional
scan
All components are up-to-date and services work
properly.
Conventional
scan
The pattern file has not been updated for a while.
Conventional
scan
Real-time Scan is disabled.
Conventional
scan
The pattern file has not been updated for a while.
Conventional
scan
Real-time Scan Service was stopped.
Conventional
scan
The pattern file has not been updated for a while.
Smart scan
The client can connect to a Smart Scan Server.
Real-time Scan is enabled.
Real-time Scan is disabled.
Real-time Scan Service was stopped.
All services work properly.
Smart scan
The client can connect to a Smart Scan Server.
Real-time Scan is disabled.
Smart scan
The client can connect to a Smart Scan Server.
Real-time Scan Service was stopped.
Smart scan
The client cannot connect to a Smart Scan Server.
Real-time Scan is enabled.
9-31
Trend Micro™ OfficeScan™ 10 Administrator’s Guide
TABLE 9-39.
Online client icons (Continued)
S CAN
M ETHOD
I CON
Smart scan
D ESCRIPTION
The client cannot connect to a Smart Scan Server.
Real-time Scan is disabled.
Smart scan
The client cannot connect to a Smart Scan Server.
Real-time Scan Service was stopped.
Offline Clients
Offline clients are disconnected from the server. The OfficeScan server cannot manage
these clients.
TABLE 9-40.
I CON
9-32
Offline client icons
S CAN
M ETHOD
D ESCRIPTION
Conventional
scan
Real-time Scan is enabled.
Conventional
scan
The pattern file has not been updated for a while.
Conventional
scan
Real-time Scan is disabled.
Conventional
scan
The pattern file has not been updated for a while.
Conventional
scan
Real-time Scan Service was stopped.
Conventional
scan
The pattern file has not been updated for a while.
Real-time Scan is enabled.
Real-time Scan is disabled.
Real-time Scan Service was stopped.
Managing Clients
TABLE 9-40.
I CON
Offline client icons (Continued)
S CAN
M ETHOD
Smart scan
D ESCRIPTION
The client can connect to a Smart Scan Server.
Real-time Scan is enabled.
Smart scan
The client can connect to a Smart Scan Server.
Real-time Scan is disabled.
Smart scan
The client can connect to a Smart Scan Server.
Real-time Scan Service was stopped.
Smart scan
The client cannot connect to a Smart Scan Server.
Smart scan
The client cannot connect to a Smart Scan Server.
Real-time Scan is disabled.
Smart scan
The client cannot connect to a Smart Scan Server.
Real-time Scan Service was stopped.
Roaming Clients
Roaming clients cannot update components from, nor send logs to, the OfficeScan
server. The OfficeScan server also cannot initiate tasks and deploy client settings to
roaming clients. Depending on various factors such as a client computer's location or
network connection status, a roaming client may or may not be able to communicate
with the OfficeScan server.
Users with the roaming privilege may enable roaming mode when OfficeScan server
intervention (such as server-initiated scanning) prevents them from fulfilling a task, such
as when doing a presentation. Roaming clients with an Internet connection can still
update components if configured to get updates from an Update Agent or the Trend
Micro ActiveUpdate server.
Assign roaming privileges to clients that lose connection with the OfficeScan server for
an extended period of time. To assign the privilege, go to Networked Computers >
Client Management > Settings > Privileges and Other Settings > Privileges tab.
9-33
Trend Micro™ OfficeScan™ 10 Administrator’s Guide
Updates to roaming clients occur only on the following occasions:
•
When the client user performs manual update
•
When you set an automatic update deployment that includes roaming clients
•
When you grant clients the privilege to enable scheduled update
For more information on how to update clients, see Client Update on page 4-23.
TABLE 9-41.
I CON
Roaming client icons
S CAN
M ETHOD
D ESCRIPTION
Conventional
scan
Real-time Scan is enabled.
Conventional
scan
Real-time Scan is disabled.
Conventional
scan
The pattern file has not been updated for a while.
Conventional
scan
The pattern file has not been updated for a while.
Conventional
scan
Real-time Scan Service was stopped.
Conventional
scan
The pattern file has not been updated for a while.
Smart scan
The client can connect to a Smart Scan Server.
Real-time Scan is enabled.
Real-time Scan is disabled.
Real-time Scan Service was stopped.
Real-time Scan is enabled.
Smart scan
The client can connect to a Smart Scan Server.
Real-time Scan is disabled.
Smart scan
The client can connect to a Smart Scan Server.
Real-time Scan Service was stopped.
9-34
Managing Clients
TABLE 9-41.
I CON
Roaming client icons (Continued)
S CAN
M ETHOD
Smart scan
D ESCRIPTION
The client cannot connect to a Smart Scan Server.
Real-time Scan is disabled.
Smart scan
The client cannot connect to a Smart Scan Server.
Real-time Scan is disabled.
Smart scan
The client cannot connect to a Smart Scan Server.
Real-time Scan Service was stopped.
Required Actions
Perform the necessary actions if the client icon indicates any of the following
conditions:
Pattern File has not been Updated for a While
Client users need to update components. From the Web console, configure component
update settings in Updates > Networked Computers, or grant users the privilege to
update in Networked Computers > Client Management > Settings > Privileges
and Other Settings > Privileges tab > Component Update Privileges.
Real-time Scan Service was Stopped
Users can manually start the service (OfficeScanNT RealTime Scan) from Microsoft
Management Console by clicking Start > Run and typing services.msc.
Real-time Scan was Disabled
Enable Real-time Scan from the Web console (Networked Computers > Client
Management > Settings > Real-time Scan Settings).
Real-time Scan was Disabled and Client is in Roaming Mode
Users need to disable roaming mode first. After disabling roaming mode, enable
Real-time Scan from the Web console.
9-35
Trend Micro™ OfficeScan™ 10 Administrator’s Guide
A Client Within the Corporate Network is Disconnected from the Server
Verify the connection from the Web console (Networked Computers > Connection
Verification) and then check connection verification logs (Logs > Networked
Computer Logs > Connection Verification).
If the client is still disconnected after verification:
1.
If the connection status on both the server and client is offline, check the network
connection.
2.
If the connection status on the client is offline but online on the server, the server’s
domain name may have been changed and the client connects to the server using
the domain name (if you select domain name during server installation). Register
the OfficeScan server’s domain name to the DNS or WINS server or add the
domain name and IP information into the "hosts" file in the client computer’s
<Windows folder>\system32\drivers\etc folder.
3.
If the connection status on the client is online but offline on the server, check the
OfficeScan firewall settings. The firewall may block server-to-client
communication, but allow client-to-server communication.
4.
If the connection status on the client is online but offline on the server, the client's
IP address may have been changed but its status does not reflect on the server (for
example, when the client is reloaded). Try to redeploy the client.
A Client Cannot Connect to a Smart Scan Server
1. Check if the following Computer Location settings have been configured properly:
9-36
•
Reference servers and port numbers
•
Gateway IP addresses
2.
Check if the Smart Scan Server address on the standard or custom list of scan
servers is correct.
3.
Test if connection using the server address can be established. Also ensure that you
click Notify All Clients after configuring the list. See Smart Scan Source on page
5-15 for details.
4.
Check if the following configuration files on the Smart Scan Server and OfficeScan
client are synchronized:
•
sscfg.ini
•
ssnotify.ini
Managing Clients
5.
Verify from the registry whether or not a client is connected to the corporate
network.
Key:
HKEY_LOCAL_MACHINE\SOFTWARE\TrendMicro\PC-cillinNTCorp\Curr
entVersion\iCRC Scan\Scan Server
6.
•
If LocationProfile=1, the client is connected to the network and should
connect to a local Smart Scan Server.
•
If LocationProfile=2, the client is not connected to the network and should
connect to the Global Smart Scan Server. From Internet Explorer, check if the
client computer can browse Internet Web pages.
Check internal proxy and external proxy settings used to connect to Smart Scan
Servers (local and global).
Client-Server Connection Verification
The client connection status with the OfficeScan server displays on the OfficeScan Web
console’s client tree.
FIGURE 9-21. Client tree displaying client connection status with
OfficeScan server
Certain conditions may prevent the client tree from displaying the correct client
connection status. For example, if you accidentally unplug the network cable of a client
computer, the client will not be able to notify the server that it is now offline. This client
will still appear as online in the client tree.
9-37
Trend Micro™ OfficeScan™ 10 Administrator’s Guide
Verify client-server connection manually or let OfficeScan perform scheduled
verification. You cannot select specific domains or clients and then verify their
connection status. OfficeScan verifies the connection status of all its registered clients.
To verify client-server connection:
P ATH : N ETWORKED C OMPUTERS > C ONNECTION VERIFICATION
1.
To verify client-server connection manually, go to the Manual Verification tab
and click Verify Now.
2.
To verify client-server connection automatically, go to the Scheduled Verification
tab.
3.
a.
Select Enable scheduled verification.
b.
Select the verification frequency and start time.
c.
Click Save to save the verification schedule.
Check the client tree to verify the status or view the connection verification logs.
Connection Verification Logs
OfficeScan keeps connection verification logs to allow you to determine whether or not
the OfficeScan server can communicate with all of its registered clients. OfficeScan
creates a log entry each time you verify client-server connection from the Web console.
To keep the size of logs from occupying too much space on the hard disk, manually
delete logs or configure a log deletion schedule. For more information about managing
logs, see Managing Logs on page 8-16.
To view connection verification logs:
P ATH : L OGS > N ETWORKED C OMPUTER L OGS > C ONNECTION VERIFICATION
9-38
1.
View connection verification results by checking the Status column.
2.
To save the log to a comma-separated value (CSV) file, click Export to CSV. Open
the file or save it to a specific location. A CSV file usually opens with a spreadsheet
application such as Microsoft Excel.
Managing Clients
Client Proxy Settings
Configure OfficeScan clients to use proxy settings when connecting to internal and
external servers.
Internal Proxy
Clients can use internal proxy settings to connect to the following servers on the
network:
OfficeScan server computer
The server computer hosts the OfficeScan server and the integrated Smart Scan Server.
Clients connect to the OfficeScan server to update components, obtain configuration
settings, and send logs. Clients connect to the integrated Smart Scan Server to send scan
queries.
Local Smart Scan Servers
Local Smart Scan Servers include all standalone Smart Scan Servers and the integrated
Smart Scan Server of other OfficeScan servers. Clients connect to the servers to send
scan queries.
To configure internal proxy settings:
P ATH : A DMINISTRATION > P ROXY S ETTINGS > I NTERNAL P ROXY
TAB
1.
Select the check box to enable the use of a proxy server.
2.
Specify the proxy server name or IP address, and port number.
3.
If the proxy server requires authentication, type the user name and password in the
fields provided.
4.
Click Save.
9-39
Trend Micro™ OfficeScan™ 10 Administrator’s Guide
External Proxy
The OfficeScan server and client can use external proxy settings when connecting to
servers hosted by Trend Micro. This topic discusses external proxy settings for clients.
For external proxy settings for the server, see Proxy for Server Update on page 4-16.
Clients use the proxy settings configured in Internet Explorer to connect to the Trend
Micro Global Smart Scan Server and Web Reputation servers. If proxy server
authentication is required, clients will use the authentication credentials (user ID and
password) specified on this screen.
Trend Micro Global Smart Scan Server
When smart scan clients are outside the corporate network, they connect to the Global
Smart Scan Server to send scan queries.
Web reputation servers
Clients connect to the Trend Micro Web reputation servers to determine if Web sites
that users attempt to access are safe.
To configure proxy server authentication credentials:
P ATH : A DMINISTRATION > P ROXY S ETTINGS > E XTERNAL P ROXY
1.
On the Client Connection with Trend Micro Servers section, type the user ID
and password needed for proxy server authentication.
The following proxy authentication protocols are supported:
9-40
•
Basic access authentication
•
Digest access authentication
•
Integrated Windows Authentication
2.
Confirm the password.
3.
Click Save.
Managing Clients
Client Mover
If you have more than one OfficeScan server on the network, use the Client Mover tool
to transfer clients from one OfficeScan server to another. This is especially useful after
adding a new OfficeScan server to the network and you want to transfer existing
OfficeScan clients to the new server.
Note:
The two servers must be of the same language version. If you use Client Mover to
move an OfficeScan client running an earlier version (such as version 7.x) to a server
of the current version, the client will be upgraded automatically.
To run Client Mover:
1.
On the OfficeScan server, go to <Server installation
folder>\PCCSRV\Admin\Utility\IpXfer.
2.
Copy IpXfer.exe to the client computer. If the client computer runs an x64 type
platform, copy IpXfer_x64.exe instead.
3.
On the client computer, open a command prompt and then navigate to the folder
where you copied the executable file.
4.
Run Client Mover using the following syntax:
<executable file name> -s <server_name> -p <server_listening_port>
[-c <client_listening_port>]
Where:
<executable file name> is either IpXfer.exe or IpXfer_x64.exe
<server_name> is the name of the destination OfficeScan server (the server to
which the client will transfer)
<server_listening_port> is the listening port (or trusted port) of the destination
OfficeScan server. To view the listening port on the OfficeScan Web console, click
Administration > Connection Settings in the main menu.
<client_listening_port> is the port number used by the client computer to
communicate with the server
9-41
Trend Micro™ OfficeScan™ 10 Administrator’s Guide
5.
To confirm the client now reports to the other server, do the following:
a.
On the client computer, right-click the OfficeScan client program icon in the
system tray.
b.
Select OfficeScan Console.
c.
Click Help in the menu and select About.
d. Check the OfficeScan server that the client reports to in the Server
name/port field.
Note:
If the client does not appear in the client tree of the new OfficeScan server
managing it, restart the new server’s Master Service (ofservice.exe).
Touch Tool
The Touch Tool synchronizes the time stamp of one file with the time stamp of another
file or with the system time of the computer. If you unsuccessfully attempt to deploy a
hot fix on the OfficeScan server, use the Touch Tool to change the time stamp of the
hot fix. This causes OfficeScan to interpret the hot fix file as new, which makes the
server attempt to automatically deploy the hot fix again.
To run Touch Tool:
9-42
1.
On the OfficeScan server, go to <Server installation
folder>\PCCSRV\Admin\Utility\Touch.
2.
Copy TMTouch.exe to the folder that contains the file you want to change. If
synchronizing the file time stamp with the time stamp of another file, put both files
in the same location with the Touch tool.
3.
Open a command prompt and go to the location of the Touch Tool.
Managing Clients
4.
Type the following:
TmTouch.exe <destination file name> <source file name>
Where:
<destination file name> is the name of the hot fix file whose time stamp you want
to change
<source file name> is the name of the file whose time stamp you want to replicate
Note:
If you do not specify a source file name, the tool sets the destination file time
stamp to the system time of the computer.
Use the wild card character (*) for the destination file, but not for the source file
name.
5.
To verify if the time stamp changed, type dir in the command prompt, or check the
file’s properties from Windows Explorer.
Client Information
View important information about OfficeScan clients, including privileges, client
software details and system events.
To view client information:
P ATH : N ETWORKED C OMPUTERS > C LIENT M ANAGEMENT > STATUS
1.
View the selected client's status by expanding the client computer's name. The
Reset buttons allow you to set the security risk count back to zero.
2.
If you selected multiple clients, click Expand All to view all the selected clients'
details.
9-43
Trend Micro™ OfficeScan™ 10 Administrator’s Guide
Importing and Exporting Client Settings
You may want many OfficeScan clients to have the same scan and/or client privilege
settings. OfficeScan allows you to save (export) a specific client’s scan settings and
privileges and then replicate (import) them to multiple clients. This provides an easy way
to configure identical settings on many clients.
You cannot export the scan and privilege settings of multiple clients. You can only
export the settings of a single client, a domain, or the root.
Tip: If you grouped clients with similar protection requirements into a domain, Trend Micro
recommends configuring the settings of one client, exporting its settings, and importing
the settings file to the remainder of the clients in the domain.
To export client settings to a file:
P ATH : N ETWORKED C OMPUTERS > C LIENT M ANAGEMENT > S ETTINGS > E XPORT S ETTINGS
1.
Click any of the links to view the settings for the clients or domains you selected.
2.
Click Export to save the settings. The settings are saved in a .dat file.
3.
Click Save and then specify the location to which you want to save the .dat file.
4.
Click Save.
To import client settings:
P ATH : N ETWORKED C OMPUTERS > C LIENT M ANAGEMENT > S ETTINGS > I MPORT S ETTINGS
9-44
1.
Click Browse to locate the .dat file on the computer and click Import. The Import
Settings screen appears, showing a summary of the settings.
2.
Click any of the scan or privilege settings links to view details regarding those
settings.
3.
Import the settings.
•
If you selected the root icon on the client tree, import settings by selecting
Apply to all domains, and then clicking Apply to Target.
•
If you selected domains, import settings by selecting Apply to all computers
belonging to the selected domain(s), and then clicking Apply to Target.
•
If you selected several clients, import settings by clicking Apply to Target.
Managing Clients
Managing Inactive Clients
When you use the client uninstallation program to remove the client program from a
computer, the program automatically notifies the server. When the server receives this
notification, it removes the client icon in the client tree to show that the client does not
exist anymore.
However, if you use other methods to remove the client, such as reformatting the
computer hard drive or deleting the client files manually, OfficeScan will not be aware of
the removal and it will display the client as inactive. If a user unloads or disables the
client for an extended period of time, the server also displays the client as inactive.
To have the client tree display active clients only, configure OfficeScan to automatically
remove inactive clients from the client tree.
To automatically remove inactive clients:
P ATH : A DMINISTRATION > I NACTIVE C LIENTS
1.
Select Enable automatic removal of inactive clients.
2.
Select how many days should pass before OfficeScan considers a client inactive.
3.
Click Save.
9-45
Trend Micro™ OfficeScan™ 10 Administrator’s Guide
9-46
Section 3
Providing Additional Protection
Trend Micro™ OfficeScan™ 10 Administrator’s Guide
Chapter 10
Policy Server for Cisco NAC
Topics in this chapter:
• About Policy Server for Cisco NAC on page 10-2
•
Components and Terms on page 10-2
•
Cisco NAC Architecture on page 10-6
•
The Client Validation Sequence on page 10-7
•
The Policy Server on page 10-9
•
Synchronization on page 10-17
•
Certificates on page 10-17
•
Policy Server System Requirements on page 10-19
•
Cisco Trust Agent (CTA) Requirements on page 10-20
•
Supported Platforms and Requirements on page 10-21
•
Policy Server for NAC Deployment on page 10-23
This chapter includes basic instructions to set up and configure Policy Server for Cisco
NAC. For more information about configuring and administering Cisco Secure ACS
servers and other Cisco products, see the most recent Cisco documentation available at
the following Web site: http://www.cisco.com/univercd/home/home.htm
10-1
Trend Micro™ OfficeScan™ 10 Administrator’s Guide
About Policy Server for Cisco NAC
Trend Micro Policy Server for Cisco Network Admission Control (NAC) evaluates the
status of antivirus components on OfficeScan clients. Policy Server configuration
options give you the ability to configure settings to perform actions on at-risk clients to
bring them into compliance with the organization’s security initiative.
These actions include the following:
•
Instruct client computers to update their OfficeScan client components
•
Enable Real-time Scan
•
Perform Scan Now
•
Display a notification message on client computers to inform users of the antivirus
policy violation
For additional information on Cisco NAC technology, see the Cisco Web site at:
http://www.cisco.com/go/nac
Components and Terms
The following is a list of the various components and the important terms you need to
become familiar with to understand and use Policy Server for Cisco NAC.
Components
The following components are necessary in the Trend Micro implementation of Policy
Server for Cisco NAC:
TABLE 10-42. Policy Server for Cisco NAC components
C OMPONENT
10-2
D ESCRIPTION
Cisco Trust Agent
(CTA)
A program installed on a client computer that allows it to
communicate with other Cisco NAC components
OfficeScan client
computer
A computer with the OfficeScan client program installed.
To work with Cisco NAC, the client computer also requires
the Cisco Trust Agent.
Policy Server for Cisco NAC
TABLE 10-42. Policy Server for Cisco NAC components (Continued)
C OMPONENT
Network Access
Device
D ESCRIPTION
A network device that supports Cisco NAC functionality.
Supported Network Access Devices include a range of
Cisco routers, firewalls, and access points, as well as
third-party devices with Terminal Access Controller Access
Control System (TACACS+) or the Remote Dial-In User
Service (RADIUS) protocol.
For a list of supported devices, see Supported Platforms and
Requirements on page 10-21.
Cisco Secure
Access Control
Server (ACS)
A server that receives OfficeScan client antivirus data from
the client through the Network Access Device and passes
it to an external user database for evaluation. Later in the
process, the ACS server also passes the result of the evaluation, which may include instructions for the OfficeScan
client, to the Network Access Device.
Policy Server
A program that receives and evaluates OfficeScan client
antivirus data. After performing the evaluation, the Policy
Server determines the actions the OfficeScan client should
carry out and then notifies the client to perform the
actions.
OfficeScan server
Reports the current Virus Pattern and Virus Scan Engine
versions to the Policy Server, which uses this information
to evaluate the OfficeScan client’s antivirus status.
10-3
Trend Micro™ OfficeScan™ 10 Administrator’s Guide
Terms
Become familiar with the following terms related to Policy Server for Cisco NAC:
TABLE 10-43. Terms related to Policy Server for Cisco NAC
10-4
TERM
D EFINITION
Security posture
The presence and currency of antivirus software on a client.
In this implementation, security posture refers to whether or
not the OfficeScan client program exists on client computers,
the status of certain OfficeScan client settings, and whether or
not the Virus Scan Engine and Virus Pattern are up-to-date.
Posture token
Created by the Policy Server after OfficeScan client validation. It includes information that tells the OfficeScan client to
perform a set of specified actions, such as enabling Real-time
Scan or updating antivirus components.
Client validation
The process of evaluating client security posture and returning the posture token to the client
Policy Server
rule
Guidelines containing configurable criteria the Policy Server
uses to measure OfficeScan client security posture. A rule
also contains actions for the client and the Policy Server to
carry out if the security posture information matches the criteria (see Policy Server Policies and Rules on page 10-10 for
detailed information).
Policy Server
policy
A set of rules against which the Policy Server measures the
security posture of OfficeScan clients. Policies also contain
actions that clients and the Policy Server carry out if the criteria in the rules associated with the policy do not match the
security posture (see Policy Server Policies and Rules on page
10-10 for detailed information).
Policy Server for Cisco NAC
TABLE 10-43. Terms related to Policy Server for Cisco NAC (Continued)
TERM
D EFINITION
Authentication, Authorization, and
Accounting
(AAA)
Describes the three main services used to control end-user
client access to computer resources. Authentication refers to
identifying a client, usually by having the user enter a user
name and password. Authorization refers to the privileges the
user has to issue certain commands. Accounting refers to a
measurement, usually kept in logs, of the resources utilized
during a session. The Cisco Secure Access Control Server
(ACS) is the Cisco implementation of an AAA server.
Certificate
Authority (CA)
An authority on a network that distributes digital certificates
for the purposes of performing authentication and securing
connections between computers and/or servers.
Digital
Certificates
An attachment used for security. Most commonly, certificates
authenticate clients with servers, such as a Web server, and
contain the following: user identity information, a public key
(used for encryption), and a digital signature of a Certificate
authority (CA) to verify that the certificate is valid.
Remote
Authentication Dial-In
User Service
(RADIUS)
An authentication system requiring clients to enter a user
name and password. Cisco Secure ACS servers support
RADIUS.
Terminal
Access Controller Access
Control System
(TACACS+)
A security protocol enabled through AAA commands used for
authenticating end-user clients. Cisco ACS servers support
TACACS+.
10-5
Trend Micro™ OfficeScan™ 10 Administrator’s Guide
Cisco NAC Architecture
The following diagram illustrates a basic Cisco NAC architecture.
Cisco
Secure
Access
Control
Server
Trend Micro Policy
Server for Cisco NAC
OfficeScan
server
Cisco NAC-supported
Network Access Device
OfficeScan client with
CTA installation
FIGURE 10-22. Basic Cisco NAC architecture
The OfficeScan client in this figure has a CTA installation and is only able to access the
network through a Network Access Device that supports Cisco NAC. The Network
Access Device is between the client and the other Cisco NAC components.
Note:
10-6
The architecture of your network may differ based on the presence of proxy servers,
routers, or firewalls.
Policy Server for Cisco NAC
The Client Validation Sequence
Client validation refers to the process of evaluating an OfficeScan client’s security
posture and returning instructions for the client to perform if the Policy Server
considers it to be at-risk. The Policy Server validates an OfficeScan client by using
configurable rules and policies.
Below is the sequence of events that occurs when an OfficeScan client attempts to
access the network:
1.
The Cisco Network Access Device starts the validation sequence by requesting the
security posture of the client when it attempts to access the network.
2.
The Network Access Device then passes the security posture to the ACS server.
3.
The ACS server passes the security posture to the Policy Server, which performs
the evaluation.
4.
In a separate process, the Policy Server periodically polls the OfficeScan server for
Virus Pattern and Virus Scan Engine version information to keep its data current.
It then uses a policy you configure to perform a comparison of this information
with the client security posture data.
5.
Following that, the Policy Server creates a posture token, and passes it back to the
OfficeScan client.
10-7
Trend Micro™ OfficeScan™ 10 Administrator’s Guide
6.
The client performs the actions configured in the posture token.
OfficeScan
client
Network
Access Device
Cisco
Secure ACS
Policy
Server
for
Cisco
NAC
Request to connect to network
Request security posture
Pass security
posture (Virus
Pattern and
Virus Scan
Engine version)
Pass security
posture
Pass security
posture
Return posture
token
Return posture
token
Return posture
token
Carry out actions specified
in the posture token and
retry connection to the
network.*
The validation sequence
repeats.
Office
Scan
server
Request current
version of Virus
Pattern and Virus
Scan Engine
Return current
version of the
Virus Pattern
and Virus Scan
Engine
Use security
posture to validate client. The
Policy Server
uses policies to
compare client
security posture
with the most
recent versions
of the Virus Pattern and Virus
Scan Engine.
* The client retries to access the network when the Network Access
Device timer expires. See the Cisco router documentation for information
on configuring the timer.
FIGURE 10-23. Network access validation sequence
10-8
Policy Server for Cisco NAC
The Policy Server
The Policy Server is responsible for evaluating the OfficeScan client’s security posture
and for creating the posture token. It compares the security posture with the latest
versions of the Virus Pattern and Virus Scan Engine received from the OfficeScan
server to which the client is a member. It returns the posture token to the Cisco Secure
ACS server, which in turn passes it to the client from the Cisco Network Access Device.
Installing additional Policy Servers on a single network can improve performance when
a large number of clients simultaneously attempt to access the network. These Policy
Servers can also act as a backup if a Policy Server becomes inoperable. If there are
multiple OfficeScan servers on a network, the Policy Server handles requests for all
OfficeScan servers registered to it. Likewise, multiple Policy Servers can handle requests
for a single OfficeScan server registered to all the Policy Servers. The following figure
illustrates the relationship of multiple OfficeScan servers and Policy Servers.
Cisco
Secure ACS
Policy
servers
OfficeScan
servers
Network
Access
Device
OfficeScan client
FIGURE 10-24. Multiple Policy Server/OfficeScan server relationship
You can also install the Policy Server on the same computer as the OfficeScan server.
10-9
Trend Micro™ OfficeScan™ 10 Administrator’s Guide
Policy Server Policies and Rules
Policy Servers use configurable rules and policies to help enforce your organization’s
security guidelines.
Rules include specific criteria that Policy Servers use to compare with the security
posture of OfficeScan clients. If the client security posture matches the criteria you
configure in a rule, the client and server carry out the actions you specify in the rule (see
Policy Server and OfficeScan Client Actions on page 10-12).
Policies include one or more rules. Assign one policy to each registered OfficeScan server
on the network for both outbreak mode and normal mode (see Outbreak Protection on
page 5-57 for more information on network modes).
If the OfficeScan client security posture matches the criteria in a rule that belongs to the
policy, the OfficeScan client carries out the actions you configure in the rule. However, if
the client security posture does not match any of the criteria in any of the rules
associated with the policy, you can still configure default actions in the policy for the
client and server to carry out (see Policy Server and OfficeScan Client Actions on page 10-12).
Tip: If you want certain clients in an OfficeScan domain to have different outbreak and
normal mode policies from other clients in the same domain, Trend Micro suggests
restructuring the domains to group clients with similar requirement (see OfficeScan
Domains on page 2-20).
Rule Composition
Rules include security posture criteria, default responses associated with clients, and
actions that clients and the Policy Server perform.
10-10
Policy Server for Cisco NAC
Security Posture Criteria
Rules include the following security posture criteria:
•
Client machine state: If the client computer is in the booting state or not
•
Client Real-time Scan status: If Real-time Scan is enabled or disabled
•
Client scan engine version currency: If the Virus Scan Engine is up-to-date
•
Client virus pattern file status: How up-to-date the Virus Pattern is. The Policy
Server determines this by checking one of the following:
•
If the Virus Pattern is a certain number of versions older than the Policy Server
version
•
If the Virus Pattern became available a certain number of days prior to the
validation
Default Responses for Rules
Responses help you understand the condition of OfficeScan clients on the network
when client validation occurs. The responses, which appear in the Policy Server client
validation logs, correspond to posture tokens. Choose from the following default
responses:
•
Healthy: The client computer conforms to the security policies and is not infected.
•
Checkup: The client needs to update its antivirus components.
•
Infected: The client computer is infected or is at risk of infection.
•
Transition: The client computer is in the booting state.
•
Quarantine: The client computer is at high risk of infection and requires
quarantine.
•
Unknown: Any other condition
Note:
You cannot add, delete, or modify responses.
10-11
Trend Micro™ OfficeScan™ 10 Administrator’s Guide
Policy Server and OfficeScan Client Actions
If the client security posture matches the rule criteria, the Policy Server can carry out the
following action:
•
Creates an entry in a Policy Server client validation log (see Client Validation Logs on
page 10-39 for more information)
If the client security posture matches the rule criteria, the OfficeScan client can carry out
the following actions:
•
Enable client Real-time Scan so the OfficeScan client can scan all opened or saved
files (see Real-time Scan on page 5-19 for more information)
•
Update all OfficeScan components (see OfficeScan Components and Programs on page
4-2 for more information)
•
Scan the client (Scan Now) after enabling Real-time Scan or after an update
•
Display a notification message on the client computer
Default Rules
Policy Server provides default rules to give you a basis for configuring settings. The rules
cover common and recommended security posture conditions and actions. The
following rules are available by default:
TABLE 10-44. Default rules
R ULE
N AME
Healthy
10-12
M ATCHING
C RITERIA
Real-time
Scan status is
enabled and
Virus Scan
Engine and
Virus Pattern
are up-to-date.
R ESPONSE
IF
C RITERIA
M ATCHED
Healthy
S ERVER
A CTION
None
C LIENT A CTION
None
Policy Server for Cisco NAC
TABLE 10-44. Default rules (Continued)
R ULE
N AME
Checkup
M ATCHING
C RITERIA
Virus Pattern
version is at
least one version older than
the version on
the OfficeScan server to
which the client is registered.
R ESPONSE
IF
C RITERIA
M ATCHED
Checkup
S ERVER
A CTION
Create
entry in
client
validation log
C LIENT A CTION
• Update
components
• Perform automatic
Cleanup Now on
the client after
enabling
Real-time Scan or
after an update
• Display
notification
message on the
client computer
Tip: If you use this
rule, use
automatic
deployment.
This helps
ensure that
clients receive
the latest Virus
Pattern
immediately
after the
OfficeScan
downloads new
components.
Transition
Client computer is in the
booting state.
Transition
None
None
10-13
Trend Micro™ OfficeScan™ 10 Administrator’s Guide
TABLE 10-44. Default rules (Continued)
R ULE
N AME
Quarantine
M ATCHING
C RITERIA
Virus Pattern
version is at
least five versions older
than the version on the
OfficeScan
server to which
the client is
registered.
R ESPONSE
IF
C RITERIA
M ATCHED
Quarantine
S ERVER
A CTION
Create
entry in
client
validation log
C LIENT A CTION
• Update
components
• Perform automatic
Cleanup Now and
Scan Now on the
client after
enabling
Real-time Scan or
after an update
• Display
notification
message on the
client computer
Not protected
10-14
Real-time
Scan status is
disabled.
Infected
Create
entry in
client
validation log
• Enable client
Real-time Scan
• Display
notification
message on the
client computer
Policy Server for Cisco NAC
Policy Composition
Policies include of any number of rules and default responses and actions.
Rule Enforcement
Policy Server enforces rules in a specific order, which allows you to prioritize rules.
Change the order of rules, add new ones, and remove existing ones from a policy.
Default Responses for Policies
As with rules, policies include default responses to help you understand the condition of
OfficeScan clients on the network when client validation occurs. However, the default
responses are associated with clients only when client security posture does NOT match
any rules in the policy.
The responses for policies are the same as those for rules (see Default Responses for Rules
on page 10-11 for the list of responses).
Policy Server and OfficeScan Client Actions
The Policy Server enforces rules to clients by subjecting client posture information to
each of the rules associated with a policy. Rules are applied top-down based on the rules
in use specified on the Web console. If the client posture matches any of the rules, the
action corresponding to the rule is deployed to the client. If no rules match, the default
rule applies and the action corresponding to the default rule is deployed to clients.
Default Outbreak Mode Policy evaluates OfficeScan clients using the "Healthy" rule. It
forces all clients that do not match this rule to immediately implement the actions for
the "Infected" response.
Default Normal Mode Policy evaluates OfficeScan clients using all the non-"Healthy"
rules (Transition, Not Protected, Quarantine, CheckUp). It classifies all clients that do
not match any of these rules as "healthy" and applies the actions for the "Healthy" rule.
10-15
Trend Micro™ OfficeScan™ 10 Administrator’s Guide
Default Policies
Policy Server provides default policies to give you a basis for configuring settings. Two
policies are available, one for normal mode and one for outbreak mode.
TABLE 10-45. Default policies
P OLICY N AME
Default Normal
Mode Policy
D ESCRIPTION
• Default rules associated with policy: Transition, Not
protected, Quarantine, and Checkup
• Response if none of the rules match: Healthy
• Server action: None
• Client action: None
Default Outbreak
Mode Policy
• Default rules associated with policy: Healthy
• Response if none of the rules match: Infected
• Server action: Create entry in client validation log
• Client action:
• Enable client Real-time Scan
• Update components
• Perform Scan Now on the client after enabling
Real-time Scan or after an update
• Display a notification message on the client
computer
10-16
Policy Server for Cisco NAC
Synchronization
Regularly synchronize the Policy Server with registered OfficeScan servers to keep the
Policy Server versions of the Virus Pattern, Virus Scan Engine, and server outbreak
status (normal mode or outbreak mode) up-to-date with those on the OfficeScan server.
Use the following methods to perform synchronization:
•
Manually: Perform synchronization at any time on the Summary screen (see
Summary Information for a Policy Server on page 10-36).
•
By schedule: Set a synchronization schedule (see Administrative Tasks on page
10-39).
Certificates
Cisco NAC technology uses the following digital certificates to establish successful
communication between various components:
TABLE 10-46. Cisco NAC certificates
C ERTIFICATE
D ESCRIPTION
ACS certificate
Establishes trusted communication between the ACS server
and the Certificate Authority (CA) server. The Certificate
Authority server signs the ACS certificate before you save it
on the ACS server.
CA certificate
Authenticates OfficeScan clients with the Cisco ACS server.
The OfficeScan server deploys the CA certificate to both the
ACS server and to OfficeScan clients (packaged with the
Cisco Trust Agent).
Policy Server
SSL certificate
Establishes secure HTTPS communication between the Policy
Server and ACS server. The Policy Server installer automatically generates the Policy Server SSL certificate during Policy
Server installation.
The Policy Server SSL certificate is optional. However, use it
to ensure that only encrypted data transmits between the Policy Server and ACS server.
10-17
Trend Micro™ OfficeScan™ 10 Administrator’s Guide
The figure below illustrates the steps involved in creating and deploying ACS and CA
certificates:
Certificate Authority (CA) server
ACS
certificate
CA certificate
CA certificate
OfficeScan
server
Cisco Secure
ACS server
CA certificate
with CTA
OfficeScan client
FIGURE 10-25. ACS and CA certificate creation and deployment
1.
After the ACS server issues a certificate signing request to the CA server, the CA
issues a certificated called ACS certificate. The ACS certificate then installs on the
ACS server. See Cisco Secure ACS Server Enrolment on page 10-24 for more
information.
2.
A CA certificate is exported from the CA server and installed on the ACS server.
See CA Certificate Installation on page 10-24 for detailed instructions.
3.
A copy of the same CA certificate is saved on the OfficeScan server.
4.
The OfficeScan server deploys the CA certificate to clients with the CTA. See Cisco
Trust Agent Deployment on page 10-26 for detailed instructions.
10-18
Policy Server for Cisco NAC
The CA Certificate
OfficeScan clients with CTA installations authenticate with the ACS server before
communicating client security posture. Several methods are available for authentication
(see the Cisco Secure ACS documentation for details). For example, you may already
have enabled computer authentication for Cisco Secure ACS using Windows Active
Directory, which you can configure to automatically produce an end user client
certificate when adding a new computer in Active Directory. For instructions, see
Microsoft Knowledge Base Article 313407, HOW TO: Create Automatic Certificate
Requests with Group Policy in Windows.
For users with their own Certificate Authority (CA) server, but whose end user clients
do not yet have certificates, OfficeScan provides a mechanism to distribute a root
certificate to OfficeScan clients. Distribute the certificate during OfficeScan installation
or from the OfficeScan Web Console. OfficeScan distributes the certificate when it
deploys the Cisco Trust Agent to clients (see Cisco Trust Agent Deployment on page 10-26).
Note:
If you already acquired a certificate from a Certificate Authority or produced your
own certificate and distributed it to end user clients, it is not necessary to do so again.
Before distributing the certificate to clients, enroll the ACS server with the CA server
and then prepare the certificate (see Cisco Secure ACS Server Enrolment on page 10-24 for
details).
Policy Server System Requirements
Before installing Policy Server, check if the computer meets the following requirements:
Operating System
• Windows 2000 Professional with Service Pack 4
•
Windows 2000 Server with Service Pack 4
•
Windows 2000 Advanced Server with Service Pack 4
•
Windows XP Professional with Service Pack 2 or later, 32-bit and 64-bit
•
Windows Server 2003 (Standard and Enterprise Editions) with Service Pack 2 or
later, 32-bit and 64-bit
•
Windows Cluster Server 2000
10-19
Trend Micro™ OfficeScan™ 10 Administrator’s Guide
Hardware
• 300MHz Intel Pentium II processor or equivalent
•
128MB of RAM
•
300MB of available disk space
•
Monitor that supports 800 x 600 resolution at 256 colors or higher
Web Server
• Microsoft Internet Information Server (IIS) versions 5.0 or 6.0
•
Apache Web server 2.0 or later (for Windows 2000/XP/Server 2003 only)
Web Console
To use the OfficeScan server Web console, the following are required:
•
133MHz Intel Pentium processor or equivalent
•
64MB of RAM
•
30MB of available disk space
•
Monitor that supports 800 x 600 resolution at 256 colors or higher
•
Microsoft Internet Explorer 5.5 or later
Cisco Trust Agent (CTA) Requirements
Before deploying Cisco Trust Agent to client computers, check if the computers meet
the following requirements:
Operating System
• Windows 2000 Professional and Server with Service Pack 4
•
Windows XP Professional with Service Pack 2 or later, 32-bit
•
Windows Server 2003 (Standard and Enterprise Editions) with Service Pack 2 or
later, 32-bit
10-20
Policy Server for Cisco NAC
Hardware
• 200MHz single or multiple Intel Pentium processors
•
128MB of RAM for Windows 2000
•
256MB of RAM for Windows XP and 2003
•
5MB of available disk space (20MB recommended)
Others
• Windows Installer 2.0 or later
Supported Platforms and Requirements
The following platforms support the Cisco NAC functionality:
TABLE 10-47. Supported platforms and requirements
S UPPORTED
P LATFORM
M ODELS
IOS I MAGES
M INIMUM
M EMORY /F LASH
R OUTERS
Cisco 830, 870
series
831, 836, 837
IOS 12.3(8) or
later
48MB/8MB
Cisco 1700 series
1701, 1711,
1712, 1721,
1751, 1751-V,
1760
IOS 12.3(8) or
later
64MB/16MB
Cisco 1800 series
1841
IOS 12.3(8) or
later
128MB/32MB
Cisco 2600 series
2600XM, 2691
IOS 12.3(8) or
later
96MB/32MB
Cisco 2800 series
2801, 2811,
2821, 2851
IOS 12.3(8) or
later
128MB/64MB
10-21
Trend Micro™ OfficeScan™ 10 Administrator’s Guide
TABLE 10-47. Supported platforms and requirements (Continued)
S UPPORTED
P LATFORM
M ODELS
IOS I MAGES
M INIMUM
M EMORY /F LASH
Cisco 3600 series
3640/3640A,
3660-ENT series
IOS 12.3(8) or
later
48MB/16MB
Cisco 3700 series
3745, 3725
IOS 12.3(8) or
later
128MB/32MB
Cisco 3800 series
3845, 3825
IOS 12.3(8) or
later
256MB/64MB
Cisco 7200 series
720x, 75xx
IOS 12.3(8) or
later
128MB/48MB
VPN C ONCENTRATORS
Cisco VPN 3000
Series
3005 - 3080
V4.7 or later
N/A
S WITCHES
Cisco Catalyst
2900
2950, 2970
IOS 12.1(22)EA5
N/A
Cisco Catalyst
3x00
3550, 3560, 3750
IOS 12.2(25)SEC
N/A
Cisco Catalyst
4x00
Supervisor 2+ or
higher
IOS 12.2(25)EWA
N/A
Cisco Catalyst
6500
6503, 6509,
Supervisor 2 or
higher
CatOS 8.5 or
later
Sup2 - 128MB,
Sup32 - 256MB,
Sup720 - 512MB
W IRELESS A CCESS P OINTS
Cisco AP1200
Series
10-22
1230
N/A
N/A
Policy Server for Cisco NAC
Policy Server for NAC Deployment
The following procedures are for reference only and may be subject to change
depending on updates to either the Microsoft and/or Cisco interfaces.
Before performing any of the tasks, verify that the Network Access Device(s) on the
network are able to support Cisco NAC (see Supported Platforms and Requirements on page
10-21). See the device documentation for set up and configuration instructions. Also,
install the ACS server on the network. See the Cisco Secure ACS documentation for
instructions.
1.
Install the OfficeScan server on the network (see the Installation and Upgrade Guide).
2.
Install the OfficeScan client program on all clients whose antivirus protection you
want Policy Server to evaluate.
3.
Enroll the Cisco Secure ACS server. Establish a trusted relationship between the
ACS server and a Certificate Authority (CA) server by having the ACS server issue a
certificate signing request. Then save the CA-signed certificate (called the ACS
certificate) on the ACS server (see Cisco Secure ACS Server Enrolment on page 10-24
for details).
4.
Export the CA certificate to the ACS server and store a copy on the OfficeScan
server. This step is only necessary if you have not deployed a certificate to clients
and the ACS server (see CA Certificate Installation on page 10-24).
5.
Deploy the Cisco Trust Agent and the CA certificate to all OfficeScan clients so
clients can submit security posture information to the Policy server (see Cisco Trust
Agent Deployment on page 10-26).
6.
Install the Policy Server for Cisco NAC to handle requests from the ACS server (see
Policy Server for Cisco NAC Installation on page 10-30).
7.
Export an SSL certificate from the Policy Server to the Cisco ACS server to
establish secure SSL communications between the two servers (see Policy Server for
Cisco NAC Installation on page 10-30).
8.
Configure the ACS server to forward posture validation requests to the Policy
Server (see ACS Server Configuration on page 10-35).
9.
Configure the Policy Server for NAC. Create and modify Policy Server rules and
policies to enforce your organization’s security strategy for OfficeScan clients (see
Policy Server for Cisco NAC Configuration on page 10-35).
10-23
Trend Micro™ OfficeScan™ 10 Administrator’s Guide
Cisco Secure ACS Server Enrolment
Enroll the Cisco Secure ACS server with the Certificate Authority (CA) server to
establish a trust relationship between the two servers. The following procedure is for
users running a Windows Certification Authority server to manage certificates on the
network. Refer to the vendor documentation if using another CA application or service
and see the ACS server documentation for instructions on how to enroll a certificate.
CA Certificate Installation
The OfficeScan client authenticates with the ACS server before it sends security posture
data. The CA certificate is necessary for this authentication to take place. First, export
the CA certificate from the CA server to both the ACS server and the OfficeScan server,
then create the CTA agent deployment package. The package includes the CA certificate
(see The CA Certificate on page 10-19 and Cisco Trust Agent Deployment on page 10-26).
Perform the following to export and install the CA certificate:
•
Export the CA certificate from the Certificate Authority server
•
Install it on the Cisco Secure ACS server
•
Store a copy on the OfficeScan server
Note:
The following procedure is for users running a Windows Certification Authority
server to manage certificates on the network. Refer to the vendor documentation if
you use another Certification Authority application or service.
To export and install the CA certificate for distribution:
1.
Export the certificate from the Certification Authority (CA) server:
a.
On the CA server, click Start > Run. The Run screen opens.
b.
Type mmc in the Open box. A new management console screen opens.
c.
Click File > Add/Remove Snap-in. the Add/Remove Snap-in screen
appears.
d. Click Certificates and click Add. The Certificates snap-in screen opens.
10-24
e.
Click Computer Account and click Next. The Select Computer screen opens.
f.
Click Local Computer and click Finish.
Policy Server for Cisco NAC
g.
Click Close to close the Add Standalone Snap-in screen.
h. Click OK to close the Add/remove Snap-in screen.
i.
In the tree view of the console, click Certificates > Trusted Root >
Certificates.
j.
Select the certificate to distribute to clients and the ACS server from the list.
k.
Click Action > All Tasks > Export... The Certificate Export Wizard opens.
l.
Click Next.
m. Click DER encoded binary x.509 and click Next.
n. Enter a file name and browse to a directory to which to export the certificate.
o.
Click Next.
p.
Click Finish. A confirmation window displays.
q. Click OK.
2.
Install the certificate on Cisco Secure ACS.
a.
Click System Configuration > ACS Certificate Setup > ACS Certification
Authority Setup.
b.
Type the full path and file name of the certificate in the CA certificate file
field.
c.
Click Submit. Cisco Secure ACS prompts you to restart the service.
d. Click System Configuration > Service Control.
e.
Click Restart. Cisco Secure ACS restarts.
f.
Click System Configuration > ACS Certificate Management > Edit
Certificate Trust List. The Edit Certificate Trust List screen appears.
g.
Select the check box that corresponds to the certificate you imported in step b
and click Submit. Cisco Secure ACS prompts you to restart the service.
h. Click System Configuration > Service Control.
i.
Click Restart. Cisco Secure ACS restarts.
10-25
Trend Micro™ OfficeScan™ 10 Administrator’s Guide
3.
Copy the certificate (.cer file) to the OfficeScan server computer to deploy it to the
client with the CTA (see Cisco Trust Agent Deployment on page 10-26 for more
information).
Note:
Store the certificate on a local drive and not on mapped drives.
Cisco Trust Agent Deployment
Cisco Trust Agent (CTA), a program hosted within the OfficeScan server and installed
to clients, enables the OfficeScan client to report antivirus information to Cisco ACS.
Deploying CTA During OfficeScan Server Installation
If you already prepared a CA certificate before installing the OfficeScan server, deploy
CTA during OfficeScan server installation. The option to deploy CTA is on the Install
Other OfficeScan Programs screen of Setup. For instructions on installing the
OfficeScan server, see the Installation and Upgrade Guide.
To deploy the CTA to clients using the OfficeScan server installation program:
1.
On the Install Other OfficeScan Programs screen, select Cisco Trust Agent for
Cisco NAC.
2.
Do one of the following:
•
If you have already distributed certificates to Cisco Secure NAC end user
clients, click Next.
•
If you need to distribute certificates to clients:
i.
Click Import Certificate.
ii. Locate and select the prepared certificate file and click OK. For
instructions on preparing a certificate file, see CA Certificate Installation on
page 10-24.
iii. Click Next.
3.
10-26
Continue with OfficeScan server installation.
Policy Server for Cisco NAC
Deploying CTA from the OfficeScan Web Console
If you did not select the option to install/upgrade CTA during server installation, you
can do so from the Web console. Before installing/upgrading CTA, deploy the client
certificate to clients.
Note:
A Certificate Authority (CA) server generates the client certificate file. Request a
certificate file from your Trend Micro representative.
When you are ready to install/upgrade, check the version of the CTA to be installed in
Cisco NAC > Agent Management, then install CTA to clients in Cisco NAC >
Agent Deployment. The Agent Deployment screen also gives you the option to
uninstall CTA.
Install Windows Installer 2.0 for NT 4.0 on OfficeScan clients running Windows
2000/XP before deploying CTA.
Importing the Client Certificate
The client (or CA) certificate authenticates end-user clients with the Cisco ACS server.
The OfficeScan server deploys the CA certificate to clients along with the Cisco Trust
Agent (CTA). Therefore, import the certificate to the OfficeScan server before
deploying CTA.
To import the certificate:
1.
Open the OfficeScan server Web console and click Cisco NAC > Client
Certificate.
2.
Type the exact file path of the certificate.
3.
Type the full path and file name of the prepared CA certificate stored on the server
(for example: C:\CiscoNAC\certificate.cer). For instructions on preparing a CA
certificate, see CA Certificate Installation on page 10-24.
4.
Click Import. To clear the field, click Reset.
10-27
Trend Micro™ OfficeScan™ 10 Administrator’s Guide
Cisco Trust Agent Version
Before installing CTA to clients, check the CTA version (Cisco Trust Agent or Cisco
Trust Agent Supplicant) to install. The only difference between these two versions is
that the Supplicant package provides layer 2 authentication for the computer and end
user.
If the Cisco NAC Access Control Server (ACS) is version 4.0 or later, upgrade the Cisco
Trust Agent on the clients to version 2.0 or later.
To check the CTA version:
1.
Open the OfficeScan server Web console and click Cisco NAC > Agent
Management.
2.
Click Use <CTA version>. The OfficeScan server starts to use the new version.
To manually replace the CTA package:
Manually replace the CTA package on the OfficeScan server if there is a specific version
you want to use.
1.
In the CTA version you want to use, copy the CTA .msi file to the following folder:
<Server installation folder>\PCCSRV\Admin\Utility\CTA\CTA-Package
OR
<Server installation folder>\PCCSRV\Admin\Utility\CTA\
CTA-Supplicant-Package
2.
Copy the following files to <Server installation folder>\
PCCSRV\Admin\Utility\CTA\PosturePlugin: TmabPP.dll, tmabpp.inf and
TmAbPpAct.exe.
3.
In the Web console, go to Cisco NAC > Agent Management and click Use
<CTA version>.
After agent upgrade, the files will be zipped to PostureAgent.zip as a CTA deployment
package under <Server installation folder>\PCCSRV\download\Product.
Deploying the Cisco Trust Agent
Deploy the Cisco Trust Agent to enable the OfficeScan client to report antivirus
information to Cisco ACS.
10-28
Policy Server for Cisco NAC
To deploy CTA to clients from the OfficeScan Web console:
1.
Open the OfficeScan server Web console and click Agent Deployment. The client
tree appears.
Note:
If you did not accept the terms of the Cisco License Agreement during
installation of the OfficeScan server, you cannot deploy the agent. When you
click Agent Deployment, the license information appears again. Read the
license agreement and click Yes to agree to the terms.
2.
Select the clients or domains to which to deploy the CTA and click Deploy Agent.
The Agent Installation/Uninstallation screen appears.
3.
Click Install/Upgrade Cisco Trust Agent. Optionally select to uninstall the
Cisco Trust Agent when the OfficeScan client is uninstalled.
Note:
4.
Also use this screen to uninstall or preserve CTA status on clients.
If you selected domain(s) or client(s) on the client tree, click Save to apply settings
to the domain(s) or client(s). If you selected the root icon
following options:
, choose from the
•
Apply to All Clients: Applies settings to all existing clients and to any new
client added to an existing/future domain. Future domains are domains not yet
created at the time you configure the settings.
•
Apply to Future Domains Only: Applies settings only to clients added to
future domains. This option will not apply settings to new clients added to an
existing domain.
Note:
If the client to which you deploy the agent is not online when you click Install
Cisco Trust Agent, OfficeScan automatically fulfills the task request when the
client becomes online.
10-29
Trend Micro™ OfficeScan™ 10 Administrator’s Guide
Cisco Trust Agent Installation Verification
After deploying the CTA to clients, verify successful installation by viewing the client
tree. The client tree contains a column titled CTA Program, which is visible in the
Update, View All, or Antivirus views. Successful CTA installations contain a version
number for the CTA program.
Also verify if the following processes are running on the client computer:
•
ctapsd.exe
•
ctaEoU.exe
•
ctatransapt.exe
•
ctalogd.exe
Policy Server for Cisco NAC Installation
There are two ways to install Policy Server:
•
The Policy Server installer located on the Enterprise DVD
•
The OfficeScan server’s master installer (this installs both OfficeScan server and the
Policy Server on the same computer)
Note:
The master installer installs both the OfficeScan server and Policy Server Web
console on an IIS or Apache Web server. If the installer does not find an Apache
server on the system, or if an existing Apache server installation is not version 2.0, the
installer automatically installs Apache version 2.0.
The ACS server, Policy Server, and OfficeScan server must be on the same network
segment to ensure effective communication.
Before installing the Apache Web server, refer to the Apache Web site for the latest
information on upgrades, patches, and security issues at:
http://www.apache.org
10-30
Policy Server for Cisco NAC
To install Policy Server for Cisco NAC using the Policy Server installer:
1.
Log on to the computer to which you will install Policy Server for Cisco NAC.
2.
Locate the Policy Server for Cisco NAC installer package on the Enterprise CD.
3.
Double-click setup.exe to run the installer.
4.
Follow the installation instructions.
You can install the Policy Server to the OfficeScan server computer.
To install Policy Server for Cisco NAC from the OfficeScan server master
installer:
1.
In the Install Other OfficeScan Programs screen of the OfficeScan server master
installer, select Policy Server for Cisco NAC.
2.
Click Next.
3.
Continue with OfficeScan server installation until the Welcome screen for Trend
Micro Policy Server for Cisco NAC appears.
4.
Click Next. The Policy Server for Cisco NAC License Agreement screen appears.
5.
Read the agreement and click Yes to continue. The Choose Destination Location
screen appears.
6.
Modify the default destination location if necessary by clicking Browse... and
selecting a new destination for the Policy Server installation.
7.
Click Next. The Web Server screen appears.
8.
Choose the Web server for the Policy Server:
9.
•
IIS server: Click to install on an existing IIS Web server installation
•
Apache 2.0 Web server: Click to install on an Apache 2.0 Web server
Click Next. The Web Server Configuration screen appears.
10. Configure the following information:
a.
If you selected to install Policy Server on an IIS server, select one of the
following:
•
IIS default Web site: Click to install as an IIS default Web site
•
IIS virtual Web site: Click to install as an IIS virtual Web site
10-31
Trend Micro™ OfficeScan™ 10 Administrator’s Guide
b.
c.
Next to Port, type a port that will serve as the server listening port. When the
Policy Server and OfficeScan server are on the same computer and uses the
same Web server, the port numbers are as follows:
•
Apache Web server/IIS Web server on default Web site: Policy Server
and OfficeScan server share the same port
•
Both on IIS Web server on virtual Web site: Policy Server default
listening port is 8081 and the SSL port is 4344. The OfficeScan server
default listening port is 8080 and the SSL port is 4343.
If you selected to install Policy Server on an IIS server, you can use Secured
Socket Layer (SSL). Type the SSL port number and the number of years to
keep the SSL certificate valid (the default is 3 years). If you enable SSL, this
port number will serve as the server’s listening port. The Policy Server’s
address is as follows:
•
http://<Policy Server name>:<port number> or
•
https://<Policy Server name>:<port number> (if you enable SSL)
11. Click Next.
12. Specify the Policy Server console password and click Next.
13. Specify the ACS Server authentication password and click Next.
14. Review the installation settings. If satisfied with the settings, click Next to start the
installation. Otherwise, click Back to go to the previous screens.
15. When the installation completes, click Finish. The OfficeScan server master
installer will continue with the rest of the OfficeScan server installation.
10-32
Policy Server for Cisco NAC
Policy Server SSL Certificate Preparation
To establish a secure SSL connection between the ACS server and the Policy Server,
prepare a certificate especially for use with SSL. Setup automatically generates the SSL
certificate.
To prepare the Policy Server SSL certificate for distribution:
1.
Export the certificate from the Certification Store on mmc.
If the Policy server runs IIS:
a.
On the Policy Server, click Start > Run. The Run screen opens.
b.
Type mmc in the Open box. A new management console screen opens.
c.
Click Console > Add/Remove Snap-in. the Add/Remove Snap-in screen
appears.
d. Click Add. The Add Standalone Snap-ins screen appears.
e.
Click Certificates and click Add. The Certificates snap-in screen opens.
f.
Click Computer Account and click Next. The Select Computer screen opens.
g.
Click Local Computer and click Finish.
h. Click Close to close the Add Standalone Snap-in screen.
i.
Click OK to close the Add/remove Snap-in screen.
j.
In the tree view of the console, click Certificates (Local Computer) >
Trusted Root Certification Authorities > Certificates.
k.
Select the certificate from the list.
Note:
Check the certificate thumbprint by double-clicking the certificate and selecting
Properties. The thumbprint should be the same as the thumbprint for the
certificate located in the IIS console.
To verify this, open the IIS console and right click either virtual Web site or
default Web site (depending on the Web site on which you installed Policy
Server) and then select Properties. Click Directory Security and then click
View Certificate to view the certificate details, including the thumbprint.
l.
Click Action > All Tasks > Export... The Certificate Export Wizard opens.
10-33
Trend Micro™ OfficeScan™ 10 Administrator’s Guide
m. Click Next.
n. Click DER encoded binary x.509 or Base 64 encoded X.509 and click
Next.
o.
Enter a file name and browse to a directory to which to export the certificate.
p.
Click Next.
q. Click Finish. A confirmation window displays.
r.
Click OK.
If the Policy server runs Apache 2.0:
a.
b.
2.
Obtain the certificate file server.cer. The location of the file depends on which
server, the OfficeScan server or the Policy Server, you installed first:
•
If you installed OfficeScan server before installing Policy Server, the file is
in the following directory:
<Server installation folder>\PCCSRV\Private\certificate
•
If you installed Policy Server before installing OfficeScan server, the file is
in the following directory:
<Server installation folder>\PolicyServer\Private\certificate
Copy the certificate file to the ACS server.
Install the certificate on Cisco Secure ACS.
a.
On the ACS Web console, click System Configuration > ACS Certificate
Setup > ACS Certification Authority Setup.
b.
Type the full path and file name of the certificate in the CA certificate file
field.
c.
Click Submit. Cisco Secure ACS prompts you to restart the service.
d. Click System Configuration > Service Control.
e.
10-34
Click Restart. Cisco Secure ACS restarts.
Policy Server for Cisco NAC
ACS Server Configuration
To allow Cisco Secure ACS to pass authentication requests to the Policy Server for Cisco
NAC, add the Policy Server for Cisco NAC in External Policies for the external user
database to use for authentication. See the ACS server documentation for instructions
on how to add the policy server in a new external policy.
Note:
Configure the ACS server to perform tasks such as blocking client access to the
network. These ACS functions are beyond the scope of the Trend Micro Policy Server
for Cisco NAC implementation and are not in this document. See the ACS
documentation for details on configuring other ACS functions.
Policy Server for Cisco NAC Configuration
After installing OfficeScan and the Policy Server, and deploying both the OfficeScan
client and the Cisco Trust Agent, configure the Policy Server for Cisco NAC. To
configure a Policy Server, access the Policy Server Web console from the OfficeScan
Web console by going to Cisco NAC > Policy Servers and clicking the Policy Server
link.
This section describes the following aspects of Policy Server configuration:
•
Policy Server Configuration from OfficeScan on page 10-36 describes how to manage
Policy Servers on the OfficeScan Web console.
•
Summary Information for a Policy Server on page 10-36 shows you how to get an
overview of Policy Servers on the network.
•
Policy Server Registration on page 10-38 is the first step in configuring Policy Servers.
•
Rules on page 10-38 shows you how to create and edit rules that comprise policies.
•
Policies on page 10-38 shows you how to create and edit policies that ultimately
determine how Policy Server measures client security posture.
•
Client Validation Logs on page 10-39 gives an overview of how to use logs to
understand the security posture status of clients on the network.
•
Administrative Tasks on page 10-39 describes how to change the Policy Server
password and set a schedule for synchronization.
10-35
Trend Micro™ OfficeScan™ 10 Administrator’s Guide
Policy Server Configuration from OfficeScan
The first step in configuring Policy Servers is to add the installed Policy Servers to the
OfficeScan server. This allows you to open the Policy Server Web console from the
OfficeScan Web console.
To add a Policy Server:
1.
On the main menu of the OfficeScan Web console, click Cisco NAC > Policy
Servers. The Policy Servers screen appears displaying a list of all Policy Servers.
2.
Click Add. The Policy Server screen displays.
3.
Type the full Policy Server address and port number the server uses for HTTPS
communication (for example: https://policy-server:4343/). Also type an optional
description for the server.
4.
Type a password to use when logging in the Policy Server Web console and confirm
the password.
5.
Click Add.
To delete a Policy Server:
1.
On the main menu of the OfficeScan Web console, click Cisco NAC > Policy
Servers. The Policy Servers screen appears displaying a list of all Policy Servers.
2.
Select the check box next to the Policy Server to delete.
3.
Click Delete.
Note:
To validate all clients on the network, add all OfficeScan servers to at least one
Policy Server.
Summary Information for a Policy Server
The Summary screen contains information about the Policy Server including
configuration settings for policies and rules, client validation logs, and OfficeScan
servers registered to a Policy Server.
The IP address and port number of the Policy Server for Cisco NAC appears at the top
of the Summary screen.
10-36
Policy Server for Cisco NAC
The Configuration Summary table displays the number of OfficeScan servers
registered to the Policy Server, the Policy Server policies, and the rules that compose the
policies.
To view and modify Configuration Summary details for a Policy Server:
1.
On the main menu of the OfficeScan Web console, click Cisco NAC > Policy
Servers. The Policy Servers screen appears displaying a list of all Policy Servers.
2.
Click the server name of the Policy Server whose details you want to view. The
Summary screen appears showing the Configuration Summary table.
3.
Click the link next to the item whose configuration settings you want to view:
•
Registered OfficeScan server(s): The OfficeScan servers currently on the
network
•
Policies: The Policy Server policies registered OfficeScan servers can use
•
Rule(s): The Policy Server rules that comprise policies
Tip:
If you want multiple Policy Servers on the network to have the same settings,
including the same rules and policies, export and then import settings from one
server to another.
Trend Micro recommends configuring the same settings on all Policy Servers on
the network to maintain a consistent antivirus policy.
To synchronize the Policy Server with registered OfficeScan servers:
In the summary screen, click Synchronize with OfficeScan. The Summary Synchronization Results screen appears showing the following read-only information:
•
OfficeScan server name: The host name or IP address and port number of the
registered OfficeScan servers
•
Synchronization Result: Indicates if the synchronization was successful or not
•
Last Synchronized: The date of the last successful synchronization
For more information on synchronization, see Synchronization on page 10-17.
10-37
Trend Micro™ OfficeScan™ 10 Administrator’s Guide
Policy Server Registration
Register the Policy Server with at least one OfficeScan server so the Policy Server can
obtain Virus Pattern and Virus Scan Engine version information. See The Client
Validation Sequence on page 10-7 for information on the role the OfficeScan server
performs in the validation process.
Note:
For Policy Server to validate all clients on the network, add all OfficeScan servers to
at least one Policy Server.
Add a new OfficeScan server or edit the settings of an existing one from the OfficeScan
servers screen, which you can access by going to the Policy Server Web console and
clicking Configurations > OfficeScan servers.
Rules
Rules are the building blocks of policies and comprise policies. Configure rules as the
next step in Policy Server configuration. See Rule Composition on page 10-10 for more
information.
To access the Web console screens for Cisco ACS rules, go to the Policy Server Web
console and click Configurations > Rules on the main menu.
Policies
After configuring new rules or ensuring that the default rules are suitable for your
security enforcement needs, configure policies registered OfficeScan servers can use. See
Policy Composition on page 10-15 for more information.
Add a new Cisco NAC policy or edit an existing one to determine the rules currently
enforced and to take action on clients when client security posture does not match any
rules.
To access the Web console screens for Cisco ACS policies, go to the Policy Server Web
console and click Configurations > Policies on the main menu.
10-38
Policy Server for Cisco NAC
Client Validation Logs
Use the client validation logs to view detailed information about clients when they
validate with the Policy Server. Validation occurs when the ACS server retrieves client
security posture data and sends it to the Policy Server, which compares the data to
policies and rules (see The Client Validation Sequence on page 10-7).
Note:
To generate client validation logs, when adding or editing a new rule or policy, select
the check box under Server-side actions.
To access the Web console screens for Cisco ACS logs, go to the Policy Server Web
console and click Logs > View Client Validation Logs on the main menu.
Client Log Maintenance
The Policy Server archives client validation logs when they reach a size you specify. It
can also delete log files after a specified number of log files accumulates. Specify the way
Policy Server maintains client validation logs by clicking Logs > Log Maintenance on
the Policy Server Web console.
Administrative Tasks
Perform the following administrative tasks on the Policy Server:
•
Change password: Change the password configured when adding the Policy Server
(see Policy Server Configuration from OfficeScan on page 10-36)
•
Configure a synchronization schedule: The Policy Server needs to periodically
obtain the version of the Virus Pattern and Virus Scan Engine on the OfficeScan
server to evaluate OfficeScan client security posture. Therefore, you cannot enable
or disable scheduled synchronization. By default, the Policy Server synchronizes
with the OfficeScan server(s) every five minutes (see Synchronization on page 10-17
for more information).
Note:
Manually synchronize the Policy Server with the OfficeScan server at any time on
the Summary screen (see Summary Information for a Policy Server on page 10-36).
To access the Web console screens for Cisco ACS administration tasks, go to the Policy
Server Web console and click Administration on the main menu.
10-39
Trend Micro™ OfficeScan™ 10 Administrator’s Guide
10-40
Chapter 11
Configuring OfficeScan with
Third-party Software
Topics in this chapter:
• Overview of Check Point Architecture and Configuration on page 11-2
•
Check Point for OfficeScan Configuration on page 11-4
•
SecureClient Support Installation on page 11-6
11-1
Trend Micro™ OfficeScan™ 10 Administrator’s Guide
Overview of Check Point Architecture and
Configuration
Integrate OfficeScan installations with Check Point™ SecureClient™ using Secure
Configuration Verification (SCV) within the Open Platform for Security (OPSEC)
framework. Refer to the Check Point SecureClient OPSEC documentation before
reading this section. Documentation for OPSEC can be found at:
http://www.opsec.com
Check Point SecureClient has the capability to confirm the security configuration of
computers connected to the network using Secure Configuration Verification (SCV)
checks. SCV checks are a set of conditions that define a securely configured client
system. Third-party software can communicate the value of these conditions to Check
Point SecureClient. Check Point SecureClient then compares these conditions with
conditions in the SCV file to determine if the client is considered secure.
SCV checks are regularly performed to ensure that only securely configured systems are
allowed to connect to the network.
SecureClient uses Policy Servers to propagate SCV checks to all clients registered with
the system. The administrator sets the SCV checks on the Policy Servers using the SCV
Editor.
The SCV Editor is a tool provided by Check Point that allows you to modify SCV files
for propagation to client installation. To run the SCV Editor, locate and run the file
SCVeditor.exe on the Policy Server. In the SCV Editor, open the file local.scv in the
folder C:\FW1\NG\Conf (replace C:\FW1 with the installation path for the Check
Point firewall if different from the default).
For specific instructions on opening and modifying an SCV file with the SCV Editor,
see Check Point for OfficeScan Configuration on page 11-4.
11-2
Configuring OfficeScan with Third-party Software
OfficeScan Integration
OfficeScan client periodically passes the Virus Pattern number and Virus Scan Engine
number to SecureClient for verification. SecureClient then compares these values with
values in the client local.scv file.
This is what the local.scv file looks like if you open it in a text editor:
(SCVObject
:SCVNames (
: (OfceSCV
:type (plugin)
:parameters (
:CheckType (OfceVersionCheck)
:LatestPatternVersion (701)
:LatestEngineVersion (7.1)
:PatternCompareOp (">=")
:EngineCompareOp (">=")
)
)
)
:SCVPolicy (
: (OfceSCV)
)
:SCVGlobalParams (
:block_connections_on_unverified (true)
:scv_policy_timeout_hours (24)
)
)
11-3
Trend Micro™ OfficeScan™ 10 Administrator’s Guide
In this example, the SCV check will allow connections through the firewall if the pattern
file version is 701 or later, and the scan engine number is 7.1 or later. If the scan engine
or pattern file is earlier, all connections through the Check Point firewall get blocked.
Modify these values using the SCV Editor on the local.scv file on the Policy Server.
Note:
Check Point does not automatically update the pattern file and scan engine version
numbers in the SCV file. Whenever OfficeScan updates the scan engine or pattern
file, you need to manually change the value of the conditions in the local.scv file to
keep them current. If you do not update the scan engine and pattern versions, Check
Point will authorize traffic from clients with earlier pattern files or scan engines,
creating a potential for new viruses to infiltrate the system.
Check Point for OfficeScan Configuration
To modify the local.scv file, you need to download and run the SCV Editor
(SCVeditor.exe).
To configure the Secure Configuration Verification file:
1.
Download SCVeditor.exe from the Check Point download site. The SCV Editor is
part of the OPSEC SDK package.
2.
Run SCVeditor.exe on the Policy Server. The SCV Editor console opens.
3.
Expand the Products folder and select user_policy_scv.
4.
Click Edit > Product > Modify, and then type OfceSCV in the Modify box. Click
OK.
Note:
11-4
If the local.scv file already contains product policies for other third-party
software, create a new policy by clicking Edit > Product > Add, and then
typing OfceSCV in the Add box.
Configuring OfficeScan with Third-party Software
5.
Add a parameter by clicking Edit > Parameters > Add, and then typing a Name
and Value in the corresponding boxes. The following table lists the parameter
names and values. Parameter names and values are case-sensitive. Type them in the
order given in the table.
TABLE 11-48. SCV file parameter names and values
N AME
VALUE
CheckType
OfceVersionCheck
LatestPatternVersion
<current pattern file number>
LatestEngineVersion
<current scan engine number>
LatestPatternDate
<current pattern file release date>
PatternCompareOp
>=
EngineCompareOp
>=
PatternMismatchMessage
EngineMismatchMessage
Type the most current pattern file number and scan engine number in place of the
text in curly braces. View the latest virus pattern and scan engine versions for
clients by clicking Update & Upgrade on the main menu of the OfficeScan Web
console. The pattern version number will appear to the right of the pie chart
representing the percentage of clients protected.
6.
Select Block connections on SCV unverified.
7.
Click Edit > Product > Enforce.
8.
Click File > Generate Policy File to create the file. Select the existing local.scv file
to overwrite it.
11-5
Trend Micro™ OfficeScan™ 10 Administrator’s Guide
SecureClient Support Installation
If users connect to the office network from a Virtual Private Network (VPN), and they
have both Check Point SecureClient and the OfficeScan client installed on their
computers, instruct them to install SecureClient support. This module allows
SecureClient to perform SCV checks on VPN clients, ensuring that only securely
configured systems are allowed to connect to the network.
Users can verify that they have Check Point SecureClient installed on their computers by
checking for the
icon in the system tray. Users can also check for an item named
Check Point SecureClient on the Add/Remove Programs screen of Windows.
To install SecureClient support:
11-6
1.
Open the client console.
2.
Click the Toolbox tab.
3.
Under Check Point SecureClient Support, click Install/Upgrade SecureClient
support. A confirmation screen appears.
4.
Click Yes. The client connects to the server and downloads the module. OfficeScan
displays a message when the download is complete.
5.
Click OK.
Chapter 12
Getting Help
Topics in this chapter:
• Troubleshooting Resources on page 12-2
•
Contacting Trend Micro on page 12-15
12-1
Trend Micro™ OfficeScan™ 10 Administrator’s Guide
Troubleshooting Resources
This section provides a list of resources you can use to troubleshoot OfficeScan server
and client issues.
•
Case Diagnostic Tool
•
OfficeScan Server Logs
•
OfficeScan Client Logs
Case Diagnostic Tool
Trend Micro Case Diagnostic Tool (CDT) collects necessary debugging information
from a customer’s product whenever problems occur. It automatically turns the
product's debug status on and off and collects necessary files according to problem
categories. Trend Micro uses this information to troubleshoot problems related to the
product.
Run the tool on all platforms that OfficeScan supports. To obtain this tool and relevant
documentation, contact your support provider.
OfficeScan Server Logs
Aside from logs available on the Web console, you can use other types of logs (such as
debug logs) to troubleshoot product issues.
WARNING! Debug logs may affect server performance and consume a large amount
of disk space. Enable debug logging only when necessary and promptly
disable it if you no longer need debug data. Remove the log file if the file
size becomes huge.
12-2
Getting Help
Server Debug Log Using LogServer.exe
Use LogServer.exe to collect debug logs for the following:
•
OfficeScan server basic logs
•
Trend Micro Vulnerability Scanner
•
OfficeScan features that leverage Active Directory
•
Role-based administration
•
Smart scan
•
Policy Server
To enable debug logging:
1.
Log on to the Web console.
2.
On the banner of the Web console, click the first "c" in "OfficeScan".
3.
Specify debug log settings.
4.
Click Save.
5.
Check the log file (ofcdebug.log) in the default location: <Server installation
folder>\PCCSRV\Log.
To disable debug logging:
1.
Log on to the Web console.
2.
On the banner of the Web console, click the first "c" in "OfficeScan".
3.
Clear Enable debug log.
4.
Click Save.
To enable debug logging for server installation and upgrade:
Enable debug logging before performing the following tasks:
•
Uninstall and then install the server again.
•
Upgrade OfficeScan to a new version.
•
Perform remote installation/upgrade (Debug logging is enabled on the computer
where you launched Setup and not on the remote computer.)
12-3
Trend Micro™ OfficeScan™ 10 Administrator’s Guide
Perform the following steps:
1.
Copy the LogServer folder located in <Server installation
folder>\PCCSRV\Private to C:\.
2.
Create a file named ofcdebug.ini with the following content:
[debug]
debuglevel=9
debuglog=c:\LogServer\ofcdebug.log
debugLevel_new=D
debugSplitSize=10485760
debugSplitPeriod=12
debugRemoveAfterSplit=1
3.
Save ofcdebug.ini to C:\LogServer.
4.
Perform the appropriate task (that is, uninstall/reinstall the server, upgrade to a
new server version, or perform remote installation/upgrade).
5.
Check ofcdebug.log in C:\LogServer.
Installation Logs
Local Installation/Upgrade Log
File name: OFCMAS.LOG
Location: %windir%
Remote Installation/Upgrade Log
On the computer where you launched Setup:
File name: ofcmasr.log
Location: %windir%
On the target computer:
File name: OFCMAS.LOG
Location: %windir%
12-4
Getting Help
Component Update Log
File name: TmuDump.txt
Location: <Server installation folder>\PCCSRV\Web\Service\AU_Data\AU_Log
To get detailed server update information:
1.
Create a file named aucfg.ini with the following content:
[Debug]
level=-1
[Downloader]
ProxyCache=0
2.
Save the file to <Server installation folder>\PCCSRV\Web\Service.
3.
Restart the OfficeScan Master Service.
To stop collecting detailed server update information:
1.
Delete aucfg.ini.
2.
Restart the OfficeScan Master Service.
Client Packager Log
To enable logging for Client Packager creation:
1.
Modify ClnExtor.ini in <Server installation
folder>\PCCSRV\Admin\Utility\ClientPackager as follows:
[Common]
DebugMode=1
2.
Check ClnPack.log in C:\.
To disable logging for Client Packager creation:
1.
Open ClnExtor.ini.
2.
Change the "DebugMode" value from 3 to 0.
12-5
Trend Micro™ OfficeScan™ 10 Administrator’s Guide
ServerProtect Normal Server Migration Tool Log
To enable debug logging for ServerProtect Normal Server Migration Tool:
1.
Create a file named ofcdebug.ini file with the following content:
[Debug]
DebugLog=C:\ofcdebug.log
DebugLevel=9
2.
Save the file to C:\.
3.
Check ofcdebug.log in C:\.
To disable debug logging for ServerProtect Normal Server Migration Tool:
Delete ofcdebug.ini.
VSEncrypt Log
OfficeScan automatically creates the debug log (VSEncrypt.log) in the user account's
temporary folder. For example, C:\Documents and Settings\<User name>\Local
Settings\Temp.
Control Manager MCP Agent Log
Debug Files on the <Server installation folder>\PCCSRV\CMAgent
Folder
• Agent.ini
12-6
•
Product.ini
•
The screenshot of the Control Manager Settings page
•
ProductUI.zip
Getting Help
To enable debug logging for the MCP Agent:
1.
Modify product.ini in <Server installation folder>\PCCSRV\CmAgent as follows:
[Debug]
debugmode = 3
debuglevel= 3
debugtype = 0
debugsize = 10000
debuglog = C:\CMAgent_debug.log
2.
Restart the OfficeScan Control Manager Agent service from Microsoft
Management Console.
3.
Check CMAgent_debug.log in C:\.
To disable debug logging for the MCP Agent:
1.
Open product.ini and delete the following:
debugmode = 3
debuglevel= 3
debugtype = 0
debugsize = 10000
debuglog = C:\CMAgent_debug.log
2.
Restart the OfficeScan Control Manager service.
12-7
Trend Micro™ OfficeScan™ 10 Administrator’s Guide
Virus Scan Engine Log
To enable debug logging for the Virus Scan Engine:
1.
Open the Registry Editor (regedit.exe).
2.
Go to
HKEY_LOCAL_MACHINE\SYSTEM\CurrentControlSet\Services\TMFilter\
Parameters.
3.
Change the value of "DebugLogFlags" to "00003eff".
4.
Perform the steps that led to the scanning issue you encountered.
5.
Check TMFilter.log in %windir%.
To disable debug logging for the Virus Scan Engine:
Restore the value of "DebugLogFlags" to "00000000".
Outbreak Logs
Current Firewall Violation Outbreak Log
File name: Cfw_Outbreak_Current.log
Location: <Server installation folder>\PCCSRV\Log\
Last Firewall Violation Outbreak Log
File name: Cfw_Outbreak_Last.log
Location: <Server installation folder>\PCCSRV\Log\
Current Virus /Malware Outbreak Log
File name: Outbreak_Current.log
Location: <Server installation folder>\PCCSRV\Log\
Last Virus /Malware Outbreak Log
File name: Outbreak_Last.log
Current Outbreak: <Server installation folder>\PCCSRV\Log\
12-8
Getting Help
World Virus Tracking Log
File name: wtc.log
Location: <Server installation folder>\PCCSRV\Log\temp
OfficeScan Client Logs
Use client logs (such as debug logs) to troubleshoot client issues.
WARNING! Debug logs may affect client performance and consume a large amount of
disk space. Enable debug logging only when necessary and promptly disable it if you no longer need debug data. Remove the log file if the file size
becomes huge.
Client Debug Log using LogServer.exe
To enable debug logging for the OfficeScan client:
1.
Create a file named ofcdebug.ini with the following content:
[Debug]
Debuglog=C:\ofcdebug.log
debuglevel=9
debugLevel_new=D
debugSplitSize=10485760
debugSplitPeriod=12
debugRemoveAfterSplit=1
2.
Send ofcdebug.ini to client users, instructing them to save the file to C:\.
LogServer.exe automatically runs each time the client computer starts. Instruct
users NOT to close the LogServer.exe command window that opens when the
computer starts as this prompts OfficeScan to stop debug logging. If users close the
command window, they can start debug logging again by running LogServer.exe
located in <Client installation folder>.
3.
For each client computer, check ofcdebug.log in C:\.
12-9
Trend Micro™ OfficeScan™ 10 Administrator’s Guide
To disable debug logging for the OfficeScan client:
Delete ofcdebug.ini.
Fresh Installation Log
File name: OFCNT.LOG
Locations:
•
%windir% for all installation methods except MSI package
•
%temp% for the MSI package installation method
Upgrade/Hot Fix Log
File name: upgrade.log
Location: <Client installation folder>\Temp
Damage Cleanup Services Log
To enable debug logging for Damage Cleanup Services:
1.
Open TSC.ini in <Client installation folder>.
2.
Modify the following line as follows:
DebugInfoLevel=3
3.
Check TSCDebug.log in <Client installation folder>\debug.
To disable debug logging for Damage Cleanup Services:
Open TSC.ini and change the "DebugInfoLevel" value from 3 to 0.
Cleanup Log
File name: yyyymmdd.log
Location: <Client installation folder>\report\
Mail Scan Log
File name: SmolDbg.txt
Location: <Client installation folder>
12-10
Getting Help
Client Connection Log
File name: Conn_YYYYMMDD.log
Location: <Client installation folder>\ConnLog
Client Update Log
File name: Tmudump.txt
Location: <Client installation folder>\AU_Data\AU_Log
To get detailed client update information:
1.
Create a file named aucfg.ini with the following content:
[Debug]
level=-1
[Downloader]
ProxyCache=0
2.
Save the file to <Client installation folder>.
3.
Reload the client.
To stop collecting detailed client update information:
1.
Delete aucfg.ini.
2.
Reload the client.
Outbreak Prevention Log
File name: OPPLogs.log
Location: <Client installation folder>\OppLog
12-11
Trend Micro™ OfficeScan™ 10 Administrator’s Guide
OfficeScan Firewall Log
To enable debug logging for the Common Firewall Driver on Windows
Vista/2008 computers:
1.
Add the following data in:
a.
b.
HKEY_LOCAL_MACHINE\System\CurrentControlSet\Services\tmwfp\Par
ameters:
•
Type: DWORD value (REG_DWORD)
•
Name: DebugCtrl
•
Value: 0x00001111
HKEY_LOCAL_MACHINE\System\CurrentControlSet\Services\tmlwf\Para
meters:
•
Type: DWORD value (REG_DWORD)
•
Name: DebugCtrl
•
Value: 0x00001111
2.
Restart the computer.
3.
Check wfp_log.txt and lwf_log.txt in C:\.
To enable debug logging for the Common Firewall Driver on Windows
2000/XP/2003 computers:
1.
Add the following data in
HKEY_LOCAL_MACHINE\System\CurrentControlSet\Services\tmcfw\Para
meters:
•
Type: DWORD value (REG_DWORD)
•
Name: DebugCtrl
•
Value: 0x00001111
2.
Restart the computer.
3.
Check cfw_log.txt in C:\.
To disable debug logging for the Common Firewall Driver (all operating
systems):
1.
Delete "DebugCtrl" in the registry key.
2.
Restart the computer.
12-12
Getting Help
To enable debug logging for the OfficeScan NT Firewall service:
1.
Edit TmPfw.ini located in <Client installation folder> as follows:
[ServiceSession]
Enable=1
2.
Reload the client.
3.
Check TmPfw.log in C:\temp.
To disable debug logging for the OfficeScan NT Firewall service:
1.
Open TmPfw.ini and change the "Enable" value from 1 to 0.
2.
Reload the client.
Web Reputation and POP3 Mail Scan Log
To enable debug logging for the Web reputation and POP3 Mail Scan features:
1.
Edit TmProxy.ini located in <Client installation folder> as follows:
[ServiceSession]
Enable=1
LogFolder=C:\temp
2.
Reload the client.
3.
Check the TmProxy log in C:\temp.
To disable debug logging for the Web reputation and POP3 Mail Scan features:
1.
Open TmProxy.ini and change the "Enable" value from 1 to 0.
2.
Reload the client.
12-13
Trend Micro™ OfficeScan™ 10 Administrator’s Guide
Transport Driver Interface (TDI) Log
To enable debug logging for TDI:
1.
Add the following data in
HKEY_LOCAL_MACHINE\SYSTEM\CurrentControlSet\Service\tmtdi\Para
meters:
Key 1
•
Type: DWORD value (REG_DWORD)
•
Name: Debug
•
Value: 1111 (Hexadecimal)
Key 2
•
Type: String value (REG_SZ)
•
Name: LogFile
•
Value: C:\tmtdi.log
2.
Restart the computer.
3.
Check tmtdi.log in C:\.
To disable debug logging for TDI:
1.
Delete "Debug" and "LogFile" in the registry key.
2.
Restart the computer.
12-14
Getting Help
Contacting Trend Micro
Technical Support
Trend Micro provides technical support, pattern downloads, and program updates for
one year to all registered users, after which you must purchase renewal maintenance. If
you need help or just have a question, please feel free to contact us. We also welcome
your comments.
Trend Micro Incorporated provides worldwide support to all registered users.
•
Get a list of the worldwide support offices at:
http://www.trendmicro.com/support
•
Get the latest Trend Micro product documentation at:
http://www.trendmicro.com/download
In the United States, you can reach the Trend Micro representatives through phone, fax,
or email:
Trend Micro, Inc.
10101 North De Anza Blvd., Cupertino, CA 95014
Toll free: +1 (800) 228-5651 (sales)
Voice: +1 (408) 257-1500 (main)
Fax: +1 (408) 257-2003
Web address:
http://www.trendmicro.com
Email: [email protected]
12-15
Trend Micro™ OfficeScan™ 10 Administrator’s Guide
Speeding Up Your Support Call
When you contact Trend Micro, to speed up your problem resolution, ensure that you
have the following details available:
•
Microsoft Windows and Service Pack versions
•
Network type
•
Computer brand, model, and any additional hardware connected to your computer
•
Amount of memory and free hard disk space on your computer
•
Detailed description of the install environment
•
Exact text of any error message given
•
Steps to reproduce the problem
The Trend Micro Knowledge Base
The Trend Micro Knowledge Base, maintained at the Trend Micro Web site, has the
most up-to-date answers to product questions. You can also use Knowledge Base to
submit a question if you cannot find the answer in the product documentation. Access
the Knowledge Base at:
http://esupport.trendmicro.com
Trend Micro updates the contents of the Knowledge Base continuously and adds new
solutions daily. If you are unable to find an answer, however, you can describe the
problem in an email and send it directly to a Trend Micro support engineer who will
investigate the issue and respond as soon as possible.
12-16
Getting Help
TrendLabs
TrendLabsSM is the global antivirus research and support center of Trend Micro.
Located on three continents, TrendLabs has a staff of more than 250 researchers and
engineers who operate around the clock to provide you, and every Trend Micro
customer, with service and support.
You can rely on the following post-sales service:
•
Regular virus pattern updates for all known "zoo" and "in-the-wild" computer
viruses and malicious codes
•
Emergency virus outbreak support
•
Email access to antivirus engineers
•
Knowledge Base, the Trend Micro online database of technical support issues
TrendLabs has achieved ISO 9002 quality assurance certification.
Security Information Center
Comprehensive security information is available at the Trend Micro Web site.
http://www.trendmicro.com/vinfo/
Information available:
•
List of viruses and malicious mobile code currently "in the wild," or active
•
Computer virus hoaxes
•
Internet threat advisories
•
Virus weekly report
•
Virus Encyclopedia, which includes a comprehensive list of names and symptoms
for known viruses and malicious mobile code
•
Glossary of terms
12-17
Trend Micro™ OfficeScan™ 10 Administrator’s Guide
Sending Suspicious Files to Trend Micro
If you think you have an infected file but the scan engine does not detect it or cannot
clean it, Trend Micro encourages you to send the suspect file to us. For more
information, refer to the following site:
http://subwiz.trendmicro.com/subwiz
You can also send Trend Micro the URL of any Web site you suspect of being a phish
site, or other so-called "disease vector" (the intentional source of Internet threats such as
spyware and viruses).
•
Send an email to the following address and specify "Phish or Disease Vector" as the
subject.
[email protected]
•
You can also use the Web-based submission form at:
http://subwiz.trendmicro.com/subwiz
Documentation Feedback
Trend Micro always seeks to improve its documentation. If you have questions,
comments, or suggestions about this or any Trend Micro document, please go to the
following site:
http://www.trendmicro.com/download/documentation/rating.asp
12-18
Appendix A
Glossary
ActiveUpdate
ActiveUpdate is a function common to many Trend Micro products. Connected to the
Trend Micro update Web site, ActiveUpdate provides up-to-date downloads of pattern
files, scan engines, programs, and other Trend Micro component files through the
Internet.
Compressed File
A single file containing one or more separate files plus information for extraction by a
suitable program, such as WinZip.
Cookie
A mechanism for storing information about an Internet user, such as name, preferences,
and interests, which is stored in the Web browser for later use. The next time you access
a Web site for which your browser has a cookie, the browser sends the cookie to the
Web server, which the Web server can then use to present you with customized Web
pages. For example, you might enter a Web site that welcomes you by name.
A-1
Trend Micro™ OfficeScan™ 10 Administrator’s Guide
Denial of Service Attack
A Denial of Service (DoS) attack refers to an attack on a computer or network that
causes a loss of "service", namely a network connection. Typically, DoS attacks
negatively affect network bandwidth or overload system resources such as the
computer’s memory.
DHCP
Dynamic Host control Protocol (DHCP) is a protocol for assigning dynamic IP
addresses to devices in a network. With dynamic addressing, a device can have a
different IP address everytime it connects to the network. In some systems, the device’s
IP address can even change while it is still connected. DHCP also supports a mix of
static and dynamic IP addresses.
DNS
Domain Name system (DNS) is a general-purpose data query service chiefly used in the
Internet for translating host names into IP addresses.
When a DNS client requests host name and address data from a DNS server, the
process is called resolution. Basic DNS configuration results in a server that performs
default resolution. For example, a remote server queries another server for data in a
machine in the current zone. Client software in the remote server queries the resolver,
which answers the request from its database files.
Domain Name
The full name of a system, consisting of its local host name and its domain name, for
example, tellsitall.com. A domain name should be sufficient to determine a unique
Internet address for any host on the Internet. This process, called "name resolution",
uses the Domain Name System (DNS).
Dynamic IP Address
A Dynamic IP address is an IP address assigned by a DHCP server. The MAC address
of a computer will remain the same, however, the DHCP server may assign a new IP
address to the computer depending on availability.
A-2
Glossary
End User License Agreement
An End User License Agreement or EULA is a legal contract between a software
publisher and the software user. It typically outlines restrictions on the side of the user,
who can refuse to enter into the agreement by not clicking "I accept" during installation.
Clicking "I do not accept" will, of course, end the installation of the software product.
Many users inadvertently agree to the installation of spyware and other types of
grayware into their computers when they click "I accept" on EULA prompts displayed
during the installation of certain free software.
False Positive
A false positive occurs when a file is incorrectly detected by security software as
infected.
FTP
File Transfer Protocol (FTP) is a standard protocol used for transporting files from a
server to a client over the Internet. Refer to Network Working Group RFC 959 for
more information.
Hot Fix
A hot fix is a workaround or solution to a single customer-reported issue. Hot fixes are
issue-specific, and therefore not released to all customers. Windows hot fixes include a
Setup program, while non-Windows hot fixes do not (typically you need to stop the
program daemons, copy the file to overwrite its counterpart in your installation, and
restart the daemons).
By default, the OfficeScan clients can install hot fixes. If you do not want clients to
install hot fixes, change client update settings in the Web console by going to
Networked Computers > Client Management > Settings > Privileges and Other
Settings > Other Settings tab.
If you unsuccessfully attempt to deploy a hot fix on the OfficeScan server, use the
Touch Tool to change the time stamp of the hot fix. This causes OfficeScan to interpret
the hot fix file as new, which makes the server attempt to automatically deploy the hot
fix again. For details about this tool, see Touch Tool on page 9-42.
A-3
Trend Micro™ OfficeScan™ 10 Administrator’s Guide
HTTP
Hypertext Transfer Protocol (HTTP) is a standard protocol used for transporting Web
pages (including graphics and multimedia content) from a server to a client over the
Internet.
HTTPS
Hypertext Transfer Protocol using Secure Socket Layer (SSL). HTTPS is a variant of
HTTP used for handling secure transactions.
ICMP
Occasionally a gateway or destination host uses Internet Control Message Protocol
(ICMP) to communicate with a source host, for example, to report an error in datagram
processing. ICMP uses the basic support of IP as if it were a higher level protocol,
however, ICMP is actually an integral part of IP, and implemented by every IP module.
ICMP messages are sent in several situations: for example, when a datagram cannot
reach its destination, when the gateway does not have the buffering capacity to forward
a datagram, and when the gateway can direct the host to send traffic on a shorter route.
The Internet Protocol is not designed to be absolutely reliable. The purpose of these
control messages is to provide feedback about problems in the communication
environment, not to make IP reliable.
IntelliScan
IntelliScan is a method of identifying files to scan. For executable files (for example,
.exe), the true file type is determined based on the file content. For non-executable files
(for example, .txt), the true file type is determined based on the file header.
Using IntelliScan provides the following benefits:
A-4
•
Performance optimization: IntelliScan does not affect applications on the client
because it uses minimal system resources.
•
Shorter scanning period: Because IntelliScan uses true file type identification, it
only scans files that are vulnerable to infection. The scan time is therefore
significantly shorter than when you scan all files.
Glossary
IntelliTrap
Virus writers often attempt to circumvent virus filtering by using real-time compression
algorithms. IntelliTrap helps reduce the risk of such viruses entering the network by
blocking real-time compressed executable files and pairing them with other malware
characteristics. Because IntelliTrap identifies such files as security risks and may
incorrectly block safe files, consider quarantining (not deleting or cleaning) files when
you enable IntelliTrap. If users regularly exchange real-time compressed executable files,
disable IntelliTrap.
IntelliTrap uses the following components:
•
Virus Scan Engine
•
IntelliTrap Pattern
•
IntelliTrap Exception Pattern
IP
"The internet protocol (IP) provides for transmitting blocks of data called datagrams
from sources to destinations, where sources and destinations are hosts identified by
fixed length addresses." (RFC 791)
Java File
Java is a general-purpose programming language developed by Sun Microsystems. A
Java file contains Java code. Java supports programming for the Internet in the form of
platform-independent Java "applets". An applet is a program written in Java
programming language that can be included in an HTML page. When you use a
Java-technology enabled browser to view a page that contains an applet, the applet
transfers its code to your computer and the browser’s Java Virtual Machine executes the
applet.
LDAP
Lightweight Directory Access Protocol (LDAP) is an application protocol for querying
and modifying directory services running over TCP/IP.
Listening Port
A listening port is utilized for client connection requests for data exchange.
A-5
Trend Micro™ OfficeScan™ 10 Administrator’s Guide
MCP Agent
Trend Micro Management Communication Protocol (MCP) is Trend Micro's next
generation agent for managed products. MCP replaces Trend Micro Management
Infrastructure (TMI) as the way Control Manager communicates with OfficeScan. MCP
has several new features:
•
Reduced network loading and package size
•
NAT and firewall traversal support
•
HTTPS support
•
One-way and Two-way communication support
•
Single sign-on (SSO) support
•
Cluster node support
Mixed Threat Attack
Mixed threat attacks take advantage of multiple entry points and vulnerabilities in
enterprise networks, such as the “Nimda” or “Code Red” threats.
NAT
Network Address Translation (NAT) is a standard for translating secure IP addresses to
temporary, external, registered IP address from the address pool. This allows trusted
networks with privately assigned IP addresses to have access to the Internet. This also
means that you do not have to get a registered IP address for every machine in the
network.
NetBIOS
Network Basic Input Output System (NetBIOS) is an application program interface
(API) that adds functionality such as network capabilities to disk operating system
(DOS) basic input/output system (BIOS).
One-way Communication
NAT traversal has become an increasingly more significant issue in the current
real-world network environment. To address this issue, MCP uses one-way
communication. One-way communication has the MCP agent initiating the connection
to, and polling of commands from, the server. Each request is a CGI-like command
A-6
Glossary
query or log transmission. To reduce the network impact, the MCP agent keeps
connection alive and open as much as possible. A subsequent request uses an existing
open connection. If the connection breaks, all SSL connections to the same host benefit
from session ID cache that drastically reduces re-connection time.
Patch
A patch is a group of hot fixes and security patches that solve multiple program issues.
Trend Micro makes patches available on a regular basis. Windows patches include a
Setup program, while non-Windows patches commonly have a setup script.
Phish Attack
Phish, or phishing, is a rapidly growing form of fraud that seeks to fool Web users into
divulging private information by mimicking a legitimate Web site.
In a typical scenario, unsuspecting users get an urgent sounding (and authentic looking)
email telling them there is a problem with their account that they must immediately fix
to avoid account termination. The email will include a URL to a Web site that looks
exactly like the real thing. It is simple to copy a legitimate email and a legitimate Web site
but then change the so-called backend, which receives the collected data.
The email tells the user to log on to the site and confirm some account information. A
hacker receives data a user provides, such as a logon name, password, credit card
number, or social security number.
Phish fraud is fast, cheap, and easy to perpetuate. It is also potentially quite lucrative for
those criminals who practice it. Phish is hard for even computer-savvy users to detect.
And it is hard for law enforcement to track down. Worse, it is almost impossible to
prosecute.
Please report to Trend Micro any Web site you suspect to be a phishing site. See Sending
Suspicious Files to Trend Micro on page 12-18 for more information.
Ping
Ping is a utility that sends an ICMP echo request to an IP address and waits for a
response. The Ping utility can determine if the computer with the specified IP address is
online or not.
A-7
Trend Micro™ OfficeScan™ 10 Administrator’s Guide
POP3
Post Office Protocol 3 (POP3) is a standard protocol for storing and transporting email
messages from a server to a client email application.
Proxy Server
A proxy server is a World Wide Web server which accepts URLs with a special prefix,
used to fetch documents from either a local cache or a remote server, then returns the
URL to the requester.
RPC
Remote procedure call (RPC) is a network protocol that allows a computer program
running on one host to cause code to be executed on another host.
Security Patch
A security patch focuses on security issues suitable for deployment to all customers.
Windows security patches include a Setup program, while non-Windows patches
commonly have a setup script.
Service Pack
A service pack is a consolidation of hot fixes, patches, and feature enhancements
significant enough to be a product upgrade. Both Windows and non-Windows service
packs include a Setup program and setup script.
SMTP
Simple Mail Transport Protocol (SMTP) is a standard protocol used to transport email
messages from server to server, and client to server, over the internet.
SNMP
Simple Network Management Protocol (SNMP) is a protocol that supports monitoring
of devices attached to a network for conditions that merit administrative attention.
A-8
Glossary
SNMP Trap
A Small Network Management Protocol (SNMP) trap is a method of sending
notifications to network administrators that use management consoles that support this
protocol.
OfficeScan can store notification in Management Information Bases (MIBs). You can
use the MIBs browser to view SNMP trap notification.
OfficeScan, however, does not maintain a local MIB file. If you have Trend Micro
Control Manager installed, you can download the Control Manager MIB file and use it
in OfficeScan with an application (for example, HP™ OpenView) that supports SNMP
protocol.
To use the Control Manager MIB file:
1.
Access the Control Manager management console.
2.
Click Administration on the main menu. A drop-down menu appears.
3.
Click Tools.
4.
On the working area, click Control Manager MIB file.
5.
On the File Download screen, select Save, specify a location on the server, and
then click OK.
6.
Copy the file to the OfficeScan server, extract the Control Manager MIB file
cm2.mib, Management Information Base (MIB) file.
7.
Import cm2.mib using an application (for example, HP OpenView) that supports
SNMP protocol.
SOCKS 4
SOCKS 4 is a TCP protocol used by proxy servers to establish a connection between
clients on the internal network or LAN and computers or servers outside the LAN. The
SOCKS 4 protocol makes connection requests, sets up proxy circuits and relays data at
the Application layer of the OSI model.
A-9
Trend Micro™ OfficeScan™ 10 Administrator’s Guide
SSL
Secure Socket Layer (SSL) is a protocol designed by Netscape for providing data security
layered between
application protocols (such as HTTP, Telnet, or FTP) and TCP/IP. This security
protocol provides data encryption, server authentication, message integrity, and optional
client authentication for a TCP/IP connection.
SSL Certificate
This digital certificate establishes secure HTTPS communication.
TCP
Transmission Control Protocol (TCP) is a connection-oriented, end-to-end reliable
protocol designed to fit into a layered hierarchy of protocols that support multi-network
applications. TCP relies on IP datagrams for address resolution. Refer to DARPA
Internet Program RFC 793 for information.
Telnet
Telnet is a standard method of interfacing terminal devices over TCP by creating a
"Network Virtual Terminal". Refer to Network Working Group RFC 854 for more
information.
A-10
Glossary
Trojan Port
Trojan ports are commonly used by Trojan horse programs to connect to a computer.
During an outbreak, OfficeScan blocks the following port numbers that Trojan
programs may use:
TABLE A-49.
Trojan ports
P ORT N UMBER
TROJAN H ORSE
P ROGRAM
P ORT N UMBER
TROJAN H ORSE
P ROGRAM
23432
Asylum
31338
Net Spy
31337
Back Orifice
31339
Net Spy
18006
Back Orifice
2000
139
Nuker
12349
Bionet
44444
Prosiak
6667
Bionet
8012
Ptakks
80
Codered
7597
Qaz
21
DarkFTP
4000
RA
3150
Deep Throat
666
Ripper
2140
Deep Throat
1026
RSM
10048
Delf
64666
RSM
23
EliteWrap
22222
Rux
6969
GateCrash
11000
Senna Spy
7626
Gdoor
113
Shiver
10100
Gift
1001
Silencer
21544
Girl Friend
3131
SubSari
7777
GodMsg
1243
Sub Seven
A-11
Trend Micro™ OfficeScan™ 10 Administrator’s Guide
TABLE A-49.
Trojan ports (Continued)
P ORT N UMBER
TROJAN H ORSE
P ROGRAM
P ORT N UMBER
TROJAN H ORSE
P ROGRAM
6267
GW Girl
6711
Sub Seven
25
Jesrto
6776
Sub Seven
25685
Moon Pie
27374
Sub Seven
68
Mspy
6400
Thing
1120
Net Bus
12345
Valvo line
7300
Net Spy
1234
Valvo line
Trusted Port
The server and the client use trusted ports to communicate with each other.
If you block the trusted ports and then restore network settings to normal after an
outbreak, clients will not immediately resume communication with the server.
Client-server communication will only be restored after the number of hours you have
specified in the Outbreak Prevention Settings screen elapses.
OfficeScan uses the HTTP port (by default, 8080) as the trusted port on the server.
During installation, you may enter a different port number. To block this trusted port
and the trusted port on the client, select the Block trusted ports check box on the Port
Blocking screen.
The master installer randomly generates the client trusted port during installation.
A-12
Glossary
To determine the trusted ports:
1.
Access <Server installation folder>\PCCSRV.
2.
Open the ofcscan.ini file using a text editor such as Notepad.
3.
For the server trusted port, search for the string "Master_DomainPort" and then
check the value next to it. For example, if the string appears as
Master_DomainPort=80, this means that the trusted port on the server is port 80.
4.
For the client trusted port, search for the string "Client_LocalServer_Port" and
then check the value next to it. For example, if the string appears as
Client_LocalServer_Port=41375, this means that the trusted port on the client is
port 41375.
Two-way Communication
Two-way communication is an alternative to one-way communication. Based on
one-way communication but with an extra HTTP-based channel that receives server
notifications, two-way communication can improve real time dispatching and processing
of commands from the server by the MCP agent.
UDP
User Datagram Protocol (UDP) is a connectionless communication protocol used with
IP for application programs to send messages to other programs. Refer to DARPA
Internet Program RFC 768 for information.
Uncleanable File
The Virus Scan Engine is unable to clean the following files:
Files Infected with Trojans
Trojans are programs that perform unexpected or unauthorized, usually malicious,
actions such as displaying messages, erasing files, or formatting disks. Trojans do not
infect files, thus cleaning is not necessary.
Solution: OfficeScan uses the Virus Cleanup Engine and Virus Cleanup Template to
remove Trojans.
A-13
Trend Micro™ OfficeScan™ 10 Administrator’s Guide
Files Infected with Worms
A computer worm is a self-contained program (or set of programs) able to spread
functional copies of itself or its segments to other computer systems. The propagation
usually takes place through network connections or email attachments. Worms are
uncleanable because the file is a self-contained program.
Solution: Trend Micro recommends deleting worms.
Write-protected Infected Files
Solution: Remove the write-protection to allow OfficeScan to clean the file.
Password-protected Files
Includes password-protected compressed files or password-protected Microsoft Office
files.
Solution: Remove the password protection for OfficeScan to clean these files.
Backup Files
Files with the RB0~RB9 extensions are backup copies of infected files. OfficeScan
creates a backup of the infected file in case the virus/malware damaged the file during
the cleaning process.
Solution: If OfficeScan successfully cleans the infected file, you do not need to keep the
backup copy. If the computer functions normally, you can delete the backup file.
Infected Files in the Recycle Bin
OfficeScan may not remove infected files in the Recycle Bin because the system is
running.
Solutions:
For computers running Windows 2000/XP/Server 2003 with NTFS File System,
perform the following steps:
1.
Log on to the computer with Administrator privilege.
2.
Close all running applications to prevent applications from locking the file, which
would make Windows unable to delete it.
A-14
Glossary
3.
Open the command prompt, and type the following to delete the files:
cd \
cd recycled
del *.* /S
The last command deletes all files in the Recycle Bin.
4.
Check if the files were removed.
For computers running other operating systems (or NT platforms without NTFS),
perform the following steps:
1.
Restart the computer in MS-DOS mode.
2.
Open a command prompt, and type the following to delete the files:
cd \
cd recycled
del *.* /S
The last command deletes all files in the Recycle Bin.
3.
Restart the computer in normal mode.
Infected Files in Windows Temp Folder or Internet Explorer Temporary
Folder
OfficeScan may not clean infected files in the Windows Temp folder or the Internet
Explorer temporary folder because the computer uses them. The files to clean may be
temporary files needed for Windows operation.
Solution:
For computers running Windows 2000/XP/Server 2003 with NTFS File System,
perform the following steps:
1.
Log on to the computer with Administrator privilege.
2.
Close all running applications to prevent applications from locking the file, which
would make Windows unable to delete it.
A-15
Trend Micro™ OfficeScan™ 10 Administrator’s Guide
3.
If the infected file is in the Windows Temp folder:
a.
Open the command prompt and go to the Windows Temp folder (located at
C:\Windows\Temp for Windows XP/Server 2003 computers and at
C:\WinNT\Temp for Windows NT/2000 computers by default).
b.
Type the following to delete the files:
cd temp
attrib -h
del *.* /S
The last command deletes all files in the Windows Temp folder.
4.
If the infected file is in the Internet Explorer temporary folder:
a.
Open a command prompt and go to the Internet Explorer Temp folder
(located in C:\Documents and Settings\<Your user name>\Local
Settings\Temporary Internet Files for Windows 2000/XP/Server 2003
computers by default).
b.
Type the following to delete the files:
cd tempor~1
attrib -h
del *.* /S
The last command deletes all files in the Internet Explorer temporary folder.
c.
A-16
Check if the files were removed.
Glossary
For computers running other operating systems (or those without NTFS):
1.
Restart the computer in MS-DOS mode.
2.
If the infected file is in the Windows Temp folder:
a.
At the command prompt, go to the Windows Temp folder. The default
Windows Temp folder in Windows XP/Server 2003 is C:\Windows\Temp.
The default Windows Temp folder in Windows 2000 is C:\WinNT\Temp.
b.
Open the command prompt, and type the following to delete the files:
cd temp
attrib –h
del *.* /S
The last command deletes all files in the Windows Temp folder.
c.
3.
Restart the computer in normal mode.
If the infected file is in the Internet Explorer temporary folder:
a.
At the command prompt, go to the Internet Explorer temporary folder. The
default Internet Explorer temporary folder in Windows 2000/XP/Server 2003
is C:\Documents and Settings\<Your user name>\Local Settings\Temporary
Internet Files.
b.
Type the following commands:
cd tempor~1
attrib –h
del *.* /S
The last command deletes all files in the Internet Explorer temporary folder.
c.
Restart the computer in normal mode.
A-17
Trend Micro™ OfficeScan™ 10 Administrator’s Guide
A-18
Index
A
Access Control Server (ACS) 10-3
ACS certificate 10-17
Active Directory 1-3, 2-22, 3-12, 3-23, 8-9
query results 2-24
scheduled query 2-27
scope and query 2-23
ActiveAction 5-32
adware 5-4
approved list 5-41
approved URLs 6-5
assessment mode 9-23
Authentication, Authorization, and Accounting (AAA) 10-5
AutoPcc.exe 3-11, 3-15–3-16
AutoRun 5-65
B
behavior monitoring 1-3
Behavior Monitoring Configuration Pattern
4-7
Behavior Monitoring Core Service 4-7
Behavior Monitoring Driver 4-7
C
CA certificate 10-17, 10-19
Case Diagnostic Tool 12-2
Certificate Authority (CA) 10-5
certificates 10-17
CA 10-19
SSL 10-33
Check Point SecureClient 3-23
Cisco NAC
about 10-1
architecture 10-6
components and terms 10-2
policy server deployment 10-23
Cisco Trust Agent 1-6, 4-8, 10-2
client console
access restriction 9-17
client disk image 3-12, 3-29
client installation
browser-based 3-15
from the Web console 3-27
from the Web install page 3-13
post-installation 3-48
system requirements 3-2
using client disk image 3-29
using Client Packager 3-18
using Login Setup Script 3-15
using Security Compliance 2-26
using Vulnerability Scanner 3-30
client logs
client connection log 12-11
client update log 12-11
DCS debug log 12-10
debug log 12-9
fresh installation log 12-10
Mail Scan log 12-10
OfficeScan firewall debug log 12-12
Outbreak Prevention debug log 12-11
TDI debug log 12-14
upgrade/hot fix log 12-10
Web Reputation debug log 12-13
client mover 9-41
Client Packager 3-11, 3-18, 3-23–3-24
deployment 3-20
settings 3-20
IN-1
Trend Micro™ OfficeScan™ 10 Administrator’s Guide
client security level 9-17
client self-protection 1-3, 9-27
client tree 2-11
advanced search 2-13
general tasks 2-12
specific tasks 2-13
client uninstallation 3-50
client update
automatic 4-27
event-triggered 4-28
from the ActiveUpdate server 9-15
manual 4-31
privileges 4-33
scheduled update 4-28, 9-15–9-16
scheduled update with NAT 4-32
client upgrade
disable 9-16
client validation 10-4
Common Firewall Driver 4-6, 12-12
Common Firewall Pattern 4-6, 5-4
component duplication 4-16, 4-42
components 2-10, 3-49, 4-2
on the client 4-23
on the OfficeScan server 4-13
on the Smart Scan Server 4-21
on the Update Agent 4-37
update privileges and settings 4-33, 9-15
update summary 4-43
compressed files 5-26, 9-18, 9-20
Conflicted ARP 7-3
connection verification 9-37
Control Manager 8-10
console 8-13
integration with OfficeScan 8-11
registration 8-12
conventional scan 2-7, 5-8
cookie scanning 9-23
IN-2
CPU usage 1-4, 5-27
D
Damage Cleanup Services 1-5, 1-10
database backup 8-21
database scanning 9-19
debug logs
clients 12-9
server 12-2
Device Control 1-3, 5-65
device permissions 5-65
DHCP settings 3-41
dialer 5-5
digital certificates 10-5
Digital Signature Pattern 4-7
documentation feedback 12-18
domains 2-11, 2-20, 9-30
E
EICAR test script 3-49, 5-3
encrypted files 5-36
End User License Agreement (EULA) A-3
evaluation version 2-5, 8-19–8-20
export settings 9-44
external device permissions 5-65
external device protection 4-7, 5-65
F
file infector 5-3
firewall 1-6, 1-10, 7-2
benefits 7-2
default policy exceptions 7-9
disabling 7-19
outbreak monitor 7-4
policies 7-5
policy exceptions 7-9
privileges 7-4, 7-16, 9-10
Manual Name
profiles 7-2, 7-12
tasks 7-4
testing 7-18
Fragmented IGMP 7-3
G
gateway IP address 9-2
gateway settings importer 9-4
global client settings 9-18
Global Smart Scan Server 1-12, 9-40
grace period 2-5, 8-19
H
hacking tools 5-5
hot fixes 4-8, 9-42
I
ICSA certification 4-4
IDS 7-3
import settings 9-44
inactive clients 9-45
incremental pattern 4-16
installation
client 3-2
Policy Server 10-30
IntelliScan 5-26
IntelliTrap 5-26
IntelliTrap Exception Pattern 4-5
IntelliTrap Pattern 4-5
Intrusion Detection System 7-3
IpXfer.exe 9-41
J
Java malicious code 5-3
joke program 5-2, 5-5
K
kernel mode driver 9-25
Knowledge Base 12-16
L
LAND Attack 7-4
licenses 2-5, 8-19
local Smart Scan Server 1-12
location awareness 5-12, 5-15, 6-3, 9-2
Login Script Setup 3-11, 3-15
logs 8-16
about 8-16
client update logs 4-35
connection verification logs 8-17, 9-38
Device Control logs 5-67
firewall logs 7-17, 9-11, 9-25
maintaining 8-18
network virus logs 9-29
security risk logs 5-48, 8-16
spyware/grayware logs 5-54
spyware/grayware restore logs 5-56
system event logs 8-15
virus/malware logs 5-48, 9-29
Web reputation logs 6-7
LogServer.exe 12-3, 12-9
M
MAC address 9-2
macro virus 5-3
mail scan 1-9, 3-22, 9-12
Manual Scan 5-21
shortcut 9-19
Microsoft Exchange Server scanning 9-20
Microsoft SMS 3-11, 3-24
migration
from ServerProtect Normal Servers 3-45
from third-party security software 3-44
IN-3
Trend Micro™ OfficeScan™ 10 Administrator’s Guide
MSI package 3-11–3-12, 3-23–3-24
N
Network Access Device 10-3
network virus 5-4, 7-2, 9-29
new features 1-2
notifications
client update 4-35
computer restart 9-17, 9-25
firewall violations 7-16
for administrators 5-44
for client users 5-46
outbreaks 5-57
outdated Virus Pattern 9-25
Scheduled Scan 9-16
spyware/grayware detection 5-40
virus/malware detection 5-36
Web threat detection 6-6, 9-16
O
OfficeScan
about 1-2
client 1-9
client services 9-26
component update 3-49
components 2-10, 4-2
database backup 8-21
database scanning 9-19
key features and benefits 1-5
licenses 8-19
logs 8-16
programs 2-10
SecureClient integration 11-3
server 1-7
Web console 2-2
Web server 8-23
OfficeScan client 1-9
IN-4
compatible products 3-10
connection with OfficeScan server 9-30,
9-36
connection with Smart Scan Server 9-36
detailed client information 9-43
features 1-9
files 9-27
global settings 9-18
grouping 9-30
import and export settings 9-44
inactive clients 9-45
installation methods 3-11
offline 9-32
online 9-31
privileges and other settings 9-5
processes 9-28
registry keys 9-28
reserved disk space 9-28
roaming 9-33
uninstallation 3-50
OfficeScan server 1-7
functions 1-7
offline client 9-32
OLE layer 9-19
online client 9-31
outbreak criteria 5-57
outbreak prevention 5-60
disabling 5-64
policies 5-61
outbreak prevention policy
block ports 5-62
deny write access 5-63
limit/deny access to shared folders 5-61
outbreak protection 2-10, 5-57
Outlook mail scan 9-13
Overlapping Fragment 7-3
Manual Name
P
packer 5-3
password 2-3, 8-23
password cracking applications 5-5
patches 4-8
performance control 1-4, 5-27
phishing A-7
Ping of Death 7-3
Plug-in Manager 1-7, 1-10
policies
firewall 7-2, 7-5
Web reputation 6-3
Policy Enforcement Pattern 4-7
Policy Server for Cisco NAC 10-3
CA certificate 10-19
certificates 10-17
client validation process 10-7
default policies 10-16
default rules 10-12
deployment overview 10-23
policies 10-38
policies and rules 10-10
policy composition 10-15
Policy Server installation 10-30
rule composition 10-10
rules 10-38
SSL certificate 10-17
synchronization 10-39
system requirements 10-19
POP3 mail scan 9-13, 9-17
port blocking 5-62
posture token 10-4
privileges
firewall privileges 9-10, 9-25
mail scan privileges 9-12
proxy configuration privileges 9-14
roaming privileges 9-6
scan privileges 9-7
Scheduled Scan privileges 9-8, 9-16
toolbox privileges 9-14
uninstallation privileges 9-15
unload privilege 9-15
update privileges 9-15
privileges and other settings 9-5
probable virus/malware 5-3, 5-50
product enhancements 1-4
programs 2-10, 4-2
protection status 2-24
proxy settings
automatic proxy settings 9-29
for client component update 4-34
for external connection 9-40
for internal connection 9-39
for server component update 4-16
for Web reputation 6-5
privileges 9-14
Q
quarantine directory 5-34, 5-36, 8-25
quarantine manager 8-24
R
Real-time Scan 5-19
Real-time Scan service 9-35
reference server 7-13, 8-14
remote access tools 5-5
Remote Authentication Dial-In User Service
(RADIUS) 10-5
roaming client 9-33
roaming clients 1-10
Role-based Administration 1-3, 8-2
Active Directory user accounts 8-9
custom user roles 8-5
from Control Manager 8-7
IN-5
Trend Micro™ OfficeScan™ 10 Administrator’s Guide
user accounts 8-6
user roles 8-2
rootkit protection 4-7
S
scan actions 5-30
spyware/grayware 5-40
virus/malware 9-20
scan criteria
CPU usage 5-27
file compression 5-26
files to scan 5-26
schedule 5-27
user activity on files 5-25
Scan Engine
ICSA certification 4-4
scan exclusions 5-27
directories 5-28
file extensions 5-29
files 5-29
scan method 3-20, 5-8
switching 5-10, 5-14
Scan Now 5-23
scan privileges 5-43
scan types 1-9, 5-19
Scheduled Scan 5-22
postpone 9-8, 9-24
reminder 9-23
resume 9-24
skip and stop 9-9, 9-24
stop automatically 9-24
SCV Editor 11-2
Secure Configuration Verification 11-2
SecureClient 1-10, 11-2
integrating with OfficeScan 11-3
Policy Servers 11-2
SCV Editor 11-2
IN-6
Security Compliance 1-3, 2-22
Security Information Center 12-17
security patches 4-8
security posture 10-4
security risks
phish attacks A-7
protection from 1-5
spyware and grayware 5-4
virus/malware 5-2
security summary 2-5
components and programs 2-10
networked computers 2-6
outbreak status 2-10
product license status 2-5
top 10 security risks 2-9
server logs
client packager log 12-5
component update log 12-5
debug log 12-3
local installation/upgrade log 12-4
MCP Agent debug log 12-6
remote installation/upgrade log 12-4
ServerProtect Migration Tool debug log
12-6
Virus Scan Engine debug log 12-8
VSEncrypt debug log 12-6
Server Tuner 8-25
server update
component duplication 4-16
logs 4-20
manual update 4-20
proxy settings 4-16
scheduled update 4-19
update methods 4-19
ServerProtect 3-45
service restart 9-26
smart scan 1-2, 1-5, 1-10, 2-8, 5-8
Manual Name
Smart Scan Agent Pattern 4-3
Smart Scan Pattern 1-10, 4-3
Smart Scan Server 1-10, 4-21, 5-10
scheduled updates 4-21
types 1-12
update source 4-21
Smart Scan Server list 5-12, 5-15
custom 5-17
standard 5-16
spyware 5-4
Spyware Active-monitoring Pattern 4-6
Spyware Pattern 4-6
Spyware Scan Engine 4-6
spyware/grayware
guarding against 5-7
potential threats 5-6
restoring 5-42
spyware/grayware scan
actions 5-40
approved list 5-41
results 5-55
SSL Certificate 10-33
standalone Smart Scan Server 5-11
summary
security 2-5
updates 4-43
suspicious files 12-18
SYN Flood 7-3
synchronization 10-39
system requirements
Policy Server 10-19
Update Agent 4-37
T
Teardrop 7-3
Technical Support 12-15
Terminal Access Controller Access Control
System (TACACS+) 10-5
test scan 3-49
test virus 5-3
third-party security software 2-26
Tiny Fragment Attack 7-3
TMTouch.exe 9-42
token variable 5-45, 5-59
Too Big Fragment 7-3
touch tool 9-42
Trojan horse program 1-5, 4-5, 5-2
troubleshooting resources 12-2
U
uninstallation 3-50
from the Web console 3-50
manual 3-52
privileges 9-15
using the uninstallation program 3-51
Update Agent 1-9, 3-21, 4-37
assigning 4-38
component duplication 4-42
system requirements 4-37
update methods 4-42
update methods
clients 4-27
OfficeScan server 4-19
Update Agent 4-42
Update Now 9-15
update source
clients 4-24
OfficeScan server 4-15
Smart Scan Server 4-21
Update Agents 4-39
updates
clients 4-23
OfficeScan server 4-13
Smart Scan Server 4-21
IN-7
Trend Micro™ OfficeScan™ 10 Administrator’s Guide
Update Agent 4-37
URL Filtering Engine 4-6
user role
administrator 8-2
guest user 8-4
power user 8-3
V
Virus Cleanup Engine 4-5
Virus Cleanup Template 4-5
Virus Pattern 4-2, 4-36, 9-25
Virus Scan Driver 4-5
Virus Scan Engine 4-4, 12-8
updating 4-4
virus/malware 5-3
virus/malware scan
global settings 5-43
results 5-49
VSEncode.exe 5-37
Vulnerability Scanner 3-13, 3-30
client installation 3-34
computer description retrieval 3-38
DHCP settings 3-41
effectiveness 3-30
functions 3-30
launched on another computer 3-34
ping settings 3-39
product query 3-36
scheduled task 3-42
supported protocols 3-38
tasks on the console 3-34
W
Web console 1-6, 2-2
banner 2-4
logon account 2-3
requirements 2-2
IN-8
URL 2-3
Web install page 3-11, 3-13
Web reputation 1-5, 1-9, 6-2
approved URLs 6-5
location awareness 6-3
policies 6-3, 9-2
Web server information 8-23
Web threats 6-2
Windows Vista
pre-installation tasks 2-26, 3-14, 3-27, 3-35
World Virus Tracking Program 8-28
worm 5-3