1
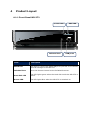
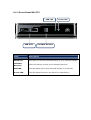
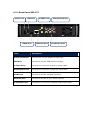
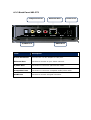
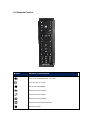
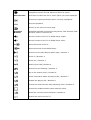
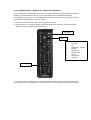
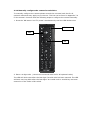
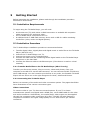
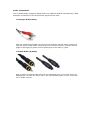
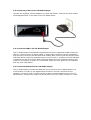
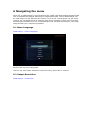
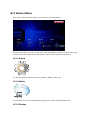
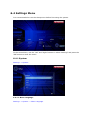
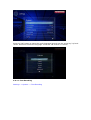
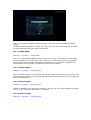
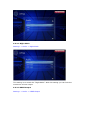
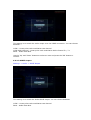
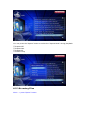
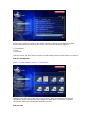
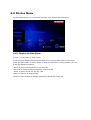
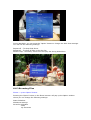
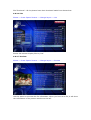
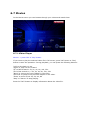
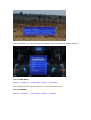
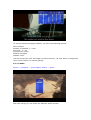
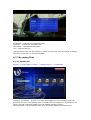
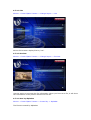
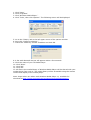
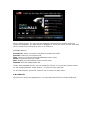
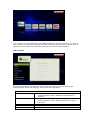
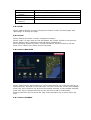
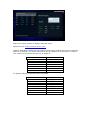
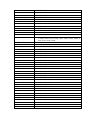
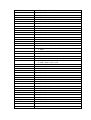
MD-272/MD-273
TV Media Player
Full Manual
Introduction
Congratulations on your purchase of the Sitecom MD-272/MD-273 TV Media Player.
The MD-272/273 TV Media Player supports playback of the most common file formats
of digital video, audio and photo media. Attach the media player via standard AV or
HDMI cables to a standard or high-definition TV. The compact size of the device
allows you to take it with you to anyone you like and share your digital content.
Photos
• Display slide shows with music
• Zoom, pan, move and rotate photos
Video
• Fast forward, rewind, pause, zoom, and pan
• View subtitles
Music
• Fast forward, rewind, pause, shuffle, and repeat
• Playlist support
Network
• Connect the TV Media Player via cable or wireless to your home network
• Play Media from a NAS or computer directly to your TV
Online
• Connect the TV Media Player via cable or wireless to the internet
• View Media from popular applications such as YouTube and MediaFly
• Use popular online applications such as Facebook
Index
2
3
Package Contents ..................................................................... 5
Cautions ................................................................................... 6
3.1
3.2
3.3
3.4
3.5
3.6
3.7
4
Usage Cautions.......................................................................................... 6
Power ........................................................................................................ 6
Radio Interference .................................................................................... 6
Repair ....................................................................................................... 6
Disposing of the Player ............................................................................. 6
Hard Disk Cautions (MD-272 only) ............................................................ 6
Other ......................................................................................................... 7
Product Layout ......................................................................... 8
4.1.1 Front Panel MD-272................................................................................ 8
4.1.2 Front Panel MD-273................................................................................ 9
4.2.1 Back Panel MD-272 .............................................................................. 10
4.2.2 Back Panel MD-273 .............................................................................. 11
4.3 Remote Control ....................................................................................... 12
5
Getting Started....................................................................... 18
5.1 Installation Requirements ....................................................................... 18
5.2 Installation Procedure ............................................................................. 18
6.1 Menu Language ....................................................................................... 22
6.2 Output Resolution ................................................................................... 22
6.3 Home Menu ............................................................................................. 24
6.4 Settings Menu ......................................................................................... 26
6.4.1 System ................................................................................................26
6.4.2 Audio ...................................................................................................29
6.4.3 Video ...................................................................................................32
6.4.4 Network ...............................................................................................35
6.4.5 MISC....................................................................................................35
6.5 Music Menu ............................................................................................. 37
6.5.1 Playing Audio ........................................................................................37
6.5.2 Browsing Files .......................................................................................38
6.6 Photos Menu ........................................................................................... 42
6.6.1 Display & Slide Show .............................................................................42
6.6.2 Browsing Files .......................................................................................43
6.7 Movies ..................................................................................................... 46
6.7.1 Video Player ..........................................................................................46
6.7.2 Browsing Files .......................................................................................50
6.7.3 Network playback ..................................................................................52
6.8 Online...................................................................................................... 54
7
Appendix ................................................................................ 59
7.1
7.2
7.3
7.4
Copyrights and Trademarks .................................................................... 59
Warranty ................................................................................................. 59
GPL Statement ........................................................................................ 59
TV Codes ................................................................................................. 59
Revision 1.1
© Sitecom Europe BV 2012
Note: All the information contained in this manual was correct at the time of publication.
However, as our engineers are always updating and improving the product, your device’s
software may have a slightly different appearance or modified functionality than
presented in this manual.
1
Key Features
The key features of MD-272/273 TV Media Player include:
•
•
•
•
•
•
•
HDMI interface for digital audio and high-definition video.
Composite interface (RCA, yellow/white/red) for analogue AV connection.
Video output resolution includes 480i (using the composite interface), or 480p,
576p, 720i, 720p, 1080i, and 1080p (available when using the HDMI interface).
Built-in screensaver.
Remote Control included.
Dolby Digital and DTS support.
Ethernet connection for network connectivity.
Supported file types
Video
Audio
Photo
Playlist
Subtitles
Mpeg 1
MP3 (CBR, VBR)
GIF
PLS
SRT (UTF-8)
Mpeg 2
MP2
BMP
M3U
SMI
Mpeg 4 (ASP)
WAV/PCM/LPCM
JPEG
SUB
Mpeg 4 (AVC HD/H.264)
AAC (Mpeg 4)
TIF/TIFF
ASS
WMV9
AC3 (Dolby)
PNG
SSA
VC-1
FLAC
MKV
WMA
Xvid
WMA Pro
DivX
Ogg Vorbis
AVI (MPEG4, Xvid, AVC)
VOB/ISO/IFO
DVR-MS
ASF
MOV(MPEG4, H.264)
DAT (VCD/SVCD)
FLV
2
Package Contents
Open the package carefully, and make sure that none of the items listed below are
missing. Do not discard the packing materials, in case of return; the unit must be
shipped back in its original package.
The contents of the package of the MD-272/273 TV Media Player are:
•
•
•
•
•
•
•
•
TV Media Player
HDMI Cable
RCA Cable
Remote control with batteries
12V DC adapter
Quick Installation Guide
CD-ROM with additional manuals
USB cable (MD-272 only)
3
Cautions
This player’s design and manufacturer has your safety in mind. In order to safely and
effectively use this player, please read the following before usage.
3.1 Usage Cautions
User should not modify this player. If commercial hard disk is being used, the
environmental temperature should be within +5 ~ +35 degrees Celsius.
3.2 Power
The player’s power voltage is DC 12V.
When using this player, please connect the supplied AC adapter or AC adapter cable
to the player’s power jack. When placing the adapter cable, make sure it can not get
damaged or be subject to pressure. To reduce the risk of electric shock, unplug the
adapter first before cleaning it. Never connect the adapter to the player in a humid or
dusty area. Do not replace the adapter or cable’s wire or connector.
3.3 Radio Interference
- If not properly shielded, almost all electronic devices will get radio interference.
Under some conditions, your player might get interference.
- The design of this player has followed the FCC/CE standard, and has followed the
following rules:
(1) This player may not cause harmful interference;
(2) This player could accept some interference received including interference that
may cause undesired operation.
3.4 Repair
If the player has a problem, you should take it to an appointed repair centre and let
the specialists do the repair, never repair the player yourself, you might damage the
player or endanger yourself or your data.
3.5 Disposing of the Player
When you dispose of the player, be sure to dispose it appropriately. Some countries
may regulate disposal of electrical device, please consult with your local authority.
3.6 Hard Disk Cautions (MD-272 only)
The player uses an internal hard disk for data storage, in normal case, format or
repair is not required. You should carefully read the <Frequently Asked Questions>
chapter on our website for the latest information before formatting the hard disk.
- Physical impact may create bad sectors on the hard disk, you can use CHKDSK to
fix the problem.
- All data stored on the player may be lost due to physical impact, electrical shock,
power surge, HDD format etc. Please backup your data regularly.
- It is suggested to do a defragmentation after a long period of usage.
- Regularly backup the data in the hard disk so that it can be recovered in the event
of data corruption or loss. Our company takes no responsibility for loss of data
stored on the hard disk.
3.7 Other
When using this player, please do not let the player come into contact with water or
other liquid, if water is accidentally spilled on the player, please use a dry cloth to
absorb the spillage. Electronic products are vulnerable, when using please avoid
shaking or hitting the player, and do not press the buttons too hard.
- Do not let the player come into contact with water or other liquid.
- Do not disassemble the player, repair the player or change the design of the player,
any damage done will not be included in the repair policy.
- Do not press the buttons of the remote too hard.
- Avoid hitting the player with a hard object, avoid shaking the player and stay away
from magnetic fields.
- If during electrostatic discharge or a strong electromagnetic field the product will
malfunction, unplug the power cable. The product will return to normal performance
the next time it is powered on.
4
Product Layout
4.1.1 Front Panel MD-272
Power LED
Infrared Port
HDD LED
USB ports
Item
Description
USB Ports
Use thes to connect the Media Player to your PC or to connect
external storage to the MD-272.
InfraRed Port
Point the Remote Control at the InfraRed Receiver.
Hard disk LED
The LED lights green when the Hard disk inside the MD-272 is
active.
Power LED
The LED lights blue when the MD-272 is switched on.
4.1.2 Front Panel MD-273
USB LED
USB Ports
Power LED
InfraRed Receiver
Item
Description
USB Ports
Use these to connect the Media Player to your external storage.
InfraRed
Receiver
Point the Remote Control at the InfraRed Receiver.
USB LED
The LED lights green when external storage is connected.
Power LED
The LED lights blue when the MD-273 is switched on.
4.2.1 Back Panel MD-272
Power Port
USB Port
HDMI Port
S/PDIF Port
Ethernet Port
Component Ports
Composite Ports
Item
Description
Power Connector
Connect the 12V DC Adapter to this port.
USB Port
Use this to connect USB external storage
S/PDIF Ports
Use these to connect a coaxial or optical cable.
Component Ports
Use these to connect a component video cable.
HDMI Port
Use this to connect a digital Television.
Ethernet Port
Use this to connect to your home network.
Composite Ports
Use these to connect a composite audio/video cable.
4.2.2 Back Panel MD-273
Composite Ports
S/PDIF Port
Ethernet Port
Power Port
HDMI Port
Item
Description
Power Connector
Connect the 12V DC Adapter to this port.
Ethernet Port
Use this to connect to your home network.
S/PDIF Port
Use these to connect a optical audio cable.
Composite Ports
Use these to connect a composite audio/video cable.
HDMI Port
Use this to connect a digital Television.
4.3 Remote Control
Button
Function or Description
Turn the TV Media Player on or off.
Turn the TV on or off.
Go to the Homepage.
Shortcut to the Videos.
Shortcut to the Music.
Shortcut to the Photos.
Shortcut to the Online section.
View the guide.
View options for playback of the file type used. Use the
navigation buttons and OK button to select an option.
Menu Arrows
Use these to select the file or menu option you want displayed.
Choose the option/action/file that’s currently highlighted.
Stop the playback.
Return to the previous menu page.
Playback
Buttons
Standard playback functions for Play/Pause, Fast Forward, Fast
Reverse, Next or Previous file.
Set the volume of the TV or Media Player higher.
Set the volume of the TV or Media Player lower.
Mute the sound of the TV.
TV
MP
Mute the sound of the Media Player.
Shortcut to the Now Playing Music page / Number 1.
Zoom in / Number 2.
Zoom out / Number 3.
Safely eject USB / Number 4.
Shortcut to the Settings / Number 5.
Go to the Search menu / Number 6.
Show information about the playing file / Number 7.
Repeat the playing file / Number 8.
Choose the audio stream while watching video / Number 9.
Choose the subtitle stream while watching video.
Show the currently used resolution / Number 0.
Switch the source on the TV.
4.3.1 Automatically configure the remote for television.
The remote can automatically scan for the correct settings of most popular television
brands. For this feature a list of 10 top manufacturers is composed which all
correspond to a digit key. To automatically configure the remote for a specific brand
of television please follow the next steps.
1. Power on the Television with your original TV remote.
2. Hold down the ‘TV power button’ and ‘Movies Button’ until the LED blinks twice.
After this the LED will be lit continuously.
TV Power
LED
0
1
2
3
4
5
6
7
8
9
Other
Grundig
LG
Panasonic, Loewe
Philips
Samsung
Sharp, JVC
Sony
Thompson
Toshiba
Movies
3. Hold the digit corresponding to your television brand until the television turns off.
Your remote is now configured. The television can now be turned on with this remote.
4.3.2 Manually configure the remote for television.
To manually configure the remote please consult the universal code list for all
optional codes that may apply to your device. This list can be found in Appendix 7.4
in this manual. Continue with the following steps to configure the remote manually.
1. Press the ‘OK button’ and ‘TV power’ simultaneously until the LED blinks twice.
TV Power
LED
OK
2. Enter a 4 digit code. (consult the universal code list for all optional codes)
The LED will blink twice after the last digit if a valid code has been entered. The LED
will blink one long blink after the last digit if an invalid code or invalid key has been
entered or if the mode is ID Locked.
4.3.3 Reset the Remote to factory defaults.
To reset the device please follow the next steps.
1. Press ‘Power media player’ and the ‘OK button’ simultaneously until the LED blinks
twice.
Power
Mediapl
LED
OK
2. Press the following digits: 9, 8, 0. If the Factory reset is successful the LED will
blink 4 times.
4.3.4 Troubleshooting
Volume lock/Unlock.
If the television does not respond to the TV volume keys it may be required to lock the
Volume keys as described in the steps below.
1. Press the ‘OK button’ and ‘Volume +’ simultaneously to lock until the LED blinks
twice, Volume is now locked.
2. Press ‘OK button’ and ‘Volume –’ simultaneously until the LED blinks 4 times,
Volume is now unlocked.
LED
OK button
Volume +
Volume -
5
Getting Started
Before beginning the installation, please read through the installation procedure
described in this manual.
5.1 Installation Requirements
To begin using the TV Media Player, you will need:
•
•
•
A television set (TV) with either a HDMI connection or available AV composite
cable connections for audio and video.
The TV Media Player connected to the TV.
A USB hard disk or USB flash memory device with a USB 2.0 cable containing
media files (video, music and digital photos).
5.2 Installation Procedure
The TV Media Player installation procedure is summarized below:
1. Transfer digital video, digital photo and digital music or audio files to the TV Media
Player (MD-272 only).
2. Connect the TV Media Player to a TV.
3. Connect the power to the TV Media Player.
4. Connect the USB hard disk containing stored digital media to the TV Media Player
and power on the hard disk.
5. Connect the Ethernet cable to the Ethernet port (if the device is used on a local
network).
5.2.1 Transfer Media files to the TV Media Player (MD-272 only)
Transfer your favourite content, like your music, videos and photos, from your
computer to the MD-272 via the USB connector. You can connect the MD-272 like any
other USB storage. You don’t need to put the files in any order, the Portable TV Media
Player will sort them out in the right categories for Music, Videos and Photos.
5.2.2 Connecting the TV Media Player
Below is a summary of the audio and video connection options. The pages that follow
have illustrations of the various connection types.
Video Connections
To connect video to your TV, there are several options. If your TV or home
entertainment system is equipped with a HDMI port, use a HDMI cable for the video
and audio connection. Alternatively, the media player video output can be supplied
through the composite video connection (A/V port). The MD-272 also features a
component connection for higher image quality on TV’s that haven’t got a HDMI
connection.
• Composite Video
Plug the supplied RCA cable into the A/V port on the rear panel of the TV Media
Player and the opposite end of the cable into the composite video in connector on
your TV.
• HDMI Video
Plug the HDMI cable into the HDMI connector on the back panel of the TV Media
Player. Plug the opposite end to the matching HDMI connector on your television
or audio video system. HDMI provides the best video quality resolution up to
1080p, plus audio support.
• Component Video (MD-272 only)
Plug the component cable into the corresponding ports on the back panel of the
TV Media Player. Plug the opposite ends to the corresponding ports on your
television or audio video system. Component provides the best video quality
resolution up to 1080p, but without audio.
Audio Connections
The TV Media Player supports digital audio over HDMI or S/PDIF. Alternatively a RCA
analogue connection for the stereo audio signal can be used.
• Analogue Audio (RCA)
Plug the supplied RCA cable into the A/V port and the red and white connectors
into the colour-coded Audio connectors of your stereo receiver. Connect the red
plugs to the Right (R) jacks and the white plugs to the Left (L) jacks.
• Digital Audio (S/PDIF)
Plug a coaxial or optical cable into the corresponding port on the back of the TV
Mediaplayer. Connect the other end to the corresponding port on your Television
set or Audio receiver.
5.2.3 Connect power to the TV Media Player
Connect the supplied 12V DC adapter to a free wall socket. Connect the other end to
the designated port on the back of the TV Media Player.
5.2.4 Connect USB to the TV Media Player
The TV Media Player automatically searches the disk for supported media content. If
there is a large volume of digital media, it might take several minutes to completely
scan the disk, however the files that have already been scanned can be played. Some
USB hard drives require a separate power source to use it, so make sure the USB disk
is powered on and connected. Often USB hard disks have LED indicators that let you
know if it is powered on and if it is connected. Check the user guide of the USB hard
disk for more information.
5.2.5 Connect Ethernet to the TV Media Player
The TV Media Player includes an Ethernet port to connect the TV Media Player to a
local network in order to use digital media stored on servers connected to the
network. Connect a Cat5 or higher certified cable to the designated port on the TV
Media Player. Connect the other end of the cable to a hub, switch, modem or router.
6 Navigating the menu
Once the TV Media Player is connected and the (USB) hard disk contains digital media
files it automatically begins searching for supported media. The TV Media Player can
be used while it is still scanning for content. Turn on the TV and direct it to the input
used for the TV Media Player to view the main menu interface. If this is the first time
accessing the interface or if the TV Media Player has just been powered on, the initial
setup will ask you a couple of questions.
6.1 Menu Language
Initial Setup -> Menu Language
Select from the list of languages.
Use the ‘Up’ and ‘Down’ buttons to select the item, press ‘OK’ to confirm.
6.2 Output Resolution
Initial Setup -> Resolution
Use this setting to select the video display resolution when using the HDMI interface.
The default setting is Auto.
Note: Full HD quality can be received when the mode is set to 1080p. Please note
that your TV needs to be capable of showing this resolution. 720p and up cannot be
selected if the TV is connected via the composite connection.
6.3 Home Menu
Every time you start the system, you will see the Home Menu.
At the Home Menu, use the arrow keys ‘Left’ and ‘Right’ buttons to select each item,
to enter the item please press 'OK' button. Each item is described as below.
6.3.1 Setup
To set the system functions such as System, Audio, video, etc.
6.3.2 Music
In the Music menu you can browse through your music files and play them.
6.3.3 Photos
In the Photo menu you can browse through your photos and view them.
6.3.4 Movies
In the Movies menu you can browse through the videos and watch them.
These are all items in the Home Menu. In the next chapters these items will be
described in more detail.
6.4 Settings Menu
It is recommended to use the Setup menu before first using the system.
In the Home Menu, use the ‘Left’ and ‘Right’ buttons to select ‘Settings’ and press the
‘OK’ button to enter the menu.
6.4.1 System
Settings -> System
6.4.1.1 Menu Language
Settings -> System -> Menu Language
Press the ‘OK’ button to enter the multi-language list and use the arrow key ‘Up’ and
‘Down’ buttons to select the language. Press the ‘OK’ button to confirm.
6.4.1.2 Text Encoding
Settings -> System -> Text Encoding
You can choose the different encoding types; Unicode (UTF8), Simplified Chinese
(GBK),
Traditional Chinese (BIG5), Turkish, etc. Press the ‘Up’ and ‘Down’ buttons to select
the item and press the ‘OK’ button to confirm.
6.4.1.3 DLNA DMR
Settings -> System -> DLNA DMR
Turn on or off the DLNA DMR function. When it is on, you can select the media files
on your DLNA server, and select “Play on device”, the file will be sent to this player
and playback automatically. Windows Media Player 12 in Windows 7 supports this
function and you can apply it to play the media on this player.
6.4.1.4 Device Name
Settings -> System -> Device Name
When the NAS function is on, the PC can see the player as the device name here. The
default name is based on the unique MAC Address of the player and you can change it
to your desired name.
6.4.1.5 Screen Saver
Settings -> System -> Screen Saver
Enable or disable the screen saver function. Use the ‘Up’ and ‘Down’ buttons to select
"On" or "Off". Press the ‘OK’ button to confirm.
6.4.1.6 Scan storage
Settings -> System -> Scan storage
Set the scan mode of the storage detection.
Auto scan on - system will scan the storage automatically.
Auto scan off - system will not scan the storage.
Rescan storage – manually scan the storage.
Stop scanning storage – do not scan the storage.
Please use the ‘Up’ and ‘Down’ buttons to select and press the ‘OK’ button to confirm.
6.4.1.7 Resume Play
Settings -> System -> Resume Play
The device supports a video resume play function. Use this item to enable or disable
the resume play function.
6.4.1.8 Format (MD-272 only)
Use this setting to format the internal storage of the TV Media Player.
Warning: You will lose all content on the storage!
6.4.1.9 Factory Default
Settings -> System -> Restore Default Settings
Use this setting to restore all TV Media Player system preferences and media playback
settings to their default factory values. This is done to correct performance problems
caused by a failed firmware upgrade or a faulty configuration setting.
6.4.2 Audio
Settings -> Audio
6.4.2.1 Night Mode
Settings -> Audio -> Night Mode
This setting is to switch the “Night Mode”. With this setting you can limit the
maximum volume output.
6.4.2.2 HDMI Output
Settings -> Audio -> HDMI Output
This setting is to switch the audio output over the HDMI connection. You can choose
between:
LCPM – Linear pulse code modulation two channel
LCPM Multi-Channel - Linear pulse code modulation Multi-Channel 5.1, 7.1
RAW – Audio Raw data.
Use the ‘Up’ and ‘Down’ buttons to select an item and press the ‘OK’ button to
confirm.
6.4.2.3 SPDIF Output
Settings -> Audio -> SPDIF Output
This setting is to switch the Audio SPDIF output. You can choose between:
LCPM – Linear pulse code modulation two channel
RAW – Audio Raw data.
Use the ‘Up’ and ‘Down’ buttons to select an item and press the ‘OK’ button to
confirm.
6.4.3 Video
Settings -> Video
6.4.3.1 Aspect Ratio
Settings -> Video -> Aspect Ratio
Use this setting to choose screen ratio. You can choose between:
Pan & Scan 4:3 - 16:9 picture in 4:3 screen mode with and adjusted ratio to meet
4:3.
Letter Box 4:3 - 16:9 picture in 4:3 screen mode with the black bars top and bottom.
16:9
16:10
6.4.3.2 TV System
Settings -> Video -> TV System
Use this setting to choose the resolution and TV system. You can choose between:
NTSC - National Television System Committee
PAL - Phase Alternating Line
480P
576P
720P 50Hz
720P 60Hz
1080i 50Hz
1080i 60Hz
1080P 50Hz – Full HD
1080P 60Hz – Full HD
6.4.3.3 Video Zoom
Settings -> Video -> Video Zoom
Use this function to set the video zoom in/out function.
6.4.3.4 Digital Noise Reduction
Settings -> Video -> Digital Noise Reduction
Use this function to enable or disable the digital noise reduction.
6.4.3.5 1080P 24HZ
Settings -> Video -> 1080P 24HZ
If the TV supports 1080P 24HZ, you can turn on this option.
6.4.4 Network
Settings -> Network
6.4.4.1 Wired LAN Setup
Settings -> Network -> Wired LAN Setup
Set “DHCP IP” or “Fixed IP” for the Ethernet LAN IP configuration of this player.
6.4.4.2 Network Attached Storage
Settings -> Network -> NAS
Switch the NAS function on or off.
6.4.4.3 Network Info
Settings -> Network -> Network Info
Display network information like IP Address, MAC Address and etc.
6.4.5 MISC
Settings -> MISC
Various miscellaneous settings.
Version Info - Select this setting to display the current hardware and firmware
configuration.
Firmware upgrade – Use this setting to update the new firmware if there is any.
Important: Make sure the TV Media Player’s AC power adapter remains connected
during the firmware update. A power disruption during the update process can
corrupt the system firmware.
To update the firmware:
1.
2.
3.
4.
5.
Go to www.sitecom.com and download the latest firmware update.
Unzip the firmware package.
Copy firmware file to the root of the TV Media Player via the USB connection.
Connect the TV Media Player to the TV system.
Select Settings -> MISC -> Firmware upgrade.
6.5 Music Menu
In the Music menu you can browse through your music files and play them.
6.5.1 Playing Audio
Music -> press ‘OK’ or ‘Play’ button
If you want to play the selected music file, press the ‘OK’ button or the ‘Play’ button
to start playback. During playback, you can press the following buttons:
‘FFWD’ to fast forward through the song,
‘FREV’ to fast reverse through the song,
‘Next’ to jump to the next song in play list,
‘Previous’ to jump to the previous song in play list,
‘VOL+/-’ to increase or decrease the volume,
‘Stop’ to stop play,
‘Return’ will return to file browser, while still continuing to play.
You can press the ‘Option’ button to select the ‘Repeat Mode’ during playback:
Repeat
Repeat
Repeat
Shuffle
Off
One
All
Loop
6.5.2 Browsing Files
Music -> press ‘Option’ button
Pressing the ‘Option’ button in the Music browser will pop up the Option window
which can switch the browsing file mode. You have the following options:
Thumbnail
List
Preview
Use the arrow ‘Up’ and ‘Down’ buttons to select and press the ‘OK’ button to confirm.
6.5.2.2 Thumbnails
Music -> Press ‘Option’ button -> Thumbnails
If there is at least one image file in the directory then the directory will have a
thumbnail which is made from this image file. Otherwise it will have a normal
thumbnail made from the default directory picture.
6.5.2.3 List
Music -> Press ‘Option’ button -> List
The Music file browser display files as a ‘List’.
6.5.2.4 Preview
Music -> Press ‘Option’ button -> Preview
Use this option to preview the file information. When you focus on a file, it will show
the information in the preview window on the left.
6.5.2.8 Sort by Artist
Music -> Press ‘Option’ button -> Sorted by -> Artists
The files are sorted by Artists.
6.5.2.8 Sort by Alphabet
Music -> Press ‘Option’ button -> Sorted by -> Alphabet
The files are sorted by Alphabet
6.5.2.9 Sort by Genre
Music -> Press ‘Option’ button -> Sorted by -> Genre
The files are classified by Genre.
6.6 Photos Menu
In the Photos menu you can browse through your photos and view them.
6.6.1 Display & Slide Show
Photos -> press ‘OK’ or ‘Play’ button
If you want to display the selected image file or use the slide show in full screen,
press the ‘OK’ button or ‘Play’ button to start the operation. During display, you can
press the following buttons:
“Next” to jump to the next file in the play list,
‘Previous’ to jump to the previous file in the play list,
‘Zoom’ to zoom in/out 2X, 4X, 8X, 16X
‘Stop’ or ‘Return’ to stop playing.
Press the ‘Info’ button to display information about the image file.
During playback, you can press the ‘Option’ button to change the slide show settings.
You can use the following settings:
Repeat off – To Stop Slide Show.
Repeat all – To show all files in the play list.
Shuffle Loop - Randomly select file in the play list during Slide Show
6.6.2 Browsing Files
Photos -> press ‘Option’ button
Pressing the ‘Option’ button in the Photo browser will pop up the Option window
where you can change the following settings:
Start Slideshow
Slideshow settings
Sorted by Alphabet
Date
My Favorites
Change Layout
Add to slideshow
Use the arrow ‘Up’ and ‘Down’ buttons to select and press ‘OK’ button to confirm.
6.6.2.1 Slideshow settings
Photos -> Press ‘Option button -> Slideshow settings
Here you can set the slide transition time from 2 to 30 seconds. You can also set the
slide transitions.
6.6.2.2 Sort by Alphabet
Photos -> Press ‘Option’ button -> Sorted by -> Alphabet
The files are sorted by Alphabet
6.6.2.3 Sort by Date
Photos -> Press ‘Option’ button -> Sorted by -> Date
The files are sorted by Date.
6.6.2.4 Sort by Favorites
Photos -> Press ‘Option’ button -> Sorted by -> Favorites
The files are classified by Favorites.
6.6.2.5 Thumbnails
Photos -> Press ‘Option’ button -> Change layout -> Thumbnails
Directory Thumbnail – If there is at least one image file in the directory then the
directory will have a thumbnail which is made from this image file. Otherwise it will
have
a normal thumbnail made from the default directory picture.
File Thumbnail – All the photos have their thumbnail made from themselves.
6.6.2.6 List
Photos -> Press ‘Option’ button -> Change layout -> List
Photos file browser display files by ‘List’.
6.6.2.7 Preview
Photos -> Press ‘Option’ button -> Change layout -> Preview
Use this option to preview the file information. When you focus on a file, it will show
the information in the preview window on the left.
6.7 Movies
In the Movies menu you can browse through your videos and watch them.
6.7.1 Video Player
Movies -> press ‘OK’ or ‘Play’ button
If you want to play the selected video file in full screen, press ‘OK’ button or ‘Play’
button to start the operation. During playback, you can press the following buttons:
‘Left’ to skip back 10 sec.
‘Right’ to jump 10 sec forward.
‘FF’ to fast forward 1.5x, 2x, 4x, 8x, 16x, 32x.
‘FR’ to fast rewind 1x, 1.5x, 2x, 4x, 8x, 16x, 32x.
“Next” to jump to the next chapter in the video.
‘Previous’ to jump to the previous chapter in the video.
‘Zoom’ to zoom in/out 2X, 3X, 4X, 8X
‘Stop’ or ‘Return’ to stop playing.
Press the ‘Info’ button to display information about the video file.
During playback, you can also press the ‘Option’ button to change playback settings.
6.7.1.1 DVD Menu
Movies -> Playback -> press ‘Option’ button -> DVD Menu
When playing a DVD, this will return you to the DVD main menu.
6.7.1.2 Subtitle
Movies -> Playback -> press ‘Option’ button -> Subtitle
To set the national language subtitles, you have the following options:
Show subtitle
Position of subtitles: 0 ~ 640
Font size : 3 ~ 40
Synchronous tuning
National language
Subtitle colour
Use the arrow keys ‘Left’ and ‘Right’ to select the item, ‘Up’ and ‘Down’ to adjust the
value. Press ‘Return’ to resume playing.
6.7.1.3 Audio
Movies -> Playback -> press ‘Option’ button -> Audio
With this setting you can select the different Audio streams.
Use the ‘Up’ and ‘Down’ buttons to select the audio mode and ‘OK’ button to confirm.
Press ‘Return’ to resume playback.
6.7.1.4 Go to
Movies -> Playback -> press ‘Option’ button -> Go to
With this function you can time shift to the location you want.
There are three types of jump mode:
Time : Hour : Min : Sec
Title
Chapter
Use the arrow keys ‘Left’ and ‘Right’ to select an item and ‘Up’ and ‘Down’ to adjust
the value. Press ‘Return’ to resume playback.
6.7.1.5 Video Setting
Movies -> Playback -> press ‘Option’ button -> Video Setting
Brightness – Change the brightness level
Contrast – Change the contrast level
Saturation – Change the saturation
Hue – Change the hue
Use the arrow keys ‘Up’ and ‘Down’ to select an item and ‘Left’ and ‘Right to adjust
the value. Press ‘OK’ to resume playback.
6.7.2 Browsing Files
6.7.2.1 Thumbnails
Movies -> Press ‘Option’ button -> Change layout -> Thumbnails
Directory Thumbnail – If there is at least one image file in the directory then the
directory will have a thumbnail which is made from this image file. Otherwise it will
have a normal thumbnail made from the default directory picture.
File Thumbnail – All the photos have their thumbnail made from themselves.
6.7.2.2 List
Movies -> Press ‘Option’ button -> Change layout -> List
Movies file browser display files by ‘List’.
6.7.2.3 Preview
Movies -> Press ‘Option’ button -> Change layout -> Preview
Use this option to preview the file information. When you focus on a file, it will show
the information in the preview window on the left.
6.7.2.4 Sort by Alphabet
Movies -> Press ‘Option’ button -> Sorted by -> Alphabet
The files are sorted by Alphabet.
6.7.2.5 Sort by Genre
Movies -> Press ‘Option’ button -> Sorted by -> Genre
The files are classified by Genre.
6.7.2.6 Sort by Favorites
Movies -> Press ‘Option’ button -> Sorted by -> Favorites
The files are sorted by Favorites.
6.7.3 Network playback
Movies -> Device -> Network
Music -> Device -> Network
Photos -> Device -> Network
Select “Device” in the videos/music/photos of home menu. Select “Network” to
browse the network. Select your PC in the network list to enter. Browse the folder
and select the file to playback.
UPnP
Once your TV Media Player is connected to your network, and you have made the
correct network settings, you can play media files through your network. If you want
to share media files on your computer in order to let the media player play these files,
you can setup your computer as a UPnP server. We will explain how to setup your
computer as a UPnP server in the following steps.
Create a UPnP server
Your computer does not share media by default. You will have to install a UPnP media
server on your computer to add this functionality. If you are using Windows XP,
Windows Vista or Windows 7, you can use the built-in UPnP media service of Windows
Media Player. If you enable this option, your media player can access the music
library on your computer. Follow the steps below to enable this option:
1.
2.
3.
4.
Click
Click
Click
Click
‘Start’.
‘Programs’.
‘Windows Media Player ‘.
‘Tools’, then click ‘Options’. The following screen will be displayed:
5. Go to the ‘Library’ tab in the left upper corner of the options window.
6. Now click ‘Configure sharing…’
7. Check the “Share my media” checkbox and click OK.
8. A list with detected devices will appear within a few seconds.
9. Click the name of your TV Media Player.
10. Click ‘Allow’.
11. Click ‘Ok’.
12. Click ‘Ok’.
13. All files in the media library of Windows Media Player will be shared with your
media player from now on. The media library will be accessible using the remote
control and display of the media player.
Note: Steps above are taken with Windows Media Player 11, available for
download at http://www.microsoft.com/windows/windowsmedia/player/.
6.8 Online
Select the Online option in the main menu to view the various internet functions of
the TV Media Player
6.8.1 YouTube XL
Enter YouTube-XL and you can see the video list in the right panel. Now you can just
press the direction key to highlight a video to play, but we suggest to setup language
and your location first.
Select “Settings” and then select “Set Language” to select the language for the
interface or “Set Geography” to select your location.
Available options:
Videos: select the category like “Spotlight”, “Top Rated”… to sort the videos in the
right panel. Select “More…” to choose more categories. Select the video in the right
panel to play.
Search: Type in a keyword to find the video file.
Sign In: Login to YouTube with your account name and password, and your favourite
video list will display on screen.
Note: You can plug in a USB mouse & keyboard to enter your account information.
Settings: Change settings like language and geography. You can also check the
options if you want to apply them:
“Play next video when current video ends.”
“Filter videos that may not be suitable for minors”
Click a video to play. You can use the playback controls on the remote control to
control the playback. If a USB mouse is plugged in, move the cursor on the video and
the on-screen menu will pop up for you to control it.
Available options:
Search bar: select it to input a keyword to search the video.
Favorite: Add it to your favorite list.
Flag: report it if you feel uncomfortable about this video.
Share: E-mail this link to a friend.
Info: Display the information of the current video.
Related: sort the related video list.
In the video playback screen you can press the “Zoom +” key on the remote control
for full screen playback. Press “Zoom -” to return to the video list.
To exit YouTube-XL, press the “Return” key to return to main menu.
6.8.2 Web Kit
Click the icon to see the page below. You can select the links to visit the web sites.
You can plug in your USB mouse and USB keyboard for control and input. To input a
text or URL, you need to select the text field, use the remote control to press “OK” to
open the virtual keyboard, and then input the text on the USB keyboard.
6.8.3 vTuner
Select the category to browse and play. Press the return key to go back to the
previous page. Press the stop key to stop the audio playback.
Option
Favorites
“Country”
Search
Recently Played
Location
Browse the favorite list and select one to play. In
audio playback, select “Delete from Favorites” to
delete it.
Browse the local list and select one to play. In the
audio playback, select “Add to Favorites” to add to
Favorites.
Enter a keyword to search the audio.
Browse the favorite list and select one to play.
Select your location.
Genre
Podcasts By
Location
Podcasts By Genre
New Stations
Most Popular
Stations
Browse the genre to find your audio channels.
Browse podcast by location.
Browse podcast by genre.
Browse the new stations.
Browse the most popular stations.
6.8.4 Flickr
Select “Search Photos” to enter a keyword to search. Select “Previous page” and
“Next page” to change the page.
6.8.5 Picasa
Select “Search for Photo” to enter a keyword to search.
Select “Login” to login with your ID and display the “Public” photos in this account.
Select “Remove ID” to delete the login ID which is added here.
When selecting “Search for Photo” or login the album, choose a photo in the list.
Press “Prev” “Next” and “Zoom” keys to navigate.
6.8.6 Yahoo! WEATHER
Select “Add Favorite” and browse to a country and select a city. Press the info key to
open the menu, and add it to the favourite. You can now access it from the frontpage.
Press “OK” key to select a city and see the weather forecast. In the weather forecast,
press “OK” key to change the units and the info key to add it to favourites.
Press the direction keys to move the map. Press Prev/Next key to zoom out/in the
map.
6.8.7 Yahoo! FINANCE
Input your Stock symbol to display data and chart.
Reference link: http://finance.yahoo.com/
Choose “Add Stock to Favorite list” and input the stock symbol and country code like
2485.tw to display. The Stock information will be updated in 30 seconds. To delete
one, choose it and press the info key to delete it.
Region
USA
Hong Kong
Taiwan
Shanghai
Shenzhen
Canada
Australia
Country code
N/A
.HK
.TW
.SS
.SZ
.TO
.AX
To display indexes, input the text in the table.
Indexes
Nasdaq
S&P 500
Treasury Yield 30
Hang Seng Indexes
Nikkei 225
Straits Times Index
Shenzhen B share
TSEC weighted
Text
^IXIC
^GSPC
^TYX
^HSI
^N225
^STI
^SZSB
^TWII
7
Appendix
7.1 Copyrights and Trademarks
7.1.1 Copyrights
All rights reserved. No part of this manual may be reproduced, or transmitted in any
form or by any means, whether electronically or mechanically, without the express
written permission from the copyright holder.
Copyrighted materials, such as software, music files, or movies, are protected by
local law, and may not be illegally copied or used without permission from the
copyright owner.
7.1.2 Trademarks
Microsoft and Windows are registered trademarks of Microsoft Corporation. All other
trademarks are property of their respective holders.
7.2 Warranty
What your warranty does not cover:
- Acts of nature, such as fire or static discharge.
- Damage from unauthorized repair, alteration or accident.
- Damage from misuse or neglect.
- A unit that has been modified or incorporated into other products or is used for
institutional or other commercial purposes.
- Loss of customer’s software, firmware, information, or memory data.
- Improper handling or installation.
7.3 GPL Statement
This product contains free software which is licensed under the GNU General Public
License. To obtain a copy of our open source software, please visit our website and
look for the appropriate download section. However, please be noted that we can not
provide guarantee with the source code, and there is also no technical support for the
source code from us.
7.4 TV Codes
Region:
Date:
Europe
21 June 2012
TV
A.R. Systems
0037 0556
Accent
0037 0556
Acoustic Solutions
1667 1865 1037
Adcom
0625
Admiral
0093
AEG
1556 1037 1324
Agora
1585 0037
Aiko
0037 0556 0035 0191
Aim
0037 0556
Aiwa
1505
Akai
Akiba
0208 0037 0191 0035 0714 0715 0556 0178 103
7 0812 1865
0037 0556
Akito
0037 0556
Akura
Alkos
0714 1037 1667 0037 0556 1645 0668 1585 198
3
1037 1585 0714 0037 0668 0556 0587 0036 044
3 2007 1865
0035
Allstar
0037 0556
Amstrad
0037 0556 1037 1324
Alba
Anam National
0650
Andersson
1585
Anitech
0037 0556
Ansonic
1582 0037 0556 0668
AOC
2402 0625 1588 2214
Arc en Ciel
0109
Arçelik
0714
Ardem
0714 0037 0633 0556 0715
Arena
0037
Aristona
0556 0037
ART
1037
Art Mito
1585
Asberg
0037 0556
Atlantic
0037 0556
Audiosonic
0037 0556 0109 0714 0715 1983
Autovox
0349
Axxon
0714
Baier
1324
Baird
0109 0343 0208
Bang & Olufsen
0620
Basic Line
0037 0668 0556 1037
Baur
0195 0512 0037 0556 0191 0349 1505 1010
BBK
1645
Beaumark
0178
Beko
0714 2663 0035 0715 0037 0556 2125 1652
Belson
0698 2032
Belstar
1037
Bennett
0556 0037
BenQ
2402 2214
Beon
0037 0556
Berthen
0668 0556
Bestar
0037 0556
Black Diamond
1037 0556
Black Strip
0035
Blaupunkt
0195 2106 0191 0036
Blue Diamond
2106
Blue Sky
0037 1037 1324 0714 0668 0715 0625 1652 055
6 1243
1652
Boca
Boman
1324
BPL
0037 0556
Brandt
0625 0109 0287 0335 0343 0560
Brandt Electronique
0287 0335
Brinkmann
0037 0556 0668
Brionvega
0037 0556
Bush
Cameron
1037 0714 2127 1585 0037 0668 2125 1652 155
6 0349 0036 0208 0698 0556 1667 1243 0587 2
214 1983 2402 1865 0443 2007
0556
Camper
0037 0556
Carad
0037 0556 0668 1037
Carena
0037 0556
Carrefour
0036 0037 0556
Cascade
0037 0556
Casio
0037 0556 0349
Cathay
0037 0556
Centrum
1037
Centurion
0037 0556
Cinex
1556
Clarivox
0037 0556
Clatronic
0037 0714 0556 1324
Clayton
1037
Condor
0037 0556
Conia
1645
Conrad
0037 0556
Contec
0011 0036 0037 0556
Continental Edison
0109 0287
Cosmel
0037 0556
CPTEC
0625
Crown
CWR-Tech
0037 0556 0714 0715 0208 0653 1037 1652 066
8
1324
Cyberpix
1667
D.Boss
0037
Daewoo
0634 0661 0037 0556 0698 0714
Dansai
0037 0556 0035 0036 0208
Dantax
1652 0714 1037 0715
Datron
0625
Datsura
0208
Dawa
0037 0556
Daytron
0037 0556
de Graaf
0208
Decca
0037 0556
Denver
0037 0556 0587 1324
Desmet
0037 0556
Diamant
0037 0556
DiBoss
0037 0556
Digatron
0037 0556
Digihome
1667
Digiline
0037 0556 0668
DigiLogic
0037 0556
DiK
0037 0556
Dixi
0037 0556
Domeos
0668 0037 1037
Doric
0349
Dream Vision
1704
Dual
Durabrand
0349 0343 0037 0556 1037 2032 1667 1585 132
4 0714
0037 0556 1652 1037 0714
Dux
0037 0556
D-Vision
0037 0556
Dynatron
0037 0556
E.S.C.
0037 0556
e:max
1324
Easy Living
1556
ECG
2125 0037 1037
Elbe
0037 0556 0191
Electrion
1585
Elekta
0037 0556
Elfunk
1208 1037
ELG
0037 0556
Elin
0037 0556 0349
Elite
0037 0556
Emerson
0714 0037 0556 0668
e-motion
2106
Erres
0037 0556
Etron
0037 0556
EuroLine
0037
Euroman
0037 0556
Europa
0037 0556
Europhon
0037 0556
Evesham
1667
Excel
0037 0556
Excello
1037
Exquisit
0037 0556
Fagor
0037 0556
Family Life
0037 0556
Ferguson
0625 0335 1037 0287 0109 0560 0343 0037 055
6 0035 0653 0443 2007 1865 2106
0512 0037 0556
Fidelity
Finlandia
0208 0287 0343
Finlux
0037 0556 0714 1585 1667 0715 1556
Firstline
0037 0556 0668 0714 0349 0208 1037
Fisher
0036 0208 0349 0047
Flint
0037 0556
Foehn & Hirsch
0178
Formenti
0037 0556
Fortress
0093
Fraba
0037 0556
Freesat
1636
Friac
0037 0556
Frontech
0349
Fujitsu
0037 0556
Funai
1037 0668 1505 0714
Future
0037 0556
Gaba
1037 0037
Galaxi
0037 0556
Galaxis
0037 0556
Garza
0556
GE
0343
GEC
0349 0037 0556
General Electric
0343 0287
Genexxa
0037 0556
Gericom
1721
GoGen
1667 0037 1037
Goldfunk
0668
GoldStar
0037 0556 0109 0714 0715
Goodmans
Gorenje
0634 1667 1585 1037 1983 0037 0556 0714 066
8 0036 0343 0035 0560 0335 0661 0587 1645 2
127
1585 1667
Graetz
0714 0037 0556
Granada
0037 0556 0226 0208 0036 0335 0560 0047 034
3
0037 1652 0556 0714 0715 0668 1037
Grandin
Grundig
Haier
0195 0508 1223 1582 0443 0191 2127 1037 003
7 2007 0556 0587 0036 0178 0343 1667 2125 2
663 2890 2625 1645
0698 2214
Hannspree
2214
Hanseatic
0037 0556 0349 0634 0661 0714 0625
Hantarex
0037 0556
Hantor
0037 0556
Harwood
0037 0556
Hauppauge
0037 0556
HCM
0037 0556
Hedzon
0556 0037
Hemmermann
0349
Hifivox
0109
Highline
0037 0556
Hikona
1983
Hinari
0208 0037 0556 0036 0443 2007
Hisawa
0714
Hitachi
Hitachi Fujian
1576 0578 0349 1585 1037 1484 1481 2127 166
7 0634 0343 2214 0576 2007 0443 0037 0556 0
109 0178 0036 0047
0576
Höher
0714 1556
Hornyphon
0037 0556
Humax
1539
Hypson
0037 0556 0714 0715 1037 0668
Hyundai
0037 0556 1556
Iberia
0037 0556
ICE
0037 0556
Ict
0037 0556
iDEAL
1556
Imperial
0037 0508 0556 0349
Indiana
0037 0556
Ingelen
0714
Inno Hit
1037 0037 0556 1585
Innovation
0037 0556
Inspira
1324 1556
Interactive
0037 0556 0512 0109
Interbuy
0037 0512 0556
Interfunk
0037 0556 0512 0109 0349
Internal
0037 0556
Intervision
0037 0556
Irradio
0037 0556 0714
Isis
1037
Isukai
0037 0556
ITS
0037 0556
ITT
2125 0349 0208
ITT Nokia
0349 0208
ITV
0037 0556
Jean
0036
JEC
0035
JMB
0037 0634 0556 0443 2007
Jubilee
0556
JVC
0653 1818 1653 0036 0093 0650
Kaisui
0037 0556
Karcher
0037 0556 0714 1556 2125
Kathrein
0556 0037
Kendo
0037 0556 0512 1585 1037
Kennex
1037
Kingsbrook
1037
Kiton
0556 0037 0668
Kneissel
0037 0556
Kolster
0037 0556 0349
Konka
0037 0556 0714
Korpel
0037 0556
Kosmos
0037 0556
Kuba
0349
Kuba Electronic
0349
Küppersbusch
0037 1667
L&S Electronic
0714
Lavis
1037 0037
Lecson
0037 0556
Lenco
0037 0556 0587 1037 1983
Levis Austria
0037 0556
Leyco
0037 0556
LG
Liesenkötter
1840 2182 1423 1663 0178 0037 1305 1842 071
4 1637 1721 1265 0556 0715 0698
0037 0556
Lifetec
0037 0668 1037 0512 0556 0714
Linsar
1585 1667 1037
Lodos
1037
Loewe
0512 0633 1884 0790 1836 0556 1835
Logik
1865 0011 1585 1037 1645 0037
Logix
0668
Luma
0037 0556
Lumatron
0037 0556
Lumenio
0037
Lux May
0037 0556
Luxor
0349 0208 1037 1667
Madison
0037 0556
Magnavox
0037 0556
Magnum
0714 0037 0556 0715 1289 1556
Manesth
0037 0556 0035
Manhattan
0037 0556 0668 1037
Marantz
0037 0556
Mark
0037 0556 0714 0715
Mascom
1556 0556 0037 2125 1585
Master's
0037
Matsui
Matsushita
0443 1037 2007 0037 0195 0556 0011 0036 034
9 0035 0208 0191 0335 0714 1667
0650
Matsuviama
0587
Maxim
1556
Mediator
0037 0556
Medion
0714 0037 0668 0556 0512 0698 1037 1289 155
6 1667
1037 0037 0556
MEI
Melectronic
Memory
0037 0512 0109 0343 0349 0287 0556 0634 019
1 0195 0661 0714 1652
1983
Mercury
0037 0556
Metz
0195 0191 0037 0556 0587 0668 1037 1637
Micromaxx
0037 0556 0668 1037 1324 0714
Mikomi
1585 1667 0037
Minato
0037 0556
Minerva
0195 0191
Ministry of Sound
1667
Minoka
0037 0556
Mirai
1651 0000
Mitsai
1556
Mitsubishi
0512 0037 0036 0556 0208 1037
Mivar
0609
Moree
0037
Morgan's
0037 0556
MTC
0349 0512
MTlogic
0714
Multitec
0037 0556 0668 1037 1556
Multitech
0349 0037 0556
Murphy
0443
Musikland
0037 0556
Mx Onda
1983 1645
MyCom
0178
Myryad
0556 0037
NAD
1156
Naiko
0037 0556
Nakimura
0037 0556
National
0226
NEC
0036 0037 0556 0011 1704 0653 0661
Neckermann
0037 0191 1505 1010 0556 0349 0512
NEI
0037 0556 1037
NEO
1324
Neufunk
0037 0556 0714
New Tech
0037 0556 0343
Nikkai
0037 0556 0035 0036 1667
Nikkei
0714
Nogamatic
0109
Nokia
0349 0208 0109
Nordmende
Normerel
0560 0109 0287 0343 0195 0037 0556 0335 071
4 1289 0443 2007 1585 1667 0625
0037 0556
Nortek
0668
Novak
0037 0556
Novatronic
0037 0556
Novita
1585
O.K.Line
1037 1324 1556
Oceanic
0208
Okano
0037 0556
OKI
1037 2125 1667 1585
Onei
1667
Onimax
0714
Onn
1556 2125 0556 1667
Opera
0037 0556 0714
Orava
1037
Orbit
0037 0556
Orion
2007 2032 0037 0443 0714 0556 0011 1037
Orline
0037 0556
Ormond
0668 1037 0037 0556
Osaki
0037 0556
Osio
0037 0556
Osume
0036 0037 0556
OTIC
1645 1983
Otto Versand
Pacific
1505 1010 0036 0093 0512 0037 0556 0195 034
9 0191 0109 0226 0343
0037 0556 0714 1037 0443 1324 2007
Palladium
0037 0714 0191 1505 1010 0556 0349
Panache
1585
Panama
0037 0556
Panasonic
0650 1636 1650 0226 1310 0037 0556 1335
Panavision
0037 0556
Papouw
0037 0556
Pathe Cinema
0349
Pathe Marconi
0109
Penney
0047
Perdio
0037 0556
Perfekt
0037 0556
Philco
0037 0556
Philips
0556 0037 1506 1744 2015 1583 1495 0605 188
7 1455 2800 1454 0343
Phocus
1289 0714 1652
Phoenix
0037 0556
Phonola
0037 0556
Pilot
0556 0037
Pioneer
1457 0037 0556 0343 0109 0287 0512
Plantron
0037 0556
Playsonic
0714 0037 0715 1652
Polar
0037
Polaroid
1645 2125
Policom
0109
Powerpoint
0037 0556 0698
Prinston
1037
Prinz
0349
Pro Vision
0037 0556 1037 0714 1324
Profilo
1556
Profitronic
0037 0556
ProLine
0634 1037 0625 0037 0556
Prosonic
Protech
0037 0556 1865 0668 0714 1324 2106 2125 071
5 2663
0037 0556 0349 0668 1037
Proview
1645
Pye
0037 0556 0349
Quadro
0556 0037 1667
Quelle
0037 1505 1010 0011 0109 0512 0349 0191 003
6 0668 0556 0195 1037
0036
Questa
Radialva
0109 0037 0556 0287
Radiola
0037 0556
Radiomarelli
0037 0556
Radionette
0714
RadioShack
0037 0556
Radiotone
0037 0556 0668 1037
Rank Arena
0036
Recor
0037 0556
Rectiligne
0037 0556
Red
2032
Red Star
0037 1556 0556
Rediffusion
0036
Reflex
0037 0556 1037 0668
Relisys
1585 1645
Reoc
0714 0634
Revox
0037 0556
RFT
0037 0556
Ricoh
0037 0556
R-Line
0037 0556
Roadstar
1037 0715 0037 0556 0714 0668
Rodex
0037 0556
Rolsen
0037 0556
Rowa
0587 0037 0556
Royal Lux
0335
Rukopir
0556 0037
Saba
Sagem
0625 0109 0560 0343 0287 0335 0650 0714 158
8
0618
Saisho
0011
Saivod
0037 0556 0668 1556 1037
Salora
0349 0208 1556 2125
Salsa
0335
Samsung
2051 0812 0618 0587 1458 1619 0556 1249 163
0 0644 0037 0766 0814 0178
0037 0556
Sansui
Sanyo
Save
0208 1208 0036 0011 0037 0556 1037 1667 158
5
0037 0556
SBR
0037 0556
Schaub Lorenz
0714 0349 1324 1667 2125
Schneider
0037 0556 0349 0343 0668 1037 0714 1324
Schöntech
1037
Scott
1983
Seaway
0634
Seelver
0556 1037 0037
SEG
1037 0037 0556 0668 0349 0634 0036 2125
SEI
1505 1010 0349 0037 0556
Sei-Sinudyne
1505 1010 0037 0556
Seitech
1324
Seleco
0036
Sencor
0714
Sentra
0035 0349
Serie Dorada
0178
Serino
0093
Sharp
Shintoshi
1659 0093 1193 1393 2214 0036 0818 2402 085
2
0037 0556
Shivaki
0037 0556 0443 2007 0178
Siemens
0191 0195 0037 0556
Siera
0037 0556 0587
Silva
0037 0556
Silva Schneider
1556 2125
Silver
0036 0037 0556 0715
SilverCrest
1037 0037 0556
Singer
0037 0556 0335
Sinudyne
1324 0349 1505 1010 0037 0556
Sky
0178 0661
Sliding
1324
SLX
0668
Solavox
0037 0556
Soniko
0037 0556
Sonitron
0208
Sonneclair
0037 0556
Sonoko
0037 0556
Sonolor
0208 1505 1010
Sontec
0037 0556
Sontech
1983
Sony
Sound & Vision
1825 2778 1505 1651 1751 1625 1010 0011 168
5 0036 0000 0810
0037 0556
Soundwave
0037 0556 0715
Standard
0037 0556 1037
Starion
1037
Starlite
0037 0556
Stevison
1556
Strato
0037 0556
Strong
1037 0037 0556
Sunic Line
0037 0556
Sunkai
0037 0556
Sunny
0037
Sunstar
0037 0556
Sunwood
0037 0556
SuperTech
0037 0556
Susumu
0335 0287
Sysline
0037 0556
Tandberg
0109
Tandy
0093
Targa
0618
Tashiko
0036
Tatung
0037 1556 0556 0011 1324
TCM
0714 1289
Teac
1645
TEC
0335 0037 0556
Tech Line
0037 1585 0556 0668
Technika
2106 2032 1865 1667 1983 1585 2125
TechniSat
0037 0556
Technisson
0714 1289 1652
Techno
1585 1037
Technosonic
0625 2032 0556 1324 0037 0714
Techvision
2032
Techwood
1037 1667
Tecnimagen
0556
Tedelex
0037 0208 0587 0556
TELE System
2125 1585 1037 0037
Teleavia
0109 0287 0343
Telecor
0037 0556
Telefunken
Telefusion
1667 0625 0560 0109 0343 0287 0335 0037 055
6 0714 1556 1585 1588
0037 0556
Telegazi
0037 0556
Telemeister
0037 0556
Telesonic
0037 0556
Telestar
0037 0556
Teletech
0037 0556 0668 1037
Teleton
0349 0036
Teleview
0037 0556
Tennessee
0037 0556
Tensai
0037 0556 0715 1037
Tesla
1037 0037 0668 0714 1652 0715 0556
Tevion
Thorn-Ferguson
0556 1645 1556 2032 0668 1037 1289 1585 071
4 0037
0625 0560 0343 0287 0109 0335 1588 0037 055
6 0349
0109 0343 1505 1010 0037 0556 0011 0335 051
2 0036 0035
0335 0035
Tokai
0037 0556 0668 1037
Tokaido
1037
Tokyo
0035
Topline
1037 0668
Toshiba
Towada
1508 0508 0035 1289 1656 0714 1667 1582 126
5 1704 0109 0195 0191 0618 0698 0037 0832 1
556 0650 1156 1037 2732 1652
0349
TRANS-continents
0668 1037 0556 0037
Triad
0037 0556
Trio
1645
Triumph
0556 0037
TVTEXT 95
0556
Uher
0037 0556
Ultravox
0037 0556
UMC
2106
Unic Line
0037 0556 0349
United
0714 1983 0037 0715 0556 1037 0587 1652 266
3 2125
0714 0037 0556
Thomson
Thorn
Universal
Universum
1037 0037 0668 0195 0011 0512 0036 0556 150
5 1010 0349 0109 0618
Univox
0037 0556
V7 Videoseven
0178 0618 1651 1505 0000
Vanguard
0037 0556
Venturer
1865
Vestel
1037 1585 1667 0037 0668 0556
Vexa
0037 0556
VideoSystem
0037 0556
ViewSonic
1588
Vision
0037 0556
VisionPlus
2106
Visual Innovations
2106
Vivax
0037
Vortec
0037 0556
Voxson
0037 0556 0178
Walker
1667 0037 1037 1585
Waltham
0287 0037 0556 0668 0109 1037 0443 2007
Watson
1037 0556 0037 0668
Watt Radio
0349
Wega
0037 0556 0036
Wegavox
0037 0556
Welltech
0714 1652
Weltblick
0037 0556
Weltstar
1037
Weston
0037 0556
Wharfedale
1983 1667 1324 0037 1037 0714 0556 1556
White Westinghouse
0037 0556
Wilson
0556
Windsor
0668 1037
Windy Sam
0556
World-of-Vision
1289
XDome
0508
Xenius
0634
Xiron
1983
Xoro
1243 1324
Xrypton
0037 0556
Yamaha
0650 1576
Yamishi
0037 0556
Yokan
0037 0556
Yoko
0037 0556
YU-MA-TU
0037
Zepto
1585