1
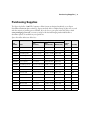
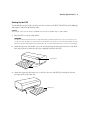
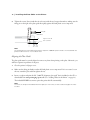
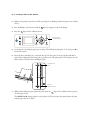
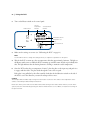
Epson Stylus ® Pro 7900CTP
Computer to Plate System
User’s Guide
2 |
Contents
Introduction . . . . . . . . . . . . . . . . . . . . . . . . . . . . . . . . . . . . . . . . . . . . . . . . . . . . . . . . . . . . . . . . . . . 3
System Workflow . . . . . . . . . . . . . . . . . . . . . . . . . . . . . . . . . . . . . . . . . . . . . . . . . . . . . . . . . . . . 3
PCU Safety Instructions . . . . . . . . . . . . . . . . . . . . . . . . . . . . . . . . . . . . . . . . . . . . . . . . . . . . . . . . . . 4
Purchasing Supplies . . . . . . . . . . . . . . . . . . . . . . . . . . . . . . . . . . . . . . . . . . . . . . . . . . . . . . . . . . . . . 5
System Requirements . . . . . . . . . . . . . . . . . . . . . . . . . . . . . . . . . . . . . . . . . . . . . . . . . . . . . . . . . . . . 6
Setting Up . . . . . . . . . . . . . . . . . . . . . . . . . . . . . . . . . . . . . . . . . . . . . . . . . . . . . . . . . . . . . . . . . . . . 7
Pre-installation Checklist . . . . . . . . . . . . . . . . . . . . . . . . . . . . . . . . . . . . . . . . . . . . . . . . . . . . . . 7
Setting Up the Printer . . . . . . . . . . . . . . . . . . . . . . . . . . . . . . . . . . . . . . . . . . . . . . . . . . . . . . . . 8
Setting Up the PCU . . . . . . . . . . . . . . . . . . . . . . . . . . . . . . . . . . . . . . . . . . . . . . . . . . . . . . . . . . 9
Calibrating the PCU . . . . . . . . . . . . . . . . . . . . . . . . . . . . . . . . . . . . . . . . . . . . . . . . . . . . . . . . 11
Installing the Plate Guide on the Printer . . . . . . . . . . . . . . . . . . . . . . . . . . . . . . . . . . . . . . . . . 13
Setting Up the RIP . . . . . . . . . . . . . . . . . . . . . . . . . . . . . . . . . . . . . . . . . . . . . . . . . . . . . . . . . . 18
Loading a Plate in the Printer . . . . . . . . . . . . . . . . . . . . . . . . . . . . . . . . . . . . . . . . . . . . . . . . . . . . . 19
Unloading a Plate from the Printer . . . . . . . . . . . . . . . . . . . . . . . . . . . . . . . . . . . . . . . . . . . . . . . . . 21
Using the PCU . . . . . . . . . . . . . . . . . . . . . . . . . . . . . . . . . . . . . . . . . . . . . . . . . . . . . . . . . . . . . . . . 21
Using Epson DirectPlate Aluminum Plates . . . . . . . . . . . . . . . . . . . . . . . . . . . . . . . . . . . . . . . . . . . 23
Plate Curing Tips . . . . . . . . . . . . . . . . . . . . . . . . . . . . . . . . . . . . . . . . . . . . . . . . . . . . . . . . . . . 23
Punching the Plate . . . . . . . . . . . . . . . . . . . . . . . . . . . . . . . . . . . . . . . . . . . . . . . . . . . . . . . . . . 23
Press Tips . . . . . . . . . . . . . . . . . . . . . . . . . . . . . . . . . . . . . . . . . . . . . . . . . . . . . . . . . . . . . . . . . 23
Cleaning Plates . . . . . . . . . . . . . . . . . . . . . . . . . . . . . . . . . . . . . . . . . . . . . . . . . . . . . . . . . . . . . 24
Correcting Plates . . . . . . . . . . . . . . . . . . . . . . . . . . . . . . . . . . . . . . . . . . . . . . . . . . . . . . . . . . . 25
Reusing Plates . . . . . . . . . . . . . . . . . . . . . . . . . . . . . . . . . . . . . . . . . . . . . . . . . . . . . . . . . . . . . 25
Washing the Press . . . . . . . . . . . . . . . . . . . . . . . . . . . . . . . . . . . . . . . . . . . . . . . . . . . . . . . . . . 25
Maintenance . . . . . . . . . . . . . . . . . . . . . . . . . . . . . . . . . . . . . . . . . . . . . . . . . . . . . . . . . . . . . . . . . . 25
PCU Specifications . . . . . . . . . . . . . . . . . . . . . . . . . . . . . . . . . . . . . . . . . . . . . . . . . . . . . . . . . . . . . 26
Notices . . . . . . . . . . . . . . . . . . . . . . . . . . . . . . . . . . . . . . . . . . . . . . . . . . . . . . . . . . . . . . . . . . . . . . 27
Introduction | 3
Introduction
The Epson Stylus® Pro 7900CTP Computer to Plate System enables small business printers to print
Epson DirectPlate Aluminum plates to run on their presses.
To run a print job on the system:
•
Computer-separated images are produced with the RIP software
•
The images are printed on a plate
•
The plate is heated in a plate curing unit
•
The plate is mounted on a press
•
The job is printed
System Workflow
The workflow for the process is as follows:
4 | PCU Safety Instructions
PCU Safety Instructions
Before using your PCU, read the following safety instructions to make sure you use the equipment safely
and effectively.
•
The electronics and heating element use dangerous electrical voltages. To reduce the chance of
personal injury or property damage, turn off and unplug the PCU when maintaining the system.
•
Always turn off the PCU using the Heater switch on the control panel first. When the PCU
temperature reads less than 100 °C it is safe to turn off the PCU by the main power switch in the back
of the unit. Failure to follow this could result in a shortening of the life of the mechanism that moves
the plate through the PCU.
•
The PCU heater reaches high temperatures during plate curing. Do not touch the slot area where the
plate comes out on the tray.
•
Aluminum plates are hot when they exit the PCU. Let the plate cool before removing from the tray.
•
Make sure the plate is dry when feeding it into the PCU; if the plate is wet, it could create steam and
cause burns.
•
Do not open the PCU because of electric shock danger.
•
Do not run the PCU with the protective cover open or removed.
•
Place the PCU on a flat, level, stable surface that is larger than the unit. The PCU will not operate
properly if it is tilted or at an angle.
•
The PCU weighs about 55 lb (25 kg) in the box and is bulky, so it should be handled by two people.
•
Do not disable the safety mechanisms installed by the manufacturer in the PCU.
See additional safety instructions for the printer in the Epson Stylus Pro 7900/9900 Printer Guide.
Purchasing Supplies | 5
Purchasing Supplies
The Epson Stylus Pro 7900CTP Computer to Plate System was designed exclusively to use Epson
DirectPlate Aluminium plate technology. Epson currently offers a complete lineup of plate sizes to work
with the majority of printing presses available. If you do not see your press in the table below, check
www.proimaging.epson.com or contact your Epson Professional Imaging Authorized Reseller to
determine if plates are available in your specific size.
Epson DirectPlate Aluminum Plate Sizes
Dimensions (Width × Length)
Part
number
Press
Inch
(fractions)
Inch
(hundredths)
Metric (mm)
Gauge
(mil)
Quantity
S045194
Ryobi 3302
13-3/16 × 19-3/32
13.19 × 19.09
335 × 485
6
100
S045195
Ryobi 3200
12-3/4 × 18-1/2
12.75 × 18.50
324 × 470
6
100
S045196
Heidelberg QM
13-3/8 × 19-7/8
13.38 × 19.88
340 × 505
6
100
S045197
Heidelberg GTO
14-9/16 × 17-3/4
14.56 × 17.75
370 × 451
6
100
S045198
Heidelberg GTO 52
15-3/4 × 20-1/8
15.75 × 20.13
400 × 511
6
100
S045199
Komori Sprint
22 × 26-1/2
22.0 × 26.50
559 × 673
8
50
S045200
Heidelberg SM 52
18-1/16 × 20-11/16
18.06 × 20.69
459 × 525
8
50
S045201
Hamada 601
12 × 18
12.00 × 18.00
305 × 457
6
100
S045202
Hamada 600
11-3/4 × 18
11.75 × 18.00
298 × 457
6
100
S045203
Hamada 700
15-3/4 × 18-1/2
15.75 × 18.50
400 × 470
6
100
S045204
Roland 200/SM74
23-13/16 × 29-1/8
23.81 × 29.13
605 × 740
8
50
S045205
Multi 1850
15 × 18
15.00 × 18.00
381 × 457
6
100
S045206
Multi 1250W
11 × 18
11.00 × 18.00
279 × 457
6
100
S045207
AB Dick 360
11 × 18-1/2
11.00 × 18.50
279 × 470
6
100
S045208
AB Dick 9800
13 × 19-3/8
13.00 × 19.38
330 × 492
6
100
S045209
Itek/Ryobi 2800
11-1/4 × 18-1/2
11.25 × 18.50
286 × 470
6
100
6 | System Requirements
System Requirements
Your computer must meet these requirements to run the RIP software:
Minimum
•
IBM®-compatible PC with a Pentium® 1 GHz CPU or equivalent
•
1GB of RAM
•
80GB hard drive (20GB available space recommended)
•
Microsoft® Windows Vista® or Windows® XP
•
DVD drive
Recommended
•
Pentium 4, 3 GHz or comparable multi-core
•
2GB of RAM
•
300GB hard drive
•
Windows 7 x32 (recommended), Windows Vista, or Windows XP
•
DVD drive
•
One free USB port
Setting Up | 7
Setting Up
Pre-installation Checklist
You will need the following components:
•
Epson Stylus Pro 7900 printer
•
Plate curing unit (PCU)
•
Plate guide
•
Epson DirectPlate Aluminum sample pack (12 × 18 inches)
•
EFI™ eXpress CTP software RIP CD
•
Hexagonal (Allen) (2.5 mm/0.10 inch) wrench
•
Teflon® tape for use on plate guide
•
THERMAX® temperature strips
8 | Setting Up the Printer
•
Windows-based PC (see “System Requirements” on page 6) (not included)
•
Ethernet® (CAT-5) network cable or USB cable for connecting computer and printer (not included)
•
Metric ruler (with half-millimeter increments) (not included)
Before you begin, make sure you have sufficient space to set up and use the system.
Setting Up the Printer
See the Epson Stylus Pro 7900/9900 Printer Guide for the printer’s setup instructions and additional space
requirements.
For additional information, see the following:
•
The Epson Stylus Pro 7900/9900 Printer Guide provides important information on setting up and
using your printer, replacing ink cartridges, maintaining your printer, and troubleshooting tips.
•
The Epson Stylus Pro 7900/9900 Quick Reference Guide provides a summary of procedures for daily
use and printer maintenance. Attach it to your printer for easy reference.
Setting Up the PCU | 9
Setting Up the PCU
You should allow an area of 50 × 33 inches (127 cm × 84 cm) for the PCU. The PCU has an L6-20P plug
and requires a 220 V L6-20 electrical outlet.
Caution:
The electrical outlet must be rated for 220/240 V AC (with an acceptable range of 208 to 240 V).
1.
Place the PCU on a level, stable surface.
WARNING:
The PCU contains a heater and rises to high temperatures. Aluminum plates are very hot when they come
out. Do not touch the plates or slots when hot to avoid burns. Use of gloves is recommended. Make sure the
plates are dry when putting them through the PCU. Do not open the PCU because of electric shock danger.
2.
Attach the input tray (the smaller one) to the unit by inserting the tab into the front slot of the PCU.
Press the tray down to make sure the tab is completely locked into the PCU.
Control panel
Input tray
3.
Attach the output tray (the larger one) to the slot at the rear of the PCU by inserting the tab and
pressing it down in the same way.
Output tray
10 | Setting Up the PCU
4.
Make sure the trays are fully seated in the slots. You can check this by looking through the slot
openings to see if the trays are level with the belt inside the PCU.
Note:
Both trays should be at a slight incline towards the PCU.
5.
To make adjustments if necessary, use the plastic nuts located underneath the tray to create more or
less incline. Turn the nuts counterclockwise to increase the tray angle or clockwise to decrease it.
Counterclockwise
raises the tray
Tray
Plastic nuts
Clockwise lowers
the tray
6.
Plug the PCU into an outlet compatible with the 220/240 V, 20A single phase plug.
7.
If you prefer to run a plate from the rear to the front, you can reverse the direction of the feed by
pressing the feed direction switch on the side of the PCU.
Feed direction
switch
Note:
It is safe to press the feed direction switch even while the belt is moving.
Calibrating the PCU | 11
Calibrating the PCU
After setting up the PCU, follow the steps below to calibrate it. The recommended initial settings for the
PCU are a temperature of 190 °C and a speed of 1.5. To cure properly, the Epson DirectPlate Aluminum
plate should reach an even surface temperature of 150 to 160 °C.
Note:
Depending on the temperature and the altitude where the PCU is located, you may need to adjust these settings
slightly.
Use the included THERMAX temperature strips and run a plate through the PCU with the strips set
across the plate. The THERMAX strips should read between 150 to 160 °C for the plate to be cured
correctly.
1.
Turn on the power switch from the rear of the unit. This activates the transport belt.
Power switch
2.
Turn on the Heater switch on the control panel.
Heater switch
Current
temperature
indicator
Set temperature
indicator
Temperature arrows
Temperature set
button
Speed control knob
12 | Calibrating the PCU
3.
Set the temperature to 190.0 °C on the control panel using the temperature arrows and then press
.
The set temperature indicator on the right displays (in green) the temperature you set. The
temperature indicator on the left displays (in red) the actual temperature.
4.
Set the Speed control knob to 1.5.
5.
Wait for the PCU to warm up to the set temperature; this takes approximately 5 minutes.
The light on the Heater switch comes on while the PCU is warming up, and then turns off and on
periodically after that. The light indicates that the heating element is working to maintain a stable
temperature.
6.
Place three THERMAX temperature strips on the coated side of an Epson DirectPlate Aluminum test
plate, one in the middle and one on each short end of the plate, 1/2 inch from the edge.
WARNING:
The plate edges are sharp. Use of gloves is recommended to avoid injury.
Insert long edge
first
Temperature
strip
7.
Place the test plate on the input tray with the long edge toward the slot, coated side up, and gently
push it in so it engages with the roller. The plate feeds through the PCU at the set speed.
If the plate is not pulled in by the roller, check that the feed direction switch on the side of the PCU is
set correctly.
8.
Check the indicated temperature on the temperature strips as the test plate leaves the PCU to see if it
is in the range of 150 to 160 °C. If the temperature is low, decrease the speed; if you see burning or the
temperature is high, increase the speed.
Installing the Plate Guide on the Printer | 13
Caution:
The transport belt should be kept moving when the heater is turned on. This reduces the surface temperature of
of the transport belt and improves belt life.
Always turn off the Heater switch on the control panel before you turn off the main power switch. Let the PCU
cool to 100 °C or less, according to the current temperature indicator, before turning off the power switch.
WARNING:
Aluminum plates are hot when they exit the PCU. Let the plate cool before removing it from the tray to avoid
burns. Use of gloves is recommended to avoid injury.
Installing the Plate Guide on the Printer
To assure proper registration when printing on Epson DirectPlate Aluminum plates, you need to install
the plate guide on the printer.
1.
Open the roll paper cover on the printer.
2.
Remove the roll paper if installed, to have room to attach the screws on the plate guide. See the
Epson Stylus Pro 7900/9900 Printer Guide for more information.
3.
Slide the plate guide onto the right side of the roll paper cover, aligning it snugly with the black edge
of the roll paper cover.
14 | Installing the Plate Guide on the Printer
4.
Tighten the screws (first #1 and then #2 as shown) with the two hexagonal wrenches, making sure the
fixing pin on the right of the plate guide fits tightly against the black plastic cover component.
Fixing pin
Nut
#1
Tighten screw #1
then screw #2
#2
Note:
The hexagonal wrench included with the Epson Stylus Pro 7900CTP system and the one included with the
printer are different sizes. You need both sizes.
Aligning the Plate Guide
The plate guide must be correctly aligned to remove any skew when printing on the plate. Otherwise, you
will have registration problems on the press.
1.
Close the printer’s roll paper cover.
2.
Make sure the fixing pin firmly touches the black plastic cover component. If it is not secure, loosen
the nut, extend the pin, and then tighten the nut.
3.
Insert a test plate and print the file “7900CTP_alignment_sheet.pdf” that is included on the CD or
downloaded from www.proimaging.epson.com. (See “Loading a Plate in the Printer” on page 19.)
The included EFI RIP has a menu option that prints this file automatically.
Note:
You must use an Epson DirectPlate Aluminum plate (12 × 18 inches) for this test because paper won’t be
accurate.
Installing the Plate Guide on the Printer | 15
4.
When the plate prints out, use a metric ruler to measure the distance from the left edge of the plate to
point A on the printed plate. Then measure the distance from the left edge of the plate to point B. If
the distances to points A and B are equal, go to step 7. If they vary by more than 1.0 mm, the plate
guide is not correctly aligned. Continue with step 5 to adjust the alignment.
Note:
For best results, use a ruler delineated in half-millimeter increments and a magnifying lens.
16 | Installing the Plate Guide on the Printer
5.
Use the hexagonal wrench included with the Epson Stylus Pro 7900CTP system to adjust the
alignment of the plate guide. If distance A is greater than distance B, tighten the alignment screw; if
distance B is greater than distance A, loosen the screw. Half a rotation of the screw moves the guide
approximately 1.0 mm (0.04 inch).
Loosen
Tighten
Alignment screw
6.
Repeat steps 3 and 4 and, if required, step 5 until the measurements are nearly equal, within 1.0 mm.
7.
Once the plate guide is aligned, you need to confirm the alignment. Use a new plate to print a test
pattern (see “Loading a Plate in the Printer” on page 19), then print the test pattern again on the same
plate. The plate is correctly aligned when the line thickness at the top and bottom of the printed
pattern is no greater than 1.0 mm.
Leading edge
Leading edge
Plate
Plate
More than 1.0 mm
difference
No more than 1.0 mm
difference
Trailing edge
Trailing edge
Correct alignment
Incorrect alignment
Installing the Plate Guide on the Printer | 17
Applying the Guide Strip
After the plate guide is aligned correctly, attach the Teflon guide strip to the printer to prevent plates from
catching under the plate guide.
1.
Remove the adhesive backing from the strip.
2.
Align the strip as shown against the plate guide, and apply it from just above the top of the guide to
the bottom edge of the roll paper cover.
Teflon strip
Note:
You should cover the markings on the aluminum roll paper cover with clear packing tape. This is recommended
because long-term use of the plates may wear the markings off.
18 | Setting Up the RIP
Setting Up the RIP
Insert your EFI software RIP CD into your computer and follow the on-screen instructions to complete
the software installation.
Refer to the documentation included with the EFI software for setup and usage instructions. Also, see
www.proimaging.epson.com for additional online videos and training tools on the EFI CTP software
RIP.
Loading a Plate in the Printer | 19
Loading a Plate in the Printer
Caution:
Examine each plate carefully before you use it. If the plate is dented or the corners or edges are bent, do not use
it. Even the slightest bent corner can damage the printer.
Use only Epson DirectPlate Aluminum plates.
WARNING:
The plate edges are sharp. Use caution to avoid injury.
1.
Make sure the media catch bin (fabric bin) is positioned as shown.
Media catch
bin
20 | Loading a Plate in the Printer
2.
Make sure the printer is turned on, the P power light is not flashing, and the roll paper cover is firmly
closed.
3.
Press the l Paper Source button until the
4.
Press the
Sheet icon appears on the LCD display.
Paper release (ePlaten) button.
Paper release
(ePlaten) button
5.
Set the printer to the highest paper suction setting. This will help load the plate. To do that, press u to
increase the suction.
6.
Insert the plate (with light gray, coated side face up) into the paper slot short-edge first and slide it
against the two alignment points along the top and bottom of the plate guide. Lower the plate into the
printer until you feel the suction holding the plate.
Top alignment
point
Bottom
alignment point
7.
While gently holding the plate against the guide, press the
close the paper release.
Paper release (ePlaten) button again to
The PRESS PAUSE message appears on the printer’s LCD screen when the printer detects the plate
and the paper release has closed.
Unloading a Plate from the Printer | 21
WARNING:
The plate edges are sharp. To avoid injury remove your hand from the plate after you press the
Pause/reset button.
8.
Press the
Pause/reset button and let go of the plate. The printer loads and aligns the plate in the
correct position.
9.
When you see PAPER SETTINGS > ARE THESE SETTINGS OK? on the LED display, be sure to
select NO PAPER SELECTED.
Note:
Since you will use multiple plates consecutively on the printing press, it is best to load plates into the printer in
the same direction each time. If this is not done, there is a slight possibility of minor differences in final printing.
Unloading a Plate from the Printer
After printing is finished, the plate stays in the printer. To prevent damage to the plate, make sure it
doesn’t fall. Hold the plate and do one of the following:
•
If you plan to print more plates, press the
Paper release (ePlaten) button. The plate currently in
the printer is released and you can load another plate.
•
If you’re done printing plates, press the d button.
Using the PCU
After a plate is printed and prior to punching or loading it on the press, the plate must be run through the
plate curing unit.
1.
Turn on the power switch from the rear of the unit. This activates the transport belt.
Power switch
22 | Using the PCU
2.
Turn on the Heater switch on the control panel.
Heater switch
Current
temperature
indicator
Set temperature
indicator
Temperature arrows
Temperature set
button
Speed control knob
3.
Make sure the settings are correct (see “Calibrating the PCU” on page 11).
Note:
You should not have to change the settings unless you experience a problem on the press.
4.
Wait for the PCU to warm up to the set temperature; this takes approximately 5 minutes. The light on
the Heater switch comes on while the PCU is warming up, and then turns off and on periodically after
that. The light indicates that the heating element is working to maintain a stable temperature.
5.
Once the PCU reaches the set temperature of 190 °C, place the plate on the input tray and push it so
it engages with the roller. The plate feeds through the oven at the set speed.
If the plate is not pulled in by the roller assembly, check that the feed direction switch on the side of
the PCU is set for the direction you want the transport belt to move.
Caution:
The transport belt should be kept moving when the heater is turned on. This reduces the temperature of the
surface of the transport belt and improves belt life.
Never turn off the power switch on the PCU without first turning off the Heater switch. When you turn off the
system, first turn off the PCU by pressing the Heater switch and let it cool to 100 °C (or less) before turning off
the power switch.
Using Epson DirectPlate Aluminum Plates | 23
Using Epson DirectPlate Aluminum Plates
Plate Curing Tips
The requirements for curing can vary with temperature, humidity, and altitude. If you don’t get the
number of impressions you expect, you may need to adjust the cure rate. You can usually achieve the best
results with lower surface temperatures and decreased speed for less media distortion and a higher number
of impressions. See “Calibrating the PCU” on page 11 for details.
Note:
Remember that the optimal settings on the control panel are 190 °C with a speed of 1.5.
Punching the Plate
Before printing, use an offline punch to create necessary guides on the plate for the press. See your press
documentation or contact your Epson Authorized Reseller if you don’t have a offline punch.
Press Tips
This section includes recommendations on optimizing use of the Epson DirectPlate Aluminum plates. If
you currently use polyester plates, Epson DirectPlate Aluminum plates use similar dampening solutions
and cleaners.
Epson DirectPlate Aluminum plates have a different structure than conventional aluminum plates, and
require a longer time and more water to obtain a properly wetted surface.
Fountain Solutions
When the press starts up, the Epson DirectPlate Aluminum plates require more water than conventional
metal plates. You should provide about 30 seconds of pre-dampening before turning on the ink rollers.
Coat the plate with a layer of fountain solution as you load the plate to speed up the process.
The following fountain solutions are recommended (not carried by Epson):
•
Prisco Fount Concentrate 142-126
•
Agfa G671c
•
Varn Universal Pink
Note:
If you use other fountain solutions, make sure they are alcohol-free.
24 | Cleaning Plates
Dampening Tips
•
If a transition roller connects the dampening system and the inking system (e.g., ALCOLOR and
other similar continuous-feed dampening systems), deactivate the transition roller.
•
If the printing press has a pre-dampening function (for example, the Heidelberg Printmaster QM), set
a higher pre-dampening level.
•
If there are short breaks during the setup phase, or when the paper stack is being replaced, you should
leave the dampening rollers engaged on the tray. If this is not possible, restart printing in the same
manner as in the initial start-up procedure.
Ink Tips
•
For best results, use highly pigmented inks to keep the amount of transferred ink at a low level and
decrease the scumming effect.
•
For optimum printing quality, do not mix ink with printing oil or any other printing agents that
decrease tackiness.
Cleaning Plates
The following plate cleaners are recommended (not carried by Epson):
•
HYDRO CLEAN™ RBP Chemical Technology, Inc.
•
Varn CtP cleaner
•
POSCO Hit-’n-Run emulsion plate cleaner
•
Ultrachem POWA PLATE CLEANER
•
Ultrachem Speedclean EXP plate cleaner
•
Fujifilm PS Plate Multi Cleaner MC-E
•
Prisco® Velocity Plate Cleaner
Caution:
Handle the plate with care to avoid damaging its hydrophilic coating. The use of other plate cleaners may reduce
the life of the plate. Some are not compatible with aluminum plates. Non-diluted IPA or strong plate cleaning
agents and some blanket cleaning materials may damage the image.
Correcting Plates | 25
Correcting Plates
You can delete images with IWATSU Elotax Corrector OX-1. You can also use AGFA Lithostar
Copyrapid Correction Pen. Also, a pencil eraser works well to delete a small section from an image.
Reusing Plates
Epson DirectPlate Aluminum plates can be reused if you would like to store them for use again to reprint
the job.
If you plan to reuse a plate:
1.
Remove ink from it by printing 20 to 30 impressions after disengaging the ink rollers from the plate.
2.
Wash the plate with water before removal from the press.
Gumming or other special treatment is not required for reusing the plate. Store the plates in a dry, cool
place.
Washing the Press
The following press washes are recommended (not carried by Epson):
•
Varn EC Wash
•
Ultrachem Prima Wash
•
Varn News 75 Wash
•
printcom® wash 202B
•
Sun Chemicals SUN WASH U H8830A
Note:
Test washes by rubbing a little on a plate to see if it removes the image.
Maintenance
•
See the Epson Stylus Pro 7900/9900 Printer Guide for printer maintenance.
•
Keep the PCU trays clean to retain their low-friction properties. Make sure the PCU is turned off.
Every week, wipe the trays with a paper towel moistened with a non-abrasive glass cleaner. You might
notice a light gray deposit of dust on the towel; this is normal. Do not spray glass cleaner directly on
the trays or the PCU.
26 | PCU Specifications
PCU Specifications
Specification
Description
Dimensions
Width: 33 inches (838 mm)
Depth: 16 inches (406 mm)
Height: 10.5 inches (267 mm)
Electrical
220/240 V, 20 A male plug
Requires a NEMA L6-20 receptacle
The supplied cable has three conductors:
Green = Earth/ground
Black = AC Phase (208 – 240 VAC)
White = Neutral
Plate size
Minimum 9 inches (229 mm)
Maximum 24 × 30 inches (610 × 762 mm)
Plate type
PET or aluminum; 0.005 to 0.012 inch (0.0127 to
0.0305 mm) thick
Temperature range
122 to 482 °F (50 to 250 °C)
Temperature accuracy
±3.6 °F (2 °C) over the plate area
Speed/dwell time
5 to 24 inches (127 to 610 mm) per minute
Weight
40 lb (18 kg)
Console controls
Heater ON/OFF
Temperature set
Temperature display
Speed set
Notices | 27
Notices
FCC Compliance Statement
The PCU has been tested to be compliant with the following standards:
EN 55022:2006/A1:2007 Class A ITE emissions requirements (EU)
ICES-003 Issue 4 Class A Digital Apparatus emissions requirements (Canada)
FCC 47 CFR Part 15 Class A emissions requirements (USA)
VCCI Class A ITE emissions requirements (Japan)
AS/NZS CISPR 22:2006 Class A ITE emissions requirements (Australia)
EN 61000-3-2:2006 Limits for harmonic current emissions (equipment input current up to including 16A per phase)
EN 61000-3-3:1995/A1:2001/A2:2005 Limitation of voltage fluctuations and flicker in low voltage supply systems for equipment
rated with current up to and including 16A per phase
EN 61000-6-3:2007 Emission requirements for residential, commercial, and light industrial environments – Generic
EMC Immunity:
EN 61000-6-1:2007 Immunity for residential commercial and light industrial environments - Generic
Copyright Notice
All rights reserved. No part of this publication may be reproduced, stored in a retrieval system, or transmitted in any form or by
any means, electronic, mechanical, photocopying, recording, or otherwise, without the prior written permission of Seiko Epson
Corporation. The information contained herein is designed only for use with these Epson printers. Epson is not responsible for
any use of this information as applied to other printers.
Neither Seiko Epson Corporation nor its affiliates shall be liable to the purchaser of this product or third parties for damages,
losses, costs, or expenses incurred by purchaser or third parties as a result of: accident, misuse, or abuse of this product or
unauthorized modifications, repairs, or alterations to this product, or (excluding the U.S.) failure to strictly comply with Seiko
Epson Corporation’s operating and maintenance instructions.
Seiko Epson Corporation shall not be liable for any damages or problems arising from the use of any options or any consumable
products other than those designated as Original Epson Products or Epson Approved Products by Seiko Epson Corporation.
Trademarks
Epson and Epson Stylus are registered trademarks, and Epson Exceed Your Vision is a registered logomark of Seiko Epson
Corporation.
Epson Preferred is a service mark of Epson America, Inc.
General Notice: Other product names used herein are for identification purposes only and may be trademarks of their respective
owners. Epson disclaims any and all rights in those marks.
This information is subject to change without notice.
© 2010 Epson America, Inc. 10/10
CPD-28133
Printed in USA