1
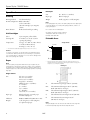
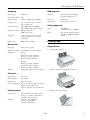
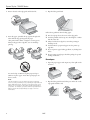
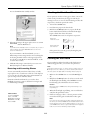
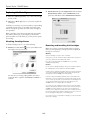
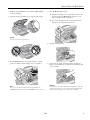
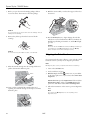
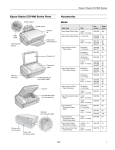
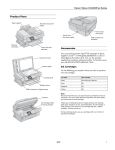
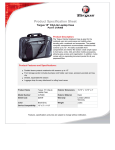
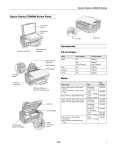
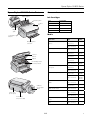
Epson Stylus CX4400 Series
Epson Stylus CX4400 Series Parts
Accessories
Paper support
Ink Cartridges
Feeder guard
Color
Scanner
lid
Edge
guide
Part number
Black
88
Cyan
88
Magenta
88
Yellow
88
Media
Control panel
buttons
Output tray and
extension
Size
Epson Ultra Premium Photo Paper
Glossy
Borderless
4 x 6 inches
S041934
Letter
(8.5 x 11 inches)
S041935
Epson Bright White Paper
Letter
(8.5 x 11 inches)
S041586
Epson Premium Photo Paper Glossy
Borderless
4 x 6 inches
S041808
S041727
Borderless
5 x 7 inches
S041464
Borderless
8 x 10 inches
S041465
Letter
(8.5 x 11 inches)
S041286
S041667
Borderless
4 x 6 inches
S041982
Letter
(8.5 × 11 inches)
S041331
Borderless
4 × 6 inches
S041809
S042038
Letter
(8.5 × 11 inches)
S041141
S041649
S041271
Letter
(8.5 × 11 inches)
S041257
Borderless
8 × 10 inches
S041467
Epson Premium Presentation Paper
Matte Double-Sided
Letter
(8.5 × 11 inches)
S041568
Epson Presentation Paper Matte
Letter
(8.5 x 11 inches)
S041062
Legal
(8.5 x 14 inches)
S041067
Epson Photo Quality Self-Adhesive
Sheets
A4
(8.3 × 11.7 inches)
S041106
Epson Iron-On Cool Peel Transfer
Paper
Letter
(8.5 x 11 inches)
S041153
Scanner
Scanner
support
Ink cartridge holder
(in home position)
Epson Premium Photo Paper
Semigloss
Epson Photo Paper Glossy
Epson Premium Presentation Paper
Matte
USB port
(for computer
cable)
Service only
(do not open)
Power inlet
(for power cable)
5/07
Part
number
Paper name
1
Epson Stylus CX4400 Series
Envelopes
Specifications
Printing
Printing method
On-demand ink jet
Size
No. 10 (4.1 × 9.5 inches)
Paper type
Plain bond paper
Weight
20 lb (75 g/m²) to 24 lb (90 g/m²)
Nozzle configuration Black: 90 nozzles
Color: 270 nozzles
(90 each cartridge: cyan, magenta,
yellow)
Note:
Poor quality paper may reduce the print quality and cause paper jams
or other problems. If you have print quality problems, switch to a
higher grade paper.
Print direction
Do not load curled or folded paper.
Bidirectional with logic seeking
Use paper only under normal conditions:
Temperature: 50 to 95 °F (10 to 35 °C)
Humidity: 20 to 80% RH
Ink Cartridges
Color
Cyan, magenta, yellow, black
Cartridge life
6 months at 77 °F (25 °C) after
opening the package
Temperature
Storage: –4 to 104 °F (–20 to 40 °C)
1 month at 104 °F (40 °C)
Freezing*: 3.2 °F (–16 °C)
*
Printable Area
Single sheets
Normal
Borderless*
A
Ink thaws and is usable after approximately 3 hours at 77 °F (25 °C).
B-L
Caution:
To ensure good results, use genuine Epson ink cartridges and do
not refill them. Other products may cause damage to your printer
not covered by Epson’s warranty. Do not use an ink cartridge if the
date on the package has expired.
B-R
C
Paper
*
Note:
Since the quality of any particular brand or type of paper may be
changed by the manufacturer at any time, Epson cannot guarantee
the quality of any non-Epson brand or type of paper. Always test a
sample of paper stock before purchasing large quantities or printing
large jobs.
When printing with the borderless feature, print quality may decline in the
expanded area. Before printing large jobs using the borderless setting, print a
single sheet to confirm printout quality.
Envelopes
Single sheets
A4 (8.3 × 11.7 inches)
A6 (4.1 × 5.8 inches)
Letter (8.5 × 11 inches)
Legal (8.5 × 14 inches)
Half-letter (5.5 × 8.5 inches)
4 × 6 inches
5 × 7 inches
3.5 × 5 inches
8 × 10 inches
16:9 wide (4 × 7.11 inches)
A:
The minimum top margin is 0.12" (3.0 mm).
B-L:
The minimum left margin is 0.12" (3.0 mm);
0.20" (5.0 mm) for envelopes.
B-R:
The minimum right margin is 0.12" (3.0 mm);
0.20" (5.0 mm) for envelopes.
Paper type
Plain bond paper or special paper
distributed by Epson
C:
The minimum bottom margin is 0.12"(3.0 mm).
Thickness
0.003 to 0.004 inch (0.08 to 0.11 mm)
D
The minimum bottom margin is 0.78"
(20 mm) for envelopes.
Weight
17 lb (64 g/m²) to 24 lb (90 g/m²)
(for plain bond paper)
Size
2
Note:
Always load paper into the sheet feeder with the short edge first.
Load envelopes flap edge left with the flap side down.
5/07
Epson Stylus CX4400 Series
Scanning
USB Interface
Scanner type
Flatbed color
Standard
Based on Universal Serial Bus
Specifications Revision 1.1
Photoelectric device
CIS
Effective pixels
5,100 × 14,040 pixels at 1200 dpi
Connector
USB Series B
Document size
216 × 297 mm (8.5 × 11.7 inches)
A4 or US letter size
Cable length
Under 6.6 feet (2 meters)
Output resolution
50 to 2400, 7200, and 9600 dpi
(50 to 2400 dpi in 1 dpi increments)
Scanning resolution
Safety Approvals
600 dpi (main scan)
1200 dpi (sub scan)
Image data
16 bits per pixel per color internal
8 bits per pixel per color external
(maximum)
Light source
RGB three color LED
EMC
FCC part 15 Subpart B class B
CAN/CSA-CEI/IEC CISPR 22
Class B
Single Sheets
Sheet feeder, top entry
1. Open the paper support.
Sheet feeder capacity About 80 sheets at 24 lb (90 g/m²)
Dimensions
UL 60950-1
CAN/CSA C22.2 No. 60950-1
Loading Paper
Mechanical
Paper path
Safety
Stored:
Width: 17.8 inches (452 mm)
Depth: 13.7 inches (347 mm)
Height: 8 inches (203 mm)
Printing:
Width: 17.8 inches (452 mm)
Depth: 18.7 inches (476 mm)
Height: 11.4 inches (290 mm)
Weight
2. Open the output tray and pull out the extension.
11 lb (5 kg) without the ink cartridges
Electrical
Input voltage
90 to 132 V
Rated frequency
50 to 60 Hz
Rated current
0.6 A (0.7 A max)
Power consumption
Approx. 15.2 W (copying), max 21.6 W
Approx. 3.8 W in sleep mode
Approx. 1 W (max.) in power-off mode
3. Flip the feeder guard forward.
Environmental
Temperature
Humidity
Operation: 50 to 95 °F (10 to 35 °C)
Storage: –4 to 104 °F (–20 to 40 °C)
1 month at 104 °F (40 °C)
Operation: 20 to 80% RH
Storage: 5 to 85% RH
(without condensation)
5/07
3
Epson Stylus CX4400 Series
4. Press in the tab on the edge guide and slide it left.
6. Flip the feeder guard back.
Follow these guidelines when loading paper:
❏ Don’t load paper above the arrow on the edge guide.
5. Insert the paper, printable side up, against the right side.
Then slide the edge guide against the paper.
❏ Load the printable side face-up. It’s often brighter or whiter
than the other side.
(The printed side is whiter or brighter on some papers.)
Always load paper short edge first, even for landscape
printing.
❏ Always load the short edge first, even when printing in
landscape mode.
❏ Load letterhead or preprinted paper into the printer top
edge first.
❏ If you experience paper feeding problems, try loading fewer
sheets.
❏ If you’re using special paper, check the package for special
loading instructions.
Envelopes
1. Open the paper support and output tray. Then pull out the
extension.
You can load up to 80 sheets of plain paper and up to
20 sheets of photo paper. Load other special papers one
sheet at a time.
Note:
The type of paper you choose affects the way your printout
looks. If you are just making a copy or printing a rough draft of an
image, plain paper is fine. However, for the best results, you’ll
want to use one of Epson’s special ink jet papers designed for
your printer. For example, your photos will look great printed on
Epson Premium Photo Paper Glossy (see page 1 for more
information).
4
2. Flip the feeder guard forward. Then press in the tab on the
edge guide and slide it left.
5/07
Epson Stylus CX4400 Series
Selecting the Correct Media Type
3. Load up to 10 envelopes at a time, flap edge left, printable
side up, against the right side.
The table below lists the settings you should choose for your
paper in the printer software:
Load the flap edge left,
printable side up
Paper
Note:
For best results, press each envelope flat before loading, or load
one envelope at a time.
4. Slide the edge guide against the envelopes (but not too
tightly).
5. Flip the feeder guard back.
Type or Media Type
setting
Plain paper
Epson Bright White Paper
Epson Presentation Paper Matte
Plain Paper /
Bright White Paper
Epson Ultra Premium Photo Paper Glossy
Ultra Premium Photo
Paper Glossy
Epson Premium Photo Paper Glossy
Premium Photo Paper
Glossy
Epson Photo Paper Glossy
Photo Paper Glossy
Epson Premium Photo Paper Semi-gloss
Premium Photo Paper
Semi-Gloss
Epson Premium Presentation Paper Matte
Epson Premium Presentation Paper Matte
Double-Sided
Epson Photo Quality Self-Adhesive Sheets
Epson Iron-On Cool Peel Transfer Paper
Premium Presentation
Paper Matte
Envelopes
Envelope
Select the following settings when printing on envelopes:
❏ Envelope as the paper Type or Media Type setting
Placing Originals for Copying or
Scanning
❏ Envelope #10 as the Size or Paper Size setting
❏ Landscape as the Orientation setting
Caution:
Do not place heavy objects on the scanner or document cover.
1. Open the document cover and place your original facedown on the glass, in the front right corner.
Move the photo or document slightly away from the edges
to avoid cropping.
2. Close the document cover gently so that your original does
not move.
5/07
5
Epson Stylus CX4400 Series
Copying
Scanning a Photo or Document
You can make copies using letter-size (8.5 × 11-inch) plain
paper or 4 × 6-inch photo paper.
You can use your CX4400 Series to scan a photo or document
and save it on your computer or other device, or to fax or email it to someone else.
Copying a Document
1. Make sure the CX4400 Series is turned on.
You can even restore faded color photographs or correct
backlighting as you scan (see page 7 for details).
2. Place the document on the glass as described on page 5. Be
sure to close the document cover.
The Epson Scan software provides three scanning modes for
progressive levels of control over your scanned image:
3. Load up to 80 sheets of letter-size plain paper or Epson
Bright White Paper (see page 3 if you need instructions.)
❏ Full Auto Mode scans quickly and easily using automatic
settings.
❏ Home Mode previews your image and provides automatic
image adjustments, cropping tools, and preset options for
various types of scans.
4. Do one of the following:
❏ To make a color copy, press the
x Color Text button. To make a black
and white copy, press the x B&W Text
button.
❏ Professional Mode previews your image and lets you
manually configure your scan settings with a full array of
tools.
❏ If you want to enlarge your document
to fit on the paper you loaded, press and
hold either the x Color Text or
x B&W Text button for 3 seconds.
Basic Scanning
You can scan from any TWAIN-compliant application—such
as ArcSoft PhotoImpression™—using Epson Scan. Or you
can start Epson Scan directly from your computer and save
your image to a file.
❏ To print a quick draft copy, press and
hold the y Stop button as you press
either the x Color Text or
x B&W Text button.
1. Open the document cover and place your original facedown on the glass, in the front right corner, as shown on
page 5.
If you need to stop copying, press the y Stop
button. Do not pull out paper that is being
printed; it will be ejected automatically to the
output tray.
2. Close the cover gently so you don’t move the original.
3. Do one of the following to start EPSON Scan:
Note:
The copies may not be exactly the same size as the original.
❏ Windows®: Double-click the EPSON Scan icon on
your desktop.
Copying a Photo
❏ Macintosh®: Double-click EPSON Scan in the
Applications folder.
❏ If you are scanning from an application, start your
application. Then open the File menu, choose Import
or Acquire, and select Epson Stylus CX4400 Series.
1. Make sure the CX4400 Series is turned on.
2. Place the photo on the glass as described on page 5. Be sure
to close the document cover.
3. Load up to 20 sheets of 4 × 6-inch photo paper. (See page 3
if you need instructions.)
4. Press the x Color Photo button.
6
5/07
Epson Stylus CX4400 Series
You see the EPSON Scan standby window:
Checking the Print Head Nozzles
If your printouts are faint or have gaps in them, some of the
nozzles in the print head may be clogged or ink may be
running low in one or more of the ink cartridges. Follow the
steps below to check the print head nozzles:
1. Turn off the CX4400 Series.
2. Load letter-size paper in the sheet feeder.
3. Hold down the y Stop button as you press the P On
button. Hold down both buttons until the P On light
begins to flash, then release the buttons.
The CX4400 Series turns on and prints a test pattern:
Print head
nozzles are clean:
4. If the Mode setting in the upper right corner is set to Full
Auto Mode, click the Scan button.
Print head needs
to be cleaned:
Note:
If you want to automatically restore a color photo as you scan or
change settings, click the Customize button (see the next
section for instructions).
If the pattern does not look good, try cleaning the print
head as described below.
If you are in Home or Professional Mode, you see a
different Epson Scan settings window. You can change the
mode using the Mode selector in the upper right corner.
(For details on using Home or Professional Mode, see the
on-screen User’s Guide.)
Cleaning the Print Head
If print quality has declined and the nozzle check pattern
indicates clogged nozzles, you can clean the print head.
5. Click OK. The image is scanned and you see its icon in
Windows Explorer or Macintosh Finder.
Note:
Print head cleaning uses ink, so clean it only if necessary. If the red
B ink light comes on or flashes, you cannot clean the print head. In
this case, replace the appropriate ink cartridge first (see page 8).
Restoring and Correcting Photos
You can automatically transform a faded, dusty, or badly
exposed photo into one with true-to-life color and sharpness
as you scan. Use the Color Restoration and Dust Removal
options in Epson Scan’s Full Auto Mode.
1. Make sure the CX4400 Series is on and the B ink light is
off.
2. Hold down the y Stop button for at least 3 seconds until
the P On light starts flashing. The CX4400 Series runs a
head cleaning cycle, which takes about one minute.
In Home and Professional Modes, you can also select
Backlight Correction to remove shadows from images with
too much background light.
Caution:
Never turn off the CX4400 Series during head cleaning or you
may damage it.
3. When the P On light stops flashing, run a nozzle check to
verify that the print head is clean.
Full Auto Mode
Click the Customize
button, click Dust
Removal and/or Color
Restoration, click OK,
and click Scan.
4. If there are still gaps or lines, or the test patterns are faint,
run another cleaning cycle and check the nozzles again.
Note:
If you don’t see any improvement after cleaning the print head
two times, turn off the CX4400 Series and wait at least 6 hours to
let any dried ink soften. Then try printing again. If you do not use
your CX4400 Series often, it is a good idea to print a few pages at
least once a month to maintain good print quality.
5/07
7
Epson Stylus CX4400 Series
❏ Macintosh OS X: Open the Applications folder and select
EPSON Printer Utility 2. Select CX4400 Series in the
printer list, click OK, and select EPSON Status Monitor.
Replacing Ink Cartridges
❏ When the red B ink light flashes, one or more ink cartridges
are low on ink.
❏ When the red B ink light stays on, you need to replace the
cartridge(s).
You’ll also see a message on your screen when you print telling
you which cartridge is low or expended. (You cannot print
when a cartridge is expended, even if the other cartridges are
not expended.)
When a cartridge is more than six months old, print quality
may decline. If necessary, try cleaning the print head. If
printouts still do not look their best, you may need to replace
the cartridge.
Checking Cartridge Status
To check cartridge status, do one of the following:
Removing and Installing Ink Cartridges
❏ Windows: Double-click the
icon on your taskbar (in the
lower right corner of your screen).
Make sure you have a new ink cartridge before you begin.
Once you start replacing a cartridge, you must complete all
the steps in one session.
Warning:
Keep ink cartridges out of the reach of children.
If ink gets on your skin, wash it off with soap and water. If it gets in
your eyes, flush them immediately with water.
Do not put your hand inside the CX4400 Series or touch any
cartridges during printing.
Caution:
Do not open ink cartridge packages until you are ready to install the
ink. Cartridges are vacuum packed to maintain reliability.
Install a new ink cartridge immediately after removing an expended
one. Leaving cartridges uninstalled can dehydrate the print head
and may prevent the CX4400 Series from printing.
You may also see a message asking whether you want to
receive ink offers or updates. Click Accept or Decline to
continue.
Leave the expended cartridge installed until you have obtained a
replacement, or the ink remaining in the print head nozzles may dry
out. To ensure good results, use genuine Epson ink cartridges and
do not refill them. Other products may cause damage to your
CX4400 Series not covered by Epson’s warranty.
If you remove an ink cartridge for later use, protect the ink supply
area from dirt and dust and store it in the same environment as the
CX4400 Series. Note that there is a valve in the ink supply port,
making covers or plugs unnecessary, but care is needed to prevent
the ink from staining items that the cartridge touches. Do not touch
the ink cartridge ink supply port or surrounding area.
If you remove a low or expended ink cartridge, you cannot reinstall
and use the cartridge.
8
5/07
Epson Stylus CX4400 Series
1. Make sure the CX4400 Series is on and the red B ink light is
on but not flashing.
4. Press the y Stop button again.
❏ If another cartridge is low or expended, it moves to the
_ position. Press the y Stop button again to see if
more cartridges are low or expended.
2. Open the scanner and make sure its support locks in place.
❏ If no other cartridges are low or expended, the print
head moves to the replacement position.
Caution:
Do not touch any area shown below.
5. Open the cartridge cover.
3. Press the y Stop button. The print head moves to the _
position to indicate which cartridge is low or expended.
6. Squeeze the tab on the cartridge and lift it straight out.
Dispose of it carefully. Do not take the used cartridge apart
or try to refill it.
Warning:
If ink gets on your hands, wash them thoroughly with soap and
water. If ink gets into your eyes, flush them immediately with
water. Keep ink cartridges out of the reach of children.
Note:
Do not move the print head by hand; this may damage the
CX4400 Always press and release the y Stop button to move it.
5/07
9
Epson Stylus CX4400 Series
11. Hold the scanner while you release the support. Then close
the scanner.
7. Before you open the new ink cartridge package, shake it
four or five times. Then remove it from the package.
Caution:
Do not touch the green chip on the front of the cartridge. This can
damage the ink cartridge.
8. Remove the yellow tape from the bottom of the ink
cartridge.
12. Press the y Stop button to begin charging the ink. This
takes about one and a half minutes. When it’s finished, the
On light stops flashing and remains on, and the B ink light
goes out.
Caution:
Never turn off the CX4400 Series while the On light is flashing or
you’ll waste ink. If the B ink light flashes, press the y Stop
button and press down all the cartridges securely.
Caution:
Do not remove any other labels or seals, or ink will leak.
Aligning the Print Head
If your printouts look grainy or blurry, or you see light or dark
bands across them, you may need to align the print head.
Note:
Banding may also occur if your print head nozzles need cleaning.
9. Place the new ink cartridge into the cartridge holder and
push it down until it clicks into place.
1. Turn on the CX4400 Series.
2. Load several sheets of paper.
3. Windows: Right-click the
printer icon on your taskbar
(in the lower right corner of your screen). Select Print Head
Alignment.
Macintosh OS X: Open the Applications folder and select
EPSON Print Utility. Select your CX4400 Series in the
printer list, click OK, and select Print Head Alignment.
4. Follow the instructions on the screen to print an alignment
sheet.
10. Once you have replaced all the cartridges that need
replacing, close the ink cartridge cover and press it until it
clicks into place.
10
Note:
Do not press the y Stop button to cancel printing of the
alignment sheet.
5/07
Epson Stylus CX4400 Series
You see the following:
6. Release the scanner support and close the scanner.
7. Repack the CX4400 Series in the original box or one of a
similar size using protective material to keep it from moving
inside the box.
Keep the CX4400 Series level as you transport it.
After transporting the CX4400 Series, remove the tape
securing the print head, plug in the CX4400 Series, and turn
it on. If you notice a decline in print quality, clean the print
head (see page 7); if output is misaligned, align the print head
(see page 10).
Related Documentation
5. Check the alignment pattern that prints and compare it to
the alignment criteria on your screen.
Note:
The availability of specific manuals varies by location.
6. Enter the number of the best pattern and click Next.
If no patterns are aligned, choose the square with the
thinnest bands and click Realignment. Then print another
alignment sheet and repeat this step.
7. Follow the on-screen instructions to print and compare
each alignment sheet, or click Skip.
CPD-23604R1
Epson Stylus CX4400 Series
Start Here sheet (English/Spanish)
CPD-23603R1
Epson Stylus CX4400 Series
Start Here sheet (English/French)
CPD-23606R1
Epson Stylus CX4400 Series
Quick Guide (English)
CPD-23608
Epson Stylus CX4400 Series
Quick Guide (Spanish)
CPD-23607
Epson Stylus CX4400 Series
Quick Guide (French)
CPD-23605R1
Epson Stylus CX4400 Series
CD-ROM
(includes on-screen User’s Guide)
Transporting the CX4400 Series
If you need to ship your CX4400 Series, you must prepare it
for transportation by packing it in its original box or one of a
similar size.
1. Turn off the CX4400 Series.
2. Unplug and disconnect all the connected cables.
3. Remove all paper.
4. Close the paper support and output tray.
5. Lift up the scanner and make sure the ink cartridge holder is
in the home position all the way on the right.
Caution:
Be sure to remove the tape after installing the printer in its new
location, but before you turn it on.
5/07
11
Epson Stylus CX4400 Series
12
5/07