1
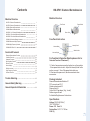
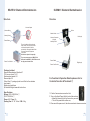
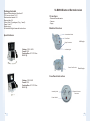
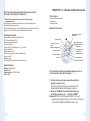
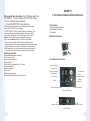
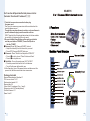
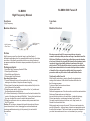
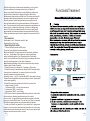
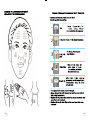
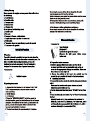
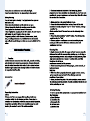
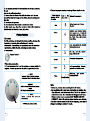
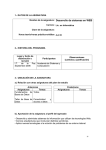
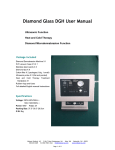
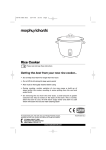
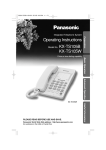
Shining Image
MANUAL
Contents
HB-SF01 Diamond Dermabrasion
Machine Structure
Machine Structure
HB-SF01 Diamond Dermabrasion
HB-SF02 Diamond Dermabrasion
SI-BM01 Diamond Dermabrasion
SI-BM02 Diamond Dermabrasion
HB-MF03 3 In 1 Diamond Dermabrasion
HB-MF01 3 Functional Diamond Dermabrasion
HB-MF05 5 Functional Diamond Dermabrasion
SI-BM03 4 Functional Beauty Intrument
12
SI-BM05 Ultrasound/High Frequency
14
1
2
3
5
7
9
11
SI-BM06 High Frequency Manual
16
SI-BM08 BIO Face Lift
17
BIO microcurrent
High-Frequency Function
Galvanic Function
Trouble Shooting
Power Cord
Face Panel Instruction
Vacuum Meter
Intensity Knob
Wands Holder
Function&Treament
Diamond Dermabrasion Function
Cold& Hot Function
Ultrasonic Function
Skin Scrubber Function
Photon Function
Vacuum/Spray
Power Switch
Face Panel
Vacuum Output
19
24
25
26
28
30
31
33
34
35
General Safety Warning
35
General Important Information
36
For Function & Operation Details please refer to:
Contents/ Function & Treatment/ ①
1- Finish all accessories connection before turn on the machine
→Press power button to start→ Adjust the Intensity Knob for the
suction you want→ Turn off the power button after use;
2- Disconnect the power cord, then disconnect and clean
accessories.
Package Included
Diamond Dermabrasion Machine X 1
PVC vacuum hose 6*4 X 1
Stainless steel wands X 2
Diamond tips X 9
Cotton filter X 2 packages (1big, 1 small)
Rubber rings and fuses
Full detailed English manual/ instructions
Specifications
Voltage: 220V-240V/50Hz □
100V-120V/60Hz □
Power: 45W Fuse: 2A
Packing Size: 36.5* 37.5* 29.5cm
G.W: 5kg
1
HB-SF02 Diamond Dermabrasion
Structure
SI-BM01 Diamond Dermabrasion
Structure
Vacuum Output
Vacuum Meter
Mirror
Wands Holder
Intensity Knob
Vacuum Connector
(Output)
Intensity Knob
Power Button
Left Angle
There is a white cylinder-shaped
filter inside. You could use a small
soft brush to brush off the dirt
periodically. Change this white filter
into a new one when it gets too
congested.
No need to replace it frequently.
Power Cord Socket
The vacuum connector of HB-SF02 is
different fromHB-SF01, HB-SF02 no need
the big round cotton filter.
Power Switch
Right Angle
Power Cord Socket
Package Included
Diamond Dermabrasion Machine X 1
PVC vacuum hose 6*4 X 1
Stainless steel wands X 2
Diamond tips X 9
Cotton filter X 1 package (small round filter for the stainless
steel wand)
Rubber rings and fuses
Full detailed English manual/ instructions
Specifications
Voltage: 220V-240V/50Hz □
100V-120V/60Hz □
Power: 45W Fuse: 2A
Packing Size: 50* 39* 40cm G.W: 8.5kg
2
For Function & Operation Details please refer to:
Contents/ Function & Treatment/ ①
1- Finish all accessories connection first;
2- Turn on the black Power Switch to start the machine
→Adjust the Intensity Knob for the suction you want
→ Turn off the power button after use;
3- Disconnect the power cord, then disconnect and clean accessories.
3
SI-BM02 Diamond Dermabrasion
Package Included
Diamond Dermabrasion Machine X 1
PVC vacuum hose 6*4 X 1
Stainless steel wands X 2
Diamond tips X 9
Cotton filter X 2 packages (1big, 1 small)
Power Cord X 1
Rubber rings
Full detailed English manual/ instructions
3 Functions
- Diamond Dermabrasion
- Vacuum
- Spray
Machine Structure
Accessories Holder
Specifications
Face Panel
Left Angle
Spray Connector
Voltage: 100V–240V
Power: 22W
Packing Size: 28* 26* 20cm
G.W: 3kg
Indicator Light
Power Cord Socket
Back Angle
Face Panel Instruction
Voltage: 100V-240V
Power: 22W
Packing Size: 28* 26* 20cm
G.W: 3kg
SI-BM02
Intensity Knob
Diamond/ Vacuum
Connector
Power Switch
4
5
For Function & Operation Details please refer to:
Contents/ Function & Treatment/ ①⑥
1- Finish all accessories connection before plug
the power cord.
Don't plug the accessory power wires to the sockets when
the machine powers are on.
2- After Operating, first turn off the machine and disconnect the
power cord, then disconnect and clean accessories.
HB-MF03 3 In 1 Diamond Dermabrasion
3 Functions
- Diamond Dermabrasion
- Ultrasonic
- Skin Scrubber
Machine Structure
Scrubber/Ultrasonic
Exchange
Package Included
Diamond Dermabrasion Machine X 1
PVC vacuum hose 6*4 X 1
Stainless steel wands X 2
Diamond tips X 9
Cotton filter X 2 packages (1 big, 1small)
Spray bottles X 2
Glass ventouse X 3
Hoses for spray & vacuum (black & red)
Power cord X 1
Rubber rings
Full detailed English manual/instructions
Timer Display
Ultrasonic Output
mode
Ultrasonic Output B/A
Adjust intensity for
Scrubber/Ultrasonic
Start/stop
Vacumm output
Intensity knob
for Vacuum
Scrubber Output
Vacumm meter
Control
Power Switch
Ultrasonic Output
Specifications
Voltage: 100V-240V
Power: 22W
Packing Size: 30* 26* 24cm
G.W: 2.2kg
For Function & Operation Details please refer to:
Contents/ Function & Treatment/ ①③④
1- Finish all accessories connection before
plug the power cord.
Don't plug the accessory power wires to the
sockets when the machine powers are on.
2- Be sure the Main Power Switch on the top
of the face panel is on. --- Set the "TIME"
Diamond: Press ON (Diamond ON/OFF)to start
→ Adjust the Intensity Knob for t he suction you want
→ Press OFF (Diamond ON/OFF) after use.
6
7
Ultrasonic & Skin Scrubber: Set TIMER and adjust the
INTENSITY→ Press scrubber START/STOP to start,
choose "Pulse/Continuous Wave"
→ Press START/STOP to stop after use.
- Ultrasonic & Skin scrubber cannot work at the same time,
press"ULT. Or SCR." for exchange.
- OUTPUTS"B A": To control the 2 probes of Ultrasonic, The
ultrasound flat probe & pointed probe cannot work at the
same time. (Choose B or A for exchange for the output)
Caution: Please don't turn on usage with long time,
better use scrubber within 15~30 minutes per time.
Then stop the scrubber for 20 minutes before the next
scrubber operation. Long time operation will burn the scrubber
inside and destroy the control board of the whole machine.
3- After operating, turn off the power buttons and disconnect
the power cord, then disconnect and clean accessories.
HB-MF01
3 Functional Diamond Dermabrasion
3 Functions
- Diamond Dermabrasion
- Cold & Hot Treatment
- Ultrasonic
Machine Structure
HB-M F01
Package Included
Diamond Dermabrasion Machine * 1
PVC vacuum hose *1
Stainless steel wands * 2
Diamond tips * 9
Cotton filter *2 packages (1 big, 1 small)
Scrubber Handle*1
Ultrasonic Handle *2
Power cord*1
Rubber rings and fuses
Full detailed English manual /instructions
Face Panel Instruction
Intensity Display
Timer Display
Intensity Up/Down
Time Up/Down
Vacumm Meter
Vacumm
Internsity Knob
Power On/Off
Diamond
ON/OFF
Wrinkle
HB-MF01
Pulse/Continuous wave
Cold & Hot ON/OFF
Ultrasonic Start/Pause
Cold&Hot Socket
Ultrasonic Output
Vacuum Output
8
9
For Function & Operation Details please refer to:
Contents/ Function & Treatment/ ①②③
1- Finish all accessories connection before plug
the power cord.
Don't plug the accessory power wires to the sockets when the
machine powers are on.
Though there are two ultrasonic sockets, only one ultrasonic
probe is allowed to plug in and be used at one time.
DON'T plug both the flat and pointed probes into the two sockets
at one time, or the intensity will be very weak.
2- Be sure the Main Power Button on the machine right side
and the panel button “POWER” (Power On/Off) are on
→ Set the “TIMER”
● Diamond: Press ON (Diamond ON/OFF) to start
→ Adjust the Intensity Knob for the suction you want
→ Press OFF (Diamond ON/OFF) after use.
● Ultrasonic: Press "Wrinkle" and adjust the INTENSITY
→ Press >/■ to start, choose "Pulse/Continuous Wave"
→ Press >/■ to stop after use.
● Cold & Hot: Turn on the panel power "HOT & COLD"
→ Press the power button on the hot & cold hammer
→ Turn off both power buttons after use.
3- After Operating, turn off the power buttons and disconnect the
power cord, then disconnect and clean accessories.
HB-MF05
HB-MF05
Package Included
Diamond Dermabrasion Machine X 1
PVC vacuum hose 6*4 X 1
Stainless steel wands X 2
Diamond tips X 9
Cotton filter X 2 packages (1big, 1 small)
Ultrasonic probe X 2 (flat and pointed)
Cold/Hot Hammer X 1
Power Cord X 1
10
11
SI-BM03
4 Functional Beauty Intrument
4 Functions
- High Frequency
- Galvanic
- Vacuum
- Spray
Machine Structure
VAC&SPY Indicator Light
Galcanic Power
VAC&SPY Indicator Light
VAC&SPY Power
VAC&SPY Intensity
Galvanic +/-Output
VAC Output
Galanic DOWN/UP
S I- B M
03
+/- Exchange
Galanic ON/OFF
H.F Intensity
High Frequency
Output
SPY Output
Galvanic Function
1.Connect the Negative & positive (Red) wire into the machine
using the plug and fasten the securing ring to hold the plug in place.
2.Connect the Electrode handle to the end of the red wire.
3. Connect Black wire to the machine and connect the straight
indifferent electrode to the end of the Black wire for the client to hold.
4. Chose the electrode that best desired treatment and insert it into
the Electrode handle and tighten the secure head to prevent
dropping the electrode.
5. Select the current you wish to use, “-“or “+”. Do not set the
intensity too high to start with.
12
(Notice: The machine has auto protection to shut off the
Galvanic function when the output current reached excessive
intensity to the treatment area. To restart the function, turn
the intensity knob left to the off position, then turn right
to reactivate the function.)
6. To select the desired current, simply press the button
on the front panel as drawn on the machine.
Vac/Spary Function
1. Start the machine: To turn on the machine, press the
Vac/Spray power switch.
2. Connect the hoses to the machine, black for suction
and white for spray.
3.Determine the choice of function and use the accessories
accordingly, Glass ventouses for suction and bottles for spray.
4. Depending on the function being used, disconnect the
opposite hose for best results.
5. To increase vacuum or spray, turn the intensity control
to the right and to decrease the vacuum or spray, turn
the control to the left.
6.When the machine is not in use make sure the power
switch is Off.
High Frequency Function
1. Connect the High Frequency handle's wire to the machine
(it only fits one way)making sure to fasten it into place the
securing ring.
2. Simply insert the desired glass electrode (metal end first)
into the hole at the end of the handle.
3. Using the power switch, turn the machine to the “on”
position and the glass electrode should light up.
4. To control the intensity of the electrode, use the knob
located at the center of the face place labeled “Min/Max”.
Turning this knob allows the user to adjust the current to
match the desired need.
5. When the machine is not in use, make sure the power
switch is in the “Off” position.
Specifications:
Voltage:
110V/60HZ
220V/50HZ
Power: 50W
13
SI-BM05
Ultrasound/High Frequency
2 Functions
- High Frequency
- Ultrasound
Machine Structure
Ultrasound Probes
High Frequency Glass Tubes
High Frequency Handpiece
Ultrasound Indicator Light
Ultrasound Display
Ultrasound Power
Ultrasound Down/Up
Accessories Holder
High Frequency
Indicator Light
Ultrasound On/Off
High Frequency Power
Ultrasound Mode
Ultrasound Power
Ultrasound Output
High Frequency Intensity
High Frequency Output
Operating Instructions for High Frequency Function
1. Connect the High Frequency handle's wire to the machine (it only
fits one way) making sure to fasten it into place the securing ring.
2. Simply insert the desired glass electrode (metal end first) into
the hole at the end of the handle.
3. Using the power switch, turn the machine to the “on” position and
the glass electrode should light up.
4. To control the intensity of the electrode, use the knob located at
the center of the face place labeled “Min/Max”. Turning this knob
allows the user to adjust the current to match the desired need.
5. When the machine is not in use, make sure the power switch is in
the “Off” position.
Operating Instruction for Ultrasonic function
I. Preparation
(1). Before start the ultrasonic, cleanse the area to be worked.
After cleansed, apply suitable lotion and gel to the skin.
(2). Press Power On/Off for Ultrasonic to start the function.
14
(3). Output intensity display on Intensity window, Press Intensity
“up” and “down” button to set output intensity, output intensity
classify into 9 levels, from minimum 0 to maximum 1.8 Watts/cm.
Each level is 0.2 Watts/cm. For Facial work, low to mid intensity
is recommended. For Body work, mid to maximum intensity
is recommended.
II. Face Treatment
(1). Connect Face Electrode (big one) into Face Electrode output.
(2). Press Intensity “up” and “down” button to set output
intensity to your need.
(3). Press Pulse/Continuing mode to select Pulse or Continuing
wave, Pulse/Continuing wave indicator will light on.
(4). Apply the Electrode working on the face.
III. Eye Treatment
(1). Connect Eye Electrode (small one) into Electrode output.
(Should take out the Face Electrode first)
(2). Press Intensity “up” and “down” button to set output
intensity to your need.
(3). Press Pulse/Continuing mode to select Pulse or Continuing
wave, Pulse/Continuing wave indicator will light on.
(4). Apply the Electrode working around the Eye area.
*** Important:
1. Clean skin with clear water.
2. Never stop the electrode on the skin in one spot.
3. Always keeps the electrode moving across the skin.
4. Never point the electrode towards chest area.
5. Do not immerse the handle or the machine into water.
6. Store in a dry cool place.
Safety Warning
1. When proceed deep cleaning or Galvanic,
accompanies with suitable emulsion or gel.
2. Do not modify the equipment.
3. Do not immerse the handle or the machine into water.
4. When adjust the intensity, slightly increase from low to max.
5. After usage, clean the accessories and store in a cool and
dry place. The machine should be grounding.
Specifications:
Voltage:
110V/60Hz □
Power: 22W
15
SI-BM08 BIO Face Lift
SI-BM06
High Frequency Manual
Functions
Functions
- High Frequency
- BIO
Machine Structure
Machine Structure
Konob
Output
High Frequency
Glass Tubes
High Frequency
Handpiece
Preface
High Frequency uses the ultraviolet rays to get the effects of
elimination and absorption.It increased glandular activity, stimulates
circulation of the blood, germicidal action occurs during treatment,
increases metabolism and aids in deeper penetration of product in to
the skin.
Package contents:
1- Insulated High Frequency Handle W/Wire
1- Glass Spoon Electrode
1- Glass Mushroom Electrode
1- Glass angled Spot Electrode
Operating Instructions:
1. Connect the handle's wire to the machine (it only fits one way)
making sure to fasten it into place the securing ring.
2. Simply insert the desired glass electrode (metal end first) into the
hole at the end of the handle.
3. Using the power switch, turn the machine to the “on” position and
the glass electrode should light up.
4. To control the intensity of the electrode, use the knob located at the
center of the face place labeled “Min/Max”. Turning this knob allows
the user to adjust the current to match the desired need.
5. When the machine is not in use, make sure the power switch is in
the“Off” position.
Caution: DO not drop or immerse the handle into water as this can
cause the machine to short, damaging the machine/handle and
causing possibleserious injury to the person(s) in contact with
the machine.
16
Bio microcurrent facelift is a non-surgical non-invasive
cosmetic technique that provides an array of aesthetic benefits.
A Bio facelift utilizes a technology called microcurrent whereby
a low level of electricity is gently delivered to the treatment area
in order to trigger favorable chemical reactions at the skin's
cellular level. The Bio facelift electrical current is much like the
body's own natural electrical current which provides a number
of benefits. It is a safe and incredibly satisfying cosmetic
procedure with very little risk of unfavorable side effects.
The Benefits of Bio Facelift:
A Bio facelift can deliver a variety of benefits to patients who
undergo this treatment. A Bio facelift is safe and effective for
the following purposes:
To improve facial and neck muscle tone.
Lift jowls and eyebrows.
Rejuvenate the skin.
Reduce the appearance of fine lines such as smile lines and wrinkles.
Reduce puffiness and even out skin tone.
Improve facial circulation, skin exfoliation, lymphatic drainage,
Product penetration, sun damage treatment, and cellulite.
Can work on whole body such as face, neck, hips, breast, etc.
Smash fat cells and burn fats.
Most people need a course of around 10 microcurrent sessions to
see the full benefits – although many claim to see immediate results
from the first treatment. The exact number you need will depend on
your skin tissue and muscle tone – not necessarily on your age.
17
After the initial course of microcurrent treatments, you only need
a booster treatment on average around every 4-6 weeks. A
microcurrent facelift utilizes microcurrent technology which uses
gentle electrical stimulation to trigger the body's natural skin
enhancement chemicals at a cellular level.The microcurrent facelift
procedure itself takes approximately one hour to complete and is
virtually painless. Use two pronged instrument to gently deliver
electrical stimulation to the muscles and tissues of the face and/or
neck. The microcurrent facelift procedure requires no anesthesia, no
recovery time, no down time from work, and has no irritating side
effects. To achieve the ultimate benefits of a microcurrent facelift,
approximately ten treatment sessions are recommended. Routine
follow up treatments are performed to maintain microcurrent facelift
results.
※ Accessories
Spot handle×1 pair Mushroom handle×1 pair
Handles without Cap×1 pair
※ Operating Instruction
1. Connect one pair handles to BIO outlet.
There are 3 pairs different handles available:
Mushroom handles: For large area such as the cheeks, forehead,
neck, etc. Spot handles: For small area, such as nasal fossa,
and so on.Handles without Cap: Please insert the Cotton stick
(which you can find them in the plastic bag), then dampen the cotton
with anti-wrinkle essence or other kind of essences.
Note: Handles with damp cotton stick conducts electricity stronger
than the other 2 kinds of handles.
2. Select the time as you like about 15 minutes or 30 minutes.
3. Select the strong or weak intensity. Adjust the BIO intensity slowly
from minimum to maximum, for commonly use, do not set the
intensity to maximum unless necessary.
9 intensity levels -- 1 to 9: it is for intensity of BIO, from weak to strong.
Please choose the suitable intensity according to clients' requirments
or tolerance capability.
4. Select the mode just you like such as for bust, neck or face.
Usage for mode1, 2 and 3:
1: pulse wave 50HZ -- use for skin around eye.
2: pulse wave 70HZ -- use for face.
3: pulse wave 100HZ -- use for body.
5. BIO function has to be operated with beauty products, such as Gel,
whiten products, slimming products and so on to conduct
micro-current. You can also apply some beauty essence on the skin
before you choose BIO function. You can feel very little if you operate
BIO without applying beauty care cream products in advance.
Usually your face is very sensitive. If you want to feel it, apply some
cream to your face, select a mode and an intensity level, and you can
feel the micro-current working obviously. Even your eye can feel light
changes due to the pulse of micro-current.
18
Function&Treament
19
Should use brush with water to
clean diam on hands, after the cleaning,put it into the solution
cosist of 75% alcohol for 5- 10 minutes,take it out and wipe it to
complete dry. Then use UV light or high temperature for
sterilization.
20
21
22
23
24
25
26
27
28
29
BIO microcurrent
Bio microcurrent facelift is a non-surgical non-invasive
cosmetic technique that provides an array of aesthetic benefits.
A Bio facelift utilizes a technology called microcurrent whereby
a low level of electricity is gently delivered to the treatment area
in order to trigger favorable chemical reactions at the skin's
cellular level. The Bio facelift electrical current is much like the
body's own natural electrical current which provides a number
of benefits. It is a safe and incredibly satisfying cosmetic
procedure with very little risk of unfavorable side effects.
The Benefits of Bio Facelift:
A Bio facelift can deliver a variety of benefits to patients who
undergo this treatment. A Bio facelift is safe and effective for
the following purposes:
To improve facial and neck muscle tone.
Lift jowls and eyebrows.
Rejuvenate the skin.
Reduce the appearance of fine lines such as smile lines
and wrinkles.
Reduce puffiness and even out skin tone.
Improve facial circulation, skin exfoliation, lymphatic drainage,
Product penetration, sun damage treatment, and cellulite.
Can work on whole body such as face, neck, hips, breast, etc.
Smash fat cells and burn fats.
Most people need a course of around 10 microcurrent sessions to
see the full benefits – although many claim to see immediate results
from the first treatment. The exact number you need will depend on
your skin tissue and muscle tone – not necessarily on your age.
After the initial course of microcurrent treatments , you only need a
booster treatment on average around every 4-6 weeks.
A microcurrent facelift utilizes microcurrent technology which uses
gentle electrical stimulation to trigger the body's natural skin
enhancement chemicals at a cellular level.
The microcurrent facelift procedure itself takes approximately one
hour to complete and is virtually painless. Use two pronged
instrument to gently deliver electrical stimulation to the muscles and
tissues of the face and/or neck. The microcurrent facelift procedure
requires no anesthesia, no recovery time, no down time from work,
and has no irritating side effects. To achieve the ultimate benefits of
a microcurrent facelift, approximately ten treatment sessions are
recommended. Routine follow up treatments are performed to
maintain microcurrent facelift results.
30
31
※ Accessories
High-Frequency Function
Spot handle×1 pair
Mushroom handle×1 pair
Handles without Cap×1 pair
※ Function
Promote blood circulation, strengthen activity of lymph, supply
nutrition to scarfskin, strengthen cell metabolism, sterilize and
diminish inflammation, promote the wound to heal up.
※ Accessories
※Operating Instruction
1. Connect one pair handles to BIO outlet.
There are 3 pairs different handles available:Mushroom handles:
For large area such as the cheeks, forehead, neck, etc. Spot handles:
For small area, such as nasal fossa, and so on.Handles without Cap:
Please insert the Cotton stick (which you can find them in the plastic
bag), then dampen the cotton with anti-wrinkle essence or other kind
of essences.
Note: Handles with damp cotton stick conducts electricity stronger
than the other 2 kinds of handles.
2. Select the time as you like about 15 minutes or 30 minutes.
3. Select the strong or weak intensity. Adjust the BIO intensity slowly
from minimum to maximum, for commonly use, do not set the
intensity to maximum unless necessary.
9 intensity levels -- 1 to 9: it is for intensity of BIO, from weak to
strong. Please choose the suitable intensity according to clients'
requirments or tolerance capability.
4. Select the mode just you like such as for bust, neck or face.
Usage for mode1, 2 and 3:
1: pulse wave 50HZ -- use for skin around eye.
2: pulse wave 70HZ -- use for face.
3: pulse wave 100HZ -- use for body.
5. BIO function has to be operated with beauty products, such as Gel,
whiten products, slimming products and so on to conduct
micro-current. You can also apply some beauty essence on the skin
before you choose BIO function. You can feel very little if you operate
BIO without applying beauty care cream products in advance.
Usually your face is very sensitive. If you want to feel it, apply some
cream to your face, select a mode and an intensity level, and you can
feel the micro-current working obviously. Even your eye can feel light
changes due to the pulse of micro-current.
32
High Frequency Handle×1
Glass Spoon Electrode×1
Glass Mushroom Electrode×1
Glass angled Spot Electrode×1
(3 glass electrodes, different
electrode for different area)
※ Operating Instruction
When lightly touched to the surface of the skin or scalp, a mild high
frequency electrical current passes through the neon or argon
gas-filled glass electrode which then produces charged particles.
This in turn causes the glass electrode to emit a calming energy in
the form of an orange or violet 'glow'. When applied to the skin, the
subject will experience a mild zapping or buzzing sensation.
1. Simply insert the desired glass electrode (metal end first) into the
hole at the end of the handle.
2. Connect the handle's wire to the machine (it only fits one way)
making sure to fasten it into place the securing ring.
3. Using the high frequency intensity knob/ power switch, turn it to
the “on” position and the glass electrode should light up.
4. Turning the intensity knob slowly from minimum to maximum to
adjust the current to match the desired need, do not set the
intensity to maximum unless necessary.
5. When the machine is not in use, make sure the power switch is in
the “Off” position.
Caution:
1- Please first turn off the high frequency power before exchange
into another shape glass electrode.
2- Do not drop or immerse the handle into water as this can cause
the machine to short, damaging the machine/handle and
causing possible serious injury to the person(s) in contact with
the machine.
33
Galvanic Function
Galvanic skin therapy is based on the basic laws of electricity. The
two forces - positive and negative, pull together like a magnet and
push the product into the deeper layers of the skin. The capacity of
your skin absorption is increased by the galvanic ion and this
improves the penetration of nutrition products (anti wrinkle lotion)
through your skin.
Further, skin will be completely cleansed as negative ions force all
the dirt and debris held within your pores to the surface. At the same
time the positive ions gives you a fresh look and plump the skin,
banishing wrinkles.
Galvanic function operation:
1.Plug the electrode handle to the positive output of galvanic function
on the machine. Choose one of the three electrodes you need to
screw into the handle.
1.Plug in the long straight electrode to the negative output of galvanic
function. Your client will hold the long straight electrode during the
whole process.
2.Turn on the power for galvanic function.
3.Select the current you want to use –-- “+” or “-“.
4. Press up/down button to adjust strength.
5.Apply some gel or cream on the target area.
6.Press Start / Stop button to start or stop work.
34
35
36