1
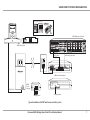
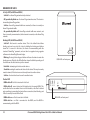
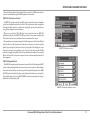
BGK3
iBridge Power Dock Kit
Installation Manual
SAFETY INSTRUCTIONS
WARNING: TO REDUCE THE RISK OF FIRE
OR ELECTRIC SHOCK, DO NOT EXPOSE THIS
APPLIANCE TO RAIN OR MOISTURE.
CAUTION: TO REDUCE THE RISK OF ELECTRIC
SHOCK, DO NOT REMOVE THE COVER. NO USERSERVICEABLE PARTS INSIDE. REFER SERVICING
TO QUALIFIED SERVICE PERSONNEL.
The lightning flash with arrowhead symbol, within an
equilateral triangle, is intended to alert the user to the
presence of uninsulated dangerous voltage within the
product’s enclosure that may be of sufficient magnitude
to constitute a risk of electric shock to persons.
The exclamation point within an equilateral triangle is
intended to alert the user to the presence of important
operating and maintenance (servicing) instructions in the
literature accompanying the appliance.
Safety Instructions
1. Read Instructions - All the safety and operating
instructions should be read before the appliance is
operated.
2. Retain Instructions - The safety and operating
instructions should be retained for future reference.
3. Heed Warnings - All warnings on the appliance in the
operating instructions should be adhered to.
4. Follow Instructions - All operating and user
instructions should be followed.
5. Water and Moisture - The appliance should not
be used near water; for example, near a bathtub,
washbowl, kitchen sink, laundry tub, in a wet
basement, or near a swimming pool. The apparatus
shall not be exposed to dripping or splashing liquids
and no objects filled with liquids, such as vases, shall
be placed on the apparatus.
2
6. Ventilation - The appliance should be situated so
that its location or position does not interfere with
its proper ventilation. For example, the appliance
should not be situated on a bed, sofa, rug, or similar
surface that may block the ventilation openings, or
placed in a built-in installation, such as a bookcase or
cabinet that may impede the flow of air through the
ventilation openings.
7. Heat - The appliance should be situated away from
heat sources such as radiators, heat registers, stoves,
or other appliances (including amplifiers) that
produce heat.
8. Power Sources - The appliance should be connected
to a power supply only of the type described in
the operating instructions or as marked on the
appliance.
9. Grounding or Polarization - Precaution should be
taken so that the grounding or polarization means of
an appliance is not defeated.
10. Power Cord Protection - Power supply cords should
be routed so that they are not likely to be walked
on or pinched by items placed upon or against
them, paying particular attention to cords at plugs,
receptacles, and the point where they exit from the
appliance.
11. Cleaning - The appliance should be cleaned only as
recommended by the manufacturer.
12. Non-Use Periods - The power cord of the appliance
should be unplugged from the outlet when left
unused for a long period of time. To remove all power
(supply mains) from the appliance, remove the plug
from the wall outlet.
13. Object and Liquid Entry - Care should be taken so that
objects do not fall and liquids are not spilled into the
enclosure through the openings.
14. Damage Requiring Service - The appliance should be
serviced by qualified service personnel when:
A. The power supply cord or the plug has been
damaged.
B. Objects have fallen, liquid has been spilled
into the appliance;
C. The appliance has been exposed to rain;
D. The appliance does not appear to operate normally;
E. The appliance has been dropped or the enclosure
is damaged.
15. Servicing - The user should not attempt to service the
appliance beyond that described in the operating
instructions. All other servicing should be referred to
qualified service personnel.
Russound BGK3 iBridge Power Dock Kit Installation Manual
TABLE OF CONTENTS
Product overview .................................................................................................................... 4
Sample IR system configuration ........................................................................................ 9
Back panel connections ........................................................................................................ 5
Behavior of LEDs ....................................................................................................................10
Installation for RNET control ............................................................................................... 6
Operation using RNET keypads........................................................................................11
Sample RNET system configuration ................................................................................. 7
Technical specifications ......................................................................................................12
Installation for IR control ...................................................................................................... 8
Warranty ...................................................................................................................................13
Russound BGK3 iBridge Power Dock Kit Installation Manual
3
PRODUCT OVERVIEW
Installation and configuration constraints
What it does
The iBridge Power Dock Kit (BGK3) allows a user to integrate an iPod into
a Russound RNET audio system without running new wires. The kit's main
components are the iBridge Power Dock (BGD2), the iBridge Dock Adapter
(BGDA) and the iBridge Controller Adapter (BGCA).
The BGD2 Power Dock is portable because it is powered by and communicates
over the home's electrical wiring through its companion piece, the BGDA. The
third component, the BGCA is mounted at the multiroom controller location
and is used to pull information from the electrical line and convert it back to
RNET, IR signals and analog audio.
The iBridge Power Dock has a standard 30-pin dock connector and supports
most iPod models. It ships with five well adapters for later iPod models (newer
models are sold with well adapters). It provides power to the iPod to keep it
charged while docked and connected to the system.
• Surge protectors, power strips and uninterruptible power supplies must be
PLC-friendly and/or Home Plug approved. Other models will compromise
power line communication.
• GFCI outlets may hinder the PLC performance if they employ filtering and
surge suppression as well. Check with the manufacturer.
• Surge duplex outlets may hinder the PLC performance if they employ
certain types of filtering Check with the manufacturer.
• The PLC protocol used in the iBridge Power Dock system (Home Plug) does
not function properly when an alternate protocol such as DS2™ is being
used within the home. Removing the competing devices, or switching the
competing device to the same protocol will resolve this issue.
The iBridge Power Dock can also be used in an IR-controlled audio system.
Regardless of which type of audio system, a maximum of four iBridge Power
Docks per system, and each Power Dock requires its own Dock Adapter and
Controller Adapter.
How it works
The Power Dock employs RNET Power Line Carrier (PLC) technology to send
audio, RNET control and IR signals between the RNET controller and the iBridge
Power Dock over the home’s existing electrical wiring.
Configuration consists of setting the iBridge Power Dock as a peripheral source
in the RNET controller programming. The BGCA connects to the controller for
audio and RNET control. The iBridge Power Dock connects to the BGDA with a
CAT-5 cable. Once the two adapters are plugged into power outlets, a simple
binding procedure ensures both ends of the system have found each other and
are communicating.
After the initial successful binding procedure, the Power Dock and its adapter
can be moved from room to room without worrying about running wires.
4
Russound BGK3 iBridge Power Dock Kit Installation Manual
BACK PANEL CONNECTIONS
BGDA Dock Adapter
(back)
BGD2 Power Dock
(back)
Power Dock
Bind
Dock Adapter port - RJ45 CAT-5
connector to BGDA Dock Adapter
Binding button recessed button
initiates binding
process with BGCA
Power Dock port RJ45 CAT-5
connector to BGD2
Power Dock
Power - 2 pronged
AC plug, nonpolarized and
non-grounding
BGCA Controller Adapter
(back)
IR input - 3.5mm IR connection
to multiroom system for IR
control of iPod in Power Dock
Power Input - for
connecting AC power cord
Source/function selector 8-position switch for selecting
source input or function
RNET Link ports - RJ45 CAT-5 connectors
for control and feedback connection to
RNET system
Audio outputs - Stereo RCA
connections to multiroom
controller source inputs
OS Update port - 4 pole connector for updating device
firmware ( Russound Programming Cable P/N 2500-521065)
Russound BGK3 iBridge Power Dock Kit Installation Manual
5
RNET CONTROL INSTALLATION
The following procedure outlines how to set up the BGD2 Power Dock and its
adapters for an RNET multiroom audio system.
1. Locate devices
Set the iBridge Power Dock in the room where the iPod will be located. Locate
a power outlet near the power dock where the BGDA Dock Adapter will be
located.
Place the BGCA Controller Adapter next to the RNET controller.
2. Connect BGCA
With the audio system turned off, use an RJ45 CAT-5 patch cable (T568A wiring
standard) up to 18 inches in length and connect the BGCA's RNET Link port with
the controller’s RNET Link Out port.
Note: the BGCA can be part of an RNET link daisy chain to the next RNET
component in the system.
Connect an RCA stereo audio cable from the BGCA to the desired source input
location on the back of the RNET controller.
Note: set the source/function selector on the BGCA to the same source
number assignment as the numbered source input the BGCA is connected to
on the RNET controller.
3. Power the controller
Plug the BGCA into a live AC outlet and power on the RNET controller.
Temporarily plug the BGDA Dock Adapter into a live AC outlet near the BGCA
to perform binding assurance procedure.
4. Bind the system
To bind the two adapter devices, press and release the binding button on the
bottom of the BGDA. The binding LED should blink fast for two seconds, then
blink slowly for 60 seconds. During this 60-second duration, press and release
the binding button on the front of the BGCA. It should instantly bind to the
BGDA, and the binding LED on both adapters should be solid on. This sets a
unique security key for the two adapters to act as a pair and only communicate
with each other.
If the system has configured itself properly, the green binding LEDs on the
front of the adapters will illuminate. Once the binding procedure is successfully
completed between adapters, the BGDA can then be moved to the Power Dock
location.
5. Connect iBridge Power Dock
Crimp an RJ45 connector to each end of a CAT-5 cable using T568A wiring
configuration (max cable length is 50 feet). Plug one connector into the RJ45
port on the back of the Power Dock. Plug the other end into the BGDA’s RJ45
port (bottom edge). Plug the BGDA into a live AC outlet near the desired Power
Dock location. Make sure the network traffic LED on the front of the BGDA is lit
to indicate strong communication between adapters.
6. Program RNET system
Follow the RNET system’s programming instructions to configure the iBridge
Power Dock as a peripheral device type. If the system includes UNO-TS2
touchscreens, use the Screen setup feature in the UNO-TS2 Options menu to
set the correct screen template (“iPod (iBridge)”) for the Power Dock.
7. Check iPod operation
With the RNET system controller and both adapters powered, place an iPod
in the Power Dock. The "Docked" LED on the BGDA Dock Adapter and BGCA
Controller Adapter should both be solid on.
Using an RNET remote control, or the RNET keypad, send a command to the
iPod. The iPod should respond to the command, and the activity LED on the
BGDA and BGCA should be on and blink periodically.
8. Reset a previously bound BGDA and/or BGCA
To reset a previously bound BGDA or BGCA, plug in the unit(s). If the binding
LED is on, clear the existing binding by pressing and holding both binding
buttons until the binding LED goes off (about 10 seconds). Then proceed to
bind the adapters (step #4).
For systems with multiple Power Docks, perform the complete binding
procedure for each set of adapters before moving to the next to ensure proper
binding between pairs.
6
Russound BGK3 iBridge Power Dock Kit Installation Manual
SAMPLE RNET SYSTEM CONFIGURATION
RJ45 using T568A wiring standard
RJ45
RNET Multiroom Controller
BGD2 Power Dock
CAT-5 cable
(RNET link)
RCA audio patch cable
BGCA Controller Adapter
CAT-5 cable
BGDA
Dock
Adapter
Power Dock
Bind
Binding button
Binding button
Typical installation for RNET multiroom controller system
Russound BGK3 iBridge Power Dock Kit Installation Manual
7
IR CONTROL INSTALLATION
The following procedure outlines how to set up the BGD2 Power Dock and its
adapters for an IR control multiroom audio system.
1. Locate devices
Set the iBridge Power Dock in the room where the iPod will be located. Locate
a power outlet near the power dock where the BGDA Dock Adapter will be
located.
Place the BGCA Controller Adapter next to the audio controller.
5. Connect iBridge Power Dock
Crimp an RJ45 connector to each end of a CAT-5 cable using T568A wiring
configuration (max cable length is 50 feet). Plug one connector into the RJ45
port on the back of the Power Dock. Plug the other end into the BGDA’s RJ45
port (bottom edge). Plug the BGDA into a live AC outlet near the desired
Power Dock location. Make sure the network traffic LED is lit to indicate strong
communication between adapters.
6. Program audio system
2. Connect BGCA
With the audio system turned off, connect an RCA stereo audio cable from the
BGCA to the desired source input location on the back of the controller.
Note: set the source/function selector on the BGCA to IR for infrared control
of the iPod.
3. Power the system
Configure the audio system for IR control of the iPod.
7. Check iPod operation
With the audio system controller, and both adapters powered, place an iPod
in the Power Dock. The "Docked" LED on the BGDA Dock Adapter and BGCA
Controller Adapter should both be solid on.
Plug the BGCA Controller Adapter into a live outlet and power on the audio
controller. Temporarily plug the BGDA Dock Adapter into a live AC outlet near
the BGCA.
Using a Pronto brand remote control programmed with Russound iPod
templates (see www.remotecontrol.com), send a command to the iPod via the
multiroom controller IR receiver. The iPod should respond to the command, and
the activity LED on the BGDA and BGCA should be on and blink periodically.
4. Bind the system
8. Reset a previously bound BGDA and/or BGCA
To bind the two adapter devices, press and release the binding button on the
bottom of the BGDA. The binding LED should blink fast for two seconds, then
blink slowly for 60 seconds. During this 60-second duration, press and release
the binding button on the front of the BGCA. It should instantly bind to the
BGDA, and the binding LED on both adapters should be solid on. This sets a
unique security key for the two adapters to act as a pair and only communicate
with each other.
To reset a previously bound BGDA or BGCA, plug in the unit(s). If the binding
LED is on, clear the existing binding by pressing and holding both binding
buttons until the binding LED goes off (about 10 seconds). Then proceed to
bind the adapters (step #4).
For systems with more than one Power Dock, perform the complete binding
procedure for each set of adapters before moving to the next to ensure proper
binding between pairs.
If the system has configured itself properly, the green binding LEDs on the
front of the adapters will illuminate. Once the binding procedure is successfully
completed between adapters, the BGDA can then be moved to the Power Dock
location.
8
Russound BGK3 iBridge Power Dock Kit Installation Manual
SAMPLE IR SYSTEM CONFIGURATION
RJ45 using T568A wiring standard
RJ45
Multiroom controller
BGD2 Power Dock
RCA audio patch cable
IR link cable
BGCA Controller Adapter
CAT-5 cable
BGDA
Dock
Adapter
Power Dock
Bind
Binding button
Binding button
Typical installation for IR control multiroom controller system
Russound BGK3 iBridge Power Dock Kit Installation Manual
9
BEHAVIOR OF LEDS
Activity LED (for BGDA and BGCA)
Solid off - no Home Plug network activity detected.
Off, periodically blinks on - No home Plug network received. The device is
transmitting Home Plug packets.
Solid on - Home Plug network traffic was received, but there is currently no
Home Plug network traffic.
On, periodically blinks off - HomePlug network traffic was received, and
there is currently communication (either transmit or receive) on the Home Plug
network.
Binding LED (for BGDA and BGCA)
Solid off - Not bound to another device. This is the default state before
binding, and can be reset to this state by holding the binding push button
down for 10 seconds. In this state, the device is communicating with the
standard "HomePlug" password, and can then be upgraded using upgrade
software and a HomePlug Ethernet bridge.
Blinking - Pressing the binding push button will cause the device to enter the
binding process. After this, the LED will either slow or fast blink depending on if
the device was the first device to join the network.
BGDA LEDs on front panel
Fast blink - attempting to bind to another device.
Slow blink - waiting for another unit to bind to this device. This may be a newly
created network, if this device was not already bound to another device.
Solid on - the device has been bound to another device.
Docked LED
BGDA solid off - No iPod is inserted in the Dock.
BGCA solid off - cannot detect an iPod attached to the remote BGDA. This
could either be the case where there is no iPod docked, or the iPod is docked
and something is preventing the devices from connection (check binding, and
if iPod is correctly inserted in the Dock.
BGDA solid on - an iPod is inserted in the Dock.
BGCA LEDs on front panel
BGCA solid on - an iPod is connected to the BGDA, and the BGDA is
communicating with the BGCA.
10
Russound BGK3 iBridge Power Dock Kit Installation Manual
OPERATION USING RNET KEYPADS
When the iPod is docked in the Power Dock as part of an RNET audio system,
it can be controlled through an RNET keypad or touchscreen.
UNO-TS2 Touchscreen Control
An UNO-TS2 touchscreen with an RNET system provides the most complete
control and feedback option for the iPod. The touchscreen allows navigation
through the iPod’s menus to select music by playlist, genre, artist, album, and
song. It also displays current selections.
When set up with the “iPod (iBridge)” source template (see the UNO-TS2
installation manual), the UNO-TS2 displays a main screen upon selecting the
iPod source: Further music selections can be made from this screen.
Whenever the source name assigned to the iPod appears in the Current Playlist
field, the iPod is in All Songs mode. From this screen you can select a specific
playlist by pressing the hard + and – keys to the right of the display, or select
the next or previous song with the > or < key. You can also press the Shuffle
soft key to toggle through the iPod’s three shuffle mode options. Pressing the
Music soft key calls up the music request screen to choose music from one of
five categories.
UNO-TS2 iPod main screen
UNO-S2 Keypad Control
The UNO-S2 keypad provides convenient control of the iPod through an RNET
system. After selecting the iPod source, press the + and – keys to select playlists
and use the >| and |< keys to select songs. Pressing the Play key accesses NOW
PLAYING, where the >| and |< keys cycle through artist, album, and song title.
Pressing Play again accesses SHUFFLE MODE, to select random play of songs or
albums or no random play (off ).
UNO-TS2 iPod music request screen
Russound BGK3 iBridge Power Dock Kit Installation Manual
11
TECHNICAL SPECIFICATIONS
BGD2 iBridge Power Dock
Dimensions:
Weight:
iPod connector:
Communication port:
BGCA Power Dock Controller Adapter
4.72” W x 2.5” D x 1.0” H
(12.0 x 6.4 x 2.5 cm)
5.4 oz. (153 g)
Standard 30-pin dock connector
5 well adapters
8-pole RJ45 jack (T568A standard)
Dimensions:
Weight:
Power requirement:
OS update port connector:
Switch:
Communication ports:
BGDA Power Dock Adapter
Dimensions:
Weight:
Power requirement:
Standards:
Security:
Data transfer rate:
Frequency band:
Communication port:
12
2.83”W x 3.86”D x 1.33”H
(7.27 x 9.9 x 3.4 cm)
5.6 oz. (158.8 g)
100-240 VAC, 50/60 Hz, 0.1A
HomePlug 1.0 @ 14Mbps
Arkados HomePlug+ @ 28Mbps
56-bit DES encryption
14/28 Mbps
4.3-20.9 MHz/2.1-26.8 MHz
Link/power port to BGD2
(8-pole RJ45 jack, T568A standard)
IR In:
Audio Out:
Standards:
Security:
Data transfer rate:
Frequency band:
Supported iPod Models
iPod touch
iPod classic
iPod with video
iPod nano (3rd generation)
iPod nano (2nd generation)
iPod nano (1st generation)
iPod with color display
iPod mini
iPod with dock connector
iPod with Click Wheel
Russound BGK3 iBridge Power Dock Kit Installation Manual
5.69”W x 5.06”D x 1.33”H
(14.45 x 12.85 x 3.4 cm)
11.2 oz. (317.5 g)
100-240 VAC, 50/60 Hz, 0.1A
4-pole jack for programming cable
(Russound P/N 2500-521065)
8-position source/function selector
RNET Link In and Link Out
(2 8-pole RJ45 jacks, T568A standard)
3.5mm female jack
Pair stereo RCA output jacks
HomePlug 1.0 @ 14Mbps
Arkados HomePlug+ @ 28Mbps
56-bit DES encryption
14/28 Mbps
4.3-20.9 MHz/2.1-26.8 MHz
WARRANTY AND REPAIR
Warranty
The Russound iBridge BGD2, BGDA and BGCA are fully guaranteed against
all defects in materials and workmanship for two (2) years from the date of
purchase. During this period, Russound will replace any defective parts and
correct any defect in workmanship without charge for either parts or labor.
For this warranty to apply, the unit must be installed and used according to its
written instructions. If service is necessary, it must be performed by Russound.
The unit must be returned to Russound at the owner’s expense and with
prior written permission. Accidental damage and shipping damage are not
considered defects, nor is damage resulting from abuse or from servicing by an
agency or person not specifically authorized in writing by Russound.
Before returning a unit for repair, call Russound at (603) 659-5170 for a Return
Authorization number. Write this number on the shipping label and ship to:
Russound
ATTN: Service
5 Forbes Road
Newmarket, NH 03857
Due to continual efforts to improve product quality as new technology and
techniques become available, Russound/FMP, Inc. reserves the right to revise
system specifications without notice.
This Warranty does not cover:
• Damage caused by abuse, accident, misuse, negligence, or improper
installation or operation
• Power surges and lightning strikes
• Normal wear and maintenance
• Products that have been altered or modified
• Any product whose identifying number, decal, serial number, etc. has been
altered, defaced or removed.
Russound sells products only through authorized Dealers and Distributors
to ensure that customers obtain proper support and service. Any Russound
product purchased from an unauthorized dealer or other source, including
retailers, mail order sellers and online sellers will not be honored or serviced
under existing Russound warranty policy. Any sale of products by an
unauthorized source or other manner not authorized by Russound shall void
the warranty on the applicable product.
Damage to or destruction of components due to application of excessive
power voids the warranty on those parts. In these cases, repairs will be made
on the basis of the retail value of the parts and labor. To return for repairs, the
unit must be shipped to Russound at the owner’s expense, along with a note
explaining the nature of service required. Be sure to pack the unit in a corrugated
container with at least three (3) inches of resilient material to protect the unit
from damage in transit.
Russound BGK3 iBridge Power Dock Kit Installation Manual
13
NOTES
14
Russound BGK3 iBridge Power Dock Kit Installation Manual
NOTES
Russound BGK3 iBridge Power Dock Kit Installation Manual
15
BGK3
iBridge Power Dock Kit
Installation Manual
©2008 Russound. All rights reserved.
All trademarks are the property of their respective owners.
iPod is a trademark of Apple Computer Inc., registered in the US and other countries.
Apple is not responsible for the operation of this device or its compliance with safety and
regulatory standards. Specifications are subject to change without notice.
Russound is not responsible for typographical errors or omissions.
Russound, Inc.
5 Forbes Road, Newmarket, NH 03857
tel 603.659.5170 • fax 603.659.5388
email: [email protected] www.russound.com
28-1315
04/28/08