1
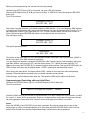
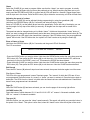
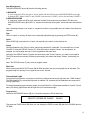
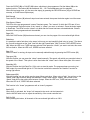
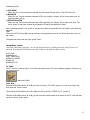
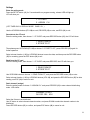
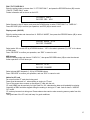
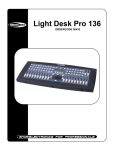
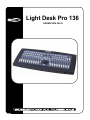
Light Desk Pro 136
ORDERCODE 50433
Congratulations!
You have bought a great, innovative product from Showtec.
The Showtec Light Desk Pro 136 brings excitement to any venue. Whether you want simple plug-&-play
action or a sophisticated DMX show, this product provides the effect you need.
You can rely on Showtec, for more excellent lighting products.
We design and manufacture professional light equipment for the entertainment industry.
New products are being launched regularly. We work hard to keep you, our customer, satisfied.
For more information: [email protected]
You can get some of the best quality, best priced products on the market from Showtec.
So next time, turn to Showtec for more great lighting equipment.
Always get the best -- with Showtec !
Thank you!
Showtec
Showtec Light Desk Pro 136™ Product Guide
Warning..…...................................................................................………………………………………….
Safety-instructions………………………………………………………………………………………….….
Operating Determinations…………………………………………………………………………………….
3
3
4
Description..…..............................................................................……….…………………………………
Features…….……………………………………………………………………………………….……...….
Overview………………………………………………………………………………………………………..
Front side..…………………………………………………………………………………....………………..
Back side..………………………………………………………………………………………..……….……
5
5
5
6
8
Installation...............................................................................…...…………………………………….…...
8
Set Up and Operation.....................................................................……..…………………………….……
Set Up Moving light effects……..………………………………………………………………….……...….
Programming and Controlling a Moving Light Effect………………………………………….……...……
- Scene.................................................………….........................……………………....…………..
- Chase...............................................................................….....………….........………………….
- Adjusting the speed of a chase........................………….........................……………………...…
- Erase a Chase or Scene...............................................................................….....…………......
- Exit Record.................................................………….........................……………………....……
- Play Scene / Chase...........................………….........................……………………....…………..
- Page (left)...............................................................................….....…………...........…………...
- Tap sync.................................................………….........................…………………………........
- Step Mix/sequence...............................................................................….....…………........…...
- Step.................................................………….........................……………………....…………....
- Audio...............................................................................….....…………..........………………....
- Group.................................................………….........................…………………….....………...
- Black Out...............................................................................….....…………...........…………...
Conventional Light (Parcans)…………………………………………………………………….……...….
- Programming...................................………….........................……………………....……………
- Exit Record...............................................................................….....………….........…………...
- Play Scene / Chase...........................………….........................……………………....…………..
- Page (right)........................………….........................…………………….…………………….….
- Fade time...............................................................................….....………………………….......
- Step.................................................………….........................……………………....………..….
- Tap sync...............................................................................….....…………...........……….…...
- Stand-by.................................................………….........................………………………….......
- Fade+speed...............................................................................….....…………........…………..
- Audio.................................................………….........................……………………....……….....
- Full On.................................................………….........................……………………....………...
- One/mix/seq...............................................................................….....………….........………....
- Auto........................………….........................…………………………………………………..….
Setup Menu Layout.........................................................................….....………….........…………….
- CF-CARD...................................………….........................……………………....……………….
- Store Data.....................………….........................……………………....…………………….
8
8
9
9
10
10
10
10
10
10
10
11
11
11
11
11
11
11
12
12
12
12
12
12
12
12
12
12
13
13
13
13
13
1
Settings.......................................................................................………......................................….....….
- Enter the setting mode.....................................………….........................…………………….......
- Save data to the CF card.......................................................................….....…………...............
- Read from the CF card.......................….........................................................……………….......
- Patch channel (assign)..................................…………………………..........................................
- PAN / TILT FADE ONLY.......................………………………………………………..……..….......
- Display mode (100/255)................................…………………………............………....................
- MIDI channel…..................................………………………………………………………..….....…
- Notice for CF card..............................………………………………………………………..….....…
- To clear memory………...................................………….........................…………………….......
- MIDI Implementation.........................………………………………………………………..….....…
14
14
14
14
14
15
15
15
15
16
16
Removing the rubber housing for 19” rack fitting….……..................……......…………………….…..
17
Maintenance...................................................................................………..………….…….……………...
17
Troubleshooting............................................................................………………….………………….…..
17
Product Specifications.................................................................……………….…….…………………..
18
2
WARNING
CAUTION!
Keep this device away from rain and moisture!
FOR YOUR OWN SAFETY, PLEASE READ THIS USER MANUAL CAREFULLY
BEFORE YOUR INITIAL START-UP!
SAFETY INSTRUCTIONS
Every person involved with the installation, operation and maintenance of this device has to:
be qualified
follow the instructions of this manual
CAUTION! Be careful with your operations.
With a dangerous voltage you can suffer
a dangerous electric shock when touching the wires!
Before your initial start-up, please make sure that there is no damage caused by transportation. Should
there be any, consult your dealer and do not use the device.
To maintain perfect condition and to ensure a safe operation, it is absolutely necessary for the user to follow
the safety instructions and warning notes written in this manual.
Please consider that damages caused by manual modifications to the device are not subject to warranty.
This device contains no user-serviceable parts. Refer servicing to qualified technicians only.
IMPORTANT:
The manufacturer will not accept liability for any resulting damages caused by the non-observance of
this manual or any unauthorized modification to the device.
•
•
•
•
•
•
•
•
•
•
•
•
Never let the power-cord come into contact with other cables! Handle the power-cord and all
connections with the mains with particular caution!
Never remove warning or informative labels from the unit.
Do not open the device and do not modify the device.
Do not connect this device to a dimmerpack.
Do not switch the device on and off in short intervals, as this would reduce the system’s life.
Only use device indoor, avoid contact with water or other liquids.
Avoid flames and do not put close to flammable liquids or gases.
Always disconnect power from the mains, when device is not used or before cleaning! Only handle
the power-cord by the plug. Never pull out the plug by tugging the power-cord.
Make sure that the available voltage is not higher than stated on the rear panel.
Make sure that the power-cord is never crimped or damaged. Check the device and the power-cord
from time to time.
If device is dropped or struck, disconnect mains power supply immediately. Have a qualified
engineer inspect for safety before operating.
If the device has been exposed to drastic temperature fluctuation (e.g. after transportation), do not
switch it on immediately. The arising condensation water might damage your device. Leave the
device switched off until it has reached room temperature.
3
•
•
•
•
If your Showtec device fails to work properly, discontinue use immediately. Pack the unit securely
(preferably in the original packing material), and return it to your Showtec dealer for service.
For replacement use fuses of same type and rating only.
Repairs, servicing and electric connection must be carried out by a qualified technician.
WARRANTY: Till one year after date of purchase.
OPERATING DETERMINATIONS
If this device is operated in any other way, than the one described in this manual, the product may suffer
damages and the warranty becomes void.
Any other operation may lead to dangers like short-circuit, burns, electric shock, lamp explosion, crash etc.
You endanger your own safety and the safety of others!
Improper installation can cause serious damage to people and property !
4
Description of the device
Features
The Light Desk Pro 136 is a lightcontroller from Showtec.
• Hybrid console for 16 DMX units (8 intelligent fixtures & 8 PARs)
• 6 freely programmable PAR programs, ONE/MIX/SEQ available
• 8 freely programmable fixture programs, MIX/SEQUENCE available
• 136 DMX channels(8 channels for PARs and up to 16 channels per fixture)
• 96 freely programmable fixture scenes / PAR scenes
• Speed, Fade Time and Master control for chases
• Joystick for Pan / Tilt & Pan fine / Tilt fine movement of fixture
• Free access of CF card (32MB) for the exchange of data and memories
• Blackout overall output
• Fade time/Non-fade time under control
• Power failure memory and Fog Machine trigger
• MIDI control over scenes, chases and blackout
• Audio input and built-in microphone for music sync. function
Scanner section (A):
• Up to 8 scanners with max. 16 addresses
• Memory for 96 scanner scenes
• Memory for 96 scanner chases with 99 steps
• Programmable speed and fade time
• Tap-sync.
• Black-out
• Patch possibility
• Joystick with fine mode and 4 step buttons
Parcan section (B):
• 8 Channel dimfaders with 1 master fader
• Memory for 96 parcan scenes
• Memory for 96 parcan chaser with 99 steps
• One/mix/sequence options for 16x 6 runlights
• Speed fader
• Audio sensivity fader
• Step function
• Tap-sync function
• Standby and full-on
• Fade / speed
• Light to sound
NOTE: Knowledge of MIDI and DMX is required to fully utilize this unit.
Overview
Fig. 1
5
Frontside
Fig. 2
1) SCENE buttons
Press the scene buttons to load or store relevant Scenes.
2) CHASE buttons
These buttons are used to load or store relevant Chases.
3) FIXTURE buttons
To select fixtures for setting, programming or recording.
4) Dimmer faders
To control and adjust relevant dimming level for each channel.
5) PAGE button
To select relevant Scene-page or Chase-page.
6) STEP / MIX / SEQ button
To activate the “STEP” function or switch between the Mix mode and the Sequence mode.
7) GROUP button
To select more fixtures while holding down this button simultaneously.
8) TAP SYNC button
Repeatedly tap this button to establish different chase rate.
9) AUDIO button
Used to activate audio sync of chase rate or set a scene at audio effect.
10) BLACKOUT button
Press this button to enable or disable relevant DMX output. When its LED is lit, that means relevant
DMX output is disabled. Press this button again the LED will be “off”, that means the DMX output is
reactivated.
11) SETUP button
Press this button for about 3 seconds to access the SETUP menu.
12) FOG MACHINE button
This button is used to control the Fog machine. Relevant LED will show you the different working states
(HEATING or READY).
13) DEL button
Press this button to delete relevant Scenes or Chases.
14) LCD Display
15) RECORD button
Press and hold down this button for about 5 seconds to access the Scene/Chase mode, and also use
6
this button to record Scenes or Chases.
16) ESC button
To cancel relevant operation or to exit.
17+18) UP/DOWN buttons
To select or adjust desired item or level during operation.
19) CH.PAGE button
Press this button to switch between CH 1-8 and CH 9-16. LED “off ” means 1-8 channels available,
while LED “on “ means 9-16 channels available.
20) Up button
Used to adjust PAN / TILT movement.
21) FINE button
Use this button can adjust relevant level finely by a small margin .
22) Left buttons
Used to adjust PAN / TILT movement.
23) Joystick
Used to control and adjust relevant level more conveniently through the Pan or Tilt movement.
24) Right button
Used to adjust PAN / TILT movement.
25) SPEED fader
Used to set or adjust relevant speed as user’s desire.
26) FADE fader
Used to set or adjust relevant fade as user’s desire.
27) Down button
Used to adjust PAN / TILT movement.
28) SCENE buttons
Press the scene buttons to load or store relevant Scenes.
29) AUTO button
Used to activate AUTO mode.
30) CHASE buttons
These buttons are used to load or store relevant Chases.
31) ONE/MIX/SEQ button
To select One mode, Mix mode or Sequence mode.
32) PAGE button
To select relevant Scene-page or Chase-page.
33) STEP button
34) TAP SYNC button
Repeatedly tap this button to establish different chase rate.
35) STANDBY button
Press this button to enable or disable relevant output of PARs. Its function is similar to the BLACKOUT
button.
36) FADE + SPEED button
To select FADE TIME or NO FADE TIME.
37) AUDIO button
To adjust for best audio effect.
38) FULL ON button
Press this button to output all the PARs at full intensity.
39) SPEED fader
Used to set or adjust relevant speed as user’s desire.
40) AUDIO fader
Used to set or adjust the sensitivity of the sound controlled mic.
41) FADE fader
Used to adjust the FADE TIME level.
42) MASTER fader
Used to proportionally and totally change the overall console output.
7
Backside
Fig. 3
43) CF CARD socket
It is for CF CARD operation.
44) FOG MACHINE INPUT
To connect with the fog machine.
45) MIDI IN
Used to receive MIDI data.
46) DMX OUT
To send DMX data.
47) DMX polarity select
Used to select DMX polarity (2-,3+ / 2+,3-).
48) AUDIO LINE INPUT
0.1V~1Vp-p
49) EXT STEP CONTROL INPUT
To input the external Step Control signals.
50) POWER ON / OFF
Used to switch on / off the power.
51) DC INPUT
DC 9 ~15V , 500mA min.
Installation
Remove all packing materials from the Light Desk Pro 136. Check that all foam and plastic padding is
removed. Connect all cables.
Always disconnect from electric mains power supply before cleaning or servicing.
Damages caused by non-observance are not subject to warranty.
Set Up and Operation
Before plugging the unit in, always make sure that the power supply matches the product specification
voltage. Do not attempt to operate a 120V specification product on 230V power, or vice versa.
Set Up Moving light effects
DMX channels 1 to 113 are reserved for the movinglights. Channels 129 to 136 are reserved for the static
DMX channels, at the Parcan section (B) of the Lightdesk Pro 136.
DMX Fixture start addresses are:
FIXTURE1
DMX START ADDRESS: 01
FIXTURE2
DMX START ADDRESS: 17
FIXTURE3
DMX START ADDRESS: 33
FIXTURE4
DMX START ADDRESS: 49
FIXTURE5
DMX START ADDRESS: 65
FIXTURE6
DMX START ADDRESS: 81
FIXTURE7
DMX START ADDRESS: 97
FIXTURE8
DMX START ADDRESS: 113
8
Before you start programming, the console first has to be patched.
Hold down the SETUP button (11) for 5 seconds, the green LED will illuminate.
With the UP/DOWN buttons (17 & 18) you have to choose “2. ASSIGN CH” and then press the RECORD
button (15).
The LCD now shows:
CHANNEL01>OUT01
OK ESC SEL ADJ
This means Controller Channel 1 now sends a signal to DMX address 1. You can change the DMX address
by pressing the DOWN button (18), until you see the address you want. By pressing the UP button (17), you
can change the Channel of your Light Desk Pro 136. To save a channel patch, you first have to select a
fixture (3) and then press RECORD (15). Make sure all channels are only used once.
After the display shows:
CHANNEL16>OUT16
OK ESC SEL ADJ
The joystick patch starts with:
PAN>NONE
OK ESC SEL ADJ
The joystick of the Light Desk Pro 136 is not standard included in the patch, that’s why the word “NONE” is
shown on the spot of the DMX address in the display.
You can change the address by using the DOWN button (18). Press the button, until the display shows the
right DMX address. Now press UP (17), until the display shows: TILT >NONE and then patch the TILT
address. Now select the FIXTURE (3), for which the joystick will be patched. Then press RECORD (15), the
LEDs will flash a moment and the display shows: “GOOD”, meaning the patch has been stored.
When, during the steps above, the display shows “ERR”, means an error has been made with patching,
example: The patch address is already used, no double channels can be patched.
Follow all steps, until all channels have been set. Then press the ESC button (16) to exit the menu.
Programming and Controlling a Moving Light Effect
Hold down the RECORD button (15) for 5 seconds, the green LED will illuminate.
The LCD now shows:
SELECT A SCENE OR CHASE!
PAGE01
Push the PAGE button (5) and use the UP/DOWN buttons (17 & 18) to change the PAGE number, on which
the “scene” or “chase” will be programmed. There are 12 pages and on every page 8 chases and 8 scenes
can be programmed. Remember which “chases” are on which page, this makes it a lot easier.
Scene
Select the SCENE (1) and FIXTURE (3) you want to program. By using the faders (4) you can set the
preferred set up. When everything has been set to your need, press the RECORD button (15) to confirm
and all LEDs will flash for a moment. Repeat these steps, until all scenes are programmed.
9
Chase
Select the CHASE (2) you want to program. Make sure that the “chase” you want to program, is actually
selected. By using the faders (4) you can set the preferred set up. When everything has been set to your
need, press the RECORD button (15) to confirm and all LEDs will flash for a moment. Repeat these steps,
until all steps are in the chase. Press the DEL button (13) to delete the current step, all LEDs will flash once.
Adjusting the speed of a chase
The speed of a CHASE (2) can be adjusted (during programming) by using the speedfader (25).
Hold down the RECORD button (15) for 5 seconds, and select an empty “chase”.
Select a FIXTURE (3), set the faders (4) and move the speedfader. On the left side of the display you can
see the length of every step of the chase (in seconds). All lengths from the steps will be stored in the
“chase”.
The speed can also be changed during a Live Mode “chase”’. Hold down the particular “chase” button of
which you want to change the speed manually and at the same time press the mix/sequence button (6). The
blinking speed of the LED (above the chase button) changes. If the LED blinks slowly, the pre-programmed
“speed” will be held. If the LED blinks fast, the “speed” and “fade” can be set by using the faders (4).
Erase a Chase or Scene
Hold down the RECORD button (15) for 5 seconds, and the green LED will illuminate.
The LCD now shows:
SELECT A SCENE OR CHASE!
PAGE01
- Press the SCENE button you want to delete. Hold down the SCENE button and at the same time press the
DEL button (13). Then press the ESC button (16) to exit the menu. You will see that the LED, which was
previously on (next to the SCENE), now is off. This means the SCENE has been deleted.
- Press the button CHASE you want to delete. Hold down the CHASE button and at the same time press the
DEL button (13). Then press the ESC button (16) to exit the menu. Now the CHASE has been deleted.
Exit Record
Press the ESC button (16) when all steps have been entered, then press the button again to exit the menu.
Play Scene / Chase
The LEDs of the pre-programmed “scenes” illuminate green. The “scenes” of which the LEDs are off, are
not programmed. Press the button of a “scene” or “chase” you want, to activate it. Press the button again to
deactivate. The LEDs from the “chase” only blink after the chase has been activated/selected. Chases that
haven’t been programmed can’t be selected.
Page (5)
When the PAGE button (5) has been activated, you can view the pages of the moving light effects.
CH.PAGE button (19)
Press this button to switch between CH 1-8 and CH 9-16. LED “off ” means 1-8 channels available, while
LED “on “ means 9-16 channels available.
Tap sync (8)
With this function you can press the “chase” speed manually. The speed, with which you press the button, is
the speed of the “chase”. This option is often used, when the “chase” has to follow the rhythm of the music.
10
Step Mix/sequence
The MIX/SEQUENCE button (6) has the following options:
1) MIX MODE
In “mix”-mode the LED of the active “chase” blinks and the LED above the MIX/SEQUENCE button (6)
is flashing RED. When CHASE 1 and CHASE 2 are selected, CHASE 1 will run first and then CHASE 2.
2) SEQUENCE MODE
In “sequence”-mode the LEDs of the selected “chases” blink synchronously and the LED above the
MIX/SEQUENCE button (6) is RED. In “sequence”-mode only the program, which has been selected last,
runs.
Note: Switching between “mix”-mode or “sequence”-mode is only possible when all “chases” have been deselected!
Step
When a “chase” is running, all steps can be manually walked through by pressing the STEP button (6).
Audio
When AUDIO (9) is activated, the “chase” will respond to the music via the internal mic.
Group
During programming the “fixture” button, which was pushed last, is selected. You can select two or more
“fixtures” by using the GROUP function (7). With this function multiple “fixtures” can be selected, for
example: you can change the color of 4 movingheads at the same time.
Hold down the GROUP button (7) and at the same time press “fixture” buttons, you want to use together.
The LEDs above these buttons will flash synchronously, this means that these “fixtures” now belong to a
group.
Note: The GROUP button (7) only works in program mode.
Black Out
When pushing the BLACK OUT button (10) all DMX activities from the moving light are de-activated. The
programs keep on running, but no signal is sent to the “fixtures”.
Conventional Light
Conventional light (parcans, etc) does not need to be patched, because this light only has 1 DMX channel.
The DMX channels for conventinal light start at address 129, because all prior addresses are reserved for
moving lighteffects.
To keep programming and controlling simple, this Light Desk Pro 136 has been devided in 2 parts. The left
side is for moving light effects and the right side is for conventional light.
Programming
Hold down the RECORD button (15) for 5 seconds, the green LED will illuminate.
SELECT A SCENE OR CHASE!
PAGE01
First press the PAGE button (32). Now you can change the PAGE number (32) with the UP/DOWN buttons
(17 &18).
11
Press the SCENE (28) or CHASE (30) button, which has to be programmed. Set the faders (38) to the
desired position. The faders (41) have address 129 – 136. These addresses can’t be patched.
When this has been done, you can store the step(s) by pressing the RECORD button (15) (a SCENE has
one step, a CHASE has multiple steps).
Exit Record
Press the ESC button (16) when all steps have been entered, then press the button again to exit the menu.
Play Scene / Chase
The LEDs of the pre-programmed “scenes” illuminate green. The “scenes” of which the LEDs are off, are
not programmed. Press the button of the “scene” or “chase” you want, to activate it. Press the button again
to deactivate. The LEDs from the “chase” only blink after the chase has been activated/selected. Chases
that haven’t been programmed can’t be selected.
Page (32)
When the PAGE button (32) has been activated, you can view the pages of the conventional light effects.
Fade time
It is possible to add a fade time to the steps. In this way you can beautifully fade in/out a “scene”. First leave
the “record”-mode and set the “fade” time with the right “speed-fader” (39). Push the FADE+SPEED button
(36). When the LED is on, FADE has been selected. Now press the “scene” you want to activate, this scene
will now fade-in. When the LED is off, SPEED has been selected.
Step (33)
When a “chase” is running, all steps can be manually walked through by pressing the STEP button (33).
Tap sync (34)
With this function you can press the “chase” speed manually. The speed, with which you press the button, is
the speed of the “chase”. This option is often used when the “chase” has to follow the rhythm of the music.
Stand-by (35)
With this function the Light Desk Pro 136 is set to a stand-by mode. The programs keep on running, but
DMX output for conventional light is off. This function is almost the same as the “blackout” function for
moving light effects.
Fade+speed (36)
With this function you can set the way the steps follow each other. When using a “fade”, the set time on the
“speed”-fader (39) will be the fading time between 2 steps. When using a “speed”, the set time on the
“speed”-fader will be the waiting time between 2 steps. When the LED is on, FADE has been selected.
When the LED is off, SPEED has been selected.
This function is for “chase” programs as well as “scene” programs.
Audio (37)
When audio is activated, the “chase” will respond to the music via the internal mic.
Use the AUDIO fader to set or adjust the sensitivity of the sound controlled mic.
Full On (38)
When pushing this button, all channels of the conventional light will be at 100%.
12
One/mix/seq (31)
1) ONE MODE
When the “one” function has been selected, the last selected chase will run. The LED will be off.
2) MIX MODE
When the “mix” function has been selected (LED is on), multiple “chases” will run at the same time. All
selected chases will run.
3) SEQUENCE MODE
When the “seq” function has been selected (LED is flashing), all “chases” will run after each other. The
active “chase” at that time is shown by a flashing LED above that particular “chase”.
Note: Switching between “mix”-mode or “sequence”-mode is only possible when all “chases” have been deselected!
Auto
When the AUTO function (29) has been selected, all programmed “scenes” will follow each other, like one
big “chase”.
The speed can be set with the right “speed”-fader.
Setup Menu Layout
The Setup menu has 6 functions. You can set these functions by holding down the “setup”-button for 5
seconds. By using the UP/DOWN buttons (17 & 18) you can walk through the menu:
1) CF Card
2) ASSIGN CH
3) P/T FADE ONLY
4) DISPLAY MODE
5) MIDI CH
6) ASSIGN LIST
CF-CARD
The CF-Card is a back-up option. You can put programs on the CF-card or backup programs, and they can
be reinstated later.
Ordercode 50449
Store Data
With the UP/DOWN buttons (17 & 18) you have to choose “CF CARD” (option 1) in the set up menu and
then press the “record” button.
Then with the UP/DOWN buttons (17 & 18) you have to choose “STORE TO CF” (option 2)
With the UP/DOWN buttons (17 & 18) you can now select what needs to be stored on the CF-card and then
press the “record” button again.
13
Settings
Enter the setting mode
Press the SETUP button (11) for 5 seconds while no program running, relevant LED will light up.
LCD will show you:
1. CF-CARD
2. ASSIGN CH.
(3.P/T FADE ONLY 4.DISPLAY MODE 5.MIDI CH. )
Use the UP/DOWN buttons (17 & 18) to scroll, RECORD (15) to enter, and ESC (16) to exit.
Save data to the CF card
Enter the setting mode, then choose “1. CF-CARD” and press RECORD button (15), the LCD will show:
1. READ FROM CF
2. STORE TO CF
Then please press UP/DOWN (17 & 18) to choose “2. STORE TO CF”, press RECORD (15) again for
further operation.
Select relevant location (1-99) by UP/DOWN buttons to save the data, and then press the RECORD button
(15) for recording, press the ESC button (16) to exit.
Read from the CF card
Enter the setting mode, then choose “1. CF-CARD” and press RECORD, the LCD will show you:
1. READ FROM CF
2. STORE TO CF
Use UP/DOWN buttons to choose “1. READ FROM CF”, and press the RECORD button (15) to enter.
Select relevant location (1-99) by UP/DOWN buttons (17 & 18), and press the RECORD button (15) for data
reading, use ESC (16) to cancel or exit.
Patch channel (assign)
Enter the setting mode to choose “2. ASSIGN CH.” and press RECORD (15) to enter channel distributing
mode. LCD shows:
CHANNEL1 > OUT1
OK ESC SEL ADJ
Select the fixtures to be distributed.
Use UP button to select relevant channel number, and press DOWN to select the channel number to be
distributed.
Press RECORD button (15) to confirm, and press ESC button (16) to cancel or exit.
14
PAN / TILT FADE ONLY
Enter the setting mode to choose item “3. P/T FADE ONLY”, and press the RECORD button (15) to enter
“PAN/TILT FADE ONLY” mode.
Further information will be shown on the LCD:
FIXTURE1: ONLY
OK ESC SEL ADJ
Select fixtures by the UP button, and press the DOWN button to select “FADE ONLY” or ”FADE ALL”.
Press RECORD (15) to confirm your operation, and ESC (16) to cancel or exit.
Display mode (100/255)
Enter the setting mode and choose item “4. DISPLAY MODE”, then press the RECORD button (15) to enter.
LCD will show you:
DISPLAY MODE : X X X
OK ESC CHANGE
Select mode 100 or mode 255 by UP/DOWN buttons. “100” is for value in percents (%), “255” is for values
in DMX steps.
Press “RECORD” to confirm your operation, use “ESC” to cancel or exit.
MIDI channel
Enter the setting mode and choose “5. MIDI CH.”, then press RECORD button (15) to enter the relevant
further operation. LCD will show you:
MIDI CH. <X X>
OK ESC CHANGE
Select relevant MIDI channels (1-16) by UP/DOWN buttons.
Press “RECORD” to confirm your operation, and use “ESC” to cancel or exit.
Notice for CF card
Do not pull out the CF card when being used.
Power must be assured “on”, when reading or storing to CF card.
Turn off the power when connect or disconnect CF card with the unit.
CF card (32MB) can be used only for Light Desk Pro 136; otherwise the data would probably be missing.
Outputting of DMX would be stopped during the reading or storing to CF card. And so does to “ASSIGN
CH.” mode.
CF card may become hot during use. Please observe due caution when removing memory cards from this
device.
Take good care of the CF card, and keep it in good conditions.
15
To clear the memory
Turn off the power, simultaneously holding down the Chase buttons 3, 6 and the Fixture buttons 2, 7, and at
the same time, turn on the power.
LCD will show you :
CLEAR MEMORY NOW
PLEASE WAIT.
Memory will be cleared within 5 seconds.
MIDI Implementation
This unit can receive and transmit MIDI NOTE information according to the relevant channels. Please keep
the following list for reference.
NOTE NUMBER
FUNCTION
23-34
FIXTURE PAGE 1-12
35-50
PAR PAGE
51-58
FIXTURE SCENE 1-8
59-66
FIXTURE CHASE 1-8
67-72
PAR SCENE
1-6
73-78
PAR CHASE
1-6
1-16
79
PAR
STANDBY
80
PAR FADE + SPEED
81
FIXTURE BLACKOUT
82
FIXTURE
AUDIO
83
PAR
AUDIO
84
PAR
AUTO
85
PAR
STEP
86
FIXTURE MIX/SEQ
87
PAR ONE/MIX/SEQ
88
PAR
FULL ON
16
Removing the rubber housing for 19” rack fitting
Remove the 4 screws (A, B, C, D) on the side and the 4 screws (E, F, G, H) on the top and bottom. Now you
can mount your Light Desk Pro 136 in a 19” rack.
Maintenance
The Showtec Light Desk Pro 136 requires almost no maintenance. However, you should keep the unit
clean. Disconnect the mains power supply, and then wipe the cover with a damp cloth. Do not immerse in
liquid. Do not use alcohol or solvents.
Keep connections clean. Disconnect electric power, and then wipe the DMX and audio connections with a
damp cloth. Make sure connections are thoroughly dry before linking equipment or supplying electric power.
Troubleshooting
Showtec Light Desk Pro 136
This troubleshooting guide is meant to help solve simple problems. If a problem occurs, carry out the steps
below in sequence until a solution is found. Once the unit operates properly, do not carry out following
steps.
1. If the device does not operate properly, unplug the device.
2. Check power from the wall, all cables, the fuse, etc.
3. If all of the above appears to be O.K., plug the unit in again.
4. If nothing happens after 30 seconds, unplug the device.
5. Return the device to your Showtec dealer.
17
Product Specification
Model: Showtec Light Desk Pro 136
Voltage : AC 230V-50Hz (CE)
Power input: DC9 ~ 15V, 600 mA min.
Audio trigger: Built-in Mic or Line-in
DMX Output : 3-pin XLR Female connector
LCD: 2 x 16 character
Dimensions : 482 x 178 x 80 mm (LxWxH)
Weight : 3,6 kg
Design and product specifications are subject to change without prior notice.
18
2004 Showtec.