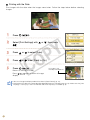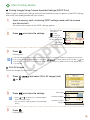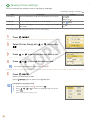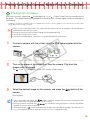
1
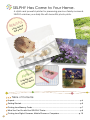
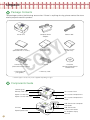
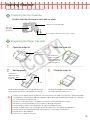
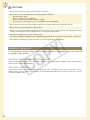
Printing Guide
ENGLISH
C
Y
P
O
ng
Printi ts
y
s
a
E
rin
tiful P
Beau Fun!
and
CDI-E361-010
© CANON INC. 2008
PRINTED IN CHINA
SELPHY Has Come to Your Home.
A stylish and powerful printer for preserving precious family moments.
SELPHY enriches your daily life with beautiful photo prints.
IFUL
T
U
BEA sting
g la
Lon prints
fine
C
Y
P
O
FUNyour
g
atin bum
Cre
al
inal
g
i
r
o
Table of Contents
Unpack...........................................................................................................................p. 4
Getting Started...............................................................................................................p. 5
Printing from Memory Cards..........................................................................................p. 7
What You Can Do with Your SELPHY Printer.................................................................p. 9
Printing from Digital Cameras, Mobile Phones or Computers......................................p. 15
C
Y
P
O
Y
EASrinting
ck p
Qui
Scrapbook created by
Art&Craft DUO YOKOHAMA-AOBADAI SHOP
by KURETAKE Co.,Ltd. (m&k)
Accessories (Sold Separately).....................................................................................p. 20
Cleaning, Storing or Carrying the Printer.....................................................................p. 21
Troubleshooting............................................................................................................p. 23
Please Read (Safety Precautions and Handling Precautions).....................................p. 27
Specifications...............................................................................................................p. 30
Unpack
Package Contents
The package contains the following accessories. If there is anything missing, please contact the store
where you purchased this product.
Printer Unit
Compact Power
Adapter
Starter Paper Pack
(Postcard Size, 5 sheets)
C
Starter Ink Cassette
(Postcard Size for 5 prints)
• Printing Guide
(This guide)
Power Cord
Y
P
O
Paper Cassette
(Postcard Size)
Cleaner
Paper Cassette
(Card Size)*
CD-ROM:
Compact Photo Printer
Solution Disk
• Warranty Card
* Card size paper cassette may not be supplied depending on region.
Components Guide
Controls (p. 9)
Memory Card Slots
Ink Cassette Lever
Paper Cassette Slot
Ink Cassette Compartment
Paper Cassette Slot Cover
Ink Cassette Compartment
Cover
USB Terminal for Computer
Connection
Air Vents
Paper Ejection Slot
USB Terminal for
Camera Connection
DC IN (Power Input)
Terminal
Getting Started
Insert the ink and paper cassettes into the printer.
Preparing the Ink Cassette
Confirm that the ink sheet is taut with no slack.
Confirm the size indication.
Ink sheet
Do not touch
or pull on.
Push and turn here if the ink sheet is slack.
Preparing the Paper Cassette
Open the outer lid.
Y
P
O
Open the inner lid.
Confirm the
size indication.
Set the paper.
Remove the
protective sheet.
The shiny side is
faced up.
C
For Wide Size
paper cassette
(sold separately),
slide the inner lid
first, then open it.
Close the inner lid.
Inner lid
Clicks.
For Postcard Size paper with a stamp field, orient the
stamp field on the reverse side towards the inner lid.
For Wide Size paper cassette, close the
inner lid and slide it until it clicks.
• Always use the paper specific to SELPHY CP series printers included in the genuine Canon brand Color
Ink/Paper Sets. Commercially sold printing paper, regular postcards, or paper specified for use in SELPHY
ES series printers cannot be used.
• Do not set 19 or more sheets in the paper cassette (13 or more for Wide Size sheets).
• Mistakenly reversing the paper in the cassette may damage the printer.
• Do not bend the paper at the perforations or separate it before printing.
• Do not use label sheets that have begun to peel or label sheets with portions peeled back.
• Do not write on a sheet before printing with the printer. It may lead to a malfunction.
• Do not print on printed paper.
• Never reuse a spent ink cassette.
Installing the Ink Cassette and the Paper Cassette
Open the two covers of the printer.
Ink cassette
compartment cover
Paper cassette
compartment cover
Insert the ink cassette and the paper cassette.
Ink cassette lever
Paper visible through
opening
Y
P
O
Ink cassette
(Insert until it clicks)
Paper cassette
(Insert all the way into
the slot)
Confirm the size indication
(Should be the same)
To remove the ink cassette, slide up the ink cassette lever.
C
Close the ink cassette cover.
Placing and Connecting the Printer
Set up and connect your SELPHY printer in the following manner for safe use.
Insert the power cord
to the compact power
adapter.
Plug the other end into a
power outlet.
Connect the compact
power adapter to the
printer.
Do not block the air vents.
Compact power adapter
To a power
outlet
10 cm (4 in.)
Power cord
Make sure there is free space at the front and back
of the printer of at least the length of the paper.
(During printing, the paper will pass in and out.)
• Do not place the printer on an unstable or tilted surface.
• Keep the printer at least 1 meter (3 ft.) from devices emitting electromagnetic waves or strong magnetic
fields.
Printing from Memory Cards
Print images from a memory card that is inserted into the printer.
• Make sure that no camera or computer is connected to the printer.
• This SELPHY printer supports image data conforming to the Design rule for Camera File system (Exif
compliant) and DPOF (Ver.1.00) standard.
• Use a memory card formatted in the device used for taking the images. A memory card formatted in the
computer might not be recognized.
• Images that have been edited on a computer might not be displayed or printed properly.
• An image that has been taken by a mobile phone might not be displayed or printed properly depending
on the size of the image when it was taken.
• Movies cannot be played back on this printer.
Compatible Memory Cards
Slot
Memory Cards
CompactFlash Card
Microdrive
Y
P
O
xD-Picture Card*1
SD Memory Card
miniSD Card
SDHC Memory Card
miniSDHC Card
MultiMediaCard
MMCplus Card
HC MMCplus Card
MMCmobile Card
RS-MMC Card*2
C
microSD Card
microSDHC Card
MMCmicro Card
Memory Stick
Memory Stick PRO
Memory Stick Duo
Memory Stick PRO Duo
Memory Stick micro
: You need to use the specific adapter for the memory card. Please purchase the specific adapter.
*1 Purchase the CompactFlash Card Adapter for xD-Picture Card.
*2 Reduced-Size MultiMediaCard
• For memory cards requiring an adapter, be sure to first insert the memory card into the adapter before
inserting the adapter into the appropriate card slot. If you insert the memory card into a card slot without
first inserting it into an adapter, you may not be able to remove the memory card from the printer.
• Please refer to the user guide included with your memory card and adapter for handling instructions.
Printing the Selected Image (Basic Printing)
You can select images, specify the number of copies for each, and then print them all out. If you want
to embed the date, follow the instructions on page 12 before printing.
• Do not pull out the paper cassette or open the ink cassette cover just after turning on the printer or while
printing. This will lead to malfunctions.
• During printing, the paper will pass in and out several times. Do not touch or pull on the paper until printing
has finished and the printed sheet collects on the print output tray (on top of the paper cassette).
• Do not let 10 or more sheets of printed paper collect on the print output tray.
• Do not pull out the memory card during printing.
Press and hold
until the start-up image
appears on the LCD monitor to turn on the power.
To change the display language, refer to page 14.
Y
P
O
Insert a single memory card into the
appropriate card slot.
When inserting a small memory card like miniSD Card in
the “SD/miniSD/MMC+/RS-MMC” slot, insert the card in
the lower portion of the slot.
Press
print.
or
or
Insert all the way.
to select the image you wish to
Press and hold down
Press
C
Label side
or
: Jumps images by 5.
to set the number of copies.
• Press and hold down
or
: Increases or decreases the number
of copies by 5.
• You can specify up to 99 copies (or total of 999 prints).
Press
Number of copies of
the selected image
Number of sheets
required
.
Printing starts.
• To print other images together, repeat the steps
and .
• Pressing
when the total number of prints is 0 copies will print one copy of the image displayed on the
LCD monitor.
• To remove a memory card, grasp the portion of the card protruding from the card slot and pull it out.
• Use a marker pen to write on the printed sheets.
What You Can Do with Your SELPHY Printer
Enjoy a multitude of basic and advanced functions with SELPHY.
Buttons and LCD Monitor
Controls
1
1
5
2
3
4
LCD monitor
2
Turns on or off the power.
3
Displays the menu screen.
• DPOF Print (p. 13)
• Print All Images (p. 13)
• Print Settings (p. 10)
• Printer Setup (p. 14)
6
7
8
4
,
Specifies the number of prints or
changes menu items.
Y
P
O
5
Selects settings.
6
Returns to the previous operation or
cancels printing.
7
Starts printing.
8
C
Displays images, setting screens, and
error messages.
,
Switches between images or changes
setting values.
The LCD monitor may be covered with a thin plastic film for protection against scratches during shipment.
If so, remove the film before using the printer.
LCD Monitor
Display when [Info Display] (p. 14) is set to [On].
1
2
3
1
2
File Number
4
3
4
Card slot being used
5
6
Number of sheets required
5
6
Installed ink cassette type
(In this example, [P] stands for Postcard Size)
Print Settings (p. 10)
Date
Correct Red-Eye
My Colors
Page Layout
Image Optimize
Borders
(Settings that are not available are grayed out)
Number of copies of the selected image
Print Settings
You can make print-related settings such as bordered/borderless or print layout.
The default setting is marked as
Date
Prints images with the date
when they were taken.
On,
Correct Red-Eye
Corrects red-eye in the image.
On,
Off ( )
Off ( )
My Colors
Changes the color of the image.
Vivid*1,
Off ( ),
Neutral*2,
Sepia,
Page Layout
Sets the number of
images to print on a
single sheet of paper. The
number of copies selected
for an image (p. 8) will be
printed in the set layout.
1-up ( ),
4-up,
Index
2-up,
8-up,
C
Y
P
O
Borders
Prints bordered or
borderless.
Bordered,
Borderless ( )
Image Optimize
Corrects the images for optimum
quality.
On ( ),
Off
*1 Contrast and color depth are enhanced.
*2 Contrast and color depth are suppressed.
*3 Produces intense, yet natural-looking colors, such as those obtained with positive film.
10
Positive Film*3,
B/W
.
Press
.
The menu screen appears.
[DPOF Print] displays only when you insert a memory card with DPOF
settings made with the camera.
Press
or
Press
.
to select [Print Settings].
The Print Settings menu appears.
Y
P
O
Press
or
to select an item you wish to set.
Press
or
to change the setting value.
To change multiple settings, repeat the steps
Press
C
.
Returns to the menu screen.
Press
and
.
again to return to image display.
• When printing with a camera connected, the print settings made with the camera will be used.
• Depending on the selected layout, some settings may not be available. You can check the available
settings when [Info Display] is set to [On] on the LCD monitor (p. 9).
Correct Red-Eye
• Depending on the image, red-eye may not be automatically detected or optimally corrected. In the
following examples red-eye may not be corrected.
− Faces that appear extremely small, large, dark or bright in relation to the overall image.
− Faces turned to the side or at a diagonal, or faces with a portion hidden.
• Images could have portions other than the eyes mistakenly corrected. Set [Correct Red-Eye] to [On] only
when printing images with red-eye.
Page Layout
• The position of the image in the layout cannot be selected.
• When you select [Index] and the print mode is set to [Print All Images] (p. 13), all images in the memory
card can be printed out as a thumbnail index.
11
Printing with the Date
Print images with the date when the images were taken. Follow the steps below before selecting
images.
Press
.
Select [Print Settings] with
.
or
, then press
Y
P
O
Press
or
to select [Date].
Press
or
to set [Date] to [On].
Press
C
.
Returns to the menu screen.
Press
display.
An image in the
memory card appears.
again to return to image
• You can change the display order of the date in [Date Format] (p. 14).
• Printing with the date may not be possible depending on the selected layout (p. 10). Make sure that [Info
Display] is set to [On] in the LCD monitor and check if [Date] is available (p. 9).
12
Other Printing Modes
Printing Images Using Camera Specified Settings (DPOF Print)
Select images or specify print settings with the camera before printing. For details on the DPOF settings,
refer to the user guide provided with your camera.
Insert a memory card, containing DPOF settings made with the camera
into the card slot.
The confirmation screen for the DPOF settings appears.
Press
and check the settings.
Print type set with
the camera
: Index
: Standard
[Date] and [File No.]
set with the camera
Number of
sheets required
Press
.
Printing starts.
Y
P
O
• The date and file number reflect the DPOF settings. These settings cannot be changed with the printer.
• The screen of step
also appears if you press
to select [DPOF Print] and press
. Be
sure to insert a memory card containing DPOF settings, otherwise [DPOF Print] will not appear on the
LCD monitor.
Print All Images
C
Print all the images on the memory card.
Press
or
and select [Print All Images] with
.
Press
and check the settings.
• Press
or
to specify the number of copies
of the selected image.
• You can specify up to 99 copies (or total of 999
prints).
Press
Print image
Number of copies
Number of sheets
required
.
Printing starts.
13
Making Printer Settings
You can make printer settings such as the display language.
The default setting is marked as
Item
Date Format
Description
Sets the date format used when printing out with the date.
Settings
Language
Sets the display language of the LCD monitor.
Info Display
Displays the properties of the print settings or file number of On ( ),
the image.
Off*
yy/mm/dd,
mm/dd/yy,
dd/mm/yy ( )
See
* The image display will be large but it will take some time until it displays.
Press
.
Select [Printer Setup] with
.
Y
P
O
or
, then press
Press
or
to select an item you wish to set.
Press
or
to change the setting value.
C
To change multiple settings, repeat steps
Press
and
.
.
Returns to the menu screen.
Press
again to return to image display.
Changing the [Language] setting
1
2
3
Select [Language] in step , then press
.
Press
,
,
or
to select the language you wish to set.
Press
.
Returns to the [Printer Setup] screen.
14
below.
.
Printing from Digital Cameras, Mobile Phones or Computers
Printing from a Camera
Print from a camera supporting
(PictBridge*) (p. 11) or
(Canon Direct Print) by connecting it to
the printer. This guide explains the procedure for printing with a Canon digital camera connected as
an example.
* PictBridge is an industry standard that allows any digital camera or video camera, regardless of the manufacturer or model, to print
images directly without using a computer.
• Make sure that no memory cards are inserted into the printer and that no computer is connected to the
printer before connecting a camera.
• Ensure the camera’s communication settings are configured correctly.
• Set the print setup with the camera.
• For camera handling details, refer to the user guide provided with your camera.
Connect a camera with the printer using the USB cable supplied with the
camera.
C
Y
P
O
Turn on the power of the printer first, then the camera. Play back the
images with the camera.
The
or the
icon appears on the LCD monitor of the camera.
Select the desired image on the camera, and press the
camera.
button of the
Printing starts.
• If the camera does not feature the
button, make the settings with the camera until printing. For
details, refer to the user guide provided with your camera.
• Printing cannot be canceled with
on the printer while printing with a camera connected.
Operate the camera to cancel printing.
• When printing from a
(Canon Direct Print) connected camera on Wide Size paper (100 x 200 mm (4 x
8 in.)), the image will print only up to 100 x 150 mm (4 x 6 in.), aligned to the left.
15
Printing from a Mobile Phone (Wireless Printing)
Print images wirelessly from a mobile phone supporting Bluetooth.
• Make sure that no memory cards are inserted in the printer, and no camera or computer is connected to
the printer during wireless printing.
• You cannot establish a wireless connection between the printer and a computer.
• Only image data files up to approx. 2 MB can be transmitted (maximum data size varies depending on the
mobile phone).
• Data transmission time increases when data size is large. Accordingly, it may take some time before
printing starts.
• Movies, E-mails, phone directories, or image data, for example, downloaded from a URL attached to an
E-mail may not be printable.
• The printer may not be able to print images saved onto the memory card of certain mobile phones.
• Printing cannot be canceled by pressing
during wireless printing.
• The position and orientation (horizontal or vertical) of images for printing is set automatically by the printer.
• The edges of the image may be cropped with certain paper sizes.
• For information on how to use the mobile phone’s wireless functions, refer to the user guide of your mobile
phone.
Printing via Bluetooth
Y
P
O
Install Bluetooth Unit BU-30, sold separately.
C
Turn the printer’s power on.
Transmit an image from your mobile phone to
the printer.
Bluetooth unit blinks blue during data transmission.
Printing starts after data transmission is completed.
Up to approx. 10 m (33 ft.)
For instructions for connecting or communication with Bluetooth, refer to the user guide provided with your
Bluetooth unit. If prompted by the mobile phone for a device to connect to, select [Canon SELPHY CP760xx:xx:xx (where x refers to a numerical digit)].
16
Printing from a Computer
Print from a computer connected to the printer.
• Make sure that no memory card is inserted in the printer, and that no camera is connected to the printer
before connecting a computer.
• The printer may not function properly if other USB devices (with the exception of a USB mouse or USB
keyboard) are used at the same time as the printer. Disconnect all other USB devices from your computer
and then reconnect the printer.
• Do not put your computer into the standby mode (or sleep mode) while the printer is connected to a USB
port. If you accidentally do so, do not disconnect the USB cable from your computer while it is in standby
mode.
• For details on how to use the computer, refer to the user guide of your computer.
System Requirements
OS
Windows
Macintosh
Windows Vista, Windows XP Service Pack 2, Mac OS X (v10.3 - v10.4)
Windows 2000 Service Pack 4
Configuration
The above OS should be pre-installed on computers with built-in USB ports.
CPU
Windows Vista: Pentium 1.3 GHz or higher
Windows XP/Windows 2000:
Pentium 500 MHz or higher
RAM
Windows Vista: 512 MB or more
256 MB or more
Windows XP/Windows 2000: 256 MB or more
Interface
USB
Y
P
O
PowerPC G3/G4/G5 or Intel processor
Free Hard Disk 520 MB or more (when all applications are 320 MB or more (when all applications are
Space
installed)
installed)
Display
C
1,024 x 768 pixels or more
High Color (16 bit) or better
1,024 x 768 pixels or more
32,000 colors or better
Introduction to the Supplied Programs
The software necessary for printing with the printer connected to a computer is included on the supplied
Compact Photo Printer Solution Disk.
✤ Ulead Photo Express LE (Windows Vista, Windows XP)
Use this software’s functions to add frames or text to your images, and to easily print them in
various ways.
✤ ZoomBrowser EX (Windows)/ImageBrowser (Macintosh)
Use this multi-function software not only for printing, but also for managing, viewing, editing,
and exporting images.
17
Installing the Printer Driver
• Do not connect the computer to the printer before placing the CD-ROM in the computer.
• You must login to the computer as an administrator before beginning installation.
The instructions in this section are intended for Windows XP and Mac OS X (v10.4). If you are using another
version, actual screen contents and procedures may differ slightly from those indicated here.
Windows
Macintosh
Place the supplied CD-ROM
in the computer.
Click
Place the supplied CD-ROM
in the computer and doubleclick the
icon in the CDROM window.
Y
P
O
Click
Click to select your printer name.
C
Click [Yes], if you consent to the
software license agreement.
Connect the computer to the
printer, and turn the printer’s
power on.
Click [Agree], if you consent
to the software license
agreement.
Click
to select [Easy
Install], then click [Install].
Restart your computer.
Connect the computer to the
printer (see the figure left),
and turn the printer’s power
on.
Commercially
available USB cable
Click [Finish].
18
Register your printer on the
Printer List in the [Printer
Setup Utility].
Installing the Software
Windows
Macintosh
Place the supplied CD-ROM
in the computer.
Click
Place the supplied CD-ROM
in the computer and doubleclick the
icon in the CDROM window.
Click
Click [Install].
Select [Easy Installation] and
click [Next].
Y
P
O
Follow the onscreen instructions to proceed.
Click [Restart] or [Finish], then
remove the CD-ROM after
screen returns to the desktop.
C
Click [OK], then remove the
CD-ROM.
• Refer to the [Help] menu of the software for operations.
• Download ZoomBrowser EX/ImageBrowser Software Guide (PDF) from:
http://web.canon.jp/imaging/information-e.html
• For Ulead Photo Express LE customer support, consult the following website.
http://ulead.com/events/canon/selphy
19
Accessories (Sold Separately)
Color Ink/Paper Sets and Paper Cassettes
The color ink cassette and the paper cassette differ depending on the paper size. Check the table
below*1.
Paper size
Postcard Size
Color Ink/Paper Set
Color Ink/Paper Set KP-36IP
Color Ink/Paper Set KP-72IP
Sheets
Paper Cassette
36
Paper Cassette PCP-CP300
(Included with the SELPHY)
72
Color Ink/Paper Set KP-72IN
72
Color Ink/Paper Set KP-108IP
108
Color Ink/Paper Set KP-108IN
108
L Size
Color Ink/Paper Set KL-36IP
36
Paper Cassette PCL-CP300
Card Size
Color Ink/Paper Set KC-36IP
36
Color Ink/Label Set KC-18IF (Full-page labels)
18
Paper Cassette PCC-CP300
(Included with the SELPHY)
Color Ink/Label Set KC-18IL (8-label sheets)*2
18
Color Ink/Paper Set KW-24IP
24
Wide Size
Y
P
O
Paper Cassette PCW-CP100
*1 Some accessories may not be available depending on region.
*2 Set the page layout to [8-up] (p. 10).
Other Accessories
• Bluetooth Unit BU-30: You can print wirelessly from a mobile phone supporting Bluetooth.
C
20
Cleaning, Storing or Carrying the Printer
Cleaning the Printer
Cleaning the Inside of the Printer
Remove dust inside of the printer with the supplied cleaner.
Remove the ink cassette (p. 6).
Insert the cleaner all the way in the ink
cassette compartment and slide it in
and out 2 or 3 times.
Arrow side facing up
Y
P
O
Do not touch white parts of the cleaner as its performance may be affected.
Cleaning the Printer Casing
Wipe the casing with a soft dry cloth.
C
Never use volatile solvents such as benzine, paint thinner, or diluted neutral solvent. They may cause
deformation or peeling of the printer’s casing.
Cleaning the Back of the Printer
Clean the dust from the air vents on the back.
If dust enters from the air vents and gets on the ink sheet, the printer may not print cleanly. If dust
becomes lodged on the ink sheet, use a commercially available blower brush to remove it so that you
do not touch the ink sheet.
21
Storing the Printer and Prints
Storing the Printer
• Detach the power cord of the compact power adapter from the power outlet.
• Remove the compact power adapter and paper cassette from the printer, store the printer flat so
that dust does not enter.
• Store the accessories as follows.
- Paper cassette: Keep the remaining paper left inside the cassette and close the outer lid.
- Ink cassette: Keep the ink cassette in the printer. Otherwise, store it in a bag to avoid dust.
- Compact power adapter: Wait until the compact power adapter has cooled down to normal
temperature before storing after usage.
If dirt or foreign objects enter the printer, print quality may deteriorate.
Storing Prints
Y
P
O
• Avoid storing prints in the following places.
- Places with high temperatures (40°C/104°F or higher).
- Places with high humidity or dusty areas.
- Places subject to direct sunlight.
• Please avoid the following actions as they may result in color change, color fading or color bleeding.
- Sticking any type of adhesive tape on a print surface.
- Allowing print surfaces to come into contact with vinyl or plastic.
- Applying alcohol or other volatile solvents to a print surface.
- Leaving print surfaces tightly pressed against other surfaces or objects for prolonged periods.
• If you wish to mount prints in an album, select an album with photo covers made of nylon, polypropylene
or cellophane.
C
Color may change over time depending on the conditions of storage. Canon assumes no liability for color
changes.
Carrying the Printer
• Remove the paper and ink cassettes and close the covers.
• Carry the printer wrapped in a soft cloth to avoid scratching it.
22
Troubleshooting
Consult this section when the printer does not function as expected or an error occurred.
You Think There is a Problem
If the solutions below do not remedy your problem, contact the retail outlet or a Canon customer
support center.
Printer and Power Source
Power will not turn on
• Has the plug come out of the power outlet? (p. 6)
• Is the connector of the compact power adapter securely connected to the printer’s DC IN terminal?
(p. 6)
• Did you try pressing
for a long time? (p. 8)
Printing Problems
Cannot Print
Y
P
O
• Is the printer power turned on? (p. 8)
• Is the ink cassette empty?
Replace the ink cassette.
C
• Are you using the correct combination of paper, paper cassette and ink cassette? (p. 6)
• Is the printer connected to more than one device at once?
Do not connect simultaneously to a camera, memory card or computer.
• Is there paper in the paper cassette? Is the paper cassette inserted all the way in?
• Is the ink cassette inserted all the way in?
• Is the ink sheet slack? (p. 5)
• Are you using the specified paper?
• Were the perforated portions of the paper folded over or separated before printing?
• Has the printer overheated?
The printer will temporarily stop when it exceeds a certain temperature. This is not a malfunction. Wait
until the temperature drops and the printer resumes. If the printer is connected to a computer when this
happens, a message will appear on the computer display. Do not cancel the print. Wait until printing
resumes.
Printing from Memory Cards
• Is the memory card inserted all the way into the slot with the label facing upward? (p. 8)
• Do the image files conform to the Design rule for Camera File system?
• Have you inserted the memory card directly into the card slot without first inserting the card into the
adapter? (p. 7)
Some memory cards require a specific adapter.
23
Cannot Print (continued from previous page)
Printing from Cameras
• Is the printer connected to the camera correctly? (p.15)
• Does the firmware of the Canon-brand camera support the printer?
• Does the camera battery have sufficient charge?
Replace the battery with a fully charged (or new) battery, or use the compact power adapter for the
camera.
Printing from Computers
• Did you install the printer driver according to the correct procedures? (p. 18)
• Is the printer connected directly to a port on the computer with the USB cable?
The printer may not operate correctly if it is connected to a USB hub.
Problems Exclusive to Windows
• Is the printer set to offline?
Right-click the printer icon and cancel the offline setting.
Problems Exclusive to Macintosh
• Is the printer registered on the Printer List? (p. 18)
Image Does Not Appear When Memory Card Is Inserted
• Is the memory card inserted all the way into the slot with the label facing upward? (p. 8)
• Do the image files conform to the Design rule for Camera File system?
Y
P
O
• Have you inserted the memory card directly into the card slot without first inserting the card into the
adapter? (p. 7)
Some memory cards require a specific adapter.
Cannot Print the Date
Printing from Memory Cards
• Is the date imprint option set? (p. 12)
If you are using DPOF printing, the date imprint settings are configured on the device used for the DPOF
settings.
C
Printing from mobile phones
• When using Bluetooth, the date will not be printed.
Printing from Cameras
• Is the date imprint option set to [Off] on the camera?
Set the date imprint option to [On] on the camera. However, if the setting is [Default], the date imprint
settings of the printer will be used.
Cannot Print Cleanly
• Is the ink sheet or paper dirty?
• Is dirt lodged within the printer? (p. 21)
• Has condensation formed within the printer?
Leave it to dry at room temperature for a while.
• Is the printer placed near a device with a strong electromagnetic or magnetic field?
Electromagnetic waves from video game devices or strong magnetism from speakers may distort
images. Set it at least 1 meter (3 ft.) apart.
Colors on the Computer Display and the Print Are Different
• Color generation methods are different for computer displays and printers. Moreover, the variance may
be attributable to the environment in which the display is viewed (color and strength of the light), or to
the display’s color adjustment settings.
24
After using the computer to cancel a print in progress, an image that had already been printed
was printed again when resumed printing.
• Are you using a Macintosh computer?
When you restart printing on a Macintosh computer after canceling, an already printed image may print
again when printing resumes.
Paper Problems
Paper Will Not Fit into Cassette
• Does the paper size match the size of the paper cassette? (p. 6)
Paper is Not Being Advanced Properly
• Check the paper and paper cassette are correctly inserted. (p. 6)
Frequent Paper Jams
• Has too much paper been placed in the paper cassette?
Do not place 19 or more sheets in the cassette (13 or more for Wide Size sheets).
• Have 10 or more sheets collected on the print output tray?
• Is the paper folded or bent?
Y
P
O
• Have you printed on a sheet that has already been used?
Cannot Print the Specified Number of Prints. Paper Left Over
• Are you wasting ink sheet capacity with following operations?
- Repeatedly turning the printer on and off without printing.
- Cancel printing while printing is in progress.
- Pulling on the ink sheet.
- Taking out the ink cassette when the paper runs out while printing multiple copies.
Do not remove the ink cassette when removing and refilling the paper cassette.
C
25
Error Messages
If a problem occurs with the printer, a message accompanied with a possible solution appears in the
LCD monitor. In this section, other possible solutions are described. If a problem occurs while the
printer is connected to the camera, the camera’s LCD monitor may display an error message.
No paper, or cassette incorrectly inserted!
• Check that the paper cassette is firmly inserted all the way into the printer.
• If the paper is not feeding correctly into the printer, remove the paper cassette and any paper left in the
printer.
Paper jam!
• Contact a Canon Customer Support center if the paper will not come out even when the power is turned
off and back on.
There is a problem with the ink cassette!
• Contact a Canon Customer Support center for assistance if the ink cassette is stuck in the printer.
Cannot read data from memory card!
Y
P
O
• The following images cannot be printed.
- Images other than JPEG
- Corrupted images
• Press
to return to the original screen.
Communication error!
• When printing from a mobile phone (wirelessly), the maximum image file size that can be transmitted is
approx. 2 MB (maximum file size varies depending on the mobile phone).
• Press
No images on card!
C
to return to the original screen.
• Check to see if the memory card is properly inserted all the way into the slot.
• Do the image files confirm to the Design rule for Camera File system?
Error!
• Turn the printer’s power off and turn it on again. If the error message continues to display, contact a
Canon Customer Support center for assistance.
26
Please Read
Safety Precautions
Use this equipment correctly according to the following precautions to avoid the risk of injury, fire,
electrical shock, malfunction or other hazards.
Equipment refers to the printer unit and accessories.
WARNINGS
• Store the equipment in a place where it cannot be reached by children.
• Do not disassemble or modify the equipment.
• If the equipment is dropped or the casing becomes damaged, do not continue operation.
Y
P
O
• Stop operating the equipment immediately if it emits smoke or noxious fumes. Immediately contact the
retail outlet or a Canon Customer Support center.
• Do not allow water or other liquids to enter the interior of the equipment.
If the equipment is subjected to water droplets or damp salty air, gently wipe it with a soft, absorbent cloth.
• Do not insert or drop metallic objects or flammable substances into the equipment interior.
If it occurs, immediately turn off the printer power and remove the power cord from the power outlet.
• Do not touch metal parts of the device or the power plug during thunderstorms.
Immediately stop using the equipment and distance yourself from it.
C
• Do not use flammable solvents such as alcohol, benzine, or paint thinner to clean the equipment.
• Do not rest heavy objects on the power cord or plug, pull on it with excessive force or damage it.
• Do not use a power source (compact power adapter) that is not specified for the equipment.
• Remove the power cord on a regular periodic basis and wipe away the dust or dirt that collects on the
plug, the exterior of the power outlet and the surrounding area.
• Do not handle the power cord if your hands are wet.
• Do not play the supplied CD-ROM(s) in any CD player that does not support data CD-ROMs. Playing the
CD-ROM(s) in an audio CD player (music player) could damage the speakers. It is also possible to suffer
from hearing loss from listening with headphones to the loud sounds of a CD-ROM played on a music CD
player.
27
CAUTIONS
• Do not stick any part of your hand into the printer interior.
• Do not use or store the equipment in the following types of places.
- Humid or dusty areas
- Places subject to heavy vibrations
- Places near flames or subject to direct sunlight
- Places that may heat up such as an automobile trunk or dashboard
• Do not attach metallic pins or allow dirt to collect on the power plug or recharging connectors.
• Do not excessively pull or bend the power cord.
• Do not use the compact power adapter for any other equipment except this printer, use it beyond its rated
capacity or voltage, or leave the plug partially inserted into a power outlet.
• Unplug the equipment when you are not using it.
Leaving the equipment plugged in during prolonged periods of non-use poses risk of electric shock or fire.
• Do not touch the paper or remove the paper cassette while printing is in progress.
Handling Precautions
Y
P
O
For the handling of memory cards, cameras, mobile phones, or computers, refer to the supplied
user guide of each product.
Warning Against Copyright Infringement
C
Please respect all copyrights. Use of images produced by this printer for purposes other than personal
entertainment may be prohibited by law.
Warranty Limitations
This printer’s warranty is only effective in the country of sale. If a problem arises while the printer is in use
abroad, please convey it back to the country of sale before proceeding with a warranty claim to a Canon
Customer Support center.
28
Printer
• Do not apply excessive force to the printer.
Force or impact on the printer may result in paper jams or equipment damage.
• Do not turn the power on and off repeatedly when you do not intend to print.
The printer initialization process consumes ink and the equivalent of several pages could be wasted.
• Be careful not to spray the equipment with insecticides or volatile substances. In addition, do not store the
equipment in contact with rubber or vinyl products for long periods of time.
These materials may cause deformation of the printer’s casing.
• If the printer overheats, it will temporarily stop operating. This does not mean that the printer has
malfunctioned. The printer will resume normal printing as soon as it cools down. Temporary stoppages are
most likely to occur in the following cases:
- When printing continuously.
- If a room is unusually warm.
- If the air vents on the back of the printer are blocked or if ventilation is inadequate.
• Do not touch the springs of the paper cassette.
If the springs are bent or deformed, paper will not feed correctly into the printer.
Y
P
O
Spring
• Do not place any foreign objects in the print output tray (on the top of the paper cassette).
• Do not touch the print side (shiny side) of the paper with your fingers.
Always hold the paper along the edges (outside the perforated border). Be sure that hands are dry before
touching the paper. Sharp objects will scratch the paper surface. Keep the paper surface free from
fingerprints, dust, water droplets, etc.
C
• Do not handle the ink cassette with wet or sweaty hands.
To prevent malfunctions and damage caused by electromagnetic fields
• Never position the equipment close to motors or other devices that generate strong electromagnetic fields.
Moreover, do not use near televisions or AM radio.
To prevent condensation
• Avoid condensation on the equipment when moving it from a cold to a hot place, by putting it in an airtight,
sealable plastic bag and allow for adjustment to temperature changes gradually before removing from the
bag. In the event that condensation does form within the equipment, keep it at room temperature until the
water droplets evaporate naturally before use.
29
Specifications
All data is measured according to standard Canon testing procedures. We reserve the right to
change specifications without notice.
SELPHY CP760
Printing Method
Dye-sublimation thermal transfer (with overcoating)
Print Resolution
300 x 300 dpi
Gradation
256 shades per color
Ink
Dedicated ink cassette (Y/M/C/overcoating)
Paper
Postcard Size, L Size, Card Size (including full page label sheets, 8-label
sheets), Wide Size
Print Size
Borderless
Bordered
Postcard Size
100.0 x 148.0 mm (3.94 x 5.83 in.)
91.3 x 121.7 mm (3.59 x 4.79 in.)
L Size
89.0 x 119.0 mm (3.50 x 4.69 in.)
78.8 x 105.1 mm (3.10 x 4.14 in.)
Card Size
54.0 x 86.0 mm (2.13 x 3.39 in.)
49.9 x 66.4 mm (1.96 x 2.61 in.)
(per label)
22.0 x 17.3 mm (0.87 x 0.68 in.)
Wide Size
100.0 x 200.0 mm (3.94 x 7.87 in.)
91.3 x 121.7 mm (3.59 x 4.79 in.)
Printing from Memory Cards
Connected to Cameras with PictBridge
Postcard Size
Approx. 52 sec.
Approx. 52 sec.
L Size
Approx. 43 sec.
Approx. 43 sec.
Card Size
Approx. 25 sec.
Approx. 25 sec.
Wide Size
Approx. 1 min. 5 sec.
Approx. 1 min. 5 sec
Printing Speed*1
Feeding System
Ejection System
LCD Monitor
Interface
USB
C
Y
P
O
Automatic paper feed from paper cassette
Automatic paper ejection on top of paper cassette
2.5-inch type, TFT color
Connecting to a PictBridge compliant device/a Canon Direct Print compliant
camera: USB compliant Type A connector
Connecting to a computer: USB compliant Type B connector
Wireless
Bluetooth*2
Memory Cards
CF (CompactFlash) Card, Microdrive, xD-Picture Card*3, SD Memory Card,
miniSD Card, SDHC Memory Card, miniSDHC Card, MultiMediaCard, MMCplus
Card, HC MMCplus Card, MMCmobile Card, RS-MMC Card, microSD Card*3,
microSDHC Card*3, MMCmicro Card*3, Memory Stick, Memory Stick PRO,
Memory Stick Duo, Memory Stick PRO Duo, Memory Stick micro*3
Operating Temperatures
5 – 40°C (41 – 104°F)
Operating Humidity
20 – 80%
Power Source
Compact Power Adapter CA-CP200
Power Consumption
60 W or less (4 W or less on standby)
Dimensions
180.0 x 126.7 x 73.1 mm (7.09 x 4.99 x 2.88 in.)
Weight (printer only)
Approx. 900 g (approx. 31.7 oz.)
*1 Measured from start of the yellow printing pass to final output.
*2 Bluetooth Unit BU-30 (sold separately) is required.
*3 Specialized adapter is required.
30
Compact Power Adapter CA-CP200
Rated Input
100 – 240 V AC (50/60 Hz)
1.5 A (100 V) – 0.75 A (240 V)
Rated Output
24 V DC, 2.2 A
Operating Temperatures
0 – 45°C (32 – 113°F)
Dimensions
122.0 x 60.0 x 30.5 mm (4.80 x 2.36 x 1.20 in.)
(excluding power cord)
Weight
Approx. 310 g (10.9 oz.)
When connecting to and using a household power outlet, use only “Compact Power Adapter CA-CP200”
(rated input: 100-240 V AC 50/60 Hz, rated output: 24 V DC). Using anything else can cause fire,
overheating, or electrical shock.
C
Y
P
O
31
FCC Notice
(Printer, Model CD1039 Systems)
This device complies with Part 15 of the FCC Rules. Operation is subject to the following two conditions;
(1) this device may not cause harmful interference, and
(2) this device must accept any interference received, including interference that may cause undesired operation.
Note: This equipment has been tested and found to comply with the limits for Class B digital devices, pursuant to
Part 15 of the FCC rules. These limits are designed to provide reasonable protection against harmful interference
in a residential installation. This equipment generates, uses and can radiate radio frequency energy and, if not
installed and used in accordance with the instructions, may cause harmful interference to radio communications.
However, there is no guarantee that interference will not occur in a particular installation. If this equipment does
cause harmful interference to radio or television reception, which can be determined by turning the equipment off
and on, the user is encouraged to try to correct the interference by one or more of the following measures:
•
•
•
•
Reorient or relocate the receiving antenna.
Increase the separation between the equipment and receiver.
Connect the equipment into an outlet on a circuit different from that to which the receiver is connected.
Consult the dealer or an experienced radio/TV technician for help.
The cable with the ferrite core provided with the digital camera must be used with this equipment in order to comply
with Class B limits in Subpart B of Part 15 of the FCC rules.
Do not make any changes or modifications to the equipment unless otherwise specified in the manual. If such
changes or modifications should be made, you could be required to stop operation of the equipment.
Canon U.S.A., Inc.
Y
P
O
One Canon Plaza, Lake Success, NY 11042, U.S.A.
Tel No. (516) 328-5600
Canadian Radio Interference Regulations
This Class B digital apparatus complies with Canadian ICES-003.
Réglementation canadienne sur les interférences radio
Cet appareil numérique de la classe B est conforme à la norme NMB-003 du Canada.
C
• As an ENERGY STAR Partner, Canon Inc. has determined that this product meets the ENERGY STAR guidelines
for energy efficiency. For voltages limited to 100-120V.
• Microsoft, Windows Vista and the Windows Vista logo are trademarks or registered trademarks of Microsoft
Corporation in the United States and/or other countries.
• Macintosh and the Mac logo are trademarks of Apple Inc., registered in the U.S. and other countries.
• The SDHC logo and miniSDHC logo are trademarks.
• Corel, the Corel logo, Ulead and Ulead Photo Express are trademarks or registered trademarks of Corel
Corporations and/or its subsidiaries.
• Portions of the code used in this firmware are based in part on the work of the Independent JPEG Group.
• No part of this guide may be reproduced, transmitted, transcribed, stored in a retrieval system, or translated into
any language in any form, by any means, without the prior written permission of Canon.
• While every effort has been made to ensure that the information contained in this guide is accurate and complete,
no liability can be accepted for any errors or omissions. Canon reserves the right to change the specifications of
the hardware and software described herein at any time without prior notice.
• Canon makes no warranties for damages resulting from corrupted or lost data due to a mistaken operation or
malfunction of the camera, the printer, the software, the memory cards, personal computers, peripheral devices,
or use of non-Canon memory cards.