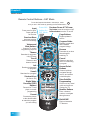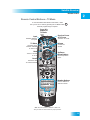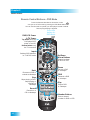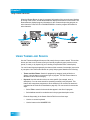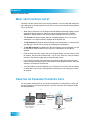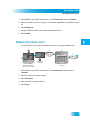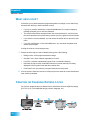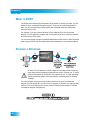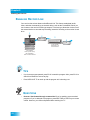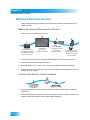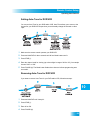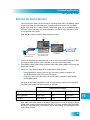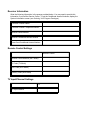
1
To subscribe to programming,
or for assistance with installing
or using the system,
visit mydish.com/chat or
call Customer Service at
Warning and Attention Symbols
You must be aware of safety when you install and use this system. This User Guide provides various procedures. If you do
some of these procedures carelessly, you could injure or kill yourself or damage equipment or property. Some other
procedures require special attention.
The lightning flash with arrowhead symbol, within an equilateral triangle, is intended to alert the user to
the presence of uninsulated “dangerous voltage” within the product’s enclosure that may be of sufficient
magnitude to constitute a risk of electric shock to persons.
The exclamation point within an equilateral triangle is intended to alert the user to the presence of
important operating and maintenance (servicing) instructions in the literature accompanying the
apparatus.
For Your Safety
Do not try to open the case of the receiver. There is risk of electrical shock, which may cause damage to
the apparatus and/or personal injury or death to you. There are no user-serviceable parts inside the
receiver. Opening the receiver case or making unauthorized changes will void the warranty.
Warning: To reduce the risk of fire or electric shock, do not expose this apparatus to rain or moisture.
Important Software Notice
As with all software controlled products, unexpected behavior could arise if the user tries to perform operations in a nonroutine manner. This product, like almost any other high tech product, is subject to bugs and hence EchoStar CANNOT
AND DOES NOT GUARANTEE OR WARRANT THAT ALL FEATURES, SUCH AS PARENTAL CONTROL, WILL WORK
AS INTENDED UNDER ALL CIRCUMSTANCES. EchoStar endeavors to improve such conditions and will periodically
download improvements.
In compliance with the terms of the GNU Public License (GPL), EchoStar is making some source code available to the
public to download from echostar.com.
Equipment and Software Covered by this User’s Guide
This User Guide covers the ViP612™ DVR receiver, and software models ViP612. This Guide may cover other devices not
listed here.
Copyright Notice
Copyright © 2012 EchoStar Technologies L.L.C., Englewood, Colorado 80112. All rights reserved.
The information in this User Guide may change without notice. We may issue revisions to tell you about such changes.
Please send comments or questions about this User Guide to: Technical Publications, EchoStar Technologies L.L.C., 90 Inverness Drive
Circle East, Englewood, Colorado 80112.
Part Number: 188342
Printed in the United States of America.
DISH is a registered trademark of DISH Network L.L.C. For information about DISH, please visit our website at mydish.com.
We acknowledge all product names, trade names, or corporate names we mention in this User Guide to be the proprietary property of the
registered owners.
Manufactured under license from Dolby Laboratories. “Dolby” and the double-D symbol are trademarks of Dolby Laboratories.
HDMI, the HDMI logo and High-Definition Multimedia Interface are trademarks or registered trademarks of HDMI Licensing LLC.
This equipment may incorporate copyright protection technology that is protected by U.S. patents, patent applications, and/or other
intellectual property rights. Use of such copyright protection technology is intended for home and other limited pay-per-view uses only
unless otherwise authorized. Reverse engineering or disassembly is prohibited.
Important Safety Instructions .........................vii
Introduction ........................................................1
WELCOME ....................................................................2
HOW TO USE THIS GUIDE .............................................2
ABOUT YOUR DISH ACCOUNT......................................3
WATCHING TV NOW .....................................................4
ADDITIONAL SERVICES .................................................6
ABOUT SATELLITE TV RECEPTION ................................7
WHY CONNECT TO A PHONE LINE OR BROADBAND .......7
MOVING ON-SCREEN LOGO ..........................................8
Satellite Receiver ...............................................9
SATELLITE RECEIVER OVERVIEW ................................10
SATELLITE RECEIVER FRONT PANEL...........................10
SATELLITE RECEIVER BACK PANEL ............................10
REMOTE CONTROL .....................................................11
USING THE ON-SCREEN MENUS ..................................15
USING TEXT FIELDS ...................................................17
i
Table of Contents
Watching TV .....................................................19
CHANGING CHANNELS ................................................20
USING THE PROGRAM GUIDE ......................................20
USING THE BROWSE BANNER .....................................21
USING THEMES AND SEARCH ......................................22
Pay Per Programs ............................................25
PAY-PER-VIEW...........................................................26
DISH ON DEMAND .....................................................26
CONSIDERATIONS .......................................................28
Favorites Lists ..................................................31
WHAT ARE FAVORITES LISTS? ...................................32
CREATING OR CHANGING FAVORITES LISTS ................32
NAMING FAVORITES LISTS ..........................................33
USING FAVORITES LISTS ............................................34
Locks .................................................................35
WHAT ARE LOCKS? ...................................................36
CREATING OR CHANGING RATINGS LOCKS..................36
CREATING OR CHANGING CHANNEL LOCKS ................40
LOCKING OR UNLOCKING PAY-PER-VIEW CHANNELS ..41
HIDING ADULT CONTENT OR LOCKED CHANNELS ........41
LOCKING OR UNLOCKING THE FRONT PANEL ..............42
CREATING OR CHANGING A PASSWORD ......................43
LOCKING AND UNLOCKING YOUR RECEIVER ................44
Interactive TV ....................................................45
DISHHOME INTERACTIVE TV .....................................46
CUSTOMER SERVICE ..................................................46
ii
Table of Contents
Digital Video Recording ...................................47
WHAT IS DVR?..........................................................48
PAUSING A PROGRAM ................................................48
REVERSING, FAST FORWARDING, AND SKIPPING .........49
SLOW MOTION AND FRAME-BY-FRAME .......................49
RECORDING A LIVE PROGRAM ....................................50
PLAYING A RECORDED PROGRAM ...............................50
DELETING RECORDED PROGRAMS ..............................51
GROUPING AND SORTING RECORDED PROGRAMS .......51
ENABLING RECORD LINK ............................................52
Record Future Programs .................................53
TIMERS AND RECORDINGS ..........................................54
USING THE TIMERS LIST .............................................55
USING THE DAILY SCHEDULE ......................................56
CREATING AN AUTOMATIC TIMER ................................58
CREATING A MANUAL TIMER ......................................58
CREATING A DISHPASS™ TIMER ...............................59
DELETING A TIMER .....................................................60
Remote Control Setup .....................................63
IMPROVING RECEIVER CONTROL .................................64
OPERATING OTHER DEVICES ......................................66
THE RECOVER BUTTON ..............................................77
SENDING DISCRETE POWER ON AND OFF ...................78
iii
Table of Contents
Customizing Receiver ......................................79
USING MULTIMEDIA ....................................................80
USING CALLER ID ......................................................83
CUSTOMIZING THE GUIDE AND CHANNEL LISTS ...........85
CHANGING LANGUAGES..............................................87
USING CLOSED CAPTIONING .......................................88
SETTING UP AUDIO OUTPUT .......................................89
RESETTING TO FACTORY DEFAULTS ...........................90
SCHEDULING RECEIVER UPDATES...............................91
INACTIVITY STANDBY ..................................................91
Connections .....................................................93
CONNECTING TO YOUR DISH SYSTEM ........................94
CONNECTING AN OVER-THE-AIR ANTENNA..................96
SCANNING FOR OVER-THE-AIR CHANNELS ..................96
USING TROUBLESHOOTING TOOLS ............................100
Reference ........................................................103
TROUBLESHOOTING TABLES .....................................104
REMOTE CONTROL DEVICE CODES ...........................115
Appendix .........................................................121
LIMITED WARRANTY .................................................122
RESIDENTIAL CUSTOMER AGREEMENT ......................123
FCC COMPLIANCE ...................................................131
Index ................................................................133
iv
Important Safety Instructions
1
Read these instructions.
2
3
4
5
6
7
8
Keep these instructions.
9
Do not defeat the safety purpose of the polarized or grounding-type plug. A polarized plug has two blades
with one wider than the other. A grounding-type plug has two blades and a third grounding prong. The wide
blade or the third prong are provided for your safety. If the provided plug does not fit into your outlet, consult
an electrician for replacement of the obsolete outlet.
10
Protect the power cord from being walked on or pinched, particularly at plugs, convenience receptacles, and
the point where they exit from the apparatus.
11
12
13
Only use attachments/accessories specified by the manufacturer.
14
The power plug must be readily accessible so that the apparatus can be easily disconnected from the AC
power.
15
The receiver is still connected to the AC power whenever it is plugged into a live power outlet, even if it is
turned off using the remote control or front panel buttons.
16
17
No flame sources, such as lit candles, should be placed on the equipment.
18
Operate the receiver using only the type of power source indicated on the marking label. Unplug the receiver
power cord by gripping the power plug, not the cord.
19
20
Do not overload wall outlets or extension cords; this can result in a risk of fire or electrical shock.
21
Do not locate the antenna near overhead light or power circuits, or where it can fall into such power lines or
circuits. When installing the antenna, take extreme care to avoid touching such power lines or circuits, as
contact with them can be fatal.
22
Do not attempt to service the receiver yourself, as opening or removing covers may expose you to dangerous
voltage and will void the Limited Warranty. Refer all servicing to authorized service personnel.
23
24
25
Unplug the receiver from the AC power outlet before cleaning.
Heed all warnings.
Follow all instructions.
Do not use the apparatus near water.
Clean only with a dry cloth.
Do not block any ventilation openings. Install in accordance with the manufacturer’s instructions.
Do not install near any heat sources such as radiators, heat registers, stoves, or other apparatus (including
amplifiers) that produce heat.
Unplug the apparatus during lightning storms or when unused for long periods of time.
Refer all servicing to qualified service personnel. Servicing is required when the apparatus has been
damaged in any way, such as the power supply cord or plug is damaged, liquid has been spilled or objects
have fallen into it, the apparatus has been exposed to rain or moisture, does not operate normally, or has
been dropped.
The apparatus shall not be exposed to dripping or splashing, and no objects filled with liquids, such as vases,
shall be placed on the top of it.
Never insert objects of any kind into the receiver through openings, as the objects may touch dangerous
voltage points or short out parts. This could cause fire or electrical shock.
Do not place the receiver in an enclosure such as a cabinet without proper ventilation.
Do not install the receiver in any area where the temperature can be less than 40°F or more than 113°F. If the
receiver is cold to the touch, do not plug it in immediately. Let it sit unplugged at room temperature for at least
45 minutes before plugging it in.
v
Safety
26
Use an outlet that contains surge suppression or ground fault protection. During an electrical storm
or when the receiver is left unattended and unused for long periods of time, unplug the power cord
from the wall outlet, disconnect the lines between the receiver and the antenna, and disconnect the
telephone line. These actions provide additional protection against damage caused by lightning or
power line surges.
27
Tighten all of the coaxial cable connections only by hand. If you use a wrench, you may overtighten
the connections and damage your equipment.
CAUTION—To reduce the risk of fire, use only No. 26 AWG or larger
telecommunication line cord.
Proper Care of Your Equipment
•
Always handle the satellite receiver carefully. Excessive shock and vibration can damage the
hard drive.
•
If the equipment is turned on and needs to be moved, unplug the equipemnt and let it sit for at
least 30 seconds before moving it.
•
The use of accessories or attachments not recommended by the receiver manufacturer voids
the Limited Warranty.
•
Do not stack the receiver on top of or below other electronic devices as this can cause heat
build-up and vibration.
On some TVs, the presence of fixed images for extended periods of time may cause
them to be permanently imprinted on the screen. Consult your TV user guide for
information on whether this is a problem for your TV, what operating/viewing restrictions
apply to avoid this problem, and associated TV warranty coverage.
If this equipment does cause harmful interference to radio or television reception, which can be
determined by turning the equipment off and on, the user is encouraged to try to correct the
interference by one or more of the following measures:
•
Reorient or relocate the antenna assembly.
•
Increase the separation between the equipment.
•
Connect the equipment into an outlet on a circuit different from that to which the DISH receiver
is connected.
•
Consult the dealer or an experienced radio/TV technician for help.
Note to Satellite TV System Installer: This reminder is provided to call the satellite TV system installer’s attention
to Article 820-40 of the National Electrical Code (NEC) that provides guidelines for proper grounding and, in
particular, specifies that the cable ground shall be connected to the grounding system of the building as close to
the point of cable entry as practical.
Satellite Dish
Coaxial Cable
from Satellite Dish
Ground Clamp
Antenna Discharge
Unit
Grounding Conductors
(NEC Section 810-21)
vi
Electric Service Equipment
Ground Clamps
Power Service Grounding
Electrode System
(NEC Art. 250, Part H)
Introduction
Introduction to DISH Services
What you’ll find in this chapter:
• WELCOME
• HOW TO USE THIS GUIDE
• ABOUT YOUR DISH ACCOUNT
• WATCHING TV NOW
• ADDITIONAL SERVICES
• ABOUT SATELLITE TV RECEPTION
• WHY CONNECT TO A PHONE LINE OR
BROADBAND
• MOVING ON-SCREEN LOGO
1
Chapter 1
Welcome
WELCOME
Thank you for choosing DISH. You are about to experience the excitement and
convenience of our Direct Broadcast Satellite (DBS) service, which delivers the very best
picture and sound quality. DISH consistently provides the latest products and satellitedelivered services—with high performance, ease of operation, and a wide variety of
entertainment options.
Your new DISH Digital Video Recorder (DVR) receiver has three tuners (two satellite and
one over-the-air) for recording and playback in standard or high definition. Additionally, the
DVR features and a host of other functions make it one of the most versatile and exciting
devices in home entertainment.
This satellite receiver lets you decide how you watch TV. You can record and play back
audio and video with full digital quality. You can pause a live program and not miss any of
the action or you can record a program to watch later, without a DVR/VCR.
HOW TO USE THIS GUIDE
This section explains how the guide is divided and the conventions used throughout.
Guide Overview
This guide contains several chapters to make it easy for you to find what you need:
• Chapter 1—Introduction gives you a brief overview of DISH and your new receiver.
• Chapter 2—Satellite Receiver explains the basic features of your system and how to
use the remote control, front panel buttons, and back panel connections.
• Chapter 3—Watching TV describes how to change channels and look for programs.
• Chapter 4—Pay Per Programs shows you how to order and watch Pay-Per-View and
DISH On Demand programs.
• Chapter 5—Favorites Lists explains how to create, name, and use favorites lists.
• Chapter 6—Locks explains how to set locks and passwords.
• Chapter 7—Interactive TV describes how to use the DishHOME Interactive TV
features of your satellite TV system.
• Chapter 8—Digital Video Recording explains how to use the recording features of
your satellite TV receiver to maximize your viewing pleasure.
• Chapter 9—Record Future Programs shows you how you can record and play back
your favorite programs when you want to watch them.
• Chapter 10—Remote Control Setup contains instructions for programming your
remote to control your satellite receiver and equipment like a TV, DVD, or VCR.
• Chapter 11—Customizing Receiver shows you how to customize your receiver.
• Chapter 12—Connections explains how to connect your satellite receiver to your TV
and other equipment, such as a TV, DVD, or VCR.
• Reference includes troubleshooting steps for common issues and remote control
device codes.
• Appendix includes the warranty, the Residential Customer Agreement, and FCC
compliance information.
2
Introduction
About Your DISH Account
Guide Conventions
•
•
•
•
•
The names of remote control buttons are all uppercase.
Example: Press SAT.
On-screen options are bold
Example: Select System Setup.
Select means to move the highlight to an on-screen option or choice in a list and press
SELECT on the remote control.
Example: Select the Locks option.
Back panel connections of the satellite receiver are small uppercase.
Example: Look at the SATELLITE IN connections.
The instructions in this guide are shown in two ways:
–
Instructions in the form of pictures are handy if you’d like to learn something
quickly. These instructions are numbered left to right as shown in the sample
below.
–
Instructions that are written out are helpful if you’d like to learn more details.
ABOUT YOUR DISH ACCOUNT
This section describes how to order your packages and provides information on how to
find information about your DISH account.
Ordering Your Programming Packages
Before you can enjoy your new receiver, order your programming packages. You can also
add programming using the Customer Support Application through DishHOME (see
page 46 for more details).
Call
1-800-333-DISH (3474)
and request
programming
3
Chapter 1
Watching TV Now
1 Press POWER on the front panel to turn on the receiver.
2 Press SYSTEM INFO on the front panel to display the receiver’s System Info screen on
the nearby TV screen.
3 Call 1-800-333-DISH (3474) and tell the Customer Service Center the system has been
installed and you would like to begin receiving services. A representative will explain the
available program packages. Give the representative information from the System Info
screen, as requested.
4 Your services will be turned on via the satellite signal. This process usually takes just a
few minutes.
5 Select Done.
Where to Find Information on Your Account
If you want to know about charges to your DISH account or if you would like to make
changes to your programming packages, be sure to have your account information handy
and choose one of the following:
•
Go to our website at mydish.com/myaccount.
•
Press MENU on your remote control and then select Customer Service.
•
Call DISH by calling 1-800-333-DISH (3474).
Note: Additional authorization may be required before high definition programming and/or
over-the-air broadcasts can be viewed; additional fees may apply.
WATCHING TV NOW
After you have ordered your programming package, you can begin enjoying the features
of your new satellite TV receiver. When you complete these simple tours, you’ll be familiar
with the remote control and be able to find a program to watch, pause live TV, and record
your favorite shows.
4
Introduction
Watching TV Now
Finding a Program to Watch
If you want to know more about watching TV, see Chapter 3—Watching TV starting on
page 19.
Pausing Live TV
Here’s something you can’t do with regular old TV: pause live TV because someone’s at
the door or calling you on the phone. For more about the pause feature of your receiver,
see Pausing a Program on page 48.
5
Chapter 1
Additional Services
Recording and Playing Back a Program
Take this tour to learn how to make basic recordings of your favorite shows. For more
about the DVR features of your receiver, see Chapter 8—Digital Video Recording starting
on page 48.
ADDITIONAL SERVICES
Pay-Per-View
Catch all the action on Pay-Per-View. Take a break from regular TV and order the latest
movies, sports, and special events. For details on ordering Pay-Per-View events, see
page 26. Be sure to connect an active phone line or broadband Internet connection to your
receiver before you order a Pay-Per-View event (see the instructions on page 95).
DISH On Demand
Enjoy movies and other programming any time without schedules, without waiting, and
without leaving your home. For details on ordering DISH On Demand events, see
page 27.
DishHOME
On DishHOME (press DISH on your remote control), you’ll find news, sports, weather
information, TV and movie buzz, customer service, games, and more.
6
Introduction
About Satellite TV Reception
ABOUT SATELLITE TV RECEPTION
Satellite television uses satellites in a stationary orbit over the Earth to deliver television
and audio programming. This type of orbit enables the satellites to stay aligned over one
place on the surface of the Earth. Once the satellite dish is aimed at the satellite, the dish
does not have to move to follow it.
Rain and Snow Fade
Heavy rain, snow, or dense cloud cover can
reduce the satellite signal, which may interrupt
your programming service. Your service will
return after the weather condition has passed.
Aiming the satellite dish to get the strongest
signal during installation helps prevent rain and
snow from interrupting the signal.
Solar Interference
Twice a year, the sun moves to a position behind
the DISH satellite as it orbits the Earth. This
event occurs during a few days at the beginning
of the spring and the beginning of the autumn
and lasts only a few minutes.
During these brief periods, you will not be able to
see programs on DISH. When the sun has
moved from behind the satellite, the programs
reappear. This is an unavoidable natural event
and has an adverse effect on many satellite
program providers.
WHY CONNECT TO A PHONE LINE OR BROADBAND
Your satellite receiver is equipped with a standard telephone jack that you use to connect
to an active telephone line. Keep the receiver connected to an active telephone line so
that you are able to order pay-per-view programs using your remote control, use all of the
DishHOME Interactive TV features, and use other services from DISH (see the
instructions on page 95).
Your satellite receiver can be connected to your broadband home network. Currently this
connection allows you to order pay-per-view programs using your remote control, as well
as providing access to additional features and servces (see connection instructions on
page 94).
7
Chapter 1
Moving On-screen Logo
MOVING ON-SCREEN LOGO
Whenever the receiver is turned off using the
remote control or front panel POWER button, the
DISH logo and helpful tips displays on your TV
screen. This feature is included with your receiver
to assure you that the connections between your
receiver and TV(s) are not lost and also provides
useful information about your receiver and its
features. Press POWER or SELECT on the remote
control to resume watching satellite TV
programming.
TIPS
•
•
Always have the latest software—Put the receiver into standby when you’re not
using it.
Order Pay-Per-View with your remote control—Keep an active phone line or
broadband Internet connection connected to the receiver to give you Pay-Per-View
and On Demand programs at your fingertips..
QUESTIONS
•
•
•
8
How do I find something to watch? Refer to page 4. For more information on finding
something to watch, see Chapter 3 —Watching TV.
Why are some of the channels red in the Program Guide? The channels that are
red in the Program Guide are those which are not currently in your subscription. If
you’d like to add channels, call 1-800-333-DISH (3474), go to mydish.com/myaccount,
or use the Customer Support Application through DishHOME (see page 46 for more
on the Customer Support Application).
I’m looking at program information in a guide I bought at the grocery store, but
nothing matches what’s on my DISH receiver, is something wrong? No. DISH
programming may vary from what you’ll find in a local publication. For best results,
use the Program Guide on your receiver or order DISH Entertainment Magazine.
Satellite Receiver
About Your Satellite Receiver
What you’ll find in this chapter:
• SATELLITE RECEIVER OVERVIEW
• SATELLITE RECEIVER FRONT PANEL
• SATELLITE RECEIVER BACK PANEL
• REMOTE CONTROL
• USING THE ON-SCREEN MENUS
• USING TEXT FIELDS
9
Chapter 2
Satellite Receiver Overview
SATELLITE RECEIVER OVERVIEW
•
This receiver is an advanced MPEG-4 dual-tuner, single-TV high-definition (HD)
satellite receiver with integrated digital video recorder (DVR).
•
View and record DISH high-definition (HD) and standard-definition (SD) programming.
•
Watch one program while recording another program, or record two programs while
watching a pre-recorded program.
•
View and record digital over-the-air broadcasts using the receiver’s built-in digital
over-the-air tuner.
SATELLITE RECEIVER FRONT PANEL
SATELLITE RECEIVER BACK PANEL
Over-the-Air
Antenna In
Input connection
to your over-the-air
antenna
TV Set Out
Audio and video
connection to your
standard-definition
TV input
Satellite In
USB Port
Connection to
your satellite dish
Connect to
multimedia
devices
Remote
Antenna
Connection to
remote control
antenna
HDMI
Output
Audio/Video
Output
High-quality standardConnect to
definition connection
your broadband
to your TV audio
and video input
home network
YPbPr/
Component
Output
Provides digital
audio and video Optional connection to
your high-definition
to your HDTV
TV video input
*Some USB multimedia devices may not be compatible.
10
Ethernet
Port
S-Video
Digital Audio
Output connection
to a high-quality
digital sound
decoding system
Phone Jack
High-quality standard Connect to your
telephone line
definition connection
to your TV video input
Satellite Receiver
Remote Control
REMOTE CONTROL
The remote control gives you access to all the features of your satellite receiver. You can
set up the remote control to operate the satellite receiver and up to three other devices
(see page 66). These devices can be a TV, a DVD or VCR player, and a third device.
The remote control uses IR (infrared) signals to control the receiver and other equipment.
IR signals travel short distances (up to 40 feet) and cannot go through walls or other solid
objects. With IR signals, you must point the remote control directly at the equipment you
want to control, with no objects to block the signal path.
Batteries
The remote control comes with AAA batteries. When you replace old
batteries, you should replace all of the batteries. Use batteries of the same
kind, for example, alkaline or carbon zinc. Don’t mix batteries of different
kinds. To change the batteries:
1 Press down on the top of the battery cover and slide the cover off.
2 Take out all of the old batteries.
3 Put the new batteries in. Make sure you match the plus (“+”) ends with the
plus markings on the battery case.
4 Slide the cover back into place.
Low Battery Warning
When you see a low battery warning message on your screen below the Program Banner,
the batteries in your remote control are weak and need to be replaced.
11
Chapter 2
Remote Control
Remote Control Buttons—SAT Mode
To use the features described in this section, make
sure you are in SAT mode by pressing the SAT Mode button.
Input
Press once for Input,
Press and hold
for Recover
Receiver Menu
Accesses receiver
features and settings
Volume and
Mute Buttons
Controls TV volume
Programming required
Themes
Searches for programs
using Themes
Recall
Returns to last
channel viewed
Info
Retrieves information
on programs
Search
Searches for a program
Shortcut Keys
(for future use)
Digital Video
Recorder (DVR)
Buttons
Pauses live TV and
plays or records
programming
Format
Formats the picture
to the desired width
to match the program
you are viewing
12
Press this
button for
SAT Mode
SAT
Receiver Power & TV Power
Top button turns the receiver on/off,
Bottom button turns the TV on/off
Page Buttons
Pages up/down in
menus
Program Guide
Displays current and
future satellite
program listings
Browse
View what is on other
channels while
watching TV
Cancel
Returns to previous
menu or to watching
a program
Arrows/Select
Buttons
Channel up/down,
navigates through
menus, and selects
a desired option
View Satellite
Programming
Exits out of any menu/
guide and returns to
viewing live TV
Number Buttons
Enter a channel
number, or navigate
through menus
DishHOME
Explore interactive
TV features
Satellite Receiver
Remote Control
Remote Control Buttons—TV Mode
To use the features described in this section, make
sure you are in TV mode by pressing the TV Mode button.
Remote programming is required.
TV
Press this
button for
TV Mode
Input
Switches between
TV inputs
TV Menu
Accesses menu
features available
on some TVs
Mute
Turns TV volume
on or off
Recall
Receiver Power
& TV Power
Turns the TV on/off
Volume
Controls TV
volume
Up/Down
Arrow Buttons
Channel up/down
on TV
Returns to last
TV channel viewed
Number Buttons
Enter a desired TV
channel number
Note: Remote operation is different on DISH TVs.
See your DISH TV User's Guide for proper operation.
13
Chapter 2
Remote Control
Remote Control Buttons—DVD Mode
To use the features described in this section, make
DVD
sure you are in DVD mode by pressing the DVD Mode button.
You can use this mode to operate your VCR player instead of a DVD.
Remote programming is required.
DVD/VCR Power
& TV Power
Press this
button for
DVD Mode
Top button turns the
DVD player/VCR
power on and off,
Bottom button turns
the TV on and off
Input
Switches DVD between
its TV & DVD mode
Up/Down
Arrow Buttons
Channel up/down
on DVD or VCR
Pause
Back
Reverses a DVD or
rewinds a videotape
Stop
Stops playing a DVD,
stops playing or
recording a
videotape
Pauses a DVD
or videotape
FWD
Forwards a DVD
or videotape
Play
Plays a DVD
or videotape
Record
Records on a
CD or videotape
Number Buttons
Enter a channel
number for DVD or VCR
14
Satellite Receiver
Using the On-screen Menus
USING THE ON-SCREEN MENUS
The on-screen menus make using the receiver and selecting programs quick and easy.
Use the menus to control the receiver and to use its features, such as setting locks,
choosing a program, or creating a favorites list.
Open and Close Menus
You can open the menus in either of two ways:
•
Press MENU on the remote control to open the Main Menu, then select any of
the other menus from the Main Menu.
•
Use the following buttons on the remote control to quickly open certain
features:
–
Press GUIDE to open the Program Guide.
–
Press THEMES (LEFT ARROW) when watching a program to open the
Themes and Search menu.
–
Press BROWSE (RIGHT ARROW) to display the Browse Banner.
–
Press DVR to access the My Recordings List on DISH On Demand.
To close a menu and return to watching a program, press VIEW LIVE TV.
Highlighting Menu Options
Use the remote control ARROWS to move the on-screen highlight to menu options. When
you move the on-screen highlight, the option turns amber.
15
Chapter 2
Using the On-screen Menus
Selecting Menu Options
When you select a menu option, that option takes effect right away. You can select a menu
option in one of two ways:
•
•
Move the highlight to the menu option using the remote
control ARROW buttons. Then press SELECT to choose
the highlighted option. In the example, Program Guide is
highlighted.
If an option has a number next to it, press the number on
the remote control NUMBER PAD that matches the option.
When you use the NUMBER PAD, you do not need to
highlight the option or press the SELECT button.
Program Guide
1
Themes & Search
2
Customer Support
3
Multimedia
4
Locks
5
System Setup
6
Daily Schedule
7
Preferences
8
DISH On Demand
9
Cancel
0
List of Choices in the Menus
When you make a choice in a list, the receiver does not apply the change until you select
Save or Done. If you do not want to save any changes, select Cancel to discard all the
changes made in the menu.
There are two types of lists:
•
A single choice list allows you to select only one choice at a time.
If you select another choice, your previous choice is deselected.
•
A multiple choice list allows you to select more than one choice
at one time. If you select another choice, your previous choice(s)
stays selected.
Canceling a Procedure
You can cancel a procedure in any of three ways:
16
•
If you want to return to watching a program, press VIEW LIVE TV.
•
If you want to return to the previous menu, press CANCEL.
•
If you wait a few moments, the menu closes automatically, discarding
any changes you have made.
Satellite Receiver
Using Text Fields
USING TEXT FIELDS
When you use features on the receiver, you might be required to enter information, such
as the name of a movie when using Search, into areas known as text fields. Your receiver
has two ways to enter the information:
•
On-screen keyboard
•
Remote Control NUMBER PAD
Using the On-screen Keyboard
Use the on-screen keyboard letters to type the information.
Use the LEFT, RIGHT, UP, and DOWN ARROWS to navigate
around the keyboard. Press SELECT to enter the characters
you want.
Using the Remote Control Number Pad
Use the letters above the NUMBER PAD on the remote
control—just like on a telephone—while the highlight is in the
field. For example, when looking for the channel and times to
watch Rudy Friml Presents, you press 7 three times for an R,
8 two times for a U, 3 one time for a D, and 9 three times for a
Y to spell the word “Rudy.”
While in the Text Field
When the cursor is in the text field:
Press the LEFT ARROW to delete characters.
Press FORMAT (*) to backspace without deleting characters.
Press 0 to enter a blank space, such as between words.
Use the RIGHT ARROW to forward space without deleting characters.
17
Chapter 2
Tips
TIPS
18
•
If you do not do anything in a menu for several minutes, the menu automatically
closes. This discards any changes you made and displays the program you were
watching.
•
On the remote control, press * (FORMAT) on the remote control to change the aspect
ratio (display shape) of HD and SD channels.
Watching TV
Finding Programs to Watch
What you’ll find in this chapter:
• CHANGING CHANNELS
• USING THE PROGRAM GUIDE
• USING THE BROWSE BANNER
• USING THEMES AND SEARCH
19
Chapter 3
Changing Channels
CHANGING CHANNELS
There are two basic ways to change the channel on your satellite TV receiver:
•
Use UP and DOWN ARROWS on your remote control.
•
Enter a channel number with the NUMBER PAD.
Using the Up and Down Arrows
While watching live TV, if you want to change the channels one at a time
to see what’s on, press the UP and DOWN ARROWS on your remote
control. You can also change the channels the same way using the UP
and DOWN ARROWS on the receiver front panel.
Entering a Channel Number
While watching live TV, if you know the specific channel you want
to watch, enter the channel number using the NUMBER PAD on
the remote control.
USING THE PROGRAM GUIDE
You can use the Program Guide to see what programs are on, to change channels, and to
set up recordings. To access the guide, press GUIDE.
20
•
A red background behind a channel usually means you have not subscribed to the
channel. After you subscribe to a channel, you can view it. To subscribe to a channel,
visit our website at mydish.com/upgrades or call 1-800-333-DISH (3474).
•
A yellow background behind a channel is for digital over-the-air channels. See
page 96 for instructions to connect an over-the-air antenna (optional) to your receiver.
•
A green background behind a channel means that you can use your remote control to
add the channel to your subscription. Press SELECT and follow the on-screen
messages to order the channel.
Watching TV
Using the Browse Banner
•
The Program Guide shows which Favorites List is active. If All Chan is active, the
Program Guide shows all available channels, whether or not you subscribe to them.
The My Channels list shows only the channels in your subscription. The My HD
Channels list shows only the HD channels in your subscription. If you activate another
list, the Program Guide shows only the channels on that list. See page 32 for
information on Favorites Lists.
•
The Program Guide shows programs currently showing and coming on within the next
nine days. The guide does not show programs that have ended.
While using the Program Guide, you can:
•
Press PAGE UP or PAGE DOWN to move a page at a time.
•
Enter the number of hours you want to skip, and then press the RIGHT/LEFT ARROW
to move forward or back in the schedule.
•
Press SKIP FWD and SKIP BACK to move forward or back a day at a time.
USING THE BROWSE BANNER
Use the Browse Banner to see what other programs are on and not miss any of a program
you are watching. Press the RIGHT ARROW (BROWSE) button to open the browse
banner.
21
Chapter 3
Using Themes and Search
When the Browse Banner is open, the program information of the current channel displays
at the top of the screen, and the Browse Banner displays at the bottom of the screen. The
Browse Banner displays program information for the current and upcoming program on
other channels. Press the UP or DOWN ARROWS to view the program information for
other channels.
USING THEMES AND SEARCH
Use the Themes and Search feature to find exactly what you want to watch. This section
shows you how to use Themes to find your favorite programs by type (such as movies,
sports, or news), or by keyword (if you’re looking for a particular actor or description).
You can list and choose programs by the theme of their contents, for example, just movies
or just sports. Use Themes and Search to quickly find programs based on the following:
•
Theme and Sub-Theme. Search for programs by category (such as Movies or
Sports). Use sub-theme to narrow the type of program. The Sub-Theme feature is
different for each Theme category.
•
Keyword. Use this selection to be even more specific (for example, actor or
description). You can even search for something to watch just by Keyword. This
feature also categorizes programs on off-air channels (if an over-the-air antenna is
connected to the receiver as described on page 96). You can search for events two
ways:
–
Select Title to search for the words that appear in the title of a program.
–
Select Info to search for words that are in the program description or title.
Enter the Keyword(s) in the Search Criteria Field in one of two ways:
22
–
Use the on-screen keyboard.
–
Use the letters on the NUMBER PAD.
Watching TV
Using Themes and Search
Using Themes
1
2
3
Theme
Sub-Theme
News / Business
Family / Kids
Education
Series / Specials
Music / Arts
Religious
All News
Agriculture
Community
Talk
Entertainment
Health
Select
a theme
Press
THEMES
4
Get Results
Select
Get Results
Select
a sub-theme
1 Press THEMES on your DISH remote control.
2 Select a theme.
3 Select a sub-theme.
4 Select Get Results. The programming that matches the themes and sub-themes selected
displays.
Using Keywords
2
1
and
A B C D E F G H
I
Title or
Exact Match
Info
(optional)
J
K L M N O P Q R S T
U V W X Y Z
'
-
.
&
1
7
8
9
0
2
Back
Press
SEARCH
3
Search by:
Cheers_
3
4
5
6
Space
Enter keyword
search criteria
Select Title or Info
(and Exact Match if
necessary)
4
5
Done
Get Results
Select
Done
Select
Get Results
1 Press SEARCH on your DISH remote control.
2 Using the keypad, enter keywords that define your search.
3 Select Title or Info.
4 Select Done.
5 Select Get Results.
23
Chapter 3
Tips
Using Search History
After you have searched previously for programs or other information, your receiver builds
a history. You can use the Search History to re-search programming instead of typing the
information again.
Note: Use the Edit or Delete options to change or delete search keywords.
1 Press SEARCH on your DISH remote control.
2 Select Cancel.
3 Select History.
4 Select a program from the list.
5 Select Search.
TIPS
•
Press INFO to get more information about a highlighted program.
•
Press VIEW LIVE TV to cancel almost any screen and return to live TV.
•
Customize the channels listed in the Program Guide by creating Favorites Lists as
described on page 32.
QUESTIONS
• Why are some of my channels missing?
24
–
You may have locked or hidden the channels. See Locking and Unlocking Your
Receiver on page 44 for more information.
–
You may have a different favorites list showing in the Program Guide. Press
GUIDE to open the Program Guide, and press GUIDE repeatedly to scan through
the available favorites lists. See Favorites Lists on page 32.
Pay Per Programs
Available Pay-Per-View Services
What you’ll find in this chapter:
• PAY-PER-VIEW
• DISH ON DEMAND
• CONSIDERATIONS
25
Chapter 4
Pay-Per-View
PAY-PER-VIEW
To order Pay-Per-View programs using your remote control, you must connect the
receiver to an active phone line or broadband (high-speed) Internet connection. After you
order a Pay-Per-View program, you can watch it on all of the receivers on your DISH
account. Using the remote control, you can order the exact same program for each
receiver, but you pay for the program only once. However, replays of programs are
separate events. Go to mydish.com/ppv for a description of the types of Pay-Per-View
events.
Ordering a Pay-Per-View Program
26
Pay Per Programs
DISH On Demand
DISH ON DEMAND
DISH On Demand is DISH’s Video On Demand service. Enjoy Movies On Demand and
other exciting DISH On Demand programs. Through All Movies, you have immediate
access to the newest movies on DISH. You can even use your DVR buttons (PAUSE,
FWD, and BACK) to control your viewing experience. For more information, go to
mydish.com/vod.
To Order a Program Through All Movies
3
2
4
1
5
6
Rent
New Releases
All Movies
Press DVR
button
Select
All Movies
2
1
Select
New
Releases
Scroll
through
choices
Select
program
Select
RENT
1 Press the DVR button to open the DISH On Demand menu.
2 Select All Movies.
3 Select New Releases, Special Offers, Explore Movies, Search Movies, or My Rentals.
4 Use the UP and DOWN ARROW buttons to scroll through the featured choices.
5 Select the program you want to watch.
6 Select Rent or Done.
DISH On Demand Considerations
•
You can repeatedly watch a rented program for the period of time (for example, 24
hours) listed. Rented programs cannot be saved to the My Recordings list.
•
The My Rentals option shows you how much time you have remaining on rented
DISH On Demand Programs.
•
Be sure to keep Updates and Inactivity Standby enabled so that your receiver always
has the latest DISH On Demand programs. See Scheduling Receiver Updates on
page 91.
27
Chapter 4
Considerations
CONSIDERATIONS
Keep in mind these important considerations about Pay-Per-View and On Demand
programs.
28
•
When you confirm an order for a DISH On Demand or Pay-Per-View program, you
cannot cancel the order and you will be billed for it.
•
You can use Pay-Per-View Locks and Ratings Locks to control the programs your
family views. See What are Locks? on page 36.
•
You can review what you have rented during the last 30-60 days by looking in
Purchase History.
•
The programs you order appear on your DISH bill.
Pay Per Programs
Considerations
Reviewing Orders
1
MENU
2
Done
System Setup
6
Purchase History
4
Purchase History
screen displays
Select Done
Press MENU, select System Setup,
and then select Purchase History
1 Press MENU on your DISH remote control. Select System Setup and then Purchase
History. The Purchase History screen displays.
2 Select Done when you are finished viewing your purchase history.
29
Chapter 4
Tips
TIPS
•
You can set up the receiver to record Pay-Per-View programs. See page 58 for more
details.
•
You can prevent others from ordering Pay-Per-View and On Demand programs by
using locks (see page 41).
•
Keep a broadband Internet connection or an active phone line connected to your
receiver so you can order Pay-Per-View and On Demand programs with your remote
control.
QUESTIONS
•
30
How can I order a Pay-Per-View event for all my receivers?
–
Order on each receiver, one at a time with the remote control. Make sure a broadband Internet connection or an active phone line is connected to each receiver.
–
Order the event online at mydish.com/ppv.
–
Order the event over the phone at 1-800-333-DISH (3474). Charges may apply.
•
I ordered a Pay-Per-View but can only see it on one receiver. Some Pay-Per-View
programs are restricted to one receiver per account.
•
Will I be charged more than once for ordering the same Pay-Per-View on two or
more receivers? If you’re using the remote control, you won’t be charged more than
once as long as it is the same exact event (for example, at the same time or All Day
events).
•
Why doesn’t my Program Guide show any Pay-Per-View channels? You may be
using a Favorites List that doesn’t include Pay-Per-View channels. Press GUIDE to
open the Program Guide and then press GUIDE again until you see All Chan in the
upper left corner of the Program Guide. See Chapter 5—Favorites Lists on page 31
for more information on using Favorites Lists. You may have Pay-Per-View channels
locked and hidden. See Chapter 6—Locks on page 35.
•
Why are some Pay-Per-View programs blacked out? Sporting events and other
programs are sometimes blacked out because of local restrictions.
•
Why did my all-day Pay-Per-View program shut off while I was watching it? The
all-day events run from 3 AM to 3 AM (Mountain Time).
Favorites Lists
Setting Up and Using Favorites Lists
What you’ll find in this chapter:
• WHAT ARE FAVORITES LISTS?
• CREATING OR CHANGING FAVORITES LISTS
• NAMING FAVORITES LISTS
• USING FAVORITES LISTS
31
Chapter 5
What are Favorites Lists?
WHAT ARE FAVORITES LISTS?
Favorites Lists are custom lists of your favorite channels. You can create and change the
lists, adding and removing channels as you wish. Your favorite channels can be grouped
into up to four lists.
•
When using a Favorites List, the Program Guide and Browse Banner display only the
channels in that Favorites List. When you use the remote control UP or DOWN
ARROW to change channels, the receiver skips channels that are not on the list.
•
The All Chan list contains all the channels, including channels not in your current
subscription. You cannot make any changes to the All Chan list.
•
The My Channels list contains all the channels in your subscription. You cannot make
any changes to the All Sub list, except by changing your subscription.
•
The My HD Channels list contains all of the HD channels in your subscription, as well
as over-the-air digital channels if your receiver is connected to an over-the-air
antenna.
•
Each Favorites List has a unique color in the Program Guide. You can also give each
list a name. The four lists are named List 1, List 2, List 3, and List 4, until you change
the name. The lists are empty until you add channels to them.
•
If you choose a program using Themes or by entering a channel number using the
remote controls, the receiver tunes to the channel for that program whether or not that
channel is on the active Favorites List.
•
You can include over-the-air channels in your Favorites Lists if an over-the-air antenna
is connected to the receiver. See page 96 for instructions on connecting an over-theair antenna.
CREATING OR CHANGING FAVORITES LISTS
You can create, add channels to, and remove channels from a Favorites List. When you
use your Favorites List only those channels in your list are shown in the Program Guide
and Browse Banner.
2
1
3
MENU
4-7
Modify Selected List:
List 1
Modify List
632 - MLB
Select
Modify List
631 - MLB
630 - MLB
629 - MLB
628 - MLB
Preferences
Favorites
2
Press the MENU,
select Preferences,
then Favorites
32
627 - MLB
8
Select list to
create or change
626 - MLB
Add or delete channels
from the list
8
Done
Select Done
Favorites Lists
Naming Favorites Lists
1 Press MENU on your DISH remote control. Select Preferences, and then Favorites.
2 Select the list that you want to change, or select List 1, List 2, List 3, or List 4 to create a
list.
3 Select Modify List.
4 Using the SELECT button, add or delete channels from the list.
5 Select DONE.
NAMING FAVORITES LISTS
You can name your Favorites Lists whatever you want, up to eight characters long.
2
1
MENU
3
Edit Name
Select Edit
Name
4
Use the Alpha-Numeric Pad on the
remote or the On Screen Keyboard
to edit Favorite List Name
Enter List Name:
Family_
A B C D E F G H
I
J
K L M N O P Q R S T
Preferences
8
Favorites
2
Press MENU,
select Preferences,
then select Favorites
Select list
to change
U V W X Y Z
'
-
.
&
1
7
8
9
0
2
Back
3
5
Done
4
5
6
Select Done
Space
Enter the name
for the list
1 Press MENU on your DISH remote control. Select Preferences, and then select
Favorites.
2 Select the list that you want to rename.
3 Select Edit Name.
4 Enter the name you want for the list.
5 Select Done.
33
Chapter 5
Using Favorites Lists
USING FAVORITES LISTS
Press GUIDE to open the Program Guide. Press GUIDE again to select the
next Favorites List. Press GUIDE repeatedly to scan through all the available
lists.
Note: GUIDE only works in this manner if the Guide button is selected under
MENU, Preferences, Favorites and Guide Options.
You can tell which favorites lists is active by looking in the Program Guide.
List: My Channels
9:22am Fri 7/20
TIPS
•
Two lists cannot have the same name.
•
Pressing GUIDE to switch Favorites Lists functions only if you have added channels to
the Favorites List. If you have not created a Favorites List, pressing GUIDE switches
the receiver between the All Chan, My Channels, and My HD Channels Lists.
•
Locked and hidden channels do not display in Favorites Lists.
QUESTIONS
•
34
Why are channels missing from the Program Guide?
–
You might have a Favorites List that does not contain those channels. Press
GUIDE until the All Chan or My Channels list displays.
–
You might have channels locked and hidden.
Locks
Securing Your Receiver
What you’ll find in this chapter:
• WHAT ARE LOCKS?
• CREATING OR CHANGING RATINGS LOCKS
• CREATING OR CHANGING CHANNEL LOCKS
• LOCKING OR UNLOCKING PAY-PER-VIEW
CHANNELS
• HIDING ADULT CONTENT OR LOCKED
CHANNELS
• LOCKING OR UNLOCKING THE FRONT PANEL
• CREATING OR CHANGING A PASSWORD
• LOCKING AND UNLOCKING YOUR RECEIVER
35
Chapter 6
What are Locks?
WHAT ARE LOCKS?
Locks allow you to password-protect programming based on ratings or on a channel-bychannel basis. When you have locked the receiver:
•
If you try to access a locked item or open the Locks menu, the receiver displays a
message prompting you to enter the password.
•
The receiver allows three attempts to enter the correct password. If you fail to enter
the correct password, the receiver does not allow you to try again for several minutes.
•
If you enter the correct password, you can access the locked item or open the Locks
menu.
•
If you exit a locked item or close the Locks menu, you must enter the password to
access the item again.
Locking the receiver is a two-step process:
1 Choose the locks that you want. Available locks types are the following:
•
Ratings Locks—locks programs based on ratings.
•
Channel Locks—locks channels regardless of content.
•
Lock PPV—prevents unauthorized pay-per-view or on demand ordering.
•
Hide Adult or Hide Locked—hides adult channels or locked channels from being
displayed in the Program Guide and other channel lists.
•
Front Panel Lock—prevents the front panel buttons from being used.
2 Lock the system. When the receiver is locked, anyone who wants to access locked items
must enter the password.
CREATING OR CHANGING RATINGS LOCKS
You can lock programs based on Motion Picture Association of America (MPAA) ratings
(PG, PG-13, etc.) and expanded ratings (violence, language, etc.).
36
Locks
Creating or Changing Ratings Locks
1 Press MENU and select Locks.
2 If the receiver is locked, enter the password using the NUMBER PAD. The receiver
displays stars (*) as you enter the digits of the password. Select OK.
3 Select Ratings Locks.
4 Highlight the least restrictive rating that you want to block. Press SELECT to lock the
highlighted rating and all ratings more restrictive than it (for example, locking PG-13
automatically locks R and NC-17).
MPAA Ratings
G—General Audiences. A G-rated motion picture contains nothing in theme, language,
nudity, sex, violence or other matters that, in the view of the Rating Board, would offend
parents whose younger children view the motion picture. The G rating is not a “certificate
of approval,” nor does it signify a “children’s” motion picture. Some snippets of language
may go beyond polite conversation but they are common everyday expressions. No
stronger words are present in G-rated motion pictures. Depictions of violence are minimal.
No nudity, sex scenes, or drug use are present in the motion picture.
PG—Parental Guidance Suggested. Some Material May Not Be Suitable For
Children. A PG-rated motion picture should be investigated by parents before they let
their younger children attend. The PG rating indicates, in the view of the Rating Board,
that parents may consider some material unsuitable for their children, and parents should
make that decision. The more mature themes in some PG-rated motion pictures may call
for parental guidance. There may be some profanity and some depictions of violence or
brief nudity. But these elements are not deemed so intense as to require that parents be
strongly cautioned beyond the suggestion of parental guidance. There is no drug use
content in a PG-rated motion picture.
PG-13—Parents Strongly Cautioned. Some Material May Be Inappropriate For
Children Under 13. A PG-13 rating is a sterner warning by the Rating Board to parents to
determine whether their children under age 13 should view the motion picture, as some
material might not be suited for them. A PG-13 motion picture may go beyond the PG
rating in theme, violence, nudity, sensuality, language, adult activities or other elements,
but does not reach the restricted R category. The theme of the motion picture by itself will
not result in a rating greater than PG-13, although depictions of activities related to a
mature theme may result in a restricted rating for the motion picture. Any drug use will
initially require at least a PG-13 rating. More than brief nudity will require at least a PG-13
rating, but such nudity in a PG-13 rated motion picture generally will not be sexually
oriented. There may be depictions of violence in a PG-13 movie, but of the harsher
sexually-derived words, though only as an expletive, initally requires at least a PG-13
rating. More than one such expletive requires an R rating, as must even one of those
words used in a sexual context. The Rating Board nevertheless may rate such a motion
picture PG-13 if, based on a special vote by a two-thirds majority, the Raters feel that most
American parents would believe that a PG-13 rating is appropriate because of the context
or manner in which the words are used or because the use of those words in the motion
picture is inconspicuous.
37
Chapter 6
Creating or Changing Ratings Locks
R—Restricted. Children Under 17 Require Accompanying Parent or Adult Guardian. An
R-rated motion picture, in the view of the Rating Board, contains some adult material. An
R-rated motion picture may include adult themes, adult activity, hard language, intense or
persistent violence, sexually-oriented nudity, drug abuse or other elements, so that
parents are counseled to take this rating very seriously. Children under 17 are not allowed
to attend R-rated motion pictures unaccompanied by a parent or adult guardian. Parents
are strongly urged to find out more about R-rated motion pictures in determining their
suitability for their children. Generally, it is not appropriate for parents to bring their young
children with them to R-rated motion pictures.
NC-17—No One 17 and Under Admitted. An NC-17 rated motion picture is one that, in
the view of the Rating Board, most parents would consider patently too adult for their
children 17 and under. No children will be admitted. NC-17 does not mean “obscene” or
“pornographic” in the common or legal meaning of those words, and should not be
construed as a negative judgment in any sense. The rating simply signals that the content
is appropriate only for an adult audience. An NC-17 rating can be based on violence, sex,
aberrational behavior, drug abuse or any other element that most parents would consider
too strong and therefore off-limits for viewing by their children.
NR/AO—Not Rated. Programs created before MPAA rating system have an NR/AO
rating. Also, if connection to the satellite is lost, the NR/AO rating appears.
TV Ratings
TV Ratings contain information about the audience and a content label.
Audience Ratings of TV Ratings
TV-Y—All Children. This program is designed to be appropriate for all children. Whether
animated or live-action, the themes and elements in this program are specifically designed
for a very young audience, including children from ages 2-6. This program is not expected
to frighten younger children.
TV-Y7—Directed to Older Children. This program is designed for children age 7 and
above. It may be more appropriate for children who have acquired the developmental
skills needed to distinguish between make-believe and reality. Themes and elements in
this program may include mild fantasy violence or comedic violence, or may frighten
children under the age of 7. Therefore, parents may wish to consider the suitability of this
program for their very young children.
TV-Y7-FV—Directed to Older Children - Fantasy Violence. For those programs where
fantasy violence may be more intense or more combative than other programs in this
category, such programs will be designated TV-Y7-FV.
TV-G—General Audience. Most parents would find this program suitable for all ages.
Although this rating does not signify a program designed specifically for children, most
parents may let younger children watch this program unattended. It contains little or no
violence, no strong language and little or no sexual dialogue or situations.
TV-PG—Parental Guidance Suggested. This program contains material that parents
may find unsuitable for younger children. Many parents may want to watch it with their
38
Locks
Creating or Changing Ratings Locks
younger children. The theme itself may call for parental guidance and/or the program may
contain one or more of the following: some suggestive dialogue (D), infrequent coarse
language (L), some sexual situations (S), or moderate violence (V).
TV-14—Parents Strongly Cautioned. This program contains some material that many
parents would find unsuitable for children under 14 years of age. Parents are strongly
urged to exercise greater care in monitoring this program and are cautioned against letting
children under the age of 14 watch unattended. This program may contain one or more of
the following: intensely suggestive dialogue (D), strong coarse language (L), intense
sexual situations (S), or intense violence (V).
TV-MA—Mature Audience Only. This program is specifically designed to be viewed by
adults and therefore may be unsuitable for children under 17. This program may contain
one or more of the following: crude indecent language (L), explicit sexual activity (S), or
graphic violence (V).
Content Labels—TV Parental Guidelines may have one or more letters added to the
basic rating to let parents know when a show may contain violence, sex, adult language,
or suggestive dialogue.
D—suggestive dialogue (usually means talks about sex)
L—coarse or crude language
S—sexual situations
V—violence
FV—fantasy violence (children’s programming only)
5 Select the expanded rating code(s), if you want to also lock these ratings.
6 To unlock a rating code, select the code.
7 Select Done. Make sure the receiver is locked as described on page 44.
39
Chapter 6
Creating or Changing Channel Locks
CREATING OR CHANGING CHANNEL LOCKS
You can lock any channel, including Pay-Per-View and over-the-air channels.
1 Press MENU and select Locks.
2 If the receiver is locked, enter the password using the NUMBER PAD. The receiver
displays stars (*) as you enter the digits of the password. Select OK.
3 Select Channel Locks.
4 Highlight and select each channel that you want to lock or unlock. Press the UP or DOWN
ARROW to highlight the channel. You can also move to each channel number using the
NUMBER PAD. If the checkbox next to the channel has a checkmark, the channel is
locked.
5 Select Done. Make sure the receiver is locked as described on page 44.
40
Locks
Locking or Unlocking Pay-Per-View Channels
LOCKING OR UNLOCKING PAY-PER-VIEW CHANNELS
This locks all Pay-Per-View channels so that a password must be entered before ordering
pay-per-view or on demand content. You can also lock individual Pay-Per-View channels
by using channel locks.
1 Press MENU and select Locks.
2 If the receiver is locked, enter the password using the NUMBER PAD. The receiver
displays stars (*) as you enter the digits of the password. Select OK.
3 Select Lock PPV or Unlock PPV.
4 Select Yes. Make sure the receiver is locked as described on page 44.
HIDING ADULT CONTENT OR LOCKED CHANNELS
When you hide adult channels or locked channels, you prevent the Program Guide,
Themes lists, and the Browse Banner from displaying adult channels or locked channels.
It also prevents anyone from choosing these channels by using the UP or DOWN
ARROWS or the remote control NUMBER PAD.
1 Press MENU and select Locks.
2 If the receiver is locked, enter the password using the NUMBER PAD. Select OK.
41
Chapter 6
Locking or Unlocking the Front Panel
3 Select Hide Adult to remove the adult channels from the channel lists or Show Adult to
display the adult channels in channel lists. Select Hide Locked to remove locked
channels from the channel lists or Show Locked to display locked channels in channel
lists.
4 Select Yes. Make sure the receiver is locked as described on page 44.
LOCKING OR UNLOCKING THE FRONT PANEL
Locking the front panel prevents anyone from using the front panel buttons unless they
enter the correct password. It does not lock the remote control buttons.
1 Press MENU and select Locks.
2 If the receiver is locked, enter the password using the NUMBER PAD. The receiver
displays stars (*) as you enter the digits of the password. Select OK.
3 Select Front Panel Lock to lock or unlock the front panel.
4 Select Yes. To activate the Front Panel Lock, you must lock the receiver. Make sure the
receiver is locked as described on page 44.
42
Locks
Creating or Changing a Password
CREATING OR CHANGING A PASSWORD
Set up your password before using the receiver locks.
Channel Locks
Lock System
Front Panel Lock
Change Password
Lock PPV
Select Lock System
OR
Change Password
1 Press MENU and select Locks.
2 If the receiver is locked, enter the password using the NUMBER PAD. The receiver
displays stars (*) as you enter the digits of the password. Select OK.
3 Select Change Password. If Change Password is grayed out, select Lock System and
go to step 6 to create a new password.
4 Enter the current password using the NUMBER PAD. Select OK.
5 Press SELECT.
6 Enter the new password using the NUMBER PAD. Select OK.
7 Enter the new password again for confirmation, using the NUMBER PAD. The receiver
displays stars (*) as you enter the digits of the password. Select OK.
8 Memorize the new password. From now on, enter this password to lock or unlock the
receiver. If you forget your password, contact a Customer Service Representative.
43
Chapter 6
Locking and Unlocking Your Receiver
LOCKING AND UNLOCKING YOUR RECEIVER
You must lock the receiver for any receiver locks you set to take effect. To lock the
receiver, you must first create a password (see Setting Up a Password in the previous
section). Be sure to refer to this section whenever you set any lock on your receiver.
1 Press MENU and select Locks.
2 If the receiver is locked, enter the password using the NUMBER PAD. The receiver
displays stars (*) as you enter the digits of the password. Select OK.
3 Select Lock System or Unlock System. If you are locking the receiver, the receiver
displays a message prompting you to enter a password.
4 Enter a password, using the NUMBER PAD. The receiver displays stars (*) as you enter
the digits of the password. Select OK.
5 Confirm the password by re-entering it. Select OK. All the locks you have set are now in
effect.
TIPS
•
If the receiver displays a message prompting you to enter a password, it is locked.
•
When you lock a rating, you also lock all other more restrictive ratings. For example, if
you lock PG-13 rated programs, then all programs with the R, NC-17, and NR/AO
ratings are also locked.
QUESTIONS
44
•
Why didn’t a lock I set take effect? You must lock the receiver for any lock you set to
take effect. See page 44 for details.
•
What do I do if I forget my password? If you forget your password, contact a
Customer Service Representative.
Interactive TV
Interacting with Your TV
What you’ll find in this chapter:
• DISHHOME
• CUSTOMER SERVICE
45
Chapter 7
DishHOME Interactive TV
DISHHOME INTERACTIVE TV
Press DISH on the remote control to access the DishHOME features available with your
service. You can order channels, check the news and weather, and even play games.
Make sure you connect an active phone line to your receiver to use all the features
available through DishHOME.
CUSTOMER SERVICE
An important feature of your satellite TV receiver is Customer Support. This menu
provides convenient access to your DISH account to review your statement, pay your bill,
upgrade programming, and more. Make sure you connect an active phone line to your
receiver to use the Customer Support features.
Press MENU and then select Customer Support.
TIPS
46
•
Whenever you want to exit an interactive feature and return to watching programming,
press VIEW LIVE TV and you’ll be taken to the last channel you were watching.
•
You can also get to Customer Support from DishHOME.
Digital Video Recording
Recording and Pausing Programs
What you’ll find in this chapter:
• WHAT IS DVR?
• PAUSING A PROGRAM
• REVERSING, FAST FORWARDING, AND
SKIPPING
• SLOW MOTION AND FRAME-BY-FRAME
• RECORDING A LIVE PROGRAM
• PLAYING A RECORDED PROGRAM
• DELETING RECORDED PROGRAMS
• GROUPING AND SORTING RECORDED
PROGRAMS
• ENABLING RECORD LINK
47
Chapter 8
What is DVR?
WHAT IS DVR?
The Digital Video Recorder (DVR) features let you watch TV the way you want. You can
pause, reverse, or skip back through a program. Then you can continue watching TV.
Also, you can record and play back programs with full digital audio and video quality,
without a DVD or VCR.
For example, if you get a phone call while you are watching a live or pre-recorded
program, you can pause the program, talk on the phone for an hour, restart the program,
and not miss any of the action.
You can move through a program forward and backward in slow motion or frame-by-frame
while using the DVR’s auto recording features while watching live or recorded programs.
PAUSING A PROGRAM
On some TVs, the presence of fixed images for extended periods of time may
cause them to be permanently imprinted on the screen. Consult your TV user’s
guide for information on whether this is a problem for your TV, what operating/
viewing restrictions apply to avoid this problem, and associated TV warranty
coverage.
For a live program, the on-screen pause timer shows how long you’ve paused the
program. You can pause up to one hour for a live program. If you think you might be away
from the TV for more than an hour but don’t want to miss any of the program, consider
recording the program (see page 50).
.
48
Digital Video Recording
Reversing, Fast Forwarding, and Skipping
REVERSING, FAST FORWARDING, AND SKIPPING
This section describes how to use the DVR buttons to move forward and back quickly
while you watch TV.
Press BACK once to reverse the program 4 times as fast as normal play. Press
BACK twice to reverse at 15 times normal speed, three times to reverse at 60
times normal speed, and four times to reverse at 300 times normal speed. The onscreen bar shows how far you’ve gone. For a live program, you can only reverse
back to the last channel change or back one hour, whichever occurs first.
Press FWD (forward) once to fast forward through the program 4 times normal
speed. Press FWD twice to forward at 15 times normal speed, three times to
forward at 60 times normal speed, and four times to forward at 300 times normal
speed. The on-screen bar shows how far you’ve gone. Of course, you can’t
“forward” into the part of a “live” program that hasn’t been broadcast yet.
Press SKIP BACK to skip back about 10 seconds in a program.
Press SKIP FWD to skip ahead about 30 seconds in the program.
SLOW MOTION AND FRAME-BY-FRAME
Your satellite receiver has features that allow you to slow down live TV. This section
describes how to use the DVR buttons to use slow motion and frame-by-frame advance or
reverse while you watch TV. Press PLAY to exit any of the features described below.
Press PAUSE and then press BACK to reverse the program in slow motion at
1/4 the speed of normal play. Press BACK again to reverse at normal speed.
Press PAUSE and then press FWD to forward the program in slow motion at
1/15 the speed of normal play. Press FWD twice to forward at 1/4 as fast as
normal play. Press FWD three times to play the program. Of course, you can’t
“forward” into the part of a “live” program that hasn’t been broadcast yet.
Press PAUSE and then press SKIP BACK to reverse the recording frame-byframe.
Press PAUSE and then press SKIP FWD to advance the recording frame-byframe.
49
Chapter 8
Recording a Live Program
RECORDING A LIVE PROGRAM
Use these steps to record a live program. Keep in mind, if you tune to a program after it
starts, you can record only the part of the program after you tune to it.
If you selected Options, select
the desired recording option
Press
RECORD
When you record a live program, you have the following recording options available:
•
Stop Recording Manually—the receiver records until you press STOP.
•
Extend End Time—you can extend the stop time for the recording. Choose this
option for programs that might run into overtime, like sporting events or awards
shows.
•
Create Recurring Timer—you can set up a timer that automatically records a program. Refer to Creating an Automatic Timer on page 58.
•
Record the Entire Event—the receiver stops recording at the end of the event. This
option is available only if the receiver was tuned to the channel at the beginning of the
program.
Note: Programs recorded in HD require up to six times more storage space than programs
recorded in SD.
PLAYING A RECORDED PROGRAM
Use these steps to view the list of previously recorded programs and select one for
viewing.
1
2
3
Start
0:34
1:04
2:30
Press DVR
twice
Select the program
from the list of recorded
programs
or
Start Over
or
Resume
Select Start, Start Over,
or Resume
1 Press DVR two times (or press DVR and select My Recordings).
2 Select a program to view.
Note: To start viewing a program from the beginning, press PLAY on the remote control.
3 Select Start, Start Over, or Resume.
50
Digital Video Recording
Deleting Recorded Programs
DELETING RECORDED PROGRAMS
Use these steps to delete previously-recorded programs.
1
2
1
3
Delete
Yes
Press DVR
twice
Select programs you
want to remove.
Select Delete and Yes
to confirm
Edit
Select Edit
1 Press DVR two times (or press DVR and select My Recordings).
2 To delete multiple programs, select Edit.
3 Highlight and select the programs you want to remove, then select Delete. Select Yes to
confirm you wish to delete the programs.
GROUPING AND SORTING RECORDED PROGRAMS
Use these steps to group or sort recorded programs.
1
2
1
Sort
Press DVR
twice
Group
Select a group or
sort option
1 Press DVR two times (or press DVR and select My Recordings).
2 Choose a group or sort option to help you quickly find the program you want to watch:
•
To sort programs by name, date, or other categories, select Sort, then select a Sort
Option.
•
To group programs into folders, select Group, then select a Group Option.
3 The My Recordings list rearranges itself to match your sorting or grouping selection.
51
Chapter 8
Enabling Record Link
ENABLING RECORD LINK
Your receiver has a timer feature called Record Link. This feature sends data (audio,
video, and other commands) to an external device, such as the PocketDISH, which you
can connect to the receiver’s RCA-type outputs. This timer type allows the receiver to tell
the external device to start and stop recording, instead of recording to the receiver’s hard
drive.
1
MENU
2
ERD Setup
Select ERD Setup
3
Disable recordings to an external device
Enable recordings to an external device
4
OK
System Setup
6
Installation
1
TV Enhancements
6
Select Enable
recordings to an
external device
Select OK
Press MENU,
select System Setup,
then Installation,
then TV Enhancements
TIPS
•
If you have a program paused, press PLAY to watch the program. Also, press PLAY to
switch from forward or reverse to play.
•
Press VIEW LIVE TV to catch up with the program as it’s showing now.
QUESTIONS
•
52
How can I fast forward through commercials? If you’re watching a pre-recorded
program or if you’ve delayed a live program, press SKIP FWD or FWD on your remote
control. However, you cannot skip ahead while watching live TV.
Record Future Programs
Setting Up and Using Timers
What you’ll find in this chapter:
• TIMERS AND RECORDINGS
• USING THE TIMERS LIST
• USING THE DAILY SCHEDULE
• CREATING AN AUTOMATIC TIMER
• CREATING A MANUAL TIMER
• CREATING A DISHPASS™ TIMER
• DELETING A TIMER
53
Chapter 9
Timers and Recordings
TIMERS AND RECORDINGS
A timer is your instruction telling the satellite receiver the programs you want to view in the
future. For most Digital Video Recorder (DVR) timers, you select a specific program on a
specific channel, and tell the satellite receiver how often you want to record that program.
DVR recordings are listed in the My Recordings screen, which you can find quickly by
pressing DVR twice on the remote control.
Timer Types
There are four types of timers:
•
DVR—records an event onto your receiver’s hard drive for later viewing.
•
Auto—automatically changes the channel for live viewing of the event.
•
Ext—automatically changes the channel for live viewing of the event and sends
commands to a compatible external device, such as the PocketDISH, which is
connected to your RCA-type or S-Video outputs. This option is not available unless
you enable the feature. See Enabling Record Link on page 52. This timer type allows
you to record to the external device, instead of recording to the receiver’s hard drive.
•
Reminder—creates an on-screen reminder when the event is about to air.
Timer Frequency
Deciding how often you want to watch a program will help you make the best choice:
•
All Episodes—records each time that program is on that channel.
•
New Episodes—records current season programs each time they occur on that
channel.
•
Once—records a program once (good for movies, sporting events, or other one-time
programs).
•
Weekly—records a program once a week, at that time, on that channel.
•
Daily—records a program once a day, at that time, on that channel.
•
Monday-Friday—records a program once a day, Monday through Friday, at the
selected time, on that channel.
•
DishPASS—records programs on all channels (default) or a specific channel, based
on your specific criteria. See page 59 for details.
Timer Priorities
Priorities are used by the receiver to know which program you would prefer to record, if
multiple timers are scheduled to start at the same time. This receiver can only record two
satellite programs at one time. If three programs are scheduled to record at the same time,
priorities tells the receiver which two programs to record.
54
•
All timers have a priority that you can change at any time.
•
The larger the number, the lower the priority (for example, priority 1 is higher than
priorities 2, 3, and 4).
Record Future Programs
Using the Timers List
•
You can override a specific timer's priority by skipping or restoring a specific program.
Select a timer in the Daily Schedule, then you'll have an option to Skip or Restore for
that timer (see page 56).
Timer Options
The Timer Options screen lets you set the following:
Note: Not all options not available for all timer types.
•
Protect Event—prevents your programs from being erased when the receiver fills up.
•
Set Channel—selects a specific channel.
•
HD Preference, HD Only, or SD Only—tells the timer if you prefer to record matching
programs in HD if available, if you only want to record the program if it is broadcast in
HD, or if you only want to record the program if it is broadcast in SD.
•
Start Early—select this option if you want to begin recording a few minutes early.
•
End Late—select this option if you want to continue recording after the scheduled
program ending.
USING THE TIMERS LIST
Use the Timers List to:
•
View the general list of timers.
•
If you select a timer from this list, you'll see a detailed list with specific dates and times
of upcoming timers for that program or DishPASS search term(s).
•
Set priorities for each timer. See Timer Priorities, above.
•
Create a Manual timer.
•
Create a DishPASS timer.
•
Select Edit List to edit or delete a timer.
55
Chapter 9
Using the Daily Schedule
USING THE DAILY SCHEDULE
The Daily Schedule lists the timers that are planned for today, up to nine days in the
future, and those that occurred in the recent past. Use the Daily Schedule to:
•
Review today's timers. You can choose to skip a scheduled timer, or restore a timer
that was not planned to occur, perhaps because of a conflict with another program.
See Timer Priorities on page 54.
•
Review future timers, up to nine days in advance, and make changes as necessary.
•
Review past timers to see which occurred, and the reason why one did not, if
applicable. See Reasons Why Timers are Skipped on page 56.
Use the ARROWS to select a future program to Skip or Restore. You can also choose to
Protect it, or view the start early/end late settings.
•
To change the start early/end late setting, select the event within the Timers List.
•
Press PAGE UP to see the previous days' timers. Review these timers to see the
result of your timers (for example, if it recorded successfully or why it might have been
skipped).
Reasons Why Timers are Skipped
If a timer is skipped, the reason is stated on the Timers List.
56
•
Priority—this timer had a lower priority than other events being recorded at the time.
•
User—a user chose to skip that timer.
•
Duplicate event—there is already another timer set to record that program.
•
Event exists in DVR—the program was already recorded and can be seen in the
Daily Schedule list.
•
Not a new episode—used for New Episode timers. Currently, a New Episode is one
that has the current year listed in the Program Guide information.
•
Incorrect event—for Weekly, Daily and Monday-Friday timers. If the guide has a
different event listed the timer will be skipped. For example, the timer was set up on a
Saturday for Daily, but the program is broadcast only Monday-Friday, so the timer will
be skipped on the weekends.
Record Future Programs
Using the Daily Schedule
When a Timer Starts a Recording
For two minutes before an timer starts a recording, the receiver may
display a digital countdown (timer reminder) on the TV screen. This
countdown disappears when the program begins. While the
countdown is displayed, you can do one of the following options:
•
Press CANCEL to clear the symbol from the TV screen. This does not stop the timer
from starting.
•
Press INFO or SELECT to see more information on the timer. If you do this, you have
the following choices:
–
Select OK to continue with the timer.
–
Select Stop Timer to stop the timer.
Note: Pressing INFO on the timer reminder only works one time. Subsequently
pressing INFO results in the current program’s information being displayed.
When the Receiver is Off
If the receiver is off when a timer is scheduled, the receiver does one of the following
actions:
•
DVR Timer Type—remains off but will record the scheduled event.
•
Auto Timer Type—turns on for the event and tunes to the correct channel.
•
Reminder Timer Type—turns on at the scheduled time. After a period of time, if you
do nothing, the receiver turns off.
•
Ext. Timer Type—turns on for the event and commands the connected external
device to record. The external device must be connected to the receiver’s RCA-type
or S-VIDEO output and must be turned on when the timer starts.
Special Considerations When Using Timers
•
For Locked Programs—you must enter the receiver password before you can create
an automatic timer. You can create a manual timer for a locked program without
entering the password. However, if you do this, when the timer operates, the receiver
may display only an error or password entry menu.
•
For Pay-Per-View Programs—you must order a Pay-Per-View program before you
can create a timer for it.
•
For Blacked Out Programs—if you set a timer for a program that is blacked out in
your area, when the timer operates the receiver may only display an error.
57
Chapter 9
Creating an Automatic Timer
CREATING AN AUTOMATIC TIMER
1 Find the program that starts in the future to record using the Program Guide or Browse
Banner. The program can be a satellite or off-air program (see page 96 for instructions on
connecting an over-the-air antenna to your receiver).
2 Select the future event. The Create Timer screen displays.
3 Select the Timer Frequency (see page 54 for more details).
4 Select a Timer Type (see page 54 for more details).
5 Select Options (see page 55 for more details).
6 Select Set Priority if you would like to change the priority of the timer (see page 54 for
more information).
7 Select Create Timer to finish making the new timer.
CREATING A MANUAL TIMER
Duration:
0hr 0min
1 Press MENU and select Daily Schedule.
2 Select Timers.
3 Select Manual Timer.
4 Select the Timer Frequency (see page 54 for more details).
5 Select a Timer Type (see page 54 for more details).
58
Record Future Programs
Creating a DishPASS™ Timer
6 Select the channel (satellite or over-the-air), using the remote control ARROWS or
NUMBER PAD to find the channel.
7 Select Options (see page 55 for more details).
8 Select Edit Time.
9 Set the Start Time and End Time, being sure to specify AM or PM.
10 Set the Date.
11 Select Done.
12 Select Create Timer.
CREATING A DISHPASS™ TIMER
DishPASS lets you create timers to record programs automatically based on your search
terms. When the receiver finds programs that meet your search term, it automatically sets
a timer to record that program. As the program guide is updated, DishPASS continues to
find and records your shows based upon your search criteria.
An example of how to use DishPASS may be that you saw a movie in the theaters and you
want to watch it again as soon as it comes out on a movie channel. Use the Exact Match
and Title options, and enter the exact title of the movie. If the movie is made available on
a movie channel you subscribe to, the receiver automatically sets a timer to record that
movie for you.
1 Press MENU and select Daily Schedule.
2 Select DishPASS.
3 Select the Search Method:
•
Title—search for programs by title.
•
Info—search for programs whose descriptions or titles contain key words.
4 Optionally, select Exact Match if you want to find only programs that match exactly what
you’ve entered in either the program title or info.
59
Chapter 9
Deleting a Timer
5 Enter your search term. You can use the on-screen keyboard or the remote control’s
alpha-numeric keypad while the highlight is in the Enter Search Criteria field. See Using
Text Fields on page 17 for instructions.
6 Select Options as described on page 55.
7 Select Create Timer. When the receiver has completed your search, the Timer Schedule
will display the results.
Note: After entering your search words, and selecting Create Timer, be sure to review the
timers that DishPASS creates—some may not be what you are expecting. You can:
•
Pick selected events to Skip. Review future timers each time the Program Guide is
updated.
•
Adjust your search terms and method. Select Set Priority to change the priority of
your DishPASS. To adjust your search, delete the unwanted DishPASS timer and try
the following:
–
Change your DishPASS search term(s) to be more specific.
–
Select Exact Match with the Title or Info.
–
Choose DishPASS when you select a future program within the Program Guide,
Browse Banner or Search. This enters the program's exact title.
8 Select Done.
DELETING A TIMER
1 Press MENU and then select Daily Schedule.
2 Select Timers.
3 Select Edit List.
4 Select the timers to delete.
5 Select Delete. The timers are deleted.
60
Record Future Programs
Tips
TIPS
•
Make sure the Updates feature is enabled as described on page 91. This feature
ensures the Program Guide has the most up-to-date information and can adjust or
create timers accordingly.
•
Weekly, Daily, and Monday-Friday timers move only if the program is within one hour
earlier or four hours later than the original time the timer was set up. These timers
adjust their length if their program's time block is extended, and the change is
reflected in the Program Guide.
•
DishPASS recordings may fill the hard drive quickly. If you have other timers you know
you don't want to be recorded over, choose Protect on those important programs.
•
DVR Timers set for sporting events typically have an end late time of 60 minutes to
allow for overtime. Change this setting in Options when you set up the timer.
QUESTIONS
•
Why is my receiver recording programs I didn’t schedule? A DishPASS Timer
may include more programs than you planned. If you’d like to refine your search,
delete the DishPASS Timer and start again as described on page 59.
•
Why did the receiver delete a program I recorded? Your recording was
unprotected. When the receiver fills, it writes over the oldest unprotected recording.
You can protect your recordings as described on page 55.
•
Where can I go to find out why the receiver didn’t record something I
scheduled? Look at your Daily Schedule and refer to Reasons Why Timers are
Skipped on page 56.
61
Chapter 9
Questions
Notes
62
Remote Control Setup
Setting Up Your Remote Control
What you’ll find in this chapter:
• IMPROVING RECEIVER CONTROL
• OPERATING OTHER DEVICES
• THE RECOVER BUTTON
• SENDING DISCRETE POWER ON AND OFF
63
Chapter 10
Improving Receiver Control
IMPROVING RECEIVER CONTROL
These instructions help you improve your remote control settings to best operate your
satellite receiver.
Making the Remote Work with the Receiver
These instructions configure your remote.
Turn your receiver
and TV on, and press
SYSTEM INFO on the
front of the receiver
Confirm that
you see the
System Info screen
Press RECORD.
The receiver then
matches the
remote’s address
Confirm that your
remote operates your
receiver by pressing
remote buttons
1 Turn your receiver and TV on, and press SYSTEM INFO on the front of the receiver.
2 Confirm that you see the System Info screen.
3 Press RECORD on your remote. The receiver then matches the remote’s address.
4 Confirm that your remote operates your receiver by pressing remote buttons. If this is not
working, go back to step 3.
Checking the Remote Control Address
1 Press and hold SAT for three seconds, until all of the Mode buttons light up, and then
release SAT.
2 Press POUND (#) twice. The SAT mode button flashes the same number of times as the
address number (for example, three flashes means address 3).
64
Remote Control Setup
Improving Receiver Control
Changing the Remote Control Address
Because UHF signals travel long distances and go through walls, a neighbor’s remote
may control your receiver by mistake. To prevent this, change the remote address.
1 Press SYSTEM INFO on the receiver's front panel. The System Info screen displays on
the TV and shows the Remote Address.
Write down the Remote Address:
2 Press and hold SAT on your remote control for about three seconds, until all of the Mode
buttons light up, and then release SAT.
3 Use the NUMBER PAD to enter any number between 1 and 16, but not the one you wrote
in step 1.
4 Press POUND (#). If you entered the address correctly, SAT flashes three times.
Write down the number you entered:
5 Press RECORD. Make sure the Remote Address you see on the System Info screen is
the same as the one you entered in step 3. If it isn't, the remote cannot control the
receiver.
6 Press SELECT to close the System Info screen.
Confirming Remote Control Operation
1 Make sure the remote has fresh batteries and is in SAT mode.
2 Press SYSTEM INFO on the receiver front panel to display the system information screen.
3 Press RECORD on the remote control. The Remote Address in the System Info screen
changes to match the address preset in your remote control.
4 Press POWER on the remote control to turn on/off receiver.
65
Chapter 10
Operating Other Devices
OPERATING OTHER DEVICES
To use the remote control to operate other devices (such as a TV, VCR, DVD player, tuner,
amplifier, or DISH satellite receiver), you must first program it to operate these other
devices. You can do this by either following the instructions in Programming Using Device
Code Tables on page 70, or the Programming Using Device Codes Scan procedure
described on page 71.
Remote Control Modes
Use the remote control’s mode buttons, SAT (satellite receiver), TV (for a TV), DVD (for a
VCR or a DVD player), and AUX (“auxiliary,” for a second TV, a VCR or DVD, a tuner, an
audio amplifier, or a second DISH satellite receiver) to set the remote to the correct mode
for the device. To change the mode, press the button for the device you want the remote to
operate. The mode button lights for two seconds to show you have set the remote to that
mode.
Limited Mode
You can program your remote control in Limited Mode to keep from accidentally changing
the channel on your TV or VCR and causing a snowy or blue screen. When the remote
control is in Limited Mode for TV mode, you will only be able to use POWER, MUTE, and
VOLUME functions for your TV. When the remote control is in Limited Mode for VCR
mode, you will only be able to use POWER and the VCR functions for your VCR.
Note: Limited Mode is not used with amplifiers.
Turning Limited Mode On and Off
Press and hold the
correct Mode button until
all Mode buttons light.
Release Mode button
Press PAGE UP to
turn Limited Mode on.
Press PAGE DOWN to
turn Limited Mode off
Press POUND (#)
1 Press and hold the correct mode button (for example, TV) until all of the mode buttons
light. Release the mode button.
2 Press:
•
•
PAGE UP to turn Limited Mode on.
PAGE DOWN to turn Limited Mode off.
3 Press POUND (#).
66
Remote Control Setup
Operating Other Devices
SAT Auto-Tune
Most snowy, blue, or black screen issues occur because the TV is set to the wrong
channel. Using the SAT Auto-Tune feature helps prevent these screen issues from
occurring on TVs connected to the receiver’s modulated output (usually TV2). Use SAT
Auto-Tune to program the correct TV channel for satellite viewing into the remote control.
When the SAT button is pressed, the remote sends that channel to the TV.
This feature is enabled by default; however, if you want to use this feature, the channel
must be programmed by following these steps.
Setting SAT Auto-Tune Channel
1 Make sure the remote control operates your TV.
2 Press and hold TV for three seconds until all four Mode buttons are lit.
3 Press STAR (*).
4 Enter the channel used for viewing (up to three digits in range of 002 to 125), for example
channel “010.”
5 Press POUND (#). The Mode button flashes three times to indicate programming was
successful.
6 Press SAT. The channel changes.
67
Chapter 10
Operating Other Devices
Enabling and Disabling SAT Auto-Tune
Note: SAT Auto-Tune is enabled by default; however, the channel must be set (see
Setting SAT Auto-Tune Channel).
1 Press and hold SAT for three seconds until all four Mode buttons are lit.
2 Press STAR (*).
3 Press VOLUME UP to enable SAT Auto-Tune or VOLUME DOWN to disable.
4 Press POUND (#).
Removing SAT Auto-Tune Channel
1 Press and hold TV until it stays lit.
2 Press STAR (*).
3 Enter 00 or 000.
4 Press POUND (#).
68
Remote Control Setup
Operating Other Devices
Setting Auto-Tune for DVD/VCR
You can set Auto-Tune for your DVD and/or VCR. Auto-Tune allows you to return to the
channel for your DVD/VCR output when you accidentally change the channel or video
input.
1 Make sure the remote control operates your DVD/VCR.
2 Press and hold DVD for three seconds until all four Mode buttons are lit.
3 Press STAR (*).
4 Enter the channel used for viewing (up to three digits in range of 002 to 125), for example
channel “003” or “004.”
5 Press POUND (#). The Mode button flashes three times to indicate programming was
successful.
Removing Auto-Tune for DVD/VCR
If you want to remove Auto-Tune for your DVD and/or VCR, follow these steps.
1 Press and hold DVD until it stays lit.
2 Press STAR (*).
3 Enter 00 or 000.
4 Press POUND (#).
69
Chapter 10
Operating Other Devices
Combination Devices
If you are programming the remote to operate a combination device, such as a TV/VCR or
a TV/DVD, program the remote control in one mode, and then repeat the procedure in the
other mode. For example, to program the remote to control a TV/VCR using code 748,
follow the instructions to program the remote to control the TV using code 748, and then
repeat the instructions for the VCR using the same code.
Programming Using Device Code Tables
Program the remote to control other devices using the device codes listed on page 115.
DVD
DVD
DVD
Find code in
Remote Codes
(separate
document)
Press
POWER to
see if device
turns off
1 Turn the device on, using the device’s front panel buttons or its remote control.
2 Find the brand name of the device in the codes insert packaged with the remote. If the
brand is not listed, see Programing using Device Codes Scan on page 71.
3 Press and hold the Mode button until all the other mode buttons light up, and then release
the button. The Mode button flashes. For example, hold TV for a TV until all of the other
mode buttons light. When you release it, TV flashes.
4 For AUX only. Press 0 for a second TV, 1 for a second DVD and/or VCR, 2 for a tuner or
amplifier, or audio receiver. If you are not programming in AUX mode, skip to step 5.
5 Enter one of the three-digit device codes for your brand from the table using the number
buttons. The three-digit device code should be for the brand name of your device that you
found in step 2.
6 If you want to program Limited Mode, press 1. If not, skep to step 7. See Limited Mode for
more information.
7 Press POUND (#). The Mode button flashes three times.
8 Press POWER to turn off the device. If the device does not turn off, go to step 10. If the
code works, the device turns off.
9 Turn the device back on and try some other buttons to make sure they work. If the code
works for other buttons, stop here. Sometimes POWER works when other buttons do not.
If in Limited Mode, try VOLUME or MUTE.
10 If the code does not work, repeats steps 3 through 9 with the next device code from the
tables. Try every code listed for your brand until one works for your device.
11 If you are unable to find a code that works, try Programming Using Device Codes Scan.
70
Remote Control Setup
Operating Other Devices
Programming Using Device Codes Scan
If the code for your device is not listed in the Remote Codes (separate document), use this
procedure to scan the remote control’s memory for the device code.
DVD
DVD
DVD
1 Turn the device on, using the device’s front panel buttons or its remote control.
2 Press and hold the mode button until all the other mode buttons light up, and then release
the button. The mode button flashes. For example, hold TV for a TV until all of the other
mode buttons light. When you let go, TV flashes.
3 For AUX Mode only. Press 0 for a second TV, 1 for a second DVD and/or VCR, or 2 for a
tuner, amplifier, or audio receiver. Press STAR(*). This step programs the type of device
that you want to program in AUX mode. If you are not programming in AUX mode, skip to
step 4.
4 Press POWER. Your remote is now in scan mode.
5 Press the UP or DOWN ARROW repeatedly until the device turns off. As you press the UP
or DOWN ARROW, the remote tries each code in the memory to see if it can turn off the
device. When the device turns off, you have found a code that might work.
Note: The mode button for the device flashes rapidly eight times when you have scanned
all the codes for that device.
6 Press POUND (#). The mode button flashes three times if the code was entered correctly.
This stores the code you found.
7 Turn the device back on and try some other buttons to make sure they work. Sometimes
POWER works when other buttons do not. If using Limited Mode, try VOLUME or MUTE.
8 If necessary, repeat this procedure until you have tried all the codes. You may need to
repeat the scan to find the best code for your device.
Learning From Another Device’s Remote
Use this procedure if you are unable to find a code that allows your DISH remote to control
your device. This procedure is also applicable if after you have programmed your DISH
remote to control your device (in TV, DVD, or AUX modes), some of the commands are
not functioning as you expect. Use this procedure to have your DISH remote learn the
commands of the other device’s remote control.
71
Chapter 10
Operating Other Devices
The remote control can learn commands in one of two ways:
•
You can follow the instructions for using device codes to program a specific mode, and
then learn commands that add new or overwrite existing functions of the remote
control’s buttons in this mode. For this type of learning, any button without a learned
command keeps the previous command (if any) for that device code. To program a
specific mode, use the instructions for Programming Using Device Codes Tables on
page 70 or Programming Using Device Codes Scan on page 71.
or
•
Each button on this remote learns a command from the device’s original remote
control. For this type of learning, any button without a learned command keeps the
previous command (if any) for that device code.
Learning can occur only in TV, DVD, or AUX modes. The Mode
buttons (SAT, TV, DVD, and AUX) cannot learn a command. For
each Mode button, the POWER button can be learned to turn the
devices associated with that Mode on and off.
Note: The TV POWER button turns the TV on and off in all Modes. It cannot be
learned.
Note: The remote times out if a button isn’t pressed within 20 seconds. If the remote times
out, then the learning process needs to start over again.
To have the DISH remote control learn specific commands for another device, complete
the following steps.
1 Ensure the DISH remote control is working with the receiver (see Making the Remote
Work with the Receiver on page 64).
2 Place both your DISH remote and the original device’s remote control on a flat, stable
surface. Point the front of the original device’s remote to face the small square (IR
window) on the front, left-hand side of the DISH remote, as shown below. The remotes
should be no more than 3” apart.
SA
T
TV
PO
W
ER
V
C
R
H
T
E
M
U
L
O
V
AU
X
E
G
A
P
G
LL FO
CA IN
RE
U
ID
V
B
E
D
SKIP
CK
3”
TV
I
MENU
MUT
E
E
M
E
S
R
R
E
S
O
W
C
W
IE
V
N
V
T
A
C
E
L
A
P
S
IP
K D
SW
F
U
E
D
D
W
F
Y
A
L
P
O
TIO
N
P
SI
3 On the DISH remote, press and hold the Mode button you want to use for the device until
all the mode buttons light up (approximately three seconds), and then release it. The
selected Mode button blinks continuously.
72
Remote Control Setup
Operating Other Devices
4 To start learning commands for this mode, select one of the folowing choices:
•
If you have found a code for the device and programmed it into the remote,
press and release RECALL (the Mode light goes off when RECALL is
pressed and comes on when released), then hold the RECORD button until
the Mode button is lit again (about three seconds). The Mode button remains lit
while learning.
•
If the device code has not been programmed for that device or if you are
unable to find a code, press and hold the RECORD button until the Mode
button is lit (approximately three seconds). The button remains lit while
learning.
5 On the DISH remote, press and release the button you want the DISH remote to learn
from the original device’s remote. The Mode light goes off and comes back on.
6 On the original device’s remote control, press and hold the button you want learned until
the Mode light goes out and comes back on. You may need to press and hold the button
on the original remote several times before the DISH remote learns the command.
•
If the DISH remote learns the command, the Mode light blinks off and then back on.
•
If the Mode light blinks three times or remains lit, the DISH remote did not learn the
command.
SAT
MEN
U
TV
I
MU
TE
TV
PO
W
ER
V
C
R
H
T
E
M
V
E
S
O
AU
L
U
X
M
G
LL
A
P
CA
E
RE
E
V
E
D
ID
U
G
FO
IN
B
R
R
E
S
O
W
C
W
IE
V
A
N
V
T
C
E
L
IP
K D
SW
F
E
D
W
F
Y
A
L
P
7 After a button has learned a command successfully, repeat step 5 and step 6 until all
commands you want have been learned.
8 Press and release one of the Mode buttons on the DISH remote to end the learning
sequence. This saves all the commands for that mode and exits learning to return to
normal remote control operation.
To cancel learning, do not press any buttons on either remote control for at least
20 seconds. The DISH remote control times out and returns to normal operation.
Note: If the remote control batteries are too low for learning, all the Mode buttons blink
quickly eight times. Learning ends without saving learned commands, and the remote
returns to normal operation. Change the batteries and begin learning again.
Note: No learned commands are saved if the DISH remote controls times out before
completion.
73
Chapter 10
Operating Other Devices
Checking the Device Codes
You can find out what device code you’ve set for each remote control mode (TV, DVD, and
AUX).
DVD
DVD
1 Press and hold the appropriate mode button until all the other mode buttons light up, and
then release the button. The Mode button flashes. For example, hold TV for a TV until all
of the other mode buttons light. When you let go, TV flashes.
2 Press POUND (#) twice. Watch the mode light to determine your code. The mode button
flashes the number for each digit of the device code, with a pause between the groups of
flashes. A quick flash is for zero. For example, if the code is 570, the Mode button flashes
five times, pauses, flashes several tiems, pauses, and flashes once quickly.
For AUX mode: The first group of flashes tells you what the AUX mode controls. A quick
flash (zero) before the three-digit code is for a TV; one regular flash is for a DVD and/or
VCR; and two flashes for for a tuner, amplifier, or audio receiver.
For a satellite receiver programmed in AUX mode: The AUX mode button flashes the
same number of times as the address number.
For Limited Mode: If you have programmed a TV or DVR/VCR in Limited Mode, the
mode button flashes once at the end of the flash sequence.
Controlling a Tuner or Amplifier
Use the following remote control buttons to control a tuner, amplifier, or audio receiver.
When the remote control is set up as described on pages 66 and 75, press the AUX mode
button to set the remote to AUX mode. The AUX mode button stays lit for two seconds to
show you’ve set the remote to AUX mode. Make sure to keep the remote in AUX mode to
use the following buttons.
74
Remote Control Setup
Operating Other Devices
Switching Between TV and Tuner/Amplifier Volume Control
When the remote control is setup to operate your TV, the VOLUME and MUTE buttons will
adjust your TV volume. To use the remote to adjust the volume of a remote-controllable
audio receiver or amplifier instead of adjusting the TV’s volume, use the steps To Use a
Tuner or Amplifier’s Volume Control, below. To switch back to control the TV’s volume, use
the steps To Use the TV’s Volume Control.
To Use a Tuner or Amplifier’s Volume Control
Note: You must first program the tuner or amplifier into the AUX mode of the remote
control to use these steps.
Press and hold the
AUX Mode button for
four seconds
(AUX flashes)
Press
POUND (AUX
button flashes
three times)
1 Press and hold the AUX button until all the mode buttons are lit, then let it go.
2 Press the POUND (#) button.
3 Press the PLUS side of the VOLUME button.
4 Press 0.
5 Press POUND (#). The AUX button flashes three times.
To confirm the VOLUME buttons are operating the tuner/amplifier’s volume control, press
SAT and then try adjusting the volume. Your tuner/amplifier’s volume should change
rather than your TV’s volume.
To Use the TV’s Volume Control
Press and hold the
TV Mode button for
four seconds
(TV flashes)
Press
POUND (TV
button flashes
three times)
1 Press and hold the TV button until all the mode buttons are lit, then let it go.
2 Press the POUND (#) button.
75
Chapter 10
Operating Other Devices
3 Press the PLUS side of the VOLUME button.
4 Press 0.
5 Press POUND (#). The TV button flashes three times.
To confirm the VOLUME buttons are operating the TV’s volume control, press SAT and
then try adjusting the volume. The TV’s volume should change.
Programming to Control a Second Satellite Receiver
If you have a second DISH satellite receiver installed, you can use this remote in AUX
mode to operate your other receiver in addition to operating this receiver. When you
program the remote to operate the other receiver, the remote sends out IR signals to the
receiver so the line of sight to the second receiver must be unobstructed. You can program
the remote control to operate any other DISH receiver, except where UHF is used, such as
TV2 on DISH receivers.
2
1
3
Press the
3 button
4
5
AUX
Press and hold the
AUX Mode button until all
Mode buttons light up
(AUX flashes)
Display System Info
screen and note the
Remote Control Address
Enter remote
address from
Step 1
6
Press
Press POUND
(AUX flashes RECORD
three times)
1 Turn on the other receiver and display the System Info screen as described in that user’s
guide.
Write down the remote control address:
2 Press and hold AUX until all the other mode buttons light up, and then let go of the button.
AUX flashes.
3 Press the 3 button.
4 Use the NUMBER PAD to enter the address you wrote in step 1.
5 Press POUND (#). AUX blinks three times.
6 Press RECORD to ensure the address in the remote matches the address on the receiver.
76
Remote Control Setup
The Recover Button
THE RECOVER BUTTON
Use RECOVER if you accidentally change the TV channel or video input and have a
snowy, blue, or black screen on your TV. When you press RECOVER as described below,
the remote control sends commands to your TV to change channels or video inputs to get
back to watching satellite programming. This procedure works only if you have
accidentally changed the TV channel or video input. It does not recover lost satellite signal
(see Troubleshooting Tables on page 104 for information on solving problems).
Note: The remote control must be programmed to operate the TV (and VCR, if applicable)
for RECOVER to work as described. RECOVER will first try to tune your TV to channel 3,
then channel 4, and then other video inputs with each press of RECOVER. You may need
to press RECOVER multiple times to recover your satellite TV video.
Using the Recover Button
To use RECOVER, the remote control must be programmed to operate the TV and, if
installed, the VCR.
Note: Press any remote control button other than RECOVER to end this procedure.
1 Turn on your TV if it isn’t already on.
2 Press and hold the RECOVER button until all the Mode buttons light up.
3 Press the RECOVER button again and wait for the TV or DVD mode buttons to flash once
then all four Mode buttons flash once.
4 When the System Info screen displays, your satellite programming is recovered. Press
SELECT to exit this screen.
If the System Info screen doesn’t display, repeat Steps 2 and 3 until the System Info
screen appears.
77
Chapter 10
Sending Discrete Power On and Off
SENDING DISCRETE POWER ON AND OFF
Discrete power ON and power OFF IR commands are used when programming macro
commands into universal remotes. Using an ON-only or OFF-only command is more
effective than a toggle ON/OFF command when trying to make sure the satellite receiver
is reliably in one state or the other. To send a discrete power ON or OFF command, use
the following steps:
1
3
2
or
SAT
Program the
remote control
Press
SAT Mode
until all Mode
buttons light up
4
Press
POWER
Press VOLUME UP
for discrete power on
or press VOLUME DOWN
for discrete power off
5
Press any
button
to end this
procedure
1 Program the remote control to control all the devices that you would like to control.
2 Press SAT until all the Mode buttons light up.
3 Press POWER.
4 Press VOLUME UP for discrete power on. Press VOLUME DOWN for discrete power off.
5 Press any button to end this procedure.
QUESTIONS
•
My remote doesn’t control my receiver or other components. What should I do?
–
–
–
•
78
Put the remote control is in the correct mode (page 66).
Check the batteries (page 11).
Check the remote control address (page 64).
Why does my receiver change channels or display menus at random? Your
neighbor may have their remote control set on the same address. Change the
address on your remote control and receiver as described on page 65.
Customizing Receiver
Personalizing Your Satellite Receiver
What you’ll find in this chapter:
• USING MULTIMEDIA
• USING CALLER ID
• CUSTOMIZING THE GUIDE AND CHANNEL
LISTS
• CHANGING LANGUAGES
• USING CLOSED CAPTIONING
• SETTING UP AUDIO OUTPUT
• RESETTING TO FACTORY DEFAULTS
• SCHEDULING RECEIVER UPDATES
• INACTIVITY STANDBY
79
Chapter 11
Using Multimedia
USING MULTIMEDIA
Photos
You can transfer photos from compatible USB storage devices and cameras to view on
your TV using your DISH receiver. Now you don’t have to pass photos around or have a
crowd of people hover around your digital camera.
Transferring Photos to Your Receiver
1
Connect your receiver to a digital camera or other USB supported device using the USB
Connection.
Note: Some cameras and USB multimedia devices may not be compatible.
80
2
Press MENU and select Multimedia.
3
Select the option under External USB Devices.
4
Select Get from Device under Photo.
5
Select the pictures that you want to send to your receiver.
6
Select Send Photos.
7
Select OK after the photos have been sent to your receiver.
Customizing Receiver
Using Multimedia
Viewing Photos on Your Receiver
1
3
MENU
2
September 3 2005 9:03am
My DISH Receiver
My Photos
Multimedia
4
Press MENU and
select Multimedia
4
August 31 2005 10:03am
December 2 2005 10:03am
1
Select
My Photos under
My DISH
Receiver
Slideshow
January 8 2006 11:00pm
5
6
Play
Select the
photo folder
you want to
view
Select
Slideshow
1
Press MENU and select Multimedia.
2
Select My Photos under My DISH Receiver.
3
Select the photo folder you want to view.
4
Select Slideshow.
5
Set up your options if desired, and/or select Play.
6
Press CANCEL to exit the slideshow.
Select Play
(or set up your
Press the
options then CANCEL button
select Play) to exit out of the
slideshow
External Hard Drive
You can expand the storage capacity of your DVR receiver by connecting a compatible
USB 2.0 hard disk drive. Transfer programs from the receiver to your external drive for
storage, and play back programs directly from the external hard drive.
Warning
865
The attached USB storage device needs to be
reformatted to support DISH Network DVR
functionality. All existing data on the device will be
erased.
Do you want to reformat the device?
Purchase an
external USB 2.0
Hard Drive
Connect Hard Drive
to receiver’s
USB port
Select Yes
to reformat
the Hard Drive
Follow the
on-screen prompt
USB Storage
4
to activate
Press DVR and
the feature
select USB Storage
Choosing a compatible external hard drive:
•
•
•
•
•
•
The hard drive must have a USB 2.0 connection.
The capacity of the hard drive can be up to 1TB and needs to be a minimum of 40GB.
Using a hard drive with an external power supply is recommended. External hard
drives powered by the USB cable may not function properly with your receiver.
Do-it-yourself kits and expandable racks may not be compatible.
Only hard drives that are single-disk units are supported.
Dedicate the hard drive for use only with the receiver; do not use the drive for other
purposes, such as storing computer files.
81
Chapter 11
Using Multimedia
To use the external hard drive feature:
1
Purchase a USB 2.0 hard-disk drive from a local consumer electronics store.
2
Connect the drive to one of the receiver’s two USB ports, making sure to follow any
instructions that came with the hard drive.
Note: Currently, the receiver supports having one USB device connected at a time. If you
have a second USB device such as a camera or portable media player connected to the
receiver, disconnect it before connecting the external hard drive.
3
If the hard drive is compatible, you’ll receive a popup confirming the connection and
asking if you want to manage its contents. Select Yes.
4
Follow the on-screen prompts for activation on your DISH account of the DVR External
Hard Disk Drive feature for storage and playback of DVR content.
5
Once the feature has been activated, you’ll receive a popup asking if you want to format
the drive. Formatting is necessary to store your recorded programs on the external hard
drive. After selecting Yes, anything on the external hard drive is erased, the drive is
formatted, and then the receiver reboots. You can use the Manage Device option to view
and manage programs stored on the external hard drive. Use the Send to Device option
to transfer programs from your receiver to the external hard drive. Copy protection for
certain content may apply. See mydish.com/support for more information.
6
Press DVR and select USB Storage to manage the contents of the external hard drive.
Portable Media Players
You can take your recorded content on the go with a portable media player from
ARCHOS. Visit archos.com for compatible models and a free DISH plug-in. A one-hour
standard-definition program will transfer in only about five minutes! Copy protection for
certain content may apply. See mydish.com/support for more information.
82
Customizing Receiver
Using Caller ID
USING CALLER ID
If you subscribe to Caller ID from your local phone company and your receiver is
connected to a phone line, enabling the Caller ID feature allows the receiver to display on
your TV the names of people and/or telephone numbers as they call.
Setting Up Caller ID Display
Use these instructions to enable or disable Caller ID.
1
Press MENU and select System Setup. Select Installation and then Caller ID.
2
Select Enable Caller ID or Disable Caller ID.
3
Select Done.
83
Chapter 11
Using Caller ID
Caller ID Screens
When you receive a call, you will see a Caller ID popup screen.
Select OK to dismiss the message. If you do nothing, it will disappear after 20 seconds.
If you are using a menu when a call comes in, a different Caller ID screen appears.
Using Caller ID History
Your receiver also stores a history of the incoming calls. Use the following steps to view
and delete numbers from your Caller ID History.
Delete
Clear List
Done
84
1
Press MENU and select System Setup and then Caller ID History.
2
Scroll through the list that displays.
3
Select Delete to delete selected histories or Clear List to delete all histories.
4
Select Done.
Customizing Receiver
Customizing the Guide and Channel Lists
CUSTOMIZING THE GUIDE AND CHANNEL LISTS
You can set up the on-screen Program Guide to list channels from higher to lower, with the
highest channel number at the top of the screen, or from lower to higher with the highest
channel number at the bottom of the screen. The default setting is to list channels from
higher to lower.
Guide Format
5
1
Press MENU and select Preferences, and then select Guide Format.
2
Select Higher to Lower or Lower to Higher for the Channel Order.
3
Select Done.
Changing the Guide Display
The receiver comes set to display the Program Guide with video in the upper right corner.
However, you can change the way the Program Guide displays.
Guide Format
1
Press MENU and
select Preferences,
then Guide Format
1
Press MENU and select Preferences and then select Guide Display.
2
Select one of the following Guide Display Options:
•
Small. This is the default option. The Program Guide displays video in the upper right
corner and 7 rows of channels per page.
•
Medium. Choose this option if you’d like larger text on your Program Guide. The
Program Guide displays video in the upper right corner and five rows of channels per
page.
85
Chapter 11
Customizing the Guide and Channel Lists
•
3
Large. Choose this option if you’d like to see video in the upper right corner and four
rows of channels per page on the Program Guide.
Select Done.
Channel Display Preferences
The Guide Format option on the Local Channels menu allows you to customize how your
local satellite channels and your DishHD channels display in the Program Guide and other
channel lists.
Select either
HD Only
or HD & SD
Guide Format
1
Press MENU and
select System Setup,
then Guide Format
1
Press MENU, select System Setup, and then Guide Format.
2
Choose a preference for how local channels display in the Program Guide and other
channel lists under Local Sat Channels:
Note: Changing the channel display preference may cause timers on those channels to be
lost. Review your timers list after making any changes (refer to Using the Timers List on
page 55).
3
86
•
HD Only—display only HD versions of the local channel below 100 at the local
station’s channel number. If an HD local channel is not available, the SD channel is
listed.
•
HD and SD (default)—display both HD and SD local channels at the local station’s
channel number.
Select Done.
Customizing Receiver
Changing Languages
CHANGING LANGUAGES
You may be able to change the language of some programs. An alternate language may
not be available for all programs. Some programs, such as movies, indicate at the
beginning whether an alternate language or descriptive audio is available. An alternate
language applies only to the audio part of a program and does not change the language
used in the menus displayed by the receiver. Descriptive audio—not included on all
channels and programs—is a feature for the visually impaired that describes what is
happening during a program.
1
Press MENU on your DISH remote control, select Preferences, and then select Alternate
Audio.
2
Select the preferred language.
3
Select Done.
87
Chapter 11
Using Closed Captioning
USING CLOSED CAPTIONING
The receiver has many options for Closed Captioning (CC), which allow you to change the
feature to suit your needs. Also, you can display captions when you play back programs
recorded using the receiver’s DVR (Digital Video Recorder), even if you didn't have closed
captioning turned on when the program was recorded.
Note: Not all programming contains closed captioning information.
To enable or disable closed captions and adjust how they are displayed, use the following
steps:
1
2
3
Caption On/Off
Turn Caption
On/Off
Press MENU and
select Preferences,
then Closed Captions
88
Select from
the list of options
1
Press MENU. Select Preferences, then select Closed Captions.
2
Select Caption On/Off.
3
Select CC is On (to turn captions on) or CC is Off (to turn captions off), then select Done.
4
Choose the display options that match your preferences, then select Done.
•
Caption Font/Size—select a comfortable font and size.
•
Caption Colors—sets the background, letter, and edge colors. Choose the color
combinations that makes the captioning easy to see.
•
Caption Edge Style—sets the edge style of the CC available text.
•
Captioning Service—selects the service you want to use.
•
Caption Opacity—choose from Provider, Transparent (see-through), Translucent
(semi-see-through), Solid, and Flashing.
•
Reset CC Defaults—reset all closed captions settings to the default setting.
Customizing Receiver
Setting Up Audio Output
SETTING UP AUDIO OUTPUT
This receiver uses HDMI or an optical port for outputting digital audio. The HDMI or optical
output can provide two audio data types—Dolby® Digital and Linear PCM (only Dolby
Digital can provide full 5.1-channel sound). Dolby Digital gives you the capability to enjoy
programs in surround sound. An external decoder is required to enjoy this feature. Refer
to your decoder user’s guide.
Note: Not all programs contain a Dolby Digital sound track.
2
MENU
3-4
1
5
Decoder
Connect receiver to an
external decoder
System Setup
6
Audio Output
6
Press MENU and
select System Setup,
then Audio Output
Done
Select Done
Select from
the options
1
Connect an external Dolby Digital decoder to the receiver’s back panel Digital Audio Output using an HDMI or optical cable (available at consumer electronics stores).
2
Press MENU, select System Setup, and then select Audio Output (MENU-6-6) to open the
Audio Output screen.
3
Select one of the following digital audio output options under Decoder:
•
Dolby Digital/PCM—select this option only if the stereo system or amplifier can
decode both Dolby Digital and Linear PCM signals.
•
PCM Only—select this option only if the stereo system or amplifier cannot decode
Dolby Digital signals.
The audio output is also dependent on what is present in the program you are watching.
The table below shows what type of output you will hear:
Signal Present in Program
Optical Output Setting
Dolby Digital
PCM
Both
Dolby Digital/PCM
Dolby Digital
PCM
Dolby Digital
PCM Only
PCM (downmix)
PCM
PCM
Note: When both audio signals are present in the program, the receiver defaults to Dolby
Digital output unless you have selected PCM Only. If you have selected Dolby Digital Only
but there is only PCM audio in the program, you will hear nothing. This also applies to the
analog audio outputs.
89
Chapter 11
Resetting to Factory Defaults
4
•
Line Mode. When you use this setting, in comparison to RF Mode, the dynamic range
is wider, which makes the music and loud noises louder, but voices quieter. This
setting is good if you don’t mind turning the volume up louder to hear the speaking
portions of programs.
•
RF Mode. When you use this setting, in comparison with Line Mode, the dynamic
range is narrower, which makes music and loud noises quieter, but voices louder. This
setting is good if you need to keep the volume lower.
If Volume Leveling is desired, select Enable to turn on Volume Leveling. Volume leveling
keeps the volume levels consistent between programs and commercials, preventing
drastic volume changes while watching television.
Note: When volume leveling is enabled, only the digitial PCM and RCA analog line outputs
are affected.
5
Select Done.
RESETTING TO FACTORY DEFAULTS
You can reset the receiver to discard any changes you have made to the receiver, except
for remote control address setting and locks. Resetting the receiver to factory default
settings also discards all Favorite Lists except the All Chan, All Sub, and All HD lists.
If you have set any locks on the receiver, and the receiver is locked, these locks will be
kept. If the receiver is unlocked, any such locks will be lost. You cannot reset the receiver
to default settings to discard a password you have forgotten. No one but a Customer
Service Representative can reset the receiver to bypass a receiver lock.
1
2
System Setup
6
Factory Defaults
4
Press Menu, then System Setup
and Factory Defaults
90
Select Yes.
STB returns to
Factory Defaults.
1
Press MENU, select System Setup, and then Factory Defaults. The receiver displays a
Warning message to confirm that you want to reset the receiver’s preferences.
2
Select Yes.
Customizing Receiver
Scheduling Receiver Updates
SCHEDULING RECEIVER UPDATES
The receiver comes scheduled to update the Program Guide at 3:00 am every day. This
section describes how to change the Updates settings.
Note: This feature does not interfere with scheduled timers.
1
2
MENU
3
Time Set
AM/PM
03:00
AM
Select
time
Preferences
8
Updates
4
4
Done
Select
AM or
PM
Select Done
Press MENU and
select Preferences,
then Updates
1
Press MENU, select Preferences, and then select Updates.
2
Select the time that you would like the updated software to be downloaded to your
receiver.
3
Select AM or PM.
4
Select Done.
INACTIVITY STANDBY
If your receiver is on for a preset period of time without any activity (for example, no
channel changes), the Inactivity Standby feature turns off the receiver so that you’ll always
have the latest Program Guide and DISH On Demand programs. Enabling this feature is
recommended, as it also helps improve the reliability of your receiver. To change the
settings for this feature, use the following steps:
1-2
3
4
Done
Preferences
8
Updates
4
Select Inactivity
Duration
Select Done
Press MENU and select
Preferences, then
Updates
1
Press MENU on the remote control.
2
Select Preferences, and then Updates.
91
Chapter 11
Tips
3
Use the UP and DOWN ARROW buttons to select the amount of time the receiver waits
before turning off.
4
Select Done.
Note: Select Defaults to reset the changes you’ve made to this feature.
TIPS
•
To take full advantage of Dolby Digital 5.1 surround sound, you need an optical cable
and a stereo that supports this feature.
•
To use the Caller ID feature on this receiver, be sure to have the receiver connected to
an active phone line and subscribe to Caller ID service from your phone company.
QUESTIONS
92
•
How can I see who has called me in the past? Open your Caller ID History by pressing
MENU, select System Setup and then Caller ID History.
•
Why is my audio in another language? You may have selected an alternate language.
See the instructions on page 87 to change your preferred language.
•
How can I change the channel order in the Program Guide? You can switch from
lowest to highest or highest to lowest by following the instructions on page 85.
Connections
Connecting Your Satellite Receiver
What you’ll find in this chapter:
• CONNECTING YOUR DISH SYSTEM
• CONNECTING AN OVER-THE-AIR ANTENNA
• SCANNING FOR OVER-THE-AIR CHANNELS
• USING TROUBLESHOOTING TOOLS
93
Chapter 12
Connecting Your Dish System
CONNECTING YOUR DISH SYSTEM
1-2
4
3
SATELLITE IN
5
6
7
8
SATELLITE IN
Label
cables
Connect receiver
to dish system.
Connect TV
to receiver.
Continue with the
Installation Wizard, Wait as the system
programming the downloads software
remote to the receiver. and updates the
receiver. When
Select Continue
finished the
when finished.
receiver restarts.
Select the
best resolution
for your TV.
Select Test
and Save.
Select Guide to
view the Program
Wait while the
Guide, Live TV to
receiver connects view Live TV, or
to Ethernet
Preferences to
or Phone.
establish your
preferences.
1
Connect two RG-6 coaxial cables between the SATELLITE IN 1 and SATELLITE IN 2 ports on
the receiver’s back panel and two available ports on either the switch, LNBF, or DISH Pro
Plus Separator in your existing system.
Note: If you are installing your receiver in a system with DISH Pro or DISH Pro Plus
LNBFs (and/or switches), you can have as much as 200 feet of cable between the LNBF
and the receiver. You must use RG-6 coaxial cables rated up to at least 2150 MHz.
2
Peel off the blue stickers (found at the beginning of this User’s Guide) and affix them to the
cables near where they connect to the SATELLITE IN 1 and SATELLITE IN 2 connections on
the back of the receiver.
3
Connect the TV to the receiver, using one of the following connections:
•
HDMI
•
YPBPR
•
AUDIO/VIDEO connection (RCA-type composite connection)
•
S-VIDEO and LEFT/RIGHT AUDIO
•
TV SET OUT
Note: Make sure the TV is set to the correct input for the RCA-type connection. Refer to
your TV user’s guide for assistance.
4
Connect either a phone line or Ethernet to the receiver so you can order Pay-Per-View
programs, use all of the DishHOME Interactive features, or use other services from DISH
with your remote control.
Note: You may be able to use a wireless modem jack. However, this product may not
support all the features of this receiver, such as Caller ID. If you have a Digital Subscriber
Line (DSL), you may have to install a DSL filter between the receiver’s back panel PHONE
JACK and the telephone wall jack to successfully connect with DISH. You can obtain a filter
from your DSL provider.
For additional information on doing this, see Connecting the Phone Line on page 95.
94
Connections
Connecting Your Dish System
5
Power on the receiver and the TV. Program Remote to Receiver (Step 1 of 5), which is the
first step of the Installation Wizard appears.
6
Using the remote, press SAT and then press RECORD. A number appears in the box on
the screen. Select Continue. Download Software (Step 2 of 5) of the Installation Wizard
appears.
7
After the software is downloaded and the receiver has been updated, the receiver restarts.
This process can take 10-25 minutes.
Note: Step 2 of 5 eventually fails to proceed if your antenna is not pointed correctly. You
may see a pop-up instructing you to make sure that all cables leading to the receiver are
connected securely and correctly. If this is the case, make sure your antenna is pointed
correctly before selecting Continue on this screen.
8
On the Set Video Resolution screen, select the best resolution supported by your TV.
Select Test. On the confirmation screen, select Save.
9
On the Connect Receiver to Ethernet or Phone screen, the system is establishing
connection to broadband or phone. Wait while this process occurs.
10 On the Receiver Setup Complete scren, select Guide to display the Program Guide,
select Live TV to view live programming, or select Preferences to customize the guide
Connecting the Phone Line
Phone Connection Recommendations for VoIP
If you have a VoIP (Voice over Internet Protocol) phone service, the following tips may
help improve the chances of the satellite receiver successfully connecting to DISH using
the VoIP phone service.
Note: Not all VoIP services will function with the receiver.
•
Manually set the VoIP equipment for the proper bandwidth, to the highest bandwidth
possible, using the VoIP equipment’s instructions.
•
Use other settings or connections suitable for modems or fax machines.
•
For Vonage VoIP customers only, using the phone prefix *99 in the phone systems
setup can allow the VoIP connection to switch to its highest possible bandwidth.
95
Chapter 12
Connecting an Over-the-Air Antenna
CONNECTING AN OVER-THE-AIR ANTENNA
If you want to receive digital channels from an over-the-air antenna (optional) in addition to
your satellite receiver programming, connect the over-the-air antenna to your satellite
receiver.
•
The OVER-THE-AIR ANTENNA IN connection on your receiver's back panel can be used
to receive and view programming on the TV from an over-the-air antenna.
•
Connect a VHF/UHF over-the-air antenna to the OVER-THE-AIR ANTENNA IN port. Peel
off the black sticker (found at the beginning of this User’s Guide) and affix it to the
cable close to where it connects to the back of the receiver.
•
You can add local over-the-air channels to the receiver’s channels lists and assign
them network affiliations. Once you have done this, you can access the channels via
the Program Guide or the Browse Banner similar to accessing satellite channels.
Note: The type of antenna required depends on the channels used by, and the locations
of, the local broadcasters for your area. Visit antennaweb.org or contact a professional
installer to help you select a suitable antenna.
Make sure to follow the antenna installation instructions correctly. Ground an
outdoor antenna per the National Electrical Code (NEC) and any state and local
electrical codes.
The audio/video quality on local over-the-air channels depends on the distance
and terrain between the broadcast station and your home, and on the
placement and quality of the over-the-air TV antenna you use. If you have
questions about over-the-air channels, contact the broadcaster, not DISH.
SCANNING FOR OVER-THE-AIR CHANNELS
After your over-the-air antenna is adjusted for the best reception and connected to the
receiver’s OVER-THE-AIR ANTENNA IN connection, use these instructions to scan over-theair channels into the satellite receiver’s menus.
2
3
MENU
Scan Locals
1
Select Scan
Locals
System Setup
6
Local Channels
8
Check off-air Press MENU and
antenna select System Setup,
installation then Local Channels
96
4-5
OK
Allow
receiver to
scan for locals
then select OK
7
8-9
MENU
6
A B C D E F G H
Done
J
U V W X Y Z
'
-
.
&
1
7
8
9
0
2
Back
Select
Done
to store
channels
I
K L M N O P Q R S T
System Setup
6
Local Channels
8
Go back to
the Local
Channels screen
3
4
5
6
Space
Enter local
channel names
Done
then select
Done
Connections
Scanning for Over-the-Air Channels
1
Verify your over-the-air antenna is installed and connected to the receiver’s OVER-THE-AIR
ANTENNA IN.
2
On the remote control, press MENU, select System Setup, and then Local Channels. If
this is the first time you have opened the Local Channels screen, it has no channels listed.
3
Scan for channels by selecting Scan Locals.
4
The scan takes a few minutes to complete. When it finishes, the results show how many
channels the scan found. If you want to stop the scan before it is completed, select
Cancel.
5
Select OK to go back to the Local Channels screen and view the list of channels.
Note: The ARROW at the bottom left means that there are more channels, off the bottom
of the screen, which you can get to with the ARROW keys if you wish to edit their names
or remove them.
6
If you want to name the over-the-air channels, continue on. If you do not want to name
your over-the-air channels, select Done. You are then taken out of the menus back to
watching TV.
7
Select a channel and then select Edit Name to modify the way the channel name displays
on your screen. You can rename only one channel at a time.
8
Use the on-screen keyboard on the screen to select the letters of your channel name.
9
When you are finished making changes, select Done. The receiver displays a message
while it is saving the changes. Be sure not to interrupt the receiver while it is saving the
changes.
Peaking Your Over-the-Air Antenna
8
1
Press MENU, select System Setup, and then Local Channels.
2
Highlight a channel in the local channels list to display its signal strength. Make sure you
see a green signal strength bar and a Locked indication on the signal meter.
3
Adjust the orientation of your antenna to maximize the signal strength. If you cannot get a
Locked indication, you may need to upgrade your antenna or relocate it.
97
Chapter 12
Scanning for Over-the-Air Channels
About Over-the-Air TV Broadcasts
Over-the-air TV signals are broadcast by local TV stations from a transmitter tower. You
receive over-the-air TV signals using an indoor or outdoor antenna instead of the satellite
reflector. You are likely familiar with analog over-the-air TV signals—these are the signals
that have been used to broadcast TV for many years. New digital over-the-air TV signals
are broadcast and received in the same way. Digital over-the-air TV broadcasting uses
advanced technology like that of the DISH to deliver superb picture quality and CD quality
sound. However, digital over-the-air signal reception (like analog over-the-air signal
reception) depends on several things.
•
The distance between the broadcast station and your home (the farther away the
station, the weaker the signal)
•
The broadcast station's power (the lower the power, the weaker the signal)
•
Obstacles between the station and your home, such as mountains, buildings, trees, or
other objects (these may block or reflect the signal before it reaches you)
•
Multiple broadcast stations (to receive good signals from several stations, you may
need to compromise in how you aim the antenna or you may need more than one
antenna)
The effects of poor digital reception are different from the effects of poor analog reception:
•
Poor analog reception usually causes the TV picture to be “snowy” or to include
“ghosts”, that is, multiple images caused by receiving reflected signals along with the
direct signal from a station. Poor digital reception may cause the TV picture to be
“pixelized”, that is, broken up into small squares of various colors, or to be lost
completely (the TV screen is all black or all blue).
•
Digital broadcasts often provide either a very good picture or no picture at all.
•
You may be able to receive a poor analog signal but not be able to receive a digital
signal at all.
To get the best possible digital signal reception, make sure you use the best over-the-air
antenna for where you live:
•
You can receive a limited number of channels using a rabbit ears type antenna on top
of the TV set, or a much larger number via a large UHF/VHF indoor/outdoor antenna.
•
The higher the quality of the antenna you use, the greater its range and the better its
reception will be.
Digital OTA Broadcasts are Still Developing
98
•
Broadcasters may still be testing digital signals and their strength and may stop
broadcasting without notice, vary power output, or turn it off.
•
Some broadcasters do not yet have permanent transmitter tower.
Connections
Scanning for Over-the-Air Channels
•
Broadcasters may choose to multicast, which allows them to provide multiple
standard-definition channels in the same bandwidth used to provide a high-definition
channel.
•
These factors are beyond DISH's control.
Additional Installation Considerations
•
Follow local and National Electric Code requirements for grounding the antenna.
•
RG-6 coaxial cable is preferred for the OVER THE AIR ANTENNA IN connection. If you
are diplexing the OVER THE AIR ANTENNA IN and SATELLITE IN cables, RG-6 coaxial
cable must be used.
•
You cannot use a diplexer to combine the OVER THE AIR ANTENNA IN and SATELLITE IN
cables if using an amplified antenna.
If you have questions about over-the-air channels, contact the broadcasters, not DISH.
DISH does not broadcast over-the-air signals and so cannot do anything to change overthe-air signal quality. However, the receiver's digital channel setup menus provide a signal
strength bar that can help you in aiming the over-the-air TV antenna for the strongest
possible signal.
Additional Resources for Over-the-Air TV Broadcasts
For information on channel numbers, you can visit the National Association of
Broadcasters (NAB) web page at nab.org.
Note: The receiver displays “Transmit Channel” which is referred to on the NAB web page
as RF Channel. These terms mean the same thing.
Another good source of local channel information is available from the Consumer
Electronics Association (CEA) web page at antennaweb.org. This website provides
recommendations for antenna types and pointing directions.
99
Chapter 12
Using Troubleshooting Tools
USING TROUBLESHOOTING TOOLS
Your receiver has troubleshooting tools that you can use to solve many common
problems.
Resetting Your Receiver
2
3
1
Acquiring satellite signal
message displays. May
download Program Guide.
Press front panel
POWER button
and hold until
front panel light
blinks and release
Returns to Programming
1
Press and hold the receiver POWER button until the front panel lights blink.
2
Release the POWER button.
The receiver takes several minutes to reset, displays the message “Acquiring Satellite
Signal,” may download the Program Guide, and then returns you to programming.
Diagnostics
The Diagnostics screen allows you to check the phone and broadband Internet connection
of your receiver.
1
2
MENU
3
The Diagnostics screen appears
System Setup
6
Diagnostics
3
Select
Done
Press MENU, select System Setup
and then select Diagnostics
1
2
100
Press MENU, select System Setup, then select Diagnostics.
•
Connection—Tests for a valid phone connection or broadband Internet connection.
•
Call Out—Updates the receiver’s smart card records. If No Call Out Pending is
displayed, the receiver does not need to have its smart card records updated.
Select Done to exit the Diagnostics screen.
Connections
Using Troubleshooting Tools
Point Dish and Check Switch
The Point Dish and Check Switch screens are helpful to the Customer Service
Representatives. You may be asked to display these screens when you call DISH. Even
though there are items that can be changed, only change them when specifically directed
by a Customer Service Representative.
Warning: Running the Check Switch test while the receiver has low or no signal
results in incorrect receiver settings and causes you to lose channels. Do not run
a Check Switch test unless directed by a Customer Service Representative or
other DISH instructions.
1
3
2
MENU
System Setup
Installation
4
1
6
Point Dish
Select
System Setup
Select
Installation
1
Select
Point Dish
Press MENU
1
Press MENU.
2
Select System Setup.
3
Select Installation.
4
Select Point Dish. This screen shows you information to help maximize your satellite
signal. The bar at the bottom of the screen tells you the signal strength. Green is a good
signal, yellow is a marginal signal, and red indicates the signal is not acceptable or is from
the wrong satellite.
101
Chapter 12
Using Troubleshooting Tools
Notes
102
Appendix
What you’ll find in this chapter:
• LIMITED WARRANTY
• RESIDENTIAL CUSTOMER AGREEMENT
• FCC COMPLIANCE
117
Appendix
Limited Warranty
LIMITED WARRANTY
This Limited Warranty is a legal document. Keep it in a safe place. Remember to retain your Bill of Sale for
warranty service! Any items returned without a copy of the Proof of Purchase will be considered out of
warranty.
What the Warranty Covers
This warranty extends only to the original user of the equipment and is limited to the purchase price of each part.
EchoStar Corporation and its affiliated companies (“EchoStar”) warrant this system against defects in materials or
workmanship as follows:
•
Labor: For a period of one (1) year from the original date of purchase, if EchoStar determines that the
equipment is defective subject to the limitations of this warranty, it will be replaced at no charge for labor.
EchoStar warrants any such work done against defects in materials or workmanship for the remaining
portion of the original warranty period.
•
Parts: For a period of one (1) year from the original date of purchase, EchoStar will supply, at no charge,
new or re-manufactured parts in exchange for parts determined to be defective subject to the limitations of
this warranty. EchoStar warrants any such replacement parts against defects in materials or workmanship
for the remaining part of the original warranty period. Note: “Parts” means items included in this package,
which may include the satellite dish assembly, receiver, LNBF, remote control, or dish mounting hardware.
It does not include other parts purchased separately.
What the Warranty Does Not Cover
•
This warranty does not cover installation of the system. If applicable, such installation will be warranted
under a separate installation agreement.
•
This warranty does not cover consumer instruction, physical setup or adjustment of any consumer
electronic devices, remote control batteries, signal reception problems, loss of use of the system, or
unused programming charges due to system malfunction.
•
This warranty does not cover cosmetic damage, damage due to lightning, electrical or telephone line
surges, battery leakage, fire, flood, or other acts of Nature, accident, misuse, abuse, repair or alteration by
other than authorized factory service, use of accessories not recommended by the receiver manufacturer,
negligence, commercial or institutional use, or improper or neglected maintenance.
•
This warranty does not cover equipment sold AS IS or WITH ALL FAULTS, shipping and handling,
removal or reinstallation, shipping damage if the equipment was not packed and shipped in the manner
prescribed, nor equipment purchased, serviced, or operated outside the continental United States of
America.
Legal Limitations
REPLACEMENT AS PROVIDED UNDER THIS WARRANTY IS YOUR EXCLUSIVE REMEDY. ECHOSTAR
SHALL NOT BE HELD LIABLE FOR ANY INCIDENTAL OR CONSEQUENTIAL DAMAGES FOR BREACH OF
ANY EXPRESSED OR IMPLIED WARRANTY ON THIS SYSTEM, NOR FOR ANY INCIDENTAL OR
CONSEQUENTIAL DAMAGES RESULTING FROM THE USE OF, OR INABILITY TO USE, THIS SYSTEM.
UNDER NO CIRCUMSTANCES SHALL ECHOSTAR'S LIABILITY, IF ANY, EXCEED THE PURCHASE PRICE
PAID FOR THIS SYSTEM. EXCEPT TO THE EXTENT PROHIBITED BY APPLICABLE LAW, ANY IMPLIED
WARRANTY OF MERCHANTABILITY OR FITNESS FOR A PARTICULAR PURPOSE ON THIS SYSTEM IS
LIMITED IN DURATION TO THE PERIOD OF THIS WARRANTY. ECHOSTAR RESERVES THE RIGHT TO
REFUSE TO HONOR THIS WARRANTY IF ECHOSTAR DETERMINES ANY OF THE ABOVE EXCEPTIONS TO
HAVE CAUSED THIS SYSTEM NOT TO HAVE PERFORMED PROPERLY. THIS WARRANTY SHALL BE VOID IF
ANY FACTORY-APPLIED IDENTIFICATION MARK, INCLUDING BUT NOT LIMITED TO SERIAL OR
CONDITIONAL ACCESS NUMBERS, HAS BEEN ALTERED OR REMOVED. THIS WARRANTY SHALL ALSO BE
VOID IF THE RECEIVER HAS BEEN OPENED BY AN UNAUTHORIZED PERSON.
If You Need Assistance
Call the Customer Service Center at 1-800-333-DISH (3474). Have the date of purchase and either your
customer account number, the receiver conditional access number, or the receiver model number ready.
Display the System Info menu to find these numbers.
118
Appendix
Residential Customer Agreement
Accessory Warranty
An accessory is any DISH branded equipment, displaying the DISH logo, excluding the receiver, cables and
hookups, and non-mechanical components. A one-year warranty becomes effective upon the activation of the DISH
system or date of purchase, if bought separately. If an accessory has an expired warranty, no exchange will be
issued. You may purchase replacement accessories from DISH or your local retailer.
RESIDENTIAL CUSTOMER AGREEMENT
Thank you for choosing DISH Network®.
To view this Residential Customer Agreement in Spanish, please visit dish.com or call us at
800-333-DISH (3474) and we will send you a copy. Para ver este acuerdo en español por favor visite dish.com o
llame all 1-800-333-DISH (3474) y le enviaremos una copia.
DISH Network is happy to answer any questions you may have (including questions regarding billing, installation,
equipment and service) and to provide you with technical and other customer support. You may contact us 24 hours
a day, any day of the year:
Phone:
Email:
Mail:
Website:
800-333-DISH (3474)
[email protected]
DISH NETWORK CUSTOMER SERVICE CENTER
P.O. BOX 9033
LITTLETON, CO 80160
dish.com
For purposes of this Residential Customer Agreement (the “Agreement”) and any customer agreement(s)
applicable to the package plan(s) under which you are receiving Services and/or equipment from DISH Network
(each, a “Package Plan Agreement”): (i) “you” and “your” refer to you, the DISH Network subscriber; and (ii) "DISH
Network", “DISH”, "we," "us" or “our” refer to DISH Network L.L.C. (formerly known as EchoStar Satellite L.L.C.) or,
where applicable under the particular circumstances, third party billing agents.
“DISH Network” is a registered trademark of DISH Network L.L.C.
THIS AGREEMENT, TOGETHER WITH ANY APPLICABLE PACKAGE PLAN AGREEMENT, SETS FORTH THE
TERMS AND CONDITIONS UNDER WHICH DISH NETWORK WILL PROVIDE ITS SERVICES AND EQUIPMENT
TO YOU. THIS AGREEMENT IS EFFECTIVE UNTIL WE CHANGE OR REPLACE IT. IF YOU ARE A NEW DISH
NETWORK CUSTOMER, YOUR ACTIVATION OF A DISH NETWORK ACCOUNT AND RECEIPT OF DISH
NETWORK SERVICES OR EQUIPMENT SHALL CONSTITUTE YOUR ACCEPTANCE OF THIS AGREEMENT. IF
YOU ARE AN EXISTING DISH NETWORK CUSTOMER, WE WILL NOTIFY YOU OF ANY CHANGES TO, OR
REPLACEMENT OF, THIS AGREEMENT, AND YOUR CONTINUED RECEIPT OF DISH NETWORK SERVICES
OR EQUIPMENT FOLLOWING RECEIPT OF SUCH NOTICE SHALL CONSTITUTE YOUR ACCEPTANCE OF
SUCH CHANGED OR REPLACED AGREEMENT. IF YOU ARE AN EXISTING CUSTOMER AND DO NOT WISH
TO ACCEPT ANY CHANGED OR REPLACED AGREEMENT, YOU MUST NOTIFY US IMMEDIATELY AND WE
WILL, AT OUR OPTION, EITHER CANCEL YOUR SERVICE OR ALLOW YOU TO CONTINUE TO RECEIVE
YOUR SERVICES UNDER THE PREVIOUS VERSION OF THIS AGREEMENT.
1.
THE DISH NETWORK SERVICE
A. Services Defined. "Services" shall mean all video, audio, data, interactive and other programming services and
all other services that are currently available from DISH Network (whether subscription, pay-per-view or otherwise)
and that we may provide to customers in the future.
B. Minimum Programming Levels. If your applicable Package Plan Agreement specifies required minimum
programming, you must subscribe to such programming. Otherwise, you must subscribe to one or more of the
following programming packages: Welcome Pack, Latino Welcome, DISH America or a higher version of such
packages; a qualifying International package plus one of the following: International Basic Package, Chinese Basic
Package, or a previously listed package. We may change such minimum programming requirements at any time.
For select customers based on when activation of service occurred, an International Service Access Fee (as
detailed in Exhibit 1) may apply. If you subscribe to Racetrack TV, but do not subscribe to applicable minimum
programming a Service Access Fee (as detailed in Exhibit 1) may appply.
C. Programming Availability. Certain Services, including without limitation, some subscription Services, sporting
events and broadcast network Services, may be blacked out in your viewing area; if you circumvent or attempt to
circumvent any of these blackouts, you may be subject to legal action. If the location at which you are receiving
Services is a wagering location, you are not eligible to receive certain channels, including without limitation,
Racetrack TV. You must be at least 18 years of age, or the applicable age of majority where you reside, to order or
receive adult-oriented programming services.
D. Changing Your Programming Selection. Unless otherwise specified in this Agreement or any applicable Package
Plan Agreement(s), you may change your programming selection at any time by notifying us. A Programming
Change Fee (as detailed in Exhibit 1) may apply to such programming changes, unless you are receiving Services
119
Appendix
Residential Customer Agreement
and/or Equipment (as defined in Section 4(A)) pursuant to a Package Plan Agreement that requires you to pay in full
for all Services and/or Equipment prior to receiving such Services and/or Equipment (a “Pre-Pay Promotion”).
E. Multi-Month Subscriptions. For multi-month subscriptions, you may downgrade your Services only when you
renew. You may not downgrade your Services during the term of a multi-month subscription.
F. Ordering Pay-Per-View. You may use your remote control and on-screen program guide to order pay-per-view
Services through your television if your DISH Network receiver is connected to a land-based telephone line and/or a
broadband home network. You may also order DISH Network pay-per-view Services by calling 877-DISH-PPV
(3474-778) and using our automated system, or by visiting dish.com/orderppv, or by speaking with a live operator at
one of our customer service centers (an Agent Assist Fee will apply as detailed in Exhibit 1). Pre-Pay Promotion
customers may only order pay-per-view Services by calling 877-DISH-PPV (3474-778).
G. Accessing the Internet Through Your Receiver. Some of our receivers can be used to access websites and
information on the Internet. DISH Network does not have any control over such websites and information, and we
do not make any representations, warranties or guarantees as to the availability or content of such websites and
information, including without limitation: (i) the accuracy, availability, sequence, completeness, timeliness, copyright
compliance, legality, content, validity, or quality of any such websites or information; or (ii) whether using the
software contained in such receivers may result in accessing unintended, inappropriate or objectionable content.
We may change, limit, suspend, disable and/or remove your ability to access the Internet using your receiver at any
time without notice. We may also limit or restrict the websites and information that you may access on the Internet
using your receiver at any time without notice.
H. Private Home Viewing Only. DISH Network provides Services to you solely for viewing, use and enjoyment in
your private home. You agree that no Services provided to you will be viewed in areas open to the public,
commercial establishments or other residential locations. Services may not be rebroadcast or performed, and
admission may not be charged for listening to or viewing any Services. If your Services are viewed in an area open
to the public, a commerical establishment or another residential location, we may disconnect your Services and, in
addition to all other applicable fees, you must pay us the difference between the price actually paid for Services and
the full applicable rate for such Services, regardless of whether we have the right to distribute such Services in such
other location.
I. Changes in Services Offered. We may add, delete, rearrange and/or change any and all programming,
programming packages and other Services that we offer, as well as the prices and fees related to such
programming, programming packages and Services, at any time, including without limitation, during any term
commitment period to which you have agreed. If a change affects you, we will notify you of such change and its
effective date. In the event that we delete, rearrange or change any programming, programming packages or other
Services, we have no obligation to replace or supplement such programming, programming packages or other
Services. You are not entitled to any refund because of a deletion, rearrangement or change of any programming,
programming packages or other Services.
J. Promotional Offers and Items. If a third party, such as an independent DISH Network retailer, integrator or private
cable operator, offered you a promotional offer or item in connection with your subscription to the Services, such
third party is wholly responsible for fulfilling such promotional offer or providing such promotional item, and DISH
Network is not in any way responsible for such fulfillment unless the promotional offer or item was offered with DISH
Network’s prior authorization, approval, permission or knowledge.
2.
BILLING POLICIES; PAYMENTS FOR SERVICES; FEES
A. Payments. You agree to pay all amounts billed for Services, as well as all taxes, fees and other charges, if any,
that are now or may in the future be assessed in connection with any Services you receive from us, and any other
charges due and owing to us. State and local taxes or reimbursement charges for gross earnings taxes imposed on
satellite providers for transmission of programming in some states may apply. Unless you prepay for a multi-month
subscription to Services or prepay for all Services as required by your participation in a Pre-Pay Promotion, we will
bill you monthly in advance for most Services and in arrears for other Services such as pay-per-view ordered by you
or anyone who uses your Equipment, whether with or without your permission, until you cancel your Services. Multimonth subscription customers and Pre-Pay Promotion customers will be billed based on your pre-pay period (multimonth subscriptions) or monthly (Pre-Pay Promotion customers), and must make all payments in advance of the
due date on your bill in order to continue receiving your Services; you must also pre-pay for all other Services, such
as pay-per-view, ordered by you or anyone who uses your Equipment, whether with or without your permission.
B. Billing Policies. Your bills will show the total amount due, the payment due date, payments, credits, purchases
and other charges to your account. You may submit your payment by mail, on our website, through our AutoPay
program, by calling a DISH Network customer service representative, or by any other means that we designate.
Partial payments will be applied first to the oldest outstanding bill. You must make your payment regardless of
whether you receive a bill. We do not assume the risk of undelivered mail. If you send checks or money orders
marked with a designation such as “payment in full,” we can accept them without waiving any of our rights, including
without limitation, our rights to collect any other amounts owed by you, notwithstanding your characterization of
such payment. DISH Network does not extend credit to our customers, and the Late Payment Fee (as detailed in
Exhibit 1) is not interest, a credit service charge or a finance charge. Certain fees and charges may apply in certain
circumstances to your payment for the Services, including without limitation, those expressly set forth in Exhibit 1
attached hereto and incorporated herein by reference.
C. AutoPay and Paperless Billing. If you accept a promotion that requires you to sign up for and maintain AutoPay
and/or Paperless Billing and later discontinue AutoPay and/or Paperless Billing, then you may no longer be eligible
for that promotion and you may lose the promotional price.
120
Appendix
Residential Customer Agreement
D. Alterations to Payment Terms. If you paid for a monthly subscription (other than a Pre-Pay Promotion) and your
account is past due on more than one occasion, we may require that you pay for all Services and Equipment before
you receive them and you will be deemed to be receiving your Service under a Pre-Pay Promotion, at which point,
all terms and conditions of such Pre-Pay Promotion will apply to you. If you paid for a multi-month subscription to
any Services and your account is past due for any amount, we may convert your multi-month subscription to a
monthly subscription, and we will first apply the amount you paid for your multi-month subscription to any past due
amounts and then to any obligations you incur in the future.
E. Restarting your Services. If you do not pay your bill in full by its due date, or you at any time otherwise fail,
neglect or refuse to make timely payment for your Services, we may disconnect your Services, and in such event
we will be wholly relieved from any and all of our duties and obligations under this Agreement. If your Services are
disconnected for non-payment or any other reason, DISH Network may require that you pay, and you agree to pay,
before we reconnect your Services, all past due charges, a deposit equal to a minimum of one month of service
charges, and all outstanding balances accrued through the date of such disconnection. If your Services are
disconnected for non-payment or any other reason, you will no longer be eligible, even if you pay to restart your
Service, to receive any remaining credits or promotional pricing that you would have been eligible to receive had
your Services not been disconnected. Unless required by applicable law, deposits will not be held segregated from
other funds and will not earn or accrue interest. Promotional pricing is valid only at the time of installation.
F. Attorneys’ Fees/Collections. If we use an attorney or a collection agency to collect any money you owe us or to
assert any other right that we may have against you, including without limitation, any breach of any agreement you
may have with DISH Network or one of our affiliates, you agree to pay the reasonable costs of such collection or
other action. These costs may include, without limitation, the costs of a collection agency, reasonable attorneys’
fees and court costs. If you believe you have been billed in error or you would like to make any other requests for a
billing statement credit, you must contact our customer service center by telephone or in writing within twenty (20)
days after the date you receive the bill for which you are seeking correction. Failure to timely notify us of a dispute
will constitute your acceptance of the corresponding bill. You must pay undisputed portions of any billing statement
before the next billing statement is issued or you must pay a Late Payment Fee. All payments for Services must be
made directly by you to us, unless we authorize otherwise; for example, DISH Network shall have no obligation to
provide Services for which payment is made by you to a third party or payment is made by a third party on your
behalf.
G. Billing Agent Payments. Different or other payment and billing terms, conditions, options and fees may apply
when billing is provided through a third-party billing agent, including without limitation, a local telephone company.
H. Early Termination Fees. Depending on your specific Package Plan Agreement, you may incur fees for
disconnecting your service before the expiration of a commitment period or downgrading your programming below
any applicable minimum programming requirement during a commitment period (each an “Early Termination Fee”).
Please reference your Package Plan Agreement for details regarding any Early Termination Fee that may apply.
3.
CANCELLATION OF SERVICE
A. Continuation of Services. Your subscription to Services will automatically renew until you cancel your Services or
we otherwise disconnect your Services, in each case as provided herein or in any applicable Package Plan
Agreement.
B. Cancellation Policies. You may cancel your Services for any reason at any time by notifying us at the phone
number, e-mail address or mailing address set forth at the top of this Agreement. Please be aware that certain
Package Plan Agreements have an optional or mandatory term commitment period and if you cancel your Services
prior to the expiration of an applicable optional or mandatory term commitment period, certain early termination or
cancellation fees may apply.
C. Disconnection of Services. In addition to all other rights that DISH Network may have to disconnect your
Services, DISH Network may disconnect your Services if: (i) you fail to pay any bill in full when it is due; (ii) we
receive confirmation that you have received Services, or any part of the Services, without paying for them; (iii) you
otherwise violate the terms and conditions of this Agreement or any applicable Package Plan Agreement; (iv) you
transfer, encumber or relocate any leased Equipment (unless you relocate such Equipment as part of a residential
move into an area within which you can permissibly continue to receive such Services); (v) you assign or attempt to
assign any of your rights, duties or obligations under this Agreement or any applicable Package Plan Agreement;
(vi) you are receiving Services through a third-party billing agent and become ineligible to receive applicable
services provided by such third-party billing agent; or (vii) you commence any act or filing of bankruptcy or
bankruptcy proceedings are commenced against you.
D. No Credits. If your Services are cancelled or disconnected for any reason, you still must pay all outstanding
balances accrued, including without limitation, any applicable fees. Except in certain limited circumstances, charges
for Services, once charged to your account, are non-refundable, and no refunds or credits will be provided in
connection with the cancellation of Services. If you received a discounted price due to a promotion, and you cancel
prior to any applicable expiration of that promotion, you are not entitled to any refund or credit for the unused
portions of such discounted price. If you received a discounted price in exchange for your agreement to pay for your
Services on a multi-month basis, and you cancel your Services prior to the expiration of your multi-month
subscription, you are not entitled to any refund or credit for the unused portions of your multi-month subscription.
121
Appendix
Residential Customer Agreement
4. EQUIPMENT
A. Equipment. In order to receive Services you must purchase or lease certain reception equipment consisting
primarily of a DISH Network compatible satellite receiver(s) and applicable Smart Card(s), remote control(s),
satellite antenna(s), and sometimes low noise block converter(s) with integrated feed(s) (collectively, “Equipment”).
B. Additional Tuners and Receivers. We may choose to allow you to place additional receivers on your account. If
we allow you to do so, each additional receiver will be authorized to receive the same Services as your initial
receiver, subject to the limitations of your television equipment. All of your receivers must be located at the same
residence and continuously connected to the same land-based telephone line and/or broadband home network. If
you wish to receive Services at two different residential locations, you must open a separate account for each
location, unless otherwise specifically authorized by DISH Network. You may not directly or indirectly use a single
account for the purpose of authorizing Services for multiple DISH Network receivers that are not all located in the
same residential location and connected to the same land-based telephone line and/or broadband home network. If
we later determine that you did, we may disconnect your Services and, in addition to all other applicable fees, you
agree to pay us the difference between the amounts actually received by us and the full retail price for the Services
authorized for each DISH Network receiver on your account.
C. Smart Cards. Receiver(s) are equipped with a conditional access card (“Smart Card”) inserted into a slot or
otherwise installed in such receiver. Not all receivers with a Smart Card slot require a Smart Card for proper
authorization. Smart Cards remain the property of DISH Network at all times and must be returned to us upon our
request. Smart Cards are not transferable. Your Smart Card will only work in the DISH Network receiver to which it
was assigned by DISH Network. If you report to our customer service center that your Smart Card has been lost,
damaged, defective or stolen, we will replace it, unless there is evidence of unauthorized tampering or modification,
and a Smart Card Replacement Fee will apply. In addition, in order to minimize downtime for your Equipment, DISH
Network will, upon your request, deliver a replacement Smart Card to you via overnight delivery, in which case an
Overnight Delivery Fee will apply.
D. DVR. DISH Network’s digital video recorder (“DVR”) products allow you to record programming in digital format.
Total available recording time varies depending on your receiver and the nature of the programs being recorded.
DISH Network does not guarantee access to or recording of any particular programming, or that any such
programming will not be deleted from your DVR product. Most programming is the copyrighted material of the third
party that supplies it; is protected by copyright and other applicable laws; and may not be reproduced, published,
broadcast, rewritten, or redistributed without the written permission of the third party that supplied it (except as
permitted by the “fair use” provisions of the U.S. copyright laws).
E. Telephone/Broadband Connection. To optimize the operation of your Equipment, you must continuously connect
each DISH Network receiver on your account to the same land-based telephone line and/or a broadband home
network. Failure to connect each receiver to the same land-based telephone line and/or a broadband home network
may result in interruption or disconnection of Services. We may charge you a TV2 Receiver Connection Fee for
each dual tuner receiver that is not connected to the same land based telephone line and/or a broadband network
(as detailed in Exhibit 1).
F. Receiver Alterations. DISH Network may, through periodic downloads, alter the software, features and/or
functionality in your DISH Network receivers; provide data and content to DVR products; store and remove data and
content on the hard drives of DVR products; and send electronic counter-measures to your DISH Network
receivers. DISH Network will use commercially reasonable efforts to schedule these downloads to minimize
interference with or interruption to your Services, but shall have no liability to you for any interruptions in Services
arising out of or related to such downloads. DISH Network may from time to time cease supporting one or more
DISH Network receiver models.
G. Proprietary Components and Software. DISH Network receivers and Smart Cards contain components and
software that are proprietary to DISH Network and its licensors. You agree that you will not try to reverse-engineer,
decompile or disassemble, nor will you tamper with or modify, any software or hardware contained within any
receiver or Smart Card. Such actions are strictly prohibited and may result in the termination of this Agreement,
disconnection of your Services and/or legal action.
H. Software License. You are licensed to use the software provided in your DISH Network receiver(s), as updated
by DISH Network, its licensors and/or its suppliers from time to time, solely in executable code form, solely in
conjunction with lawful operation of the DISH Network receiver(s) that you purchased or leased, and solely for the
purposes permitted under this Agreement. You may not copy, modify or transfer any software provided in your DISH
Network receiver(s), or any copy of such software, in whole or in part. You may not reverse-engineer, disassemble,
decompile or translate such software, or otherwise attempt to derive its source code, except to the extent allowed
under any applicable laws. You may not rent, lease, load, resell for profit or distribute any software provided in your
DISH Network receiver(s), or any part thereof. Such software is licensed, not sold, to you for use only under the
terms and conditions of this license, and DISH Network, its licensors and its suppliers reserve all rights not
expressly granted to you. Except as stated above, this license does not grant to you any intellectual property rights
in the software provided in your DISH Network receiver(s). Any attempt to transfer any of the rights, duties or
obligations of this license is null and void. If you breach any term or condition of this license, this license will
automatically terminate.
I. Stolen Equipment. If any of your Equipment is stolen or otherwise removed from your premises without your
authorization, you must notify our customer service center by telephone or in writing immediately, but in any event
not later than three (3) business days after such removal, to avoid liability for payment for unauthorized use of your
Equipment. You will not be liable for unauthorized use that occurs after we have received your notification.
122
Appendix
Residential Customer Agreement
5. LEASED EQUIPMENT
A. Lease Terms. We may choose to lease certain Equipment to subscribers. Unless otherwise specified in an
applicable Package Plan Agreement(s), such Equipment (including without limitation, the LNBFs, but not the
satellite antenna), shall at all times remain the sole and exclusive property of DISH Network, and we may provide or
replace leased Equipment with new or reconditioned Equipment at any time, and upon cancellation or
disconnection of your Services, remove or require the return of such Equipment. No leased Equipment provided to
you by DISH Network shall be deemed fixtures or part of your real property. We may make such filings and
recordings that we may consider necessary to evidence our ownership rights in such Equipment, and you agree to
execute any and all documents that we may consider necessary for us to make such filings. Our ownership of such
Equipment may be displayed by notice contained on it. You have no right at any time to pledge, sell, mortgage,
otherwise encumber, give away, remove, relocate, alter or tamper with such Equipment, or to tamper with or alter
any notice of our ownership on such Equipment. Any reinstallation, return, or change in the location of such
Equipment must be performed by DISH Network at our then-current service rates. You shall not attach any electrical
or other devices to, or in any way alter, any such Equipment without our prior written consent. You are responsible
for preventing the loss or destruction of leased Equipment and we recommend that such Equipment be covered by
your homeowners, renters or other insurance policy.
B. Return of Leased Equipment. It is your responsibility to return all leased Equipment within thirty (30) days
following cancellation or disconnection of your Services. You must call 800-333-DISH (3474) to receive a return
authorization number and instructions regarding acceptable methods for returning the Equipment. Options to return
your Equipment include, but are not limited to, the use of a shipping label and empty box provided by DISH Network
by paying a Box Return Fee (as detailed in Exhibit 1) (which price is subject to change at any time) or scheduling a
DISH Network in-home service call to remove the Equipment by paying a Service Call Fee (as detailed in Exhibit 1)
charge (which price is subject to change at any time). Equipment will not be deemed returned until received by
DISH Network. If you do not return such Equipment undamaged and in working order, normal wear and tear
excepted, and in accordance with the procedures set forth herein, then you are responsible and must pay us certain
charges as described in the Package Plan Agreement.
C. Defects and Damages. You must notify us immediately of any defect in, damage to, or accident involving your
leased Equipment. All maintenance and repair of such Equipment must be performed by us or our designee(s).
DISH Network may charge you for any repairs that are necessitated by any damage to, or misuse of, such
Equipment.
6.
TRANSFER OF ACCOUNT, SERVICES OR EQUIPMENT
You may not assign or transfer your Services without our written consent, which will not be unreasonably withheld.
Provided however, if you lease Equipment or your account has an outstanding balance, then the withholding of
consent to assign or transfer your Services shall not be deemed unreasonable.
7.
LIMITATION OF OUR LIABILITY
A. INTERRUPTIONS AND DELAYS. NEITHER WE NOR OUR THIRD-PARTY BILLING AGENTS, NOR ANY OF
OUR OR THEIR AFFILIATES, WILL BE LIABLE FOR ANY INTERRUPTION IN ANY SERVICE OR FOR ANY
DELAY OR FAILURE TO PERFORM, INCLUDING WITHOUT LIMITATION: IF SUCH INTERRUPTION, DELAY OR
FAILURE TO PERFORM ARISES IN CONNECTION WITH THE TERMINATION OR SUSPENSION OF DISH
NETWORK'S ACCESS TO ALL OR ANY PORTION OF SERVICES; THE RELOCATION OF ALL OR ANY
PORTION OF THE SERVICES TO DIFFERENT SATELLITE(S); A CHANGE IN THE FEATURES AVAILABLE
WITH YOUR EQUIPMENT; ANY SOFTWARE OR OTHER DOWNLOADS INITIATED BY US; OR ANY ACTS OF
GOD, FIRES, EARTHQUAKES, FLOODS, POWER OR TECHNICAL FAILURE, SATELLITE OR UPLINK
FAILURE, ACTS OF ANY GOVERNMENTAL BODY OR ANY OTHER CAUSE BEYOND OUR REASONABLE
CONTROL.
B. ALTERATIONS TO EQUIPMENT. NONE OF DISH NETWORK, ECHOSTAR OR OUR THIRD-PARTY BILLING
AGENTS, OR ANY OF OUR OR THEIR AFFILIATES, WILL BE LIABLE FOR ANY ALTERATION TO ANY
EQUIPMENT, INCLUDING WITHOUT LIMITATION, REMOVING OR DISABLING FEATURES (SUCH AS THE
ABILITY TO ACCESS THE INTERNET VIA A RECEIVER).
C. LOSS OF RECORDED MATERIAL. NEITHER WE NOR OUR THIRD-PARTY BILLING AGENTS NOR ANY OF
OUR OR THEIR AFFILIATES WILL BE LIABLE FOR ANY DAMAGE RESULTING FROM LOSS OF RECORDED
MATERIAL OR THE PREVENTION OF RECORDING, INCLUDING WITHOUT LIMITATION, ANY LOSS OR
PREVENTION OF RECORDING DUE TO ANY FAULT, FAILURE, DEFICIENCY OR DEFECT IN SERVICES OR
EQUIPMENT.
D. NO WARRANTIES. EXCEPT AS EXPRESSLY PROVIDED TO THE CONTRARY BY APPLICABLE STATE
LAW, NEITHER WE NOR OUR THIRD-PARTY BILLING AGENTS, NOR ANY OF OUR OR THEIR AFFILIATES,
MAKE ANY WARRANTY, EITHER EXPRESSED OR IMPLIED, REGARDING YOUR DISH NETWORK
EQUIPMENT OR ANY OTHER EQUIPMENT OR ANY SERVICES FURNISHED TO YOU. ALL SUCH
WARRANTIES, INCLUDING WITHOUT LIMITATION, ANY IMPLIED WARRANTY OF MERCHANTABILITY OR
FITNESS FOR A PARTICULAR PURPOSE, ARE HEREBY EXPRESSLY DISCLAIMED AND EXCLUDED.
E. CONTENT RESTRICTIONS. IT IS YOUR RESPONSIBILITY TO IMPOSE ANY PROGRAMMING, INTERNET
OR OTHER CONTENT RESTRICTIONS ON YOURSELF, MEMBERS OF YOUR FAMILY AND HOUSEHOLD,
AND GUESTS, AS YOU DEEM APPROPRIATE. NONE OF DISH NETWORK, ECHOSTAR, OUR THIRD-PARTY
BILLING AGENTS, OR OUR AND THEIR AFFILIATES SHALL HAVE ANY LIABILITY TO ANYONE DUE TO, OR
BASED UPON, ANY CONTENT (INCLUDING WITHOUT LIMITATION, ANY INACCURACIES, ERRORS IN OR
OMISSIONS FROM SUCH CONTENT): (i) CONTAINED IN ANY OF THE SERVICES FURNISHED TO YOU; OR
(ii) ACCESSED USING THE SERVICES OR EQUIPMENT FURNISHED TO YOU.
123
Appendix
Residential Customer Agreement
F. DAMAGES LIMITATION. NEITHER WE NOR OUR THIRD-PARTY BILLING AGENTS, NOR ANY OF OUR OR
THEIR AFFILIATES, SHALL HAVE ANY LIABILITY WHATSOEVER FOR ANY SPECIAL, INDIRECT, INCIDENTAL
OR CONSEQUENTIAL DAMAGES ARISING OUT OF OR RELATING TO: DISH NETWORK EQUIPMENT OR
ANY OTHER EQUIPMENT; OUR FURNISHING OR FAILURE TO FURNISH ANY SERVICES OR EQUIPMENT TO
YOU; OR ANY FAULT, FAILURE, DEFICIENCY OR DEFECT IN SERVICES OR EQUIPMENT FURNISHED TO
YOU.
8.
LEGAL COMPLIANCE; PIRACY AND INFRINGEMENT; TRADEMARKS; PUBLIC RIGHTS OF WAY
A. Piracy. Receiving any portion of the Services without paying for them and/or any direct or indirect act or
attempted act to engage or assist in any unauthorized interception or reception of any portion of the Services is a
violation of various U.S. federal and state laws and of this Agreement. The penalties for violating such laws can
include imprisonment and civil damage awards of up to $110,000 per violation.
B. Infringement. Section 605(e)4 of Title 47 of the United States Code makes it a federal crime to modify Equipment
to receive encrypted (scrambled) television programming without payment of required subscriptions. Conviction can
result in a fine of up to $500,000 and imprisonment for five years, or both. Any person who procures Equipment that
has been so modified is an accessory to that offense and may be punished in the same manner. Investigative
authority for violations lies with the Federal Bureau of Investigation. The Equipment may incorporate copyright
protection technology that is protected by U.S. patents and/or other intellectual property rights. Use of such
copyright protection technology must be authorized by DISH Network or its suppliers or licensors, and is intended
for home and other limited pay-per-view uses only, unless otherwise authorized by DISH Network or its suppliers or
licensors. Reverse engineering or disassembly is prohibited.
9.
GENERAL
A. Notice. Any notice required or permitted to be given by us under this Agreement may be provided via the mail, on
your bill, as a bill insert, via broadcast on a television channel, through publication on the website set forth at the top
of this Agreement, by telephone, or by any other reasonable means. If we send you notice by mail, on your bill or as
a bill insert, it will be considered given the day after it is deposited in the U.S. mail, addressed to you at your thencurrent billing address in our records. If we send you notice via broadcast on a television channel or through
publication on the website set forth at the top of this Agreement, it will be considered given when first broadcast or
published. If we send you notice by telephone, it will be considered given when personally delivered to you or when
left as a message at your then-current phone number in our records. Unless otherwise specified in this Agreement,
any notice required or permitted to be given by you under this Agreement shall be in writing and shall be sent by
first-class mail addressed to us at the mailing address set forth at the top of this Agreement, and shall be deemed
given when received by us at such mailing address.
B. Physical Address/Change of Address. When setting up your DISH Network account, you must provide us with
the physical address where your Equipment will be located and your Services will be provided. A post office box
does not meet this requirement. You must give us immediate notice of any change of name, mailing address,
telephone number, or physical address where your Equipment is located. You may do this by notifying our customer
service center by telephone or in writing at the phone number, mailing address, or e-mail address set forth at the top
of this Agreement.
C. Online Account Information. If you have an online account with us, you are responsible for maintaining the
confidentiality of your account username and password and for all activities that occur under your account
username and/or password. You must: (i) keep your account username and password confidential and not share
them with anyone else; and (ii) immediately notify us of any unauthorized use of your password and/or account
username or other breach of security.
D. Third-Party Billing Agents. We may enter into relationships with third parties to provide billing and other services
on our behalf, in which case the terms and conditions of this Agreement shall apply to such third parties as
applicable under the circumstances. Additional terms and conditions imposed by our third-party billing agents may
apply. For example and without limitation: (i) late fees imposed by our third-party billing agents may be administered
according to our third-party billing agent's billing procedures and applicable state tariffs and regulations; (ii) our thirdparty billing agents may require that you to pay all past due charges for Services, a restart fee, and/or a prepayment
before we reconnect your Services; and (iii) other services provided by our third-party billing agents, including
without limitation, local telephone service, may need to be restored before DISH Network Services can be restored,
and a restoral fee and/or deposit may be required to restore third-party billing agent services. Partial payments on
third-party billing agent bills may be applied first to the balance due for other services billed on your third-party billing
agent bill, including without limitation, local telephone service, according to the third-party billing agent's billing
procedures and applicable state statutes and regulations. Please contact your third-party billing agent for details.
Failure to pay all or any part of your third-party billing agent bill may result in disconnection of Services. If your
account is assigned to a third-party billing agent we will provide you notice of such assignment.
E. Credit Checks. You authorize DISH Network to investigate your financial responsibility and creditworthiness,
including without limitation, acquiring credit reports and histories, and to report any payment defaults to credit
reporting agencies. Such credit checks may require you to provide DISH Network with your social security number.
Under the Fair Credit Reporting Act, you have the right to notify DISH Network if you believe we have reported
inaccurate information about your account to any credit reporting agency. Please include in any such notice the
specific item of dispute and why you believe the information reported is in error.
F. Applicable Law. This Agreement, including without limitation, all matters relating to its validity, construction,
performance and enforcement, and any claim, complaint or dispute arising out of or related to this Agreement, the
Services or the Equipment shall be governed by the laws and regulations of the State of Colorado without giving
effect to its conflict of law provisions. This Agreement is subject to amendment, modification or termination if
required by such laws or regulations. If any provision in this Agreement is declared to be illegal or in conflict with any
124
Appendix
Residential Customer Agreement
law or regulation, that provision will be considered modified to the minimum extent necessary to make such
provision legal and no longer in conflict with such law or regulation, without affecting the validity of any other
provisions.
G. Remedies Cumulative. The rights and remedies provided under this Agreement to DISH Network in case of your
default or breach of this Agreement are cumulative and without prejudice to any other rights and remedies that
DISH Network may have by reason of such default or breach at law, in equity, under contract or otherwise (all of
which are expressly reserved).
H. Other. No salesperson, installer, customer service representative, authorized retailer, or other similarly situated
individual is authorized to change or override this Agreement. DISH Network may, however, change this Agreement
at any time and will notify you if that occurs. The terms and conditions of this Agreement that either are expressly
stated to survive or by their nature would logically be expected to survive its expiration or termination will continue
thereafter. This Agreement is in addition to any other written agreement(s), if any, between you and DISH Network,
including without limitation, any applicable Package Plan Agreement, and except as provided to the contrary herein,
all such written agreements shall remain in full force and effect. Except as expressly set forth in this Agreement to
the contrary, this Agreement replaces and supersedes any and all prior DISH Network Residential Customer
Agreements in their entirety, and such prior DISH Network Residential Customer Agreements shall be of no further
force or effect whatsoever. In the event of any ambiguity between this Agreement and any applicable Package Plan
Agreement, DISH Network shall have the sole and exclusive authority to interpret and/or make a final determination
concerning any issue arising from such ambiguity.
EXHIBIT 1 - FEES
In addition to any amounts due for your Services and any other amounts due under this Agreement or any
applicable Package Plan Agreement, you agree to pay the fees listed in the table below (“Fees”) if and when
applicable. DISH may change these Fees, increase or decrease these Fees, or impose additional Fees at any time
upon notice to you. Discounts on certain Fees may be available from time to time if you subscribe to certain
programming packages and/or use certain Equipment. Additional Fees may apply for non-standard installations or if
you upgrade your Equipment after installation. You may call 800-333-3474 to request an itemization of any cost that
you will incur in order to purchase and/or lease or receive DISH equipment and/or DISH Services.
Type of Fee
Amount
Description of When Fee Applies
Monthly Fees
$7.00
You have more than one (1) receiver on your
account. Per additional high definition (HD)
receiver.
$10.00
You have more than one (1) receiver on your
account. Per additional DVR receiver.
$14.00
You have more than one (1) receiver on your
account. Per additional Duo receiver.
$17.00
You have more than one (1) receiver on your
account. Per additional DuoDVR or SlingLoaded
receiver.
$7.00
You have a Hopper 2000 receiver on your account.
$7.00
You have a Joey 1.0 receiver on your account.
Whole Home DVR
Service Fee
$4.00
You have a Whole Home DVR Hopper 2000 on
your account.
DVR Service Fee
$6.00
You purchase or lease a digital video recording
receiver and you do not subscribe to a “with DVR”
programming package. (If you have a HD Duo
SlingLoaded DVR receiver on your account, a
$10.00 fee will also apply.)
Protection Plan
$6.00
You participate in the Protection Plan.
DISH Pause
$5.00
You are eligible for and participate in DISH Pause.
Additional Receiver
Fee*
(*In determining the
Additional Receiver Fee
amount, the receiver
with the highest
associated fee shall be
deemed activated prior
to all other receivers on
your account.)
Receiver Fees
125
Appendix
Residential Customer Agreement
Type of Fee
Amount
Description of When Fee Applies
Service Access Fee
$6.00
You subscribe to Racetrack TV but do not
subscribe to applicable required minimum
programming.
International Service
Access Fee
$10.00
You do not subscribe to applicable required
minimum programming.
TV2 Receiver
Connection Fee
$5.00
You purchase or lease a dual tuner receiver and it
is not connected to a phone line and/or a
broadband network.
DISH 500 Upgrade Fee
$5.00
You receive Services in Alaska (AK) or Hawaii (HI).
Transactional Fees
126
Agent Assist Fee
$5.00
You order PPV or make a credit/debit card or Bank
Account payment over the phone with an agent.
External Hard Drive
Activation Fee
$40.00
One-time fee charged if you have a ViP receiver
and you choose to connect an external hard drive
to that receiver.
Late Payment Fee
$7.00
You do not pay your bill in full on or before its due
date (unless you are receiving Services pursuant to
a Pre-Pay Promotion).
Returned Payment Fee
$10.00
You make an EFT or check payment to DISH
Network and it is subsequently returned.
Shipping and Handling
Fee
$15.00
DISH Network delivers hardware to you via regular
delivery. (A $20.00 Extended Delivery Fee also
applies to AK, HI, Puerto Rico, or Virgin Islands.)
Overnight Delivery Fee
$20.00
DISH Network delivers an item to you via overnight
delivery (not available in Alaska, Hawaii, Puerto
Rico, or the U.S. Virgin Islands).
Box Return Fee
$17.00
DISH Network delivers return boxes and labels to
return leased equipment.
Smart Card
Replacement Fee
$50.00
We replace your Smart Card because it was lost,
damaged, defective or stolen, as long as there is no
evidence of tampering or modification.
Out of Warranty
Receiver Replacement
Fee
$75.00
You need to replace or repair an out of warranty
receiver.
Service Call Fee
$95.00
We send a certified technician to you.
Programming Change
Fee
$5.00
You change your programming selection in 30 days
or less from the same service being added (but not
regarding adult programming).
$20.00
Changes to your programming selection include
adult programming.
Appendix
FCC Compliance
FCC COMPLIANCE
The following text is extracted from Federal Communications Commission (FCC) regulations, as of the
publication date of this Guide. Contact the FCC (see following) or your library for the complete text of the
regulations.
Telephone Communication
This equipment complies with Part 68 of the FCC rules and the requirements adopted by the ACTA. On the back
panel of this equipment is a label that contains, among other information, a product identifier in the format
US:AAAEQ##TXXXX. If requested, this number must be provided to the telephone company.
A plug and jack used to connect this equipment to the premises wiring and telephone network must comply with the
applicable FCC Part 68 rules and requirements adopted by the ACTA. A compliant telephone cord and modular plug
is provided with this product. It is designed to be connected to a compatible modular jack that is also compliant,
such as RJ-11. See installation instructions for details.
The REN is used to determine the number of devices that may be connected to a telephone line. Excessive RENs
on a telephone line may result in the devices not ringing in response to an incoming call. In most but not all areas,
the sum of RENs should not exceed five (5.0). To be certain of the number of devices that may be connected to a
line, as determined by the total RENs, contact the local telephone company. For products approved after July 23,
2001, the REN for this product is part of the product identifier that has the format US:AAAEQ##TXXXX. The digits
represented by ## are the REN without a decimal point (e.g., 03 is a REN of 0.3). For earlier products, the REN is
separately shown on the label.
If this equipment causes harm to the telephone network, the telephone company will notify you in advance that
temporary discontinuance of service may be required. But if advance notice isn't practical, the telephone company
will notify the customer as soon as possible. Also, you will be advised of your right to file a complaint with the FCC if
you believe it is necessary.
The telephone company may make changes in its facilities, equipment, operations or procedures that could affect
the operation of the equipment. If this happens the telephone company will provide advance notice in order for you
to make necessary modifications to maintain uninterrupted service.
If trouble is experienced with this equipment, for repair or warranty information, please contact DISH at 1-800-3333474 (DISH). If the equipment is causing harm to the telephone network, the telephone company may request that
you disconnect the equipment until the problem is resolved.
There are no user serviceable parts inside.
Connection to party line service is subject to state tariffs. Contact the state public utility commission, public service
commission or corporation commission for information.
If your home has specially wired alarm equipment connected to the telephone line, ensure the installation of this
equipment does not disable your alarm equipment. If you have questions about what will disable alarm equipment,
consult your telephone company or a qualified installer.
127
Appendix
FCC Compliance
Compliance Information Statement
EchoStar Technologies L.L.C., 100 Inverness Terrace East, Englewood CO., (303) 706-4000, declares that: This
device complies with Part 15 of the FCC Rules. Operation is subject to the following two conditions: (1) this device
may not cause harmful interference, and (2) this device must accept any interference received, including
interference that may cause undesired operation.This equipment has been tested and found to comply with the
limits for a Class B digital device, pursuant to Part 15 of the FCC Rules. These limits are designed to provide
reasonable protection against harmful interference in a residential installation. This equipment generates, uses and
can radiate radio frequency energy and, if not installed and used in accordance with the instructions, may cause
harmful interference to radio communications. However, there is no guarantee that interference will not occur in a
particular installation. If this equipment does cause harmful interference to radio or television reception, which can
be determined by turning the equipment off and on, the user is encouraged to try to correct the interference by one
or more of the following measures:
•
Reorient or relocate the receiving antenna.
•
Increase the separation between the equipment and receiver.
•
Connect the equipment into an outlet on a circuit different from that to which the receiver is connected.
•
Consult the dealer or an experienced radio/TV technician for help.
Connecting to an Over-the-Air Antenna
In order to receive local broadcast channels, you may wish to install an over-the-air antenna into your TV
distribution equipment. There are many devices that allow you to connect your antenna to your in-home distribution
system such as splitters and amplifiers. You must be careful to meet certain FCC regulations with respect to the
isolation between the antenna port and the network port of your system. It is recommended that you purchase a
splitter or amplifier with the correctly specified isolation from your local satellite television retailer.
128
Reference
Troubleshooting and Remote Codes
What you’ll find in this chapter:
• TROUBLESHOOTING TABLES
• REMOTE CONTROL DEVICE CODES
103
Reference
Troubleshooting Tables
TROUBLESHOOTING TABLES
Use these tables if you have problems using the system. Look in this section for a description of
the problem before calling the Customer Service Center. Many problems arise from basic
misunderstandings of how the system works, especially when you are just becoming familiar with
it. To solve a particular problem, do the following:
1 Review the section in this Guide that relates to the problem.
2 If you cannot find a solution, then find the section in the following tables that relates to the problem.
•
Read the What’s Happening column until you find the problem.
•
Read the information in the Possible Reason column.
•
Try each of the suggested solutions in the What to Do column.
3 Sometimes resetting the receiver can fix a minor problem. See Resetting Your Receiver on
page 100.
4 Make sure your TV is tuned to the correct channel or input. Use RECOVER as described on
page 77.
5 Make sure your remote control has fresh batteries. If you see the Remote Battery Low warning on
your TV screen, it’s time to change the batteries. Follow the instructions on page 11.
6 Make sure your receiver is connected to an active telephone line. See the instructions on page 95.
7 Check for anything that might be blocking the dish antenna’s view of the sky, such as tree
branches or snow.
8 For more information, call the Customer Service Center at 1-800-333-DISH (3474), or see
mydish.com.
Note: Before calling the Customer Service Center, have ready the date of purchase and either
your customer account number, the receiver conditional access number, or the receiver model
number. Display the System Info screen to find these numbers (See Ordering Your Programming
Packages on page 3). Also, write down any error messages that the receiver displays on the
television screen.
104
Reference
Troubleshooting Tables
Message Numbers
Message
Number
Possible Reason
What to Do
002
Heavy rain, snow, or cloud cover
may be interfering with
transmission of the satellite signal,
or there may be other interference.
• Note the local weather conditions. Remove any snow or
other debris which may have collected on the satellite
dish.
• Make sure that the satellite dish has a clear line of sight to
the satellite. Check whether branches or leaves have
grown into the line of sight.
• Make sure that the satellite dish is aimed at the satellite.
Check the strength of the signal using the Point Dish
screen as described on page 101. Consult your installer to
re-aim the dish, if necessary, to obtain the strongest
possible signal.
003
The wrong type of coaxial cable
may be used in the system, or the
cable run length may be too long.
There may also be a problem with
the multi-dish switch.
• Make sure the system uses RG6 coaxial cable; if not, call
your dealer or installer.
• Check the dish-to-receiver cable run length is not more
than 200 feet. Check the coaxial cables and their
connections to and from the multi-dish switch. Make sure
that all required cables are in place, and check that all
cable connections are tight and dry (for outdoor cables).
Refer to mydish.com/support for additional steps.
004
The receiver may have
temporarily lost the satellite signal
for this channel.
• Change the channel using the UP or DOWN button on the
remote and then return to the problem channel to see if the
issue is resolved.
• Unplug the receiver for 10 seconds and plug it back in.
005
The receiver may not have
received authorization for
programming yet.
• If you have authorized the receiver (added it to your
account), wait a few minutes to see if the message is
removed. Make sure that all required cables are in place,
and check that all cable connections are tight and dry (for
outdoor cables).
• Confirm that you subscribe to this channel us ing
mydish.com/mychannels.
• Unplug the receiver for 10 seconds and plug it back in.
• If you have not authorized the receiver, call the Customer
Service Center at 1-800-333-DISH (3474).
006
Purchase of the event was not
completed.
Contact the Customer SErvice Center at 1-800-333-DISH
(3474).
013
You may have tried to tune to a
program on a channel which you
have not bought.
• You must buy a channel before you can tune to a program
on that channel. Call the Customer Service Center at 1800-333-DISH (3474) to buy the channel, or if you believe
this message was displayed by mistake.
• If you subscribe to the channel and you see these
messages, reset the receiver (page 100).
018
Customer Service Center needs
to authorize your smart card.
• You must connect the receiver to an active telephone
connection at all times. If you install two or more receivers,
you must connect each receiver to an active telephone
connection at all times.
• Call the Customer Service Center at 1-800-333-DISH
(3474) for help checking the credit limit and/or to get
authorization to make a purchase.
028
The receiver may need to get new
software before you can use it to
order Pay-Per-View programs.
Turn the receiver off. Doing this allows the receiver to
download new software via the satellite signal. The
download may take several minutes; do not disturb or unplug
the receiver during this time. When the download is done,
you will be able to use it to order Pay-Per-View programs.
105
Reference
Troubleshooting Tables
Message
Number
Possible Reason
What to Do
060
You may have aimed the satellite
dish at one satellite, but selected
the option for another satellite on
the Point Dish screen.
• Make sure that you have selected the option for the right
satellite on the Point Dish screen, as described on
page 101.
• Make sure that the cable(s) for the satellite you have
selected are connected to the LNBF that receives signals
from that satellite. Re-aim the satellite dish at the right
satellite.
061
The receiver is downloading
current software.
It is very important for the receiver to get the latest software
to function properly. The download may take several
minutes. Do not disturb or unplug the receiver during this
time.
074
The receiver gives you three
chances to enter the correct
password. If you fail to do so, the
receiver “times out” and will not
allow you to try again for several
minutes.
078, 079,
080
You may not have connected the
receiver to an active telephone
line or broadband Internet
connection, or the telephone line
or Internet connection may be
defective.
Connect the receiver to an active telephone line or
broadband Internet connection. Make sure that the
telephone line or Internet connection to which you connect
the receiver is working properly.
Note: To order Pay-Per-View programs, you must keep each
receiver connected to an active telephone line or broadband
Internet connection. The receiver uses the telephone line to
make toll-free calls (when the phone is not in use) or the
Internet connection to send purchase information to DISH.
093
You may have selected the Reset
Factory Defaults option.
If you want to reset the receiver to its factory default settings,
select Yes. If you do not want to reset factory defaults, select
No. For more information on resetting to factory defaults, see
page 100.
The receiver may not have
received authorization for
programming yet. The satellite
dish may have moved so that it is
no longer picking up the satellite
signal. The cable connections
may have loosened or have
moisture inside. There may be an
interruption of the satellite signal.
• If you have authorized the receiver, wait a few minutes to
see if the message is removed. Make sure that all required
cables are in place, and check that all cable connections
are tight and dry (for outdoor cables).
• Make sure that the satellite dish has a clear line of sight to
the satellite. Check whether branches or leaves have
grown into the line of sight.
• Check that the Signal Strength bar in the Point Dish
screen is green and displays the word Locked, as
described on page 101. If not, contact your installer to reaim the satellite dish. If you have not authorized the
receiver, call the Customer Service Center at 1-800-333DISH (3474) for help.
129
535
106
You may have just plugged in the
receiver and it is acquiring the
satellite signal or the receiver may
have temporarily lost the signal.
Wait a few minutes and then try again to enter the password.
Note: The “time out” feature is designed to prevent someone
from trying password after password until he or she happens
to guess the right one and so gains unauthorized access to
the receiver.
• Wait a few minutes to see if the message goes away.
Make sure that all required cables are in place, and check
that all cable connections are tight and dry (for outdoor
cables).
• Make sure that the satellite dish has a clear line of sight to
the satellite. Check whether branches or leaves have
grown into the line of sight.
• Check that the Signal Strength bar in the Point Dish
screen is green and displays the word Locked, as
described on page 101. If not, contact your installer to reaim the satellite dish.
Reference
Troubleshooting Tables
Changing Channels
What Is Happening
Possible Reason
What to Do
You enter a channel number. The
channel changes, but not to the
channel number you entered.
You may have made a mistake
entering the channel number, or
the channel number you entered
may be invalid. If so, the channel
displayed is the closest possible
to the channel you entered.
• Try entering the channel number
again.
• Reset the receiver using the
instructions on page 100.
When changing channels, using the
Program Guide, Browse, or other
channel lists, some of the channels
you subscribe to are not listed.
• If you entered the number for
a channel that you have not
subscribed to, the receiver will
change to the channel and
display a message indicating
it is not part of your
subscription.
• If a Favorites List other than
All Chan is applied, the
receiver will skip channels that
are not on the applied list.
• If you have set up the to hide
adult channels or to hide
locked channels, these
channels are not displayed in
the Program Guide or other
channel lists.
• If you want to buy a channel, go to
mydish.com/myaccount, select the
Customer Support option from the
receiver’s menu, or call the Customer
Service Center at 1-800-333-DISH
(3474).
• Press GUIDE on the remote control,
and press it again until it says All
Chan at the top of the screen.
• Change the Hide Adult or Hide
Locked setting to include these
channels in the Program Guide and
other channel lists.
Possible Reason
What to Do
The remote control may be
missing batteries, the batteries
may be incorrectly placed in the
remote, the batteries may be
weak or dead, or there may be
InfraRed (IR) interference in the
room.
• Install four new AAA batteries in the
remote control.
• If the remote control has fresh
batteries, check whether they are
placed according to the label diagram.
If not, remove them and install them
correctly.
• Move the receiver away from an
HDTV.
• Disable the ambient light sensor on an
LCD HDTV.
• Increase the HDTV’s brightness
setting.
• Remote control is not
operating properly or the
batteries are weak or dead.
• The receiver power cord is not
plugged into a power outlet, or
there may be a problem with
the power.
• The remote control(s) may not
be set to the address(es) used
by the satellite receiver.
• Try the receiver’s front panel button to
see if the receiver responds.
• Replace the remote batteries with
fresh ones.
• Check that the receiver power cord is
not damaged, and that the plug is
inserted correctly into the outlet.
• Make sure the remote control(s) are
set to the same address(es) used by
the satellite receiver. Refer to
page 65.
Remote Control
What Is Happening
When you press a button on the
remote control, the receiver does not
do what you expect.
When you press the remote control
POWER button to turn the receiver on,
the receiver front panel power light
does not light up.
107
Reference
Troubleshooting Tables
Program Guide or the Browse Banner
What Is Happening
Possible Reason
What to Do
In the Program Guide, some
channels have a red background.
Red means that you have not
subscribed to that channel. You
must subscribe to a channel
before you can view it.
• If you want to buy a channel, go to
mydish.com/myaccount, select the
Customer Support option from the
receiver’s menu, or call the Customer
Service Center at 1-800-333-DISH
(3474).
• Reset the receiver (page 100).
You try to display future programs in
the Program Guide or Browse
Banner, but find you cannot.
The Program Guide and Browse
Banner can display programs
scheduled for an extended, but
not unlimited time beyond the
present.
Try displaying the Program Guide again
later. By that time, it may show
programs for the time and date you
want.
You try to display programs that have
ended in the Program Guide or
Browse Banner, but find you cannot.
The Program Guide and Browse
Banner can display only
programs that have not yet
ended. These features cannot
display a time earlier than the
present.
Contact the program providers (for
example, the channel or network
affiliate that broadcast the program) for
details on past programs.
• You may have applied a
Favorites List other than the
list named All Chan.
• You may have set up the
Program Guide so that when
the receiver is locked, the
Guide hides adult channels
• You can change the applied
Favorites List while using the
Program Guide by pressing the
remote control GUIDE button. You
can choose another custom
Favorites List, the All Chan list, which
includes all the channels, the My
Channels list, which includes all
subscribed channels, or the My HD
Channels list, which includes all
subscribed HD channels.
• Unlock the receiver for the Program
Guide to display adult channels.
When you are using the Program
Guide or Browse Banner, some
channels are missing.
108
Reference
Troubleshooting Tables
Watching A Program
What Is Happening
Possible Reason
What to Do
• The TV set may not be
working properly.
• The TV may be connected to
the wrong input.
• If the TV and the receiver are
working properly, there may
be interference with the
satellite signal.
• Verify the TV is set to the correct
input or channel for your setup.
• Make sure that the TV set is plugged
into a working electrical outlet.
• Make sure that the TV is turned on.
• Use the RECOVER button (page 77).
• Make sure that the TV is connected
properly to the receiver.
• Make sure that the TV’s text mode
and closed captioned features are
turned off.
• Make sure that the TV brightness and
contrast are adjusted correctly.
Your receiver may be
experiencing signal loss due to
something blocking your dish’s
view of the sky, the dish being
mis-aligned, or weather.
• Make sure that the satellite dish has a
clear line of sight to the satellite.
• Check whether branches or leaves
have grown into the line of sight.
• Make sure that the satellite dish is
aimed at the satellite. Check the
strength of the signal using the Point
Dish screen, as described on
page 101. Consult your installer to reaim the dish, if necessary, to obtain
the maximum possible signal
strength.
• Note the local weather conditions.
Heavy rain, snow, or cloud cover may
be interfering with transmission of the
satellite signal. Remove any snow or
other debris which may have
collected on the satellite dish.
The receiver front panel power light is
on, and there is a picture on the TV
screen, but the picture:
• has sparkles or is grainy
• has a herringbone pattern
• lacks color or vertical hold
• wobbles
• looks “washed out” or fuzzy.
• The TV set may not be
working properly.
• The receiver may not be
properly connected to the TV.
• There may be interference
from other nearby electrical
devices (such as radio towers,
cellular telephones,
computers, microwave ovens,
radios, stereos, or TVs).
• Make sure that the TV brightness and
contrast are adjusted correctly, and
that the TV is working properly. Refer
to your TV’s user guide for
assistance.
• Make sure that the TV is connected
properly to the receiver. Refer to
Chapter 12 beginning on page 93.
• Check other nearby electrical devices
as possible sources of interference.
• Check that all required coaxial cables
are in place.
• Check for moisture or water leaking
into all connections. Dry them out if
needed, then seal them with coaxial
cable sealant.
• Check the length of cable between
your dish and receiver. If it is greater
than 200 feet, contact the person who
installed your system.
• Make sure the system is properly
grounded.
A “black box” fills almost all of the TV
screen.
You may have turned on the
Closed Captioning feature on
the TV, and put that feature into
Text mode.
• Turn off Closed Captioning through
your TV’s menus. Refer to page 88 to
enable Closed Captioning through
your receiver.
The receiver front panel power light is
on, but the TV image is black, blue, or
snowy.
The TV image has pixels (small
squares), is freezing, or you have
intermittent black screens.
109
Reference
Troubleshooting Tables
Favorites Lists
What Is Happening
Possible Reason
What to Do
You press the remote GUIDE button
while the Program Guide is
displayed. You find that you can
apply only the All Chan, My
Channels, or My HD Channels list.
If you have not added channels
to any custom Favorites List, you
will be able to apply only the All
Chan, My Channels, or My HD
Channels lists.
You must add channels to a custom
Favorites List before you can apply it.
You try to change the
All Chan, My Channels, or My HD
Channels list. The receiver displays
an ERROR message.
The receiver will not allow you to
change the All Chan, My
Channels, or My HD Channels
lists.
Choose another list to change. The My
Channels list includes all channels that
are part of your subscription. The My
HD Channels list includes all highdefinition channels that are part of your
subscription.
You try to apply an empty Favorites
List. The receiver displays an
ERROR message.
The receiver will not allow you to
apply an empty list.
Choose another list to apply, or add at
least one channel to the empty list.
A Favorites List does not show
channels that you know you have
added to it.
If you have set the receiver to
hide adult channels or hide
locked channels, these channels
are not included in the Program
Guide or other channel lists.
Change the Hide Adult or Hide Locked
setting on your receiver if you do not
want these channels excluded from the
Program Guide or other channel lists.
Refer to page 41.
What Is Happening
Possible Reason
What to Do
You try to set up an event timer and
the receiver displays a message
noting that the program is locked.
You must enter the password
before you can create an event
timer for a locked program.
To create an event timer for the
program, first enter the password.
You try to set up an event timer and
the receiver displays a message
noting that the program is a Pay-PerView event.
You must order a Pay-Per-View
event before you can create an
event timer for it.
To create an event timer for the event,
first order it.
You try to set up an event timer, but
the receiver displays an Error
message giving you the option to
delete an event timer that was set up
earlier.
You already have set up the
maximum number of event
timers.
To be able to set up a new event timer,
delete one of the event timers you set
up earlier.
You set up an event timer, but the
receiver does not tune to the channel
of the program, or does not record the
program.
You may have set up a
Reminder but what you should
have set up is an Auto-Tune or a
DVR timer.
Remember that a Reminder just
reminds you that the program is about to
start. An Auto-Tune timer reminds you
and tunes the receiver to the program. A
DVR timer reminds you, tunes the
receiver, and records the program to the
receiver’s hard drive.
Timers
110
Reference
Troubleshooting Tables
What Is Happening
Possible Reason
What to Do
You set up an event timer for a
program that is repeated (such as a
regularly scheduled program), but the
timer does not operate for a showing
of the program.
You may have set up a timer with
an incorrect frequency.
Remember that a Once event timer
operates just one time. A Mon.-Fri.
event timer operates Monday through
Friday on the same channel at the same
time. A Daily event timer does the same,
Monday through Sunday. A Weekly
event timer operates once a week on
the same channel at the same time. All
Episodes timers will record all episodes
of that program, while New Episodes
timers will record only the current
season. A DishPASS timer records
programs matching your DishPASS
search term.
You set up an event timer, but the
timer does not operate at all.
• You may have several timers
set up for the same time and
the event timer you set is at a
lower priority than others.
• You may have selected New
Episodes and the timer you
set was for an episode that is
not new.
• Check the Priorities as described on
page 54.
• Check the Timer Frequency as
described on page 54.
You set up a DishPASS Timer and
you notice that you have no space left
on your My Recordings List.
The DishPASS Timer may have
included more matching
programs than what you
expected.
Delete that DishPASS Timer and begin
again. See page 59.
You stop the operation of an event
timer for one showing of a program
that is repeated (such as a regularly
scheduled program), but the timer
operates for the next showing.
Stopping the event timer applies
only to the current showing of the
program.
To stop all operations of a repeated
event timer, you must delete the event
timer.
Note: The receiver deletes a Once event
timer when it operates.
You edit an automatic event timer.
The timer does not start or does not
end according to the program for
which you set the timer.
Editing an automatic event timer
converts it to a manual event
timer. Such a timer starts and
stops at the times you specify,
not the start and stop times of
any specific program.
If you want an automatic event timer to
start and stop according to a specific
program, avoid editing that event timer.
You try to set up a manual event
timer. The receiver displays an Error
message.
You may have tried to set a
manual event timer with invalid
start or stop times.
Review the information on manual
event timers on page 58.
The receiver does not display the
program name for a manual event
timer.
The receiver may not be able to
display a program name for a
manual event timer.
Use the Program Guide or a printed
schedule to find the program name.
The program may have started a
little earlier than scheduled, or it
may have run over its scheduled
ending time.
• Use the Start 1 min. early option to
start any event timer one minute
early, except for a Pay-Per-View
event.
• Use a manual event timer to start any
event timer at the times you set
yourself, except for a Pay-Per-View
event.
You set an event timer. The event
timer misses the beginning or the end
of a program.
111
Reference
Troubleshooting Tables
Hearing A Program
What Is Happening
Possible Reason
What to Do
The receiver front panel power light is
on and there is a good picture on the
TV set, but you do not hear any
sound.
• You may have muted the
sound, or set the volume so
low that you cannot hear it.
• The audio connections may
not be properly connected.
• You have selected Dolby
Digital Only when there is no
Dolby Digital soundtrack.
• Check the volume level on the TV or
audio device. Turn off the mute or
turn up the volume, as required.
• Check the audio connectors and
cables from the receiver to the TV or
the sound system.
• Check the TV speakers or the sound
system.
• In the Dolby Digital menu, select
Dolby Digital/PCM for the audio
output. If your decoder/amplifier will
not accept Linear PCM digital input,
use the analog connections instead.
You hear a foreign language with a
program.
You may have set the receiver to
select an alternate audio
language. The program may be
in a foreign language.
Press the MENU button on your remote.
From the Main Menu, select
Preferences, then Alternate Audio, and
choose the language that you prefer.
Possible Reason
What to Do
• You do not have Caller ID
service from your local phone
company.
• Your phone line is not
connected to the phone jack
on the back of the receiver.
• You do not have the Caller ID
option enabled.
• Verify that Caller ID is a service
provided by your local phone
company.
• Verify that you have connected the
phone line to the phone jack on the
back of the receiver.
• Press the MENU button on your
remote. From the Main Menu, select
System Setup, then Installation, and
then Caller ID. Select the Enable
Caller ID option.
Caller ID
What Is Happening
Caller ID is not working.
112
Reference
Troubleshooting Tables
Telephone for Voice/Data/FAX
What Is Happening
Possible Reason
What to Do
While you are making a telephone
call, you hear “clicks.”
The receiver may have tried to
send Pay-Per-View purchase
information to DISH using your
phone line. When the receiver
found that the telephone was
busy, it automatically
disconnected.
You do not have to do anything. You
can always use your telephone line,
because the receiver automatically
hangs up if it finds the line is busy.
You pick up the telephone to make a
call, but you do not hear a dial tone.
The receiver was sending PayPer-View purchase information
to DISH using your phone line.
When the receiver found that the
telephone was busy, it
automatically disconnected.
Hang up, and then pick up the
telephone again to get a dial tone.
Your computer or fax machine tries to
send a fax or modem transmission,
but fails.
The receiver was sending PayPer-View purchase information
to DISH using your phone line.
When the receiver found that the
telephone was busy, it
automatically disconnected. The
fax or modem found that there
was no dial tone, and cancelled
the transmission.
Re-send the FAX or modem
transmission.
Your computer or fax machine was
receiving a fax or modem
transmission, but an error occurred.
The receiver may have tried to
send Pay-Per-View purchase
information to DISH using your
phone line during the fax or
modem call. When the receiver
found that the telephone was
busy, it automatically
disconnected. This generated
“clicks” that caused an error in
the FAX or modem transmission.
Have the sender resend the FAX or
modem transmission.
Locks
What Is Happening
You set a lock (for example, a lock on
programs by ratings), but the lock
does not take effect.
You forgot the password, so that you
are unable to unlock the receiver.
Possible Reason
What to Do
You may not have locked the
receiver.
You must lock the receiver to apply any
lock that you have set.
N/A
Call the Customer Service Center at 1800-333-DISH (3474). You must be
able to verify your account information
with the customer service
representative.
113
Reference
Troubleshooting Tables
Ordering a Pay-Per-View Program
What Is Happening
Possible Reason
What to Do
Someone orders a Pay-Per-View
program without your permission.
You may have been away from
the receiver, and someone else
used it.
Lock the purchase of Pay-Per-View
programs. Remember that you are
responsible for all Pay-Per-View
purchases, whether or not you
authorize such purchases. If you lock
Pay-Per-View purchases, then anyone
who wants to order a Pay-Per-View
program must enter the password.
You find that you are not able to order
a Pay-Per-View program.
The receiver may not be
connected to an active
telephone line or broadband
Internet connection.
Connect each receiver to a phone line
or a broadband Internet connection for
Pay-Per-View ordering using the
remote control.
You find that you are not able to
cancel a Pay-Per-View program.
You ordered a Pay-Per-View
program, and then decided not
to watch it.
You cannot cancel an order for a PayPer-View program, whether it was just
ordered or ordered earlier.
Your setup includes more than one
receiver. You order a Pay-Per-View
program, but it does not appear on all
of the receivers.
You ordered a Pay-Per-View
program, and want it to be
available on all the receivers in
your setup.
If you want to watch a Pay-Per-View
program on TVs connected on each
receiver, you must order the program for
each receiver but you only pay for the
program once.
Possible Reason
What to Do
You may have not done anything
with the remote control or front
panel buttons for several
minutes.
The receiver has a time-out feature that
closes any menu after several minutes
of no activity. This will discard any
changes you have made, but otherwise
does no harm to the receiver. Start over
again.
Menus
What Is Happening
You were using a menu, and it
suddenly closed.
114
Reference
Remote Control Device Codes
REMOTE CONTROL DEVICE CODES
Included with your remote is a list of the manufacturer codes for programming the remote to control your
TV, VCR, Blu-ray Disc™ or DVD player, or audio equipment. Every attempt has been made to include all
codes. If your device brand is not listed or if the codes listed do not work, then the DISH remote may not
control your specific device. In some cases, codes may operate some but not all of the buttons.
115
Reference
Remote Control Device Codes
116
Index
A
D
H
Account
Adding Channels 46
Additional Services 6
Information 3, 4
Pay Bill 46
Review Statement 46
All Episodes 54
Alternate Language 87
ARCHOS portable media players 82
Attention Message 105
Daily Schedule 56
Timers 55, 60
Delete Recorded Programs 51
Device Codes 115
Diagnostics 100
Discrete Power On and Off 78
Dish Antenna 94
DISH On Demand 6, 27
Locks 41
Ordering 27
Reviewing Orders 27
DishHOME 6, 46
DishPASS 54, 59
Dolby Surround Sound Settings 89
DVR 48
DVR Codes 114
History
Caller ID 84
Purchase 27
Search 24
Timers and Recordings 56
B
Batteries 11
Broadband Internet
Connection 96
Why to Connect 7
Browse 15, 21
Favorites Lists 32
Browse Banner
Troubleshooting 108
Buttons
Front Panel 10
Remote Control 12, 13, 14
C
Caller ID 83
History 84
Screens 83
Setting Up 83
Troubleshooting 112
Canceling a Procedure 16
Changing Channels 20
Troubleshooting 107
Changing Languages 87
Troubleshooting 112
Channel Display 86
Channel Display Preferences 86
Channel Lists 20
Channel Display 86
Display 85
Favorites 32
Channels
Descriptive Audio 87
Hiding Adult Channels 41
Hiding Locked Channels 41
Locks 40
Check Switch 101
Closed Captions 88
Connections 10, 93
Content Labels for TV Ratings 39
Customer Service 46
E
Entering Text 17
ERD Setup 52
Error Message 105
F
Factory Defaults 90
Fast Forwarding 49
Favorites Lists 32
Changing 32
Creating 32
Naming 33
Troubleshooting 110
Using 34
FCC Compliance 127
Finding Programs 20
Browse 15, 21
Keywords 23
Program Guide 15
Search 22
Themes 15, 22
Frame-By-Frame 49
G
Games 46
G—General Audiences MPAA
Ratings 37
Group 51
Guide 15, 20
Changing Channels Listed 32
Changing Favorites Lists 34
Using Favorites Lists 34
Guide Display Preference 85
I
Inactivity Standby 91
Installation
Broadband Internet Connection
96
Channel Scan for Over-the-Air
Channels 96
Dish Antenna 94
Over-the-Air Antenna 96
Peaking Over-the-Air Antenna 97
Phone Line 95
Safety Instructions vi
Interactive TV 46
K
Keyboard 17
Keywords 23
L
Languages 87
Limited Mode 66
Limited Warranty 118
Locks 36
Change Password 43
Changing 36
Channels 40
Create Password 43
Creating 36
DISH On Demand 41
Favorites Lists 34
Front Panel Buttons 42
Hiding Adult Channels 41
Hiding Locked Channels 41
Locking Receiver 36, 44
Pay-Per-View 41
Timers 57
Troubleshooting 113
M
Menus 15
Canceling a Procedure 16
Choices 16
Closing 15
On-screen Keyboard 17
Opening 15
Text Fields 17
Troubleshooting 114
Missed Recordings 56
Missing Channels 34
129
Index
MPAA Rating
NC-17—No One 17 and Under
Admitted 38
MPAA Ratin—-PG-13—Parents
Strongly Cautioned 37
MPAA Ratings
G—General Audiences 37
NR/AP—Not Rated 38
PG—Parental Guidance
Suggested 37
R—Restricted 38
Multimedia 80
My Recordings List 50
Group 51
Sort 51
N
NC-17—No One 17 and Under
Admitted MPAA Rating 38
New Episodes 54
NR/AO—Not Rated MPAA Rating 38
O
On-screen Keyboard 17
On-screen Logo 8
On-screen Menus 15
Ordering Channels 46
Over-the-Air Antenna 96
Broadcasts 98
Channel Scan 96
Peaking 97
P
Parental Controls 36
Change Password 43
Changing 36
Channels 40
Create Password 43
Creating 36
Front Panel Buttons 42
Hiding Adult Channels 41
Hiding Locked Channels 41
Locking Receiver 36, 44
Password 43
Pausing a Program 48
Pausing Live TV 5
Pay-Per-View 6, 26
Locks 41
Ordering 26
Reviewing Orders 27
Timers 57
Troubleshooting 114
PG-13—Parents Strongly Cautioned
MPAA Rating 37
PG—Parental Guidance Suggested
MPAA Rating 37
Phone Line 95
130
Troubleshooting 113
Why to Connect 7
Playing a Recorded Program 50
Point Dish 101
portable media player, ARCHOS 82
Preferences
Channel Display 85
Closed Captioning 88
Inactivity Standby 91
Updates 91
Program Guide 15, 20
Changing Channels Listed 32
Changing Favorites Lists 34
Channel Display 86
Color 32
Display 85
Favorites Lists 32
Troubleshooting 108
Using Favorites Lists 34
Programming
Ordering 3, 46
Upgrading 3, 46
Programs
Descriptive Audio 87
DISH On Demand 6, 27
Fast Forwarding 49
Finding a Program 5
Frame-By-Frame 49
Hiding Adult Channels 41
Hiding Locked Channels 41
Locking 36
Ordering DISH On Demand 27
Ordering Pay-Per-View 26
Pausing 48
Pay-Per-View 6, 26
Playing Recorded Programs 50
Recording 50, 54
Reviewing Orders 27
Search 22
Slow Motion 49
Timer Considerations 57
R
Reception
Over-the-Air Antenna 98
Rain and Snow 7
Satellite TV 7
Solar Interference 7
Record Link 52, 54
Recorded Events
Delete 51
Fast Forwarding 49
Frame-By-Frame 49
Grouping 51
Playing 50
Reversing 49
Rewinding 49
Skipping 49
Slow Motion 49
Sorting 51
Recording 54
All Episodes 54
Automatic Timer 58
Considerations 57
Daily Schedule 56
Deleting Timers 60
DishPASS 54, 59
Manual Timer 58
New Episodes 54
Playing Back a Program 6
Programs 50
Receiver is Off 57
Skipped Timers 56
Timer Frequency 54
Timer Options 55
Timer Priorities 54
Timer Types 54
Timers List 55
Troubleshooting 61
Recover Button 77
Remote Control 11
Address 64, 65
Antenna 11
AUX Mode 66
Batteries 11
Buttons 12, 13, 14, 48, 49
Changing Address 65
Changing Tuner/Amplifier
Volume 75
Changing TV Volume 75
Checking Device Codes 74
Combination Devices 70
Confirm Operation 65
Device Code Scan 71
Device Codes 70, 115
Discrete Power On and Off 78
DVD Mode 14
Entering Text 17
Improving Operation 64
Limited Mode 66
Low Battery Warning 11
Making Remote Work with
Receiver 64
Modes 66
Number Pad 17
Operating a Second Satellite
Receiver 76
Operating Other Devices 66, 70,
71
Operating Receiver 64
Index
Programming Universal Remote
78
Recover Button 77
SAT Auto-Tune 67
SAT Mode 12, 66
TV Mode 13, 66
VCR Mode 66
Resetting Factory Defaults 90
Resetting Your Receiver 100
Residential Customer Agreement 119
R—Restricted MPAA Rating 38
S
SAT Auto-Tune 67
Satellite Receiver
Back Panel 10
Buttons 10
Connections 10
Front Panel 10
Front Panel Lock 42
Multimedia 80
Overview 10
Updates 91
USB Port 80
Satellite TV Reception 7
Rain and Snow 7
Solar Interference 7
Screensaver 8
Search
DishPASS 54, 59
History 24
Keywords 23
Searching for Programs 22
Skipping 49
Slow Motion 49
Sort 51
Staying Legal 127
Surround Sound Settings 89
T
Text Fields 17
Themes 15
Themes and Search 22
Timers 54
All Episodes 54
Automatic Timer 58
Considerations 57
Create a Manual Timer 55
Daily Schedule 56, 60
Deleting 60
DishPASS 54, 59
Manual Timer 58
New Episode 54
Priorities 54, 56
Receiver is Off 57
Record Link 52
Reminder 57
Restore 56
Skip 56
Skipped Timers 56
Starts Recording 57
Timer Frequency 54
Timer Options 55
Timer Types 54
Timers List 55
Troubleshooting 61, 110
Troubleshooting 104
Caller ID 112
Changing Channels 107
Changing Languages 112
Diagnostics 100
Error Message 105
Favorites Lists 110
Hearing a Program 112
If You Need Assistance 118
Locks 113
Menus 114
Missing Channels 34
Pay-Per-View 114
Phone Line 113
Program Guide and Browse
Banner 108
Recover Button 77
Resetting Your Receiver 100
Snowy, Blue, or Black Screen 77
Timers 56, 61, 110
Tools 100
Watching a Program 109
Tv Rating
TV-Y7-FV—Directed to Older
Children - Fantasy Violence
38
TV Ratings
Content Labels 39
TV-14—Parents Strongly
Cautioned 39
TV-G—General Audience 38
TV-MA—Mature Audience Only
39
TV-PG—Parental Guidance
Suggested 38
TV-Y7—Directed to Older
Children 38
TV-Y—All Children 38
TV-14—Parents Strongly Cautioned
TV Rating 39
TV-G—General Audience TV Rating
38
TV-MA—Mature Audience Only TV
Rating 39
TV-PG—Parental Guidance
Suggested TV Rating 38
TV-Y7--Directed to Older Children TV
Rating 38
TV-Y7-FV—Directed to Older
Children - Fantasy Violence TV
Rating 38
TV-Y--All Children TV Rating 38
U
Universal Remote Control
Programming 78
Updates 91
User’s Guide
Conventions 3
How to Use 2
V
Video on Demand 27
W
Watching TV 4, 20
131
Index
Notes
132
Index
Notes
133
Index
Notes
134
Index
Notes
135
Index
Notes
136
Index
Notes
137
Index
Notes
138
Receiver Information
Write the following information in the spaces provided below. You may need to provide this
information if you call the Service Center. To get the Conditional Access Numbers, display the
System Information screen (see Ordering Your Program Packages).
Purchase Location Name:
Purchase Location Telephone Number:
Receiver Serial Number:
Receiver Conditional Access Number
Smart Card Conditional Access Number:
Remote Control Settings
Remote Control
Remote Control Address (SAT Mode)
TV Code (TV Mode)
DVD Code (DVD Mode)
Auxiliary Code (AUX Mode)
TV Input/Channel Settings
TV
TV Input/Channel