1
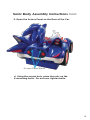
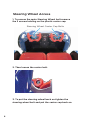
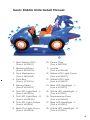
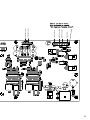
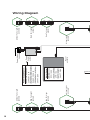
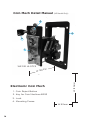
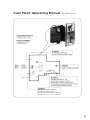
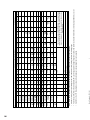
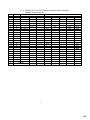
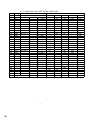
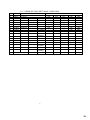
Version 070914
Sonic Kiddie Ride
BG-SSC-004 Kiddie Ride Owners Manual
Assembly operation and care instructions.
Serial #
Distributed By
Sales Person
Technical Service #
Dimension: L215 cm x W115 cm x H130 cm
Weight: 155 Kg
Voltage: 110V AC, 60Hz, .5A | 220V AC, 50Hz, .5A
Definition of 'Site Maintenance Personnel
or Other Qualified Individuals
WARNING
Servicing and maintenance work of the contents herein stated should be
performed by the SERVICEMAN stipulated as per IEC Standard. Those who do
not have technical expertise and knowledge other than the SERVICEMAN are not
allowed to perform the work herein stated. Executing aforementioned work by
such non-technical personnel can cause serious accidents that may endanger life.
Parts replacement, maintenance inspections and troubleshooting should
be carried out by site maintenance personnel or other qualified
professionals. This manual includes directions for potentially dangerous
procedures which should only be carried out by professionals with the
appropriate specialised knowledge.
The site maintenance personnel or other qualified professionals
mentioned in this manual are defined as follows:
Site maintenance personnel:
Individuals with experience in maintaining amusement equipment, vending
machines, etc., working under the supervision of the owner/operator of
this product to maintain machines within amusement facilities or similar
premises by carrying out everyday procedures such as assembly,
maintenance inspections, and replacement of units/expendable parts.
Activities to be carried out by site maintenance personnel:
Amusement equipment/vending machine assembly, maintenance
inspection and replacement of units/expendable parts.
Other qualified professionals:
Persons employed by amusement equipment manufacturers, or involved
in design, production, testing or maintenance of amusement equipment.
The individual should have either graduated from technical school or hold
similar qualifications in electrical/electronics/mechanical engineering.
Activities to be carried out by other qualified professionals:
Amusement equipment/vending machine assembly, repair/adjustment of
electrical/electronic/mechanical parts.
1
Safety Instructions for use and play.
Once you place the ride in it’s desired location please ensure
that the 4 rubber stopper legs are all the way the floor and the
car is not supported by the wheels.
Risk of Electric Shock
Hazardous voltage which can cause electrical shock
exists inside the equipment. Only qualified personnel
should work inside the equipment.
Playing Warnings
Spectators should not climb on the ride. This may
cause injury.
This game features flashing lights which may not be
suitable for photosensitive epilepsy.
Before using this product
To ensure the safe operation of this product, be sure to read the following before usage.
The following instructions are intended for the users, operators and the personnel in charge
of the operation of the product. After carefully reading and sufficiently understanding the
warning displays and cautions, handle the product appropriately. Be sure to keep this
manual for future reference.
Perform work in accordance with the instructions herein stated. Instructions for work are
explained by paying attention to the aspect of accident prevention. Failing to perform work
as per the instructions can cause accidents. In the case where only those who have technical
expertise should perform the work to avoid hazardous situation, the instructions herein state
that the site maintenance personnel should perform such work.
• Be sure to turn off the power before working on the machine. To prevent an electric shock,
be sure to turn off the power before carrying out any work that requires direct contact with
the interior of the product. If the work is to be performed in the power-on status, the
Instruction Manual herein always states to that effect.
• Be sure to ground the Earth Terminal. (This is not required in the case where a power cord
with earth is used.)
• This product is equipped with the Earth Terminal. When installing the product, connect the
Earth Terminal to the "accurately grounded indoor earth terminal" by using an earth wire.
Unless the product is grounded appropriately, the user can be subject to an electric shock.
After performing repair, etc. for the control equipment, ensure that the Earth Wire is firmly
connected to the control equipment.
• Ensure that the Power Supply used is equipped with an Earth Leakage Breaker. This
product does not incorporate the Earth Leakage Breaker. Using a power supply which is not
equipped with the Earth Leakage Breaker can cause a fire when earth leakage occurs.
• Be sure to use fuses which meet the specified rating. (Only for the machines which use
fuses.) Using fuses exceeding the specified rating can cause a fire and an electric shock.
(Only for the machines which use fuses.)Using fuses exceeding the specified rating can
cause a fire and an electric shock.
• Ensure that the product meets the requirements of appropriate electrical specifications.
Before installing the product, check for electrical specifications. Ensure that the product is
compatible with the power supply voltage and frequency requirements of the location.
Using any electrical specifications different from the designated specifications can cause a
fire and an electric shock.
2
• Install and operate the product in places where appropriate lighting is available, allowing
warning labels to be clearly read. To ensure safety for the customers, labels and printed
instructions describing potentially hazardous situations are applied to places where
accidents can be caused. Ensure that where the product is operated has sufficient lighting
allowing the warnings to be read. If any label is peeled off, apply it again immediately.
Please place an order from office herein stated.
INSPECTIONS IMMEDIATELY AFTER TRANSPORTING THE
PRODUCT TO THE LOCATION
Before turning on the power, check the following points to ensure that the product has been
transported in a satisfactory status.
• Are there any dented portions or defects (cuts, etc.) on the external surfaces of the cabinet?
• Are casters and adjusters damaged?
• Do the power supply voltage and frequency requirements meet with those of the location?
• Are all wiring connectors correctly and securely connected? Unless connected in the correct
way, connector connections can not be made accurately. Do not insert connectors forcibly.
• Do power cables have cuts and dents?
• Are all accessories available?
• Can all doors/lids be opened with the accessory keys? Can doors/-lids be firmly closed?
3
Sonic Body Assembly Instructions
1. Locate Sonic Body Bolt Holes
Sonic Body Bolt Holes
2. Place Sonic Body on guiding the 6 bolts into location.
Insert Sonic
with Bolts Here
Insert Sonic
with Bolts Here
Insert Sonic
with Bolts Here
4
Sonic Body Assembly Instructions Cont.
3. Open the Access Panel on the Rear of the Car.
Access Panel Bolts
4. Using the access hole, place the nuts on the
6 mounting bolts. Do not over tighten bolts.
5
Steering Wheel Access
1. To access the main Steering Wheel bolt remove
the 3 screws holding on the plastic center cap.
Steering Wheel Center Cap Bolts
2. Then loosen the center bolt.
3. To put the steering wheel back on tighten the
steering wheel bolt and put the center cap back on.
6
LED Light Replacement
1. To access the main Steering Wheel bolt remove
the 3 screws holding on the plastic center cap.
LED Wheel Cover Access Screws
LED Light Cover Access
7
Warning Sticker Placement
MAXIMUM of 2 Riders
at any one time.
Weight limit 80 KG
MAXIMUM of 2 Riders
at any one time.
Weight limit 80 KG
Caution Moving Car Body
Caution Moving Car Body
[40 kg per rider]
ATTENTION
[40 kg per rider]
ATTENTION
PLEASE DO NOT leave children
unattended. Children MUST be
seated and supervised at all
times or injuries may occur.
PLEASE DO NOT leave children
unattended. Children MUST be
seated and supervised at all
times or injuries may occur.
ATTENTION
DO NOT CLIMB
ATTENTION
DO NOT CLIMB
Technician Access Only
Refer to Manual for Service
ATTENTION
FENG YUNG CHENG CO., LTD (FYC)
9F-1, NO.48, TIEN SHUI RD TAIPEI 103, TAIWAN, R.O.C.
MODEL
SONIC CAR
VOLTAGE
AC110/120V
POWER
.5A [237W]
FREQUENCY
50/60 Hz
DATE
12/20/2013
FUSE
3.15A
WEIGHT
SERIAL NO
BG-SGKDXXXX
SPECIAL
SPEC
Authorized Service Only
FENG YUNG CHENG CO., LTD (FYC)
9F-1, NO.48, TIEN SHUI RD TAIPEI 103, TAIWAN, R.O.C.
MODEL
SONIC CAR
VOLTAGE
AC110/120V
POWER
.5A [237W]
50/60 Hz
DATE
12/20/2013
FUSE
3.15A
WEIGHT
SERIAL NO
BG-SGKDXXXX
FREQUENCY
SPECIAL
SPEC
155 Kg
MADE IN TAIWAN
155 Kg
MADE IN TAIWAN
Technician Access Only
Refer to Manual for Service
ATTENTION
Authorized Service Only
Insert Coin and
Push START to Start Ride
Hold Steering Wheel
8
Sonic Kiddie Ride Detail Manual
6
18
1
17
16
15
2
5
7
3
4
14
8
9
12
13
10
11
1. Start Button/SFX
[Part # 4230207]
2. Steering Wheel
[Part # 4230205]
3. Coin Mechanism
[Part # 3604056]
4. Coin Box
[Part # 4712120z]
5. Racing Seats
[Part # 4230203]
6. Tail LED Light Red - L
[Part # 4233613L]
7. Tail LED Light Red - R
[Part # 4233613R]
8. Tail LED Light Amber
[Part # 4233614]
9. Back Fin Light Cover
[Part # 4235008]
10. Power Plug
[Part # 3601216]
11. Leveler
[Part # 4230028]
12. Wheel LED Light Cover
[Part # 4236014]
13. Wheel LED Light
[Part # 4233610]
14. Blue LED Headlight - L
[Part # 4233612]
15. White LED Headlight - L
[Part # 4233611]
16. Maintenance Door
[Part # 4235003]
17. Blue LED Headlight - L
[Part # 4233612]
18. White LED Headlight - R
[Part # 4233611]
9
+12VDC
RESERVED (future accessory)
RESERVED (future accessory)
RESERVED (future accessory)
[CN8 is the same]
10
WHEEL BLUE output
WHEEL RED output
WHEEL GREEN output
+12VDC
HEAD/TAIL “T” output
HEAD/TAIL “R” output
HEAD/TAIL “L” output
+12VDC
COIN COUNTER output
+12VDC
GND
RESERVED (future accessory)
RESERVED (future accessory)
+12VDC
GND
HORN SWITCH input
HORN LIGHT output
+12VDC
GND
COIN SWITCH input
COIN COUNTER input
+12VDC
MPU Diagram
[CN4 is the same]
11
GND SUPPLY
MOTOR (-) output
MOTOR (+) output
+24VDC SUPPLY
SPEAKER output 2
SPEAKER output 1
1
2
3
4
12
1
2
3
4
red
white
green
black
red 1
white 2
green 3
black 4
1
2
3
4
red
white
green
black
red 1
white 2
green 3
black 4
1
2
3
4
red
white
green
black
Wheel Light
4233610
Motor
4237070
black
white
3A MDQ
Wheel Light
4233610
Red Tail Light
4233613
4233613
Red Tail Light
4233614
Amber Tail Light
red 1
white 2
green 3
black 4
HP: 1/4
RPM: 1800
VOLT: 24VDC
AMP: 10A
DUTY: CONT
SHAFT: 5/8K
white
green
black
Motor Specs:
4237071
Power
Supply
I
O
1 red
2 white
3 green
4 black
Red Tail Light
4233613
DC VOLTAGE: 24VDC
CURRENT: 13.4A
RATED POWER: 321.6W
RANGE: 20-26.4V
FREQUENCY: 47-63Hz
SHAFT: 5/8K
Power Supply Specs:
3699020
POWER CORD
red 1
white 2
green 3
black 4
4233613
Red Tail Light
4233614
Power Module
1 red
2 white
3 green
4 black
ech Meter
1
2
3
4
ech Meter
Amber Tail Light
Wiring Diagram
1 red
2 white
3 green
4 black
1
2
3
4
1
2
3
4
1
2
3
4
1
2
3
4
red
white
green
black
white
green
black
white
black
red
white
green
black
Wheel Light
4233610
red
white
green
black
black
4
motor (-) output
motor (+) output
+24VDC
1
white
2
speaker output 2
green
3
speaker output 1
4
0000
Coin Counter
3699002
red
white
green
black
red
white
green
black
red
white
red
white
green
red
Wire Block
4232394
Speaker
3611011
12VDC Out to
black
yellow
white
red
6
Main MPU
green
white
3
5
Common Out to
red
ground
2
black
white
white
1
2
3
4
5
6
7
8
+12VDC
head/tail Loutput
head/tail R output
head/tail T output
+12VDC
wheel G output
wheel R output
wheel B output
red
white
green
black
red
white
green
black
1
2
3
4
5
6
7
8
+12VDC
head/tail Loutput
head/tail R output
head/tail T output
+12VDC
wheel G output
wheel R output
wheel B output
red 1
white 2
green 3
black 4
1
2
3
4
red
white
green
black
red 1
white 2
green 3
black 4
red
white
green
black
red
white
green
black
1
2
3
4
5
6
7
8
9
10
11
12
+12VDC
counter input
coin switch input
ground
+12VDC
horn light output
horn switch input
GND
4233611
White HeadLight
red
white
green
black
4233612
1
2
3
4
red
white
green
black
Blue
HeadLight
red 1
white 2
green 3
black 4
Start Button
4230207
red 1 +12VDC
white 2 coin output
Wheel Light
4233610
Excel Board
1
Wiring Diagram
Sonic Kiddie Ride
BG-SSC-004
1
2
3
4
4233611
red 1
white 2
green 3
black 4
White HeadLight
red
white
green
black
1
2
3
4
red
white
green
black
4233612
red 1
white 2
green 3
black 4
1
2
3
4
Blue HeadLight
red 1
white 2
green 3
black 4
1
2
3
4
red
white
green
black
13
Coin Mech Detail Manual (US Model Only)
3
4
2
1
WEIYEI HI-07CS
m
W 120mm
30m
W1
Electronic Coin Mech
1. Coin Reject Button
2. Key for Coin Machine #8153
3. Lock
4. Mounting Frame
W 63mm
14
Coin Mech Operating Manual (US Model Only)
Adjust VR sensitivity Tuning
Clockwise: slack selection
Counter-clockwise: strict selection
15
Coin Mech Operating Manual (US Model Only)
STEP 1
Choose the right coin for use in the clamp.
STEP 2
Adjust the right insert size for use from the front panel
back side.
STEP 3
Select the right mode: Normal Open/Normal Close
“Timer Switch” for synchronizing your system.
100ms (Slow Speed/Long Pulse)
50ms (Medium Speed/Medium Pulse)
30ms (Fast Speed/Short Pulse)
STEP 4
Adjust VR Sensitivity Tuning
Clockwise: slack selection (LED dark -> light)
Counter-clockwise: strict selection (LED light -> dark)
16
Coin Box Manual
3
2
1
4
5
Details
1. Key for Coin Box #103
2. Lock
3. Coin Box Frame
4. Coin Box
5. Door of Coin Box
Size: W:175mm x L: 145mm x H: 175mm
17
Maintenance Access Manual
1
Details
1. Security Access Screws
Sonic Kiddie Ride Motherboard.
18
DIP Switch Adjustment
I = UP
O = DOWN
*Default switch position is down.
SW1 - Dip Switch 1
Free
1 Coin
2 Coins
3 Coins
4 Coins
5 Coins
Sound Test
10 Seconds
1 Minute
2 Minutes
2.5 Minutes
3 Minutes
3.5 Minutes
4 Minutes
5 Minutes
0 Second Delay
1 Second Delay
3 Second Delay
5 Second Delay
1
I
I
I
I
0
0
0
2
I
I
0
0
I
I
0
O=OFF I=ON
3 4 5 6 7 8
I
0
I
0
I
0
I
I I I
I 1 0
I 0 I
0 0 1
I 0 0
0 0 0
0 I I
0 I 0
I I
I 0
0 I
0 0
19
Service Engineers & Maintenance Personnel
No Power
• Make sure the power connector is connected and have correct
voltage. Make sure all power switches are “ON”.
• Check the distribution switch is “ON”.
• Check power going out of the 24VDC Switched Mode Power Supply
Cannot Insert Coin
• Go to page 13 in manual to check coin settings.
• Reinstall reference coin.
• Make sure DIP switches are set for desired setting.
No Sound
• Adjust amplifier volume.
• Check wire connecting speaker
• Make sure game is credited and ON
START/FX Button Failure
• Change micro switch.
• Check wire connecting.
• Check PCB connection
Ride Not Moving.
• Check motor for damage
• Inspect Orange torque Safety arm
• Inspect Gear Box for leaking oil.
• Check to see if there is debris blocking the base from moving.
Maintenance Guide
1. Please keep the machine clean. The exterior is touched by players,
resulting in it getting dirty, so please use neutral cleaners on surface.
2. Please regularly clean the machine to maintain appearance.
Use stain removers or detergents to clean and remove stains.
3. Check underneath the unit for debris.
4. The appliance must not be cleaned by a water jet.
5. Moving parts inside the appliance, turn off the power before
getting into the appliance.
20
Part Number
Part Name
4237070
Sonic Kiddie Ride 24VDC Motor
4237069
Sonic Kiddie Ride Actuator Arm With Clutch
4237068
Sonic Kiddie Ride Gear Box
4237071
Sonic Kiddie Ride 24VDC Power Supply
4230028
Sonic Kiddie Ride Rubber Stopper
4230029
Sonic Kiddie Ride Caster Wheels
4233610
Sonic Kiddie Ride Wheel LED RGB
4236014
Sonic Kiddie Ride Wheel LED Cover
4233611R
Sonic Kiddie Ride White Headlight - Right
4233611L
Sonic Kiddie Ride White Headlight - Left
4236015
Sonic Kiddie Ride Large LED Cover
4233612R
Sonic Kiddie Ride Front Blue LED - Right
4233612L
Sonic Kiddie Ride Front Blue LED - Left
4236016
Sonic Kiddie Ride Small LED Cover
4233613L
Sonic Kiddie Ride Back Red LED - Left
4233613R
Sonic Kiddie Ride Back Red LED - Right
4233614
Sonic Kiddie Ride Amber Tail Light
4230205
Sonic Kiddie Ride Steering Wheel
4230206
Sonic Kiddie Ride Steering Wheel LED Cover
4230204
Sonic Kiddie Ride Steering Wheel Shaft
4230207
Sonic Kiddie Ride Sound FX Button
4230203
Sonic Kiddie Ride Seat
4232394
Sonic Kiddie Ride Main PC Board
4231246
Sonic Kiddie Ride LED Wire Harness
21
22
Part Number
Part Name
3601007
Power Cord (US Style)
3601216
European Power Cord
4235000
Sonic Kiddie Ride Sonic Character
4235001
Sonic Kiddie Ride Back Right Fin
4235002
Sonic Kiddie Ride Back Left Fin
4235008
Sonic Kiddie Ride Back Fin LED Cover
4235003
Sonic Kiddie Ride Hood
4235004
Sonic Kiddie Ride Trunk Access Panel
4235005
Sonic Kiddie Ride Orange Torque Safety Release
4235006
Sonic Kiddie Ride Bottom Skirt
4235007
Sonic Kiddie Ride Car Shell
4233280
Sonic Kiddie Ride Safety Stickers
3604056
Coin Mechanism
4232004
Kiddie Ride Key Set #103 And #8153
3699002
Kiddie Ride Numeric Counter
3611011
Kiddie Ride Speaker
3699020
Kiddie Ride Power Module
0234006.MXP
Small Fuse
BG-SKR-MPUPCB
Sonic Kiddie Ride MPU PCB
BG-SKR-SBACHS
Sonic Kiddie Ride Sub AC/DC Harness
[No motor and no power supply].
BG-SKR-DCHNS
Sonic Kiddie Ride DC Power Harness
[Main harness, headlight cable, jumper cable, wheel
cable, & amber cable]
BG-SKR-LTPCB
Sonic Kiddie Ride Lights PCB Set
[Main harness, headlight cable, jumper cable, wheel
cable, & amber cable]
COIN HANDLING INSTRUCTIONS.
Coin Handling Instructions
Pin 7
Pin 6
Pin 4
Pin 3
Pin 1
Excel Pin 7 - 12VDC Meter Output - Connect to the
coil
of -the
mechanical
meter
1)Positive
12vdc Meter
Output
Connect
to the Postitive
coil of(Red)
mechanical meter (Red)
2) Comm Meter Output - Connect this to the Common side of the Mechanical coin meter. (Black)
Excel Pin 6 - Comm Meter Output - Connect this to the
Common
side- Connect
of thethis
Mechanical
coinLine
meter.
(Black)
3) Coin Signal
to your 5vd Signal
from your
MPU
4) 0vdc input - Connect this to 0vdc (Ground) from your PSU or MPU
Excel Pin 4 - Coin Signal - Connect this to your 5VDC
5) 12vdc
inputLine
- Connect
thisyour
to a 12vdc
Supply inside your machine or from the MPU
Signal
from
MPU
Excel Pin 3 - 0VDC Input - Connect this 0VDC (Ground)
from your PSU or MSU
Excel Pin 1 - 12VDC Input - Connect this to a 12VDC
Supply inside your machine or from the MPU
23
COIN HANDLING INSTRUCTIONS.
Coin Handling Instructions
DIPSWITCH
Switch
Settings
DIP
SETTINGS
FOR for
EURO
¤
Acceptance
EURO (€) ACCEPTANCE
MECH
withWITH
SR3SR3Mech
1=OFF
1=OFF 2=OFF
2=OFF 3=ON
3=ON 4=OFF
4=OFF5=OFF
5=OFF6=OFF
6=OFF
24
COIN RIBBON LOOM
Loom
Settings
DIP Switch
DIP SWITCH
SETTINGS FOR Coin Ribbon
THE COIN LOOM MUST BE
(SW1)
for ¤1 Per Play
€1 PER PLAY
The coin CONNECTED
loom
TO THIS
(SW1)
INPUT
MUST be connected
1=OFF
1= ON
(CN5)
to this input (CN5).
2=OFF
2=OFF
3=ON
3=OFF
4=OFF
4=OFF
5=ON
5=OFF
6=OFF
COIN HANDLING INSTRUCTIONS.
Coin Handling Instructions
NRI COIN MECH
DIP Coin
SWITCHMech
SETTINGS
NRI
DIP Switch
FOR EURO Settings
COIN (€) ACCEPTANCE
for Euro Coin (¤)
TOP BANK
Acceptance
TOP BANK
1=OFF
1=OFF
2=OFF
3=OFF
2=OFF
4=OFF
3=ON
5=OFF
4=OFF
6=OFF
5=OFF
7=OFF
6=OFF
8=OFF
9=OFF
7=OFF
10=ON
8=OFF
9=OFF
10=ON
25
26
Coin Controls
SR3 Parallel
ON
OFF
ON
ON
OFF
ON
ON
OFF
OFF
OFF
ON
ON
OFF
OFF
OFF
ON
ON
ON
OFF
OFF
ON
ON
ON
OFF
OFF
OFF
OFF
ON
OFF
50p new
50Pta
new
100Es
50¢
200Pta
20p
50BFr
5NLG
10Sch
200Pta
£1
!1
£2
50p new
50p new
TBA
OFF Direct Mode
ON 2 channel Mode
200Es
!1
TBA
100Pta
500Pta
10p
20Sch
500Pta
£2
!2
£1
£1
£1
£1
50Es
-
100Pta
50p
20BFr
2.5NLG
5Sch
100Pta
50p new
50¢
20p
20p
20p
20p
25Pta
new
-
50Pta
£1
5BFr
1NLG
1Sch
50Pta
20p
20¢
10p
10p
10p
10p
£2
£2
50p old
-
-
-
-
50Pta
old
-
-
-
-
-
COIN7
-
25Pta
old
-
25Pta
old
200Pta
50p
old
50p
old
-
£2
COIN8
-
-
50p old
-
50Pta
old
-
-
25Pta
old
-
-
-
-
-
C120/SR3 Only
COIN9 COIN10 COIN11 COIN12
Set SW 3 on the VTS /Excel board as shown in the table above corresponding to the country required.
•
1
For Germany (DM), France (Fr) & Switzerland (SFr), use the appropriate existing setting shown above (from another country) that matches the coin ratios programmed into your coin mech.
•
Rev 1Updated:- 23/11/01
Set SW 1 according to the option settings found in the relevant Price of Play Settings Table on the following pages.
•
Please Note
The credit board automatically sets the validator for parallel and binary
operation through an output on pin 8 of the 17 way pinstrip. For the feature
to work it is necessary for the validator interconnecting cable to include at
wire at this position
50Pta
old
-
200Pt
old
-
25Pta
25Pta
-
£2
10p
10¢
50p new 50p old
-
-
-
Credit Board Mode Settings Switch 3
Coin Validator Programming
COIN1 COIN2
COIN3
COIN4 COIN5 COIN6
£1
50p new
20p
10p
50p old
Note: These switch settings are under constant review and may change due to world currency updates.
Channels
TBA
OFF
OFF
OFF
Parallel
Spain
Portugal
Euro
ON
ON
ON
SR3/NRI
Parallel
ON
ON
OFF
OFF
ON
OFF
ON
OFF
ON
OFF
ON
OFF
OFF
ON
ON
OFF
OFF
ON
OFF
Coin Controls
C220 Parallel
Spain
C220 Binary
NRI Parallel
UK
Parallel
Belgium
Parallel
Holland
SR3
Parallel
Austria
Spain Coin Controls
Mars ME/MS
111 Parallel
Coin Controls
SR3 Parallel
UK
Euro
UK
C220 Parallel
Coin Controls
C220 Binary
Coin Controls
C220 Binary
Switch 3 Setting
SW1 SW2 SW3 SW4 SW5 SW6
Coin Controls OFF OFF OFF OFF
Setting
UK
UK
UK
UK
Country
Price
1
2
3
4
5
6
7
8
9
10
11
12
13
14
15
16
17
18
19
20
21
22
23
24
25
26
27
28
29
30
31
32
1.1.1. PRICE OF PLAY SETTINGS UK
Bonus
10p
No Bonus
10p
6 = 50p
20p
No Bonus
20p
3 = 50p
6 = £1
30p
No Bonus
30p
1.66 = 50p
4 = £1
30p
2 = 50p
4 = £1
30p
AMLD *
3 = £1
40p
No Bonus
40p
1.25 = 50p
3 = £1
50p
No Bonus
50p
3 = £1
50p
2 = £1
60p
No Bonus
60p
2 = £1
80p
No Bonus
80p
1.25 = £1 2 = £1.50
£1
No Bonus
£1
3 = £2
£1
2 = £2
£1.50
No Bonus
£1.50
2 = £2
£2
No Bonus
£2
£3
No Bonus
£3
£5
No Bonus
£5
£7.50
No Bonus
£7.50
£10
No Bonus
Free Play
Rev 1Updated:- 23/11/01
12 =£2
8 = £2
6 = £2
6 = £2
6 = £2
5 = £2
4 = £2
2.5 = £2
5 = £4
3 = £5
2 = £5
3 = £10
2 = £10
DIL Switch 1
Switch 1 Switch 2 Switch 3 Switch 4 Switch 5
OFF
OFF
OFF
OFF
OFF
OFF
OFF
OFF
OFF
ON
OFF
OFF
OFF
OFF
ON
OFF
OFF
OFF
ON
ON
OFF
OFF
OFF
OFF
ON
OFF
OFF
OFF
ON
ON
OFF
OFF
OFF
ON
ON
OFF
OFF
ON
ON
ON
OFF
OFF
OFF
OFF
ON
OFF
OFF
OFF
ON
ON
OFF
OFF
ON
OFF
ON
OFF
OFF
ON
ON
ON
OFF
OFF
OFF
ON
ON
OFF
OFF
ON
ON
ON
OFF
OFF
ON
ON
ON
OFF
ON
ON
ON
ON
OFF
OFF
OFF
OFF
ON
OFF
OFF
OFF
ON
ON
OFF
OFF
OFF
ON
ON
OFF
OFF
ON
ON
ON
OFF
OFF
OFF
ON
ON
OFF
ON
ON
OFF
ON
OFF
OFF
ON
ON
ON
OFF
ON
ON
ON
ON
OFF
OFF
OFF
ON
ON
OFF
OFF
ON
ON
ON
OFF
OFF
ON
ON
ON
OFF
ON
ON
ON
ON
OFF
OFF
ON
ON
ON
ON
OFF
ON
OFF
ON
ON
ON
ON
ON
ON
ON
ON
ON
ON
ON
2
27
Price
1
2
3
4
5
6
7
8
9
10
11
12
13
14
15
16
17
18
19
20
21
22
23
24
25
26
27
28
29
30
31
32
1.1.2. PRICE OF PLAY SETTINGS EURO
Bonus
DIL Switch 1
10¢
No Bonus
10¢
6 = 50¢
20¢
No Bonus
20¢
3 = 50¢
6 = !1
30¢
No Bonus
30¢
1.66 = 50¢
4 = !1
30¢
2 = 50¢
4 = !1
30¢
AMLD *
3 = !1
40¢
No Bonus
40¢
1.25 = 50¢
3 = !1
50¢
No Bonus
50¢
3 = !1
50¢
2 = !1
60¢
No Bonus
60¢
2 = !1
80¢
No Bonus
80¢
1.25 = £1 2 = !1.50
!1
No Bonus
!1
3 = !2
!1
2 = !2
!1.50
No Bonus
!1.50
2 = !2
!2
No Bonus
!2
!3
No Bonus
!3
!5
No Bonus
!5
!7.50
No Bonus
!7.50
!10
No Bonus
Free Play
Rev 1Updated:- 23/11/01
28
12 =!2
8 = !2
6 = !2
6 = !2
6 = !2
5 = !2
4 = !2
2.5 = !2
5 = !4
3 = !5
2 = !5
3 = !10
2 = !10
3
Switch 1 Switch 2 Switch 3 Switch 4 Switch 5
OFF
OFF
OFF
OFF
OFF
OFF
OFF
OFF
OFF
ON
OFF
OFF
OFF
OFF
ON
OFF
OFF
OFF
ON
ON
OFF
OFF
OFF
OFF
ON
OFF
OFF
OFF
ON
ON
OFF
OFF
OFF
ON
ON
OFF
OFF
ON
ON
ON
OFF
OFF
OFF
OFF
ON
OFF
OFF
OFF
ON
ON
OFF
OFF
ON
OFF
ON
OFF
OFF
ON
ON
ON
OFF
OFF
OFF
ON
ON
OFF
OFF
ON
ON
ON
OFF
OFF
ON
ON
ON
OFF
ON
ON
ON
ON
OFF
OFF
OFF
OFF
ON
OFF
OFF
OFF
ON
ON
OFF
OFF
OFF
ON
ON
OFF
OFF
ON
ON
ON
OFF
OFF
OFF
ON
ON
OFF
ON
ON
OFF
ON
OFF
OFF
ON
ON
ON
OFF
ON
ON
ON
ON
OFF
OFF
OFF
ON
ON
OFF
OFF
ON
ON
ON
OFF
OFF
ON
ON
ON
OFF
ON
ON
ON
ON
OFF
OFF
ON
ON
ON
ON
OFF
ON
OFF
ON
ON
ON
ON
ON
ON
ON
ON
ON
ON
ON
1.1.3. PRICE OF PLAY SETTINGS Austria-Czech-DenmarkNorway-Israel-France2
Price
1
2
3
4
5
6
7
8
9
10
11
12
13
14
15
16
17
18
19
20
21
22
23
24
32
1
1
1
2
2
2
3
3
3
4
4
5
5
6
6
8
10
10
20
20
30
30
50
50
Bonus
No Bonus
11 = 10
6=5
No Bonus
6 = 10
Switch 2
OFF
OFF
OFF
ON
ON
ON
ON
OFF
ON
3=5
No Bonus
OFF
4 = 10
ON
2=5
OFF
3 = 10
ON
OFF
ON
No Bonus
No Bonus
3 = 10
No Bonus
4 = 20
OFF
ON
OFF
ON
No Bonus
No Bonus
OFF
3 = 20
No Bonus
ON
OFF
3 = 50
No Bonus
ON
OFF
2 = 50
No Bonus
ON
OFF
3 = 100
Free Play
Rev 1Updated:- 23/11/01
Switch 1
OFF
ON
ON
OFF
OFF
ON
ON
Switch 1
Switch 3
OFF
OFF
OFF
OFF
ON
ON
ON
ON
OFF
OFF
OFF
OFF
ON
ON
OFF
OFF
OFF
ON
ON
OFF
OFF
ON
ON
OFF
OFF
ON
ON
ON
OFF
ON
ON
ON
ON
OFF
OFF
OFF
OFF
ON
ON
ON
ON
ON
Switch 4
OFF
OFF
OFF
OFF
OFF
OFF
OFF
OFF
ON
ON
ON
ON
ON
ON
ON
ON
OFF
OFF
OFF
OFF
OFF
OFF
OFF
OFF
ON
Switch 5
OFF
OFF
OFF
OFF
OFF
OFF
OFF
OFF
OFF
OFF
OFF
OFF
OFF
OFF
OFF
OFF
ON
ON
ON
ON
ON
ON
ON
ON
ON
4
29
Price
1
2
3
4
5
6
7
8
9
10
11
12
13
14
15
16
17
18
19
20
21
22
23
24
25
26
27
28
29
30
31
32
5BFr
5BFr
5BFr
10BFr
10BFr
10BFr
15BFr
15BFr
15BFr
20BFr
20BFr
20BFr
25BFr
25BFr
25BFr
30BFr
30BFr
30BFr
40BFr
40BFr
50BFr
50BFr
1.1.4. PRICE OF PLAY SETTINGS - BELGIUM
Bonus
No Bonus
No Bonus
6 = 50BFr
Switch 2
OFF
OFF
OFF
ON
ON
ON
ON
OFF
ON
3 = 20BFr
No Bonus
OFF
4 = 50BFr
ON
7 = 100BFr
OFF
3 = 50BFr
ON
OFF
ON
No Bonus
3 = 50BFr
No Bonus
OFF
5=100BFr
3 = 50BFr
ON
OFF
No Bonus
4=100BFr
ON
OFF
ON
2=50BFr
No Bonus
OFF
3=100BFr
No Bonus
ON
OFF
3=100BFr
ON
OFF
ON
OFF
ON
OFF
ON
Free Play
Rev 1Updated:- 23/11/01
30
11 = 50BFr
5 = 20BFr
5
DIL Switch 1
Switch 1
OFF
OFF
OFF
ON
ON
Switch 3
OFF
OFF
OFF
OFF
ON
ON
ON
ON
OFF
OFF
OFF
OFF
ON
ON
OFF
OFF
OFF
ON
ON
OFF
OFF
ON
ON
OFF
OFF
ON
ON
OFF
OFF
ON
ON
OFF
OFF
ON
OFF
ON
OFF
ON
ON
OFF
ON
ON
ON
ON
OFF
OFF
OFF
OFF
ON
ON
ON
ON
OFF
OFF
OFF
OFF
ON
ON
ON
ON
Switch 4
OFF
OFF
OFF
OFF
OFF
OFF
OFF
OFF
ON
ON
ON
ON
ON
ON
ON
ON
OFF
OFF
OFF
OFF
OFF
OFF
OFF
OFF
ON
ON
ON
ON
ON
ON
ON
ON
Switch 5
OFF
OFF
OFF
OFF
OFF
OFF
OFF
OFF
OFF
OFF
OFF
OFF
OFF
OFF
OFF
OFF
ON
ON
ON
ON
ON
ON
ON
ON
ON
ON
ON
ON
ON
ON
ON
ON
1.1.5. PRICE OF PLAY SETTINGS - FRANCE
Price
Bonus
1
2
3
4
5
6
7
8
9
10
11
12
13
14
15
16
17
18
19
20
21
22
23
24
25
26
27
28
29
30
31
32
1Fr
No Bonus
1Fr
6 = 5Fr
2Fr
No Bonus
2Fr
3 = 5Fr
3Fr
No Bonus
3Fr
1.66 = 5Fr
3Fr
2 = 5Fr
3Fr
**
4Fr
No Bonus
4Fr
1.25 = 5Fr
5Fr
No Bonus
5Fr
5Fr
6Fr
No Bonus
6Fr
8Fr
No Bonus
8Fr
1.25 = 10Fr
10Fr
No Bonus
10Fr
10Fr
15Fr
No Bonus
15Fr
20Fr
No Bonus
20Fr
30Fr
No Bonus
30Fr
50Fr
No Bonus
50Fr
75Fr
No Bonus
75Fr
100Fr
No Bonus
Free Play
6 = 10Fr
12 =20Fr
4 = 10Fr
4 = 10Fr
3 = 10Fr
8 = 20Fr
3 = 10Fr
6 = 20Fr
3 = 10Fr
2 = 10Fr
6 = 20Fr
5 = 20Fr
2 = 10Fr
4 = 20Fr
2 = 15Fr
2.5 = 20Fr
3 = 20Fr
2 = 20Fr
5 = 40Fr
6 = 20Fr
2 = 20Fr
3 = 50Fr
2 = 50Fr
3 = 100Fr
2 = 100Fr
DIL Switch 1
Switch 1 Switch 2 Switch 3 Switch 4 Switch 5
OFF
OFF
OFF
OFF
OFF
OFF
OFF
OFF
OFF
ON
OFF
OFF
OFF
OFF
ON
OFF
OFF
OFF
ON
ON
OFF
OFF
OFF
OFF
ON
OFF
OFF
OFF
ON
ON
OFF
OFF
OFF
ON
ON
OFF
OFF
ON
ON
ON
OFF
OFF
OFF
OFF
ON
OFF
OFF
OFF
ON
ON
OFF
OFF
ON
OFF
ON
OFF
OFF
ON
ON
ON
OFF
OFF
OFF
ON
ON
OFF
OFF
ON
ON
ON
OFF
OFF
ON
ON
ON
OFF
ON
ON
ON
ON
OFF
OFF
OFF
OFF
ON
OFF
OFF
OFF
ON
ON
OFF
OFF
OFF
ON
ON
OFF
OFF
ON
ON
ON
OFF
OFF
OFF
ON
ON
OFF
ON
ON
OFF
ON
OFF
OFF
ON
ON
ON
OFF
ON
ON
ON
ON
OFF
OFF
OFF
ON
ON
OFF
OFF
ON
ON
ON
OFF
OFF
ON
ON
ON
OFF
ON
ON
ON
ON
OFF
OFF
ON
ON
ON
ON
OFF
ON
OFF
ON
ON
ON
ON
ON
ON
ON
ON
ON
ON
ON
* * This is a special setting which gives no credit until a total of 10Fr is input and
then gives three games.
Rev 1Updated:- 23/11/01
6
31
1.1.6.
Price
1
2
3
4
5
6
7
8
9
10
11
12
13
14
15
16
17
18
19
20
21
22
23
24
25
26
27
28
29
30
31
32
PRICE OF PLAY SETTINGS - ITALY
Bonus
OFF
ON
ON
ON
OFF
ON
OFF
ON
OFF
Rev 1Updated:- 23/11/01
32
Switch 2
OFF
OFF
ON
100L
No Bonus
100L
100L
200L
No Bonus
200L
200L
300L
No Bonus
300L
300L
400L
No Bonus
400L
400L
500L
No Bonus
500L
500L
600L
No Bonus
600L
600L
800L
No Bonus
800L
1000L
No Bonus
1000L
Free Play
6 = 500L
3 = 200L
ON
OFF
ON
OFF
3 = 500L
3 = 400L
ON
OFF
2 = 500L
ON
OFF
ON
3 = 600L
OFF
3 = 1000L
3 = 800L
ON
OFF
ON
3 = 1000L
OFF
5 = 2000L
ON
OFF
3 = 1200L
4 = 2000L
DIL Switch 1
Switch 1
OFF
ON
OFF
ON
OFF
OFF
ON
ON
ON
ON
ON
ON
OFF
OFF
OFF
OFF
ON
ON
OFF
OFF
OFF
ON
ON
OFF
OFF
ON
ON
OFF
OFF
ON
ON
OFF
OFF
ON
ON
2 = 1000L
OFF
OFF
2 = 1500L
ON
OFF
ON
OFF
ON
ON
7
Switch 3
OFF
OFF
OFF
OFF
OFF
ON
ON
ON
ON
OFF
OFF
OFF
OFF
ON
ON
ON
ON
OFF
OFF
OFF
OFF
ON
ON
ON
ON
Switch 4
OFF
OFF
OFF
OFF
OFF
OFF
OFF
OFF
ON
ON
ON
ON
ON
ON
ON
ON
OFF
OFF
OFF
OFF
OFF
OFF
OFF
OFF
ON
ON
ON
ON
ON
ON
ON
ON
Switch 5
OFF
OFF
OFF
OFF
OFF
OFF
OFF
OFF
OFF
OFF
OFF
OFF
OFF
OFF
OFF
OFF
ON
ON
ON
ON
ON
ON
ON
ON
ON
ON
ON
ON
ON
ON
ON
ON
Price
1.1.7. PRICE OF PLAY SETTINGS - PORTUGAL
Bonus
DIL Switch 1
1
2
3
4
5
6
7
8
9
10
50Esc
50Esc
50Esc
100Esc
100Esc
100Esc
150Esc
150Esc
200Esc
200Esc
No Bonus
11
12
13
14
15
200Esc
4 = 600Esc
250 Esc No Bonus
250 Esc
3 = 500Esc
300 Esc No Bonus
300 Esc
16
17
400 Esc No Bonus
400 Esc
32
Free Play
5 = 200Esc
3=100Esc
No Bonus
5 = 400Esc
Switch 2
OFF
OFF
ON
OFF
OFF
OFF
OFF
ON
ON
Switch 5
OFF
OFF
OFF
OFF
OFF
OFF
OFF
OFF
OFF
OFF
OFF
ON
ON
OFF
ON
ON
ON
OFF
ON
ON
ON
ON
ON
OFF
OFF
OFF
OFF
OFF
ON
ON
OFF
ON
3 = 200Esc
No Bonus
OFF
3 = 400Esc
No Bonus
Rev 1Updated:- 23/11/01
Switch 1
OFF
ON
OFF
6=
1000Esc
OFF
ON
OFF
OFF
ON
ON
OFF
OFF
ON
Switch 3
OFF
OFF
OFF
OFF
ON
ON
ON
ON
OFF
ON
ON
ON
Switch 4
OFF
OFF
OFF
OFF
OFF
OFF
OFF
OFF
4=
1000Esc
OFF
OFF
OFF
OFF
ON
OFF
3=
1000Esc
OFF
ON
ON
ON
ON
ON
ON
ON
ON
ON
8
33
Price
1.1.8. PRICE OF PLAY SETTINGS - NETHERLANDS
Bonus
DIL Switch 1
1
2
1G
1G
No Bonus
3
4
5
6
7
8
9
10
11
12
13
14
15
16
17
18
19
32
2G
No Bonus
2G
3G
No Bonus
3G
4G
No Bonus
4G
5G
No Bonus
5G
6G
No Bonus
6G
8G
No Bonus
8G
10G
No Bonus
10G
15G
15G
No Bonus
20G
No Bonus
Free Play
Rev 1Updated:- 23/11/01
34
Switch 1
OFF
Switch 2
OFF
OFF
Switch 3
OFF
OFF
Switch 4
OFF
OFF
Switch 5
OFF
OFF
OFF
ON
ON
OFF
OFF
OFF
OFF
OFF
OFF
OFF
OFF
OFF
OFF
OFF
OFF
OFF
OFF
OFF
OFF
OFF
OFF
OFF
OFF
OFF
OFF
ON
2.5NLG =
2
ON
5NLG = 3
OFF
ON
5NLG = 2
OFF
ON
10NLG = 3
OFF
ON
OFF
ON
10NLG = 3
15NLG = 3
OFF
ON
20NLG = 3
OFF
ON
20NLG = 3
30NLG = 3
OFF
ON
OFF
ON
9
OFF
OFF
ON
ON
ON
ON
ON
ON
OFF
OFF
OFF
OFF
ON
ON
OFF
OFF
OFF
ON
ON
OFF
OFF
ON
ON
OFF
ON
ON
ON
ON
ON
ON
ON
ON
ON
ON
ON
ON
OFF
OFF
OFF
OFF
OFF
OFF
ON
ON
ON
ON
ON
ON
Price
1
2
3
4
5
6
7
8
9
10
11
12
13
14
15
16
17
18
19
20
21
22
23
24
25
26
27
28
29
30
31
32
1.1.9. PRICE OF PLAY SETTINGS - SPAIN
Bonus
25Pta
25Pta
25Pta
50Pta
50Pta
50Pta
75Pta
75Pta
75Pta
100Pta
100Pta
100Pta
200Pta
200Pta
200Pta
300Pta
300Pta
300Pta
400Pta
400Pta
400Pta
500Pta
500Pta
500Pta
600Pta
600Pta
600Pta
800Pta
800Pta
1000Pta
1000Pta
Free Play
No Bonus
5=100Pta
3=50Pta
No Bonus
3=100Pta
No Bonus
OFF
3=200Pta
ON
3=200Pta
OFF
3=200Pta
ON
OFF
ON
No Bonus
4=300Pta
No Bonus
OFF
3=500Pta
3=400Pta
ON
OFF
No Bonus
2=500Pta
ON
OFF
ON
3=600Pta
No Bonus
OFF
3=1000Pta
3=800Pta
ON
OFF
No Bonus
3=1000Pta
ON
OFF
ON
2=800Pta
No Bonus
OFF
3=1200Pta
2=1000Pta
ON
OFF
No Bonus
ON
ON
OFF
OFF
ON
ON
Switch 3
OFF
OFF
OFF
OFF
ON
ON
ON
ON
OFF
OFF
OFF
OFF
ON
ON
OFF
OFF
OFF
ON
ON
OFF
OFF
ON
ON
OFF
OFF
ON
ON
OFF
OFF
ON
ON
2=1000Pta
OFF
OFF
2=1500Pta
ON
OFF
ON
OFF
ON
ON
No Bonus
Rev 1Updated:- 23/11/01
ON
OFF
ON
4=150Pta
DIL Switch 1
Switch 1 Switch 2
OFF
OFF
OFF
ON
OFF
ON
OFF
ON
ON
ON
ON
OFF
OFF
OFF
OFF
ON
ON
ON
ON
OFF
OFF
OFF
OFF
ON
ON
ON
ON
Switch 4
OFF
OFF
OFF
OFF
OFF
OFF
OFF
OFF
ON
ON
ON
ON
ON
ON
ON
ON
OFF
OFF
OFF
OFF
OFF
OFF
OFF
OFF
ON
ON
ON
ON
ON
ON
ON
ON
Switch 5
OFF
OFF
OFF
OFF
OFF
OFF
OFF
OFF
OFF
OFF
OFF
OFF
OFF
OFF
OFF
OFF
ON
ON
ON
ON
ON
ON
ON
ON
ON
ON
ON
ON
ON
ON
ON
ON
10
35
36
37
PLEASE CONTACT STS OR PIA FOR
ALL PARTS AND SERVICE
RELATING TO THIS MACHINE.
PARTS CUSTOMER SERVICE
+44 (0)208 391 8060
TECHNICAL SUPPORT
+44 (0)208 391 8072
PARTS CUSTOMER SERVICE
+1 224-265-4287
TECHNICAL SUPPORT
+1 224-265-4283
WWW.SEGAARCADE.COM