1
®
J
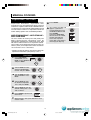
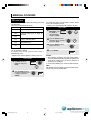
SUPERSTEAM OVEN
MODEL AX-1500J(S)
OPERATION MANUAL
CONTENTS
Warranty
Page
Inside of front cover
Warning
1
Installation Instructions
3
Oven Diagram
4
Operation of Control Panel
5
Touch Control Panel Layout
5
Display Information
5
Important Instructions
6
Read Carefully Before Cooking in SuperSteam Convection & Steam 6
SuperSteam Convection & Steam in Automatic and Manual Cooking
7
Drain Water Function
8
Descale Function
8
Before Operating
9
Getting Started
9
Stop/Clear
9
Back
Clean the Oven Before First Use
Automatic Cooking
10
Steam
12
Microwave
13
14
Manual Cooking Chart
14
SuperSteam Convection
15
Convection
17
Steam
18
Microwave
20
Other Convenient Features
21
Automatic Cooking Time Adjustment
21
Extending Cooking Time at the End of Cooking
21
Temperature Adjustment
21
End of Cooking Reminder
21
Multiple Sequence Cooking
22
Info
23
Cleaning and Care
Steam Clean
24
24
Troubleshooting Chart
26
Service Call Check
29
Specifications
29
Cooking Guides
30
About Your Oven
30
About Cooking Options
30
About Utensils and Coverings
31
SuperSteam Convection and Steam Cooking Advice
32
Microwave Cooking Advice
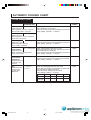
Automatic Cooking Chart
1
10
SuperSteam Convection
Manual Cooking
SCA AX1500J cover
9
9
34
36
SuperSteam Convection Menu Guide
36
Steam Menu Guide
41
09.6.2, 5:59 PM
WARRANTY
Consumer Electronic Products
Congratulations on Your Purchase!
This Sharp product is warranted against faults in materials and manufacture for a period
of twelve(12) months from the date of original purchase.
If service is required during the warranty period, please contact your nearest Sharp
Approved Service Centre. These repairs would be carried out at no charge to the owner,
subject to the conditions specified herein.
The owner is responsible for any transportation and insurance costs if the product has to
be returned for repair.
This warranty does not extend to accessories or defects or injuries caused by or resulting
from causes not attributable to faulty parts or the manufacture of the product, including but
not limited to, defect or injury caused by or resulting from misuse, abuse, neglect,
accidental damage, improper voltage, liquid spillage, vermin infestation, software, or any
alterations made to the product which are not authorised by Sharp.
Please retain your sales documentation, as this should be produced to validate a warranty
claim.
This warranty is in addition to and in no way limits, varies or excludes any express and
implied rights and remedies under any relevant legislation in the country of sale.
IMPORTANT
DO NOT RETURN THIS DOCUMENT TO SHARP
For your reference, please enter the particulars of your purchase
below and retain, with your purchase documentation.
Model No.
Serial No.
Date of Purchase
Retailer
IMPORTANT NOTICE: This warranty applies only to products sold in Australia & New Zealand
FOR LOCATION ENQUIRIES WITHIN
FOR LOCATION ENQUIRIES WITHIN
AUSTRALIA
NEW ZEALAND
REGARDING YOUR LOCAL
REGARDING YOUR LOCAL
SHARP APPROVED SERVICE CENTRE
SHARP APPROVED SERVICE CENTRE
VISIT OUR WEBSITE AT
VISIT OUR WEBSITE AT
www.sharp.net.au
www.sharp.net.nz
OR CALL SHARP CUSTOMER CARE
CONTACT YOUR SELLING DEALER/RETAILER
OR CALL
SHARP
CUSTOMER
CARE
SHARP
CUSTOMER
SERVICES
1300 135 022
TELEPHONE: 09 573 0111
FACSIMILE: 09 573 0113
(LOCAL CALL COST APPLY WITHIN AUSTRALIA)
SHARP CORPORATION OF NEW ZEALAND LIMITED
SHARP CORPORATION OF AUSTRALIA PTY LTD
2
SCA AX1500J cover
2
09.6.2, 6:00 PM
WARNING
IMPORTANT SAFETY INSTRUCTIONS: READ CAREFULLY AND KEEP FOR FUTURE REFERENCE.
1. To reduce the risk of fire in the oven cavity:
a. No other liquid than room temperature water suitable for drinking (filtered) can be poured into the water
tank.
b. The oven should not be left unattended during operation. High oven temperature or long cooking time
may overheat foods resulting in a fire.
c. Do not overcook food.
d. Remove wire twist-ties from paper or plastic bags before placing bag in the oven.
e. Do not heat oil or fat for deep frying. The temperature of the oil cannot be controlled.
f. Look at the oven from time to time when food is heated in disposable containers made of plastic, paper
or other combustible materials for signs of smoke or burning.
g. If materials inside the oven should ignite, or smoke is observed, keep oven door closed, turn oven off,
and disconnect the power plug, or shut off power at the fuse or circuit breaker panel.
h. Do not use containers made of synthetic material for cooking. They could melt at high temperature.
i. Do not use plastic containers if the oven is still hot because they may melt. Plastic containers must not
be used on SuperSteam Convection or Convection modes unless the container manufacturer claims
it is suitable.
j. Do not store food or any other items inside the oven.
k. When alcoholic beverage are added when roasting or cooking cakes and sweets, there is a risk that
vapours released by the alcohol may catch fire upon coming into contact with the electrical heating
element. Attend the oven closely during cooking.
2. To reduce the risk of an explosion or delayed eruptive boiling when handling the container. Your oven is
capable of heating food and beverages very quickly with microwave, therefore it is very important that you
select the appropriate cooking time and power level for the type and quantity of food to be heated. If you
are unsure of the cooking time and power level required, begin with low cooking times and power levels until
the food is sufficiently heated evenly throughout.
Additionally:
a. Do not place sealed containers in the oven. Babies bottles fitted with a screw cap or teat are considered
to be sealed containers.
b. Do not use excessive amount of time.
c. When boiling liquids in the oven, use a wide-mouthed container.
d. Stand at least for 20 seconds at the end of cooking to avoid delayed eruptive boiling of liquids.
e. Stir the liquid before and during cooking. Use extreme care when handling the container or inserting
a spoon or other utensil into the container.
3. This oven is for home food preparation only and should only be used for heating, cooking and defrosting food
and beverage.
It is not suitable for commercial, laboratory use, or heating therapeutic devices eg. Wheat bags.
4. Never operate the oven whilst any object is caught or jammed between the door and the oven.
5. Do not try to adjust or repair the oven by yourself. It is hazardous for anyone other than a qualified service
technician trained by SHARP to carry out any service or repair operation. Especially those which involve
the removal of a cover which gives protection against exposure to microwave energy are very hazardous.
6. Do not operate the oven if it is not working correctly or damaged until it has been repaired by a qualified
service technician trained by SHARP. It is particularly important that the oven door closes properly and that
there is no damage to:
(1) Door (warped), (2) Hinges and Latches (broken or loosened), (3) Door Seals, Sealing Surfaces and oven
cavity (buckled or deformed), (4) Burn marks on the door seal faces.
7. Handle with care when removing items from the oven so that the utensil, your clothes or accessories do not
touch the latches.
8. Never poke an object, particularly a metal object, through a grille or between the door and the oven while
the oven is operating.
9. Never tamper with or deactivate the latches.
10. Always use oven gloves to prevent burns when handling utensils that are in contact with hot food. Enough
heat from the food can transfer through utensils to cause skin burns.
11. Should the power supply cord become damaged, it must be replaced with a special cord supplied by a
SERVICE CENTRE APPROVED BY SHARP. And it must be replaced by a qualified service technician
trained by SHARP in order to avoid a hazard.
12. If the oven lamp fails please consult your dealer or a qualified service technician trained by SHARP.
1
SCA AX1500J P01-20
1
09.6.3, 1:37 PM
13. Avoid steam burns by directing steam away from the face and hands. Slowly lift the furthest edge of a dish's
cover including microwave plastic wrap etc., and carefully open popcorn and oven cooking bags away from
the face.
14. Make sure that the power supply cord is undamaged, and that it does not run under the oven or over any
hot surfaces or sharp edges.
15. Use care when opening door. To avoid burns from escaping heat and steam, let hot air or steam escape
before removing or replacing food.
16. Do not place anything on the outer cabinet because the oven will become very hot during operation.
17. To avoid burns, always test the food and container temperature and stir before serving. Pay special attention
to the temperature of food and drink given to babies, children and the elderly. Do not drink beverage or soup
without checking the container's temperature. Take extra caution when handling the container because it
becomes very hot.
18. Make sure the utensil does not touch the interior walls during cooking.
19. This appliance is not intended for use by persons (including children) with reduced physical, sensory or
mental capabilities, or lack of experience and knowledge, unless they have been given supervision or
instruction concerning use of the appliance by a person responsible for their safety.
20. Children should be supervised to ensure that they do not play with the appliance.
21. Accessible parts (e.g. oven door, oven cavity, dishes and accessories) may become hot during use. To
avoid burns young children should be kept away. Always use thick oven gloves to prevent yourself from
getting burnt.
22. When the appliance is operated in SuperSteam Convection, Convection or Steam, children should only use
the oven under adult supervision due to the temperature generated.
23. Do not touch the oven door, outer cabinet, rear cabinet, oven cavity, air-vent openings, accessories and
dishes because the escaping steam from the ventilation cover during operation becomes hot.
24. Do not touch around the oven lamps directly. This part will become hot when the oven lamp is on.
25. When the oven is in use, ventilate a room where the oven is installed. e.g. open a window or switch a kitchen
ventilation fan on. Steam from the ventilation cover may wet nearby walls or funiture.
26. Do not operate the oven if the water tank cracks and water leaks. Please contact a SERVICE CENTRE
APPROVED BY SHARP.
27. To prevent condensation which could corrode the appliance, do not leave cooked food in the oven for an
extended period. Clean the oven at regular intervals and remove any food deposits in the oven or on the
door.
28. Do not insert fingers or objects in the holes (the steam outlets or air-vent openings) as this may damage
the oven and cause an electric shock or a hazard.
29. Do not place any things weighing more than 5 kg on the door to prevent that the oven may fall down or could
damage the door and hinges. Do not cling onto the handle and do not hang heavy objects from it.
30. Do not touch the electric plug with wet hands and plug into the electric wall socket securely. When removing
the plug from the socket always grip the plug, never pull the power supply cord as this may damage the
power supply cord and the connections inside the plug.
31. Never move the oven in operating. If the oven needs to be moved, always drain all water inside the oven
using DRAIN WATER function. After draining, empty the drip tray.
32. Do not water the door or control panel intentionally.
33. If the oven falls down or drops on the floor, do not use the oven. Unplug and contact a SERVICE CENTRE
APPROVED BY SHARP.
34. Only allow children to use the oven, without supervision, when adequate instructions have been given so
that the child is able to use the oven in a safe way and understands the hazards of improper use.
2
SCA AX1500J P01-20
2
09.6.5, 11:30 AM
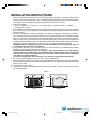
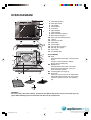
INSTALLATION INSTRUCTIONS
1. Remove all packing materials from the oven cavity, and the feature sticker from the outside of the door, if there
is one. Check the unit for any damage, such as a misaligned door, damaged door seals around the door or dents
inside the oven cavity or on the door. If there is any damage, please do not operate the oven until it has been
checked by a SERVICE CENTRE APPROVED BY SHARP and repaired, if necessary.
2. Accessories provided
1) Rack 2) 2 Baking trays 3) Steam tray 4) Descaling guide 5) Operation manual 6) Cookbook
7) Touch guide 8) Test strip
3. Since the door may become hot during cooking, and in order to avoid its accidental touch, the oven should be
placed at least 85 cm or more above floor. You should also keep children away from the door to prevent them
burning themselves.
4. This oven is designed to be used on a countertop or in a cabinet. It should not be installed in any area where
excessive heat and steam are generated, for example, next to a conventional oven unit. It should not be installed
near combustible materials, for example, curtains. The oven should be installed so as not to block ventilation
openings. A fire may occur if this appliance is covered or touching flammable material, including curtains, drapes,
walls, etc. Allow a space of at least 10cm on the top, both sides and at the rear of the oven for adequate air
circulation. When installing in a cabinet, the minimum inside dimension of the cabinet should be 723mm(W) x
500mm(H) x 560mm(D). Refer to Figure 1 below. This oven is not designed for built-in installation.
WARNING: Steam is ventilated from the top rear of the oven. Make sure the escaping steam does not
wet electrical outlets/other electrical appliances.
5. If the window is close to the oven, keep more than 20 cm distance between the ventilation and the window.
Window may be broken by the heat from the ventilation.
CAUTION: Steam ventilated from the oven may wet or dirty nearby furniture or wall. Keep sufficient
space between the oven and the wall or furniture. Steam comes from the ventilation cover or door during
cooking or after cooking. Condensation may form on the wall or furniture around the oven. Install the
oven where it can be well ventilated.
To prevent from getting wet, we recommend to cover the wall or furniture with aluminium foil.
6. Do not connect other appliances to the same socket using an adaptor plug.
7. Neither the manufacturer nor the distributors can accept any liability for damage to the machine or personal injury
for failure to observe the correct electrical connecting procedure. The A.C. voltage and frequency must be single
phase 230-240V, 50Hz.
8. This appliance must be earthed.
9. Operate the oven from a general purpose domestic outlet. If a generator is used, do not operate the oven with
non-sinusoidal outputs.
Figure 1
10cm
500mm
10cm
10cm
10cm
723mm
560mm
3
SCA AX1500J P01-20
3
09.6.3, 3:18 PM
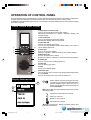
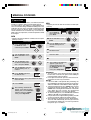
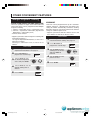
OVEN DIAGRAM
1
2
3
COOKING OPTIONS
SuperSteam
SuperSteam
Convection
Convection
Steam
Steam
Convection
Convection
Microwave
Microwave
Stop
Clear
START
4
Enter
Back
Info
15
16
5
10
18
13
12
11
20
19
Ventilation openings
Door open handle
LCD display
Control panel
Oven lamp
Upper position
Lower position
Water tank lid (See page 6.)
Water tank (See page 6.)
Door seals and sealing surfaces
Latches
Ceramic oven floor
Door hinges
Steam outlets
Drip tray lid (See page 6.)
Drip tray (See page 6.)
Oven cavity
See through door
ACCESSORIES
19 Rack
For SuperSteam Convection, Convection and
Steam.
Do not use when microwave cooking.
Always place on baking tray.
20 Baking tray x2
For SuperSteam Convection, Convection,
Steam and Descale function. Do not use
when microwave cooking.
21 Descaling guide (See page 8.)
22 Steam tray
For Steam. You can also use for SuperSteam
Convection and Convection. Do not use when
microwave cooking. Place on rack in baking
tray.
14
6
7
8
9
17
1
2
3
4
5
6
7
8
9
10
11
12
13
14
15
16
17
18
22
20
21
WARNING:
The oven cavity, door, outer cabinet, accessories and dishes will become very hot, use thick dry oven
gloves when removing food or accessories from the oven to prevent burns.
4
SCA AX1500J P01-20
4
09.6.3, 3:18 PM
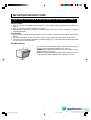
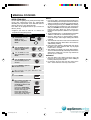
OPERATION OF CONTROL PANEL
The operation of the oven is controlled by pressing the appropriate pads arranged on the surface of the control panel.
An entry signal tone should be heard each time you press the control panel to make a correct entry.
In addition the oven will beep for approximately 2 seconds at the end of the cooking cycle, or 4 times when a cooking
procedure is required.
Touch Control Panel Layout
1. SuperSteam Convection pad
Press to select SuperSteam Convection cooking.
SuperSteam Convection has 2 options; "automatic cooking" and
"manual cooking".
2. Convection pad
Press to select Manual Convection cooking.
No automatic cooking mode for Convection.
1
4
2
5
3
6
7
3. Stop/Clear pad
Press to clear during programming.
Press once to stop operation of oven during cooking; Press twice to
cancel cooking programme.
4. Steam pad
Press to select Steam cooking.
Steam has 2 options; "automatic cooking" and "manual cooking".
5. Microwave pad
Press to select Microwave cooking.
Microwave has 3 options; "auto defrost", "sensor reheat" and "manual cooking"
6. START pad
Press to start oven after setting programmes.
8
7. Enter pad
Press to confirm your choice.
8. Knob
Turn to select desired option.
9
9. Back/Info pad
Press to go back to the previous page during programming before
pressing START.
Press to do maintenance to your oven, or customise it.
Display Information
Arrows indicate more than one page; when you
see an arrow, you can turn the knob to move back
and forth between pages. When there are no
arrows, you can go back to the previous page by
touching Back/Info.
1
1
2
2 The illustration at the top of display indicates the selected
3
cooking mode.
SuperSteam Convection was selected.
Steam was selected.
Microwave was selected.
Convection was selected.
3 Words will light in the display to indicate features and
cooking instructions.
5
SCA AX1500J P01-20
5
09.6.3, 1:37 PM
IMPORTANT INSTRUCTIONS
Read Carefully Before Cooking in SuperSteam Convection & Steam
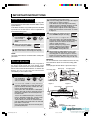
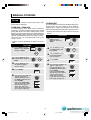
WATER TANK
NOTES:
1. Do not use any other liquids such as distilled water,
mineral water and etc.
2. An insufficient amount of water in the water tank
may cause an undesired result.
3. We recommend that you empty the water tank every
time after cooking. Do not leave the water tank filled
with water in the oven over a day.
4. If any messages, such as “ Fill water tank”, are as
shown in the display during cooking, refer to
Troubleshooting Chart on page 26.
5. Do not drop or damage the water tank. Heat may
cause the water tank to change shape. Do not use
a damaged water tank. Contact a SERVICE
CENTRE APPROVED BY SHARP.
6. There may be a few water drops when removing
the water tank. Wipe the oven dry with a soft cloth.
7. Do not block the air holes on the lid of the water
tank. It will cause trouble during cooking.
8. A small amount of water will drain into the drip tray
when the water tank is removed. Empty after cooking.
Fill the water tank with room temperature water
suitable for drinking (filtered). Be sure to follow the
directions below.
1. Pull the water tank toward you to remove.
2. Wash the water tank and lid for the first time.
(Figure 1)
3. Fill the water tank with room temperature water
suitable for drinking (filtered) through the lid to
the 2 mark (MAX mark) each time you begin to
cook. (Figure 2) Do not fill the water tank over the 2
mark (MAX mark).
4. Make sure the lid is closed firmly.
5. Install the water tank by pushing firmly. (Figure 3)
6. After cooking, empty the water tank and wash the
water tank and the lid.
Figure 1
Figure 2
Figure 3
DRIP TRAY
Empty the drip tray after each time you cook. Empty,
rinse thoroughly, dry and replace. Failure to empty may
cause the drip tray to overflow. Cooking repeatedly
without emptying the drip tray may cause it to overflow.
Be sure to cook with drip tray in position and follow
the directions below.
The drip tray and the lid are packed with the oven. Place
the drip tray and lid under the oven door as shown in
Figure 4. This drip tray collects the condensation from
the oven door.
To remove the drip tray: Pull the drip tray toward you
with both hands.
* Make sure water is not dripping down before removing
the drip tray.
To replace the drip tray: Place the drip tray onto the right
and left hooks under the oven and push firmly as shown in
Figure 4. Insert the drip tray horizontally when you attach
it. Improper use may cause the damage to the hooks.
Hooks
If “ Replace drip tray” or “ Empty drip tray and
replace” is as shown in the display, remove and then
replace the drip tray correctly.
Drip tray lid
Drip tray
Figure 4
WARNINGS:
1. The oven will become very hot after cooking and draining water function.
2. Do not open the oven with your face close to the oven. Steam from the oven may cause burns.
3. Make sure that the oven has cooled before emptying the water tank and the drip tray and then wipe the oven cavity.
4. Do not touch the water directly as water in the drip tray may be hot.
6
SCA AX1500J P01-20
6
09.7.3, 3:33 PM
IMPORTANT INSTRUCTIONS
SuperSteam Convection & Steam in Automatic and Manual Cooking
Before cooking
1. Make sure the water tank is filled with room temperature water suitable for drinking (filtered) and is installed. (See
page 6.)
2. Make sure the empty drip tray is installed. (See page 6.)
3. Place food in the oven unless preheating is needed. (Refer to each chart to check if preheating is required in
automatic operations.)
After Cooking
1. After the oven has cooled, remove and empty the water tank, wipe oven cavity. Wait a few minutes, then empty the
drip tray.
2. Perform the Drain Water function at least once a day after using SuperSteam Convection or Steam mode.
3. Check that water is not dripping down before removing the drip tray, as a small amount of water drains into the drip
tray when the water tank is removed.
Oven Door Opening
You can leave the oven door partly open to exhaust steam, to cool or dry
the oven cavity temporarily after cooking. (See Figure 1)
WARNING: Do not open the oven with your face close to the oven. Steam
from the oven may cause burns.
NOTE: Avoid opening and closing the door during cooking as the oven
cavity temperature drops suddenly, which may affect the result.
Figure 1
7
SCA AX1500J P01-20
7
09.6.3, 1:37 PM
IMPORTANT INSTRUCTIONS
Drain Water Function
3
Place baking tray on upper level.
Place descaling guide on the right side edge of
baking tray as shown in Figure 1.
Push down the right side edge of descaling
guide to insert the projection between the wall
and the baking tray as shown in Figure 2.
Check that the edge of the descaling guide is
below all steam outlets/screw heads as shown
in Figure 3.
4
Do not place any food in the oven.
Press START to begin descaling.
5
When the oven has stopped and is cool, remove
water tank, empty, rinse and refill with room
temperature water suitable for drinking (filtered).
Replace water tank. Remove the descaling
guide as shown in Figure 4.
Remove baking tray, empty, rinse
and dry. Follow step 3 to replace
baking tray and descaling guide.
Press START. Rinsing will start.
6
When rinsing has ended and the oven is cool,
remove water tank and empty. Then remove
descaling guide as shown in Figure 4. Remove
baking tray and empty. Wipe oven cavity to dry.
Wait a few minutes and then empty the drip tray.
Perform the Drain Water function at least once a day after
using SuperSteam Convection or Steam mode. It takes
up to 8 minutes.
Drain Water function is very useful to prevent scale build
up and the use of stale water. It causes evaporation of
the internal steam system.
PROCEDURE
1
Press Back/Info,
turn the Knob to
select DRAIN
WATER and press
Enter.
2
Make sure the water tank is
removed and press START.
3
After the oven has cooled, wipe oven cavity.
Wait a few minutes, then empty the drip tray.
NOTE:
The water tank must be removed before starting this
procedure.
WARNING:
The area around the steam outlets becomes hot. Pay
extra attention to attach or remove descaling guide.
Descale Function
White or gray grains, also called scale, may form in
the water circuit inside the oven during steam
generation, which could cause the oven to malfunction.
NOTE:
Oven light goes off after Enter is pressed at Step 1.
When "DESCALING IS NECESSARY" is shown in the
display, be sure to carry out Descale function
immediately. It takes about 1 hour.
Baking tray
Descaling guide
Descaling guide
Upper level
PROCEDURE
1
2
Press Back/Info,
turn the Knob to
select DESCALE
and press Enter.
Oven cavity
Projection
Figure 1
Pure citric acid, available at some pharmacies/
chemists, or bottled 100% lemon juice with no
pulp are used for descaling. Choose one and
prepare the descaling solution.
To use pure citric acid, dissolve 1 tablespoon
of pure citric acid crystals in 500ml of water in a
non-porous container. Stir well and pour into
the water tank.
To use 100% bottled lemon juice, check that
there is absolutely no pulp in it. If there is pulp
or you are not sure, strain through a fine
strainer. Measure 70ml of the strained lemon
juice and add it to 500ml of water. Stir well and
pour into the water tank.
Place the water tank in the oven correctly and
push firmly into place.
Figure 2
Steam outlets
Check that steam outlets/screw heads
are not covered by the descaling guide.
Figure 3
8
Right side of
the oven wall
Figure 4
Removing descaling guide.
8
SCA AX1500J P01-20
Screw heads
09.6.3, 1:37 PM
CLEAN THE OVEN
BEFORE FIRST USE
BEFORE OPERATING
• Before operating your Superheated Steam oven,
make sure you read and understand this operation
manual completely.
• Before the oven can be used, follow these procedures:
1. Place the drip tray correctly. See page 6.
2. See below for getting started.
3. Follow directions on the right side of this page to
clean the oven before first use.
Your oven has an Energy Save Mode. This facility saves
electricity when the oven is not in use.
The steam generator heats the water which is used for
cooking. It should be cleaned before the first use to get
rid of any odour in the oven cavity. Clean the oven with
SuperSteam Convection Grill in manual operation for
20 minutes without preheat and food. You may notice
some smoke and odour during this process. This is
normal. The oven is not faulty.
PREPARATION
1. Ventilate the room.
2. Make sure the water tank is filled with room temperature
water suitable for drinking (filtered) and is installed.
3. Make sure that the empty drip tray is installed.
PROCEDURE
PROCEDURE
Getting Started
1
Plug the oven into a power point.
Nothing will appear on the display at this time.
2
Open the door. The display will show ENERGY
SAVE MODE.
3
Close the door.
Now you are ready to use the oven.
CAUTION:
In Energy Save Mode, if you do not operate the oven for
3 minutes or more (i.e. after closing the door, or pressing
the Stop/Clear pad, or at the end of cooking), you will not
be able to operate the oven until you open and close the
oven door.
NOTE:
When you set Child Lock or Demonstration Mode,
Energy Save Mode will be cancelled temporary.
1
Press SuperSteam
Convection, turn the
Knob to select
MANUAL and press
Enter.
2
Turn the Knob to select
SUPER STEAM GRILL
and press Enter.
3
Turn the Knob to select
WITHOUT PREHEAT
and press Enter.
4
Turn the Knob to enter
cooking time (20 min.)
and press START.
WARNINGS:
1. The oven door, outer cabinet and oven cavity will
become hot.
2. Do not open the oven with your face close to the
oven. Steam from the oven may cause burns.
Stop/Clear
Press Stop/Clear if:
1. You make a mistake during programming.
2. To stop the oven temporarily during cooking.
3. To return to the home page ("ENERGY SAVE MODE"
is displayed).
4. To cancel a programme during cooking, press twice.
Back
1. Press Back/Info if you want to go back to the
previous page during programming before pressing
START.
2. After pressing START, it is not possible to return to
a previous page.
9
SCA AX1500J P01-20
9
09.6.3, 1:37 PM
AUTOMATIC COOKING
Automatic Operation is available with SuperSteam Convection, Steam and Microwave. Refer to each function for
the details.
SuperSteam Convection
SuperSteam Convection has 4 options: Complete
Meals, Grill, Roast and Bake.
Refer to the SuperSteam Convection Menu Guide for
details on page 36-40.
GRILL • ROAST • BAKE
* Suppose you want to cook 4 pieces of Baked Potatoes
with Standard time.
PROCEDURE
COMPLETE MEALS
* Suppose you want to cook Complete Meals Salmon
Steaks with Potato Bake with Standard time.
1
Press SuperSteam
Convection, turn the
Knob to select
AUTO and press
Enter.
2
Turn the Knob to select
BAKE and press Enter.
3
Turn the Knob to select
BAKED POTATOES
and press Enter.
4
Turn the Knob to enter
amount (4 pieces) and
press Enter.
5
Make sure STANDARD is
selected and then press
Enter.
6
Press START to preheat.
No food in oven.
7
When preheat is over, place food in the oven
by following the directions in the display and
the cooking chart. Close the door.
8
Press START.
9
After cooking, EXTEND will
appear. If you wish to
extend cooking time, turn
the Knob to add time and
press START.
If not, press Stop/Clear.
After the oven has cooled,
remove and empty the
water tank, wipe oven
cavity. Wait a few minutes,
then empty the drip tray.
PROCEDURE
1
Press SuperSteam
Convection, turn the
Knob to select AUTO
and press Enter.
2
Turn the Knob to select
COMPLETE MEALS and
press Enter.
3
Turn the Knob to select
SALMON STEAKS
WITH POTATO BAKE
and press Enter.
4
Make sure STANDARD is
selected and then press Enter.
5
Place food in the oven by
following the directions in the
display and the cooking chart.
Close the door. Press START.
6
After cooking, EXTEND will
appear. If you wish to
extend cooking time, turn
the Knob to add time and
press START.
If not, press Stop/Clear.
After the oven has cooled,
remove and empty the
water tank, wipe oven
cavity. Wait a few minutes,
then empty the drip tray.
10
SCA AX1500J P01-20
10
09.6.3, 1:37 PM
AUTOMATIC COOKING
NOTES:
1. Enter the weight or amount of the food only (except
Complete Meals, Cake and Bread in BAKE). Do not
include the weight of the container.
2. For food weighing more or less than weights given in
the cooking charts, cook manually.
3. If the oven door is not opened after preheating, the
oven will hold the preheat temperature for 30 minutes
and then "ENERGY SAVE MODE" will be displayed.
4. Always follow the instructions in the display.
5. The programmed cooking times are average times.
To extend cooking times preprogrammed in the
automatic cooking, see EXTENDING COOKING
TIME AT THE END OF COOKING on page 21.
6. All selections can be programmed with More or Less
Time Adjustment. See page 21.
7. Keep the door closed. If opened during cooking,
steam will escape and a longer cooking time will be
required in SuperSteam Convection and Steam.
8. The amount of water in the water tank is sufficient for
one cooking operation. Water does not need to be
added during cooking.
9. During and after cooking, condensation may be on
the door, oven walls and oven floor. Dry any liquid
residue with a soft cloth.
10. After cooking, the display may show "Now cooling".
The oven will automatically cool and you will hear
the sound of the cooling fan. The fan may continue
to operate up to 13 minutes.
WARNINGS:
1. The oven door, outer cabinet and oven cavity will
become hot. Use thick oven gloves when adding or
removing food to prevent burns.
2. Do not open the oven with your face close to the
oven. Steam from the oven may cause burns.
11
SCA AX1500J P01-20
11
09.6.3, 1:37 PM
AUTOMATIC COOKING
Steam
Steam has 6 options: Fresh Veg 1, Fresh Veg 2, Frozen
Veg, Fresh Fish/Prawns, Frozen Convenience and Rice.
Refer to the Steam Chart for details on page 41.
NOTES:
1. Enter the weight or amount of the food only. Do not
include the weight of the container.
2. For food weighing more or less than weights given
in the cooking charts, cook manually.
3. The programmed cooking times are average times.
To extend cooking times preprogrammed in the
automatic cooking, see EXTENDING COOKING
TIME AT THE END OF COOKING on page 21.
4. Any Steam selection can be programmed with More
or Less Time Adjustment. See page 21.
5. Keep the door closed. If opened during cooking,
steam will escape and a longer cooking time will be
required.
6. The amount of water in the water tank is sufficient for
one cooking operation. Water does not need to be
added during cooking.
7. During and after cooking, condensed water may be
on the door, oven walls and oven floor. Dry any liquid
residue with a soft cloth.
8. After cooking, the display may show "Now cooling".
The oven will automatically cool and you will hear
the sound of the cooling fan. The fan may continue
to operate up to 13 minutes.
* Suppose you want to cook 0.3 kg of Fresh Veg 1 with
Standard time.
PROCEDURE
1
Press Steam,
turn the Knob to
select AUTO and
press Enter.
2
Turn the Knob to select
FRESH VEG 1 and press
Enter.
If any examples are shown
in the display, check them
and press Enter.
3
Turn the Knob to enter
amount (0.3 kg) and
press Enter.
4
Make sure STANDARD is
selected and press Enter.
5
Place food in oven. Close the
door. Press START.
6
After cooking, EXTEND will
appear. If you wish to extend
cooking time, turn the Knob to
add time and press START.
If not, press Stop/Clear.
After the oven has cooled,
remove and empty the water
tank, wipe oven cavity. Wait a
few minutes, then empty the
drip tray.
WARNINGS:
1. The oven door, outer cabinet and oven cavity will
become hot. Use thick oven gloves when adding or
removing foods to prevent burns.
2. Do not open the oven with your face close to the
oven. Steam from the oven may cause burns.
12
SCA AX1500J P01-20
12
09.6.3, 3:18 PM
AUTOMATIC COOKING
Microwave
AUTO DEFROST
SENSOR REHEAT
Auto Defrost automatically defrosts all the food shown
in the Defrost Chart on page 7 in the cookbook provided.
Sensor Reheat automatically reheat all the food shown in
the Sensor Reheat Chart on page 7 in the cookbook provided.
SPECIAL NOTE for SENSOR REHEAT:
1. Wipe off any moisture from the outside of cooking
containers and the interior of the oven with a dry
cloth or paper towel prior to reheating.
2. After oven is plugged in, wait 2 minutes before using.
3. SENSOR ERROR will be displayed if:
(a) the sensor does not detect the vapour.
(b) the door is opened or the Stop/Clear pad is
pressed before the cooking time is displayed.
To clear, press the Stop/Clear pad and reheat manually.
* Suppose you want to defrost a 0.5 kg steak with
Standard time.
PROCEDURE
1
Press Microwave, turn
the Knob to select
AUTO DEFROST and
press Enter.
2
Turn the Knob to select
the desired food
STEAKS/CHOPS and
press Enter.
3
Turn the Knob to select
the desired amount (0.5
kg) and press Enter.
4
Make sure STANDARD is
selected and press Enter.
5
Press START.
6
The oven will stop and directions
will be displayed.
Follow the indicated message.
Close the door. Press START.
7
* Suppose you want to reheat 4 cups of soup with
Standard time.
PROCEDURE
1
Press Microwave, turn
the Knob to select
SENSOR REHEAT and
press Enter.
2
Turn the Knob to select
the desired food SOUP
and press Enter.
3
Make sure STANDARD is
selected and press Enter.
4
Press START.
* When the sensor detects the vapour from
the food, the remaining reheating time will
appear.
After cooking,
EXTEND will appear.
If you wish to extend
defrosting time, turn
the Knob to add time
and press START. If
not, press Stop/Clear.
5
After cooking, follow the indicated message.
NOTES:
1. It is not necessary to enter the weight of the food.
2. Any Sensor Reheat selection can be programmed
with More or Less Time Adjustment. See page 21.
3. To reheat other food or food above or below the
weights allowed on Sensor Reheat Chart, reheat
manually. See Microwave on page 20.
4. When reheating small quantities of food on Sensor
Reheat, the food may be reheated without displaying
any remaining reheating time during the reheating.
5. Do not use the baking tray, steam tray and metal
rack.
NOTES:
1. Enter the weight of the food only. Do not include the
weight of the container.
2. Any Auto Defrost selection can be programmed with
More or Less Time Adjustment. See page 21.
3. To defrost other food or food above or below the weights
allowed on Defrost Chart, use time and 30% microwave
power. See Microwave on page 20.
4. The programmed defrosting times are average times.
To extend defrosting times preprogrammed in the
automatic operation, see EXTENDING COOKING
TIME AT THE END OF COOKING on page 21.
5. Do not use the baking tray, steam tray and metal rack.
13
SCA AX1500J P01-20
13
09.6.3, 1:38 PM
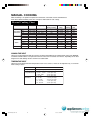
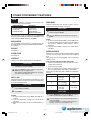
MANUAL COOKING
Manual Cooking is an option in SuperSteam Convection, Convection, Steam and Microwave.
Refer to the Manual Cooking Chart. The chart gives information on each setting.
Manual Cooking Chart
Bake/Roast
SuperSteam Grill
Convection Cake
Bread
Convection
Steam
Microwave
Preheat *
Temp range
Adjustment temp
during cooking
Time
range
2 layer
cooking
Water
tank
YES or NO
100 - 250°C
100 - 250°C
YES
0 - 2h30m
0 - 2h30m
YES
YES
NO
YES
YES
YES
100 - 250°C
100 - 250°C
-
YES
YES
-
0 - 2h30m
0 - 2h30m
YES
YES
YES
NO
0 - 2h30m
-
-
0 - 35m
NO
NO
NO
YES
YES
-
0 - 45m
0 - 35m
NO
40°C
0 - 100% power
-
0 - 2h30m
0 - 1h30m
NO
NO
YES
YES
NO
NO
YES or NO
YES or NO
YES or NO
Oven
YES or NO
Grill
High
YES or NO
NO
Low
Reheat
NO
NO
Proof
Manual
NO
-
YES
0 - 2h30m
* Preheat temperature is held for 30 minutes.
COOKING TIME INPUT
Your oven can be programmed for up to 2 hours 30 minutes depending on the cooking mode. Refer to the MANUAL
COOKING CHART above. The input unit increment varies from 5 seconds to 5 minutes, depending on the total
length of time and cooking mode as shown in the table below.
TEMPERATURE INPUT
Your oven can be programmed for temperatures from 100°C to 250°C, which can be adjusted every 10°C with an
initial setting is 180°C.
ITEM
Temperature
Cooking Time
except Microwave
Cooking Time
Microwave
INPUT STEP
10°C per step (180°C is initial temperature)
0 - 15 min.
: 30 sec. per step
15 min. - 1 hour : 1 min. per step
1 hour - Max
: 5 min. per step
0 - 2 min.
: 5 sec. per step
2 - 5 min.
: 10 sec. per step
5 - 10 min.
: 30 sec. per step
10 - 30 min.
: 1 min. per step
30 - 90 min.
: 5 min. per step
14
SCA AX1500J P01-20
14
09.6.3, 1:38 PM
MANUAL COOKING
SuperSteam Convection
Manual SuperSteam Convection has 4 functions:
SuperSteam Bake/Roast, SuperSteam Grill,
SuperSteam Cake and SuperSteam Bread, and each
function has 2 options, With Preheat or Without Preheat.
Use SuperSteam Convection for cooking food that need
to retain moisture and have a crisp brown exterior. For
further cooking options refer to cookbook provided.
SUPER STEAM BAKE/ROAST • SUPER STEAM CAKE •
SUPER STEAM BREAD
Use these modes for roasting meat and poultry and
baking cake/bread with superheated steam. By
automatically controlling the superheated steam, food
will retain its moisture but have a crisp brown outside.
These modes can be programmed for up to 2 hours 30
minutes (2H30). Oven temperature can be set between
100°C and 250°C in 10°C increments.
8
Press START.
9
After cooking, EXTEND will
appear. If you wish to
extend cooking time, turn
the Knob to add time and
press START.
If not, press Stop/Clear.
After the oven has cooled,
remove and empty the
water tank, wipe oven
cavity. Wait a few minutes,
then empty the drip tray.
* Suppose you want to cook for 1 hour and 10 minutes on
SuperSteam Bake/Roast (with preheat) at 160°C.
PROCEDURE
1
Press SuperSteam
Convection, turn the
Knob to select MANUAL
and press Enter.
2
Turn the Knob to select
SUPER STEAM BAKE/
ROAST and press Enter.
3
Turn the Knob to select
WITH PREHEAT. Press
Enter.
4
Turn the Knob to enter
the desired temperature
160°C and press Enter.
5
Turn the Knob to enter the
desired cooking time 1 hour
and 10 minutes.
6
Press START to preheat. No
food in oven.
7
When preheat is over, place food in the oven.
Close the door.
15
SCA AX1500J P01-20
15
09.6.3, 1:38 PM
MANUAL COOKING
NOTES:
1. If the oven door is not opened after preheating, the
oven will hold the preheat temperature for 30 minutes
and then "ENERGY SAVE MODE" will be displayed.
2. To program only preheat, press START after entering
the desired preheat temperature. For SuperSteam
Grill, press START after selecting WITH PREHEAT.
Preheat will start. When the oven reaches the
programmed temperature, follow the message in the
display.
3. To extend cooking time, see EXTENDING COOKING
TIME AT THE END OF COOKING on page 21.
4. Keep the door closed. If opened during cooking,
steam will escape and a longer cooking time will be
required.
5. The amount of water in the water tank is sufficient for
one cooking operation. Water does not need to be
added during cooking.
6. During and after cooking, condensation may be on
the door, oven walls and oven floor. Dry any liquid
residue with a soft cloth.
7. After cooking, the display may show "Now cooling".
The oven will automatically cool and you will hear the
sound of the cooling fan. The fan may continue to
operate up to 13 minutes.
WARNINGS:
1. The oven door, outer cabinet and oven cavity will
become hot. Use thick oven gloves when adding or
removing food to prevent burns.
2. Do not open the oven with your face close to the
oven. Steam from the oven may cause burns.
SUPER STEAM GRILL
Use this mode for grilling meat, poultry and ready-made
snacks with superheated steam. By automatically
controlling the superheated steam food will retain its
moisture but have a crisp brown outside.
This mode can be programmed for up to 2 hours 30
minutes (2H30).
* Suppose you want to cook for 15 minutes on
SuperSteam Grill (with preheat).
PROCEDURE
1
Press SuperSteam
Convection, turn the
Knob to select
MANUAL and press
Enter.
2
Turn the Knob to select
SUPER STEAM GRILL
and press Enter.
3
Turn the Knob to select
WITH PREHEAT. Press
Enter.
4
Turn the Knob to enter the
desired cooking time 15
minutes.
5
Press START to preheat.
No food in oven.
6
When preheat is over, place food in the oven.
Close the door.
7
Press START.
8
After cooking, EXTEND will
appear. If you wish to
extend cooking time, turn
the Knob to add time and
press START.
If not, press Stop/Clear.
After the oven has cooled,
remove and empty the
water tank, wipe oven
cavity. Wait a few minutes,
then empty the drip tray.
16
SCA AX1500J P01-20
16
09.6.3, 1:38 PM
MANUAL COOKING
Convection
Manual Convection has 2 functions, Oven and Grill, and each
function has 2 options, With Preheat or Without Preheat.
Use Convection as you would use a conventional oven.
There is no need to change traditional cooking times. This
mode does not use steam. This mode can be programmed
for up to 2 hours 30 minutes (2H30). Oven temperature
can be set between 100°C and 250°C by 10°C increments.
Grill is a pre-set temperature, so oven temperature cannot
be changed.
GRILL
* Suppose you want to cook for 20 minutes on Grill (with
preheat).
PROCEDURE
1
Press Convection,
turn the Knob to
select GRILL and
press Enter.
2
Turn the Knob to select
WITH PREHEAT. Press
Enter.
3
Turn the Knob to enter the
desired cooking time 20
minutes.
4
Press START to preheat.
No food in oven.
5
When preheat is over, place food in the oven.
Close the door.
6
Press START.
7
After cooking, EXTEND will
appear. If you wish to
extend cooking time, turn
the Knob to add time and
press START.
If not, press Stop/Clear.
OVEN
* Suppose you want to cook for 10 minutes on Oven (with
preheat) at 250°C.
PROCEDURE
1
2
Press Convection, turn
the Knob to select
OVEN and press Enter.
Turn the Knob to select
WITH PREHEAT. Press
Enter.
3
Turn the Knob to enter
the desired temperature
250°C and press Enter.
4
Turn the Knob to enter the
desired cooking time 10
minutes.
5
Press START to preheat.
No food in oven.
6
When preheat is over, place food in the oven.
Close the door.
7
Press START.
8
After cooking, EXTEND will
appear. If you wish to extend
cooking time, turn the Knob to
add time and press START.
If not, press Stop/Clear.
WARNINGS:
1. The oven door, outer cabinet and oven cavity will
become hot. Use thick oven gloves when adding or
removing foods to prevent burns.
2. Do not open the oven with your face close to the oven.
Steam from the oven may cause burns.
NOTES:
1. If the oven door is not opened after preheating, the
oven will hold the preheat temperature for 30 minutes
and then "ENERGY SAVE MODE" will be displayed.
2. To program only preheat, press START after entering
the desired preheat temperature. For Grill, press
START after selecting WITH PREHEAT. Preheat will
start. When the oven reaches the programmed
temperature, follow the message in the display.
3. To extend cooking times, see EXTENDING COOKING
TIME AT THE END OF COOKING on page 21.
4. Keep the door closed. If opened during cooking, heat will
escape and a longer cooking time will be required.
5. After cooking, the display may show "Now cooling".
The oven will automatically cool and you will hear
the sound of the cooling fan. The fan may continue
to operate up to 13 minutes.
17
SCA AX1500J P01-20
17
09.6.3, 1:38 PM
MANUAL COOKING
Steam
STEAM has 4 functions: Steam High, Steam Low,
Steam Reheat and Proof.
STEAM REHEAT
Use Steam Reheat to reheat gently without drying. Use
Steam Reheat to reheat foods in metal container.
Cooking time is longer than microwave oven. Steam
Reheat can be programmed for up to 35 minutes (35.00).
STEAM HIGH • STEAM LOW
Use Steam High to steam foods such as chicken or
vegetables. Use Steam Low to steam fish or egg custard
gently. With Steam Low mode, cooking time is a little
longer than Steam High mode. Steam cooks food gently
without destroying shape, colour or aroma. The Steam
High can be programmed for up to 35 minutes (35.00).
The Steam Low can be programmed for up to 45
minutes (45.00).
* Suppose you want to reheat for 20 minutes on Steam
Reheat.
PROCEDURE
1
Press Steam, turn the
Knob to select
MANUAL and press
Enter.
2
Turn the Knob to select
STEAM REHEAT and
press Enter.
3
Turn the Knob to enter
the desired cooking
time 20 minutes.
4
Press START.
5
After cooking, EXTEND will
appear. If you wish to
extend cooking time, turn
the Knob to add time and
press START.
If not, press Stop/Clear.
After the oven has cooled,
remove and empty the
water tank, wipe oven
cavity. Wait a few minutes,
then empty the drip tray.
* Suppose you want to cook for 20 minutes on Steam
High.
PROCEDURE
1
2
Press Steam, turn the
Knob to select MANUAL
and press Enter.
Turn the Knob to select
STEAM HIGH and press
Enter.
3
Turn the Knob to enter
the desired cooking
time 20 minutes.
4
Press START.
5
After cooking, EXTEND will
appear. If you wish to
extend cooking time, turn
the Knob to add time and
press START.
If not, press Stop/Clear.
After the oven has cooled,
remove and empty the
water tank, wipe oven
cavity. Wait a few minutes,
then empty the drip tray.
18
SCA AX1500J P01-20
18
09.6.3, 1:38 PM
MANUAL COOKING
PROOF
NOTES:
1. To extend steaming time, see EXTENDING
COOKING TIME AT THE END OF COOKING on
page 21.
2. Keep the door closed. If opened during cooking,
steam will escape and a longer cooking time will be
required.
3. The amount of water in the water tank is sufficient for
one cooking operation. Water does not need to be
added during cooking.
4. During and after cooking, condensation may be on
the door, oven walls and oven floor. Dry any liquid
residue with a soft cloth.
5. After cooking, the display may show "Now cooling".
The oven will automatically cool and you will hear the
sound of the cooling fan. The fan may continue to
operate up to 13 minutes.
Use Proof to aid dough rising when making regular or
sweet yeast breads. Proof can be programmed for up to
2 hours 30 minutes (2H30).
* Suppose you want to proof for 20 minutes.
PROCEDURE
1
Press Steam, turn the
Knob to select MANUAL
and press Enter.
2
Turn the Knob to select
PROOF and press
Enter.
3
Turn the Knob to enter the
desired proofing time 20
minutes.
4
Press START.
5
After proofing, EXTEND will
appear. If you wish to
extend proofing time, turn
the Knob to add time and
press START.
If not, press Stop/Clear.
After the oven has cooled,
remove and empty the
water tank, wipe oven
cavity. Wait a few minutes,
then empty the drip tray.
WARNINGS:
1. The oven door, outer cabinet and oven cavity will
become hot. Use thick oven gloves when adding or
removing foods to prevent burns.
2. Do not open the oven with your face close to the oven.
Steam from the oven may cause burns.
19
SCA AX1500J P01-20
19
09.6.3, 1:38 PM
MANUAL COOKING
Microwave
To change the power, turn the Knob. To lower power
level, turn the Knob to the left.
* Suppose you want to defrost for 5 minutes on 30%.
Microwave is fast and convenient for cooking, reheating
and defrosting.
There are six different power levels.
Power level
Examples
100%
Raw meat, Vegetables, Rice or Pasta
70%
Delicate Food such as Eggs or
Seafood.
PROCEDURE
1
Press
Microwave, turn
the Knob to
select MANUAL
and press Enter.
2
Turn the Knob to enter
defrosting time 5 minutes
and press Enter.
3
Turn the Knob to select
power level 30%.
4
Press START.
50%
30%
Defrost, Softening butter
10%
Keep food warm
0%
This variable cooking control allows you to select the
rate of microwave cooking.
If a power level is not selected, then 100% is
automatically used.
* Suppose you want to cook for 5 minutes on 100%.
NOTES:
1. After cooking, the display may show "Now cooling".
The oven will automatically cool and you will hear the
sound of the cooling fan. The fan may continue to
operate up to 13 minutes.
2. Do not use the baking tray, steam tray and metal rack.
PROCEDURE
1
2
Press Microwave, turn
the Knob to select
MANUAL and press
Enter.
HINT:
For cooking cake or meatloaf, place the container on upturned heat-resistent shallow dish.
Turn the Knob to enter
the desired cooking time
5 minutes and press
START.
20
SCA AX1500J P01-20
20
09.6.3, 1:38 PM
OTHER CONVENIENT FEATURES
Automatic Cooking Time Adjustment
(More or Less Time Adjustment)
Temperature Adjustment
To change the oven temperature during cooking in
Manual Operation with SuperSteam Convection Bake/
Roast, SuperSteam Convection Cake, SuperSteam
Convection Bread and Convection Oven, simply turn
the Knob to increase or decrease in 10°C increments
and then press Enter.
You can adjust cooking results as you like.
The automatic settings can be adjusted to your
preferred result with the MORE/LESS option.
Select MORE or LESS in the display before START.
If Enter is not pressed within 5 seconds, the
temperature will revert to the initial temperature that
you selected.
Extending Cooking Time at the
End of Cooking
End of Cooking Reminder
Cooking results may vary depending on room
temperature, initial food temperature and other factors.
You can adjust cooking results by adding more cooking
time at the end. When cooking is finished, the display
will show "EXTEND". It is only possible to add extra
time during the 5 minutes when "EXTEND" is displayed.
The time can be extended up to 10-30 minutes
depending on cooking mode. Turn the Knob for the
desired time and then press START. The same cooking
mode will be continued except for SuperSteam
Convection. Convection mode will be continued for
SuperSteam Convection. Carefully check the cooking
process.
At end of cooking, the oven will signal and repeat after
2 and 4 minutes unless door is opened or Stop/Clear
is pressed.
NOTES:
1. If "Fill water tank with water" is displayed when
START is pressed, fill the water tank to the 2 mark
(MAX mark). Position and push firmly into place.
2. Extend mode is canceled when Stop/Clear is
pressed.
3. EXTEND is available depending on the cooking
mode. See below. The Extending Cooking Time
function can be repeated until the food is cooked as
you desire.
Extend time at end
SuperSteam
Convection
Convection
Steam
Microwave
Auto
Manual
Manual
Auto
Manual
Auto Defrost
Sensor Reheat
Manual
0 - 30 min
0 - 30 min
0 - 30 min
0 - 10 min
0 - 10 min
0 - 10 min
No
No
21
SCA AX1500J P21-29
21
09.6.3, 8:55 AM
OTHER CONVENIENT FEATURES
Multiple Sequence Cooking
SUPER STEAM CONVECTION AND CONVECTION
MICROWAVE
There are 2 patterns in Super Steam Convection and
Convection which can be programmed into Multiple
Sequence Cooking.
1 Preheat + Convection (Oven) + Convection (Oven)
2 Preheat + SuperSteam Convection (SuperSteam
Bake/Roast) + Convection (Oven)
• Preheat can be omitted.
Your oven can be programmed for up to 4 automatic
cooking sequences, switching from one power level
setting to another automatically. Sometimes cooking
directions tell you to start on one power level and then
change to a different power level.
• Suppose you want to cook for 5 minutes at 30% and
then continue to cook for 30 minutes at 50%.
PROCEDURE
* Suppose you want to cook in Sequence Cooking with
Preheating in pattern 2.
1st stage is SuperSteam Bake/Roast, at 160°C for 1
hour and 10 minutes.
2nd stage is Convection Oven, at 230°C for 10
minutes.
1
For 1st stage, follow the steps 1 to 3 in
manual microwave cooking. See page 20.
2
Press Microwave to
program the second stage.
3
Turn the Knob to enter
cooking time 30 minutes
and press Enter to
proceed.
4
Turn the Knob to select
power level 50%.
5
Press START.
PROCEDURE
1
For 1st stage, follow the steps 1 to 5 in
SuperSteam Bake/Roast. See page 15.
2
Press Convection to
program the second stage.
3
Turn the Knob to enter
the desired temperature
230°C and press Enter.
4
Turn the Knob to enter the
desired cooking time 10
minutes.
5
Press START .
22
SCA AX1500J P21-29
22
09.6.3, 8:55 AM
OTHER CONVENIENT FEATURES
Info
Back/Info provides 7 features and step-by-step
instructions for special functions.
MAINTENANCE
SETTINGS
DRAIN WATER
DESCALE
STEAM CLEAN
CONTRAST
CHILD LOCK
DEMO MODE
WATER HARDNESS
DEMO MODE
Cooking operations and special features can be
demonstrated with no power in the oven.
PROCEDURE
These features can be selected by pressing Back/Info
in home page (displayed ENERGY SAVE MODE) and
then turning the Knob and pressing Enter.
1
Press Back/Info, turn the Knob to select DEMO
MODE and press Enter.
2
Turn the Knob to select DEMO ON and press
Enter.
NOTE:
1. To cancel Demonstration Mode, select DEMO OFF
at step 2 or unplug the oven from the electrical outlet
and re-plug. "ENERGY SAVE MODE" will be
displayed.
2. If you set Demo Mode, energy save mode will be
cancelled.
DRAIN WATER
The remaining water inside the steam generator can
be evaporated by using the DRAIN WATER function.
See page 8.
DESCALE
See page 8.
WATER HARDNESS
STEAM CLEAN
Your oven is set at the factory to water hardness setting
2 (Hard). You can set the oven for the water hardness
level.
You can use the test strip supplied to check the water
hardness level.
HOW TO USE THE TEST STRIP SUPPLIED:
1. Put the test strip into the water you want to use for 1
second, then remove it.
2. Shake off excess water.
3. Wait 15 seconds, and compare colour change on
the test strip to colour chart and the table below.
When you use other test strips, follow the instructions
of them.
Hardness level Hardness range
Setting
<120 ppm
1
<120 mg/l
Soft
<6.7 °dH
120 - 250 ppm
2
120 - 250 mg/l
Hard
6.7 - 14.0 °dH
>250 ppm
3
>250 mg/l
Very hard
>14.0 °dH
See page 24.
CONTRAST
Contrast can adjust display darkness or brightness.
PROCEDURE
1
Press Back/Info, turn the Knob to select
CONTRAST and press Enter.
2
Turn the Knob to adjust contrast and press
Enter to keep the adjustment.
The contrast setting will be held in the memory
even if the oven power is off.
CHILD LOCK
Child Lock prevents unwanted oven operations by small
children. The oven can be set so that the control panel
is deactivated and locked.
PROCEDURE
1
Press Back/Info, turn the Knob to select CHILD
LOCK and press Enter.
2
Press Enter.
PROCEDURE
NOTES:
1. To cancel Child Lock, press Enter and hold for 3
seconds.
2. If you set Child Lock, energy save mode will be
cancelled.
3. When the oven power is off, the setting returns to
OFF.
1
Press Back/Info, turn the Knob to select
WATER HARDNESS and press Enter.
2
Turn the Knob to select desired hardness level
and press Enter.
The water hardness setting will be held in the
memory even if the oven power is off.
23
SCA AX1500J P21-29
23
09.6.3, 8:55 AM
CLEANING AND CARE
CLEAN THE OVEN AT REGULAR INTERVALS Keep the oven clean and remove any food deposits,
which lead to deterioration of the surface. This could
adversely affect the life of the appliance and possibly
result in a hazardous situation.
Oven Cleaning - Interior
Steam Clean
The Steam Clean function helps to loosen any grease,
oil or food residue. The steam will make the oven easy
to clean; however, it is not a self-cleaning function. It will
take approximately 20 minutes for the cleaning cycle.
PREPARATION
1. Make sure that the water tank is filled with room
temperature water suitable for drinking (filtered) and
is installed. (See page 6.)
2. Make sure that the empty drip tray is installed. (See
page 6.)
IMPORTANT CAUTIONS:
• DISCONNECT THE POWER CORD BEFORE
CLEANING OR LEAVE THE DOOR OPEN TO
INACTIVATE THE OVEN DURING CLEANING.
• BEFORE CLEANING, MAKE SURE THE OVEN
IS COMPLETELY COOL.
• DO NOT USE OVEN CLEANERS, ABRASIVE,
HARSH CLEANERS OR SCOURING PADS ON
ANY PART OF YOUR OVEN.
• DO NOT USE A STEAM CLEANER.
PROCEDURE
1
Press Back/Info, turn
the Knob to select
STEAM CLEAN and
press Enter.
2
Press START.
Oven Cleaning - Exterior
The outside may be cleaned with mild soap and warm
water. Wipe clean with a damp cloth. Avoid the use of
harsh abrasive cleaners. Keep the ventilation openings
free of dust.
Door
Wipe the door and window on both sides, the door
seals and adjacent parts frequently with a damp cloth
to remove any spills or spatters. Do not use harsh
abrasive cleaners or sharp metal scrapers to clean the
oven door glass since they can scratch the surface,
which may result in shattering of the glass.
Allow the oven to cool to prevent burns. Then open the
door and remove any residue carefully with a soft damp
cloth. Finally, remove and empty the water tank. Wait a
few minutes, then empty the drip tray.
To clean the interior surfaces, wipe with a soft cloth and
warm water.
1. After every use while the oven is still warm, wipe
spatters or spills with a soft damp cloth or sponge.
DO NOT USE ABRASIVE OR HARSH CLEANERS
OR SCOURING PADS. For heavier soil, use mild
soap; rinse thoroughly with hot water. Carry out Steam
Clean function to clean thoroughly.
2. The cleaning cloth or sponge must be wrung dry to
prevent moisture or residue from entering the oven
vents.
3. Do not use spray type cleaners on the oven interior.
4. Any remaining food or fat could cause smoke or an
unpleasant smell. It is a good idea to heat the oven
with SuperSteam Convection Grill in manual operation
for 20 minutes without preheat and food to remove
any fat or residue from the interior ducts and heaters
and to remove any unpleasant smell. See CLEAN
THE OVEN BEFORE FIRST USE on page 9.
Control Panel
Care should be taken in cleaning the control panel. If
the control panel becomes soiled, open the oven door
before cleaning. Wipe the panel with a cloth dampened
slightly with water only. Dry with a soft cloth. Do not
scrub or use any sort of chemical cleaners. Close the
door and press Stop/Clear.
24
SCA AX1500J P21-29
24
09.6.3, 8:55 AM
CLEANING AND CARE
Door Seals
Water Tank and Water Tank Lid
Always keep the door seals clean to prevent any
damage. If water condenses inside the door seals, wipe
dry with a soft cloth. Polish with another soft cloth. Do
not use a chemical or abrasive cleaner on these
surfaces. Care should be taken not to rub, damage,
pull or move the seals. Before cooking, always check
that door seal is smooth and flat. If not, steam will leak
from the door. Do not use the oven if it has a damaged
door seal. Contact a SERVICE CENTRE APPROVED
BY SHARP.
After cooking, wash in a mild soap or detergent solution
with a soft damp cloth or sponge, rinse and polish dry.
Do not wash in the dishwasher. Note the filter in the
rear bottom of the water tank. Use a very soft brush to
remove any build-up in the filter. The filter cannot be
removed nor replaced so special care should be taken
not to tear the mesh of the filter when cleaning it. Do
not use harsh cleaners, sharp metal scrapers or stiff
brushes on the water tank, water tank lid and the filter.
Do not use a torn filter. Order replacement. Contact a
SERVICE CENTRE APPROVED BY SHARP.
Baking Tray / Rack
Drip Tray and Drip Tray Lid
Wash baking tray and rack after cooking with a mild
soap or detergent solution, rinsing and polishing dry.
Do not use harsh cleaners, sharp metal scrapers or
stiff brushes to prevent damage to the easy clean
surface. All the accessories can be washed in the
dishwasher.
Empty drip tray after cooking, wash in a mild soap or
detergent solution with a soft damp cloth or sponge,
rinse, polish dry and replace below the oven front. Do
not wash in the dishwasher.
Descaling of the Oven’s Steam Parts
During steam production, scale may form in the steam
generator. To remove scale, carry out descale function
when DESCALING IS NECESSARY. is shown in the
display. See page 8 for complete instructions.
25
SCA AX1500J P21-29
25
09.6.3, 8:55 AM
TROUBLESHOOTING CHART
If EE is displayed or you think the oven is not working properly, check the chart below before consulting a SERVICE CENTRE APPROVED BY SHARP. This will help to prevent unnecessary service calls.
WARNING:
Never adjust, repair or modify the oven by yourself. It is hazardous for anyone other than a qualified
service technician trained by SHARP to carry out any service or repair operation. This is important as
it may involve the removal of covers that provide protection against electrical parts.
• Repairs and Modifications: Do not attempt to operate the oven if it is not working properly.
• Outer cabinet & Lamp Access: Never remove the outer cabinet to avoid the possibility of electric shock or burns.
Troubleshooting Chart
ERROR MESSAGE / INFORMATION MESSAGE
MESSAGE ON DISPLAY
ACTION
ERROR
MESSAGE
EE
Due to technical error, contact a SERVICE CENTRE
APPROVED BY SHARP.
INFORMATION
MESSAGE
SENSOR ERROR
SENSOR ERROR will be shown if:
(a) the sensor does not detect the vapour.
(b) the door is opened or the Stop/Clear pad is pressed
before the cooking time is displayed.
To clear the message, press the Stop/Clear pad and cook
manually.
Wait.
Oven is too warm to use.
The oven is too hot to use Microwave for defrosting or Steam
Manual Proof. Remove food from oven and allow to cool
until the message clears.
Water is frozen.
The oven may not operate properly.
Please refer to instructions in Operate the oven with Convection Grill without food and
operation manual.
preheat for 5 minutes.
See page 17.
Now cooling.
After cooking, the oven and the oven parts will be hot.
Now cooling is shown in the display until the oven cavity has
cooled. The cooling fan may continue to operate up to 13 minutes.
Now cooling will disappear when the oven has cooled.
If you wish to use the warm oven, simply press Stop/Clear.
Replace drip tray.
Remove and replace the drip tray correctly.
See page 6.
In case the drip tray is not installed correctly, Replace drip
tray will be shown in the display.
Empty drip tray and replace.
Empty drip tray and replace will be shown in the display
when water remains in the drip tray. You must empty the
drip tray and replace it before SuperSteam Convection or
Steam Cooking will start. See page 6.
Descaling is necessary.
Follow step-by-step instructions for descaling.
See page 8.
Fill water tank with water.
Remove water tank and fill with water to the 2 mark (MAX
mark). Replace and push firmly into place.
NOTE: Ensure you do not use any other liquids like distilled
water, mineral water and etc.
Remove water tank
If water is in the water tank, Drain Water function will not
start. Remove the water tank before starting Drain Water.
Hot
The oven cabinet and oven cavity are very hot.
Pay extra attention not to burn yourself.
26
SCA AX1500J P21-29
26
09.6.3, 8:55 AM
TROUBLESHOOTING CHART
The following situations are normal and are not signs that the oven is malfunctioning.
QUESTION / SITUATION
Control panel /
power supply
The display is black / blank.
ANSWER
* Open the door and close.
* Check the power plug is properly connected to a suitable
wall outlet.
* Check the wall socket and fuse are functioning properly.
* Disconnect the power cord, wait for a minute, then
reconnect.
The display is fine but START * Open the door and close. Is the oven light off? Press
will not function when pressed.
START again.
* If the message "Wait. Oven is too warm to use." is
displayed, wait until the message has disappeared.
Electrical power supply is The programmed cooking time and mode will be cancelled.
interrupted during cooking.
Continue to cook with manual mode.
Oven light is off during PROOF Normal operation to prevent bread dough from drying on
mode.
the surface.
Oven light is off during This is normal operation. See page 8.
descaling.
Oven light is off when door is Oven light will turn OFF if the door is open for more than 5
opened.
minutes.
27
SCA AX1500J P21-29
27
09.6.3, 8:55 AM
TROUBLESHOOTING CHART
The following situations are normal and are not signs that the oven is malfunctioning.
ANSWER
QUESTION / SITUATION
Steam
Water is found inside the oven Steam has condensed inside the oven. Wipe dry with a
soft cloth or a sponge after cooling.
when the door is opened.
Steam comes out of the air It is normal for used steam to come from the air ventilation
ventilation openings at the top opening on the top of the oven.
of the oven.
Condensation can be seen in This operation is normal.
the oven cavity.
Steam has condensed on the oven floor. Wipe dry with a
soft cloth or a sponge after cooling.
Steam comes from the door Check the door seals to make sure it is lying smooth and
flat.
during cooking.
Noise / Sound
Noise during
cooking.
microwave When microwaving, you may hear the magnetron cycling
on and off depending on the power level.
Noise after cooking.
The cooling fan will operate until the oven is cool.
The fan may continue to operate up to 13 minutes.
Noise when cooking with high High temperatures may cause expansion of the oven's
components. This is normal.
temperature.
Smoke / Aroma
When using the oven for the first See page 9 for step-by-step instructions for cleaning the
oven before the first use.
time, it may smoke or smell.
The oven cavity smells after See CLEAN THE OVEN BEFORE FIRST USE on page
9 for step-by-step instructions for removing the aroma.
cooking.
Others
Time appearing in the display is Check Demonstration Mode on page 23 and cancel.
counting down very rapidly.
28
SCA AX1500J P21-29
28
09.6.3, 8:55 AM
SERVICE CALL CHECK
Check the following before calling service:
1. Does the display light when the door is opened and closed?
Yes _______
No _______
2. When the door is opened, is the oven lamp switched on?
Yes _______
No _______
3. Place one cup of water (approx. 250 ml) in a glass measure in the oven and close the door securely.
Oven lamp should go off if door is closed properly.
Programme the oven for one minute on Microwave 100%. At this moment:
A. Does the oven lamp light?
Yes _______
No _______
B. Does the cooling fan work?
Yes _______
No _______
(Put your hand over the ventilation openings.)
C. Does the Microwave icon
appear on the display?
Yes _______
No _______
D. After one minute, did an audible signal sound?
Yes _______
No _______
E. Is the water inside the oven hot?
Yes _______
No _______
4. Remove water from the oven and programme the oven for 5 minutes on Convection, Oven 250°C.
A. Does the Convection icon
appear on the display?
Yes _______
No _______
B. After the oven stops, is the inside of the oven hot?
Yes _______
No _______
5. Fill the water tank with water and replace.
Operate the oven for 3 minutes on Manual Steam High.
A. After the oven stops, is the inside of the oven filled with steam?
Yes _______
No _______
If “NO” is the answer to any of the above questions, please check your wall socket and the fuse in your meter box.
If both the wall socket and the fuse are functioning properly, CONTACT YOUR NEAREST SERVICE CENTRE
APPROVED BY SHARP.
IMPORTANT: If the display shows nothing even if the power supply plug is properly connected, the Energy Save
Mode may be in operation. Open and close the oven door to operate the oven. See "Getting Started" on page 9.
NOTES:
1. If time in the display is counting down very rapidly, check Demonstration Mode. (Please see page 23 for detail.)
2. If the oven is set for more than about 8 minutes on Microwave 800W power level, output power will be reduced
to avoid overheating. Finally the output power will be 600W after 9 minutes.
SPECIFICATIONS
AC Line Voltage
AC Power Required
Microwave
Convection
Output Power
: Single phase 230 - 240V, 50Hz.
:
1.16 kW
1.55 kW
:
800 W* (IEC test procedure)
1.45 kW
1.25 kW
Microwave
Convection
Steam heating element
Microwave Frequency
: 2450 MHz** (Class B/Group 2)
Outside Dimensions
Weight
: 553 mm(W) x 438 mm(H) x 483 mm(D)***
: Approx. 24 kg
*
**
***
When tested in accordance with AS/NZS 2895.1.2007.
This is the classification of ISM (Industrial, Scientific and Medical) equipment described in the International
Standard CISPR11.
The depth does not include the door opening handle and knob.
29
SCA AX1500J P21-29
29
09.7.3, 3:47 PM
COOKING GUIDES
About Your Oven
Be aware that, unlike microwave-only ovens, Super
Steam Ovens have a tendency to become hot during
cooking with SuperSteam Convection, Convection or
Steam.
This Operation Manual is valuable: read it carefully and
always save it for reference.
About Cooking Options
Your oven has a variety of cooking options that are divided into automatic and manual. SuperSteam Convection,
Steam and Microwave have both automatic and manual choices. Convection has only manual.
SuperSteam Convection
Helps remove extra fat and reduce calories whilst preserving the moisture and flavour in food.
Complete Meal option for cooking meals conveniently. LCD display and pre- programmed settings assure good
results.
Steam
Gentle cooking helps retain moisture, natural flavours and nutrients.
Ideal for seafood, meat, vegetable and dumpling dishes.
Convection
Browns, bakes, grills and crisps a wide variety of food.
Two-layer convection baking for cookies, cakes, muffins and biscuits.
Microwave
800W microwave power for fast and convenient microwave cooking and defrosting.
Pre-programmed sensor menus eliminate guesswork when reheating popular items.
30
SCA AX1500J P30-
30
09.6.3, 2:04 PM
COOKING GUIDES
About Utensils and Coverings
The chart below will help you decide what utensils and coverings should be used in each mode.
Utensils Coverings
Cooking
Mode
SuperSteam Convection /
Convection
Steam
YES
YES
Aluminium Foil,
Foil Containers
Microwave
YES
Small flat pieces of aluminum foil placed
smoothly on food can be used to shield
areas from cooking or defrosting too
quickly. Keep foil at least 2 cm from
walls of oven.
Metal
China, Ceramics,
YES
YES
YES
YES
NO
YES
Oven-proof porcelain, pottery, glazed earthenware and bone china are usually
suitable. Do not use the container if it has a flaw.
Heat-resistant
Glassware
e.g. Pyrex®
YES
Check manufacturer's recommendation
for being microwave safe. Do not use
the container if it has a flaw.
YES
YES
Care should be taken if using fine glassware as it can break or crack if heated
suddenly.
NO
Plastic/Polystyrene
heat-resistant temp.
over 140°C
Plastic Wrap
heat-resistant temp.
over 140°C
Paper Towel,
Paper Plates
YES
YES
Care must be taken as some
containers warp, melt or discolour at
high temperatures.
Use microwave-safe plastic containers
for reheating and defrosting. Some
microwave-safe plastics are not suitable
for cooking foods with high and sugar
content.
Follow manufacturer's directions.
NO
YES
YES
NO
NO
YES
Paper towel: To cover for reheating and
cooking. Do not use recycled paper
towels which may contain metal filings.
Paper plates: For reheating.
Containers made of
synthetic material
NO
NO
NO
YES
NO
They could melt at high temperature.
Baking paper
YES
Do not touch the oven wall as it may be burnt. Keep the heat-resistant temp.
YES
Roasting Bags
NO
Roasting bags should only be used with
Convection Oven.
YES
Follow manufacturer’s directions.
Silver Dishes and
Cooking Utensils or
Containers that
might rust inside the
oven.
NO
NO
NO
Rack, Baking Tray
YES
YES
NO
Utensils should be checked to ensure that they are suitable for use in each cooking mode. When heating
food in plastic containers, pay special attention to the melting temperature of the containers. Do not
heat the plastic containers at over their specified melting temperature. Keep an eye on the oven in case
of melting and ignition.
31
SCA AX1500J P30-
31
09.6.3, 2:04 PM
COOKING GUIDES
ACCESSORIES There are many microwave or heat-resistant accessories available for purchase. Evaluate
carefully before you purchase so that they meet your needs. A microwave-safe thermometer will assist you in
determining correct cooking result and assure you that food has been cooked to safe temperatures when using
microwave-only cooking. Sharp is not responsible for any damage to the oven when accessories are used.
For automatic cooking, use the recommended container in the cooking chart in this operation manual or the
cookbook supplied.
SuperSteam Convection and Steam Cooking Advice
There are certain techniques for cooking with steam. It is essential that these techniques are followed to ensure good
results. Many of them are similar to those used in conventional cooking so you may be used to doing them already.
Please follow the advise given below for all cooking options which use SUPERSTEAM CONVECTION and STEAM.
NOTE:
• Always attend the oven when in use.
• Ensure that the utensils are suitable for each cooking mode. (See About Utensils and Coverings page
31)
• Ventilate the room to allow the steam to dissipate.
• After cooking and the oven has cooled, remove and empty the water tank, wipe oven cavity with a soft
cloth or sponge. Wait a few minutes, then empty the drip tray.
WARNING:
Follow instructions in the SHARP operation manual at all times. If you exceed recommended cooking
times and use oven temperature that are too high, food may overheat, burn and, in extreme
circumstances, catch fire and damage the oven.
- Special advice for STEAM Cooking Techniques
Container
Ensure food is arranged evenly. Food which has little or no space between will
take longer to cook, please ensure food is positioned with enough space between
items to allow the steam to circulate around it. For the container, a shallow dish is
suitable. It is not recommended to use dense dishes, because of the thickness of
such dishes, recommended cooking times will have to be extended.
For efficiently reducing salt and fat, please put the food directly on rack. If
the food is put on the plate, please discard the drips left on the plate.
Covering
Covering is not necessary in most cases. If a cover is required, aluminium foil
is recommended to keep food becoming wet from the condensed water in the
oven cavity. Covered food will take longer to cook.
Door
For accurate cooking times, keep the door closed.
Stir
Sometimes soup or casserole reheated in a casserole dish without covering
may look watery after cooking. Appearance will be better when stirred.
Stand
Standing time is recommended after cooking so it enables the heat to disperse
equally throughout the food. Do not allow to stand for a long time; food may be
overcooked or wet by the residual steam.
Cooking Hints
Blanching
STEAM can be used to blanch vegetables to prepare them for freezing. Place
the prepared vegetables on a plate and cook with STEAM, MANUAL, STEAM
HIGH for 4 to 5 minutes. After that, put in the cold water to cool quickly. Dry
them and then freeze.
Salty Food
For certain salty food like salty fish, bacon etc., salty taste can be reduced by
steaming before cooking. Place salty food on rack directly and STEAM,
MANUAL, STEAM HIGH for 4 to 5 minutes.
32
SCA AX1500J P30-
32
09.6.3, 2:04 PM
COOKING GUIDES
- Advice for SUPERSTEAM CONVECTION and STEAM Food characteristics
Density
Food density will affect the amount of cooking time needed. Cut the food into
thinner parts if possible, and arrange in single layer.
Quantity
The cooking time must be increased as the amount of food cooked in the oven
increases.
Size
Small pieces cook faster than larger ones, as heat can penetrate from all
sides to the centre. For even cooking make all the pieces the same size.
Shape
Food that is irregular in shape, such as chicken breasts or drumsticks, may
take longer to cook in the thicker parts. Check that these parts are cooked
thoroughly before serving.
Temperature of food
The initial temperature of food affects the amount of cooking time needed.
Chilled food will take longer to cook than food at room temperature. The
temperature of the container is not the actual temperature of the food or drink.
Seasoning & flavouring
Seasoning or flavouring is best added after cooking. If added as a marinade
or rub, the taste may become light when cooking with steam. Add seasoning
or flavouring again after cooking if necessary.
NOTE:
• Ensure the food is thoroughly cooked / reheated before serving.
• Cooking time will be affected by the shape, depth, quantity and temperature of food together with the size, shape
and material of the container.
• Never heat oil or fat for deep frying as this may lead to overheating and fire. Care should be taken for foods high
in fat or sugar (e.g. Christmas pudding) as overheating can lead to fire.
Face & Hands: Always use thick oven gloves to remove food or cookware from the oven. Be careful
when opening the oven door to allow steam to dissipate. Do not remove the food from the oven with
your bare hand.
Check the temperature of food and drink and stir before serving. Take special care when serving to
babies, children or the elderly.
33
SCA AX1500J P30-
33
09.6.3, 2:04 PM
COOKING GUIDES
Microwave Cooking Advice
- Special Notes and Warning for MICROWAVE -
DO
DON’T
Eggs, fruits,
nuts, seeds,
vegetables,
sausages and
oysters
* Puncture egg yolks and whites and
oysters before cooking to prevent
"explosion".
* Pierce skins of potatoes, apples,
squash, hot dogs, sausages and
oysters so that steam escapes.
* Cook eggs in shells. This prevents
"explosion", which may damage the
oven or injure yourself.
* Cook hard/soft boiled eggs.
* Overcook oysters.
* Dry nuts or seeds in shells.
Popcorn
* Use specially bagged popcorn for the
microwave oven.
* Listen while popping corn for the
popping to slow to 1-2 seconds.
* Pop popcorn in regular brown bags or
microwave safe glass bowls.
* Exceed maximum time on popcorn
package.
Baby food
* Transfer baby food to small dish and
heat carefully, stirring often. Check for
suitable temperature to prevent burns.
* Remove the screw cap and nipple
before warming baby bottles. After
warming shake thoroughly. Check for
suitable temperature.
* Heat disposable bottles.
* Overheat baby bottles.
Only heat until warm.
* Heat bottles with nipples on.
* Heat baby food in original jars.
General
* Food with filling should be cut after
heating, to release steam and avoid
burns.
* Use a deep bowl when cooking liquids
or cereals to prevent boiling over.
* Heat or cook in closed glass jars or
airtight containers.
* Deep fat fry.
* Heat or dry wood, herbs, wet papers,
clothes or flowers.
Liquids
(Beverages)
* For boiling or cooking liquids see
WARNING on page 1-2 to prevent
explosion and delayed eruptive boiling.
* Heat for longer than recommended
time.
Canned foods
* Remove food from can.
* Heat or cook food in cans.
Sausage rolls,
Pies, Christmas
pudding
* Cook for the recommended time.
(These foods have high sugar and/or
fat contents.)
* Overcook as they may catch fire.
Meats
* Use a microwave proof roasting rack or
plate to collect drained juices.
* Place meat directly on the ceramic
oven floor for cooking.
Utensils
* Check the utensils are suitable for
MICROWAVE cooking before you use
them.
* Use metal utensils for MICROWAVE
cooking. Metal reflects microwave
energy and may cause an electrical
discharge known as arcing.
Aluminium foil
* Use to shield food to prevent over
cooking.
* Watch for sparking. Reduce foil or keep
clear of cavity walls.
* Use too much.
* Shield food close to cavity walls.
Sparking can damage the oven.
34
SCA AX1500J P30-
34
09.6.3, 2:04 PM
COOKING GUIDES
- Advice for MICROWAVE Cooking Techniques
Arrange food carefully
Place the thickest areas toward outside of dish.
Watch cooking time
Cook for the shortest amount of time indicated and add more time as needed.
Overcooked food can smoke or ignite.
Cover food before cooking
Check recipe for suggestions: paper towel, microwave plastic wrap or a lid.
Covers prevent spattering and help food to cook evenly and helps keep oven clean.
Shield food
Use small pieces of aluminium foil to cover thin areas of meat or poultry to
avoid overcooking.
Stir food
Stir food from outside to centre of dish once or twice during cooking, if possible.
Turn food
Food such as chicken, hamburgers or steaks should be turned over once during
cooking.
Rearrange food
Food such as meatballs need to be rearranged halfway through cooking from
top to bottom and from the centre of the dish to the outside.
Allow standing time
After cooking ensure adequate standing time. Remove food from oven and stir
if possible. Cover during standing time can allow the food to finish cooking
completely.
Check for cooking result
Look for signs indicating that the cooking temperature has been reached. Good
cooking results include:
– Steam emits throughout the food, not just at edge;
– Joints of poultry can be torn apart easily;
– Pork and poultry show no pinkness;
– Fish is opaque and flakes easily with a fork.
Condensation
A normal part of microwave cooking. The humidity and moisture in food will
influence the amount of moisture in the oven. Generally, covered foods will not
cause as much condensation as uncovered foods. Ensure that the ventilation
openings are not blocked.
Microwave safe plastic
wrap
For cooking food with high fat content, do not bring the wrap in contact with the
food as it may melt.
Microwave safe plastic
cookware
Some microwave safe plastic cookware is not suitable for cooking food with
high fat and sugar content.
Cake/Meatloaf
For cooking cake or meatloaf, place the container on up-turned heat-resistent
shallow dish.
- Advice for defrosting Defrosting Techniques
Arrange
Arrange food in a single even layer in a shallow dish. This will ensure that all
parts of the food defrosts evenly.
Separate
Food may be stuck together when removed from the freezer. It is important to
separate foods as soon as possible during defrosting.
e.g. steaks, chops
Stand
Standing time is necessary to ensure food is thoroughly defrosted. Food must
stand, covered, for a length of time to ensure the centre has completely
defrosted.
NOTE:
• Remove all packing and wrapping before defrosting.
35
SCA AX1500J P30-
35
09.6.3, 2:04 PM
AUTOMATIC COOKING CHART
SuperSteam Convection Menu Guide
RECIPES FOR COMPLETE MEALS
Salmon Steaks with Spinach and Potato Bake
[ Utensils ]
Large Shallow Casserole dish
2 Baking trays
Rack
[ Ingredients for the Salmon Steak ]
4
Salmon Steaks (Approx. 200 g each)
Juice of 1 Lemon
Black Pepper to taste
[ Ingredients for the Spinach Bake ]
Olive Oil to grease the dish
400g Defrosted Spinach, well drained
Salt and Pepper to taste
Nutmeg to season
500g Cooked Potatoes, peeled and sliced
150g Crème Fraîche
100ml Milk
[ Method ]
1. Wash and dry the salmon steaks. Sprinkle with lemon juice and
salt, if desired. Season with black pepper.
2. Place the salmon steaks on rack in baking tray. Place the baking
tray on upper position.
3. Lightly grease the large shallow casserole dish. Season the
spinach leaves with salt and pepper and mix well.
4. Spread 1/2 of the spinach covering the base of the large shallow
casserole dish, followed by layering 1/2 of the potato slices.
Continue the next layer by spreading the remaining spinach,
followed by layering the remaining potato slices.
5. Mix the Crème fraîche with the milk, season with salt and pepper
and pour over the vegetables. Season with nutmeg.
6. Place the large shallow casserole dish on another baking tray.
Place the baking tray on lower position.
7. Cook using 'SuperSteam Convection, AUTO, COMPLETE
MEALS, SALMON STEAKS WITH POTATO BAKE'.
8. After cooking, stand covered with aluminium foil for 5 minutes.
Serves 4
Chicken Breasts with Mediterranean Style Roasted Vegetables
[ Utensils ]
1 Baking tray
Rack
[ Ingredients for Chicken ]
3 tbsp Soy Sauce
3 tbsp White Wine
2 cloves Garlic, crushed
Black Pepper to taste
4
Chicken Breasts
(Approx. 200g each)
4 tbsp Corn flour
[ Ingredients for the Mediterranean
roasted vegetables ]
75g
Asparagus
1 tbsp Olive Oil
Salt and Pepper to taste
1 tsp
Fresh Rosemary
200g
Potatoes, cubed 2cm
1
Onion, sliced
100g
Tomatoes, quartered
100g
Eggplant, sliced
1
Yellow Capsicum, sliced
[ Method ]
1. In a large bowl, mix together the soy sauce, wine, garlic and
black pepper.
2. Add the chicken and marinate for 1hour.
3. Add the corn flour and mix together until the chicken pieces are
completely coated.
4. Trim the hard bottom of the asparagus and cut into 3 equal
amounts of approx. 4 cm length.
5. In a large bowl, combine the olive oil, salt, pepper and rosemary.
Add all vegetables and mix well
6. Place the vegetables directly into a baking tray, towards the
right.
7. Place the chicken on the rack, towards the left, place rack into the
baking tray. Place the baking tray on upper position.
8. Cook using 'SuperSteam Convection, AUTO, COMPLETE
MEALS,CHICKEN BREAST WITH ROASTED VEG'.
9. After cooking, stand covered with aluminium foil for 5 minutes.
Serves 4
36
SCA AX1500J P30-
36
09.6.5, 11:33 AM
AUTOMATIC COOKING CHART
Chinese Style Beef with Noodles
[ Utensils ]
Large Shallow Casserole dish
Small shallow Casserole Dish
2 Baking trays
[ Ingredients ]
400g
Beef Rump Steak
1 tbsp Light Soy Sauce
1 tbsp White Wine
1/2 tsp
Sugar
1 tsp
Sesame Oil
2 tsp
Corn flour
1 tbsp Ginger, grated
1 tbsp Oyster Sauce
1.5 tbsp Garlic, crushed
1
Fresh Bird's Eye Chilli,
seeds removed, finely chopped
100 ml Hot Beef stock
3 tbsp Canned Black Beans, chopped
(or canned kidney beans)
1/2
Green Capsicum, sliced
1
Onion, chopped
5
Shallots, sliced
400g
Fresh Egg Noodles
11/2 cups Cold Water
[ Method ]
1. Cut beef into strips.
2. In a large bowl, mix together the soy sauce, wine, sugar, sesame
oil, corn flour, ginger, oyster sauce, garlic and chilli.
3. Add the hot beet stock to the mixture.
4. Add the black beans, capsicum, onion, shallots and steak. Mix
well.
5. Pour the mixture into the large shallow casserole dish. Place the
dish into the baking tray. Place the baking tray on upper position.
6. Put the noodles into the small casserole dish and cover with the
cold water. Place the dish on another baking tray. Place the
baking tray on lower position.
7. Cook using 'SuperSteam Convection, AUTO, COMPLETE
MEALS, CHINESE BEEF WITH NOODLES'.
8. Drain the noodles. Stir the noodles and the beef immediately
after cooking then stand for 5 minutes.
Serves 4
Roast Leg of Lamb with Roasted Potatoes, Carrots and Turnips
[ Utensils ]
Small shallow casserole dish
2 Baking trays
[ Ingredients ]
1kg
Leg of Lamb with bone
1 tbsp
Olive Oil
Salt and Pepper to taste
1 tbsp
Fresh Rosemary
500g
Baby Potatoes, cut in half
200g
Carrot, diced
200g
Turnips, diced
8 tbsp
Cold Water
[ Method ]
1. Place the lamb directly in baking tray. Brush with olive oil and season
with salt, pepper and rosemary.
Place the baking tray on upper position.
2. Brush the potatoes with olive oil. Place in the left hand side of another
baking tray.
3. Put the carrot and turnips into the small shallow casserole dish, add
the cold water and cover with aluminium foil. Place the dish into the
baking tray.
Place the baking tray on lower position.
4. Cook using 'SuperSteam Convection, AUTO, COMPLETE MEALS,
ROAST LEG OF LAMB WITH ROASTED VEG'.
5. Stand for 5 minutes after cooking.
Serves 4
Roast Beef with Potatoes
[ Utensils ]
1 Baking tray
Rack
[ Ingredients ]
1/4 cup chopped fresh parsley
1 tbsp chopped fresh coriander
1 tbsp chopped fresh chives
1/4 tsp cracked black pepper
salt and pepper to taste
oil to brush
1kg
roast beef
800g baby potatoes
Serves 4-6
[ Method ]
1. Preheat is pre-programmed. Select the menu, desired cooking result
and press START to preheat.
2. In a small bowl, combine the parsley, coriander and chives. Mix until
well combined. Spread the herb mixture over a clean chopping board.
3. Evenly brush the beef with oil. Roll the beef over the herb mixture,
coating evenly. Season with salt and pepper. Set aside.
4. Wash and cut the baby potatoes in half.
5. Place meat on the rack in baking tray. Evenly place the potatoes
around the beef on the rack.
6. After preheating, place the baking tray on lower position.
7. Cook using 'SuperSteam Convection, AUTO, COMPLETE MEALS,
ROAST BEEF WITH POTATOES'.
8. After cooking, stand covered with aluminium foil for 10-15 minutes.
37
SCA AX1500J P30-
37
09.6.5, 11:33 AM
AUTOMATIC COOKING CHART
Spinach and Ricotta Cannelloni
[ Utensils ]
Large shallow casserole dish
1 Baking tray
[ Ingredients ]
250g
packet frozen spinach, thawed
500g
reduced fat ricotta cheese
pinch of ground nutmeg
salt and pepper to taste
12
instant cannelloni tubes
500g
jar tomato basil pasta sauce
2 tbsp
shredded cheddar cheese
Serves 4
[ Method ]
1. Drain spinach and squeeze to remove any excess liquid.
2. In a large bowl, add the spinach, ricotta cheese, nutmeg, salt and
pepper. Mix until well combined.
3. Place mixture into a piping bag. Fill the cannelloni tubes by gently
squeezing the piping bag until each tube is filled. Place the tubes
in a single layer in a large shallow casserole dish.
4. Pour the pasta sauce over the cannelloni. Smooth the sauce over
the pasta using the back of a spoon to ensure even coverage.
5. Sprinkle the cheddar cheese over the pasta.
6. Place casserole dish on a baking tray. Place the baking tray on
upper position.
7. Cook using 'SuperSteam Convection, AUTO, COMPLETE
MEALS, SPINACH AND RICOTTA CANNELLONI'.
8. After cooking, stand for 5 minutes.
Vegetable Rice with Prawns
[ Utensils ]
1 Baking tray
[ Ingredients ]
1
carrot, grated
100g
green beans, sliced
1/2
leek sliced, cut into quarters
125g
can corn kernels
21/2
cups water
1 tsp
vegetable powder
2 cups jasmine rice, rinsed
150g
cooked peeled prawns, cut into
small pieces
salt and pepper to taste
[ Method ]
1. In a large bowl, combine carrot, beans, leek and corn. Add water
and vegetable stock. Mix until well combined.
2. Continue to add the rice, prawns, salt and pepper. Mix until well
combined.
3. Carefully pour this mixture into a baking tray and evenly spread.
Place the baking tray on upper position.
4. Cook using 'SuperSteam Convection, AUTO, COMPLETE
MEALS, VEGETABLE RICE WITH PRAWNS'.
5. After cooking, stand for 5 minutes.
Serves 4
Roast Chicken with Potatoes and Parsnips
[ Utensils ]
1 Baking tray
Rack
[ Ingredients ]
1tbsp oil
1/2 tsp chicken stock
1/2 tsp dried oregano
salt and pepper to taste
1 kg chicken
500g baby potatoes
300g parsnips
Serves 4
[ Method ]
1. Preheat is pre-programmed. Select the menu, desired cooking
result and press START to preheat.
2. In a small bowl, combine the oil, chicken stock, oregano, salt and
pepper. Mix until well combined.
3. Evenly brush chicken with oil mixture. Tie the chicken legs
together. Set aside.
4. Wash baby potatoes and parsnips. Cut potatoes in half, and cut
parsnips into quarters.
5. Place chicken breast side up on the rack in baking tray. Evenly
place the potatoes and parsnips around the chicken on the rack.
6. After preheating, place the baking tray on upper position.
7. Cook using 'SuperSteam Convection, AUTO, COMPLETE
MEALS, ROAST CHICKEN WITH POTATOES'.
8. After cooking, stand covered with aluminium foil for 10 minutes.
38
SCA AX1500J P30-
38
09.7.3, 3:38 PM
AUTOMATIC COOKING CHART
SUPERSTEAM GRILL
Menu name
Weight range
(Increasing unit)
Procedure
Baking Tray
Position
Chicken Legs
(initial temp 5°C)
0.2 - 1.0 kg
(100g)
• Season with salt, pepper and paprika.
• Pierce the skin of the chicken legs.
• Put the chicken legs on the rack, skin side down, in
baking tray.
• After cooking, place on a dish and serve.
Upper
Chicken Fillet
(initial temp 5°C)
0.25 - 1.00 kg
(50g)
• Season with salt, pepper and paprika.
• Put the chicken fillet on the rack in baking tray.
• After cooking, stand for 5 minutes.
Upper
Grilled Fish
(initial temp 5°C)
0.2 - 1.0 kg
(100g)
whole fish
• Make a few slits on the skin of fish.
• Brush oil, then pat with cornstarch lightly on fish body.
Place fish on rack in baking tray and put in the oven.
• After cooking, place on a dish and serve.
Upper
Grilled Skewers
(initial temp 5°C)
0.20 - 0.80 kg
(50g)
• Prepare the grill skewers referring to the recipe below.
• Place on the rack in baking tray.
• After cooking, remove and put on a plate for serving.
Upper
RECIPES FOR GRILLED SKEWERS
Pork Kebabs
[ Ingredients ]
400g escalope of pork
100g smoked belly of pork
2
onions (100 g), in quarters
4
tomatoes (250 g), in quarters
1/2
green pepper (100 g), in eight pieces
4 tbsp oil
2 tsp sweet paprika
salt
1/2 tsp cayenne pepper
1 tsp worcester sauce
[ Method ]
1. Cut the escalope of pork and the pork belly into 2-3 cm cubes.
2. Thread meat and vegetables alternately on four wooden skewers
(approx. 25cm long).
3. Combine the oil with the spices and brush over the kebabs. Place
the kebabs on the rack in baking tray.
4. Cook using 'SuperSteam Convection, AUTO, GRILL, GRILLED
SKEWERS'.
39
SCA AX1500J P30-
39
09.6.3, 2:04 PM
AUTOMATIC COOKING CHART
SUPERSTEAM ROAST
Menu name
Weight range
(Increasing unit)
Procedure
Baking Tray
Position
Roast Chicken
(initial temp 5°C)
0.9 - 2.0 kg (100g) • Season with salt, pepper and paprika.
• Place on rack in baking tray, uncovered and cook.
• After cooking, stand covered with aluminium foil for 10
minutes.
Lower
Roast Pork
(initial temp 5°C)
0.9 - 1.5 kg (100g) •
•
•
•
Tie meat with string (loins only).
Season with salt, pepper and paprika.
Place on rack in baking tray, uncovered and cook.
After cooking, stand covered with aluminium foil for 10
minutes.
Lower
Roast Beef,
Medium
(initial temp 5°C)
1.0 - 2.0 kg (100g) • Season with salt and pepper.
• Place meat on rack in baking tray, uncovered and cook.
• After cooking, stand covered with aluminium foil for 5 10 minutes.
Lower
Roast Leg
of Lamb
(initial temp 5°C)
1.0 - 2.0 kg (100g) • Season with salt, pepper and rosemary.
• Place on rack in baking tray, uncovered and cook.
• After cooking, stand covered with aluminium foil for 10
minutes.
Lower
SUPERSTEAM BAKE
Procedure
Baking Tray
Position
Frozen Pizza
1 layer cooking:
(Thin, Thick Type) 0.2 - 1.0 kg
(initial temp -18°C) (100 g)
2 layers cooking:
0.2 - 1.0 kg
(100 g)
• Preheat is pre-programmed. Select the menu, desired
layer, quantity and cooking result, then press START to
preheat.
• Remove from packaging and place on the baking tray.
After preheating, put the baking tray in the oven.
• After cooking, serve.
1 layer cooking:
Upper
2 layers
cooking:
Upper/Lower
1 layer
Cake
(initial temp 20°C) (Cake tin:
eg: Carrot Cake,
approx. 20cm)
Butter Cake,
Chocolate Cake
• Use desired homemade recipe or packet mix.
• Preheat is pre-programmed. Select the menu, desired
cooking time and press START to preheat.
• After preheating, place the cake tin on the baking tray.
Put the baking tray in the oven.
• After baking, allow to cool in the cake tin for 5 minutes.
Lower
Bread
1 layer
(initial temp 20°C) (Loaf tin: approx.
eg: White Loaf,
13 x 20cm)
Multigrain Loaf
• Use desired homemade recipe or packet mix.
• Preheat is pre-programmed. Select the menu, desired
cooking time and press START to preheat.
• After preheating, place the loaf tin on the baking tray.
Put the baking tray in the oven.
• After baking, allow to cool in the loaf tin for 5 minutes.
Lower
Baked Potatoes 1 - 4 piece
(initial temp 20°C) (1 piece: 250g)
• Preheat is pre-programmed. Select the menu, quantity,
desired cooking time and press START to preheat.
• Pierce each potato in several places and place on rack
in baking tray. After preheating, put the baking tray in
the oven.
• After cooking, leave to stand wrapped in aluminium foil
for 2 - 3 minutes.
Lower
Menu name
Weight range
(Increasing unit)
40
SCA AX1500J P30-
40
09.6.3, 2:04 PM
AUTOMATIC COOKING CHART
Steam Menu Guide
Menu name
Weight range
(Increasing unit)
Baking Tray
Position
Procedure
Fresh Vegetable 1 0.2 - 1.0 kg (100g) • Wash vegetables, then remove excess water.
(initial temp 20°C)
• Put vegetables in a steam tray.
• Place the steam tray on rack in baking tray, uncovered.
Soft Vegetables: Zucchini, Capsicum,
• After cooking, stand for 1 - 5 minutes.
Broccoli, Mushrooms, Asparagus
Upper
Fresh Vegetable 2 0.2 - 1.0 kg (100g)
(initial temp 20°C)
Hard Vegetables: Carrots, Cauliflower,
Beans, Brussels Sprouts
Frozen Vegetable 0.2 - 1.0 kg (100g) • Put frozen vegetables in a steam tray.
(initial temp -18°C)
• Place the steam tray on rack in baking tray, uncovered.
• After cooking, stand for 1 - 5 minutes.
Mixed Vegetables, Broccoli,
Upper
Peas, Carrots, Cauliflower
Fresh Fish/
Fresh Prawns
(initial temp 5°C)
0.1 - 1.0 kg (100g) •
•
•
Whole Snapper, Barramundi Fillet,
•
Large Green Prawns
•
Wash fish thoroughly and remove scales.
Make a few slits on the skin of fish, pierce the eyes of fish.
Put fish/prawns in a steam tray.
Place the steam tray on rack in baking tray, uncovered.
After cooking, stand for 1 - 3 minutes.
Upper
Frozen
0.1 - 0.5 kg (100g) • Put food in a steam tray.
Convenience
• Place the steam tray on rack in baking tray, uncovered.
(Dumplings)
• After cooking, stand for 1 - 3 minutes.
(initial temp -18°C)
Upper
Vegetable, Pork,
Chicken
Rice
(initial temp 60°C
hot tap water
or soup stock)
White Rice
1 - 4 serves
(1 serve)
• Wash rice thoroughly until water runs clear.
• Place into 2 litre shallow casserole dish and cover with
hot soup stock or with hot tap water.
• Place the dish on baking tray, uncovered.
• After cooking, stand for 1 - 5 minutes.
Serve
Rice
1 serve
1
/2 cup
Soup stock or 1
Hot tap water 1 /2 cups
2 serves
3 serves
1 cup
1 /2 cups
2 cups
21/2 cups
3 cups
4 cups
41
SCA AX1500J P30-
41
4 serves
1
09.6.3, 2:04 PM
Upper
Printed in Thailand
TINS-A779WRRZ-J92
SHARP CORPORATION
42
SCA AX1500J P30-
42
09.7.3, 3:38 PM