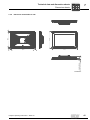
1
Drive Technology \ Drive Automation \ System Integration \ Services Compact Operating Instructions Operator Panels DOP11C Edition 08/2013 20149344 / EN SEW-EURODRIVE—Driving the world Contents Contents 1 General information ............................................................................................ 5 1.1 Scope of this documentation....................................................................... 5 1.2 Design of the safety notes .......................................................................... 5 1.2.1 2 Meaning of signal words .............................................................. 5 1.2.2 Design of the section-related safety notes................................... 6 1.2.3 Design of the embedded safety notes ......................................... 6 1.3 Right to claim under warranty ..................................................................... 6 1.4 Exclusion of liability..................................................................................... 6 1.5 Other applicable documentation ................................................................. 6 1.6 Product names and trademarks .................................................................. 7 1.7 Copyright notice .......................................................................................... 7 Safety notes......................................................................................................... 8 2.1 General information .................................................................................... 8 2.2 Target group ............................................................................................... 8 2.3 Designated use ........................................................................................... 9 2.4 Non-designated use.................................................................................... 9 2.4.1 Safety functions ........................................................................... 9 2.5 Bus systems................................................................................................ 9 2.6 Preventive measures and protection devices ........................................... 10 2.7 Transportation / storage............................................................................ 10 2.8 Installation and startup .............................................................................. 10 2.9 Operating notes ........................................................................................ 11 2.10 Service and maintenance ......................................................................... 11 2.11 Disassembly and waste disposal .............................................................. 11 3 Unit structure..................................................................................................... 12 3.1 3.1.1 Sample type designation ........................................................... 12 3.1.2 Example nameplate ................................................................... 12 3.2 Scope of delivery ...................................................................................... 13 3.3 DOP11C-40, -70 and -100 ........................................................................ 14 3.4 4 Type designation and nameplates ............................................................ 12 3.3.1 Display ....................................................................................... 14 3.3.2 Connections............................................................................... 15 DOP11C-120 and -150 ............................................................................. 16 3.4.1 Display ....................................................................................... 16 3.4.2 Connections............................................................................... 17 Installation ......................................................................................................... 18 4.1 Important installation notes ....................................................................... 18 4.1.1 Installation notes for the basic unit ............................................ 18 4.1.2 UL-compliant installation............................................................ 19 4.1.3 Space required for installation ................................................... 20 4.1.4 Installation diagram:................................................................... 21 4.2 Unpacking ................................................................................................. 21 4.3 Mounting the operator panel ..................................................................... 22 Compact Operating Instructions – DOP11C 3 Contents 4.4 Connecting a voltage supply..................................................................... 23 4.5 Connecting the operator panel.................................................................. 24 4.5.1 Preparation ................................................................................ 24 4.5.2 Connecting the operator panel to the frequency inverter and PC.............................................................................................. 25 4.5.3 5 6 Startup................................................................................................................ 29 5.1 Important notes on startup ........................................................................ 29 5.2 Starting the unit......................................................................................... 30 Operation ........................................................................................................... 31 6.1 7 Connection types ....................................................................... 26 Open service menu ................................................................................... 31 Technical data and dimension sheets ............................................................ 32 7.1 Technical data........................................................................................... 32 7.1.1 7.2 7.1.2 Voltage supply ........................................................................... 32 7.1.3 Display ....................................................................................... 33 7.1.4 Housing...................................................................................... 33 7.1.5 Ambient Conditions.................................................................... 33 7.1.6 Certifications .............................................................................. 34 7.1.7 Communication and memory..................................................... 34 Pin assignment ......................................................................................... 35 7.2.1 7.3 Part numbers ............................................................................. 32 Serial connections ..................................................................... 35 7.2.2 Ethernet ..................................................................................... 35 7.2.3 USB ........................................................................................... 35 Cable......................................................................................................... 36 7.3.1 RS485 /RS422 communication cable (assembled Sub-D 9-pin) .......................................................................... 36 7.4 7.4.1 Dimension sheet DOP11C-40 ................................................... 37 7.4.2 Dimension sheet DOP11C-70 ................................................... 38 7.4.3 Dimension sheet DOP11C-100 ................................................. 39 7.4.4 Dimension sheet DOP11C-120 ................................................. 40 7.4.5 Dimension sheet DOP11C-150 ................................................. 41 8 Declaration of conformity................................................................................. 42 9 Appendix............................................................................................................ 43 9.1 4 Dimension sheets ..................................................................................... 37 Chemical resistance.................................................................................. 43 9.1.1 Metal housing ............................................................................ 43 9.1.2 Solvent resistance of the display ............................................... 43 9.1.3 Solvent resistance of the coating............................................... 44 Compact Operating Instructions – DOP11C General information Scope of this documentation 1 General information 1.1 Scope of this documentation 1 This documentation comprises the general safety notes and selected information regarding DOP11C operator panel. • Please note that this documentation does not replace the detailed system manual (still in progress). • Please consult the online help of the project planning software HMI-Builder.PRO before using the operator panels DOP11C. • Note and follow the information, instructions and notes in the detailed system manual. This is essential for fault-free operation of the unit and fulfillment of any rights to claim under guarantee. • The detailed system manual is provided in PDF format on the enclosed DVD. • All technical documentation from SEW-EURODRIVE is available for download in PDF format from the SEW-EURODRIVE website: www.sew-eurodrive.com. 1.2 Design of the safety notes 1.2.1 Meaning of signal words The following table shows the graduation and meaning of the signal words for safety notes, warnings regarding potential risks of damage to property, and other notes. Signal word Meaning Consequences if disregarded DANGER! Imminent hazard Severe or fatal injuries WARNING! Possible dangerous situation Severe or fatal injuries CAUTION! Possible dangerous situation Minor injuries NOTICE Possible damage to property Damage to the drive system or its environment NOTE Useful information or tip: Simplifies handling of the drive system. Compact Operating Instructions – DOP11C 5 General information Right to claim under warranty 1 1.2.2 Design of the section-related safety notes Section-related safety notes do not apply to a specific action, but to several actions pertaining to one subject. The symbols used either indicate a general hazard or a specific hazard. This is the formal structure of a safety note for a specific section: SIGNAL WORD! Type and source of danger. Possible consequence(s) if disregarded. • 1.2.3 Measure(s) to prevent the danger. Design of the embedded safety notes Embedded safety notes are directly integrated into the instructions just before the description of the dangerous action. This is the formal structure of an embedded safety note: • SIGNAL WORD! Type and source of hazard. Possible consequence(s) if disregarded. – Measure(s) to prevent the hazard. 1.3 Right to claim under warranty A requirement of fault-free operation and fulfillment of any rights to claim under limited warranty is that you adhere to the information in the documentation at hand. Therefore, read the documentation before you start working with the software and the connected units from SEW-EURODRIVE. Make sure that the documentation is available to persons responsible for the machinery and its operation as well as to persons who work independently on the devices. Also ensure that the documentation is legible. 1.4 Exclusion of liability You must adhere to this documentation and the documentation of the connected devices from SEW-EURODRIVE to ensure safe operation and to achieve the specified product characteristics and performance features. SEW-EURODRIVE assumes no liability for injury to persons or damage to equipment or property resulting from non-observance of the documentation. In such cases, any liability for defects is excluded. 1.5 Other applicable documentation Observe the following applicable documentation: 6 • Installation guide (supplied with the product) • System manual (still in progress) • EMC in Drive Engineering (part of the printed publication: Drive Engineering – Practical Implementation) Compact Operating Instructions – DOP11C General information Product names and trademarks 1 Always use the latest version of the documentation and software. The SEW-EURODRIVE homepage (www.sew-eurodrive.com) provides a wide selection of documentation in various languages available for download. If required, you can also order printed and bound copies of the documentation from SEW-EURODRIVE. 1.6 Product names and trademarks The product names mentioned in this documentation are brands or registered brands of the titleholders. 1.7 Copyright notice © 2013 – SEW-EURODRIVE. All rights reserved. Unauthorized reproduction, modification, distribution, and use of this instruction manual, in whole or in part, are prohibited. Compact Operating Instructions – DOP11C 7 Safety notes General information 2 2 Safety notes 2.1 General information 2.2 • Read the safety notes carefully. • Check the delivery for damage caused during transport on receipt. If damage is found, advise your supplier. • The panel meets the requirements of article 4 of the EMC Directive 2004/108/EC. • Do not use the operator panel in or near a mining facility or outdoors, or in areas where there is a risk of explosion or fire hazard. • SEW-EURODRIVE is not liable for modifications, changes, additions and/or alterations to the product. • Use only spare parts and accessories manufactured according to the specifications of SEW-EURODRIVE. • Read the installation and operating instructions carefully prior to installation, use or repair of the operator panel. • Never allow fluids to penetrate the slots or holes in the operator panel. This may lead to a fire or cause the equipment to become live. • Operation of the panel is restricted to qualified personnel. Target group Any mechanical work may only be performed by adequately qualified personnel. Qualified personnel in the context of this documentation are persons familiar with the design, mechanical installation, troubleshooting and servicing of the product who possess the following qualifications: • Training in mechanical engineering, e.g. as a mechanic or mechatronics technician (final examinations must have been passed). • They are familiar with this documentation. Any electronic work may only be performed by adequately qualified electricians. Qualified electricians in the context of this documentation are persons familiar with electrical installation, startup, troubleshooting and servicing of the product who possess the following qualifications: • Training in electrical engineering, e.g. as an electrician or mechatronics technician (final examinations must have been passed). • They are familiar with this documentation. In addition to that, they must be familiar with the relevant safety regulations and laws, especially with the requirements of the performance levels according to DIN EN ISO 13849-1 and all other standards, directives and laws specified in this documentation. The above mentioned persons must have the authorization expressly issued by the company to operate, program, configure, label and ground units, systems and circuits in accordance with the standards of safety technology. All work in further areas of transportation, storage, operation and waste disposal must only be carried out by persons who are trained appropriately. 8 Compact Operating Instructions – DOP11C Safety notes Designated use 2.3 2 Designated use The operator panel of the DOP11C series are intended for the operation and diagnostics of industrial and commercial systems. The DOP11C series comprises only panels for fixed installation . A suitable response to communication errors between the DOP11C and the controller must be implemented in the controller. Additionally, suitable measures (e.g. limit switches, position monitoring) must be implemented to ensure that no damage occurs as a result of a communication error with DOP11C. Do not take the operator panel into operation (i.e. start of designated operation) until you have ensured that the local laws and guidelines are complied with. For the member states of the European Union (EU) this means that the machine complies with EMC Directive 2004/108/EC and the end product with Machinery Directive 2006/42/EC; EN 60204 must be adhered to. 2.4 Non-designated use • 2.4.1 Do not install or operate the panels where they will be exposed to direct sunlight. Safety functions WARNING The operator panels of the DOP11C series may not execute any safety functions without higher-level safety systems. Severe or fatal injuries. • 2.5 Use higher-level safety systems to ensure protection of equipment and personnel. Bus systems A bus system makes it possible to adapt frequency inverters and/or motor starters to the particulars of the machinery within wide limits. This results in the risk that a change of parameters that cannot be detected externally can result in unexpected, though not uncontrolled, system behavior. Compact Operating Instructions – DOP11C 9 Safety notes Preventive measures and protection devices 2 2.6 Preventive measures and protection devices Make sure that preventive measures and protection devices correspond to the applicable regulations (e.g. EN 60204 or EN 50178). 2.7 Required preventive measure: Grounding the unit Required protection devices: Overcurrent protection devices Transportation / storage Immediately upon delivery, inspect the shipment for any damage that may have occurred in transit. Inform the shipping company immediately about any damage. Do not operate the operator panel if it is damaged. If necessary, use suitable, sufficiently rated handling equipment. Store the operator panel in a dry, dust-free room if it is not to be installed straight away. 2.8 10 Installation and startup • Place the panel on a stable base during installation. The panel can be damaged if it is dropped. • Install the panel according to the accompanying installation instructions. • The unit must be grounded according to the accompanying installation instructions. • The installation must be performed by qualified personnel. • Route high-voltage cables, signal cables and supply cables separately from one another. • Make sure that the voltage and polarity of the electrical power source are correct before you connect the operator panel to the power supply. • The openings in the housing are designed to allow air to circulate and therefore must not be covered. • Do not install the operator panel in locations where it will be exposed to a powerful magnetic field. • The peripheral equipment must be suitable for the designated use. • The display glass of the panel is covered with a laminated foil to protect it from scratches during delivery. Pull off the foil carefully after installation to prevent static electricity causing damage to the panel. Compact Operating Instructions – DOP11C Safety notes Operating notes 2.9 2.10 2.11 2 Operating notes • Always keep the panel clean. • Emergency stop and other functions should not be controlled from the operator panel. • Make sure that the keys, display, etc. are not touched by any sharp objects. • Bear in mind that the panel is ready for operation even if the backlighting is no longer illuminated, which means that entries made on the keyboard and touchscreen will still be registered. Service and maintenance • The agreed limited warranty applies. • Clean the display and the front of the panel with a soft cloth and mild detergent. • Repairs must be performed by qualified personnel. Disassembly and waste disposal Complete or partial recycling of the operator panel is subject to local regulations. Note that the following components contain substances that may pose a health hazard and cause environmental pollution: Lithium battery, electrolyte capacitors and display. Please observe currently applicable national regulations. Dispose of the following materials separately in accordance with the country-specific regulations in force, as: • • • • Electronics scrap Plastics Sheet metal Copper etc. Compact Operating Instructions – DOP11C 11 Unit structure Type designation and nameplates 3 3 Unit structure 3.1 Type designation and nameplates 3.1.1 Sample type designation DOP 11 C 40 TFT-/LCD display Design Version C 40 = 4.3 inches, 480 x 272 pixels 65,536 colors 70 = 7 inches, 800 x 480 pixels 65,536 colors 100 = 10.4 inches, 640 x 480 pixels 65,536 colors 120 = 12.1 inches, 1280 x 800 pixels 262,144 colors 150 = 15.4 inches, 1280 x 800 pixels 262,144 colors Generation Type: DOP = Drive Operator Panel 3.1.2 Example nameplate The nameplate is attached to the rear of the unit: 8795483531 12 Compact Operating Instructions – DOP11C Unit structure Scope of delivery 3.2 3 Scope of delivery Included in the scope of delivery: • DOP11C operator panel • Installation material • Phoenix COMBICON connector for DC 24 V, 5 mm, 3-pin • Compact operating instructions and installation guide (in English) Compact Operating Instructions – DOP11C 13 Unit structure DOP11C-40, -70 and -100 3 3.3 DOP11C-40, -70 and -100 The following sections will give you an overview of the display and the connections. For further details, refer to chapter "Technical data and dimension sheets". 3.3.1 Display The following illustration shows the display on the front of the operator panel: 8993412747 14 Compact Operating Instructions – DOP11C Unit structure DOP11C-40, -70 and -100 3.3.2 3 Connections • The following illustration shows the connections on the bottom of the operator panel: [1] [2] [3] [4] 8993407371 Pos. Connection Description [1] Voltage supply DC 24 V (18 – 32 V) [2] COM1/2 Communication ports (serial, 9-pin D-sub) • RS232 • RS422 • RS485 [3] Ethernet interface (LAN) 1 x 10/100 Base-T (shielded RJ45) [4] COM3/4 Communication ports (serial, 9-pin D-sub) • RS232 • RS422 • RS485 • The following illustration shows the connections on the back of the operator panel: [1] [2] 8993418123 Pos. Connection Description [1] USB interface 1 x USB host 2.0, max. output current 200 mA [2] SD memory card 1 x SD memory card (optional) Compact Operating Instructions – DOP11C 15 Unit structure DOP11C-120 and -150 3 3.4 DOP11C-120 and -150 The following sections will give you an overview of the display and the connections. For further details, refer to chapter "Technical data and dimension sheets". 3.4.1 Display The following illustration shows the display on the front of the operator panel: 8993569675 16 Compact Operating Instructions – DOP11C Unit structure DOP11C-120 and -150 3.4.2 3 Connections • The following illustration shows the connections on the bottom of the operator panel: [1] [2] [3] [4] [5] [6] [7] 8993562379 Pos. Connection Description [1] Voltage supply DC 24 V (18 – 32 VDC) [2] COM1/2 Communication ports (serial, 9-pin D-sub) • RS232 • RS422 • RS485 [3] Ethernet interface (LAN2) 1 x 10/100/1000 Base-T (shielded RJ45) [4] USB interface 2 x USB host 2.0, max. output current 500 mA [5] Audio output Jack plug 3.5 mm [6] Ethernet interface (LAN1) 1 x 10/100 Base-T (shielded RJ45) [4] COM3/4 Communication ports (serial, 9-pin D-sub) • RS232 • RS422 • RS485 • The following illustration shows the connections on the back of the operator panel: [1] [2] 9030637323 Pos. Connection Description [1] USB interface 1 x USB host 2.0, max. output current 500 mA [2] SD memory card 1 x SD memory card (can be ordered optionally) Compact Operating Instructions – DOP11C 17 Installation Important installation notes 4 4 Installation 4.1 Important installation notes 4.1.1 Installation notes for the basic unit Separate cable ducts Route power cables and electronic cables in separate cable ducts. Cross-sections • Voltage supply: Cross section according to nominal input current. • Electronics cables: – 1 conductor per terminal 0.20 ... 0.75 mm2 (AWG 20 ... 17) – 2 conductors per terminal 0.20 ... 0.75 mm2 (AWG 20 ... 17) Shielding and grounding • Use only shielded signal cables. • Connect the shield by the shortest possible route and make sure it is grounded over a wide area at both ends. You can ground one end of the shield via an interference suppression capacitor (220 nF / 50 V) to avoid ground loops. If using doubleshielded cables, ground the outer shield on the controller end and the inner shield on the other end. Examples of correct shield connection with metal clamp (shield terminal) or metal Pg cable gland. 4247498763 18 • Shielding can also be achieved by routing the cables in grounded sheet metal ducts or metal pipes. In this case, the power cables and control cables should be routed separately. • The unit is grounded via the connector for 24 V voltage supply. Compact Operating Instructions – DOP11C Installation Important installation notes 4.1.2 4 UL-compliant installation Note the following information for UL-compliant installation: • Use only copper conductors with a temperature range of 60 / 75 °C as connection cable. WARNING • • • Disconnect units only if no voltage is applied. This device is equipped with a battery. The unit must be used on an even surface with protection 4X. Only for indoor use. NOTICE Only use tested units with a limited output voltage (Vmax = DC 30 V) and limited output current (I ≤ 8 A) as an external DC 24 V voltage source. UL certification does not apply to operation in voltage supply systems with a nongrounded star point (IT systems). Compact Operating Instructions – DOP11C 19 Installation Important installation notes 4 4.1.3 Space required for installation The thickness of the mounting plate depends on the unit type. The following table lists the maximum wall thickness for each unit type: Unit type Max. thickness of mounting plate: DOP11C-40 11 mm DOP11C-70 DOP11C-100 8 mm DOP11C-120 DOP11C-150 Space required for installing the operator panel: 100 mm 50 mm 50 mm m 100 mm 100 mm m 8795688843 20 Compact Operating Instructions – DOP11C Installation Unpacking 4.1.4 4 Installation diagram: 1. Connect the cables as shown to the following diagram: [1] [2] [3] [4] DC 24 V RS232 / RS422 / RS485 RS232 / RS422 / RS485 Ethernet DC 24 V [5] Ethernet 8832896395 [1] [2] [3] [4] [5] Make sure that the operator panel and controller have the same electrical grounding (reference voltage value), as otherwise there may be problems with communication. Use an M5 screw and a PE (as short as possible) with a minimum cross section of 2.5 mm2. Only use shielded communication cables. Route high-voltage cables separately from signal and supply cables. The operator panel must be adjusted to the ambient temperature before it is taken into operation. If condensation builds up, you must ensure that the operator panel is dry before connecting it to the power supply. Ensure that the voltage and polarity of the power source are correct. Control cabinet 2. Carefully remove the protective film from the display of the operator panel to prevent damage from static electricity. 4.2 Unpacking • Unpack the delivery and check it. Inform your supplier immediately in the event of damage. NOTICE Place the operator panel on a stable base during installation. If the unit falls down, it could be damaged. Compact Operating Instructions – DOP11C 21 Installation Mounting the operator panel 4 4.3 Mounting the operator panel How the operator panel is mounted depends on the unit type: • DOP11C-40, -70 and -100 Use all the retaining slots and the brackets and screws supplied to mount the operator panel. 0.5 - 1.0 Nm 4249326347 • 4249328011 DOP11C-120 and DOP11C-150 Mount the operator panel to its designated spot using 8 screws (Torx, M4). Loosen the screw [1] with a screw driver (Torx, TX7) [2] until the retaining clamp tilts up. Then tighten the screw clockwise (0.4 Nm) until the retaining clamp is pressed against the housing wall. Repeat the procedure for the remaining screws. TX7 [3] [1] [2] 8953957771 [1] [2] [3] 22 Screw (Torx, M4) Screw driver (Torx, TX7) Retaining clamp Compact Operating Instructions – DOP11C Installation Connecting a voltage supply 4.4 4 Connecting a voltage supply NOTICE Ensure correct polarity when connecting the panel. Incorrect polarity will damage the unit. INFORMATION Make sure the operator panel and the controller system have the same electrical grounding (reference voltage value). Otherwise, communication errors might occur. Voltage supply DOP11C: [1] [2] [3] 9052978827 [1] +24 V [2] 0 V [3] Ground Compact Operating Instructions – DOP11C 23 Installation Connecting the operator panel 4 4.5 Connecting the operator panel 4.5.1 Preparation NOTICE Possible damage to property. The power must be switched off when connecting the units. • Take suitable measures to prevent the motor from starting up unintentionally via the connected frequency inverter. – Disconnect the electronics input X13.0/controller inhibit in MOVIDRIVE® or – Disconnect the supply voltage (24 V backup voltage must still be applied) – Disconnect the terminals "clockwise rotation" and "enable" on MOVITRAC® Additional safety measures must be taken depending on the application to avoid injury to people and damage to machinery. 24 Compact Operating Instructions – DOP11C Installation Connecting the operator panel 4.5.2 4 Connecting the operator panel to the frequency inverter and PC 1. Connect the operator panel to the inverter. For detailed information, refer to chapter "RS485 connection" (page 26). RS485 RS485 8997683979 2. Connect the operator panel to the PC using the standard Ethernet patch cable. INFORMATION The Ethernet interface of the operator panel has an "autocrossing" function. Therefore, there is no need for a crossover cable for a point-to-point connection. For detailed information, refer to chapter "Ethernet connection" (page 28). Ethernet 8993640715 3. Switch on the PC. If the HMI Builder.PRO project planning software is not already installed on the PC, install it now and then start the software. 4. Switch on the supply (24 V) for the operator panel and the connected frequency inverter. Compact Operating Instructions – DOP11C 25 Installation Connecting the operator panel 4 4.5.3 Connection types RS-485 connection With the RS485 interface you can connect up to 31 MOVIDRIVE® units to one operator panel. DOP11C can be directly connected to a frequency inverter of the type MOVIDRIVE® via the RS485 interface using a 9-pin Sub-D connector. Wiring diagram: RS485 interface RS485 connection: RS485 RS485 8997683979 26 Compact Operating Instructions – DOP11C Installation Connecting the operator panel 4 Pin assignment for DOP11C: DOP11C MOVITRAC® 9-pin D-Sub socket Jumper between 1 and 6 to activate bus termination 120 ohms 0.25 W MOVIDRIVE® S1 Control unit S2 /Controller inhibit CW/stop* CCW/stop* Enable/rapid stop* n11/n21* n12/n22* Reference X13:DIØØ...DIØ5 +24V output Reference potential for binary signals RS-485 + RS-485 – ON OFF X44 RS-422 / RS-485 X13: DIØØ DIØ1 DIØ2 DIØ3 DIØ4 DIØ5 DCOM** VO24 DGND ST11 ST12 5 9 1 6 1 2 3 4 5 6 7 8 9 10 11 FSC11B X46 HL ^ 1 2 3 4 5 6 7 Shield plate or shield terminal X45 8965662347 Cable specification Use a 2 x 2-core twisted and shielded copper cable (data transmission cable with braided copper shield). The cable must meet the following specifications: – Core cross section 0.5 ... 0.75 mm2 (AWG 20 ... 18) – Cable resistance 100 ... 150 Ω at 1 MHz – Capacitance per unit length ≤ 40 pF/m (12 pF/ft) at 1 kHz. For example, the following cable is suitable: – UNITRONIC® BUS CAN, 2 x 2 x 0.22 mm2 by Lappkabel. Applying the shield Apply the shield at both ends over large area to the electronics shield clamp of the controller and in the housing of the 9-pin Sub-D connector of the operator panel. NOTICE The bus controller may suffer irreparable damage as a result of a short circuit in the EMC decoupling between the electronics and ground. Never connect the shield ends to DGND! Cable length The permitted total cable length is 200 m. Compact Operating Instructions – DOP11C 27 Installation Connecting the operator panel 4 Potential shift NOTICE There must not be any potential shift between the units connected to RS485. Take suitable measures to avoid potential shift, for example, by connecting the unit grounds (GND) with a separate cable, connecting the voltage supply (24 V) etc. Ethernet connection Connecting DOP11C to a PC for programming and remote maintenance via Ethernet and TCP/IP. LAN Switch / Hub Uplink DOP11C 8997845259 Cable specification Use a standard shielded Ethernet cable with shielded RJ45 connectors and cables according to the CAT5 specification. The maximum cable length is 100 m. For example, the following cable is suitable: • Ethernet connections of DOP11C120 and -150 28 UNITRONIC® LAN UTP BS flexible 4 x 2 x 26 AWG by Lappkabel The units DOP11C-120 and -150 are equipped with 2 Ethernet connections. Note: The Ethernet connections cannot be used as a switch (with the same IP address). • Used the Ethernet connections independently (only one or both at one time) in order to connect the operator panel to other devices (inverters, controller). • Assign one IP address from your local network (IP address range) to each Ethernet connection. Compact Operating Instructions – DOP11C Startup Important notes on startup 5 I 5 0 Startup WARNING Risk of injury due to electric shock. Severe or fatal injuries. • 5.1 Adhere to the safety instructions in chapter 2 during installation. Important notes on startup For a successful startup, a correct electrical connection of the operator panel is required. WARNING The operator panels of the DOP11C series may not execute any safety functions without higher-level safety systems. Severe or fatal injuries. • Use higher-level safety systems to ensure protection of equipment and personnel. Compact Operating Instructions – DOP11C 29 I 5 0 5.2 Startup Starting the unit Starting the unit INFORMATION Units are delivered without an uploaded project. The unit starts automatically and shows the start screen on the display when it is connected to a voltage supply. Basic settings (e. g. IP addresses) can be set in the service menu. • Touch the start screen to open the service menu. 8969090699 30 Compact Operating Instructions – DOP11C Operation Open service menu 6 Operation 6.1 Open service menu 6 INFORMATION For the following procedure, a project has to be uploaded into the service menu. Proceed as follows to switch to the service menu: 1. Connect the operator panel to the voltage supply. An hourglass appears on the screen. 2. Wait until the hourglass disappears. 3. Touch the display and keep the finger on the display until the following message appears: "Tap anywhere on screen, or touch calibrate will start in 10 seconds" 4. Stop touching the display and then touch it again. The service menu appears. 8969090699 For detailed information on setting options, refer to the system manual. Compact Operating Instructions – DOP11C 31 kVA 7 i f n Technical data and dimension sheets Technical data P Hz 7 Technical data and dimension sheets 7.1 Technical data 7.1.1 Part numbers Part number 7.1.2 DOP11C-40 DOP11C-70 DOP11C-100 DOP11C-120 DOP11C-150 17974216 17974224 17974232 17974240 17974259 DOP11C-70 DOP11C-100 DOP11C-120 DOP11C-150 Voltage supply DOP11C-40 Voltage supply Power consumption at rated voltage 32 DC +24 V (DC 18-32 V) CE: The voltage supply has to meet the requirements of IEC 60950 and IEC 61558-2-4. UL and cUL: The current supply has to be in line with guidelines for current supply class 2. 3.6 W 6W 9.6 W 22 W 24 W Fuse Internal DC fuse, 2.0 AT, 5 x 20 mm 3.15 A TT (super slow blow) 5 x 20 mm Accumulator / Battery Accumulator: MS920-SE Battery: CR 2032 Compact Operating Instructions – DOP11C kVA Technical data and dimension sheets Technical data 7.1.3 i f n 7 P Hz Display DOP11C-40 DOP11C-70 DOP11C-100 DOP11C-120 DOP11C-150 Graphics resolution (pixels) 480 x 272 (16:9) 800 x 480 (16:9) 640 x 480 (4:3) 1280 x 800 (16:10) 1280 x 800 (16:10) Active screen size, WxH 95.0 x 53.9 mm (4.3") 152.4 x 91.4 mm (7") 211.2 x 158.4 mm (10.4") 261.12 x 163.2 mm (12.1") 331.2 x 207.0 mm (15.4") Backlight LED, can be dimmed >50,000 h at an ambient temperature of +25 °C. LED, can be dimmed >20,000 h at an ambient temperature of +25 °C. LED, can be dimmed >50,000 h at an ambient temperature of +25 °C. Brightness (cd/m2) 350 350 450 400 450 Contrast 400 : 1 400 : 1 700 : 1 1000 : 1 1000 : 1 Angle of vision (H) / (V) 140 deg. / 115 deg. 140 deg. / 115 deg. 176 deg. / 176 deg. 160 deg. / 140 deg. Touch screen material1) Polyester on glass, resistive Touch screen contacts 1 million touch screen contacts Display TFT-LCD, 65 k colors 160 deg. / 140 deg. Coating: Autoflex EBA180L Coating: Autotex F157 / F207 1) For detailed information, refer to "Chemical resistance" in the appendix 7.1.4 Housing DOP11C-40 DOP11C-70 DOP11C-100 Dimensions WxHxD 145 x 103 x 7 mm 204 x 143 x 7 mm 280 x 228 x 7 mm Cutout WxH 128 x 87 mm 187 x 126 mm 262 x 209 mm Installation depth 43 mm (143 mm incl. free space) DOP11C-120 340 x 242.2 x 79 mm 324 x 226 mm 44 mm (144 mm incl. free space) free space: 72 mm (172 mm including free space) Degree of protection - front IP 65 Degree of protection - back IP 20 Protection material back and frame Powder-coated aluminum Weight 7.1.5 0.5 kg 0.8 kg 1.5 kg 2.6 Kg DOP11C-100 DOP11C-120 DOP11C-150 410 x 286 x 83 mm 394 x 270 mm 76mm (176 mm including free space) 3.85 kg Ambient Conditions DOP11C-40 DOP11C-70 Operating temperature −10 °C to +60 °C Storage temperature Rel. Humidity DOP11C-150 −10 °C to +50 °C -20 to +70 °C < 85 % (non-condensed) Compact Operating Instructions – DOP11C 5 % – 85 % (non-condensing) 33 7 kVA i f n Technical data and dimension sheets Technical data P Hz 7.1.6 Certifications DOP11C-40 EMC tests on panel UL approval DOP11C-70 DOP11C-100 DOP11C-150 UL 508 In association with the UL approval, the installation guides (in English) delivered with the unit and with the following document numbers apply: 20162944 / EN 20194544 / EN 20194943 / EN DNV approval 20195346 / EN 20195745 / EN Yes NEMA 7.1.7 DOP11C-120 Tested according to: EN 61000-6-3 (emission) and EN 61000-6-2 (interference immunity). 4X, indoor use only Communication and memory DOP11C-40 DOP11C-70 DOP11C-100 DOP11C-120 DOP11C-150 9-pin D-sub connector, installed plug with 4-40 UNC retaining screws. RS232 serial interface (COM1, 3) RS422/485 serial interface (COM2, 4) 34 Ethernet 1 x 10 Base-T / 100 Base-T (shielded RJ45) 1 x 10/100/1000 Mbit/s and 1 x 10/100 Mbit/s. Shielded RJ45 USB 1 x USB host 2.0, max. output current 200 mA 3 x USB host 2.0, max. output current 500 mA Processor: ARM9 400 MHz Intel® Atom 1.1 GHz External memory media 1 x SD memory card (optional) Compatibly only with a standard SD format with a memory capacity of up to 2 GB. RAM 128 MB (DDR2) 1 GB (DDR2) Application memory 80 MB 1.4 GB LED 1 x blue / red, programmable using software 1 x multicolor Real-time clock Yes (on chip) Compact Operating Instructions – DOP11C kVA Technical data and dimension sheets Pin assignment 7.2 Pin assignment 7.2.1 Serial connections i f n 7 P Hz 9-pin D-sub connector Diagram connector 1 6 7 2 3 8 terminal no. COM1 COM2 COM3 COM4 1 - RS422 TX+ RS485 TX+/RX+ - RS422 TX+ RS485 TX+/RX+ 2 RS232 RX - RS232 RX - 3 RS232 TX - RS232 TX - 4 - RS422 RX+ 5 GND GND GND GND 6 - RS422 TXRS485 TX-/RX- - RS422 TXRS485 TX-/RX- 7 RS232 RTS - - RS422 RTS+ 8 RS232 CTS - - RS422 RTS- 9 - RS422 RX- - RS422 RX 4 9 5 7.2.2 RS422 RX+ Ethernet RJ45 socket 1 Terminal no. Designation Signal direction operator panel ↔ XXX 1 Tx+ → 2 Tx- → 3 Rx+ ← 6 Rx- ← 4, 5, 7, 8 GND - 8 7.2.3 USB USB socket Terminal no. Designation USB-A 1 VBUS 2 D- ↔ 3 D+ ↔ 4 GND - 1 VBUS - 2 D- ↔ 3 D+ ↔ 4 GND 1 2 3 4 USB-B 2 3 Compact Operating Instructions – DOP11C 1 Signal direction operator panel ↔ XXX - - 4 35 7 kVA i f n Technical data and dimension sheets Cable P Hz 7.3 Cable 7.3.1 RS485 /RS422 communication cable (assembled Sub-D 9-pin) all Cables and shield on this side with ferrules 9-pin D-Sub Male TXD/RXD+ 1 TXD/RXD- 6 4x Cable-labeling 120 Ohm 0,25W + GND GND Data+ DataGND 5 Shield connected to D-SUB cover max 15 3m max 33 UNC 4-40 9-pin D-Sub Male Label Cable: LIYCY-Pair 2x2x0,14 or equivalent 8966255627 36 Compact Operating Instructions – DOP11C Technical data and dimension sheets Dimension sheets 7.4 Dimension sheets 7.4.1 Dimension sheet DOP11C-40 128 i f n 7 P Hz 9 104 7 43 145 maximal 11mm material thickness 9 87 9 9 kVA 8795697547 Compact Operating Instructions – DOP11C 37 kVA 7 i 7.4.2 n Technical data and dimension sheets Dimension sheets P Hz Dimension sheet DOP11C-70 187 9 143 maximal 11mm material thickness 9 126 9 9 f 7 43 204 8797601547 38 Compact Operating Instructions – DOP11C Technical data and dimension sheets Dimension sheets 7.4.3 i f n 7 P Hz Dimension sheet DOP11C-100 262 9 228 9 209 9 9 kVA 7 44 maximal 8mm material thickness 280 8799560715 Compact Operating Instructions – DOP11C 39 Technical data and dimension sheets Dimension sheets 7 Dimension sheet DOP11C-120 maximal 8 mm material thickness 9 224 242 9 7.4.4 322 9 340 50 7 9 8799614731 40 Compact Operating Instructions – DOP11C Technical data and dimension sheets Dimension sheets i f n 7 P Hz Dimension sheet DOP11C-150 9 286 268 9 7.4.5 kVA 392 9 410 7 maximal 8 mm material thickness 54 9 8799694987 Compact Operating Instructions – DOP11C 41 Declaration of conformity 8 8 Declaration of conformity EC Declaration of Conformity 6(:(852'5,9(*PE+&R.* (UQVW%OLFNOH6WUDH'%UXFKVDO GHFODUHVXQGHUVROHUHVSRQVLELOLW\WKDWWKH RSHUDWRUSDQHOV '23& '23& '23& '23& '23& DUHLQFRQIRUPLW\ZLWK (0&'LUHFWLYH (& $SSOLHGKDUPRQL]HGVWDQGDUGV (1 (1$ $FFRUGLQJWRWKH(0&'LUHFWLYHWKHOLVWHGSURGXFWVDUHQRWLQGHSHQGHQWO\RSHUDEOHSURGXFWV(0& DVVHVVPHQWLVRQO\SRVVLEOHDIWHUWKHVHSURGXFWVKDYHEHHQLQWHJUDWHGLQDQRYHUDOOV\VWHP7KH DVVHVVPHQWZDVYHULILHGIRUDW\SLFDOV\VWHPFRQVWHOODWLRQEXWQRWIRUWKHLQGLYLGXDOSURGXFW Bruchsal Place Date Johann Soder Managing Director Technology a) b) a) Authorized representative for issuing this declaration on behalf of the manufacturer b) Authorized representative for compiling the technical documents 8795491339 42 Compact Operating Instructions – DOP11C Appendix Chemical resistance 9 Appendix 9.1 Chemical resistance 9.1.1 Metal housing 9 The frame and housing are made of powder-coated aluminum. This powder coating can be exposed to the following substances for more than 24 hours without any visible changes: Sea water Tap water Diesel oil / fuel oil Sodium chloride solution 2% / 20% Deionized water Phosphoric acid 4% / 10% Acetic acid 10% Sulfuric acid 20% Hydroperoxide 3% Cooking oil Citric acid - The powder coating is partly resistant to the following chemicals at room temperature: Butanol Nitric acid 3% Hydrochloric acid 5% Nitric acid 10% Isopropyl alcohol Phosphoric acid 43% Sodium hypochlorite 10% Turpentine INFORMATION If contact with any of the above mentioned chemicals cannot be avoided, it is recommended to first test the reaction of the substance at a spot of the metal housing which is not visible to everybody. The powder coating is not or barely resistant to the following chemicals at room temperature: 9.1.2 Concentrated acetic acid Methyl ethyl ketone Toluene Acetone Nitric acid 30% Trichlorethylene Ammonia 5% Phenol Xylene Concentrated ammonia Sodium hydroxide 5% Gasoline, 97 octane, unleaded Ethyl acetate Sodium hydroxide 30% Gasoline, 98 octane, leaded - Solvent resistance of the display The display can be exposed to the following substances for given time period the without any visible changes: Solvent Time period Acetone 10 min Isopropanol 10 min Toluene 5h Compact Operating Instructions – DOP11C 43 Appendix Chemical resistance 9 9.1.3 Solvent resistance of the coating Autotex F157 / F207, Autoflex EBA180L According to DIN 42115 part 2, Autotex F157 / F207, Autoflex EBA180L can be exposed to the following chemicals for more than 24 hours without showing any noticeable changes: Acetonitrile Fuel Downey / Lenor1) Phosphoric acid (<30%) Dissolved abrasive cleaner (Ajax / Ethanol Vim) Potassium ferrocyanide / ferricyanide Alkali carbonate solution Glycerin Potassium hydroxide (< 30%) Ammonia1) (< 40%) Glycol Pure turpentine Acetic acid (<50%) Gumption1) SBP 60/951) Dissolved Ariel powder (laundry detergent) (1) Hydrochloric acid (<36%) Sulfuric acid (<10%) Bleach1) Linseed oil Ketchup Caster oil Methanol Trichloroacetic acid (< 50%) Sodium hydroxide1) (<40%) Nitric acid (<10%) Test gasoline1) Drilling oil Paraffin oil Windex1) Cyclohexanol Dissolved Persil powder (laundry detergent) (1) Wisk Diacetone alcohol - - 1) A barely noticeable shininess was detected. According to DIN 42115 part 2, Autotex F157 / F207, Autoflex EBA180L is resistant to glacial acetic acid for 1 hour maximum without any noticeable changes. Autotex F157 / F207, Autoflex EBA180L is neither resistant to high pressure steam of over 100 °C nor to the following chemicals: 44 Concentrated inorganic acids Benzyl alcohol Concentrated etching solution Methylene chloride Compact Operating Instructions – DOP11C SEW-EURODRIVE—Driving the world SEW-EURODRIVE Driving the world SEW-EURODRIVE GmbH & Co KG P.O. Box 3023 76642 BRUCHSAL GERMANY Phone +49 7251 75-0 Fax +49 7251 75-1970 [email protected] www.sew-eurodrive.com