1
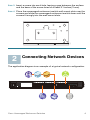
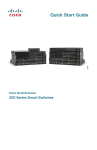
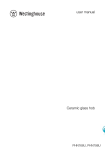
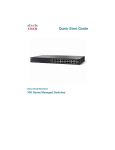
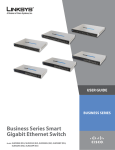
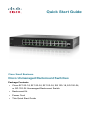
Quick Start Guide
Cisco Small Business
Cisco Unmanaged Rackmount Switches
Package Contents
• Cisco SF 100-16, SF 100-24, SF 102-24, SG 100-16, SG 100-24,
or SG 102-24 Unmanaged Rackmount Switch
• Rackmount Kit
• Power Cord
• This Quick Start Guide
Welcome
Thank you for choosing the Cisco SF 100-16, SF 100-24, SF 102-24,
SG 100-16, SG 100-24, or SG 102-24 Unmanaged Rackmount Switch, a
Cisco Small Business network communications device.
This guide will familiarize you with the layout of the unmanaged rackmount
switch and describe how to deploy the device in your network. For
additional information, see www.cisco.com/smb.
Network Speed and Auto MDI/MDI-X Detection
All ports support network speed auto-negotiation and auto MDI/MDI-X
crossover detection. Network speed auto-negotiation automatically
selects the best connection speed and mode (half- or full-duplex) for
communicating with attached devices. Auto MDI/MDI-X crossover
detection automatically adjusts for the cable type (straight-through or
crossover) used to connect the unmanaged rackmount switch to other
devices.
Green Energy–Efficient Technology
SG 100-16, SG 100-24, and SG 102-24 switches support Green Energyefficient Technology that increases energy efficiency and helps
businesses to use less energy and save money.
Traffic Prioritization
The unmanaged rackmount switches deliver Quality of Service (QoS); all
received packets are examined for QoS priority encoding. The switch
reads the priority level and forwards the packet based on that priority
level. For example, during heavy loads voice and video traffic are given
priority over data traffic. This ensures that time-sensitive traffic gets the
highest level of service.
Jumbo Frame Support
SG 100-16, SG 100-24, and SG 102-24 switches support frames up to
9,000 bytes called jumbo frames. Jumbo Frame support improves
network throughput and reduces CPU utilization during large file transfers,
such as multimedia files, by allowing larger payloads in each packet.
1
Cisco Unmanaged Rackmount Switches
1
Installing the Cisco Switch
There are three ways to physically install the switch:
• Set the switch on a flat surface.
• Mount the switch in a standard rack (1U high).
• Mount the switch on a wall.
Before you install the Unmanaged Rackmount Switch, follow the guidelines
in this section.
When you choose a location for the switch, consider the following
guidelines:
• Make sure that the switch is accessible and that the cables can be
connected easily.
• Keep cabling away from sources of electrical noise, power lines, and
fluorescent lighting fixtures.
• Position the switch away from water and moisture sources.
• To ensure adequate air flow around the switch, be sure to provide a
minimum clearance of two inches (50 mm).
• Do not stack free-standing switches more than four units high.
Do not deploy the device in a location where any of the following
conditions exist:
High Ambient Temperature—The ambient temperature must not
exceed 104 degrees Fahrenheit (40C).
Reduced Air Flow—Both side panels must be unobstructed to prevent
overheating.
Mechanical Overloading—The device should be level, stable, and
secure to avoid it sliding or shifting out of position.
Circuit Overloading—Adding the device to the power outlet must not
overload that circuit.
Cisco Unmanaged Rackmount Switches
2
Rack-Mount Placement
Follow these steps to rack-mount the switch in any standard 19-inch rack.
STEP 1 Place the switch on a hard, flat surface with the front panel facing
towards you.
STEP 2 Attach a rack–mount bracket to one side of the switch with the
supplied screws and secure the bracket tightly. Repeat this step to
attach the other bracket to the opposite side of the switch.
STEP 3 After the brackets are attached to the switch, use suitable screws
to securely attach the brackets to any standard 19-inch rack.
1
1
2
3
4
5
6
7
8
9
10
11 12 / miniGBIC1
13
14
15
16
17
18
19
20
21
22
23 24 / miniGBIC2
Gigabit
Link/Act
Gigabit
2
3
4
5
6
7
8
9
13
10
11
12
Cisco Small
Busines
14
15
s
SR2024
16
17
(Shared with
18
19
12)
(Shared with
24)
20
21
22
23
24
miniGBIC1
miniGBIC2
10/100/1000
24-Port
Switch
193086
Link/Act
SYSTEM
Wall Mounting
A Cisco SF 100-16, SF 100-24, SG 100-16, or SG 102-24 Unmanaged
Rackmount Switch can be wall-mounted.
Before you begin, you need 2 wallboard screws (included) to mount the
unmanaged rackmount switch. We recommend using screws with a
minimum of 4mm width at the head and a shaft diameter of at least 1.5mm.
WARNING Insecure mounting might damage the device or cause injury.
Cisco is not responsible for damages incurred by insecure wallmounting.
To mount the unmanaged rackmount switch to the wall:
STEP 1 Determine where you want to mount the unmanaged rackmount
switch. Verify that the surface is smooth, flat, dry, and sturdy.
STEP 2 Drill two pilot holes into the surface 3.74 inches (95 mm) apart, and
with a minimum of 5.12 inches (130 mm) of clearance.
3
Cisco Unmanaged Rackmount Switches
STEP 3 Insert a screw into each hole, leaving a gap between the surface
and the base of the screw head of at least 0.1 inches (3 mm).
STEP 4 Place the unmanaged rackmount switch wall-mount slots over the
276583
screws and slide the unmanaged rackmount switch down until the
screws fit snugly into the wall-mount slots.
2
Connecting Network Devices
The application diagram is an example of a typical network configuration.
1
2
3
4
5
6
7
8
9
10
11
12
Cisco Small Business
SR2024
1
2
3
4
5
6
7
8
9
10
11 12 / miniGBIC1
Gigabit
(Shared with 12)
(Shared with 24)
miniGBIC1
miniGBIC2
Link/Act
SYSTEM
13
14
15
16
17
18
19
20
21
22
23 24 / miniGBIC2
Gigabit
13
14
15
16
Cisco Unmanaged Rackmount Switches
17
18
19
20
21
22
23
24
24-Port
10/ 100/ 1000 Swit ch
193803
Link/Act
4
To connect the unmanaged rackmount switch to the network:
STEP 1 Connect the Ethernet cable to the Ethernet port of a computer,
printer, network storage, or other network device.
STEP 2 Connect the other end of the network Ethernet cable to one of the
numbered unmanaged rackmount switch Ethernet ports.
The LED of the port lights if the device connected is active.
NOTE If the uplink from one unmanaged, cascaded switch to another is
moved from one port to another port, it can take up to five
minutes for full network operation to resume. This is normal and
expected behavior.
STEP 3 Repeat Step 1 and Step 2 for each device you want to connect to
the unmanaged rackmount switch.
NOTE To prioritize voice or video traffic by using the QoS feature on the
switch, set flow control to off in the configurations of the
connected devices. Otherwise, flow control might send a pause
frame to the switch, blocking the high-priority QoS packets
queued on the port. On some devices, such as some IP phones
and IP cameras, flow control might not be configurable.
STEP 4 Connect the power cord to the switch and a power source.
5
Cisco Unmanaged Rackmount Switches
3
Features of the Unmanaged
Rackmount Switch
This section describes the exterior of the unmanaged rackmount switches
that provide non-blocking, wire-speed switching for your network clients.
Front Panel Ports
The ports and LEDs are located on the front panel of the switch.
13
2
14
3
15
4
16
5
LINK
ACT
17
6
18
7
19
8
20
9
21
10
22
11
23
12
24
GIGABIT
276579
1
RJ-45 Ethernet Ports —Use these ports to connect network devices, such
as computers, printers, and access points, to the switch. The auto-sensing,
Ethernet (802.3) ports are used for wired network communications. Each
Ethernet port supports network speeds of 10 Mbps, 100 Mbps, or
1000 Mbps.
MiniGBIC (if present)—The miniGBIC (gigabit interface converter) ports are
connection points for miniGBIC modules, so the unmanaged rackmount
switch can uplink to other switches by using optical fiber.
• MiniGBIC ports are compatible with Cisco miniGBIC modules MGBSX1,
MGBLH1, MGBT1, MGBLX1, and MGBBX1, as well as other brands of
miniGBIC modules.
• MiniGBIC interface is a combination port, shared with one other RJ-45
interface. When the MiniGBIC is active, the closest RJ-45 port is
disabled.
• The LEDs on RJ-45 respond to the miniGBIC interface traffic.
Front Panel LEDs
System LED—Lights green when the switch is powered on.
Link/Act LED—(Green) Lights when a link between the corresponding port
and another device is detected. Flashes when the port is passing traffic.
Cisco Unmanaged Rackmount Switches
6
100M LED (if present)—(Green) Lights and remains lit when another device
is connected to the port, is powered on, and a 100 Mbps link is established
between the devices. When the LED is off, the connection speed is under
100 Mbps or nothing is cabled to the port.
Gigabit LED (if present)—Lights and remains lit when another device is
connected to the port, is powered on, and a 1000 Mbps link is established
between the devices. When the LED is off, the connection speed is under
1000 Mbps or nothing is cabled to the port.
MiniGBIC (if present)—Lights green when a connection is made through
the shared RJ-45 port. It flashes green when the connection is active.
Back Panel
POWER
276580
The power port is located on the back panel of the unmanaged rackmount
switch.
Side Panel
276581
The Kensington lock is located on the side panel of the unmanaged
rackmount switch. (Only the Cisco SF 100-16, SF 100-24, SG 100-16, or
SG 102-24 Unmanaged Rackmount Switch has a lock.)
7
Cisco Unmanaged Rackmount Switches
4
Specifications
The following tables list the specifications for the unmanaged rackmount
switches.
Weights and Dimensions
Model
Weight
Dimensions mm
Dimensions
Inch
SF 100-16
16 RJ-45 10/100 ports
SF 100-24
24 RJ-45 10/100 ports
SF 102-24
24 RJ-45 10/100 ports,
2 shared Gigabit
11x1.75x6.7
1.251 Kg 279.4x44.45x170
2.758 lbs
11x1.75x6.7
1.322 Kg 279.4x44.45x170
2.915 lbs
1.995 Kg 440x44.45x202.5 17.35x1.74x7.99
4.398 lbs
RJ-45/miniGBIC ports
SG 100-16
16 RJ-45 10/100/1000 ports
SG 100-24
24 RJ-45 10/100/1000 ports
SG 102-24
24 RJ-45 10/100/1000 ports,
2 miniGBIC uplinks
1.429 Kg 279.4x44.45x170 11x1.75x6.7
3.150 lbs
2.292 Kg 440x44.45x202.5 17.35x1.74x7.99
2.292 lbs
1.629 Kg 279.4x44.45x170 11x1.75x6.7
3.591 lbs
Cisco Unmanaged Rackmount Switches
8
Features
Feature
Standards
Cabling Type
Physical Security
Power
Certification
Operating Temperature
Storage Temperature
Operating Humidity
Storage Humidity
9
Description
IEEE 802.3, 802.3u, 802.3x, 802.3ab, 802.3z,
and 802.1p
Category 5 or better
Kensington security slot on a
Cisco SF 100-16, SF 100-24, SG 100-16, or
SG 102-24 Unmanaged Rackmount Switch
100V-240V~ 1A 50-60 Hz
FCC Class A, CE
32 to 104ºF (0 to 40ºC)
-4 to 158ºF (-20 to 70ºC)
10% to 90% Relative Humidity,
noncondensing
10% to 90% Relative Humidity,
noncondensing
Cisco Unmanaged Rackmount Switches
5
Where to Go From Here
Support
Cisco Small Business
Community
www.cisco.com/smb
Cisco Small Business Support
Community
www.cisco.com/go/smallbizsupport
Online Technical Support and
www.cisco.com/support
Documentation (Login Required)
Phone Support Contacts
www.cisco.com/en/US/support/tsd_cisco_
small_business_support_center_contacts.html
Product Documentation
Cisco Unmanaged Rackmount
Switches Quick Start Guide
www.cisco.com/en/US/docs/switches/lan/
csbus/sf10x-xx_sg10x-xx/quick_start/guide/
78-19225-01.pdf
Regulatory, Compliance, and
Safety Information
www.cisco.com/en/US/products/ps10007/
tsd_products_support_series_home.html
Warranty Information
www.cisco.com/go/warranty
Cisco Small Business
Cisco Partner Central for Small
Business (Partner Login
Required)
www.cisco.com/web/partners/sell/smb
Cisco Small Business Home
www.cisco.com/smb
Marketplace
www.cisco.com/go/marketplace
Cisco Unmanaged Rackmount Switches
10
Americas Headquarters
Cisco Systems, Inc.
170 West Tasman Drive
San Jose, CA 95134-1706
USA
http://www.cisco.com
Tel: 408 526-4000
800 553-NETS (6387)
Fax: 408 527-0883
Cisco, Cisco Systems, the Cisco logo, and the Cisco Systems logo are registered trademarks
or trademarks of Cisco Systems, Inc. and/or its affiliates in the United States and certain other
countries. All other trademarks mentioned in this document or Website are the property of
their respective owners. The use of the word partner does not imply a partnership relationship
between Cisco and any other company. (0705R)
© 2009 Cisco Systems, Inc. All rights reserved.
78-19225-01