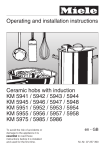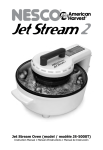
1
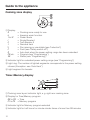
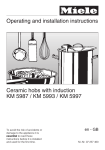
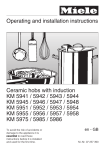
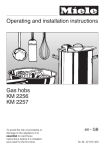
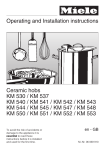
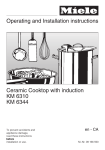
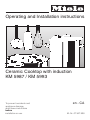
Operating and Installation instructions
Ceramic Cooktop with induction
KM 5987 / KM 5993
To prevent accidents and
appliance damage,
read these instructions
before
installation or use.
en - CA
M.-Nr. 07 367 890
Contents
Important safety instructions . . . . . . . . . . . . . . . . . . . . . . . . . . . . . . . . . . . . . . . . 4
Guide to the appliance . . . . . . . . . . . . . . . . . . . . . . . . . . . . . . . . . . . . . . . . . . . . 10
Cooktop . . . . . . . . . . . . . . . . . . . . . . . . . . . . . . . . . . . . . . . . . . . . . . . . . . . . . . . . . 10
Control panel . . . . . . . . . . . . . . . . . . . . . . . . . . . . . . . . . . . . . . . . . . . . . . . . . . . . . 11
Cooking zone display . . . . . . . . . . . . . . . . . . . . . . . . . . . . . . . . . . . . . . . . . . . . . . 12
Timer-/Memory display . . . . . . . . . . . . . . . . . . . . . . . . . . . . . . . . . . . . . . . . . . . . . 12
Cooking zone data. . . . . . . . . . . . . . . . . . . . . . . . . . . . . . . . . . . . . . . . . . . . . . . . . 13
Before the first use . . . . . . . . . . . . . . . . . . . . . . . . . . . . . . . . . . . . . . . . . . . . . . . 14
First cleaning . . . . . . . . . . . . . . . . . . . . . . . . . . . . . . . . . . . . . . . . . . . . . . . . . . . . . 14
Breaking in the appliance . . . . . . . . . . . . . . . . . . . . . . . . . . . . . . . . . . . . . . . . . . . 14
Calibrating the sensors . . . . . . . . . . . . . . . . . . . . . . . . . . . . . . . . . . . . . . . . . . . . . 15
Induction . . . . . . . . . . . . . . . . . . . . . . . . . . . . . . . . . . . . . . . . . . . . . . . . . . . . . . . . 16
How induction works . . . . . . . . . . . . . . . . . . . . . . . . . . . . . . . . . . . . . . . . . . . . . . . 16
Noise . . . . . . . . . . . . . . . . . . . . . . . . . . . . . . . . . . . . . . . . . . . . . . . . . . . . . . . . . . . 17
Cookware . . . . . . . . . . . . . . . . . . . . . . . . . . . . . . . . . . . . . . . . . . . . . . . . . . . . . . . . 18
Operation . . . . . . . . . . . . . . . . . . . . . . . . . . . . . . . . . . . . . . . . . . . . . . . . . . . . . . . 19
Sensor switches . . . . . . . . . . . . . . . . . . . . . . . . . . . . . . . . . . . . . . . . . . . . . . . . . . . 19
Switching on . . . . . . . . . . . . . . . . . . . . . . . . . . . . . . . . . . . . . . . . . . . . . . . . . . . . . 19
Range of settings . . . . . . . . . . . . . . . . . . . . . . . . . . . . . . . . . . . . . . . . . . . . . . . . . . 20
Auto heat . . . . . . . . . . . . . . . . . . . . . . . . . . . . . . . . . . . . . . . . . . . . . . . . . . . . . . . . 21
Cooking without auto heat . . . . . . . . . . . . . . . . . . . . . . . . . . . . . . . . . . . . . . . . . . . 22
Booster function . . . . . . . . . . . . . . . . . . . . . . . . . . . . . . . . . . . . . . . . . . . . . . . . . . . 23
Hold . . . . . . . . . . . . . . . . . . . . . . . . . . . . . . . . . . . . . . . . . . . . . . . . . . . . . . . . . . . . 25
Switching off and residual heat indicators. . . . . . . . . . . . . . . . . . . . . . . . . . . . . . . 26
Timer and Memory function . . . . . . . . . . . . . . . . . . . . . . . . . . . . . . . . . . . . . . . . 27
Timer . . . . . . . . . . . . . . . . . . . . . . . . . . . . . . . . . . . . . . . . . . . . . . . . . . . . . . . . . . . 27
Memory function . . . . . . . . . . . . . . . . . . . . . . . . . . . . . . . . . . . . . . . . . . . . . . . . . . 29
Using Timer and Memory functions at the same time . . . . . . . . . . . . . . . . . . . . . . 31
2
Contents
Safety features . . . . . . . . . . . . . . . . . . . . . . . . . . . . . . . . . . . . . . . . . . . . . . . . . . . 32
Safety lock / System lock . . . . . . . . . . . . . . . . . . . . . . . . . . . . . . . . . . . . . . . . . . . . 32
Stop and Go. . . . . . . . . . . . . . . . . . . . . . . . . . . . . . . . . . . . . . . . . . . . . . . . . . . . . . 33
Safety switch-off. . . . . . . . . . . . . . . . . . . . . . . . . . . . . . . . . . . . . . . . . . . . . . . . . . . 34
Overheat protection . . . . . . . . . . . . . . . . . . . . . . . . . . . . . . . . . . . . . . . . . . . . . . . . 35
Cleaning and care . . . . . . . . . . . . . . . . . . . . . . . . . . . . . . . . . . . . . . . . . . . . . . . . 36
Programming . . . . . . . . . . . . . . . . . . . . . . . . . . . . . . . . . . . . . . . . . . . . . . . . . . . . 38
Troubleshooting . . . . . . . . . . . . . . . . . . . . . . . . . . . . . . . . . . . . . . . . . . . . . . . . . 41
Technical Service. . . . . . . . . . . . . . . . . . . . . . . . . . . . . . . . . . . . . . . . . . . . . . . . . 43
Optional accessories . . . . . . . . . . . . . . . . . . . . . . . . . . . . . . . . . . . . . . . . . . . . . . 44
IMPORTANT SAFETY INSTRUCTIONS - INSTALLATION . . . . . . . . . . . . . . . . . 46
Cooktops with frame or beveled edges . . . . . . . . . . . . . . . . . . . . . . . . . . . . . . . 51
Installation dimensions . . . . . . . . . . . . . . . . . . . . . . . . . . . . . . . . . . . . . . . . . . . . . 51
Installation . . . . . . . . . . . . . . . . . . . . . . . . . . . . . . . . . . . . . . . . . . . . . . . . . . . . . . . 52
Sealing advice . . . . . . . . . . . . . . . . . . . . . . . . . . . . . . . . . . . . . . . . . . . . . . . . . . . . 53
Flush-fitted cook tops . . . . . . . . . . . . . . . . . . . . . . . . . . . . . . . . . . . . . . . . . . . . . 54
Installation dimensions . . . . . . . . . . . . . . . . . . . . . . . . . . . . . . . . . . . . . . . . . . . . . 54
Installation . . . . . . . . . . . . . . . . . . . . . . . . . . . . . . . . . . . . . . . . . . . . . . . . . . . . . . . 55
Electrical connection . . . . . . . . . . . . . . . . . . . . . . . . . . . . . . . . . . . . . . . . . . . . . . 58
Help protect our environment. . . . . . . . . . . . . . . . . . . . . . . . . . . . . . . . . . . . . . . 59
3
Important safety instructions
Proper use
This cooktop complies with all
applicable safety laws and
regulations. However, improper use
can result in personal injury and
material damage.
Before using the cooktop for the first
time, carefully read the Instructions
for installation and operation.
These operating instructions contain
important information on the safety,
installation, operation, and care of
your appliance. Reading the
instructions will help reduce the risk
of personal injury or damage to the
appliance.
Keep them in a safe place and pass
them on to any future user.
4
~ Only use the cooktop for household
use, and for the purposes described in
this manual.
Other uses are not allowed and can be
possibly dangerous. The manufacturer
will not be held liable for damage
caused by unauthorized use or
improper operation of any kind.
~ Individuals who are incapable of
using the cooktop safely, because of
physical, sensory or mental
limitations,or a lack of experience or
knowledge, should not use this
appliance without supervision or
instruction by a responsible person.
Important safety instructions
Children around the appliance
~ Use the system lock to prevent
children from inadvertently switching on
the cooktop or changing the settings.
~ Always supervise any children in the
vicinity of the cooktop. Never allow
children to play with the appliance.
~ Children should use the cooktop
only if they have received sufficient
instruction to operate it safely. They
must be able to recognize the potential
hazards of improper use.
~ The cooktop is hot during use and
remains so for some time after being
switched off. Keep children away from
the appliance until it has cooled down
enough that there is no longer any
danger of burns.
~ Make sure that children will not be
able to grab and topple any cookware
on the cooktop. ALWAYS turn pot/pan
handles inward so that they do not
extend out from the cooktop, where
they could be grabbed - this helps
reduce the danger of burns and
scalding! A special childproofing
screen is available through your dealer,
to help reduce these risks.
~ Packing materials (e.g., foil,
styrofoam) can be dangerous for
children. Danger of suffocation! Keep
packaging materials out of the reach of
children and dispose of them as
promptly as possible.
~ Keep the spaces above and behind
the appliance clear of any items that
could draw the interest of a child.
Otherwise, a child might be tempted to
climb on it. Danger of burns!
5
Important safety instructions
Technical safety
~ Before installing the cooktop, check
for externally visible damage. NEVER
operate a damaged appliance. A
damaged appliance can endanger your
safety.
~ The electrical safety of this cooktop
can only be guaranteed if proper
grounding has been installed in
compliance with applicable safety
regulations. It is imperative that this
basic safety requirement be met.
In case of doubt, have the power
supply checked by a qualified
electrician. The manufacturer will not be
held liable for damages resulting from a
missing, broken or inadequate
grounding system (for example, electric
shock).
~ Before connecting the cooktop, you
must make sure that the electrical
rating (voltage and frequency,
indicated on the data plate)
corresponds to the household electrical
supply.
These ratings must match, in order to
avoid damaging the appliance. If in
doubt, please contact a qualified
electrician.
~ To ensure safe operation, use the
appliance only after it has been
installed in place.
6
~ Do not under any circumstances
open the cooktop housing.
Any contact with connections carrying
voltage, or changes to the electrical or
mechanical set-up, will endanger you
and may impair the functioning of the
appliance.
~ Only professionals who are duly
authorized by the manufacturer should
perform installation work, maintenance,
and repairs on this appliance.
Work performed by unqualified persons
carries the risk of serious harm to the
user. The manufacturer will not be held
liable for such harm.
~ Whenever performing installation or
maintenance work or repairs, the
appliance must be disconnected from
the power supply. The appliance is
considered to be electrically
disconnected when one of the following
conditions is met:
– The fuses or circuit breakers are
tripped.
– The screw-in type fuses are fully
unscrewed.
– The power cable is disconnected
from the electrical system.
Important safety instructions
~ Repair of the cooktop during the
warranty period should be performed
only by a service who is authorized by
the manufacturer; otherwise, should
damage result, it will not be covered by
the warranty.
Proper use
~ For users who wear a pacemaker:
It is important to note that the appliance
is surrounded by an electromagnetic
field. It is unlikely that the pacemaker
will be affected.
However, it is wise to consult with your
cardiologist or the manufacturer of the
pacemaker if there is any doubt.
~ Defective components should be
replaced by genuine Miele replacement
parts only. Only these parts are
guaranteed by the manufacturer to
comply with safety requirements.
~ Magnetized objects, such as credit
~ If the power cord is damaged, it
must be replaced with a special power
cord, which is available from the
manufacturer or from Customer Service.
~ The cooktop is hot during use and
~ Do not connect the appliance to the
power supply by an extension cord or
power strip, as they do not guarantee
the required safety of the appliance
(danger of overheating, for example).
~ If you discover that the cooktop is
defective or its ceramic glass is
chipped, cracked or broken in any way,
do not use it or immediately switch it off
and do not continue to operate it.
Disconnect the appliance from the
power supply. If you fail to follow these
steps, there is the danger of electric
shock!
cards, diskettes, and calculators should
be kept away from the appliance when
it is on. Otherwise, they may be
affected.
remains so for some time after being
switched off. The risk of burns remains
until the residual heat indicators have
switched off.
~ Never leave the cooktop
unsupervised while in operation!
Cookware that boils dry and overheats
can cause damage to the glass
ceramic, and the manufacturer will not
be held liable for such damage.
Overheated fat or oil can ignite and
start a fire.
~ If hot fat or oil catches fire, NEVER
use water to douse the flames. Use a
lid, or wet dishtowel, for example, to put
out the fire.
7
Important safety instructions
~ Protect your hands when working
with a hot appliance - wear oven mitts,
and use potholders, etc. Make sure the
material is not wet or damp. This would
increase the transfer of heat to your
skin, and could cause burns.
~ NEVER use the appliance to heat up
~ Never flambé food under an exhaust
smooth bottom only. Rough cookware
can scratch the glass ceramic cooktop.
hood. The flames can set fire to the
exhaust hood.
~ Do not use the appliance as a
storage surface.
Do NOT use the appliance as a resting
place for cutlery or other items made of
metal
If the cooktop is on or accidentally
switched on or there is residual heat,
metallic objects can heat up and cause
burns.
Other items may melt or catch fire.
Damp lids can become attached to the
cooktop by suction.
Always switch the cooking zone(s) off
after use.
~ NEVER cover the grill with a cloth or
foil stovetop protector. It could be hot
enough to set objects on fire.
~ Do not use plastic or aluminum foil
or cookware. It can melt at high
temperatures. There is also the danger
of fire.
8
closed containers, e.g., canned foods.
The increased pressure can cause the
containers/cans to explode, and this
carries the danger of injury and burns.
~ Choose pots and pans with a
~ Never heat dishware when it is
empty, unless expressly permitted by
the manufacturer. Because induction
heating works so quickly, the
temperature of the cookware bottom
can quickly reach the ignition point of
oils and fats.
~ Keep the cooktop clean. Salt, sugar,
and grains of sand or dirt (for example,
from fresh vegetables) can cause
scratches.
~ Never place hot cookware near the
control panel. The electronic unit
underneath might be damaged.
~ Be careful that no objects or
cookware fall onto the glass ceramic
surface. Even a light object, such as a
salt shaker, can cause cracks and
chips in the glass ceramic.
Important safety instructions
~ If sugar, sugary foods, plastic, or
aluminum foil fall onto a hot cooking
zone, switch the appliance off. Immediately, while the zone is still hot, use a
glass scraper to thoroughly eliminate
the spill from the cooking zone. Failure
to do so can lead to damage to the
glass ceramic as it cools down.
Exercise caution - danger of burns.
Once the cooking zone has cooled off,
clean it thoroughly.
~ If a gadget is plugged into a socket
near the appliance, check to be sure
that the power cord does not come into
contact with the hot appliance. This
could damage the insulation on the
cord. Danger of electric shock!
~ The appliance is equipped with a
cooling fan. If there is a drawer below
the cabinetry, you will need to ensure
there is enough space to allow for
ventilation. Do not use the drawer to
store sharp or small objects, or paper.
They could pass through (or be sucked
into) the ventilation slit in the housing
and damage the fan blades or
otherwise interfere with cooling.
~ Note that metal objects stored in a
drawer under the cooktop can become
hot when the appliance is in heavy use.
~ Always cook food thoroughly.
Temperatures must be high enough,
and the cooking times long enough, to
kill any germs in the food.
~ If the cooktop is installed above a
self-cleaning oven or stovetop, do not
use it during self-cleaning, as this could
trigger the overheat protection on the
cooktop (refer to the corresponding
section of the manual).
The manufacturer will not be held
liable for damage caused by failure
to comply with the safety information
and warnings.
~ If there is a drawer below the
appliance, do NOT store any spray
cans, flammable liquids, or flammable
materials in the drawer. Cutlery trays
must be made of heat-resistant
material.
9
Guide to the appliance
Cooktop
ac
Cooking zones with Twin Booster
bde Cooking zones with Single Booster
10
Guide to the appliance
Control panel
Sensor switches
a For setting the power level
b Booster
c Switching the timer, changing between functions, selecting a cooking zone.
e Safety lock
f Setting the time / Selecting a memory program
g Cooking top ON/OFF
h Memory function
Indicator light
d Safety lock
11
Guide to the appliance
Cooking zone display
a Display:
0
^
1 to 12
I
II
#
ß
F
A
P0 etc.
S0
=
=
=
=
=
=
=
=
=
=
=
Cooking zone ready for use
Keeping warm function
Power levels
Single Booster I
Twin Booster II
Residual heat
Pan missing or unsuitable (see "Induction")
Fault (see "Safety switch-off")
Auto heat when the power-setting range has been extended
Program (see "Programming")
Status (see "Programming")
b Indicator light for extended power setting range (see "Programming")
c Light ring: The number of lighted segments corresponds to the power setting
chosen (Exception: see "Auto Heat")
d Light segment for booster
Timer-/Memory display
a Cooking zone layout indicator light, e.g. right rear cooking zone
b Display for Time/Memory program
00 to 99 = Time
P1 to P5 = Memory program
c Indicator light for Memory program selected
d Indicator light for half hours for minute minder times of more than 99 minutes
12
Guide to the appliance
Cooking zone data
Cooking
zone
KM 5987 / KM 5993 / KM 5997
Minimum to maximum
C in cm*
Rating in Watts at 230 V**
y
16 - 23
Normal:
With Single Booster I:
With Twin Booster II:
2300
3000
3700
w
10 - 16
Normal:
With Booster:
1400
1800
b
18 - 28
Normal:
With Single Booster I:
With Twin Booster II:
2300
3000
3700
x
14 - 20
Normal:
With Booster:
1850
2900
z
14 - 20
Normal:
With Booster:
1850
2900
Total:
11100
* Pans of any diameter within the indicated range may be used.
** The wattage quoted may vary depending on the size and material of the pans
used.
13
Before the first use
Read the section on the "Data plate"
and attach the plate, which is included
with the appliance documents, in the
location specified in "Technical Service".
First cleaning
Remove any protective foil and stickers.
Before the first use, wipe down the
appliance with a damp cloth and dry it.
Do NOT use dish liquid to clean the
glass ceramic cooktop, because this
can cause permanent blue
discolorations.
Breaking in the appliance
For facetted cooktops (with bevelled
glass edging):
In the first few days after installation,
a small gap may be visible between
the cooktop and the countertop. This
will diminish over time. Despite the
small gap, the electrical safety of the
appliance remains intact.
The first time the appliance is used,
there may be an odour and some
vapour released. The odour will
diminish over time and eventually
disappear.
The odour and any vapors given off do
not indicate a faulty connection or
defective appliance, and are not
hazardous to your health.
14
Before the first use
Calibrating the sensors
Automatic calibration
To ensure continuing trouble-free
operation, the sensors
– are recalibrated after the appliance
is connected and after every power
interruption, such as an electricity
outage.
The safety lock indicator light comes
on during automatic calibration and
the cooktop cannot be switched on.
– continuously adjust to changing
environmental conditions during
operation.
If the automatic calibration cannot be
successfully performed, an A lights in
the front left and right cooking zone
display and an F in the rear left of the
display. Numbers light up in the right
rear of the cooking zone display and in
the Timer/Memory display.
Manual calibration
^ First ensure that no direct light (either
sunlight or artificial light) is falling on
the cooktop. As well, the area around
the cooktop should neither be too
dark nor should the lighting
conditions be constantly changing.
^ Make sure there is nothing covering
the entire cooktop and the sensors.
Remove any cookware and clean any
food residues off the cooktop.
^ Interrupt the power supply to the
cooktop for approximately 1 minute.
Restore the power. The electronic until
will reset the sensitivity levels of the
sensors.
Should the problem still persist, please
call customer service.
In that case, you can perform the
calibration manually.
15
Induction
How induction works
Under each induction cooking zone,
there is an induction coil. When the
cooking zone is switched on, the coil
generates a magnetic field that acts
directly on the bottom of the pot/pan to
heat it up. The cooking zone heats up
indirectly, only from the heat given off
by the pot/pan.
Cooking zones with induction only work
with cookware that has a magnetizable
bottom (see "Cookware").
The induction process automatically
takes into account the size of the
cookware being used. In other words, it
only works in the area that is covered
by the cookware bottom.
The cooking zone will not work
– if there is no cookware, or unsuitable
cookware (items without a
magnetizable bottom) being used
– if the bottom diameter of the
cookware being used is too small
– if the cookware is removed from a
cooking zone that is on.
In such cases, the symbol ß will flash
alternatingly in the matching cooking
zone display with 0 or the selected
power setting.
16
If suitable cookware is placed on the
induction zone within 3 minutes, the
ßgoes out, and you can continue as
usual.
If no cookware or unsuitable cookware
is used, the cooking zone will
automatically switch off after 3 minutes.
Do NOT use the appliance as a
resting place for cutlery or other
items made of metal. If the
appliance is on, or accidentally
switched on or there is residual heat,
there is the danger that these items
will heat up (danger of burns!).
Always switch off the cooking zones
after use.
Induction
Noise
When you use an induction cooking
zone, the following noises may occur,
depending on the the type and shape
of the cookware bottom:
– The zone may hum at the higher
power settings. The humming will
become quieter or disappear if you
lower the power setting.
To extend the life of the electronics, the
appliance is equipped with a cooling
fan. If the appliance is under heavy
use, the fan will start, and you will hear
it whirring. The cooling fan may
continue to run after the appliance is
switched off.
– Cookware with mixed bottoms (for
example, sandwich bottoms made of
different materials) may produce a
crackling noise.
– Whistling may occur if the connected
cooking zones (see "Booster
function") are also in use and there is
cookware with layered bottom on
them as well.
– The electronics may produce a
clicking sound, especially at lower
power settings.
17
Induction
Cookware
Type of cookware
Suitable cookware is made of:
– Stainless steel with a magnetizable
bottom
– enamel-coated steel
– Cast iron
Unsuitable cookware is made of:
– Stainless steel with a
non-magnetizable bottom
– Aluminum, copper
– Glass/ceramic/earthenware/
stoneware
If you are not sure whether a pot or pan
is suitable for induction, you can test it
using a magnet against the bottom. If
the magnet sticks, the cookware can be
used.
Size of cookware
For optimal efficiency, select cookware
that fits between the innermost and
outermost markings on the cooking
zone. If the pot/pan is smaller than the
innermost marking, the induction may
not work. The cooking zone will behave
as though no cookware is on it.
Please note that, although the diameter
indicated for pots and pans is typically
the maximum or upper diameter, you
should instead pay attention to the
bottom diameter, which will tend to be
smaller.
Tips for saving energy
Whenever possible, keep pots and
pans covered while cooking. This helps
keep in the most possible heat.
Note that the type of cookware bottom
you use will have an effect on how
evenly the food cooks.
open
18
closed
Operation
Sensor switches
Switching on
The control panel on your ceramic
cooktop is equipped with electronic
sensor switches. They respond to finger
contact.
To operate the cooking zones, simply
touch the corresponding sensor
switches. Every response of the sensor
switches is acknowledged with an
acoustic signal.
Begin by switching on the cooktop,
then the desired cooking zone.
Do not leave the appliance
unattended during operation!
Switching on the cooktop
^ Tap the ON/OFF sensors.
A 0 appears in each of the cooking
zone displays, while 00 appears in the
Timer/Memory display. If no further
information is entered within the next
few seconds, the cooktop will shut off
for safety.
Switching on the cooking zone
^ By touching the - or + sensor
switches, select the desired power
setting between 1 and 12 or the
keeping warm function.
Take care to touch only the desired
sensor switch in the middle with your
finger vertical, and keep the control
panel clean with nothing placed on
top of it. Otherwise, the sensor areas
may not respond, or unintentional
commands may be given, even
causing the cooktop to automatically
switch off (see the section on "Safety
Switch-Off"). NEVER place hot
cookware on the sensor switches.
The electronic unit underneath might
be damaged.
If you begin with -, you select cooking
with Auto heat (see "Auto heat"). If you
begin with +, you select cooking
without Auto heat.
If you would like to switch on another
cooking zone, for which the 0 has
already gone out, briefly press - or +
once. The 0 appears, and you can
select a power setting (with or without
Auto heat).
19
Operation
Range of settings
Settings*
Factory settings
(12 power
settings)
Extended
settings**
(23 settings)
h
h
1-2
1-2
3
3-3
4-5
4-5
6
5-6
Warming up larger quantities, such as stews
Cooking pasta
7-8
7-8
Gentle braisins (without overheating fat) of fish, cutlets,
sausages, fried eggs
9 - 10
8 - 10
Cooking potato fritters, pancakes, blintzes
11
11 - 11
Boiling large quantities of water
Bringing to a boil
12
12
Keeping warm
Melting butter
Dissolving gelatin
Warming small quantities of liquid
Cooking rice
Thawing out frozen vegetables
Warming liquid and semi-solid dishes
Thickenng creams and sauces, such as zabaglione
or hollandaise
Cooking milk pudding
Preparing omelettes and eggs sunny side up
Steaming fruit
Thawind deep-frozen food
Steaming fish or vegetables
Cooking cereals
* These are suggested guidelines. They refer to standard portions for four persons. For deeper pots,
pots without lids, and large quantities, a higher setting is required. Likewise, smaller quantities may
require a lower setting.
** If you wish to fine-tune the settings, you can extend the range of power settings
(see "Programming"). Intermediate settings are represented by an illuminated dot next to the
number.
20
Operation
Auto heat
When automatic heat-up is activated,
the cooking zone switches on
automatically to full power (boil setting)
and then switches to the continued
cooking setting you have selected. The
warm-up time depends on the
continued cooking setting chosen (see
Table).
Continued
cooking setting*
Heat-up time
in minutes and
seconds
(approx.)
1
0:15
1.
0:15
2
0:15
If the cookware is removed from the
heat during the boil time, the Automatic
Boil feature is temporarily interrupted.
As long as the cookware is returned to
the stovetop within 3 minutes, the boil
time will resume.
2.
0:15
3
0:25
3.
0:25
4
0:50
4.
0:50
5
0:50
5.
2:00
6
2:00
6.
2:00
7
5:50
7.
5:50
8
5:50
8.
2:50
9
2:50
9.
2:50
10
2:50
10.
2:50
11
2:50
11.
2:50
12
-
* The continued cooking levels
marked with a dot are available only
with the expanded power levels (see
"Programming").
21
Operation
Activate auto heat
Cooking without auto heat
^ Switch the cooking zone on by
touching the - sensor switch. Touch the sensor switch until the desired
power level appears in the display.
for instance 3.
^ Switch the cooking zone on using the
+ sensor switch. Touch the sensor
switch + until the desired power level
appears in the display; for instance
4.
During the heat-up time, 12 segments
in the light ring are illuminated. After
this time has expired, only the number
of segments that correspond the
continued cooking level set, show in
the light ring.
Example:
during the heat-up time:
during the continued cooking time:
During the auto-heat time the continued
cooking level can be increased or
reduced using the - or + controls. The
heat-up time will automatically adjust to
the new level.
22
The power level is also shown in the
number of segments that light up in the
light ring. For example, four segments
light up to represent power level 4.
Operation
Booster function
The cooking zones are equipped with a
Single (I) or Twin Boosters (I/II) (see
Guide to the Appliance).
The booster function boosts power so
that large quantities can be quickly
heated, such as water for cooking
pasta. When Booster I is switched on,
the cooking zones operate for
10 minutes with extra power, and when
Booster II is used, for 15 minutes with
extra high power.
The booster function can only be used
on two cooking zones at a time, one of
the left and one on the right.
If the booster function is switched on
when
– no power setting has been selected,
the cooking zone will automatically
revert to setting 12 at the end of the
booster time or if it is switched off
before this.
In order to supply the Booster power
needed, another cooking zone will
operate at reduced power while the
Booster Function is on. This means that
the cooking zones are connected
(networked) in pairs, as shown in the
following example:
When the Booster is turned on, the
following takes place:
– if Auto heat is activated on either
zone in the same network, this will be
switched off.
– the power level of the linked cooking
zone will be reduced under certain
conditions.
– When Booster II is switched on, the
linked cooking zone is switched off.
– a power setting has been selected,
the cooking zone will automatically
revert to the setting selected.
If the cookware is removed from the
heat during the Booster time, the
Booster Function is interrupted. If the
cookware is returned to the cooking
zone within 3 minutes, the Booster time
will resume.
23
Operation
Activating Booster I
Deactivating Booster
^ If necessary, switch on the desired
cooking zone.
The Booster function may be switched
off early.
^ Touch the B sensor switch of the
relevant cooking zone.
^ Touch the B sensor switch of the
corresponding cooking zone
repeatedly until the indicator light for
the Booster in the display goes out,
or use the - sensor switch for the
cooking zone in question.
I will appear in the cooking zone
display, and the Booster function
indicator light will also come on.
Activating Booster II
^ If necessary, switch on the desired
cooking zone.
^ Touch the B sensor switch of the
relevant cooking zone.
I will appear in the cooking zone
display, and the Booster function
indicator light will also come on.
^ Touch the B sensor switch again.
II will appear in the cooking zone
display.
24
Operation
Hold
Useful Tips
Every cooking zone has a keeping
warm setting.
Use only cookware (pots/pans) for
keeping food warm. Cover the
cookware with a lid.
If it has been activated, the cooking
zone switches off after a maximum of
two hours' operation.
This function is for keeping food that
has just been cooked warm, that is
food that is still hot. It is not for
reheating food that became cold!
It is not necessary to stir the food while
it is being kept warm.
Loss of nutrients begins with
preparation of the food and continues
while it is being kept warm. The longer
food is kept warm, the greater the loss
of nutrients. Keep the warming time as
short as possible.
25
Operation
Switching off and residual heat
indicators
Switching off a cooking zone
^ Simultaneously touch the - and + for
the zone you wish to turn off.
A 0 will light up in the cooking zone
display for a few seconds. If the
cooking zone is still hot, the residual
temperature will be indicated in the
display.
Switching off the cooktop
^ Touch the ON/OFF sensor switch s.
This switches off all cooking zones. The
residual temperature for each cooking
zone that is still hot appears in the
display.
26
The bars in the residual temperature
display gradually disappear as the
cooking zones cool down. The last bar
goes out when the cooking zones can
be touched again without danger.
The residual temperature displays
also react when hot cookware is
placed on a cooking zone that has
been switched off. As long as the
residual temperature displays are
on, do not touch the cooking zones
or place any heat-sensitive items on
them.
Danger of burns and fire!
Please note that the residual heat
indicators do not light up if there is
an error message, even when the
cooking zones are still hot.
Timer and Memory function
Timer
Setting the minute minder
The timer can be used for two different
functions:
You can set the timer whether the
cooktop is switched on or off.
– setting a minute minder
^ Touch the m, - or + sensor.
– to set a cooking zone to switch off
automatically.
00 appears in the Timer/Memory
display.
You can set times from 1 minute (01) to
9 1/2 (9.^) hours. Half-hours are
indicated by a dot following the
number.
Times of more than 99 minutes (99) are
set in half-hour steps.
^ Touch the - or + touchpad until the
desired amount of time appears, for
example 15 minutes.
Use the - touchpad to reduce the time
from 9.^ to 00, and the + touchpad to
increase the time from 00 to 9^.The
display stops at 2h and at 99. To
continue entering the setting, briefly
remove your finger from the sensor and
then touch it again.
For all functions, 00 will appear in the
Timer/Memory display for a few
seconds, while a signal sounds at the
same time. If you would like to switch
off the acoustic tone early, simply touch
the m touchpad.
The time set then counts down in
1-minute decrements. You can read the
remaining time from the display, and
adjust it at any time using - or +.
Canceling the minute minder
^ Touch the - and + sensors at the
same time.
27
Timer and Memory function
Automatic cooking zone shut-off
You can set a time at the end of which
a selected cooking zone switches off
automatically. In order to be able to
program the automatic shut-off, you
must first set the cooking zone to a
particular level. All of the cooking zones
can be programmed at the same time.
If the time programmed is longer than
the maximum permissible operating
time, the cooking zone will switch off
when that time has been reached
(see "Safety Switch-off").
^ Begin as usual, by setting the
cooking zone - for example, the right
rear - to the desired power level.
^ Tap the m sensor until the indicator
light for the desired zone starts
flashing.
If several cooking zones are on, the
indicator lights will appear in a
clockwise direction, starting with the left
front.
^ Touch the - or + sensors until the
desired amount of time appears, for
example 15 minutes.
The time set then counts down in
1-minute decrements. You can read the
remaining time from the display, and
adjust it at any time using - or +.
28
If you would like to set another cooking
zone to shut off automatically, simply
repeat the above steps.
If more than one shut-off time is
programmed, the shortest time
remaining is the one that appears in the
display, and the indicator light for that
cooking zone will flash. The other
indicator lights show a constant light. If
you would like to see the other
remaining times, keep touching the m
sensor until the desired indicator light
flashes.
Timer and Memory function
Memory function
Recording a Memory program
The settings used on a cooking zone
from switching on to switching off can
be saved as a memory program. Up to
five processes that you frequently use
can be saved as memory programs.
Only one program can be recorded or
used at a time.
Memory programs can be recorded for
all cooking zones.
Each cooking zone can have more than
one program recorded on it..
First, select a Memory program and
then the cooking zone in the usual way.
Saved programs are identified by a dot
after the number.
Example:
P 1 Program not saved in memory
P 1. Program saved
If all five programs are saved and you
would like to save a new process, you
must first delete a program.
The maximum time that can be
recorded is 99 minutes with a maximum
of 10 changes of power level.
^ Switch the cooktop on.
^ Touch the M sensor.
P 1 appears in the Timer/Memory
display.
^ Touch the + sensor until the desired
program number is displayed.
^ Touch the M sensor until a long
audible tone sounds.
^ Within 10 seconds of this, switch the
desired cooking zone on.
Recording now begins.
During recording, the indicator light for
the cooking zone being used flashes in
the Timer/Memory display and the
program memory lights up.
The process will be saved automatically
when the cooking zone is switched off
or if you touch M until a long signal
sounds. After being saved, the program
steps are displayed.
Times displayed are rounded off to the
next full minute, but when the program
is running the steps are timed to the
second.
29
Timer and Memory function
Using a Memory program
To achieve the same result when
calling up a memory program, the
same pot must be used. Quantities and
sizes of ingredients must also be the
same.
^ Switch the cooktop on.
^ Touch the M sensor.
P 1 appears in the Timer/Memory
display.
^ Touch the + sensor until the desired
program number is displayed.
^ Touch the M sensor until a long
audible tone zounds.
The associated cooking zone switches
on and then off once the program has
run. While the program is running, the
cooking zone indicator light flashes and
the program number is shown
alternatively with the remaining time.
Checking the steps of Memory
program
^ Switch the cooktop on.
^ Touch the M sensor.
^ Touch the + sensor until the desired
program number is displayed.
The applicable power level appears in
the relevant cooking zone display; the
indicator lamp for that cooking zone
flashes in the Timer/Memory display,
and the time programmed for the power
level appears. Times are displayed
rounded off to the next full minute, but
when the program is running the steps
are timed to the second.
Deleting a Memory program
^ Switch the cooktop on.
^ Touch the M sensor.
^ Touch the + sensor until the desired
program number is displayed.
Touch the - and + sensors at the same
time until a long audible signal sounds
and the dot behind the number goes
out.
30
Timer and Memory function
Using Timer and Memory
functions at the same time
If you wish to use the minute minder at
the same time as another function,
touch the m sensor repeatedly until the
indicator lights of the programmed
cook zones light up constantly and 00
appears in the Timer/Memory display.
You can have the functions and
remaining times that are running in the
background displayed. Tap the m
sensor until
- the indicator light required flashes
(Memory function or Automatic
switch-off).
- the indicator lamps light up constantly
(minute minder).
If you are using the timer and would
also like to program one or more
shut-off times:
press the m sensor until the indicator
light for the desired cooking zone is
flashing.
Starting from the shortest remaining
time in the display, all the cooking
zones that are in use and the minute
minder are selected clockwise.
Exception: Recording a Memory
program.
If you want to use the Memory function
at the same time as another function:
Follow the steps described in "Memory
function".
Shortly after the last entry, the
Timer/Memory display switches to the
function with the shortest time
remaining. Exception: When a Memory
program is being recorded, all
programmed times (timer, automatic
switch-off) count down in the
background. They will only show in the
display as 00 once they have finished
running.
31
Safety features
Safety lock / System lock
Activation
To prevent cooktop and cooking zones
from being inadvertently switched on or
their settings changed, your appliance
is equipped with a safety lock.
^ Touch the $ sensor until the
associated indicator light appears.
The safety lock is activated when the
cooktop is switched on. If it is activated,
the appliance may only be operated to
a limited degree:
– The cooking zone power levels and
the timer settings cannot be
changed.
– The cooking zones and the cooktop
can only be switched off, and then
cannot be switched on again.
The system lock is activated when the
cooktop is switched off. If it is activated,
the appliance cannot be switched on
and the timer cannot be used.
The programming is set so that the
system lock has to be activated
manually. You can change the settings
so that the system lock is activated
automatically five minutes after the
cooktop is switched off (see
"Programming").
If the safety or system lock is activated,
the control light comes on when you
touch a sensor switch.
Both safety and system locks are
deactivated by power outages.
32
The indicator light will go out after a
short time.
You can alter the setting from
one-finger to three-finger operation to
make the operation more difficult for
children, for instance (see
"Programming").
Deactivation
^ Touch the $ sensor until the indicator
light goes out.
Safety features
Stop and Go
Activate
Your appliance is equipped with a
feature which when activated reduces
all active cooking zones to level 1. If
you de-activate the feature, the cooking
zones will automatically return to the
previous levels. If the feature is not
de-activated, the cooktop will switch off
after 1 hour.
^ Touch the $ sensor until you hear
two consecutive acoustic signal
tones.
Take care not to continue touching
the $ sensor too long otherwise the
safety lock will be activated.
If you wish to use this feature, you must
first alter the factory setting (see
"Programming").
When "Stop and Go" is activated
- the countdown of a programmed
automatic switch-off time
is interrupted. When deactivated,
the time continues.
- the timer continues to run without
interruption.
- the recording of a
Memory program will be cancelled.
The indicator light for the safety lock will
begin to flash. The power of the
cooking zones in use will be reduced to
setting 1 and a 1 will appear in the
corresponding cooking zone display.
Deactivation
^ Touch the $ sensor until the indicator
light goes out.
The cooking zones will continue to
operation at the last levels set.
33
Safety features
Safety switch-off
If the sensors are covered
Your cooktop is equipped with a safety
switch-off.
Your cooktop will switch off
automatically if one or more of the
sensors remains covered for longer
than approximately 10 seconds, for
example by finger contact, food boiling
over, or by any object laid on top of
them.
At the same time an acoustic signal
sounds every 30 seconds (for a
maximum of 10 minutes), while in the
display of the covered sensor switch an
F will flash:
For excessively long operating time
If one of the cooking zones stays on for
an unusually long period of time (see
Table), and the power settings are not
altered, the zone will switch itself off
automatically and the corresponding
residual heat indication will appear.
To use the cooking zone again, switch
it back on in the usual way.
Power setting*
Maximum
operating time in
hours
h
2
1 / 1.
10
2 / 2.
5
3 / 3.
5
4 / 4.
4
5 / 5.
4
6
4
6.
3
7 / 7.
3
8 / 8.
3
9 / 9.
2
10 / 10.
2
11 / 11.
2
12
1
* The power levels marked with a dot
are available only with the extended
power levels (see "Programming").
34
^ Clean the control area or remove the
obstruction.
This will shut off the acoustic signal and
the F goes out.
^ Switch the cooktop back on again
using the ON/OFF sensor s. You can
then resume operation as usual.
Safety features
Overheat protection
All induction coils and the cooling
elements for the electronics are fitted
with overheating protection. Before the
induction coils or the cooling elements
overheat, the overheat protection
initiates the following measures for the
affected cooking zone or the entire
cooktop:
– If the Booster function is switched
on, it will be switched off.
The overheat protection can be
triggered if:
– Empty cookware is being heated.
– Fats or oils are heated at high power
settings.
– The underside of the appliance is
insufficiently ventilated.
If despite the removal of the cause the
overheat protection is triggered again,
contact customer service.
– If the power level is set between 10
and 12, it will be reduced. The power
level set and the reduced power
level will blink alternately in the
display. The reduced power level is
also represented by the number of
segments in the light ring.
– If an induction coil is affected, the
related cooking zone switches itself
off automatically, and its display first
shows an 0 and then the residual
heat indicator.
Only when the cooking zone has
cooled down sufficiently can it resume
operation in the usual manner.
– If a cooling element is affected, all
cooking zones automatically switch
off, and an 0 will alternate in the
displays with the power level set.
As soon as the cooling elements have
cooled down sufficiently, the cooking
zones will automatically operate at the
power levels originally set.
35
Cleaning and care
,NEVER use a steam cleaner to
clean this appliance. The steam can
reach the electrical components and
cause the appliance to short circuit.
Clean the entire appliance after each
use. Let the appliance cool down
before cleaning.
Dry the appliance any time water is
used to clean it - this helps prevent lime
spots.
To avoid damaging the surfaces, do
not use any
– cleaning products that contain
washing soda, acids/alkali, ammonia,
or bleach,
– lime removers,
– stain and rust removers,
– scouring cleansers, e. g., scouring
powder, scouring liquid, pumice
stones,
– solvent-based cleansers,
– Dishwasher detergents
– grill and oven sprays,
– glass cleaner,
– scouring brushes and sponges (such
as pot scrubbers), or used sponges
that still contain residue of scouring
agents,
– sharp objects
(they could damage the seals
between the ceramic and the frame
or between the frame and the
countertop).
36
Cleaning and care
Glass ceramic
First wipe down the surface with a
damp cloth to loosen soiling, then
remove stubborn crusting with a glass
scraper.
Finish by cleaning the cooking zone
with a special cleaner for glass ceramic
and stainless steel (see the section
"Additional accessories") and paper
towel or a clean cloth. Do not apply
cleaner to a hot cooking zone, as this
can leave spots. Follow the instructions
indicated by the manufacturer of the
cleaning product.
Spots from lime residue, water, and
aluminum deposits (shimmering
metallic spots) can be removed with a
glass ceramic and stainless steel
cleanser.
If sugar, plastic, or aluminum foil fall
onto a hot cooking zone, switch the
appliance off. Immediately, while the
zone is still hot, use a glass scraper to
thoroughly eliminate the spill from the
cooking zone. Exercise caution danger of burns!
Once the zone has cooled off, clean
thoroughly as described above.
Wipe the cooktop with clean water and
dry it with a clean, dry cloth. Be sure to
remove all cleaning product residue.
Residue will burn into the cooktop
during subsequent uses, damaging the
glass ceramic.
37
Programming
You can change the programming of
your appliance (see Table).
Proceed as follows:
^ With the cooktop switched off,
simultaneously touch the ON/OFF
cooktop sensor s and the safety
lock sensor$ until the indicator lamp
for the safety lock flashes.
A P (Program) and an S (Status), each
with a number, appear in the cooking
zone display. They show the current
setting.
^ First select the desired Program by
touching the + or - sensors for the
front left cooking zone, and then by .
touching the + or - sensors of the
front right cooking zone, set the
desired Status (see Table). In this
way you can change several
programs one after the other.
38
To store the new settings in memory,
touch the ON/OFF cooktop sensor s
until the displays go out. If you do not
wish to store the displays in memory,
touch the safety lock sensor $ until the
displays go out.
Programming
Program*
P
P
P
P
P
P
*
0
1
2
3
4
5
Demonstration mode and
factory default settings
Status** Setting
S
0
Demonstration mode on
S
1
Demonstration mode off
S
9
Reinstate factory default settings
S
0
Off
S
1
On
S
0
12 power settings
(1, 2, 3 ... to 12)
S
1
23 Power settings
(1, 1., 2, 2., 3 ... to 12)
If the auto heat setting is
selected:
an A will flash alternate with the
continued cooking setting in the
display.
S
0
Off
S
1
Quiet
S
2
Medium
S
3
Loud
Keypad tone when sensor S
is touched
S
0
Off
1
Quiet
S
2
Medium
S
3
Loud
S
0
Off
S
1
Quiet steady tone for 10 seconds
S
2
Medium steady tone for 10
seconds
S
3
Loud steady tone for 10 seconds
Stop and Go
Power setting range
Induction warning tone
when there is no or
unsuitable cookware.
Timer audible tone
Program / Status unassigned.
** Factory default settings are shown in bold.
39
Programming
Program*
P
P
P
P
6
7
8
16
Status** Setting
Safety lock
Auto heat
Automatic Boil
Touchpad speed of
response
S
0
One-finger locking using $
S
1
Three-finger locking using $ and
+ of both right-hand cooking
zones
S
0
Manual activation of system lock
S
1
Automatic activation of system
lock
S
0
Off
S
1
On
S
0
Slow
S
1
normal (300 ms)
S
2
Fast
* Program / Status unassigned.
** Factory default settings are shown in bold.
40
Troubleshooting
Repairs to electrical appliances
should only be carried out by a
qualified professional. Work
performed by unqualified persons
can place the user at considerable
risk of harm.
What should I do if ...
... the cooktop or the cooking zones
cannot be switched on?
Check whether:
– the cookware is suitable.
– the safety lock is activated.
If so, de-activate it (see "Safety
lock").
– the fuses or breakers were tripped.
... If there is a smell or vapor formed
when a new appliance is switched
on:
The smell and any vapors given off do
not indicate a faulty connection or
defective appliance, and are not
hazardous to health.
... The cooking area can be switched
on and settings selected, but the
cooking zones do not heat up.
Check whether the appliance is still in
demonstration mode (see
"Programming").
... A ß appears in a cooking zone
display.
Check whether:
If none of the above is the case,
disconnect the appliance from the
electrical supply for about 1 minute. To
do this:
– the empty cooking zone was
inadvertently switched on without
cookware on it.
– switch off the relevant circuit
breakers or unscrew the fuses all the
way from the sockets.
– that the cookware being used is
suitable for use on an induction zone
and is sufficiently large (see
"Cookware").
If after resetting the circuit breakers or
replacing the fuses in their sockets the
appliance will still not operate, call an
electrician or customer service.
... a single cooking zone or the entire
cooktop has automatically switched
off?
The safety shut-off mechanism or the
overheat protection has been triggered
(see "Safety switch-off", "Overheat
protection").
41
Troubleshooting
... One of the following has occurred:
– The Booster has automatically
de-activated ahead of time.
– The 10, 11 or 12 power level set is
alternating in the display with a lower
power level. The reduced power
level is also represented by the
number of segments in the light ring.
... Numbers light up in the timer
display and A, F and numbers light up
in the cooking zone display, when
the cooktop is switched off.
The sensitivity of the sensors has been
altered and they cannot recalibrate
automatically. Recalibration must be
performed manually (see "Calibrating
the sensor switches").
The overheat protection is being
triggered (see the section on "Overheat
protection").
Should the problem still persist, please
call customer service.
... With the Auto heat function
switched on, the food in the pan
does not cook.
... An F , appears in the left cooking
zone display, and an E in the right,
and numbers appear in the timer
display.
This may be because:
– There is too much food in the pan.
Interrupt the power supply to the
cooktop for approximately 1 minute.
– The cookware does not conduct heat
well.
If the problem persists after power is
restored, please call customer service.
Select a higher continued cooking
setting next time, or start cooking at the
highest setting and then switch down
manually to a lower setting later on.
... The cooling fan continues to run
after switch-off.
That is not a malfunction. The fan runs
until the appliance is cooled down, and
then switches off automatically.
42
Technical Service
For replacement parts or a fault which
you cannot easily fix yourself, please
contact the Miele Technical Service
Department at the address on the back
of this booklet.
When contacting Technical Service
please quote the serial number and
model of the appliance. This
information is visible on the silver data
plate supplied with the appliance.
Adhere data plate sticker here:
43
Optional accessories
Miele appliances are designed to give the best possible
results and many years of satisfaction. However, to achieve
that goal, there must be a perfect interplay of all factors. That
is why Miele has put together a comprehensive line of
accessories that harmonize optimally with our appliances.
These care products are tailored to the specific appliance.
They are available form Miele Customer Service (see
overleaf) and from your Miele dealer.
Baking and roasting dishes
Pots in a range of sizes
Saucepan with cover
Non-stick coated pan
Wok
Roasting pan
Care products
Glass ceramic and stainless steel cleaner 250 ml
Removes heavy soiling, limescale, and aluminum residue.
All-purpose microfiber cloth
Removes fingerprints and light soiling
44
Installation Instructions
IMPORTANT: SAVE FOR THE LOCAL ELECTRICAL INSPECTOR'S USE
To prevent accidents
and machine damage
read these instructions
before
installation or use.
IMPORTANT SAFETY INSTRUCTIONS - INSTALLATION
Note to the installer:
Please leave this instruction book
with the consumer for the local
electrical inspector’s use.
The minimum distances given in
these Installation Instructions must
be observed in order to ensure safe
operation. Failure to do so increases
the risk of fire.
The cabinetry and venting hood
should be installed first to prevent
damage to the appliance.
~ The countertop must be bonded
with heat resistant (212 °F/100 °C)
adhesive to prevent distortion or
dissolving.
Any back splashes must be
heat-resistant as well.
~ The appliance has not been
designed for maritime use or for use in
mobile installations such as recreational
vehicles or aircraft. However, under
certain conditions it may be possible for
installation in these applications. Please
contact the Miele Technical Service
Department with specific requirements.
~ The appliance must not be installed
over a dishwasher, washer, dryer,
refrigerator or freezer. Heat radiated by
the appliance may damage them.
~ The appliance must not be installed
above an oven not equipped with a
cooling fan.
46
~ To eliminate the risk of burns or fire
by reaching over heated surfaces,
cabinet storage space above the
appliance should be avoided. If cabinet
storage is necessary, the risk can be
reduced by installing a venting hood to
project horizontally a minimum of 5"
(127 mm) beyond the front of the
cabinets.
~ Make sure that the power cord to
the cooktop does not come into contact
with the underside of it or any
mechanical parts once the cooktop has
been installed.
~ The appliance must not be
permanently sealed into the countertop
when installed. The sealing strip under
the edge of the appliance provides a
sufficient seal for the countertop. See
"Sealing".
Keep this instruction book in a safe
place for reference and pass it on to
any future user.
IMPORTANT SAFETY INSTRUCTIONS - INSTALLATION
Safety distances above the appliance
If there is more than one appliance
beneath a hood (e.g. wok burner
and electric cooktop), and they have
different minimum safety distances,
always observe the greater
distance.
The minimum safety distance given by
the hood manufacturer must be
maintained between the cooktop and
the hood above it. See the installation
instructions of the hood for these safety
measurements.
If the hood manufacturers instructions
are not available or if flammable objects
are installed over the combiset (e.g.
cabinets, utensil rail, etc.), a minimum
safety distance of 30" (760 mm) must
be maintained.
47
IMPORTANT SAFETY INSTRUCTIONS - INSTALLATION
Safety distances to the sides and
rear of the cooktop
If you are installing a cooktop, it is
allowed to have cabinets or walls of any
height on one side and at the rear, but
on the other side there must be no
appliance or furniture standing higher
than the cooktop (see illustrations).
Not allowed
Following minimum safety clearances
must be kept:
– 50 mm to the right or left of the
countertop cut-out to the nearest
piece of furniture (e.g., a tall
cupboard).
2”
– 50 mm from the countertop cut-out to
the rear wall.
Highly recommended
Not recommended
48
IMPORTANT SAFETY INSTRUCTIONS - INSTALLATION
Safety distance underneath the
cooktop
To ensure sufficient ventilation of the
appliance, a certain gap must be left
between the underside of the cooktop
and any oven, intermediate shelf or
drawer.
The minimum distance from the
underside of the cooktop to
– the top of an oven must be 15 mm.
– the top of an intermediate shelf
must be 15 mm.
At the rear, to accommodate the
electrical power cable, a gap of
10 mm must be provided.
– the base of a drawer must be
75 mm.
49
IMPORTANT SAFETY INSTRUCTIONS - INSTALLATION
Safety distance when installing the appliance near a wall with trim or a back
splash
A minimum distance of 2" (50 mm) between the trim or back splash and the
countertop cut-out if required.
This distance is only necessary if these items are made of combustible materials
e.g. wood. If the trim or back splash is made of a non-combustible material, the
required safety distance can be reduced by the thickness of the wall covering
material.
Cooktops flush with the countertop
a Wall frame
b Ply wood, particle board or dry wall
c Trim or back splash
d Countertop
e Countertop cut-out
f 2" (50 mm) minimum clearance
50
Frame/Facet cooktops
Cooktops with frame or beveled edges
Installation dimensions
KM 5993
a Front
b Installation depth
c Installation depth power cord
d Power cable, L = 1440 mm
51
Cooktops with frame or beveled edges
Installation
Inserting the cooktop
Preparing the countertop
^ Feed the appliance power cord
downward through the cut-out.
^ Use the template to make a work
cut-out.
Be sure to observe the minimum
distance from the rear wall and
from the left or right to a side wall.
See the section on "IMPORTANT
SAFETY INSTRUCTIONS INSTALLATION".
^ Seal any wooden work surfaces with
a special varnish, silicone rubber, or
resin, to help prevent swelling from
moisture.
The materials used must be
temperature-stable.
If, during installation, you find that
the seal on the corners of the frame
are not flush with the countertop, the
corner radii ß R4 can be carefully
cut out with a jig saw.
No clamps will be required to for
installation of the appliances, a seal
underneath will keep the cooktop
solidly seated in the cutout. The gap
between the frame and the
countertop will reduce over time.
52
^ Place the cooktop centered in the
cutout. Ensure that the cooktop seal
sits flush with the countertop on all
sides. This is necessary for a proper
seal all the way around. Do NOT use
sealant.
^ Connect the cooktop.
^ Check the cooktop for function.
Cooktops with frame or beveled edges
Sealing advice
Tiled countertop
The cooktop must not be permanently
sealed into the countertop when
installed. The sealing strip under the
edge of the cooktop provides a
sufficient enough seal.
Grout lines a and the hatched area
underneath the cooktop frame must be
smooth and even, so that the frame will
sit flush with the countertop and the
sealing strip underneath the edge of
the upper part of the appliance
provides a sufficient seal between the
cooktop and the countertop.
If the cooktop is sealed into position,
the countertop or the appliance may
be damaged if the cooktop needs to
be removed for maintenance or service.
53
Flush-fitted cook tops
Installation dimensions
KM 5987
a Front
b Installation depth
c Installation depth, including power
cable
d Stepped cutout for granite or marble
worktops
54
e Power cable, L = 1440 mm
Cutout dimensions for granite or
marble worktops:
Please take careful note of the inset
detail drawing!
Flush-fitted cook tops
Installation
A flush-fitting cooktop is suitable
only for installation in natural stone
(granite, marble), tiled or solid wood
worktops. Other materials, such as
Corian and Askilan, are not suitable.
A base unit 1000 mm wide is
required for installation.
The cooktop is
– directly inserted into a matching
cut-out in a granite or marble
worktop.
– in a cutout in a solid wood or tiled
worktop carried on a wooden
support frame. The frame must be
provided on site and is not supplied
with the appliance.
The cooktop must be freely
accessible from below for servicing
purposes so that the seal around it
is not removed.
55
Flush-fitted cook tops
Making the worktop cutout and
installing the cooktop
^ Make the worktop cutout as shown in
the illustrations.
Granite or marble worktop
^ Feed the appliance power cord
downward through the countertop
cut-out.
^ Place the cooktop f in the cutout
and center it.
^ Connect the cooktop.
^ Check that the cooktop is functioning
properly.
^ Spray the remaining gap g with a
temperature-resistant (to at least
160 °C) silicone sealant.
e Worktop
f Cooktop
g Gap width
Since the ceramic glass plate and
the worktop cutout have a certain
dimensional tolerance, the gap width
g can vary (min. 1 mm).
56
For granite and marble worktops,
use only a silicone sealant that is
suitable for stone worktops and
follow the sealant manufacturer's
instructions.
Flush-fitted cook tops
Solid wood or tiled worktop
^ Make the worktop cutout as shown in
the illustrations.
^ Fix the wooden frame a 7 mm below
the top edge of the worktop (see
illustration).
^ Feed the appliance power cord
downward through the countertop
cut-out.
^ Place the cooktop f in the cutout
and center it.
^ Connect the cooktop.
a 7.5 mm
(wooden frame - not supplied with
appliance)
e Worktop
f Cooktop
g Gap width
Since the ceramic glass plate and
the worktop cutout have a certain
dimensional tolerance, the gap width
g can vary (min. 1 mm).
^ Check that the cooktop is functioning
properly.
^ Spray the remaining gap g with a
temperature-resistant (to at least
160 °C) silicone sealant.
Observe the silicone-sealant
manufacturer's instructions. For
granite- and marble-tiled worktops
use only silicone sealant especially
formulated for granite and marble.
57
Electrical connection
,CAUTION: Before installation or
servicing, disconnect the power
supply by either removing the fuses,
shutting off the power main or
manually "tripping" the circuit
breakers.
Installation work and repairs should
only be performed by a qualified
technician in accordance with all
applicable codes and standards.
Repairs and service by unqualified
persons could be dangerous and
the manufacturer will not be held
responsible.
Before connecting the appliance to
the power supply, make sure that
the voltage and frequency listed on
the data plate correspond with the
household electrical supply. This
data must correspond to prevent
appliance damage. Consult an
electrician if in doubt.
Only operate the cooktop after it has
been installed into the countertop.
Installer:
Please leave these instructions with
the consumer.
Power supply
^ Make sure your electrical supply
matches the data plate.
58
Connection
The cooktop is ready for connection to
a grounded power supply.
240 / 208 V, 60 Hz, 50 A fuse rating.
Connect as following:
Black wire: connect to L1 (hot)
Red wire: connect to L2 (hot)
Green wire: connect to GND (ground)
A dedicated line and junction box
should be used to connect the cooktop
to a 50 A circuit.
For further information, see the wiring
diagram provided with the appliance.
, WARNING:
THIS APPLIANCE MUST BE
GROUNDED!
Help protect our environment
Disposal of packing materials
Disposal of an old appliance
The cardboard box and packing
materials are biodegradable and
recyclable. Please recycle.
Old appliances contain materials that
can be recycled. Please contact your
local recycling authority about the
possibility of recycling these materials.
Ensure that any plastic wrappings,
bags, etc. are disposed of safely and
kept out of the reach of children.
Danger of suffocation!
Before discarding an old appliance
disconnect it from the electrical supply
and cut off the power cord to prevent it
from becoming a hazard.
59
Alteration rights reserved / 1209
For the most updated manual see the Miele web site.
M.-Nr. 07 367 890 / 00