1
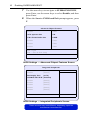
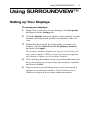
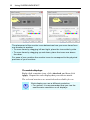
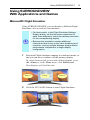
SURROUNDVIEW™
Installation and Setup User’s Guide
P/N: 137-40593-10
26:
n
a
J
4
0
08
Y
AR
N
I
LIM
E
PR
Copyright © 2004, ATI Technologies Inc. All rights reserved.
ATI and all ATI product and product feature names are trademarks and/or registered
trademarks of ATI Technologies Inc. All other company and/or product names are
trademarks and/or registered trademarks of their respective owners. Features,
performance and specifications are subject to change without notice. Product may not
be exactly as shown in the diagrams.
Reproduction of this manual, or parts thereof, in any form, without the express written
permission of ATI Technologies Inc. is strictly prohibited.
i
Disclaimer
While every precaution has been taken in the preparation of this
document, ATI Technologies Inc. assumes no liability with respect to
the operation or use of ATI hardware, software or other products and
documentation described herein, for any act or omission of ATI
concerning such products or this documentation, for any interruption of
service, loss or interruption of business, loss of anticipatory profits, or
for punitive, incidental or consequential damages in connection with
the furnishing, performance, or use of the ATI hardware, software, or
other products and documentation provided herein.
ATI Technologies Inc. reserves the right to make changes without
further notice to a product or system described herein to improve
reliability, function or design. With respect to ATI products which this
document relates, ATI disclaims all express or implied warranties
regarding such products, including but not limited to, the implied
warranties of merchantability, fitness for a particular purpose, and noninfringement.
Documentation updates
ATI is constantly improving its product and associated documentation.
To maximize the value of your ATI product, you should ensure that you
have the latest documentation. ATI’s documentation contains helpful
installation/configuration tips and other valuable feature information.
ii
Table of Contents
Getting Started ................................................................................. 1
System Requirements ................................................................................. 2
Getting Additional Accessories .................................................................. 2
Warranty Information ................................................................................. 3
Installing the External ATI Graphics Card ..................................... 7
Enabling SURROUNDVIEW............................................................. 9
Using SURROUNDVIEW ................................................................ 11
Setting up Your Displays.......................................................................... 11
Using SURROUNDVIEW With Applications and Games ...................... 13
Frequently Asked Questions .................................................................... 16
Index................................................................................................ 17
iii
iv
Getting Started
1
Getting Started
SURROUNDVIEW™ provides the power and convenience of
multi-adapter, multi-monitor support for computers that use
internal ATI integrated graphics processors (IGP). Using
SURROUNDVIEW, ATI’s RADEON™ 9100 IGP in
combination with an external ATI AGP graphics card, can
support up to three, independent monitors.
Multi-monitor capability increases productivity — read email
on one screen, work on a spreadsheet on another, and create a
document on another. SURROUNDVIEW is also ideal for the
office environment: a brokerage can monitor trades, place
orders, and sell — each on a different display.
When the home office computer is not being used for work, it
can be used to play the latest games, several of which can take
advantage of SURROUNDVIEW's multi-monitor feature. With
Microsoft® Flight Simulator, cyber pilots can move different
views to separate monitors.
Getting SURROUNDVIEW up and running requires only two
steps:
• Install an external ATI AGP graphics card — page 7.
• Enable SURROUNDVIEW in the BIOS — page 9.
2
Getting Started
System Requirements
• RADEON™ 9100 IGP
(enabled by system BIOS)
Supported
ATI Products
External ATI AGP graphics cards:
• RADEON™ 9800 SE / PRO / XT
• RADEON™ 9600 Series
• RADEON™ 9500 / PRO
• RADEON™ 9200 / SE / PRO
• RADEON™ 9000 Series
• All ALL-IN-WONDER cards
Expansion Slot
AGP 2X, AGP 8X or AGP 2X/4X/8X slot
Operating System
Windows® 2000 / XP
CPU
Pentium® P4 2.6GHz or equivalent;
3.0GHz recommended.
System Memory
256MB minimum; 512MB recommended.
AGP Aperture
128MB minimum; 256MB recommended.
UMA Frame Buffer
64MB minimum; 128MB recommended.
Getting Additional Accessories
Additional and replacement cables, installation CD-ROMs,
manuals, and other accessories for ATI products can be
purchased from the online ATI store at
http://www.ati.com/online/accessories.
Getting Started
3
Warranty Information
Product Warranty Registration
To receive Customer Service, you must register your product
with ATI. Online Product Warranty Registration is available at
http://www.ati.com/online/registration.
Customer Service
For detailed instructions on how to use your ATI product, refer
to the Online User’s Guide included on your ATI Installation
CD-ROM. If you require further assistance with your product,
use one of the following options:
Online:
For product information, video drivers, Frequently Asked
Questions and Email support, visit:
http://www.ati.com and select Customer Service for Built By
ATI products.
Telephone:
Available Monday to Friday, 9:00 AM - 7:00 PM EST.
905-882-2626
*
to Telephone Support is available to registered users
*at Access
no additional cost for the first 30 days from the date of
purchase (long distance charges may apply). For complete
details, please visit: http://www.ati.com/online/customercare.
Mail:
ATI TECHNOLOGIES INC.
Attention: Customer Service
33 Commerce Valley Drive East
Markham, Ontario
Canada L3T 7N6E
4
Getting Started
Hardware Warranty Service Statement
Should the product, in ATI’s opinion, malfunction within the
warranty period, ATI will at its discretion repair or replace the
product upon receipt with an equivalent. Any replaced parts
become the property of ATI. This warranty does not apply to the
software component of a product or a product which has been
damaged due to accident, misuse, abuse, improper installation,
usage not in accordance with product specifications and
instructions, natural or personal disaster, or unauthorized
alterations, repairs, or modifications.
For a detailed description of the ATI Hardware Warranty
Service Statement visit:
http://www.ati.com/online/warranty/statement.
Warranty Service
For warranty service instructions visit:
http://www.ati.com/online/warranty or contact one of our
Customer Service Representatives using one of the
aforementioned means.
• Before shipping any unit for repair, obtain an RMA number
for warranty service.
• When shipping your product, pack it securely, show the
RMA and serial number of the product on the outside, and
ship prepaid and insured.
• ATI will not be held liable for damage or loss to the product
in shipment.
Getting Started
5
Limitations
• This warranty is valid only if the online Product Warranty
Registration form at
http://www.ati.com/online/registration
is successfully submitted within 30 days of purchase of said
product.
• All warranties for this product, when purchased as a retail
product, expressed or implied, will expire three (3) years
from date of original purchase.
All accompanying cables and accessories are warranted
for 90 days.
• No warranties for this product, expressed or implied, shall
extend to any person who purchases the product in a used
condition.
• The liability of ATI in respect of any defective product will
be limited to the repair or replacement of such product. ATI
may use new or equivalent-to-new replacement parts.
Defective product will be sent in for repair or replacement
only.
ATI makes no other representations or warranties as to fitness
for a particular purpose, merchantability or otherwise in respect
of the product. No other representations, warranties or
conditions shall be implied by statute or otherwise.
In no event shall ATI be responsible or liable for any damages,
including but not limited to the loss of revenue or profit, arising:
• from the use of the product,
• from the loss of use of the product, as a result of any event,
circumstance, action or abuse beyond the control of ATI;
whether such damages be direct, indirect, consequential,
special or otherwise and whether such damages are incurred
by the person to whom this warranty extends or a third party.
6
Getting Started
Installing the External ATI Graphics Card
7
Installing the
External ATI Graphics Card
AGP slot on Motherboard
8
Installing the External ATI Graphics Card
1
Power-off the computer and monitor, and then disconnect
the monitor cable from the back of your computer.
2
Remove the computer cover. If necessary, consult your
computer’s manual for help in removing the cover.
Discharge your body’s static electricity by touching
the metal surface of the computer chassis.
3
After locating the AGP slot, and if necessary, removing the
metal cover, align your ATI graphics card with the slot, and
then press it in firmly until the card is fully seated.
4
Replace the screw to fasten the card in place, and then
replace the computer cover.
5
Connect one display to the motherboard’s internal graphics
connector A , and then connect the other two displays to
the external graphics card monitor connectors B and C .
A
B
C
Monitor Connectors on back of computer
If your monitors use DVI-I connectors, you will need
DVI-I-to-VGA adapters to connect them. Adapters are
available from the online ATI store at
http://www.ati.com/online/accessories.
DVI-I Connector
from monitor
DVI-I to VGA
Adapter
VGA Connector
on Card
You are now ready to enable SURROUNDVIEW™. See
page 9.
Enabling SURROUNDVIEW™
9
Enabling
SURROUNDVIEW™
Enable SURROUNDVIEW using the system BIOS settings.
i
• The motherboard manufacturer must provide an
option in CMOS to enable / disable internal
graphics when external graphics cards are used.
• Implementation may vary, depending upon the
motherboard manufacturer.
To enable SURROUNDVIEW
1
Restart your system, and then enter CMOS setup (see the
illustration on the following page).
When restarting, most computers prompt you to press
certain keys (usually F10, DEL, F2, or F8) to enter Setup.
If this does not occur, refer to the manufacturer’s
documentation.
The CMOS Setup screen appears.
2
Use the arrow keys (
) to navigate to Advanced
Chipset Features, and then press Enter.
The Advanced Chipset Features screen appears.
3
Use the arrow keys to navigate to AGP Aperture Size, and
then use the + or – key to set it to 128. (This is the
recommended setting for best general performance;
SURROUNDVIEW does not require it.)
Your system must have at least 256MB of RAM to use an
AGP Aperture size of 128 (see System Requirements on
page 2).
4
Use the arrow keys to navigate to UMA Frame Buffer
Size, and then set it to 64MB. Press Esc to return to the
CMOS Setup screen.
5
Use the arrow keys to navigate to Integrated Peripherals,
and then press Enter.
The Integrated Peripherals screen appears.
6
Use the arrow keys to navigate to Init Display First, and
then set it to AGP.
10
Enabling SURROUNDVIEW™
7
Use the arrow keys to navigate to SURROUNDVIEW,
press Enter, use the arrow keys to select Enable, and then
press Enter.
8
When the Save to CMOS and Exit prompt appears, press
Y.
Advanced Chipset Features
Feature
Value
AGP Aperture Size
128
UMA Frame Buffer Size
64MB
Feature
Value
Feature
Value
Feature
Value
ESC = Quit
F10 = Save & Exit Setup
BIOS Settings — Advanced Chipset Features Screen
Integrated Peripherals
Feature
[Status]
Feature
[Status]
Init Display First
[AGP]
Item Help
SURROUNDVIEW [Enabled]
Feature
[Status]
Feature
[Status]
Feature
[Status]
Feature
[Status]
Feature
[Status]
BIOS Settings — Integrated Peripherals Screen
These screens may look different, depending upon the
motherboard manufacturer.
Using SURROUNDVIEW™
11
Using SURROUNDVIEW™
Setting up Your Displays
To set up your displays
1
Right-click a clear area of your desktop, click Properties,
and then click the Settings tab.
2
Click the Identify button to display a large number on each
monitor, showing which monitor corresponds with each
icon.
3
Right-click the icon for the display that you want to be
primary, click Use this device as the primary monitor,
and then click Apply.
The primary monitor displays the log-on screen when you
start your computer. When you first open most programs,
they display windows on the primary monitor.
4
Click and drag the monitor icons to positions that represent
how you want to move items from one monitor to another,
and then click OK.
5
Drag an item on your desktop across your screen until it
appears on an alternate monitor. You can also resize a
window to stretch it across more than one monitor.
12
Using SURROUNDVIEW™
Primary
Display
Primary
Display
The placement of the monitor icons determines how you move items from
one monitor to another.
• To move items by dragging left and right, place the icons side by side.
• To move items by dragging up and down, place the icons one above
the other.
For ease of use, position the monitor icons to correspond to the physical
positions of your monitors.
To enable displays
Right-click a monitor icon, click Attached, and then click
Apply. Repeat for each display that you wish to attach.
The selected monitors are attached and available for use.
i
Each display can use a different resolution,
• For games, it is recommended that you use the
same screen resolution on all displays.
Using SURROUNDVIEW™
13
Using SURROUNDVIEW
With Applications and Games
Microsoft® Flight Simulator
Using SURROUNDVIEW, you can display a different Flight
Simulator view on each of your monitors.
i
1
Start with Flight Simulator running in windowed mode, so
that you can move windows off the primary display.
To switch between full-screen and windowed mode, press
Alt + Enter or, in the Views menu, click Full Screen.
Your displays will look like this:
Monitor 2
2
• For best results, in the Flight Simulator Settings
Display dialog, set the full screen resolution for
each video adapter to match the desktop resolution
for the corresponding display.
• Because the simulation creates additional
information that is sent to the video hardware and
monitors, running multiple displays always affects
performance compared to a single-display
configuration.
Primary
Monitor 3
Click the FLY NOW! button to start Flight Simulator.
14
Using SURROUNDVIEW™
i
3
Click the
4
From the Views menu, create a new window, and then drag
it to monitor 2.
button to continue.
• When moving a 3D window, you may see some hesitation when crossing
the boundary to a secondary display. After you move the 3D window to
the secondary display, that scene will be displayed in 3D. You can return
to full-screen mode on each display after you move the windows.
• Multiple full-screen setups are not saved in the Flight Simulator or Flight
Configuration (.cfg) files. You can save a Flight while each display is in
windowed mode, and then switch to full-screen mode after you launch
Flight Simulator.
5
From the Views menu, create another new window, and
then drag it to monitor 3.
Using SURROUNDVIEW™
15
Business applications
You can run multiple business applications simultaneously —
for example, a spreadsheet, a web browser, and a stock tracker.
1
Right-click a clear area of your desktop, click Properties,
click the Settings tab, and then click the Identify button
button to display a large number on each monitor, showing
which monitor corresponds with each icon.
2
1
3
2
Open your spreadsheet.
Your spreadsheet opens in the primary monitor.
3
Open your web browser, and then drag it to monitor 2.
4
Open your stock tracker, and then drag it to monitor 3.
16
Using SURROUNDVIEW™
Frequently Asked Questions
Does the Windows “Standby”
function work when
SURROUNDVIEW is enabled?
Do all ATI cards support
SURROUNDVIEW?
Can SURROUNDVIEW run on
other vendors’ graphics cards?
If the Integrated Graphics
Processor (IGP) is AGP, and I
install an external PCI card, is
SURROUNDVIEW available?
Yes, Standby should work properly with
SURROUNDVIEW.
No, only ATI AGP graphics cards,
including ALL-IN-WONDER AGP
cards, support SURROUNDVIEW.
No, this function is called dual adapter,
similar to using two, discrete graphics
cards (AGP + PCI).
Index
A
F
Accessories
getting additional 2
AGP and PCI slots 7
Flight Simulator 13
Frequently Asked Questions 16
B
BIOS 9
Installing the external ATI
graphics card 7
C
P
CMOS Setup 9
CMOS setup utility 10
Primary monitor
setting 11
D
S
Displays
enabling 12
setting up 11
Setting up displays 11
SURROUNDVIEW
BIOS settings 10
enabling 9
System requirements 2
I
E
Enabling displays 12
Enabling SURROUNDVIEW 9
External ATI graphics card
installing 7
U
Using SURROUNDVIEW 11
business applications 15
with business applications 15
with Flight Simulator 13
W
Warranty
customer service 3
hardware 4
limitations 5
registration 3
service 4
17
18