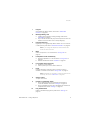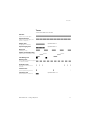
1
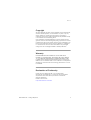
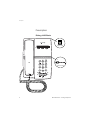
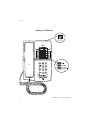
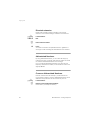
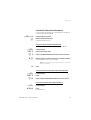
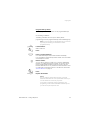
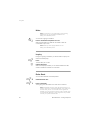
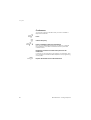
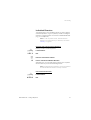
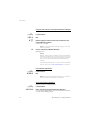
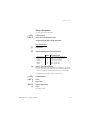
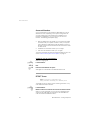
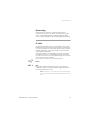
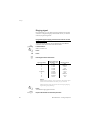
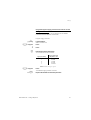
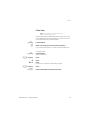
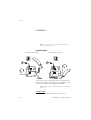
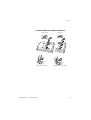
Analog Telephones BusinessPhone Communication Platform User Guide Cover Page Graphic Place the graphic directly on the page, do not care about putting it in the text flow. Select Graphics > Properties and make the following settings: • Width: 15,4 cm (Important!) • Height: 11,2 cm (May be smaller) • Top: 5,3 cm (Important!) • Left: -0,3 cm (Important!) This text should then be hidden. ? Title Title EN/LZTBS 160 1300 R1A © Ericsson Enterprise AB 2003 2 BusinessPhone – Analog Telephone Table of Contents Table of Contents page Welcome .......................................................... 4 Description ....................................................... 6 Incoming Calls ............................................... 13 Outgoing Calls ............................................... 15 During Calls .................................................... 25 Call Forwarding .............................................. 29 Absence Information ...................................... 34 Messages ...................................................... 37 Security .......................................................... 46 Group Features .............................................. 49 Other Useful Features ..................................... 52 Settings .......................................................... 59 Useful Hints .................................................... 67 Installation ...................................................... 68 Troubleshooting .............................................. 73 Glossary ......................................................... 74 Index .............................................................. 76 BusinessPhone – Analog Telephone 3 Welcome Welcome Welcome to the User Guide for the Ericsson Analog Basic, Medium and the ordinary Analog phone in the BusinessPhone Communication Platform from Ericsson. The BusinessPhone Communication Platform consists of BusinessPhone 50, BusinessPhone 128i, and BusinessPhone 250. The features described in this User Guide are related to version 5.1 or higher of the BusinessPhone Communication Platform. Some might not work in earlier versions of the system and/or might be protected by a hardware dongle that has to be bought separately. The User Guide describes the features of the BusinessPhone Communication Platform and the Basic / Medium phone with a default programming. There may be some differences in the way your phone is programmed. Please consult your system administrator if you need further information. The latest version of this User Guide can also be downloaded from: http://www.ericsson.com/enterprise/ Important The BusinessPhone Communication Platform supports all types of analog telephones, but some features require that an Ericsson Basic or Medium analog telephone is connected to the platform. Throughout the guide you will be advised if a function is adapted for a particular telephone or not. Note: The Ericsson Basic and Medium analog phones can be connected to all types of telephone exchanges. 4 BusinessPhone – Analog Telephone Welcome Copyright All rights reserved. No parts of this publication may be reproduced, stored in retrieval systems, or transmitted in any form or by any means, electronic, mechanical, photocopying, recording or otherwise, without prior written permission of the publisher except in accordance with the following terms. If this publication is made available on Ericsson media, Ericsson gives its consent to downloading and printing copies of the content provided in this file only for private use and not for redistribution. No parts of this publication may be subject to alteration, modification or commercial use. Ericsson will not be liable for any damages arising from use of an illegal modified or altered publication. Warranty ERICSSON MAKES NO WARRANTY OF ANY KIND WITH REGARD TO THIS MATERIAL, INCLUDING, BUT NOT LIMITED TO, THE IMPLIED WARRANTIES OF MERCHANTABILITY AND FITNESS FOR A PARTICULAR PURPOSE. Ericsson shall not be liable for errors contained herein nor for incidental or consequential damages in connection with the furnishing, performance or use of this material. Declaration of Conformity Hereby, Ericsson Enterprise AB, S-131 89 Stockholm, declares that this telephone is in conformity with the essential requirements and other relevant provisions of the R&TTE directive 1999/5/EC. Details to be found at: http://www.ericsson.com/sdoc BusinessPhone – Analog Telephone 5 Description Description Dialog 4106 Basic 8 (upper side) 1 9 7 10 (bottom side) 2 6 3 5 4 6 BusinessPhone – Analog Telephone Description 1 Programmable keys Three keys for storing frequently called numbers. You can store one number per key, see section “Dial-by-Name” on page 22. Note: If you unplug the telephone, stored numbers will remain for about 24 hours. 2 Mute / Prog a. Switch microphone on or off. See section “During Calls” on page 25. b. Enter programming mode, see section “Settings” on page 59. 3 Message Waiting key a. A flashing light indicates a waiting message. See section “Messages” on page 37. b. Programmable key for storing of one frequently called number. See section “Dial-by-Name” on page 22 4 Last number redial / Pause key a. Redial last number dialled. b. Insert a pause if you have to wait for dial tone when programming a number into the memory. 5 R-key Used for example to make an inquiry, to transfer a call or to establish a conference, see section “During Calls” on page 25. 6 Volume control To adjust the volume. 7 Message Waiting switch Switch Message Waiting indication on or off. Also used to reverse the polarity in case of crossed line cables. See section “Settings” on page 59. 8 Data port Data port for connection of a modem, PC or other telephone equipment. 9 Loudspeaker (beneath handset) 10 Handset with hearing aid function Please note: The handset may attract and retain small metal objects in the earcap region. BusinessPhone – Analog Telephone 7 Description Dialog 4147 Medium 12 (upper side) 1 2 3 3 13 9 14 10 11 (bottom side) 4 8 5 7 6 8 BusinessPhone – Analog Telephone Description 1 Program Store frequently called numbers, see section “Abbreviated Numbers” on page 20. 2 Message Waiting / 2nd a. A flashing light indicates a waiting message. See section “Messages” on page 37. b. Key for access to secondary key functions (these functions are stated on the second line of the corresponding key). 3 Programmable keys Eight keys for storing frequently called numbers. You can store two numbers per key, see section “Abbreviated Numbers” on page 20. Note: If you unplug the telephone, stored numbers will remain for about 24 hours. 4 Mute Switch microphone on or off. See section “During Calls” on page 25. 5 Loudspeaker on/off / Headset key a. Switch loudspeaker on or off. See section “During Calls” on page 25. b. Activate headset. See section “Headset” on page 64. 6 Last number redial / Pause key a. Redial last number dialled. b. Insert a pause if you have to wait for dial tone. 7 R-key Used for example to make an inquiry, to transfer a call or to establish a conference, see section “During Calls” on page 25. Note: Sometimes it is required to change the flash time for the R-key, see section “Flash time” on page 65. 8 Volume control To adjust the volume. 9 Headset / Loudspeaker switch a. At the headset position the loudspeaker key activates a connected headset. See section “Settings” on page 59. b. At the loudspeaker position the loudspeaker key activates the loudspaker. See section “Settings” on page 59. 10 Prog On/Off switch Enable or disable the program key. See section “Settings” on page 59. BusinessPhone – Analog Telephone 9 Description 11 Message Waiting switch Switch Message Waiting indication on or off. Also used to reverse the polarity in case of crossed line cables. See section “Settings” on page 59. 12 Data port Data port for connection of a modem, PC or other telephone equipment. 13 Loudspeaker (beneath handset) 14 Handset with hearing aid function Please note: The handset may attract and retain small metal objects in the earcap region. 10 BusinessPhone – Analog Telephone Description Tones Tones are audible in the handset. Dial tone (System ready to accept digits) Special dial tone (System ready to accept digits, active diversion on telephone) Ringing tone - repeated after 4 s (Ringing signal to called party) Special ringing tone - repeated after 4 s Busy tone (Called party is busy) Number unobtainable tone (Called number not accessible or vacant) Call Waiting tone Blocking tone (Call cannot be executed due to congestion or called party blocked) Verification tone (Verification that ordered function is accessed) Intrusion tone (Sent to all parties during Intrusion) Coference tone - repeated after 15 s (Sent to all parties in a Conference) BusinessPhone – Analog Telephone 11 Description Signals Ringing signals are emitted from the phone. Internal ringing signal - repeated after 4 s External ringing signal - repeated after 4 s Automatic Callback signal Note: The tones and ringing signals in this guide refer to the standard system but may vary between countries. 12 BusinessPhone – Analog Telephone Incoming Calls Incoming Calls A ringing signal indicates an incoming internal- or external call. u Answer calls Lift the handset On another extension uz 6 You can answer a call to another extension from any phone in your office. Lift the handset and call the ringing extension. You receive busy tone. Press. BusinessPhone – Analog Telephone 13 Incoming Calls Answer a second call A call waiting tone will inform you, during a conversation, that a second call is waiting on your phone. See also section “Camp-on” on page 19. You have two options. Option 1: d u Finish the ongoing call: Replace the handset. The new call will be signalled on your phone. Lift the handset to receive the new call. Option 2: ¸d u d u 14 Ask your conversation partner to wait: Press and replace the handset. The waiting call will be signalled on your phone. Lift the handset to receive the new call. After finishing the new call: Replace the handset. Your first call will be signalled on your phone. Lift the handset to receive the first call again. BusinessPhone – Analog Telephone Outgoing Calls Outgoing Calls Sometimes you make a call but the person is not available. These functions will help you in your attempts to establish contact with the called party. Make calls u z 0z d How to make internal and external calls. Lift the handset and dial either: An extension number to make an internal call. Or: The digit(s) for external call access and the external number. Note: Which digit to press for external call access, depends on the configuration of the system. Replace the handset to end the call. BusinessPhone – Analog Telephone Note: You can make your calls faster, using Common Abbreviated Numbers and by programming your own Abbreviated Numbers, see section “Abbreviated Numbers” on page 20. 15 Outgoing Calls Wait for dial tone Note: This function is not supported for other analog telephones, only for the Dialog 4106 Basic and Dialog 4147 Medium phone. © Sometimes it is required to wait for a new dial tone after dialling the prefix digit when making an external call. In such situations, you must store the pause for a new dial tone into the number: Press. Manual dial pause control: You can control the length of a dial pause manually if you store the pause after the fifth digit or later. This function is very useful, if you are connected to a PBX that requires a new dial tone for extension numbers. Example: © © 16 You want to talk to Steven. Steven’s company has the number 12345678, and his extension is 1234, so the complete number is 12345678-1234. To wait for a new dial tone, you have to store a pause before the extension number. Press. The phone number is dialled without the extension, in this example 12345678. Press when the new dial tone is received. Now the extension number is dialed. BusinessPhone – Analog Telephone Outgoing Calls Last External Number Redial When you initiate an external call the system automatically stores all the dialled digits, irrespective of whether the call was successful or not. Stored numbers can consist of maximum 32 digits. Note: To redial a number that incorporates a wait for a new dial tone, you must indicate to the telephone where in the number it must pause and wait for the new dial tone. To do this, press the Redial/Pause key at the proper place in the number. See section “Wait for dial tone” on page 16. u © u *** On the Dialog 4106 Basic or Dialog 4147 Medium telephone: Lift the handset. Press to redial the last dialled external number. On other analog telephones: Lift the handset. Press to redial the last dialled external number. BusinessPhone – Analog Telephone 17 Outgoing Calls Automatic Callback 5 d u 18 You call an extension and receive busy tone or get no answer. This can also be used if no external line is free: Press. Verification tone. Note: The number for Automatic Callback may differ from country to country, see table “Alternative programming for Automatic Callback, Camp-on, Intrusion” on page 66. Replace the handset. You are called back if the extension finishes the ongoing call or the next time the extension finishes a new call. You have to answer within eight seconds otherwise the Callback service is cancelled. Lift the handset when you are called back. The requested extension is called automatically. BusinessPhone – Analog Telephone Outgoing Calls Busy extension You call an extension and receive busy tone. Camp-on 4 You can notify a busy extension of your call by a muted ringing call. Press to camp-on. Keep the handset off hook. When the called extension replaces the handset it will be called automatically. Notes: If you receive the busy tone again, the desired extension does not allow Camp-on. The number for Camp-on may differ from country to country, see table “Alternative programming for Automatic Callback, Camp-on, Intrusion” on page 66. Intrusion 8 You can intrude on an ongoing call on a busy extension (if this function is allowed). Press to intrude. Intrusion tone is heard and a three-party call is established. When the called extension replaces the handset and you keep off hook, the called extension will be recalled automatically. Notes: If you still hear the busy tone, your extension does not have the authority to intrude or the desired extension is protected against Intrusion. The number for Intrusion may differ from country to country, see table “Alternative programming for Automatic Callback, Camp-on, Intrusion” on page 66. BusinessPhone – Analog Telephone 19 Outgoing Calls Diverted extension u *60* z # Bypass Call Forwarding makes it possible to call a specific extension, even if Call Forwarding is activated on this extension. Lift the handset. Dial. Enter extension number. Press. You will be connected to the specified extension, regardless of which type of Call Forwarding the called extension has activated. Abbreviated Numbers By using Abbreviated Numbers, you can make calls simply by pressing a few keys. Frequently used external numbers are stored as Common Abbreviated Numbers in the exchange. Up to 10 Individual Abbreviated Numbers (your personal most frequently used external numbers) can be stored and used on the digit keys to . 0 9 Common Abbreviated Numbers u z 20 External numbers are stored centrally in your BusinessPhone Communication Platform. Common Abbreviated Numbers can be dialled from every extension that has the authority to do so. Lift the handset. Dial the Common Abbreviated Number. Please refer to your telephone directory. BusinessPhone – Analog Telephone Outgoing Calls Individual Abbreviated Numbers u ** z 0 9 You can program and activate your most frequently used external numbers on the digit keys to . Lift the handset and press. Dial the Abbreviated Number. A number between 0 and 9. Program Individual Abbreviated Number u *51* z* 0z # How to program external numbers on the digit keys 0 to 9. Lift the handset. Enter programming mode. Select an Abbreviated Number between 0 and 9 and press. Dial the digit(s) for external call access and dial the number. The number can consist of up to 24 digits. * Note: If your public network requires waiting for a second dial tone, press . Press. u #51* z# Cancel one specific Individual Abbreviated Number u #51# Cancel all Individual Abbreviated Numbers Lift the handset. Press. Enter an Abbreviated Number between 0 and 9 and press. Lift the handset. Press. Confirmation tone. BusinessPhone – Analog Telephone 21 Outgoing Calls Dial-by-Name Note: This function is not supported for other analog telephones, only for the Dialog 4106 Basic and Dialog 4147 Medium phone. u î Head Office 22 You can program and activate directory numbers (extensions and Common Abbreviated Numbers) on the programmable keys. On the Dialog 4106 Basic you can also store one number on the Message key. Stored numbers can consist of maximum 21 digits. Lift the handset. Wait for dial tone. Press to make a call (pre-programmed). Note: To dial a number that is stored on the second level, press the Message Waiting/2nd key before pressing the pre-programmed key. BusinessPhone – Analog Telephone Outgoing Calls Program Dial-by-Name How to program a directory number on the programmable keys. On the Dialog 4106 Basic: The Dialog 4106 Basic has four keys for Dial-by-Name programming; the three programmable keys and the Message key. u ¥ î z ¥ d Note: To store a number on the Message key, just press the key during the following procedure like a normal programmable key. Lift the handset. Wait for dial tone. Press. Press a programmable key. If a number is already stored, it will be erased automatically. If you would like to erase a Dial-by-Name number, store a 0 instead of the telephone number. Dial the number. You can use any directory number, e.g. a Common Abbreviated Number or a colleague’s extension number. You can also store a pause (multiple pauses possible), the R-key function, the Last Number Redial function or any code that contains or . To store a number that incorporates a wait for a new dial tone, see section “Wait for dial tone” on page 16. * # Press. Replace the handset. Notes: You can write the names above the keys on the selfadhersive label. Because of the special label material, you can also delete and re-write any key name. If you press an invalid key during programming, the programming mode will be terminated automatically and you will here a special rejection tone. BusinessPhone – Analog Telephone 23 Outgoing Calls u î î Program z î d Program On the Dialog 4147 Medium: Lift the handset. Wait for dial tone. Press. Press a programmable key. Note: To store a number on the second level, press the Message Waiting/2nd key before pressing the programmable key. If a number is already stored, it will be erased automatically. If you would like to erase a Dial-by-Name number, store a 0 instead of the telephone number. Dial the number. You can use any directory number, e.g. a Common Abbreviated Number or a colleague’s extension number. You can also store a pause (multiple pauses possible), the R-key function, the Last Number Redial function or any code that contains or . To store a number that incorporates a wait for a new dial tone, see section “Wait for dial tone” on page 16. * # Press. Replace the handset. Notes: You can remove the transparent cover in order to write the names beside the keys. If you press an invalid key during programming, the programming mode will be terminated automatically and you will here a special rejection tone. 24 BusinessPhone – Analog Telephone During Calls During Calls The BusinessPhone Communication Platform allows you to handle calls in many different ways. You can for instance make an inquiry, transfer the call or create a conference. Monitoring Note: This function is not supported for other analog telephones, only for the Dialog 4147 Medium phone.  d Ä u You have an ongoing conversation via the handset. Press to switch the loudspeaker on. Replace the handset. The loudspeaker monitors the call. Note: When the loudspeaker is on, the microphone is automatically switched off in the handset. You can adjust the volume, see section “Settings” on page 59. Press to end the call. From Monitoring to handset Lift the handset. Continue your conversation via the handset. BusinessPhone – Analog Telephone 25 During Calls Mute Note: This function is not supported for other analog telephones, only for the Dialog 4106 Basic and Dialog 4147 Medium phone. ¥ You have an ongoing conversation. Press to switch the microphone on or off. When the lamp lights, the caller will not be able to hear the conversation in your room. Note: Mute key looks slightly different on the Dialog 4147 Medium phone. Inquiry ¸ z During an ongoing conversation you like to make an inquiry to an internal or external party. Press. The first call is put on hold. Call the third party. When the third party answers you can switch between the calls, create a Conference and end one of the calls. Refer Back ¸2 ¸1 You can switch between connected parties: Switch between calls. Press to terminate. The ongoing call is terminated. The other call is connected. Note: Sometimes the R key must be pressed twice. If no speech connection could be established, it may take a few seconds until you are re-connected to the original call. Whether you can put internal calls on hold or transfer calls to external lines depends on the configuration of your PBX. Consult your system administrator. 26 BusinessPhone – Analog Telephone During Calls Transfer ¸ z d You have an ongoing internal or external conversation and you want to transfer the ongoing call. Press. Call the third party. You can transfer the call before answer or wait for answer Note: Make sure, that you are connected to the desired party. Please read the notes and warnings in section “Useful Hints” on page 67. Replace the handset. The call is transferred. Transfer to a busy extension You can even transfer calls to busy extensions. The other party will hear a muted signal (Camp-on), and the call will be extended, as soon as the ongoing call is terminated (if Camp-on is allowed). Callback You are called back, if you have transferred an external call and the other extension has not answered the call within a certain time. Your telephone will ring again. Call Waiting If you hear the Call Waiting tone during an ongoing conversation, another person is trying to contact you. d u To terminate the ongoing call and answer the waiting call Replace the handset to finish the ongoing call. The waiting call is signalled on your phone. Lift the handset to answer the new call. BusinessPhone – Analog Telephone 27 During Calls Conference ¸ z ¸3 d 28 You have an ongoing conversation and you want to establish a telephone Conference. Press. Call the third party. Press to establish a three party Conference. Now you have established a three party Conference. To indicate the Conference, all conference members will hear a periodical conference tone. Repeat the procedure to include other persons to the Conference. In this way, you can include up to six parties in a conversation. How many of them can be external callers depends on the programming of the system. Replace the handset to leave the Conference. BusinessPhone – Analog Telephone Call Forwarding Call Forwarding When you are not available to take calls or decide to answer your calls on another extension, it is useful to forward your calls to an alternate answering position. If you urgently need to talk to someone who has forwarded his calls, the system is also equipped with a bypass function. Depending on the type of diversion you are also able to record your Personal Greeting, see section “Personal Greeting” on page 39. Note: You can still make calls as usual. Diversion when there is no answer If you are not available to answer incoming calls (internal or external), your system administrator can program your extension to automatically divert calls to a programmed diversion address (default time: 15 seconds). Diversion when caller receives busy tone If your extension is busy and you receive an incoming call (internal or external), your system administrator can program your extension to automatically divert the call to a programmed diversion address. BusinessPhone – Analog Telephone 29 Call Forwarding Fixed Diversion This function directs your calls to a pre-programmed answering position (e.g. secretary). 30 u *21# Activate Fixed Diversion u #21# Cancel diversion Lift the handset and dial to activate diversion. Lift the handset and dial to cancel diversion. BusinessPhone – Analog Telephone Call Forwarding Individual Diversion This feature gives you the possibility to divert your calls to internal and external positions, e.g. to any directory number, a colleague’s extension, an external number or a Common Abbreviated Number (e.g. your car telephone). Note: In order to prevent misuse, Individual External Diversion can be blocked for your extension, see section “Security” on page 46. Program and activate Internal Diversion u *21* z # Divert your calls to an internal position. Lift the handset. Dial. Enter the new diversion address. Press to activate the Individual Diversion. Verification tone. You can make outgoing calls as usual. A special dial tone reminds you that Call Forwarding is active. Note: An Individual Internal Diversion cannot be activated if an Individual External Diversion is already activated. u #21# Cancel Internal Diversion Lift the handset. Dial. BusinessPhone – Analog Telephone 31 Call Forwarding Program and activate a new External Diversion address u *22* 0z # To set a new Individual External Diversion address: Lift the handset. Dial. Dial the digit(s) for external call access and enter the new External Diversion address. A maximum of 24 digits. * Note: If your public network requires waiting for a second dial tone, press . Press to activate the Individual Diversion. Verification tone. Notes: Before you leave, call your extension to check if the External Diversion has been set up correctly. This way you can make sure that the number has been programmed properly and that your calls will not be diverted to another person by mistake. Individual External Diversion can also be used via the DISA function, see section “Other Useful Features” on page 52. u #22# Cancel External Diversion Lift the handset. Dial. Note: The programmed diversion address is not removed from the memory, the diversion is just inactive. Re-activate External Diversion u *22*# 32 Divert your calls to an external position. Lift the handset. Dial to activate the programmed External Diversion. You can make outgoing calls as usual. A special dial tone reminds you that Call Forwarding is active. BusinessPhone – Analog Telephone Call Forwarding Follow-me If you are in another room, you can still answer your calls by forwarding them to where you are. To activate Follow-me, Individual Diversion must be active on your telephone. Activate Follow-me u *21* z* z# Note: This procedure has to be executed from the telephone the calls are diverted to. Lift the handset. Dial. Dial your number and press. Dial the new number and press. Special dial tone. Cancel Follow-me u #21* z # Follow-me and Individual Diversion can also be cancelled from the answering position. Lift the handset. Dial. Dial your number. Press. Dial tone. BusinessPhone – Analog Telephone 33 Absence Information Absence Information If you are not in the office for a certain period of time (e.g. meeting, vacation, lunch, illness), this feature allows you to inform your callers of the reason of your absence. External callers will be routed to the operator who also has access to your absence info. Note: When you have activated a diversion with a Personal Greeting, callers will receive this greeting even if you have activated the Absence Information, see section “Personal Greeting” on page 39. You can inform your callers with: 1) Pre-defined texts Enter the reason for your absence and the date and time of your return. 2) Voice information Record a Voice message and name the reason of your absence. 34 BusinessPhone – Analog Telephone Absence Information Enter information u *23* z z # u *23* 5 0627 # To store Text or Voice information. Lift the handset. Dial to enter the information mode. Select Pre-defined Text or Voice information. Pre-defined texts Enter Code. Enter Completing Info from the table below. Time of return Date of return Lunch Meeting Vacation Illness Code 1 2 3 4 5 6 Completing Info hour (00-23) minute (00-59) month (01-12) day (01-31) back at, hour minute back at, hour minute back, month day back, month day Press to enter the information. Internal callers receive the information on the display (or as spoken information to callers without display phone). External callers will be routed to the operator who also has access to your absent info. Pre-defined texts example: Vacation, back June 27 Lift the handset. Press. Enter code. Enter month and day. Press. Information active. BusinessPhone – Analog Telephone 35 Absence Information u *23* 9 * 9 # Voice information Lift the handset. Press to enter information mode. Press and speak. Press to play-back and listen to your recording. Press and speak to re-record. Press to activate. Internal callers will hear the information via the handset or the loudspeaker. External callers will be routed to the operator who also has access to your absent info. Note: You can dial your own extension number if you want to check your information. Change information u #23# u *23*# Erase Lift the handset and press to erase info. Save Lift the handset. Press to deactivate and save for later use. Information is passive. Use saved information u *23*# 36 When the information is switched off: Lift the handset. Press to activate saved info. Information is active. BusinessPhone – Analog Telephone Messages Messages By using the Message system you can send, receive, forward, and store different kind of messages. You have also access to a number of helpful features, like placing external calls via the company network and many more ... Your incoming messages can be indicated by a rapidly flashing Message key. See section “Message Waiting indication” on page 63. Password protection The first time you enter the Message system (only possible from your own extension) you might be requested to change your Password if it is default (0000). Note: Some systems are programmed to allow the default Password. d Follow the voice announcements. You are requested to enter a new Password, confirm and save it. If you use the default Password, you are requested to try again. Replace the handset to finish the procedure. Or: Continue with any of the Message functions. If you want to change your Password again, it is possible from the Message system or via the function “Change Password” on page 46. BusinessPhone – Analog Telephone 37 Messages Individual Mailbox system Callers are able to leave messages in your Individual Mailbox. Activate u *21* z # u #21# 38 Divert your extension to the Mailbox system. Lift the handset and dial. Dial the number to the Mailbox system. Please ask the system administrator for your defined Mailbox system number. Press. Deactivate Lift the handset and dial. BusinessPhone – Analog Telephone Messages Personal Greeting u *59# 2 z # d Depending on the type of diversion you want to activate, you can leave three different Personal Greetings to the caller. You can activate a diversion when a caller receives busy tone, when there is no answer, or you can activate the Individual Diversion for all your calls. Lift the handset. Dial. During the procedure you will be asked for your extension number and your Password. Press to configure your Personal Greeting. Enter diversion code. Select an option below and follow the voice announcements. Type of diversion Diversion greeting on busy Diversion greeting on no reply Individual Diversion greeting Code 1 2 3 Press to store the recorded greeting. When you activate the diversion, the recorded greeting is played to the next caller. Replace the handset to finish the procedure. Note: When you have activated a diversion with a Personal Greeting, callers will receive this greeting even if you have activated the Absence Information, see section “Absence Information” on page 34. Retrieve messages internally When you lift the handset and receive a special dial tone, either a diversion is activated or a message is waiting. u *59# Your incoming messages can be indicated by a rapidly flashing Message key. See section “Message Waiting indication” on page 63. Lift the handset and dial. See section “Check and store received messages” on page 42. BusinessPhone – Analog Telephone 39 Messages Retrieve messages - externally z z To retrieve your messages from an external position: Dial your company’s telephone number. Dial the number to the Mailbox system. During the procedure you will be asked for your extension number and your Password. Note: You cannot use the Default Password 0000 to retrieve messages externally. If you want to check your messages from an external position, you have to change your Password first, see section “Change Password” on page 46. The following Mailbox functions can also be used from an external position: • Change Password • Check and store received messages • Forward a Voice message • Send Message • Outcall (External) Notification • Personal Greeting Outcall (External) Notification With this function the Message system can notify you when new Voice messages arrive. You can specify an external number, where you will be called at a pre-programmed time or as soon as a new message arrives. Note: This feature may be restricted or not available. Ask the system administrator for the availability and for more information. You can be notified in two different ways (depending on the programming of the system): Notification with Mailbox access: You acknowledge the notification via your Password (has to differ from the default value 0000). See section “Change Password” on page 46 to select a new Password. You have full access to the Mailbox system. 40 BusinessPhone – Analog Telephone Messages Notification without Mailbox access: You get a short voice announcement, informing that someone has left a message for you. You acknowledge the notification by pressing any key and you have to call back the Mailbox system in order to retrieve the message. Note: If you do not acknowledge the notification within the pre-programmed time, the connection is cancelled and repeated later (ask the system administrator for the programmed number of notification attempts). u *59# Programming: Lift the handset and dial. Note: Depending on the configuration, you might be asked for your Password. Follow the voice announcements. You can program the external notification number, the notification time and activate/deactivate the function. The external number (including the digit(s) for external call access) can consist of up to 24 digits. The time is entered in 24h-format, e.g. 2030 for half past eight with values automatically set to even quarters, i.e. 2013 will be 2015. d Note: The notification number and time must be programmed before you activate the notification. Replace the handset to finish the procedure. BusinessPhone – Analog Telephone 41 Messages Check and store received messages You can check and store your received messages. Received messages are divided into following three categories: • New messages (not heard) • Heard messages • Stored messages Voice messages can also be forwarded to other Mailbox numbers (Individual or Common), see section “Forward a Voice message” on page 43. u *59# Note: Messages are deleted from the system after a certain time. The time depends upon the category of the message. Please ask your system administrator regarding this. Lift the handset. Dial. You can check and store your received messages. Up to 20 messages can be stored. Voice messages will be heard via the speaker or the handset. Call Me messages will call the sender automatically (these messages cannot be stored). Note: Depending on the configuration, you might be asked for your Password before you can retrieve your messages. See section “Security” on page 46. 42 BusinessPhone – Analog Telephone Messages Forward a Voice message u *59# Your received Voice messages (in the Individual Mailbox) can be forwarded to other Mailbox numbers (Individual or Common). When you forward a Voice message to an Individual Mailbox, the Mailbox number is the same as the extension number. Lift the handset. Dial. Note: Depending on the configuration, you might be asked for your Password before you can retrieve your messages. See section “Security” on page 46. Follow the voice announcements. You can forward new, heard or stored Voice messages. Note: The forwarded message is a copy, i.e. it can be deleted without deleting the original message. d Repeat the procedure to forward the message to another Mailbox. Replace the handset to finish the procedure. BusinessPhone – Analog Telephone 43 Messages Send Message To send a message to an extension when you receive busy tone or get no answer. Callback message 9# To send a Call Me message. Press to send. Voice message 99 * 9 # 44 To send a Voice message. Press and speak. Press to play-back and listen to your recording. Press and speak to re-record. Press to send. BusinessPhone – Analog Telephone Messages Dictaphone function If you want to record and retrieve personal Voice messages you can use the Dictaphone function. A Dictaphone message is treated as a normal message. How to retrieve Dictaphone messages, see section “Check and store received messages” on page 42. Record message u *58# * 9 # To start the recording: Lift the handset. Dial and record your message. The maximum recording time is four minutes and 15 seconds. Select one of the options below: Press to play-back. Press and speak to re-record. Press to stop the recording and save the message. BusinessPhone – Analog Telephone 45 Security Security You can use your four-digit Password for blocking your phone from unauthorized use, for making external calls from any blocked extension, for entering the Message system or when you are using the DISA function. Note: The first time you enter the Message system you might be requested to change your Password if it is default (0000). This procedure is performed directly in the Message system. See section “Messages” on page 37. u #*72* z * z # 46 Change Password Lift the handset. Dial to select a new Password. Dial your present Password. The default Password is 0000. Press. Dial your new Password. Press. Verification tone. BusinessPhone – Analog Telephone Security Bypass blocked extension In order to make a call, you can temporarily bypass a blocked extension. u *72* z # Bypass own extension Lift the handset. Dial. Dial your Password. Press. Dial tone. You can make one call from your extension. Bypass another extension u *72* z * z # This makes it possible to make a call on another, blocked extension, by using your Password. Lift the handset. Dial. Dial your Password. Press. Dial your extension number. Press. Dial tone. You can make one call from the blocked extension. BusinessPhone – Analog Telephone 47 Security u *72# u #72* z # 48 Block extension Lift the handset. Dial to block your extension. Verification tone. Un-block extension Lift the handset. Dial. Dial your Password. Press to re-open. Verification tone. Your extension is open for use. BusinessPhone – Analog Telephone Group Features Group Features When you are working together in a team the following Group Features can be very useful. Group Call-pick-up u z In a Pick-up group, any member can answer any individual call to group members. You answer a call to the group by dialling a special answering number. Please ask your system administrator for the configured number. Lift the handset. Dial the group Call-pick-up code. Common Bell u z The Common Bell function allows all extensions of the system (operator included) to pick-up the call from an extension that has been predefined as a Common Bell extension. Lift the handset. Dial the Common Bell pick-up code. Please ask your system administrator for the Common Bell pick-up code. If two or more extensions simultaneously attempt to answer a call from the Common Bell extension, only the first extension will pick it up. The other extensions will receive the number unobtainable tone. This will also happen if you dial the Common Bell pick-up code and there are no calls waiting at the Common Bell extension. BusinessPhone – Analog Telephone 49 Group Features Group Hunting Your telephone can be included in one or several hunt groups. In a hunt group all members are represented with one common directory number. 16 hunt groups can be programmed, each containing 1 to 20 members. A member can be either an extension number, an operator console or a fictive number. Please ask your system administrator if you require this function. Note: The number of cordless extensions in a hunt group are limited to eight (including Tandem configurations). Incoming calls to the hunt group are directed to free extensions in the group. The hunt order within the group can be changed to suit your needs. If all members of the hunt group are busy, an incoming call is being queued. If no one answers this call before the programmed time, the call is forwarded to the programmed answering position (e.g. operator). Note: If all members in a hunt group are busy, the Callback or Intrusion functions are not available. Log in Before you can answer Group Hunting calls, you must log in. 50 u *28* z # To log in to one hunt group: u *28* *# To log in to all hunt groups: Lift the handset and dial. Dial the hunt group code. Please ask your system administrator for the configured number. Press. Lift the handset and dial. Press. BusinessPhone – Analog Telephone Group Features Answer calls Answer Group Hunting calls in the normal way. Log out u #28* z # To log out from one hunt group: u #28* *# To log out from all hunt groups: Lift the handset and dial. Dial the hunt group code. Please ask your system administrator for the configured number. Press. Lift the handset and dial. Press. BusinessPhone – Analog Telephone 51 Other Useful Features Other Useful Features By using these features your productivity will be increased, e.g. you can set Reminders for important meetings, place the costs for external calls on separate accounts and much more ... Tandem configuration The Tandem configuration is a unit, consisting of two telephones using the same directory number. One of the telephones is defined as the Primary and the other one as the Secondary. This function enhances the communication for users that, for example, have a wired phone on their desk (the primary telephone) and need to be mobile within their company’s building with their own portable (the secondary telephone). Basically the Tandem configuration works as follows: u *28# d To activate the Tandem configuration Lift the handset. Dial to log on the secondary telephone. Replace the handset. For incoming calls: • Both telephones are treated as 1 single extension. For outgoing calls: • 52 Both telephones are treated as 2 separate extensions. BusinessPhone – Analog Telephone Other Useful Features u #28# d To deactivate the Tandem configuration Lift the handset. Dial to log off the secondary telephone. Replace the handset. For incoming calls: • The secondary telephone cannot be called and the primary telephone works as a normal stand-alone telephone. For outgoing calls: • ¸ z d Both telephones are treated as 2 separate extensions. Transferring a call between members of a Tandem unit Press. Dial own directory number. Replace the handset. BusinessPhone – Analog Telephone 53 Other Useful Features Reminder u *32* z# The phone can be set to remind you at any time within the next 24 hours (multiple settings are allowed). Lift the handset. Dial. Dial Reminder time and press. (00-23) hour + (00-59) minute. When the time is reached your phone rings with recall signal. Note: If you receive busy tone, your extension does not have the authority to set a Reminder. u #32# Cancel Reminder Lift the handset. Dial to cancel all settings. Doorphone The Doorphone is used to monitor the admission to your company, i.e you can open the doorlock from your phone. u Answering Doorphone calls Lift the handset. You will be in speech connection with the calling party. Opening of the doorlock ¸ z 54 After you have answered the Doorphone, you can open the door by making an inquiry to the door-opener’s directory number Press. Dial the door-opener´s directory number. Please ask your system administrator for the number. BusinessPhone – Analog Telephone Other Useful Features Direct Inward System Access (DISA) If you are working externally and you have the need to make business calls, call your company and use the company PBX to make an external call to the desired party. You just pay the costs for the phone call to your company. The other costs will automatically be placed on your extension number or on a special project. Note: To activate this function, you have to change the default Password from 0000 to a personal one. Which code to use and how to change it, see section “Change Password” on page 46. z z z You can also divert calls from your office extension to your external position, see section “Call Forwarding” on page 29. During the procedure you will be prompted for your Password. Dial the public number of your company. followed by the DISA number. Ask the system administrator for the defined DISA number. Note: If want to register the call on an Account Number, you should use the Account Number procedure before you enter the external number, see section “Account Number” on page 56. Dial the external number. Or: Use the External Diversion function. Procedure, see section “Call Forwarding” on page 29. Note: If you program a new diversion address, remember to reset it when you return to your office. BusinessPhone – Analog Telephone 55 Other Useful Features Account Number An Account Number can be entered to debit telephone costs to different accounts. Depending on the system configuration the Account Number has to be entered from a Verified Account Number list (predefined) or you can invent an own Account Number. The following prerequisites apply: • With the Verified Account Number you can restrict the making of external calls (not a specific number or area), so everyone who is allowed to make external calls will receive an Account Number which has to be used each time he/she wants to make an external call. • Verified Account Numbers contain up to 10 digits. • Own Account Numbers contain up to 15 digits. The Account Numbers can also be used via the DISA function, see section “Direct Inward System Access (DISA)” on page 55. Verified or own Account Number u *9* z# Before an outgoing call: Lift the handset. Dial. Enter Account Number and press. Valid digits 0-9. Internal dial tone. Make the external call. DTMF Tones Note: This function is supported for the Dialog 4106 Basic and Dialog 4147 Medium phone. u z 56 The DTMF function is used to control answering machines or any other telecommunication devices. Lift the handset. Make an internal or external call to reach the desired device. When your call is answered you can continue to dial digits which will be sent as DTMF digits (tone signals) to the called device in order to activate the desired functions. BusinessPhone – Analog Telephone Other Useful Features Networking Networking is the connection of several premises within a company. The connection can be set up via leased lines, public lines, Local Area Network (LAN) or Wide Area Network (WAN). Ask your system administrator about details regarding networking. IP calls IP calls are internal calls sent via an internal data network (LAN or WAN) and the transfer of data and voice is made on the same line. If you are connected to an internal data network the IP connection is made automatically. To minimise the traffic on the network the speech quality is decreased. If the speech quality is not acceptable you can disconnect the IP call and switch to a non-IP call (alternative network). The switch from the IP net to the non-IP net is made during the call, so the call does not have to be disconnected. ¸ *61* If you want to switch to a non-IP net during the call: Press. Dial. During the procedure the other party is put on hold. When the procedure is ready you will receive a special ringing tone and the call is resumed in the non-IP net. Note: A switch to a non-IP call can only be performed if the original call is an IP call, otherwise you will receive a blocking tone. BusinessPhone – Analog Telephone 57 Other Useful Features Least Cost Routing Least Cost Routing (LCR) automatically selects the cheapest way to establish the connection to the desired external number. Please ask your system administrator if this function is installed in your system. If the extension has been configured to use LCR, each external call will be analysed and the cheapest way will be selected. u 0z Use Least Cost Routing Lift the handset. Dial the digit(s) for external call access and the external number. The usual way of making an outgoing external call. Calling Least Cost Routing u z 0z 58 If LCR has been installed in your system, but your extension is not configured to use it automatically, you also have the opportunity to get the cheapest connection by dialling the LCR code before you dial an external number. Lift the handset. Dial the LCR code. Please ask your system administrator for the LCR code. Dial the digit(s) for external call access and the external number. BusinessPhone – Analog Telephone Settings Settings Note: The functions in this chapter are not supported for other analog telephones, only for the Dialog 4106 Basic and Dialog 4147 Medium phone. The Dialog 4106 Basic and Dialog 4147 Medium phones are equipped with a couple of setting options, you can for instance set and adjust a personal volume and ringing signal. Handset and loudspeaker volume ì Use the volume keys. You can set different volume levels for internal and external calls. During a call, adjust handset listening volume in handset mode. Adjust loudspeaker volume in Monitor mode. Press to change the volume. BusinessPhone – Analog Telephone 59 Settings Ringing signal By programming, you can adjust the ringing character and ringing volume. To change the ringing character and volume, you have to enter the programming mode. Programming the ringing character and volume for the Dialog 4106 Basic u ¥ # z The ringing signal character can be adjusted with three different characters, each with another three volume levels. Lift the handset. Wait for the dial tone. Press. Press. Enter Digit from the table below. Digit (character) 1 2 3 4 5 6 (default) 7 8 9 0 Ringing character - Repetition rate 1 time 1 time 1 time 4 times 4 times 4 times 10 times 10 times 10 times None Ringing volume Soft Medium Loud Soft Medium Loud Soft Medium Loud Off Notes: Default setting is digit 6. If you choose 0, the ringing signal will be turned off until the next time you go off hook. ¥ d 60 Please note also that you will not hear the ringing singing signal during programming. Press. The selected ringing signal is stored. Replace the handset to finish the procedure. BusinessPhone – Analog Telephone Settings Programming the ringing character and volume for the Dialog 4147 Medium The ringing signal character can be adjusted with five different characters and three different volume levels. u î 7 z Program Program ringing character: Lift the handset. Wait for the dial tone. Press. Press. Enter Digit from the table below. You can hear the chosen character. Digit (character) 0 1 2 3 4 î d Program Ringing character - Repetition rate 1 time 2 times 4 times 6 times 10 times Note: Default setting is digit 0. Press. The selected ringing character is stored. Replace the handset to finish the procedure. BusinessPhone – Analog Telephone 61 Settings u î 6 z Program Program ringing volume: Lift the handset. Wait for the dial tone. Press. Press. Enter Digit from the table below. You can hear the chosen volume. Digit (character) 1 2 3 î d Program u î 9 0 1 î d Program or Program 62 Ringing volume Soft Medium Loud Note: Default setting is digit 3. Press. The selected ringing volume is stored. Replace the handset to finish the procedure. Switch off/on ringing signal: Lift the handset. Wait for the dial tone. Press. Press. Press. 0=Off and 1=On. Default setting is digit 1. Press. Replace the handset to finish the procedure. BusinessPhone – Analog Telephone Settings Hearing aid compatibility Since your telephone has a built-in inductive coupler for the hardof-hearing, anyone so desiring can use the telecoil in his/her hearing aid while telephoning. To do so, simply switch the hearing aid in the T position. Message Waiting indication Your incoming messages can be indicated by a rapidly flashing Message key. It is well known that the line leads are twisted after installation (the Message Waiting LED will be on when there is no Message Waiting signal and will go off when there is a Message Waiting signal). To solve this problem there are three possible settings for the Message Waiting indication: • STD This setting should be used when no Message Waiting indication is required. This is also the default setting upon delivery. • MW+. Use this position when Message Waiting indication is required and the line cabling is straight. • MW-. Use this position when Message Waiting indication is required and the line cabling is twisted. At the bottom side of your phone: Slide the switch to the required position. Enable/Disable Program key Note: This function is only supported for the Dialog 4147 Medium phone. Via a switch it is possible to enable or disable the program key. When the switch is set in the Off position, no programming is possible (i.e. the memory content is locked). At the bottom side of your phone: Slide the switch to the required position. BusinessPhone – Analog Telephone 63 Settings Headset Notes: This function is only supported for the Dialog 4147 Medium phone. To install the Headset, see section “Installation” on page 68. Headset calls are controlled via the Loudspeaker/Headset key. To enable the Headset functionality, you have to change the Loudspeaker/Headset switch into the Headset position. At the bottom side of your phone: Slide the switch to the required position.  Ä Answer calls Press to answer. Press to end the call. Make calls  z Ä 64 With the handset on hook. Press. Dial the number. Press to end the call. BusinessPhone – Analog Telephone Settings Flash time Note: This function is only supported for the Dialog 4147 Medium phone. u z u î 2 0 1 î d Program or Program Some systems require a different flash time for the R-key. You can set two different flash times (timed breaks). To find out if you have to change the flash time, proceed as follows: Lift the handset. Make a call using any of the services that require R. If you cannot use the service, you need to change the flash time. Change flash time: Lift the handset. Wait for the dial tone. Press. Press. Press. 0=100 ms and 1=600 ms. Default setting is digit 0. Press. Replace the handset to finish the procedure. BusinessPhone – Analog Telephone 65 Settings Alternative programming for Automatic Callback, Camp-on, Intrusion The associated number for using the Automatic Callback, Campon or the Intrusion function may vary from country to country. If you cannot use a code of a function, maybe your exchange system has been programmed with a different associated number. Because this User Guide describes only the default programming, the following table shows the most common settings in some of these countries that are known for a different programming. Austria, Belgium, Brazil, Denmark, Germany Camp-on Automatic Callback Answer calls, another extension Intrusion 66 5 6 8 4 BusinessPhone – Analog Telephone Useful Hints Useful Hints Connections between external lines With your BusinessPhone PBX, you can establish an external call diversion or a conference with more than one external party or transfer an external call to another external destination (e.g. a mobile phone). These features are very useful for everyday business life. Note: When these features are used, your BusinessPhone will occupy at least two external lines. However, there may be disadvantages in connecting to several external lines. We would therefore like to draw your attention to the following: • Please do not transfer external calls to an external Mailbox, to information systems or to external parties before they have answered. • Try to avoid diverting calls to third parties before they have answered. • If you are connected to two external lines, cancel one call by pressing R and 1. If the external parties are not persons (Mailbox, automated information or attendant systems, etc.), connections on external lines can last a long time, which can be costly. Moreover, such calls may occupy two of your system’s external lines. You can restrict connections between the external lines by re-programming your system. Please ask your system administrator or contact our service center for more information. BusinessPhone – Analog Telephone 67 Installation Installation Note: This chapter is only for the Dialog 4106 Basic and Dialog 4147 Medium phone. Install cables Handset cable to the left Handset cable to the right You can put the cable to the handset in the notch underneath the telephone. The cable to the exchange has to be plugged in “LINE” and the handset cable has to be plugged in “HANDSET”. Note: The headset is for use with the Dialog 4147 Medium phone only. Change cables To remove a cable, use a screwdriver to unlock the stop. 68 BusinessPhone – Analog Telephone Installation Install stands and adapt telephone Position high Press to fasten stand BusinessPhone – Analog Telephone Position low Release to remove stand 69 Installation Install card Note: This section only applies to the Dialog 4147 Medium phone. Use the Designation Card Manager to make and print your own designation cards. The Designation Card Manager is included on the Telephone Toolbox CD for BusinessPhone Communication Platform. For more information, please contact your Ericsson Enterprise certified sales partner. 70 BusinessPhone – Analog Telephone Installation Wall mounting The phone can be wall mounted without using a special console. Useful for instance in conference rooms or public areas. 1 Use a screwdriver to remove the handset hook. 2 Turn the hook upside down and insert. 3 Use a screwdriver to remove the two plastic covers. 4 Drill wall holes according to measure. 5 Mount screws according to measures and attach the phone. BusinessPhone – Analog Telephone 71 Installation Placing the telephone • Do not place your telephone on sensitive surfaces. Use a non-slippery pad to protect your furniture from possible damage. • Do not place your telephone near sources of extreme heat, e.g. near the radiator. • Make sure that the line cable isn´t creased. Cleaning the telephone Use a slightly moistened (not wet) soft cloth or an anti-static cloth and wipe off the telephone carefully. Do not use rough cloth, solvents or aggressive cleaning fluids. Any damages of the telephone, that are caused by non-observance of these instructions, are not part of the liability given by the manufacturer. 72 BusinessPhone – Analog Telephone Troubleshooting Troubleshooting This section contains information on how to solve common operational problems. Go through the following steps if you encounter any problems. If this does not solve the problem, contact your system administrator. If others have similar problems, there may be a system error. Fault check list 1. Make sure your telephone is connected to an analog line. 2. Read the Installation chapter. To make sure that you have done everything correctly and that everything is properly connected. 3. Disconnect all extra equipment. If your telephone is working properly when done, the problem lies in the extra equipment. 4. Connect a functioning telephone instead of the faulty one. If that telephone is working properly, the problem is probably in your telephone, contact your system administrator. 5. Check for operational problems. If operational problems are found, the problem is in the telephone network, contact the local telephone service or the local telephone company. BusinessPhone – Analog Telephone 73 Glossary Glossary Abbreviated Number Dialling Initiating a call to a pre-programmed number by dialling a code or pressing a key. Short numbers can be: 1. Common, which means that all extensions can use them. 2. Individual, which means that they are programmed and used by each extension separately (10 numbers). See section “Abbreviated Numbers” on page 20. Account Number To place call costs on an Account Number. See section “Other Useful Features” on page 52. Callback An indication to a busy extension, to inform the person that you want to speak to him/her. See sections “Messages” on page 37 and “Outgoing Calls” on page 15. Camp-on To place (queue) a call to a busy extension. See section “Outgoing Calls” on page 15. Dial-by-Name Initiation of a call by operating a single key. Internal numbers (or Common Abbreviated Numbers) can be stored on each extension. See section “Abbreviated Numbers” on page 20. 74 Direct Inward System Access (DISA) If you are working externally, the DISA function enables you to make external calls (long distance) via the company PBX. You only pay for the call to your company. See section “Other Useful Features” on page 52. Directory number Numbers with 1 – 8 digits which are assigned to extensions or external lines or as common Abbreviated Numbers. Diversion Incoming calls to an extension are diverted to another directory number (extension, Common Abbreviated Number or the operator). There are three possibilities: 1. Direct, which means that all calls to an extension are forwarded directly. 2. On no reply, which means that a call is forwarded if it is not answered within a certain time. 3. On busy, which means that a call is forwarded if the extension is busy. See section “Call Forwarding” on page 29. Diversion Bypass This is useful for letting urgent calls through to an extension where diversion is active. See section “Call Forwarding” on page 29. Extension All telephones connected to the PBX have a unique internal number (up to 3 digits). BusinessPhone – Analog Telephone Glossary Information Internal callers are informed about absence and time of return. External callers are diverted to the operator, where the same information is available. Information can be of two kinds: 1. Pre-programmed text information. 2. Voice information. Intrusion To intrude on an ongoing call when a requested extension is busy. See section “Outgoing Calls” on page 15. Least Cost Routing A function that automatically selects the cheapest way to connect your external call (not necessarily the shortest distance). See section “Least Cost Routing” on page 58. Mailbox The Mailbox system controls the messages that are left for or sent by you when you are absent. See section “Messages” on page 37. Message A message can be sent to any extension. This is useful when you receive the busy tone or get no answer. There are two kinds of message: 1. Call Me message. 2. Voice message. See section “Messages” on page 37. Mute To switch the microphone temporarily off. See section “During Calls” on page 25. BusinessPhone – Analog Telephone Password A four-digit code needed to e.g. block your extension and retrieve messages from the Mailbox system. You can set your own Password. See section “Security” on page 46. PBX Private Branch Exchange. Your telephone switching system (e.g. BusinessPhone 250). Pre-defined text Pre-programmed absent information. See section “Absence Information” on page 34. Third party A third connection (person), which can be included in an ongoing two person conversation. The connection can be internal or external. See section “During Calls” on page 25. Tie line An external line from the private network. Transfer During an internal or external ongoing call you can make an inquiry and then transfer the call to another party (internal or external). See section “During Calls” on page 25 and “Useful Hints” on page 67. Trunk line A trunk line is the same as an external line. Can be either digital or analog. 75 Index Index A Abbreviated Numbers 20 Absence Information 34, 35 Change information 36 Account Number 56 Alternative programming for Automatic Callback, Camp-on, Intrusion 66 Answer calls 13 Automatic Callback 18 B Block extension 48 Busy extension 19 Bypass blocked extension 47 C Call Forwarding 29 Diversion when caller receives busy tone 29 Diversion when there is no answer 29 Fixed Diversion 30 Follow-me 33 Individual Diversion 31 Call Waiting 27 Camp-on 19 Change information 36 Change Password 46 Check and store received messages 42 Cleaning the telephone 72 Common Abbreviated Numbers 20 Common Bell 49 Conference 28 Copyright 5 D Declaration of Conformity 5 76 Description 6 Dialog 4106 Basic 6 Dialog 4147 Medium 8 Signals 12 Tones 11 Dial-by-Name 22 Dictaphone function 45 Direct Inward System Access (DISA) 55 Diversion when caller receives busy tone 29 Diversion when there is no answer 29 Diverted extension 20 Outgoing Calls 20 Doorphone 54 DTMF Tones 56 During Calls 25 Call Waiting 27 Conference 28 Inquiry 26 Monitoring 25 Mute 26 Refer Back 26 Transfer 27 E Enter information Enter information 35 Erase information 36 F Fault check list 73 Fixed Diversion 30 Flash time 65 Follow-me 33 Forward a Voice message 43 BusinessPhone – Analog Telephone Index G Glossary 74 Group Call-pick-up 49 Group Features 49 Common Bell 49 Group Call- pick-up 49 Group Hunting 50 Group Hunting 50 H Handset and loudspeaker volume 59 Headset 64 Hearing aid compatibility 63 I Incoming Calls 13 Answer calls 13 Individual Abbreviated Numbers 21 Individual Diversion 31 Individual Mailbox system 38 Inquiry 26 Install cables 68 Install card 70 Install stands and adapt telephone 69 Installation 68 Cleaning the telephone 72 Install cables 68 Install card 70 Install stands and adapt telephone 69 Placing the telephone 72 Wall mounting 71 Intrusion 19 IP calls 57 L Last External Number Redial 17 Least Cost Routing 58 M Make calls 15 Message Waiting indication 63 Messages 37 Check and store received messages 42 Dictaphone function 45 Forward a Voice message 43 BusinessPhone – Analog Telephone Individual Mailbox system 38 Outcall (External) Notification 40 Password protection 37 Personal Greeting 39 Send Message 44 Monitoring 25 Mute 26 N Networking 57 O Other Useful Features 52 Account Number 56 Direct Inward System Access (DISA) 55 Doorphone 54 DTMF Tones 56 IP calls 57 Least Cost Routing 58 Networking 57 Reminder 54 Tandem configuration 52 Outcall (External) Notification 40 Outgoing Calls 15 Abbreviated Numbers 20 Automatic Callback 18 Busy extension 19 Camp-on 19 Common Abbreviated Numbers 20 Dial-by-Name 22 Individual Abbreviated Numbers 21 Intrusion 19 Last External Number Redial 17 Make calls 15 P Password protection 37 Personal Greeting 39 Placing the telephone 72 R Refer Back 26 Reminder 54 Ringing signal 60 77 Index S Save information 36 Security 46 Block extension 48 Bypass blocked extension 47 Change Password 46 Send Message 44 Settings 59 Flash time 65 Handset and loudspeaker volume 59 Headset 64 Hearing aid compatibility 63 Message Waiting indication 63 Ringing signal 60 Signals 12 78 T Tandem configuration 52 Tones 11 Transfer 27 Troubleshooting 73 Fault check list 73 U Useful Hints 67 W Wall mounting 71 Warranty 5 Welcome 4 BusinessPhone – Analog Telephone Quick Reference Guide Answer calls Diverted extension Answer: Lift handset Answer on another extension: Lift handset Ext. No. # Bypass Call Forwarding: Lift handset Ext. No. 6 Transfer Make calls Transfer a call: Internal calls: Lift handset External calls: Lift handset Line access code External No. Ext. No. Common Abbreviated Number: Lift handset Abbreviated No. Individual Abbreviated Number: Lift handset Abbreviated No. Last external number redial: *** ** Lift handset Messages Call Me: Voice: 09 - You get busy tone or no answer Automatic Callback: Camp-on: Intrusion: Inquiry Ongoing conversation: Refer Back Switch between calls: To terminate: Conference Ongoing conversation: 5 Replace handset Lift handset when called back 4 8 Keep handset off hook Re-record: Send: Receive messages: Call Forwarding Call 3rd party ¸ ¸ 2 1 3 Call 3rd party (To establish) Replace handset (To leave) ? ¸ Call 3rd party Replace handset Before or after answer) 9# 99 * 9 # Speak Speak Lift handset Lift handset Internal Diversion: Lift handset New No. Cancel: Cancel: External Diversion: *59# *21# *21* # #21# *21* * # #21* # Fixed Diversion: Follow-me: ¸ ¸ ¸ Play-back: *60* Lift handset Lift handset New No. Own No. Lift handset Own No. *22* # #22# *22*# Program: Lift handset Line access code External No. Cancel: Lift handset Re-activate: Lift handset All rights reserved. Ericsson Enterprise AB For questions regarding the product, please contact your Ericsson Enterprise Certified Sales Partner. Also visit us on www.ericsson.com/enterprise © Ericsson Enterprise AB 2003 EN/LZTBS 160 1300 R1A Printed on chlorine free paper. Ericsson is shaping the future of Mobile and Broadband Internet communications through its continuous technology leadership. Providing innovative solutions in more than 140 countries, Ericsson is helping to create the most powerful communication companies in the world.