1
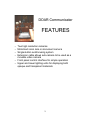
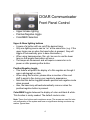
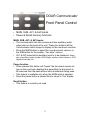
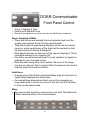
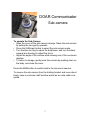
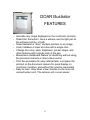
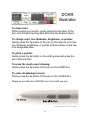
United States Bankruptcy Court
Northern District of Mississippi
DEPS
Digital Evidence Presentation System
FEATURES AND OPERATIONS GUIDE
1
TABLE OF CONTENTS
DOAR Communicator
DOAR Illustrator
3
8
Integrated S-VHS VCR
11
DOAR Wireless Touchscreen Remote
12
Video Image Printer
13
Laptop Display on the DEPS
14
2
DOAR Communicator
FEATURES
•
•
•
•
•
•
Two high resolution cameras
Motorized zoom lens on document camera
Single-button autofocusing system
Extension cable allows sub-camera to be used as a
movable video camera
Front panel control interface for simple operation
Upper and lower lighting units for displaying both
opaque and transparent materials
3
DOAR Communicator
Front Panel Control
•
•
•
Upper & base lighting
Positive/Negative toggle
Color/B&W Selection
Upper & Base lighting buttons
• A press of a button will turn on/off the desired lamp.
• Only one lighting source can be “on” at the same time. (e.g. If the
upper lamps are on when the base button is pressed, they will
toggle off automatically prior to base illumination.)
• When using transparencies, film, etc. be sure to use the lower
lamp so that proper illumination will occur.
• The lamps are flourescent and will require a second or so to
power on after pressing either button.
Positive/Negative toggle
• This feature will permit the display of a film negative as though it
were a photograph or slide.
• When using this function, please allow a member of the court
staff to assist in fine tuning your negative’s appearance.
• Note that this button toggles between positive and negative mode
when pressed
• Also, the base lamp will not automatically come on when the
positive/negative button is pressed.
Color/B&W toggles between the display of color and black & white.
This function is rarely needed. The default mode is color.
Note: These four buttons each contain an arrow. The arrows are used for internal configuration of the system and have no significance during courtroom operation. Ignore them.
4
DOAR Communicator
Front Panel Control
•
•
MAIN, SUB, AV1, & AV2 inputs
Pause & Recall memory functions
MAIN, SUB, AV1, & AV2 inputs
• The communicator has two cameras and two auxilliary audio/
video jacks on the back of the unit. These four buttons tell the
Communicator which image to display on the courtroom monitors
• Press the MAIN button to select the over-document camera, or
the SUB button for the smaller, “free style” camera.
• AV1 & AV2 select which auxilliary input is to be displayed. Examples of auxilliary inputs include a DVD player, another video camera or VCR,
digital microscope, etc.
Pause function
• When pressed this button will “freeze” the document camera image on the courtroom displays thus permitting the document to
be removed from the base without such movements being seen.
• This feature is available only when the MAIN input is selected.
• Press the pause button a second time to return to “live” display.
Recall button
• This feature is currently not used
5
DOAR Communicator
Front Panel Control
•
•
•
Zoom: Telephoto & Wide
AutoFocus & Manual Focus
Note that these buttons are active only when the MAIN input is selected.
Zoom: Telephoto & Wide
• These two buttons are probably the most important and most frequently used controls on the Communicator’s panel.
• Telephoto brings the object being displayed closer. As the camera
zooms in, some repositioning of the object will be required so that
the desired area of interest is displayed.
• Wide adjusts the lens so that more of the object is displayed. This is
sometimes referred to as “zooming out.”
• Any button can either be held down for quick operation or tapped repeatedly for more accurate control.
• Note that while using either zoom feature, the focus of the image
may become blurred. This is normal. When the desired zoom level is
reached, press the Autofocus button.
AutoFocus
• A single press of this button will automatically bring the document or
object being displayed into sharp focus.
• An unusual three-dimensional object may not focus properly on
every detail when a close zoom is used. Use the near & far buttons
to focus on the desired area.
Menu
• The menu button should be used only by court staff. This feature facilitates technical setup of the Communicator.
6
DOAR Communicator
Sub-camera
To operate the Sub-Camera
• Open the cover of the sub-camera storage. Raise the sub-camera
by pulling the lens gently upwards.
• Press the SUB input button to select the sub-camera mode.
• Turn the blue iris ring to adjust the brightness, and turn the black
camera lens housing to adjust the focus.
• Adjust the angle of the camera while viewing one of the courtroom
displays.
• To return to storage, gently lower the camera by pushing down on
the body, and close the cover.
Press the MAIN button to switch back to the document camera.
To remove the sub-camera from the holding bracket and move about
freely, have a courtroom staff member assist as an extra cable is required.
7
DOAR Illustrator
FEATURES
•
•
•
•
•
•
•
•
Annotate any image displayed on the courtroom monitors
Draw from the lectern, have a witness use the light pen at
the witness monitor, or both
Draw freehand or “drop” multiple pointers on an image.
Undo mistakes or clear all notes with a single click
Change line color, style, brightness, pointer shape, and
other features with a single click of the pen.
Bluescreen chalkboard feature for sketching without using
the document camera or other video source
Print the annotation for easy referral later. Just place the
printout on the document camera for quick display on
courtroom monitors, and without the need to reannotate.
Easy to learn. Only takes a few minutes on the more advanced lectern unit. The witness unit is even easier.
8
DOAR
Illustrator
To draw a line:
While looking at a monitor, gently press the tip button of the
pen onto the tablet writing area and draw the desired object.
To change color, line thickness, brightness, or pointer:
Gently press the tip button of the pen on the desired color box,
line thickness, brightness, or pointer and then draw on the tablet’s designated area
To place a pointer:
Gently press the tip button on the writing area and press the
pen’s barrel button.
To erase the most recent drawing:
Gently press the tip button of the pen on the UNDO box
To erase all drawings at once:
Gently press the tip button of the pen on the CLEAR box
Please do not utilize the CONTROL box. Court staff use only.
Note the second button on the pen is not used.
9
DOAR
Illustrator
WITNESS LIGHT PEN
Another component of the DOAR Illustrator is the witness light pen.
This unit functions in much the same manner as the stylus at the lectern, except there is no tablet. Instead, the witness draws on the screen
with the pen.
The lectern stylus and the witness pen can both annotate in near simultaneous fashion. There are several functions that can, but are not required to be performed by the witness as outlined below. Note, however, that each of the witness functions can be performed for the witness from the lectern unit.
The following steps require the pen to touch the screen:
• To draw a line or other shape, press the pen firmly against the
screen on the area desired and drag to draw the shape.
• To change the drawing color, tap the screen quickly while holding the
barrel button, then release the barrel button.
Do not touch the screen with the pen during the following steps
• To erase (undo) the last mark, tap the barrel button once.
• To clear all marks, press and hold the barrel button until all annotations are cleared.
Caution: Any DOAR Illustrator function performed at the lectern tablet will affect the
witness annotation as well. (clear, undo, brightness, etc)
10
Integrated
S-VHS VCR
FEATURES & OPERATION
FEATURES
• Plays S-VHS or VHS tapes.
• Crystal clear S-VHS image when paused.
• Advances forward or backward frame-by-frame by turning
the thumbwheel (a.k.a. jog dial)
• All standard functions controlled by wireless touchscreen remote (except jog function)
• Annotate with DOAR Illustrator as with any other video input.
Simple steps for viewing a video tape
• Press Current Source, then VCR on the touchscreen remote
• Make sure VCR power is on
• Insert a video tape into the VCR
• Press play either on the VCR or the touchscreen remote
To advance one frame at a time while
tape is playing, press the pause button,
then, spin the jog dial (thumb-wheel) to
the right one frame a time.
-OR• To view the tape in slow motion while
tape is playing, press the pause button,
then turn the shuttle dial to the right
and hold it for the desired duration.
•
•
To resume normal tape play, press pause a second time.
NOTE: The shuttle dial surrounds the jog dial
Also note that the VCR only plays tapes. It does not record.
11
DOAR Wireless
Touchscreen Remote
FEATURES & OPERATION
The remote for the Digital Evidence Presentation System (DEPS) is sophisticated, yet simple. It looks like a small television screen and is operated by the touch of a finger. The wireless feature operates with radio
frequency technology which means it can be operated from anywhere in
the courtroom.
In the upper right corner of the touchscreen are two buttons labeled
Publish and Unpublish. These buttons turn on (publish) or off
(unpublish) all of the monitors in the courtroom except for the one on
the Judge’s bench which remains visible at all times.
In the upper left corner there is a button labeled Current Source. There
are four sources of video input into the DEPS- the document camera,
the VCR, laptop computer, and auxilliary. Typically, only the first three
will be used. If the Current Source button is pressed, the touchscreen
changes to allow the selection of one of the four inputs. Simply touch
the desired source and the DEPS instantly switches to it and the touchscreen reverts back to it’s previous state.
Along the bottom are five keys that control the integrated VCR. These
are much like a remote found on a home VCR. Note the absence of a
Record button since the VCR is not configured for recording.
The center button signals the Video Image Printer to start. By touching
this button, whatever image is on the courtroom displays will be printed
on the Video Image Printer. Be careful to press it only once! The printer
paper is not free. Also, don’t hit this button repeatedly. Wait for the
video image printer to finish it’s task.
12
Video Image
Printer
FEATURES AND OPERATIONS
•
The integrated Video Image Printer provides hard copy of
courtroom displays. It is perhaps the easiest component to
operate requiring only a single touch of the remote control.
•
While the printer has several controls on its panel, always
use the remote control to avoid misconfigurations.
•
Within about 60 seconds of pressing the print button a color
hard copy be rendered.
•
It is best to wait until the printout is complete before operating the print function again. Otherwise, undesired multiple
copies can result.
•
After a hard copy is retrieved, it can be placed on the Communicator base and redisplayed. This is particularly useful
when redisplay of an annotation is desired.
13
LAPTOP Computer Display
on the DEPS
FEATURES AND REQUIREMENTS
The DEPS has the ability to display on all monitors the output from
nearly any laptop computer.
The laptop must have an external video port for proper courtroom display. (see picture below) The DEPS has a permanent cable connected
that permits easy laptop hookup right at the lectern.
While usually a simple task, laptop display does require knowledge of
some technical information:
• Optimal DEPS display is acheived with a laptop display setting of
800 by 600 pixels. Check laptop documentation for more information.
• The method used to switch between internal and external video display must be known. This is typically facilitated with a special sequence of keystrokes. Check laptop documentation for more information.
Most laptops have a maximum sustained battery time of less than 2
hours before requiring a recharge. Therefore, it is best to bring the appropriate cable for electrical hookup. There is a spare power outlet on
the back of the Communicator for this purpose.
External video port (VGA)
14