1
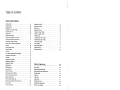
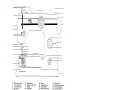
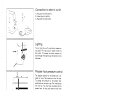
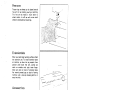
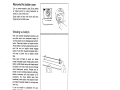
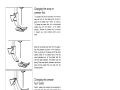
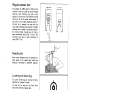
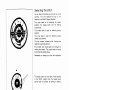
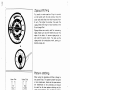
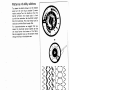
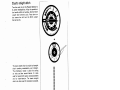
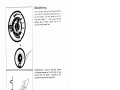
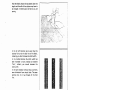
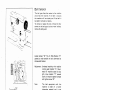
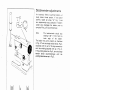
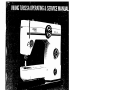
I
We have published the Operation and Service Manual to aid you in the
operation and minor service repairs of your new VIKING TURISSA SEW
ING MACHINE. If. you carefully read this manual, you will be able to make
use of all the sewing possibilities that are available to you.
We hope you will enjoy your VIKING TURISSA and have many pleasant
sewing hours.
VIKING SEWING MACHINE CO., INC.
I
ieM,y
I
(Ci•
Table of contents
OPERATING MANUAL
Accessory box
Blindstitching
Bridging Stitch
Bringing up the lower thread
Buttonhole Knife
Buttonholes
Changing the needle
Changing the presser foot ‘ankle”
Changing the srsapon presser foot
Connection to electric outlet
Correct and incorrect thread tension
Darning
Etastic straight stitch
Extension plate
Free arm
Free .hand monograms and embroidery
Insertion of bobbin case
Lighting
Lowering the feed dog
Meiding and patching
::::: : :: ::: ::::::
Needle position
Qverlock stitch
Pattern stitching
Patterns and utility stitches
Presser foot pressure control
Regular presser foot
Removing the bobbin case
Reverse cycle patterns and utility stitches
Ric rac stitch
Roller presser foot
2
.
5
20
24
9
28
26
6
12
12
4
11
36
19
5
5
37
Selecting the stitch
Sewing on buttons
Shell stitch
Straight stitching
Tension of lower thread
Tension of upper thread .
Thread cutter
Threading the lower thread
Threading the upper thread
Three step zigzag
Twin needles
Winding the bobbin
Zigzag stitching
Zipper presser foot
.
14
29
25
15
10
10
10
S
9
22
7
16
30
4
13
34
SERVICE MANUAL
15
23
16
17
4
13
7
18
18
30
Belt tension
Bobbinwincler adjustments
Bobbinwinder wheel replacement
Change needle
Cleaning
Light bulb
Lubrication
Maintenance hints
Needle plate replacement
Sewing hook clogged
..39
46
47
39
40
45
I
49
45
48
1. Bobbrn Winder Tension
2. Top Thread Guides
3. Thread Take-up Lever
4. Light Switch
5. Face Plate
6. Front Thread Guide
7. Upper Thread Tension
Dial
8. Lower Thread Guide
9, Needle
10. Needle
11. Needle
12. Presser
13. Presser
Clamp
Thread Guide
Bar
Foot Screw
14. Presser Foot
15. Needle Plate
16. Free Arm
17 Shuttle Cover
18.
19.
20.
21.
22.
23.
24.
25,
26.
Shuttie
Thread Spool Pins
Bobbin Winder
Bobbin Winder Stop
Handwheel
Handwheel Release
Stitch Width Selector
Program Selector
Transparent Indicator
27.
28.
29.
30.
31.
32.
33.
34.
Setting Dot
Reverse Feeding Lever
Stitch Length Dial
I-tote for Attaching
Extension Plate
Setting Dot
Drop Feed Dial
Base Plate
Presser Foot Pressure
Control
Connection to electric outlet
I
A. Plug cord into foot control.
B. Attach plug to machine.
C. Plug cord into wall outlet.
c
A
‘I
Lighting
To turn light on or off, press button located on
face plate. The light bulb is located inside the
face plate. To remove the bulb, unscrew the
bulb through the opening at the bottom of the
face plate.
ii
Presser foot pressure control
1’
j
4
—
The pressure control for the presser bar is lo
cated on top of the machine on the left side.
To change the pressure on the presser foot,
press down on the outer ring. The inner section
will move up. You now have no pressure on the
presser foot. As you push down on the inner
section you will increase the pressure. Loose
pressure on the presser foot is used mostly for
sewing on certain types of stretch fabric such
as sweater fabric. Tight pressure on the presser
foot is used for sewing girdle fabrics.
Free arm
Trouser legs and sleeves can be placed around
free arm for easy mending, sewing or patching.
The free arm also makes it much easier to
attach collars and cuffs as well as sew small
children’s clothes and darn stockings.
Extension plate
When you need a larger working surface, attach
the extension plate. To install extension plate
on machine, pull down the leg support, then
position plate around free arm, pulling out
catch on underside with right index finger.
Make sure groove on back of extension plate
fits around projected peg on back of sewing
machine. Lock in place by releasing catch so it
snaps into hole.
—
Accessory box
The accessory box is located under the exten
sion plate. To, remove the accessory box, pull
the box to the left.
5
Needle and thread
Cotton
Sewing
Thread
Synthetic
Thread
No.
No.
60
50--60
40--50
40
30
30
-
Machine
Embroidery
Thread
No.
50
30—50
30--50
Needle
Width
No.
70/10
80/12
90/14
100/16
110/18
120120
Synthetic threads are not generally numbered. Use a
fine needle for fine thread and a heavier needle for
heavier thread.
Your sewing machine uses a type 705 or type
130 needle. This number refers to the length
and configuration of the needle. It is best to
purchase your needles from your dealer. How
ever, if this is not possible due to some emer
gency condition in your locality you can get by
temporarily with what is commonly called a
15x1 needle which is carried in stock by almost
all sewing machine stores or wherever they sell
sewing machine needles.
The above-mentioned needles come in various
widths. And the larger the width number the
larger the eye of the needle.
With regard to the size of the needle it may be
generally said that numbers 80/12 or 90/14 can
be used for most fabrics.
For a finer thread or for sheer or tightly woven
fabrics a finer needle can be used.
For a very heavy or stiff fabric a heavy needle
can be used; the higher the needle number the
heavier the needle. The sizes of thread and
needle to be used are shown in the chart.
Changing the needle
Loosen the needle clamp screw and remove the
needle. When you insert the new needle, turn
the flat side away from you and push the needle
up into the needle socket as far as the stop.
Tighten the screw so that the needle is held
firmly.
6
Removing the bobbin case
Lift or remove extension plate. Bring needle
to highest position by turning haridwheel to
wards you. Open shuttle cover.
Grasp bobbin case latch with thumb arid index
finger and pull out bobbin case.
Winding the bobbin
With one hand hold handwheel stationary and
use other hand to turn handwheel release (A)
(turning towards you) to disengage sewing mech
anism. Place empty bobbin on bobbin winder.
Rotate bobbin on winder pressing down gently,
until the notch on bobbin winder engages
bobbin. Push bobbin towards handwheel and it
will snap in position next to bobbin winder
stop.
Place spool of thread on spool pin. Guide
thread through rear upper thread guide, around
bobbin winder tension and wind thread around
the bobbin a few times. Hold the end of thread
while pressing foot control. Release end of
thread as soon as winding process is underway.
Bobbin winder stop will allow bobbin to fill
completely. Now, •move bobbin away from
handwheel; remove bobbin from bobbin winder
and tighten handwheel release (by turning away
from you).
If you do not wish to completely fill your
bobbin with thread, you may stop any time
during the winding process by moving bobbin
winder spindle to the left.
7
Threading the lower thread
When bobbin is wound, hold it beside the
bobbin case with thread running in direction
of arrow in photo. Slide thread into the slot
on edge of bobbin case as shown. Pull thread
under tension spring. Check to b sure bobbin
rotates in direction of arrow when thread is
pulled.
The hook on top of the bobbin case is used to
increase the bottom tehsion when making
buttonholes or when doing embroidery work.
Before you insert the bobbin case, hook the
thread on the hook on the bobbin case.
Insertion of bobbin case
Grasp bobbin case latch with thumb and index
finger and place on shuttle spindle, with bobbin
case opening on top or nearest the needle.
Press bobbin case to make sure :it is locked
in
place. Release the latch.
8
II
Threading the upper thread
Raise presser bar. Turn handwheel until needle is
in highest position.
Place spool of thread on a spool pin (A).
With circular motion, guide thread through
upper thread guides, rear and front (B & C).
Bring thread down and around tension dial (D).
Now hold spool steady and pull end of thread
upward and over to the right to lock thread
into the thread tension spring.
Insert thread through either eye of take-up
lever (E).
Place thread through front thread guide (F).
Guide thread behind and through lower thread
guide (G).
Slip thread around left hook of needle thread
guide (H).
Thread the needle from the front to the back.
Bringing up the lower thread
Hold the threaded upper thread and turn the
handwheel toward you until the needle goes
down and then up again. When the needle is
in its highest position, pull the upper thread
and you will get a loop of lower thread which
is easy to catch.
You should not pull the upper thread too hard
as this may bend the needle.
Pull the threads (upper and lower) about 6”
(15 cm) toward the rear. If thread ends are too
short, the thread may slip out of the eye of the
needle when you begin to sew.
-
9
Thread cutter
?
—
/
On the back of the presser bar you will
find a
notch, the thread cutter, which mak
es it easy
for you to cut off the threads.
ç</ /•>-.
Tension of upper thread
The dial which regulates the
tension of the
upper thread is graduated from
0 to 5. Your
machine has been tested with
the thread which
accompanies it. It may be nec
essary to adjust
the thread tension somewhat
if you use thread
of another thickness.
For example, a heavier-tha
n-ordinary sewing
thread usually requires a higher
upper thread
tension. To increase the upp
er thread tension,
turn the dial to a higher number
.
Tension of lower thread
10
In most special sewing cases it
is sufficient to
change only the upper thread
tension. Rarely
do you need to adjust the lower
thread tension.
If it is necessary to adjust the
tension of the
lower thread, use the small scre
wdriver from the
accessory box. Fit it in the large
r screw on the
thread tension spring and turn
it not more
than 1/10th of a turn to the
left if the thread
tension is too tight; to the
right if it is too
loose.
Correct and incorrect thread
tension
In order to easily understand the importance
of correct thread tension, you can try different
thread tensions by sewing two thicknesses of
fabric. Begin by using an excessively loose
tension, i.e. you turn the upper thread tension
dial to the left as far as it will go. Look at the
fabric and you will find the lower thread lies
straight and the upper thread is drawn down
into the lower side of the fabric. If you turn
the dial to the right, the opposite occurs. The
upper thread lies straight and the lower thread
comes up in loops on the top of the fabric.
The thread tension is correct when the threads
interlock in the middle of the layers of fabric
(approximately at 3 on the dial). Before starting
to sew, check the tension by sewing on two
thicknesses of the same fabric you intend to
work with.
Corrct
Wrong
Wrong
Before you begin to use the zigzag stitch, check
that the thread tension is the same as when you
did straight stitching. Use a scrap of fabric to
see how the zigzag stitches look if you set them
first on the loosest (upper picture), then on
the higher thread tension (middle picture).
Then finally the correct thread tension will
look about like that in the lower picture. It is
important that you use the same weight thread
on the bobbin as on the spool.
,-,.--
‘<NN’—
Correct
\/\/\/\/\/\i\
11
Changing the snap-on
presser foot
The presser feet which accompany the machine
have the form of loose soles which are held in
place on the presser foot “ankle” by a spring.
To change the presser foot, turn the handwheel
toward you until the needle is in the highest
position. Remove the presser foot by drawing
it toward you while pressing slightly down
ward.
Slide the new presser foot over the front edge of
the ankle bracket as shown in the illustration.
There is a spring on the lower end of the ankle
bracket. Slide on the presser foot so that the
round transverse pin on the presser foot fits
into the space between the bracket and the
spring. Then press lightly backward and down
ward and the presser foot will snap into the
correct position.
Changing the presser
foot ‘nkle”
Certain presser feet cannot be constructed as
loose soles and then the ankle bracket must
also be changed. Make sure that the needle is
in its highest position. Then loosen the re
taining screw with your left hand and remove
the presser foot ankle with your right hand.
12
Regular presser foot
The presser foot (383) which is fitted on the
machine at delivery, is used for normal straight
stitching, zigzag stitching and other: utility
stitches. As you can see, it has different notches
which can be used as guides when sewing. If
you wish to have a seam allowance about
(6 mm), let the material run even with the
outer edge of the presser foot (applies to straight
stitching with the needle in the center position).
By moving one step inwards you will have a
seam allowance of about 5/32” (4 mm). The
innermost notch gives a seam allowance of
about 5/64” (2 mm).
Upper side
L-e- sce
“
2
4
7
Needle plate
Exact seam allowances may be obtained by
using guides on the needle plate which are
measured from needle in CENTER position.
Lowering the feed dog
You lower the feed dog by turning the Drop
Feed Dial to “crosshatch” symbol.
To raise the feed dog turn the Drop Feed
Dial to the symbol for a regular seam.
Lower the feed dog when you sew on buttons,
form closing bars (bar-tacks) and carry out
certain darning work, embroidery, etc.
13
Selecting the stitch
As you face the machine you wifl see two round
controls. The one towards the top of the
machine is the Stitch Program Selector.
The outer scale is for selecting the needle
position, the zigzag width and for making
buttonholes.
The middle scale is used for selecting various
patterns.
The inner scale is used for selecting various
reverse cycle stitches.
The red window indicates which function the
machine is going to perform.
The middle and inside scales are changed by
moving the handle. The outside scale is moved
by turning the outside scale.
Remember to always turn the dial clockwise.
The other control on the right of the machine
is the Stitch Length Dial, the reverse cycle
control and the control for sewing in reverse.
14
Straight stitching
To make a regular straight stitch with the
needle in the center position, turn the outer
scale on the Program Selector so that the middle
o is in the red window. Turn the pattern select
or so that the symbol on the handle is aligned
with the red window. Turn the Stitch Length
Dial to 2. If you wish a longer stitch, move
the control toward 5. If you want a smaller
stitch turn toward 0. To sew in reverse, press
down the lever located on the right of the
Stitch Length Dial. When released, the machine
will resume normal forward sewing.
Needle position
There are three needle positions: left, center
and right. On the outer scale of the Program
Selector you will see a scale from 0 5 in three
different places. The scale with the letter E on
top puts the machine in left hand needle posi
tion (line on left). The middle scale puts the
needle in center position. The third scale puts
the needle in right hand position (line on right).
-
15
Zigzag stitching
Put needle in center position. Align the symbol
on the handle with the red window. Move the
outer scale and select the width required from
to 5. The higher the number, the wider the
zigzag. Select the length of stitch desired on the
Stitch Length Dial.
Zigzag stitches are mostly used for overcasting
edges. Make sure that the needle sews over the
edge of the fabric. A narrow zigzag stitch is
also used for sewing tricot. You also use the
zigzag stitch for embroidery work, sewing on
buttons, snaps, etc.
o
Pattern stitching
Upper Side
Under Side
/LJ
When using the decorative stitches, change to
the pattern foot. The pattern presser foot gives
a more raised seam, thanks to the space behind
the needle-hole on the underside, and should
be used for all close pattern stitching and for
close zigzag stitching. You will find the pattern
presser foot in the accessory box.
16
II
Patterns and utility stitches
To obtain the patterns shown on the middle
scale turn the outer ring to number 5, center
needle position. Turn the handle so that the
desired symbol on the middle scale is lined
up with the red window. Set the Stitch Length
Dial for buttonholes. The stitch length can be
varied by turning the Stitch Length Dial.
For decorative stitches we suggest that you
loosen the top thread tension slightly so that
the knots form on the bottom of the fabric.
We also suggest that you put the bottom thread
through the hook on the bobbin case.
1o
—1
:
Is
I
I
j
1:1
III%
I
I
,
‘‘blib
I
II’
%
•
I
,
I
I
ø
I
I
I
1
..
‘.
I
.
I
I
—
•
I(•••
•
I
I
I%
,
1%
S%
I
%%
I
.
•
%
17
II
Reverse cycle patterns and
utility stitches
The symbols for reverse cycle stitches are on
the inner scale of the Program Selector. Turn
the outer scale so that number 5 in the center
position is in the red window. Turn the handle
so that the desired symbol on the inner scale
is lined up with the red window.
To lock the machine in reverse cycle, hold down
the reverse control and move the Stitch Length
Dial towards the left so that the reverse cycle
sewing symbol lines up with the dot on the
machine. Be sure that when you finish using
the reverse cycle stitch that you unlock the
reverse mechanism by presssing down the
reverse lever, and turn the Stitch Length Dial
clockwise to 0. Release the reverse lever and set
the stitch length at the desired point.
>%i
>I
>%
Ric rac stitch
Setting for pattern No. 1 in illustration.
Turn the outer scale on the Program Selector
to 5, center needle position. Align the symbol
on the handle with the red window. Set the
Stitch Length Dial for reverse cycle.
8
F
Elastic straight stitch
Turn the outer scale on the Program Selector to
0, center needle position. Align the symbol on
the handle with the red window. Set the Stitch
Length Dial for reverse cycle. Press down on
the reverse lever and turn the Stitch Length
Dial to the left.
.
The elastic straight stitch is a triple lock straight
stitch combining stretchability and strength.
The stretchability makes it useful for sewing
on knits and other stretch fabrics. It is also
used for sewing crotch seams, sewing bias seams
and for sleeve insertion. The elastic straight
stitch can also be used for decorative purposes.
Ill
Ill
Ill
III
Ill
Ill
Ill
Ill
III
19
II
Blindstitching
Turn the outer scale on the Proaram S&ector
in
so that No. 3 in the center needle position Is
the
that
so
handle
the red window. Turn the
) lines up with the red
blind hem symbol (
window. Set the Stitch Length Dial O 2:.
Use blind stitch presser foot.
is used• for hemming without
on the right side. As you
showing
stitches
the
it consists of four
sketch,
will see from the
straight stitches and one zigzag stitch.
Blindstitching
:
I
I
I
I
S
I
20
Fold the fabric as shown in the sketch. Both the
length and the width of the stitches may have to
be changed; it depends upon the fabric you are
sewing.
In the far left illustration can be seen how the
stitches fail to reach the fold line of the fabric,
indicating you should increase the stitch width.
In the middle illustration the stitch width has
been increased too much, leading to excessive
“bite”, indicating you should decrease the
stitch width.
In the right illustration is shown how a correctly
sewn blindstitched hem should look. The seam
catches only one or two threads of the fold
line.
Three-step zigzag
so
Turn the outer dial on the Program Selector
is
tion
posi
le
need
r
that number 5 in the cente
the
that
so
le
in the red window. Turn the hand
) on the middle
three-step zigzag symbol (
scale is lined up with the red window. Set the
Stitch Length Dial on number 1.5. This is the
most common size for the three-step zigzag.
You can vary the stitch width and the stitch
length according to the work you are doing.
.
12
‘.4—.
.4—
44-
‘.4‘.422
Three-step zigzag has many advantages over
ordinary zigzag when overcasting. It should
replace the zigzag stitch when overcasting thin
fabrics since ordinary zigzag may tend to cause
the edge of the material to curt.
Thick fabrics may be overcast twice with threestep in order to fasten the coarse threads in the
weave.
Three-step zigzag is even more elastic than or
dinary zigzag. It should therefore be used for
overcasting knit and stretch fabrics, if the seam
is to be pressed open.
Three-step zigzag is also used for sewing terry
cloth, darning and mending.
Overlock stitch
Turn the outer dial on the Program Selector
so that number 5 in the center needle position
is in the red window. Turn the handle so that
the symbol (
) on the inner scale is lined
up with the red window. Set the Stitch Length
Dial on reverse cycle (
). To lock the
machine in reverse cycle, hold down the reverse
lever and move the Stitch Length Dial towards
the left so that the reverse cycle sewing symbol
lines up with the dot on the machine.
Be sure that when you finish using the reverse
cycle stitch that you unlock the reverse mech
anism by pressing down the reverse lever, and
turning the Stitch Length Dial c’ockwise to 0.
Release the reverse lever and set the stitch
length at the desired point.
.0
The overlock stitch is designed to sew together
and overcast the edge in one operation: for ex
ample when constructing a T-shirt, sweater, or
in any place which calls for a %“ seam allow
ance. li you wish, you can cut out the garment
with a wider seam allowance. Sew the seam with
the overlock (remember that the left-hand edge
of the overlock should follow the seam marking)
and then trim the remaining seam allowance
along the stitches, as shown in the picture.
23
Bridging stitch
Turn the outer scale on the Program Selector
so that number 5 in the center needle position
is in the red window. Turn the handle so tnat
) on the middle scale is lined
the symbol (
up with the red window. Set the Stitch Length
Dial between 1 2.
;-‘-
-
The bridge stftch is used for sewing girdle
fabric, terry cloth, sewing on elastic and for
mending and patching.
24
II
Shell stitch
Turn the outer dial on the Program Selector so
that number 5 in the center needle position is
in the red window. Turn the handle so that
the symbol ( ). ) on the middle scaleis lined
up with the red window. Set the Stitch Length
Dial between 2 3.
-
The shell stitch is used to make a decorative
hem in sheer fabric, especially nylon tricot.
To obtain the shell effect, turn a narrow hem to
the wrong side; sew the seam so that the zigzag
stitch goes outside the folded edge. After you
have finished the seam, trim the excess fabric
from the wrong side close to the stitches.
25
Under Side
Upper Side
—r
Buttonholes
oe
In order to sew buttonholes, you should chan
will
over to the buttonhole foot (284>. You
hed
attac
is
it
and
find it in the accessory box
er
in the same way as the regular snap-on press
foot.
In
Loosen the upper thread tension slightly.
the
ing
hook
by
on
crease the bottom tensi
.
bobbin thread on the hook on the bobbin case
The buttonhole will look better, if you use
fine thread.
Mark on the fabric where you want to place
the buttonhole.
Always test sew a buttonhole and adjust the
stitch length setting.
Begin as usual by making sure that the needle
is in the highest position.
Turn the outer scale on the Program Selector
so that A is in the red window. Align the symbol
on the handle with the red window. Set the
stitch length on the buttonhole symbol.
26
S
eww
. . .——
•1
—
—
—
—
—
—-
-
—
first column of zigzag stitching in reverse. If
the stitches are not sufficiently close, reduce
the stitch length slightly. When you have sewn
this column to the right length, stop the
machine with the needle raised Out of the
fabric and turn the dial to B.
I
I
The next step is to form the first closing bar.
Sew 3 4 stitches while holding back the fabric
or lowering the feed dog. Then stop the machine
with the needle raised out of the fabric and
turnthedialtoC.
.
Now sew the other column of zigzag stitching
the same distance as the first one. Stop the
machine with the needle raised out of the
fabric and turn the dial to 0.
I
I
:,
In position D the machine makes the final
closing bar. Make 3 4 stitches while holding
back the fabric or lowering the feed dog, stop
ping the machine with the needle raised. Then
turn the dial to E and lock the threads with
a few stitches while holding back the fabric
or lowering the feed dog. If you lowered the
feed dog, make sure that you raise it after you
have finished.
-
27
I
—
__
Buftonhole knife
C__
The buttonhole knife which you wW find in
the accessory box, is equipped with a safety
cap which, when taken off, can be pushed onto
the back of the knife and thus provides a good
handle.
When you have finished sewing all of the button
holes, it is time to Cut them open. Do this by
piercing the fabric at right angles until tne curved
edge reaches down to the buttonhole.
Then incline the knife more or less parallel to
the fabric and move it carefully forward so as
not to cut through the end of the buttonhole.
Helpful hint:
You can also cut the buttonhole to the middle
and then cut the same way from the other
direction; or, place a pin at the end of the
buttonhole so that you will not cut too far.
28
Sewing on buttons
To sew on buttons, turn the outer scale on the
Program Selector so that number 3 in left needle
position is in the red window. Align the symbol
on the handle with the window. Lower the
feed dog. Use normal thread tension.
Remove the presser foot, put the button in
place and lower the presser bar. Set the Stitch
Width Selector to a suitable setting--about 3;
1/6”
most buttons have a spacing of 1/8”
4 mm) between the holes--turn the hand
(3
wheel towards you and test carefully that the
needle goes through the center of first one
hole and then the other. Depress the foot
control without disturbing the position of the
button. Hold both thread ends behind the
machine and sew 5 6 stitches. Then move to
the other holes and repeat the process if using
four-hole buttons. Set the Stitch Width Se
lector to 0 and lock the thread.
When the button has been sewn on, remember
to raise the feed dog.
-
-
-
29
Roller presser foot
Upper Side
Under Side
The roller presser foot, is suitable for coarseknitted material and certain jersey and stretch
fabrics as well as leather imitations and plastic
materials. The grooved rollers give better friction
against these materials.
Zipper presser foot
The zipper foot can be attached so that it
comes either to the right or to the left of the
needle. This makes it possible to sew on both
sides of the zipper without turning the work.
Usually instructions for inserting a. zipper are
included when you purchase the zipper. How
ever, you may find the following simplified
method easier to follow.
N
30
1.
For this zipper application Ye” seam allowance
is needed. Add if necessary. Sew the seam to
notch for zipper opening. Baste the opening
together with long stitches.
2.
Press the seam open and remove the basting.
3.
Make a stitching from the right side, 3/8” (1 cm>
from one side of the opening.
4.
Change to zipper foot. Place a piece of trans
parent tape to the cloth edge of the zipper,
on the wrong side, so that half the tape edge
comes outside.
31
5.
Take the side of the opening which i not
stitched, and stick it to the taDe, puttinG the
folded cloth edge as close as possibie to the
chain of the zipper. Work from the right slOe.
The tape will serve as basting.
6.
Turn up the seam allowance. Sew in the fold
(press crease), from the wrong side. Sew from
the bottom up, continuing to the top of the
zipper.
7.
Remove the tape.
32
8.
Place the other edge of the opening, where
the stitching is, so that the cloth edge covers
the zipper or chain. Tape together the open
ing from the right side, starting from the bottom
of the zipper.
9.
Fold back the cloth and sew as close as possible
to the stitching on the seam allowance. Sew
from the bottom up. Open the zipper a little
just before the seam is finished. It is easier to
sew when the slide of the zipper doesn’t stand
in the way.
10
Remove the tape and the zipper is attached.
33
Mending and patching
s)
LJ
The three-step zigzag and the bridge stitch are
the most suitable for mending and patching
the majority of materials. This method is called
“quick-mend”. The regular presser foot may be
used. It is naturally better if the thread is of
the same color as the fabric. The stitch length
and stitch width should be adjusted to Suit
the material. To start, try stitch length 1 2 and
stitch width 4 5.
-
‘I—
When mending a rip, bring the edges of the
fabric together and sew them together with
three-step zigzag or bridge stitch. If necessary,
reinforce the rip with a piece of fabric on the
wrong side and sew back and forth once or
twice.
34
When patching a hole, cut out the patch slightly
larger than the damaged area. Place the patch
on the right side; sew around all edges; sew
a second seam inside the first seam. From the
wrong side cut out the damaged area.
A threadbare spot is repaired by sewing back
and forth with three-step zigzag. Usethe reverse
lever. For. every row of stitching, guide the
fabric slightly to the side so that the stitches
cover the entire worn area. If the fabric is
very worn, a piece of the fabric or a lining
may be attached to the wrong side of the
material as reinforcement. Use bandage guaze
as reinforcement material when mending table
cloths, napkins and towels.
•c <
<. <c-<
:
;>
> >
>
—
—
-.
<<,•<
—
)
C
—
>
— <%ç
>>
—
—
>
C
::
_>
<-<:<
_>_>
—
>>,>
<
c
35
Darning
Put the needle in its highest position and re
move the presser foot ankle. Attach the darn
ing foot to the machine making sure that the
arm of the foot rests on the needle screw.
Set the sewing machine for straight stitch as a
wide zigzag stitch might break the needle.
Drop the feed dog. Decrease the top thread
tension slightly.
Darning with the darning foot is done by free
hand and, therefore, requires some practice.
it is easier to darn if the fabric is stretched in
a hoop. When stretched, the fabric should lie
flat on the machine.
Place the hoop under the darning foot. Lower
the presser foot and bring up the lower thread.
Begin by sewing back and forth over the hole
with long stitches. Since the feed dog is dis
engaged, you guide the hoop back and forth by
yourself and thus determine the stitch length.
The faster you move the hoop, the longer the
stitch will be. Keep the machine speed uniform.
Continue in the same manner until threads
have been stitched across the entire hole.
Then turn the work 9O’ and darn across the
hole with short stitches which are obtained
by moving the hoop slowly back and forth.
Keep the machine speed uniform. if the hole
is large, cover it with guaze and then darn as
described above. Darning can also be done
on the bias of the fabric or in circles if this
would be better adapted to the structure of
the fabric.
36
Free-hand monograms
and embroidery
Remove the presser foot including the ankle.
Drop the feed dog. Set the Program Selector
on the center needle position. The width of the
zigzag stitch will depend upon how wide you
wish the monogram to be. Loosen the top
thread tension slightly. Hook the bobbin thread
on the bobbin case hook.
It is easier to monogram if the fabric is stretched
tightly in a hoop. Place the work under the
needle with the fabric touching the arm of the
machine. Bring up the bottom thread. Re
member to lower the presser bar so that you
will have tension on the upper thread.
For most people free-hand embroidery and
monogramming requires some practice. Prac
tice the technique by sewing circles and figures
entirely by free-hand.
First, sew once with a narrower stitch width
and rather high speed on the machine. Then
sew once again, this time with a slightly wider
stitch which covers the first stitching. Move
the work somewhat more slowly than the first
time so that the stitches will be close together.
Machine speed should be rather high.
37
Twin needles
Twin needles are used for forming raised seams
as well as for sewing decorative stitches using
two threads. The twin needle is inserted in the
same way as a regular needle.
When using a twin needle you can use any
design on the middle scale of the Program
Selector. Make sure that the zigzag width is
not set for more than 2; otherwise you will
break the needle. Slowlymove the handwheel
for an entire pattern so that you are sure the
needle will not hit the needle plate. Also check
the stitch length to be sure the stitches are
not too close.
Place a spool of thread on each spool pin.
Thread both threads through the upper thread
guides. Bring each thread around the tension
dial with the threads on each side of the tension
plate. Be sure to lock both threads in the tension
spring. Insert each thread through separate
holes in the take-up lever. Both threads go
through the front thread guide but they sep
arate at the needle thread guides.
Iii
38
I
Service manual
A well-constructed sewing machine like the
TURISSA
usually does not need any major
servicing as long as the machine is kept cleaned
and oiled.
Most problems are usually caused by a blunt or
bent needle. Therefore, the first thing to do if
the machine does not perform properly is to
change the needle. Always use a new needle.
Use System 130/705H.
SERVICE
MANUAL
Change needle
To change the needle, loosen the screw on the
needle clamp. Remove the old needle by pulling
down on the needle. Insert the new needle
with the flat side facing away from you. Push
the needle up as far as it will go and tighten
the needle clamp screw. To make certain that
the needle is correctly inserted always run your
fingernail along the front of the needle; you
should be able to feel the groove of the needle.
When the needle goes down into the fabric
the thread lies in this groove. If the needle is
not correctly inserted with the groove facing
you, the thread will break and no stitches
will be formed.
39
Cleaning
After you have been sewing for some time
lint will collect around the bobbin case. When
this occurs, remove the bobbin case and brush
out the lint with a small brush. Make sure there
is no lint or threads on the shuttle spindle.
____/
Occasionally the machine should be cleaned
more thoroughly depending upon how much
the machine is used and also on the type of
fabric you are sewing. Some fabrics produce
much more lint than others. if this lint builds
up underneath the feed dogs the machine will
not feed the fabric properly.
Remove the needle and the presser foot. In
order to get at the feed dogs, remove the top
of the free arm. This is done by removing the
screw located on the left of the top of the
free arm. Remove the top plate by pulling to
wards the left. Clean away any lint.
Replace the top of the free arm. Make sure that
you tighten up the screw properly so that the
feed dogs will work correctly.
When you are cleaning the machine, check
the tension spring on the bobbin case to be
sure there is no lint under the spring. This will
cause incorrect tension. If there is lint under
the spring remove it with the point of a pin
or needle.
40
Lubrication
In order to serve you satisfactorily, your
new
sewing machine will require oiling like
all other
precision products. Remember: It is
important
that you do not give the machine
too much
oil
two drops at each lubricating point
are
sufficient. Too much oil does not give
better
results; the oil only runs out and may
stain
the fabric.
NOTE: USE ONLY LIGHTWEIGHT,
PET
ROLEUM BASE, ACID-FREE OIL.
This oil is provided in the accessory
box that comes with the machine. If
you should run out, you may obtain
additional oil from your local dealer.
Remove the two screws on the top cove
r and
remove the cover.
Remove the needle and the presser foot.
Remove the screw that holds the top
plate of
the free arm and remove the plate.
Move the face plate and light out of the way.
This is done by loosening but not remo
ving the
two screws which hold the plate. You
get at
these screws from the top of the mach
ine.
-<
2.
o-
•
fl
r4
0
‘
—
(n
0
-‘
Zr
-.
—CD
Zr
-<
ZT
(0
.-,C)
C)
Zr
(D<O
r
Zr (D
Zr
Zr
C)
0)
V)
x
-4
(n
t)
Zr
(03
C-.
(000
Hc:tj
o
dl CD
—
CD0C)
-.
.<0
=
0.
Zr C
D. CD
0
CD
0
CD
3CD
—U
‘
CD
0)
-,
0
CD
2. 3
m 2.
,
CD3cL—
tn
Zr
(flQ)
do
Ou
— ..-+
woo
T
CD
-‘
-.
-
-,
CDCD
-
-‘
CD
p
cr
-.
-.
03(0
U)
-+.
.-+
-.
0)
03
CD
O’
-‘
CD
C
CD
CDc1
-‘
0
03
CD .4
_
0)
0iZ
03
C
1
<
0
C
0
<“ D
0
WD
=-
ot,
0
!P
I”
j4CD
CD
0
r
0
+C0i
-
0
__-.,
CD0)
0<
C 0
C
0
-
C
03
-
o
(fl
C,
, VI .<
()
CDC0OO
—
C
CD
<
CD
CD
0
-+
0)
CO
?c-
-
O
z.
CD
:3__+
0
0
2
oo_
-+
‘-..
Di
C
2. !
CD-
<
(0
x
U)
-+±
CD
O
C
—
-e
CD
-,
0.
;c-_t
O—
rg
CO
:3-
CD
0.
0
0. 0-
C
0)
(00
U)
•g<0)
s•
CD
‘CD
_•‘cn
o
0) 0) -+‘_
-.gr
Belt tension
The belt goes from the motor to the machine
and drives the machine. If the belt is slipping
the machine will run slowly and if the belt is
too tight it will also run slowly.
To remove or adjust the belt, remove the four
screws on the belt guard as the arrows indicate,
remove the belt guard.
EL:
%
Loosen screws “B,” Fig. 2. Slide Bracket “C”
upward to relax tension on belt; downward to
increase belt tension.
Adjustment: Unthread machine; with machine
running puth bracket “C,” down
ward till machine speed is slug
gish; move bracket “C” upward
slowly till machine speed increases
and tighten screws “B”.
Note:
44
The belt equipment with this
machine is made of a nonde
teriorating material and is not
affected by oil or age.
Light bulb
The light bulb is located
inside the face plate.
To remove the bulb, uns
crew the bulb through
the opening at the bottom
of the face plate.
LI
I
—
K
flN_
Needle plate replacem
ent
A bent or broken needle
can damage the needle
plate slot so that even
with a new needle the
thread will continue to
break. To change the
needle plate: Remove the
needle and the presser
foot. Remove the screw
located on the left
side of the top of the
free arm plate. Slide out
the free arm cover plate
towards the left.
Turn the plate upside
down and remove the
two screws on the nee
dle plate. Insert a new
needle plate making sur
e the screws are replaced
tightly. Replace the fre
e arm cover plate.
I,
Under sde
‘\
(.
45
Bobbinwinder adjustments
An incorrectly filled or overfilled bobbrn wiH
cause uneven thread tension. If the bob b
overfills, loosen set screw “A” Fig. 1, anc
turn bobbinwinder stop clockwise. If bobbin
winder stop disengages the bobbin prior to
complete filling, turn counterclockwise.
Note:
The bobbinwinder should stop
winding 1/32” (1 mm) from the
outer edge
of the bobbir..
The bobbin may wind unevenly as illustrated
in Fig. 4. Turn the thread tension device, Fig. 2,
clockwise with the aid of the large screwdriver
until the winding becomes even as in Fig. 3.
If the winding looks like Fig. 5, turn the thread
tension device counterclockwise until the
winding becomes even as in Fig. 3.
46
Bobbinwinder wheel
replacement
It is not likely that you will ever have to replace
the bobbinwinder wheel, but if you do loosen
screws “A” and remove machine top cover.
Remove C-clip at point B; (this may be done
with the large screwdriver included with attach
ments) lift bobbinwinder frame “C” while
holding spring “D” and remove. The rubber ring
may be twisted or cut off; stretch new rubber
ring over pulley. Reinstall bobbinwinder frame
with spring; insure that the end of the spring
engages slotted area of the bobbinwinder frame
and mounting bracket. Attach C-clip.
p
47
I
Sewing hook clogged
(machine locked)
Remove the needle and unthread the machine.
Rotate handwheel backwards (away from you).
After sewing hook is free, remove any threads
around the hook or around me shuttle spindle.
Clean away any lint and oil the hook.
48
Maintenance hints
Unattractive seams
A. The needle is not correctly inserted.
B. The needle is bent or blunt.
C. The thread tension is incorrect.
D. The machine is incorrectly threaded.
E. The needle, thread and fabric do not
correspond.
F. The lower thread is not of the same
quality or thickness as the upper thread.
G. The bobbin is incorrectly inserted in
bobbin case.
H. Lint or thread is wrapped around the
spindle of the sewing hook.
I. Using incorrect sewing foot.
J. The bobbin may be over filled, causing
a tight lower tension.
K. Bobbin wound unevenly.
Needle breaks
A. The needle is incorrectly inserted.
B. You may have been pulling the fabric
when sewing. The needle can easily de
flect against the needle plate and be
broken.
C. Bobbin wound too full.
49
Upper thread breaks
A. The needle is incorrectly inserted.
B. The needle is bent or blunt.
C. The needle groove or eye has too sharp
of an edge.
D. The needle and thread do not correspond.
E. The needle plate slot is damaged and has
sharp edges.
F. The upper thread is incorrectly threaded.
G. The upper thread tension is too tight.
H. Poor quality thread may be knotted.
I. Thread is entangled on the spool pin.
-
Lower thread breaks
A. The bobbin case is incorrectly inserted.
B. The lower thread is incorrectly threaded.
C. The lower thread tension is too tight.
D. The bobbin is wound too full.
E. The needle plate slot is damaged and has
sharp edges.
F. Lint or thread is wrapped around the
shuttle spindle.
G. Bobbin is bent or has sharp edges.
Lower thread not brought up by upper thread
A. The needle is incorrectly inserted.
B.. The needle is bent.
C. Incorrect needle system: use System
130/705 H.
50
Uneven tensions
A. Upper and lower threads not of same
weight.
B. The sewing thread is of poor quality.
C. The needle, thread and fabric do not
correspond.
D. Thread tension, upper and lower may
be unbalanced.
Fabric puckers
A. The upper thread tension is too tight.
B. The upper and lower thread are of dif
ferent thickness.
C. The needle, thread and fabric do not
correspond.
D. The needle may be blunt.
E. Using incorrect presser foot.
Stitch length varies
A. Using incorrect presser foot.
B. The feed dog clogged by dust and lint.
Skipped stitches
A. Needle is incorrectly inserted.
B. Needle is bent or blunt.
C. Incorrect needle system; use System
130/705 H
D. Upper thread incorrectly threaded.
E. The needle, thread and fabric do not
correspond.
F. Using incorrect presser foot.
G. Using different size and quality of thread
for the upper and lower thread.
51
Machine does not feed fabric
A. The stitch length dial set on 0; adjust 1 5.
B. The feed dog is lowered, raise by turning
the feed dog dial to the straight stitch
symbol.
C. The feed dog teeth are clogged with lint.
D. Using improper sewing foot.
E. Pressure on the presser foot released or
too loose.
-
Machine does not sew the stitch indicated
A. Controls have incorrect setting; refer to
operating manual for correct stitch setting.
Machine runs sluggishly
A. The feed dog teeth are clogged with lint.
B. Dirt or lint in the sewing hook or the
bobbincase.
C. The outlet voltage is too low.
D. Drive-belt too tight or too loose.
E. Oiling required.
Machine will not run
A. Hand wheel release not tightened.
B. Bobbinwinder is engaged.
C. Machine not plugged into electrical
out let.
52