1
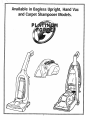
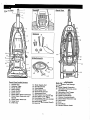
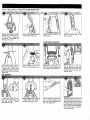
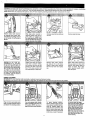
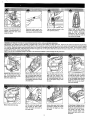
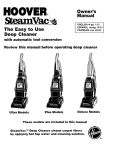
OWNER'S MANUAL
Operating and Servicing
instructions
Please read these
instructions carefully before
using your Platinum Force" Extractor.
Let us help you put your
cleaner together or answer
any questions, call:
1-800-321-1134 (USA & Canada)
www.dirtdevil.com
For quick reference, please record your vacuum
information below.
Model #:
Mfg. Code:
(Mfg. code located on the lower backside of cleaner)
02001 All rights reserved # 1-700991-000
610 1
Available in Bagless Upright, Hand Vac
and Carpet Shampooer Models.
CONGRATULATIONS
You are now the proud owner of a Dirt Devil@Platinum ForceT"Carpet Shampooer. Its unique
design has two revolving brushes and two suction nozzles for twice the cleaning power. The brushes rotate in opposite directions to clean all sides of the carpet fiber. The nozzles pick up the dirty
water before it has a chance to soak your carpet backing and padding.
The Platinum Force'" Carpet Shampooer also comes equipped with a separate shampoo tank that
holds over 16 ounces of Dirt Devil@Carpet Shampoo. This means no more measuring and the
right amount of soap is automatically mixed with the clean water as it is dispensed. You can also
conveniently turn the soap off for a clean water rinse cycle. No soap residue is left behind so your
carpets stay cleaner longer.
We are very proud of our products and hope that you are equally satisfied with their quality and
performance.
Thank you for your support of Dirt Devil@products.
Visit our website at www.dirtdevil.com
TABLE OF CONTENTS
Safety Instructions . . . . . . . . . . . . . . . . . . . . . . . . . . . . . . . . . . . .Page 4
Feature Descriptions . . . . . . . . . . . . . . . . . . . . . . . . . . . . . . . . . . .Page 5
Preparing Carpet/Upholstery . . . . . . . . . . . . . . . . . . . . . . . . . . . . .Page 6
How To Assemble . . . . . . . . . . . . . . . . . . . . . . . . . . . . . . . . . . . ..Page 7
Toolstorage . . . . . . . . . . . . . . . . . . . . . . . . . . . . . . . . . . . . . . . . Page7
.
Attachment Assembly . . . . . . . . . . . . . . . . . . . . . . . . . . . . . . . . . .Page 7
How To Operate . . . . . . . . . . . . . . . . . . . . . . . . . . . . . . . . . . . . . .Page 8
Remove and Replace Clean Water Reservoir . . . . . . . . . . .Page 8
Remove and Replace Soap Tank . . . . . . . . . . . . . . . . . . . . .Page 8
Carpet Cleaning . . . . . . . . . . . . . . . . . . . . . . . . . . . . . . . . .Page 8
How To Transport Cleaner . . . . . . . . . . . . . . . . . . . . . . . . . .Page 9
Attachmentusage . . . . . . . . . . . . . . . . . . . . . . . . . . . . . . . .Page9
Attachment Removal . . . . . . . . . . . . . . . . . . . . . . . . . . . . . .Page 10
Emptying and Cleaning Dirty Water Tank . . . . . . . . . . . . . . . . . . . .Page 10
Belt or Brushroll Removal and Replacement . . . . . . . . . . . . . . . . .Page 11
Troubleshooting Guide . . . . . . . . . . . . . . . . . . . . . . . . . . . . . . . . . .Page 12
LIMITED WARRANTY
To the consumer, Royal Appliance Mfg. Co. warrants this vacuum cleaner to be free of defects in materlal or workmanship commencing upon the date of the original purchase. Refer to your vacuum cleaner carton for the length of warranty and save your original sales receipt to validate start of warranty period.
If the vacuum cleaner should become defective within the warranty eriod we will re air or replace any defective parts free of charge. The corn lete machine must
be delivered &to
any ROYALmAuthorized Sales & Warrant !ervcie Station. Lease include complete description of the prol?lem, day o f
copy of
original sales recei t and our name. address and telephone nuder. If you are not near a Warranty Station, call the factory for assistance ~nthe USA 8 CANADA:
1-8CO-32l-llN.s e on& genuine Royalereplacement parts.
The warranty does not include unusual wear, damage resulting from accident or unreasonable use of the vacuum cleaner. This warrant does not cover brushes.
b? s, filters. bulbs or fan dama e This warranty doer not cover unauthorized repairs This warranty giver you specific legal rights andl you may also have other
rlgits. (Other rights may vary 80'm state to state in the USA).
-3
THIS CLEANER IS INTENDED FOR HOUSEHOLD USE ONLY
IMPORTANT SAFETY INSTRUCTIONS
W h e n you u s e an appliance, basic precautions should b e followed, including the following:
READ ALL INSTRUCTIONS BEFORE USING THE APPLIANCE.
ALWAYS FOLLOW THESE SAFETY INSTRUCTIONS.
BRING CLEANER TO UPRIGHT POSITION WHEN USING THE HOSE AND ATTACHMENTS.
DO NOT LEAVE CLEANER UNATTENDED WHEN PLUGGED IN.
WARNING: DO NOT USE SHARP OBJECTS TO CLEAN OUT THE HOSE SINCE THEY COULD CAUSE DAMAGE.
OCCASIONALLY REMOVE BRUSH AND CLEAN DEBRIS FROM END CAPS TO KEEP BRUSH ROTATING SMOOTHLY.
WARNING FULLY ASSEMBLE CLEANER BEFORE OPERATING.
-
READ ALL INSTRUCTIONS BEFORE USING THE APPLIANCE.
WARNING: TO REDUCE THE RISK OF FIRE,
ELECTRIC SHOCK OR INJURY:
Connect to a properly grounded outlet only. See Grounding Instructions.
Do not leave appliance when plugged in. Unplug from outlet when not in use and before servicing.
Do not use outdoors. Electrical shock could occur.
Do not immerse. To reduce the risk of electric shock - use indoors only, and use only on carpet moistened by cleaning process.
Do not allow to be used as a toy. Close attention is necessary when used by or near children.
Use only as described in this manual. Use only manufacturer's recommended attachments.
Do not use with damaged cord or plug. If appliance is not working as it should, has been dropped, damaged, left outdoors,
or dropped into water, return it to a service center for inspection. Call 1-800-321-1134 for the nearest service center.
Do not pull or carry by cord, use cord as handle, close a door on cord, or pull cord around sharp edges or corners. Do
not run appliance over cord. Keep cord away from heated surfaces.
Do not unplug by pulling on cord. To unplug, grasp the plug, not the cord.
Do not handle plug or appliance with wet hands.
Do not put any objects into openings. Do not use with any opening blocked; keep free of dust, lint, hair, and anything that
may reduce air flow.
Keep hair, loose clothing, fingers, and all parts of body away from openings and moving parts.
Do not pick up anything that is burning or smoking, such as cigarettes, matches, or hot ashes.
Do not use without dirty water reservoir in place.
Turn off all controls before unplugging.
Use extra care when cleaning on stairs.
Do not use to pick up flammable or combustible liquids, such as gasoline, or use in areas where they may be present.
Keep the vacuum cleaner on the floor. Only the hand-held vacuum cleaners may be set on furniture.
Turn off the rotating brush when doing above floor cleaning.
Do not use an extension cord with this vacuum cleaner.
Store the vacuum cleaner indoors. Put the vacuum cleaner away after use to prevent tripping accidents.
Using improper voltage may result in damage to the motor and possible injury to the user. Proper voltage is listed on the
cleaner plate.
Use only Dirt Devil" Carpet & Rug Shampoo.
SAVE THESE INSTRUCTIONS
GROUNDING INSTRUCTIONS
This appliance must be grounded. If it should malfunction or breakdown, grounding provides a path of least
resistance for electric current to reduce the risk of electric shock. This appliance is equipped with a cord
having an equipment-grounding conductor and grounding plug. The plug must be inserted into an appropriate outlet that is properly installed and grounded in accordance with all local codes and ordinances.
WARNING
Improper connection of the equipment-grounding conductor can result in a risk of electric shock. Check with a qualified electrician or service person if
you are in doubt as to whether the outlet is properly grounded. Do not modify the plug provided with the appliance - if it will not fit the outlet, have a
proper outlet installed by a qualified electrician.
This appliance is for use on a nominal 120-volt circuit and has a grounding attachment plug that looks like the plug illustrated in the sketch.
Make sure that the appliance is connected to an outlet having the same configuration as the plug. No adapter should be used with this appliance.
4
Back View
Front View
:#3
I Screws
21
I
Attachments
Front View1 Handle1 Screws
Handle Grip
Solution Trigger
Brush OnlOff
Soap OnlOff
Power OnlOff
Screw Cover
Clean Water Reservoir Release
Clean Water Reservoir Carry
Handle
9. Clean Water Reservoir
10. Soap Tank
11. Drain Cap
1.
2.
3.
4.
5.
6.
7.
8.
12. Water Supply Port
13. Dual Brushrolls
14. Front Nozzle
15. Dirty Water Tank
16. Floor~ToolsDiverter
17. Attachment Door
18. Dirty Water Tank Handle
19. Dirty Water Tank Nozzle Tab
20. Dirty Water Tank Latch
21. Front Handle Screws (Large)
22. Back Handle Nuts
23. Back Handle Screws (Small)
Back ViewlAttachments
24. Detachable Tool Storage
25. Hose
26. Water Supply Connector
27. Upholstery Tool (may come
pre-attached)
28. Upholstery Tool Trigger
29. SolutionIHose Clip
30. Quick Cord Release
31. Cleaner Carrying Handle
32. Clean Water Reservoir Cap
33. Hose Clips
34. Cord
35. Cord Wrap
36. Handle Release Pedal
PREPARING THE CARPETIUPHOLSTERY:
IMPORTANT: DO NOT USE THE PLATINUM FORCETMEXTRACTOR AS A DRY VACUUM.
1. Vacuum carpevupholstery thoroughly. Use a Dirt Devil" vacuum cleaner with a revolving brushroll for best results.
2. Vacuum upholstery with cleaning tool attachments, using a crevice tool to reach into folds and creases.
3. Remove as much furniture from the room as possible. If unable to remove the furniture, place plastic or foil under and around the legs
until the carpet has dried completely.
CHECK CLEANING CODE ON UPHOLSTERY:
NOTE: I f upholstery is not marked, seek professionalassistance.
Use only on upholsterylfabric marked:
- W (wet clean)
- SNV (soIvenUdry or wet clean)
Do NOT clean upholstery/fabricmarked
- S (solventtdry clean only).
Check the cushion foam color. If the foam is a dark color, it may
bleed through and discolor the fabric.
CHECK FOR COLOR FASTNESS:
Before cleaning carpeUupholstery, test for color fastness. Dampen a white cloth with solution. Test a small area in a closet or under a cushion. Gently rub the cloth over the area. Check each color for color bleeding. If the cloth remains clean, it should be safe to clean the carpeuupholstery.
HELPFUL HINTS FOR CLEANING CARPETfUPHOLSTERY:
1.
2.
3.
4.
5.
6.
7.
8.
Do not oversaturate carpethpholstery with cleaning solution while using Platinum Force'" Extractor.
For heavily soiled areas, additional applications may be necessary.
Allow plenty of time to dry carpeUupholstery thoroughly.
Wipe cleaning solution from woodwork and wood to prevent any damage.
Try not to walk on carpet until it is completely dry.
After carpet is thoroughly dry, vacuum the carpet using a cleaner with a revolving brushroll.
Before cleaning, determine where you will start and end, making sure not to walk over previously cleaned areas.
Rinse carpets to remove soap residue and to keep your carpets looking cleaner, longer.
AFTER CLEANING:
Allow carpet to dry completely. Try not to walk on the carpet until it is dry.
If you need to walk on the carpet, place white towels on the areas you want to walk.
If the carpet is not dry and the furniture must be placed back in the room, use plastic or foil under the furniture to prevent staining
the carpet.
Thoroughly clean the dirty water tank with hot tap water. See page 10.
WARNING:
DO NOT STORE PLATINUM FORCE" EXTRACTOR IN GARAGE OR
AREA WHERE UNIT COULD FREEZE.
iemove your Platinum Force'"
ixtractor from the carton with cauon. The handle is connected to
l e body by a cord. NOTE: DO
JOT tug or pull on cord.
Line up upper handle with lower
handle and push into place.
Secure from back with the two
smaller screws.
Feed cord through slots on the
back of handle.
CLEAN WATER RESERVOIR
'lace nut into recess in back of
lpper handle (5a). While holding nut
i place, insert LARGE screw
irough front of upper handle and
ghten. Repeat process with second
ARGE screw.
Remove backing of tape on the
screw cover and press into place.
NOTE: Make sure soap tank is resting in place with the solution tube
firmly pressed into tube opening.
Line up grooves of clean water
reservoir with support posts inside
of handle. Tilt top of clean water
reservoir inward and push until it
locks into place.
Slide tool caddy down until secured
in place. NOTE: Tool caddy is
removable for storage on wall.
Connect upholstery attachment to
end of hose by pressing until it
clicks into place (Upholstery tool
may come preattached).
Push upholstery attachment into left
hose clip, wrap hose around tool
caddy starting on the back groove
of storage caddy. Secure into place
by pushing end of hose into hose
clip on right. Press solution/hose
clip onto hose to secure solution
tube into place (4a).
-0OL STORAGE
-0 install tool caddy, line up
lrooves of tool caddy storage with
ound tabs on back of handle
above quick cord clip).
WARNING: USE ONLYDIRT DEWp CARPETAND RUG SHAMPOO. USING OTHER CLEANING SOLUTIONS MAYCAUSE EXCESlVE FOAMING. EXCESSIVE
FOAM WILLCAUSE THE FLOATTO SHUTOFF THE VACUUM PREMATURELY. USING OTHER SOAPS WILLVOID YOUR WRRANTY
NOTE: Never leave unit unattended with pcwer on. Turn OFF when emptymg and f/hg-resevoirs. Do NOT oversaturate the carpet.
Remove clean water reservoir
by pressing clean water reset
voir release and pulling reservoir
by the handle. Put to the side to
fill later.
While clean water reservoir is
removed, loosen soap tank by
gently pulling out solution plug
from plug opening. NOTE: Soap
tank can be filled while still on the
Remove soap tank by pulling up
and out.
Remove soap tank cap.
CAUTION: DO NOT OVER FILL.
LEAVEABOUT114"-112" AIR SPACE.
Fill tank with Dirt DeviPCarpet and
Rug Shampoo. NOTE: One fill-up of
the soap tank will last approximately
four (4) clean water reservoir fillups. Cleaner can be stored between
uses with soap in soap tank, it does
not need to be removed after each
use. However, soap tank should be
rinsed out periodically.
Replace soap tank cap. Return
soap tank to cleaner making
sure solution tube lines up with
groove in the back of the soap
tank. Firmly press solution tube
into plug opening of soap tank.
Remove clean water reservoir
cap and put into a safe place.
Slowly fill clean water reservoir
with hot tap water and replace
cap.
Return clean water reservoir by
lining up grooves of clean water
reservoir with support posts on
inside of handle. Rock clean
water reservoir inward until it
locks into place.
CARPET CLEANING
IMPORTANT: For best cleaning results use steady, moderate forward and backward motion.
Plug cord into a grounded outlet.
Step on handle release pedal to
put cleaner into cleaning position.
Turn main power switch, brush
switch and soap switch all to the
ON position. NOTE: See top of
page 9 for \erious switch functions.
To spray cleaning solution,
depress solution trigger (3a) and
move cleaner backward and forward (3). Release trigger and
push unit back and forth in same
path to remove dirty water and
solution from carpet. For heavily
soiled areas, repeat if necessary.
A
To rinse your carpet tunsoap
switch to the OR position. Repeat the
same process (as in step 3)with the
water as you did with the cleaning
solution When dirty water reaches
the max fill line on dirty water tank,
empty dirty water (see page 10).
NOTE: If too much water is picked up.
a float will shut off suction to the
flm~
Empty tank and rtpbce, and
continue cleaning.
POWER
ON
ON
ON
ON
OFF
BRUSH SOAP
RESULT
ON
ON
OFF
OFF
Vacuum, pump', brushroll and soap are turned on.Used to shampoo carpets.
Vacuum, pump* and brushroll are turned onused to rinse carpets.
Vacuum, pump' and soap are turned on. Used for cleaning through attachments.
Vacuum and pump' are turned on. Used for rinsing through attachments or dirty water pick-up
with brushroll off.
No power to vacuum,pump*, b ~ s h r o lor
l soap. For any motors to energize the power switch must be on.
ON
OFF
ON
OFF
ONIOFF ONIOFF
'Pump will be actuated by pulling solution dispensing trigger
Grasp the carrying handle on
the back of cleaner to trans
port from room to room. Do not
pick cleaner up by the clean
water reservoir handle.
Put cleaner in its upright position. Turn brush switch and
powerswitch to the off position.
Remove hose from its stored
position on the back of the
cleaner. Lift tool door located on
the top of the dirty water tank.
Flip the floor/tools diverter to the
tools (downward) position.
To shampoo upholstery, be sure
brush switch isOFF, powerand
soap switches are turned ON
NOTE: Do not wersaturate the
upholstely.
Insert end of hose into tool opening and twist clockwise until it
locks into place.
L
Attach water supply connector
to water supply port and press
firmly until it locks into place.
I
While depressing blue solution spray trigger, pull attachment in a backward
motion. Release trigger and push attachment forward in same path to
remove dirty water and solution from upholstery. For heavily soiled areas,
repeat if necessaryTo rinse, remember to turn soap switch to the OFFposi
tion and repeat process.NOTE: Make sure upholstety is thoroughly
before use
Remove hose from tool door by
twisting counterclockwise to
unlock. Close tool door until it
snaps into place.
Disconnect water supply connector from water supply port by
pressing gray button and pulling.
Flip the tool/floor diverter to the
floor (upward pcsition).
Return tools to their storage
position on back of cleaner (see
page 5). NOTE: Upholstery
attachment can be r e m o ~ d
from hose to clean the inside of
the tool prior to storage
-
WARNING:TO REDUCE THE RISK OF INJURYFROM MOVING PARS UNPLUG BEFORE SEWICING.
IMPORTANT: Your Platinum ForceTMExtractor is equipped with a shut off valve within your dirty water tank. When the dirty water tank becomes full, the float
(viewed from the side of the tank) will rise, shutting off the air flow through the nozzle. For best results, use smooth, steady motion keeping the nozzle flat against
the carpeting. lipping the cleaner and breaking the seal of the nozzle and carpeting will cause the float to rise and shut off the suction. Once the float is aotivat
ed, empty the dirty water tank. If the dirty water tank does not appear full, turn the power switch off and wait for the float to settle and reset. If the float repeated
ly shuts off the suction, empty the dirty water tank.
NOTE: You will hear a noticeable change in the pitch of the cleanerThis indicates a need to empty the dirty water tank.
Depress dirty water tank latch (1)
and simultaneously pull dirty
water tank nozzle tab up and
away from cleaner (la).
Remove dirty water tank by lift
ing on the dirty water tank han
dle and pulling tank out of base.
NOTE: Nozzle does not need to
be completely removed to empty
dirty water tank.
Place the dirty water tank over a
large sink and remove dirty
water tank cap by twisting to the
left (counterclockwise) and put
into a safe place. Empty water
into sink.
Dirty water tank can be rinsed
out with hot tap water to remove
any remaining debris. Wipe and
let dry thoroughly before storing
to prevent mildew from forming.
NOTE: DO not use any chemi
cals when cleaning.
Return dirty water tank cap.
Lift dirty water tank handle and
pull out filter to clean. Rinse
under hot water and return to
dirty water tank.
Return dirty water tank to base
of cleaner by tipping the nozzle
down into the b y i n and drop
into place.
Lift front base of cleaner off cafe
peting with one hangline up the
black tabs with the grooves of
front nozzle. Lift front nozzle
upwards towards cleaner and
press under latch until it locks
into place.
in
BELT STYLE: 4
Remove dirty water tank and
front nozzle (see page 10) put to
the side.
Use a Phillips screwdriver to
remove two (2) screws.
Remove belt cover. Remove
broken belt. NOTE: Diagram of
belt placement on motor cwer.
1. Loop belt around rear shaft. 2. Loop the top of the belt above the top small pulley and the bottom
of the belt below the lower small pulley. 3. Feed the entire belt over the first large pulley. 4.Loop the
belt around the front large pulley and rotate the front brushroll forward until the belt is in placB1OTE:
Make sure entire belt stays on top of the first large pulley by lightly placing finger on top to guide it.
Remove screw that holds
brushroll in place.
Tilt cleaner off carpet. Grasp
brushroll and pull the right
side out of its chamber. Tilt
brushroll down to ground and
remove silver cap. Slide worn
brushroll out of cleaner.
II new brushroll: Feed the
brushroll through the opening (3)
until the screw plate and screw
hole are lined up (3a). NOTE:
The black cap behind the silver
screw plate will be through the
hole.
J
Replace silver cap to right
side of brushroll. Lift brushroll
up and align with brushroll
chamber. Push screw plate
towards the screw hole until
flush and replace screw.
,
-
WARNING: TO REDUCE RISK OF PERSONAL INJURY UNPLUGI CLEANER BEFORE SERVICING
Problem
Possible Reasons
Possible Solutions
Cleaner won't run
1. Power cord not firmly plugged into outlet.
2. Blown fuse or tripped breaker.
3. Needs service.
1. Plug unit in firmly.
2. Check fuse or breaker. Replace fuselreset breaker
3. Take to service center or call 1-800-321-1134.
Cleaner won't pick-up
or low suction
1. Nozzle hose attachment door not closed.
2. Dirty water tank is not installed correctly.
1. Close nozzle hose attachment door-Pg. 9.
2. Review Dirty Water Tank Removal and
Replacement-Pg.10.
3. Review Dirty Water Tank Removal and
Replacement-Pg.10.
4. Flip diverter to proper position-Pg. 9.
5. Empty Dirty Water Tank-Pg. 10.
6. Replace brushroll-Pg. 11.
7. Replace belt-Pg. 11.
8. Remove hose; remove obstruction.
9. Remove hose and clean inlet.
3. Nozzle not installed correctly.
4. FloorlTools diverter in wrong position.
5. Dirty water tank is full.
6. Brushroll worn.
7. Broken or worn belt.
8. Nozzleldirt passage clogged.
9. Clogged hose inlet.
/
Water escaping from
cleaner
1. Empty Dirty Water Tank-Pg. 10.
2. Review Dirty Water Tank Removal and
Replacement-Pg. 10.
3. Review Hose Installation-Pg.9.
4. Review clean water reservoir installation-Pg. 8.
1. Dirty water tank is full.
2. Dirty water tank is not installed correctly.
.f
3. Hose not installed correctly.
4. Solution reservoir not installed properly.
Cleaner attachments
won't pick up
1. Hose is clogged.
4. Dirty water tank is full.
1.
2.
3.
4.
Cleaner attachments
won't spray
1. Water supply hose not connected properly.
1. Connect to water supply port-Pg. 9.
Cleaner won? dispense
solution
1. Solution reservoir not installed properly.
1. Review Solution Reservoir Installation-Pg. 8.
No soap dispensing
1. Pick up tube orifice plugged.
1. Clean pick up tube orifice in soap tank by wiping
with hot rag or soak end of tube in hot water.
2. Fill soap tank with Dirt DeviPCarpet and Rug
Shampoo-Pg. 8.
3. Turn soap switch to the ON position-Pg. 8.
inlet clogged.
-.
_ _ 3.2. Hose
FloorlTools diverter in wrong position.
Remove hose and tools; remove obstruction-Pg. 10
Remove hose and clean inlet.
Flip diverter to proper position-Pg. 9.
Empty dirty water tank-Pg. 10.
.
2. No soap.
3. Soap switch off.
I
Will not dispense water
I
1. Soap tank empty with soap power ON.
I
1. Fill soap tank or shut soap power OFF.
ANY OTHER SERVICING SHOULD BE DONE BY AN AUTHORIZED SERVICE REPRESENTATIVE
CUSTOMER SERVICE
In the event that further assistance is required, see your Yellow Pages for an authorized Royal" Dealer. Costs of any transportation to and
from any place of repair are to be paid by the owner. The service parts used in this unit are easily replaced and readily available from an
authorized Royala Dealer or retailer. Always identify your cleaner by the model number when requesting information or ordering replacement parts. (The model number appears on the back of the cleaner.)