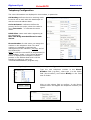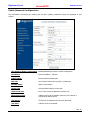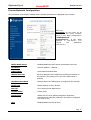
1
Digicom S.p.A.
VoiceGATE
Manual rev.2.0
VoiceGATE 8D5499
User’s Manual
REV. 2.0
Pag. 1
Digicom S.p.A.
VoiceGATE
Manual rev.2.0
Index
IIDENT
PREFACE ................................................................................................................ 3
1.0 GENERAL DESCRIPTION ........................................................................................ 4
1.1 LED Description.................................................................................................. 5
1.2 Connectors Description........................................................................................ 5
2.0 Configuration ........................................................................................................ 6
2.1 Computer configuration ....................................................................................... 6
2.2 Access to configuration........................................................................................ 7
2.3 Save the configuration ........................................................................................ 9
2.4 VoiceGATE Working Test.....................................................................................10
2.5 Configuration Menù description............................................................................11
General Information ..............................................................................................11
Telephony Configuration ........................................................................................12
Public Network Configuration ..................................................................................16
Private Network Configuration ................................................................................17
Mac Addresses .....................................................................................................18
SNMP Agent.........................................................................................................18
RIP .....................................................................................................................19
Route Table .........................................................................................................20
Security Configuration ...........................................................................................20
Save Setting ........................................................................................................21
Reset ..................................................................................................................21
3.0 VoiceGATE.exe ....................................................................................................22
3.1 Address Book Management .................................................................................22
3.2 Address Book Upgrade .......................................................................................24
Configuration Example ...............................................................................................25
VoiceGATE Configuration Work Sheet ...........................................................................28
Pag. 2
Digicom S.p.A.
VoiceGATE
Manual rev.2.0
PREFACE
All rights reserved; no part of this publication may be reproduced, stored in a retrieval system,
or trasmitted in any form or by any means, electronic, otherwise, without the prior written
permission of Digicom S.p.A. The contents of this booklet may be modified without notice.
Every possible care has been taken in testing and putting together all the documentation
contained in this booklet, however Digicom can not take any responsability brought by the use
of this booklet.
The following installation rules should be respected in order to have the best working order of
the equipment and for the user’s safety.
ENVIROMENTAL CONDITIONS
ENVIROMENTAL TEMPERATURE from 0 to
45°C
RELATIVE HUMIDITY from 20 to 80% n.c.
Rapid changes of temperature or humidity should be avoided (0,03°C/min).
This equipment, including cables, should be installed in an area free from:
• Dust, humidity, heat from direct sun light.
• Objects which irradiate heat. These could cause damage to the container or other
problems.
• Objects which produce a strong electtromagnetic field (loudspeakers, etc.)
• Liquids or chemical corrosive substances.
CLEANING THE TERMINAL
Use a clean and soft cloth. Wet the cloth with water or natural detergent if it is necessary to
remove any stains. Never use chemical products such as petrol or solvents.
VIBRATIONS OR DROPPING
Caution against vibrations and dropping.
OF CONFORMITY
DECLARATION
Digicom S.p.A. via Alessandro Volta 39 21010 Cardano al Campo-VareseThis product satisfies the basic requirements of the below indicated Directive:
• 1999/5/CE
• EN 55022
• EN 61000-3-2
• EN 55024
• EN 60950
• EN 41003
Pag. 3
Digicom S.p.A.
VoiceGATE
Manual rev.2.0
1.0 GENERAL DESCRIPTION
Digicom VoiceGATE is the ideal solution for the new Telecom Operators who want to take at
home or office the new POTs with integration of Voice (Voice over IP) and Internet. VoiceGATE
has 3 Ethernet ports (10/100) for the connection of local devices (Personal Computer, Printers,
etc.), 2 analog ports and, optional, 1 SO ISDN bus with 2 RJ45 ports (for the connection ISDN
telephones).
The connection to the network backbone (Uplink) will take place through the Ethernet
10/100BT or optionally via xDSL.
VoiceGATE integrates the Router function. The hardware architecture of VoiceGATE uses an
ARM9 microprocessor of latest generation at 140 Mips, which guarantees, in Router mode, a
throughput of more than 15 Mbps in full-duplex.
Through the VoIP functions it is possible to connect up to 2 analog devices (Telephones,
Modem, Fax) using the protocols G.711, G.723.1, G.729 A for all the voice functions.
VoiceGATE can be used with two different VoIP configurations:with and without GateKeeper.
The GateKeeper is a device that takes care of associating the telephone address with the IP
address.
To simply use the VoIP in your network, Digicom carried out a Address book inside VoiceGATE
to avoid the use of the Gatekeeper.
VoiceGATE can be used both in network with Gatekeeper and with the address book. In case
you will not use the Gatekeeper, it will be possible to configure the address book through a
graphic utility. (VoiceGate AddressBook.exe).
Technical Features
•
•
•
•
•
•
•
•
•
•
•
•
•
•
•
VoIP capability H.323v3
G.711, G.723.1, G.729 support
Modem and Fax support over IP G.711
2 analog ports POTs POTs
2 ISDN ports
ISDN Bus (S0) to connect ISDN phones (optional)
3 Ethernet ports 10/100BT
Built-in Store & Forward switch
Built-in IP router
RIPv2 support
RIP1 support compliant
NAT, TFTP, DHCP support
Can be managed through SNMP
Up to 8 devices on ISDN bus
Web based ROUTER configuration
Pag. 4
VoiceGATE
Digicom S.p.A.
Manual rev.2.0
1.1 LED Description
The VoiceGATE status can be checked through seven led indicators.
Lan x
Line x
Wan
Pwr
Indicates the LAN ports status
Off:
no device connected
On:
device connected
Indicates the status of the two telephone lines
Off:
device not registered at the GateKeeper or
internal address book not configured.
On:
device registered at the GateKeeper or internal
address book configured
Flashing:
line in use
Indicates the WAN ports status
Flashing:
activity on the WAN port
Indicates the status of the power
Off:
VoiceGATE is not powered
On:
VoiceGATE is powered
When all the LEDs are on, except the WAN led, it means the device is starting up. This
operation takes about 45 seconds and takes place at the starting up, after a saving of the
configuration or after a reset.
1.2 Connectors Description
Tel1-2
ISDN
Lan1-3
WAN
RJ11 connectors (FXS) for PSTN analog devices (telephones, modem, fax)
RJ45 connector for ISDN telephones
10/100Mbs (MDI-X) switch ports
10/100Mps (MDI) Ethernet port
Pag. 5
Digicom S.p.A.
VoiceGATE
Manual rev.2.0
2.0 Configuration
VoiceGATE can be configured using a Web browser. (Explore, Netascape, etc). This chapter
describes the test to carry out on the computer to enter the configuration and the procedure to
save the mofications in the configuration. In the paragraph “VoiceGATE working test”
you find the procedures to carry out your first tests with Digicom’s VoiceGATEs. Just
few operations and you will be able to install and test two VoiceGATEs. Then all the
configuration menus will be described.
2.1 Computer configuration
Setup minimum requirements:
•
•
•
1 PC with 10/100BT Ethernet card
1 LAN UTP cable Cat 5 Cross
Browser (Explorer or Netscape)
To go on with VoiceGate setup, be sure the PC IP address belongs to the same network of
VoiceGate (example 192.168.2.xxx).
To enter the setup menu, go on as follows:
1. Setup the TCP/IP protocol for the PC Ethernet card with an IP address of the same
network of VoiceGate (example 192.168.2.3). Do not use 192.168.2.1 (default
address) and 192.168.2.2 (test address).
2. Connect the PC to VoiceGate on the Wan port using a cross LAN cable.
3. Turn on VoiceGate and wait it finishes the Start Up procedure (about 45 sec.)
4. Once the Start Up phase is finished, the led LAN will be off.
Pag. 6
Digicom S.p.A.
VoiceGATE
Manual rev.2.0
2.2 Access to configuration
1. Run the browser and connect to http://192.168.2.1. When the connection is
established, the following window will appear:
Insert in the User Name field: admin
Insert in the Password field: voicegate
NB: User name and password must be written with lower case.
Press Enter (or click OK) and the following window will be displayed:
<-----
Attention:
after
you
enter
the
configuration menu, be sure you press the
Submit
key
to
load
the
correct
configuration.
Pag. 7
Digicom S.p.A.
VoiceGATE
Manual rev.2.0
Note: in case of problems while displaying the
configuration, be sure that no proxy Server
is active.
In Microsoft Internet Explorer the Proxy setup
is in: Tools, Internet Options, Connections
LAN, Settings.
Menù Description
1. General Configuration
It displays the information on the HW and SW release
of the equipment.
2. Telephony Configuration
It allows the reading and the voice parameters setup.
3. Supplementary Services
It allows the reading and the voice supplementary
services setup.
4. Public Network Configuration
It allows the reading and the Wan (Uplink) parameters
setup.
5. Private Network Configuration
It allows the reading and the LAN (private user
network) parameters setup.
6. Mac Addresses
Displays the Mac Address Wan side and LAN side.
7. SNMP Agent
It allows the reading and setup of SNMP protocol
parameters.
8. RIP
It allows the reading and setup of Rip protocol
parameters.
9. Routing Table
It allows the reading of the routing table.
10. Security Configuration
It allows the password setup.
11. Save Setting
Save the configuration.
12. Reset
Reset the equipment without modifying the current
configuration.
The Submit button loads the current configuration.
Use the “Submit” button before going on with the
consultation of the other menus.
Pag. 8
VoiceGATE
Digicom S.p.A.
Manual rev.2.0
2.3 Save the configuration
To confirm the new settings you must press the Submit button at
the end of any WEB page.
To activate the modifications it is necessary, before you exit the
configuration, to enter the Save settings menu and press the
Submit button. At this point VoiceGATE will execute a StartUP,
then (after about 45 seconds) the modifications are active.
Pag. 9
Digicom S.p.A.
VoiceGATE
Manual rev.2.0
2.4 VoiceGATE Working Test
With simple operations you can test at once the working of VoiceGATE. We suggest to follow
the procedures described in this chapter so to avoid working problems of VoiceGATE due to
wrong configurations.
The factory settings of VoiceGATE are the following:
Voice:
Ethernet:
Mode: Address Book
IP address: 192.168.2.1
Numbers: Line1->123 Line2 ->456
Subnet Mask: 255.255.255.0
To test the working of any single VoiceGATE, proceed as follows:
-
Power on your VoiceGATE
Wait for the start-up phase (about 45 seconds)
The led Line 1 and Line 2 of VoiceGATE will remain on (fixed red)
Connect two analog phones in Tel 1 and Tel 2
Take up the receiver of the phone connected in Tel 1
Be sure you hear the dial tone and dial the number 456
The phone connected in Tel 2 will ring
To test the working of a couple of VoiceGATE, go on as follows:
-
-
Modify the IP address of one of the two VoiceGATEs entering the WEB configuration,
and following the indications in the paragraphs “Computer Configuration” and
“Access to configuration”.
Select the menu number 4. Public Network Configuration and modify the IP Address
from 192.168.2.1 to 192.168.2.2
Attention: If the IP address is not correctly inserted, there’s the risk VoiceGATE is
no more reachable.
-
-
Click on the Submit button at the end of the WEB page
Select the Save settings menu and press on Submit
At the end of the reset procedure (about 45 seconds) only the leds Line 1 and Line 2 of
VoiceGATE will remain on (fixed red)
The following telephone numbers will be associated to the VoiceGATE with IP address
192.168.2.2 : Line1-> 111 and Line2 ->222
Connect the two VoiceGATEs directly, using an Ethernet cross cable, through the WAN
ports or use two Ethernet right cables, passing through an hub or a switch
Connect an analog phone to the Tel1 port of the VoiceGATE with IP address
192.168.2.1 and the other phone to the Tel1 port of the VoiceGATE with IP address
192.168.2.2
Take up the receiver of the first phone
Be sure ou hear the dial tone and dial the number
The phone connected to the second VoiceGATE will ring
Pag. 10
Digicom S.p.A.
VoiceGATE
Manual rev.2.0
2.5 Configuration Menù description
General Information
The information concerning the Hw and SW version and the elapsed time from the power on
are displayed in this window.
Pag. 11
Digicom S.p.A.
VoiceGATE
Manual rev.2.0
Telephony Configuration
The voice information are displayed in this window, in particular:
Call Setting: defines the Voice working mode.
It can be set to work with the Gatekeeper or
with the internal address book.
Codec Selected: it allows to define the
priority list for the codec, when the codec is
set in Automatic. “1” indicates the main
codec.
H323 Alias: name used when registering at
the Gatekeeper.
Note: This String must be different for each
devices.
Phone Number: In this menu you assign the
number to the telephone lines. For each
number it is possible to activate the
management of the identifier (clir/clip) and of
the Modem/fax.
Note: In case the VoiceGATE is programmed in
“AdrressBook” mode, in the ”Phone Number”
field it is displayed the telephone number
present in the address book and it will be
possible to change it using the
“VoiceGateAddressBook” program only.
How to modify the phone number in Gatekeeper configuration?
Type the new telephone number in the Phone
Number field (e.g.1001), then type 1 in the Index
field (line1=index1) and select Modify in the field
next to Index.
Click on the submit field to confirm. In the Phone
number field it will appear the telephone number you
typed.
Pag. 12
Digicom S.p.A.
VoiceGATE
Manual rev.2.0
Interdigit Delay: wait in sec. from the last
digit of the number, before starting the call. It
is possible to activate the immediate dialling of
the number, inserting the “#” character at the
end of the number.
Element in Gatekeeper: Gatekeeper IP
address for registration. Maximum 4
addresses can be stored.
Gatekeeper Keep Alive: Time in sec. for
Gatekeeper registration renewal.
Fixed Tei: TEI setup (Automatic or Fixed).
This parameter is valid for the ISDN interface
only.
Tei Value: This parameter is to be inserted in case of fixed TEI only.
Isdn Bus: ISDN Bus definition: Short Passive or Extende Passive.
How to insert the Gatekeeper IP Address?
Be sure the Gatekeeper is in Call Setting.
Insert the Gatekeeper IP Address in the
Address field, then type 1 in the Index field,
and select Modify in the field next to Index.
At the end of the WEB pages, click on Submit to
confirm.
Pag. 13
VoiceGATE
Digicom S.p.A.
Manual rev.2.0
Supplementary Services
The information concerning the reading and the voice supplementary service setup, according
the H.450 standard, are displayed in this window.
You will find here a brief description
of the various supplementary
services.
For almost all the supplementary
services it is necessary to hold on a
call (H.450.4 service enabled).
This operation is carried out
through the “R” key or “Flash” key
with analog phones; in case of
ISDN phones there can be different
modes: Hold Key, or through a
proper configuration menu
(example Mirò phone of Telecom
Italia).
Note: in the description of the
services the R/Flash key will be
described with (R).
H.450.2 Call Transfer
The H.450.2 service allows to manage the call transfer.
During the conversation, by pressing (R) you can put on hold a call and activate a second call.
At this point by pressing R4 (R key + 4 key on the phone) the communication will inetrrupt
and the on hold call will be put in contact with the second call.
H.450.3 Supplementary Services
H.450.3 services allow the user to divert the incoming calls to another number.
4 types of service are available:
•
•
CFU (Call Forwarding
Unconditional):
CFB (Call Forwarding
Busy):
•
CFNR (Call Forwarding
No Reply):
•
CD (Call Deflection):
calls addressed to the user requiring the service are always
forwarded.
calls are forwarded only if the user is busy.
Note: the user is busy only if he has made a call to another
user. Then, if the receiver is up, the number is free, as no
info on the status change has been sent to the Gatekeeper
yet.
calls are forwarded only if the user requiring the service is
free but does not answer within the time fixed in the CNFR
Timeout field (15 sec.)
le chiamate sono deviate solo se l’utente che richiede il
servizio risulta libero ma esplicitamente redirige le chiamata
(solo ISDN).
In the field telephone number 1 and 2 it must be inserted the number to forward the call.
Pag. 14
Digicom S.p.A.
VoiceGATE
Manual rev.2.0
H.450.4 Call Hold
H.450.4 service allows to put on hold a call and to call another number. Once the two calls
have been activated, you can:
•
•
•
Press R + 1 -> To close the active call and recover the on hold call.
Press R + 2 -> To switch from a conversation to another, keeping one on hold.
Press R + 3 -> To activate a three users conference.
Note: For the three users conference it is necessary to use the GateKeeper Server and the
MCU Server (Multipoint Conference Unit) not supplied with the product.
H.450.6 Supplementary Services
H450.6 service allows the management of the call waiting option.
During the conversation you hear the beep for a call waiting, you can:
• Press R+0 -> To reject an incoming call.
• Press R+1 -> To close the active conversation and answer the incoming call.
• Press R+2-> To put on hold the active call and answer the incoming call.
Pag. 15
Digicom S.p.A.
VoiceGATE
Manual rev.2.0
Public Network Configuration
The information concerning the reading and the Wan (Uplink) parameters setup are displayed in this
window.
Use DHCP to obtain configuration: Enables/Disables the device to DHCP configuration
IP Address:
Device IP address - LAN site
Subnet Mask:
Device Network Subnet Mask
Dns List:
List of active Domain Server Name (4 maximum)
Domain Name:
Name of the Domain
Router List:
Device default Gateway on the Wan
Time Server List:
List of Time Server IP addresses (maximum 4)
Wan Leased Time:
Validity time for the IP address (valid only if the device is
configured by DHCP server)
Tftp Server:
TFTP Server IP addresses for the code download
Tftp Path:
Code file name to download
Pag. 16
Digicom S.p.A.
VoiceGATE
Manual rev.2.0
Private Network Configuration
The information concerning the reading and the LAN part parameters are displayed in this window:
<-----
Attention: do not insert an IP
address of the same network
used in the WAN configuration
“PublicNetwork
Configuration”. If the WAN
address is 192.168.2.1 you
cannot
use
addresses
192.168.2.x.
Enable DHCP Server:
Enables/Disables the DHCP Server functionality to the LAN
IP Address:
Device IP Address – LAN side
Subnet Mask:
Device Network Subnet Mask
Address Pool List:
List of IP addresses to be assigned to the devices connected on
the LAN side. (This features is on only if the DHCP server is
enabled)
IP Address Pool Mask:
Network Mask of the addresses to be assigned to the LAN side.
Router List:
Default Gateway for the LAN side
Dns List:
List of active Domain Name Server
Domain Name:
Domain name
Leased Time:
Validity time for the IP address assigned to the devices
connected to the LAN side (valid only if the device is configured
as a DHCP server)
NAT:
Enables/Disables the NAT protocol
Pag. 17
Digicom S.p.A.
VoiceGATE
Manual rev.2.0
Mac Addresses
The Mac addresses of the device (Wan and LAN side) are displayed in this window.
Public Network Mac:
Mac address assigned to the WAN
Private Network Mac:
Mac Address assigned to the LAN
SNMP Agent
The information concerning the reading and the parameter setup of SNMP protocol are displayed in this
window.
SNMP Version:
Device SNMP agent version
SNMP Trap Server:
Server IP address to send the TRAP
SNMP Security Server:
Server IP address enabled for SNMP queries
Pag. 18
Digicom S.p.A.
VoiceGATE
Manual rev.2.0
RIP
The information concerning the reading and the parameters setup of the RIP protocol are displayed in this
window.
RIP:
Enables/Disables the RIP
Silent Mode:
OnlyRX – It manages the routing table in reception only
RX+TX – It manages the routing table also in transmission
Rip2 Mode:
Multicast – It indicates if the RIP packets must be sent to the
defined multicast address 224.0.0.9 (RIPv2)
Broadcast – It indicates if the RIP packets must be sent to the
interface broadcast address (RIPv1 compliant).
Timer Rate:
Time in seconds. It shows the updating time of the internal tables.
Supply Interval:
Time in seconds. It shows the forwarding time of the routing tables.
Expire Time:
Time in seconds. It shows the time after which a route is removed
from the routing table.
Garbage Time:
Time in seconds. It shows the time after which an expired route is
removed from the internal tables.
Pag. 19
Digicom S.p.A.
VoiceGATE
Manual rev.2.0
Route Table
The informations concerning the routing table are displayed in this window.
Security Configuration
The informations concerning the password setup.
Pag. 20
Digicom S.p.A.
VoiceGATE
Manual rev.2.0
Save Setting
In this page it is possible to save the modified configuration via browser, clicking on the Submit button.
VoiceGATE will restart to load the new configuration. After about 45 seconds it will be ready to be used.
Reset
In this page it is possible to reset the device, clicking on the Submit button.
VoiceGATE resets and load the current configuration.
All the unsaved modifications are lost.
Pag. 21
Digicom S.p.A.
VoiceGATE
Manual rev.2.0
3.0 VoiceGATE.exe
The VoiceGATE utility allows to :
- Create the “AddressBook”
- Load the AddressBook in the VoiceGATEs
- Upgrade the VoiceGATE firmware
In the following parameters you will find some information on the use of the program; for
further details refer to the Help on-line.
3.1 Address Book Management
Address Book Management allows to create the
address book in a simple way.
This address book can manage up to 250
different telephone numbers
To insert new IP addresses/telephone numbers:
• Insert the WAN IP address (Public
Network VC) of the VoiceGate (i.e.
80.204.9.194)
• Insert the first telephone number you
want to associate to VoiceGate (i.e. 101)
• Click on Add to confirm
To insert the second telephone number:
• Insert the WAN IP address of the
VoiceGate (i.e. 80.204.9.194)
• Insert the second telephone number you
want to associate to VoiceGate (p.e 102)
• Click on Add to confirm
After you have completed the insertion, save the address book clicking on Save, select the
addrbook.cpe file and proceed confirming with Save.
Pag. 22
Digicom S.p.A.
VoiceGATE
Manual rev.2.0
Gateway IP Address
The IP Address field concerning the Gateway represents the IP Address of an eventual
PSTN/ISDN Gateway.
The Gateway allows the communication between the VoIP network and the traditional
telephone lines (PSTN, ISDN and GSM). If the VoiceGATE doesn’t find the selected number in
the address book, it sends it to the Gateway, that will call the selected number.
Special Functions
Picture 1
If VoiceGATE is connected to an ISDN switchboard, as shown in picture 1, it could be
necessary to associate multiple telephone numbers (from 100 to 199) to an IP Address
(example: 80.204.9.194). In this case it is possible to insert the number with the indication
1**.
With this configuration, all the calls coming from 201 and 202 telephones and addressed to the
numbers included among 100 and 199 will be directed to IP 80.204.9.194; the call will arrive
at the ISDN switchboard, that if correctly programmed, will directly switch the call to the
extension.
Attention: when you fill in the address book, the telephone numbers composed by “*”
character must be inserted at the end.
NOTE:
The address book must contain the correspondence among the IP addresses and the telephone
numbers of your VoIP network.
Pag. 23
Digicom S.p.A.
VoiceGATE
Manual rev.2.0
3.2 Address Book Upgrade
Through the Address Book Upgrade you can send the address book created with the
Address Book Management.
After selecting Address Book Upgrade choose the address book file to be sent.
Insert the IP address, UserID and Password of the VoiceGATE to which you must send the
address book, then confirm with ADD. If you want to send the address book to other
VoiceGATEs it is sufficient to repeat the procedure, adding more addresses in th list.
Using the buttons on the tools bar, you can:
verify the presence of the VoiceGATE devices in the list.
upgrade the selected VoiceGATE devices.
upgrade all the VoiceGATEs in the list.
It is possible to save the list of the VoiceGATEs (File/Save). In this way you will have the saved
list for future upgrades.
Attention: Turn-off and Turn-on the VoiceGATEs to activate the new settings.
Pag. 24
Digicom S.p.A.
VoiceGATE
Manual rev.2.0
Configuration Example
Here is an example to use the VoiceGate and its configuration.
In teh following application there are two VoiceGATE (one in the main office and the other one
in the branch office) and no Gatekeeper is required. We will use the internal address book to
configurate the VoiceGate.
To set the device it is necessary to know the information concerning the company network
where you want to install the VoiceGate. In this example we will describe the configuration of
VoiceGATE1:
VoiceGATE1 will be connected to an ADSL router, that will act as a gateway for the connection
to the Internet network.
The used ADSL access supplies 8 public IP addresses. Five of them can be used: from
80.204.70.145 to 149.
It is necessary to associate one of the five public IP addresses (80.204.70.146) to the WAN
interface (Public Network Configuration). The LAN part (Private Network Configuration) will
be set with 192.168.30.x addresses.
To act on the configuration of a VoiceGate set with factory configuration, it is necessary to set
the PC Ethernet card with the address 192.168.2.x (see chapter VoiceGATE CONFIGURATION).
Here are the configuration windows where to insert the correct parameters:
Pag. 25
Digicom S.p.A.
VoiceGATE
Manual rev.2.0
In this menu insert the following
information::
- Alias
- The two telephone numbers
- If you yse the internal address book or
the reference Gatekeeper.
In this example we choose the Address
book mode, setting the Call Setting
parameter as Address Book.
In the Public Network Configuration Menu
you define the information concerning the
VoiceGate WAN interface.
Insert the IP Address and the Subnet
Mask. Furthermore you have to define the
Default Gateway (Router List) inserting the
LAN IP address of the ADSL Router.
Pag. 26
Digicom S.p.A.
VoiceGATE
Manual rev.2.0
In the Private Network Configuration menu
you define the information concerning the
VoiceGate LAN interface.
Besides the IP address and the SubnetMask,
you have to enable the NAT.
Configuration example of the PC Ethernet
card to connect to the VoiceGate LAN ports.
You have to insert the DNS regarding your
ADSL account.
NOTE: To set the VoiceGate internal address book, refer to the chapter: VoiceGate.exe
Pag. 27
VoiceGATE
Digicom S.p.A.
Manual rev.2.0
VoiceGATE Configuration Work Sheet
Installation:
Company:
Office:
Installed
By:
Date:
Hardware Information:
Firmware Information:
Code:
Sw Version:
Serial
Number:
Build:
Isdn
Version:
Telephony Configuration:
H323 Alias:
Call Setting
GateKeeper:
AddressBook:
Phone Number
Line 1
Number
Codec
Line 2
Number
Codec
Line 3
Number
Codec
Line 4
Number
Codec
GK- IP
Address:
Codec Selected
Priority List
G.711-A
G.711-u
G.729
G.729-A
G.729-B
G.723
Public Network Configuration:
IP Address
Subnet Mask
Router List (Gateway)
Private Network Configuration:
IP Address
Subnet Mask
NAT
Pag. 28
Digicom S.p.A.
VoiceGATE
Manual rev.2.0
Pag. 29