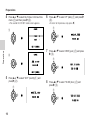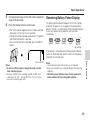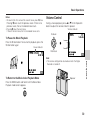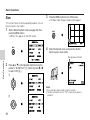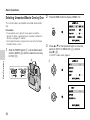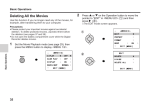
1
MPEG-4 Digital Recorder
MODEL
VN-EZ1U
OPERATION MANUAL
Important Information
Preparations
Basic Operations
Advanced Features
Please read this operation manual
carefully before using the Digital Recorder.
Important
For assistance in reporting the theft or loss
of this product, record on the line below
the serial number which is located on
the bottom of the unit.
Please retain this information.
Model No.:
VN-EZ1U
INTERNET VIEWCAM
Serial No.:
Importing Images
into a Computer
References
Thank you for purchasing this Digital Recorder from SHARP.
Before using the MPEG-4 Digital Recorder, please read this operation manual carefully and then save it for future
reference.
Important Information for Consumers in the U.S.
WARNING: TO
REDUCE THE RISK OF FIRE OR ELECTRIC SHOCK, DO NOT EXPOSE
THIS APPLIANCE TO RAIN OR MOISTURE.
CAUTION
RISK OF ELECTRIC SHOCK
DO NOT OPEN
CAUTION: TO REDUCE THE RISK OF ELECTRIC SHOCK, DO NOT
REMOVE COVER. NO USER-SERVICEABLE PARTS INSIDE.
REFER SERVICING TO QUALIFIED SERVICE PERSONNEL.
This symbol warns the user of uninsulated voltage within the unit that can cause
dangerous electric shocks.
This symbol alerts the user that there are important operating and maintenance
instructions in the literature accompanying this unit.
i
WARNING—FCC Regulations state that any unauthorized changes or modifications to this
equipment not expressly approved by the manufacturer could void the user’s authority to operate this
equipment.
This device complies with Part 15 of the FCC Rules. Operation is subject to the following two conditions: (1)
This device may not cause harmful interference, and (2) this device must accept any interference received,
including interference that may cause undesired operation.
NOTE
This equipment has been tested and found to comply with the limits for a Class B digital device, pursuant to
Part 15 of the FCC Rules. These limits are designed to provide reasonable protection against harmful
interference in a residential installation. This equipment generates, uses, and can radiate radio frequency
energy and, if not installed and used in accordance with the instructions, may cause harmful interference to
radio communications. However, there is no guarantee that interference will not occur in a particular
installation. If this equipment does cause harmful interference to radio or television reception, which can be
determined by turning the equipment off and on, the user is encouraged to try to correct the interference by
one or more of the following measures:
• Reorient or relocate the receiving antenna.
• Increase the distance between the equipment and receiver.
• Connect the equipment into an outlet on a circuit different from that to which the receiver is connected.
• Consult the dealer or an experienced radio/TV technician for help.
A shielded I/F cable is required to insure compliance with FCC regulations for Class B computing equipment.
NOTE
The LCD panel of this Digital Recorder is a very high technology product with more than 61,000 thin-film
transistors*, giving you fine picture detail. Occasionally, a pixel may appear on the screen as a fixed point of blue,
green, red, or black. Please note that this does not affect the performance of your Digital Recorder.
*Specifications are subject to change without notice.
ii
COPYRIGHT WARNING:
It is the intent of SHARP that this unit be used in full
compliance with the copyright laws of the United
States and that prior permission be obtained from
copyright owners whenever necessary.
TRADEMARKS
• SmartMedia is a registered trademark of Toshiba
Corporation.
• Microsoft and Windows are registered trademarks of
Microsoft Corporation, USA.
• All other brand or product names are trademarks or
registered trademarks of their respective holders.
About The Supplied Software “PixLab Integrated
Digital Media Software”
• PixLab Integrated Digital Media Software is the property
of Sharp Corporation and all related copyright and other
rights belong to Sharp Corporation.
• Sharp Corporation shall in no event be liable for damages,
loss of revenue or third party claims arising from the use of
the software.
• Software specifications and the contents of the on-line
operation manual are subject to change without prior
notice.
• Operating speed may slow down depending on computer
operating environment and processing capability.
iii
IMPORTANT SAFEGUARDS
1. Read Instructions—All the safety and operating
instructions should be read before operating the
Digital Recorder.
2. Retain Instructions—The safety and operating
instructions should be retained for future reference.
3. Heed Warnings—All warnings on the appliance and
in the operating instructions should be heeded.
4. Follow Instructions—All operation and usage
guidelines should be followed.
5. Cleaning—Unplug this Digital Recorder from the
wall outlet before cleaning. Do not use liquid or
aerosol cleaners. Use a damp cloth for cleaning.
6. Attachments—Do not use attachments not
recommended by the Digital Recorder manufacturer; they may cause hazards.
7. Water and Moisture—Do not use this Digital
Recorder near water; for example, near a bath tub,
wash bowl, kitchen sink, laundry tub, in a wet
basement, or near a swimming pool, etc.
8. Accessories—Do not place this Digital Recorder on
an unstable cart, stand, tripod, bracket, or table.
The Digital Recorder may fall, causing serious injury
to a child or adult, and serious
damage to the Digital
Recorder. Use only with a cart,
stand, tripod, bracket, or table
recommended by the manufacturer, or sold with the Digital
Recorder. Any mounting of the Digital Recorder
should follow the manufacturer’s instructions, and
iv
should use a mounting accessory recommended by
the manufacturer.
9. A Digital Recorder and cart
combination should be moved with
care. Quick stops, excessive force,
and uneven surfaces may cause the
Digital Recorder and cart
combination to overturn.
10. Ventilation—Slots and openings in the cabinet are
provided for ventilation to ensure reliable operation
of the Digital Recorder, and to protect it from
overheating. These openings must not be blocked
or covered by placing the Digital Recorder on a
bed, sofa, rug or other
similar surface. This Digital
Recorder should never be
placed near or over a radiator or heat registers; nor
should it be placed in a
built-in installation such as a bookcase or rack
unless proper ventilation is provided, or the manufacturer’s instructions have been heeded.
11. Power Sources—This Digital Recorder should be
operated only from the type of power source
indicated on the marking label. If you are not sure of
the type of power supply to your home, consult your
appliance dealer or local power company. For
digital recorders intended to operate from battery
power or other sources, refer to the operating
instructions.
12. Grounding or Polarization—This Digital Recorder is
equipped with a polarized alternating-current line
plug (a plug having one blade wider than the other).
This plug will fit into the power outlet only one way.
This is a safety feature. If you are unable to insert
the plug fully into the outlet, try reversing the plug. If
the plug still fails to fit, contact your electrician to
replace your obsolete outlet. Do not defeat the
safety purpose of the polarized plug.
13. Power-Cord Protection—Power-supply cords should
be routed in such a way that they are not likely to be
walked on or pinched by items placed upon or
against them. Pay particular attention to cords at
plugs, convenience receptacles, and the point
where they exit from the appliance.
14. Lightning—To provide added protection for this
Digital Recorder during a lightning storm, or when
left unattended and unused for long periods of time,
unplug it from the wall outlet and disconnect the
antenna or cable system. This will prevent damage
to the Digital Recorder due to lightning and powerline surges.
15. Overloading—Do not overload wall outlets and
extension cords; this can result in a risk of fire or
electric shock.
16. Object and Liquid Entry—Never push objects of any
kind into this Digital Recorder
through openings. They may
touch dangerous voltage points
or short-out parts that could
result in a fire or electric shock.
Never spill liquid of any kind on
the Digital Recorder.
17. Servicing—Do not attempt to service this Digital
Recorder yourself. Opening or removing covers may
expose you to dangerous voltage or other hazards.
Refer all servicing to qualified service personnel.
See the back of this operation manual.
18. Damage Requiring Service—Unplug this Digital
Recorder from the wall outlet and refer servicing to
qualified service personnel under the following
conditions:
a. When the power-supply cord or plug is
damaged.
b. If liquid has been spilled, or objects have fallen
into the Digital Recorder.
c. If the Digital Recorder has been exposed to rain
or water.
d. If the Digital Recorder does not operate normally
by following the operating instructions. Adjust
only those controls that are covered by the
operating instructions. An improper adjustment of
other controls may result in damage and will
often require extensive work by a qualified
technician to restore the Digital Recorder to its
normal operation.
v
e. If the Digital Recorder has been dropped or the
cabinet has been damaged.
f. When the Digital Recorder exhibits a distinct
change in performance, this indicates a need for
service.
19. Replacement Parts—When replacement parts are
required, be sure the service technician has used
replacement parts specified by the manufacturer or
which have the same characteristics as the original
parts. Unauthorized substitutions may result in fire,
electric shock, or other hazards.
20. Safety Check—Upon completion of any service or
repairs to this Digital Recorder, ask the service
technician to perform safety checks to determine
that the Digital Recorder is in proper operating
condition.
vi
Supplied Accessories
Alkaline batteries
(AA-size × 4)
Hand strap
UBNDT0101TAZZ
CDSKA0032TA01
AC adapter
UADP-0243TAZZ
Soft case
GCASN0022TAZZ
PixLab Integrated Digital
Media Software CD-ROM
CDSKA0039TA01
Floppy disk adapter for SmartMedia™
VR-1FPN
RUNTK0350TAZZ
SHARP
SHARP
3.3 V type
SmartMedia™ (4MB)
SmartMedia holder
Index label (× 2)
Write-protect seal (× 4)
vii
Contents
Important Information
Precautions .................................................................... 3
Care ............................................................................... 4
SmartMedia Card Precautions ...................................... 5
Dew Formation .............................................................. 6
Part Names & Index ...................................................... 7
Indicators on the LCD Monitor ....................................... 9
Warning Indicators ....................................................... 13
Preparations
Inserting and Removing the Batteries ......................... 14
Powering the Digital Recorder from an AC Outlet ....... 16
Inserting and Removing a SmartMedia Card .............. 17
Setting the Date and Time ........................................... 18
Attaching the Hand Strap ............................................ 21
Using the Soft Case ..................................................... 21
Basic Operations
Camera Recording
Quick Reference .......................................................... 22
Movie Recording .......................................................... 23
Zooming ....................................................................... 25
Still Recording ............................................................. 26
1
Recording with the Self-Timer ..................................... 27
Remaining Battery Power-Display ............................... 28
Playback
Movie Playback ........................................................... 29
Volume Control ............................................................ 30
Slow ............................................................................. 31
Skipping ....................................................................... 32
Fast Forward/Fast Reverse ......................................... 32
Deleting Unwanted Movie One by One ....................... 33
Deleting All the Movies ................................................ 35
Protecting Important Movie and Images
from Deletion ............................................................. 37
Still Playback ............................................................... 39
Deleting Unwanted Still Image One by One ................ 41
Deleting All the Still Images ......................................... 43
Advanced Features
Camera Recording
Resolution Setting ....................................................... 45
Recording Backlit Subjects .......................................... 47
Macro Shots ................................................................ 48
Time-Lapse Movie Recording ...................................... 49
Selecting the White Balance Mode .............................. 51
Selecting the Iris Mode ................................................ 53
Recording Yourself (Self Recording) ........................... 54
Turning Off the Indicators ............................................ 55
To Turn the Beep Off ................................................... 56
Contents
Playback
Continuous Playback ................................................... 57
Dividing a Movie .......................................................... 59
Auto Playback for Still Images ..................................... 62
Darking the Backlight of the LCD Monitor ................... 63
Formatting a SmartMedia Card ................................... 64
Importing Images into a Computer
Image Files in the SmartMedia Card ........................... 65
Using a Floppy Disk Adapter ....................................... 67
Using a PC Card Adapter ............................................ 68
Transferring Image Data to Your Computer ................. 69
Important Information
Preparations
Basic Operations
Advanced Features
References
Before Requesting Service .......................................... 70
Specifications .............................................................. 73
SERVICE INFORMATION (For the U.S.) .................... 74
Importing Images
into a Computer
References
Guía de operación rápida en español ................................. 75
2
Important Information
Precautions
Use & Care
Important Information
• After operation, remove the batteries from the unit.
• Do not aim the lens at the sun.
Do not allow direct sunlight to strike the Digital Recorder
lens or LCD monitor, whether recording is in progress or
not, as it may damage the lens or may result in severe
damage to the eyes. Be particularly careful when
recording outside.
• Avoid pointing the lens into direct sunlight or other
strong light sources.
The concentrated light may cause a fire.
• Avoid magnetic sources.
Using the Digital Recorder near strong
fluorescent lights, motors, televisions,
or other magnetic sources may
adversely affect recorded images.
• Be sure to back up all important files
on other media to protect against
damages or loss of image files.
Malfunction, repairs, misoperation, static electricity or
noise may delete data on the SmartMedia card.
• Remember to remove the SmartMedia card, turn off the
power, and remove the batteries when the Digital
Recorder is not in use.
• Using the Digital Recorder near a broadcasting station
or other powerful transmission source may cause
buzzing or picture deterioration.
3
• Avoid shocks and dropping.
Do not drop or otherwise subject
the Digital Recorder to hard shocks
or strong vibrations. Bumping or
striking the unit during recording
will generate noise in the recorded
image.
• Avoid placing the Digital
Recorder in close proximity to lighting equipment.
The heat from incandescent lights
may deform the Digital Recorder, or
cause it to malfunction.
• Always respect prohibitions or
restrictions on the use of
electronic equipment on
commercial flights or in other
sensitive areas.
• Be aware of the temperature and humidity.
You can use your Digital Recorder
at 0°C to +40°C (32°F to 104°F)
and at 30% to 80% relative
humidity. Do not store the unit in
an unventilated car in the summer,
in direct sunlight, or near strong
heat sources; this can result in
severe damage to the unit’s
casing and circuitry.
Do not use or keep the Digital Recorder and the
SmartMedia card in areas subject to extremely high
temperature.
Important Information
• Some small, portable tripods may
be difficult to attach and may not
be sturdy enough to support your
Digital Recorder. Be sure to use
only a strong, stable tripod.
• When using your Digital
Recorder in a cold environment,
the color LCD monitor may appear less bright
immediately after the power is turned on. This is not a
malfunction. To prevent the Digital Recorder from
becoming too cold, wrap it in a thick cloth (a blanket,
etc.).
• Always conduct a tentative recording before important
shootings to check whether the Digital Recorder
operates normally.
Care
Cleaning and Maintenance
• Many plastic parts are used in the Digital Recorder casing.
Do not use thinners, benzenes or other strong chemical
cleaners. These may cause discoloration and damage to
the casing.
• Clean the casing with a soft, dry cloth. If the casing is
particularly dirty, wipe the casing with a tightly wrung cloth
dampened with a diluted, neutral detergent. Then wipe it
again with a soft, dry cloth.
• Use a soft, dry cloth to wipe finger marks and other soiling
off the LCD monitor.
• Then clean the lens with a soft, dry cloth or compressed
air.
• Power the Digital Recorder occasionally to operate
some function even if you do not plan to use it for a
long time.
It will prevent malfunction.
4
Important Information
• Avoid situations where water, sand, dust or other
foreign matter could get on or inside the Digital
Recorder, and do not use or leave your Digital
Recorder in areas with excessive smoke, steam or
moisture.
Such environments can cause
malfunctions or cause mildew to
form on the lenses. Be sure to
keep the unit in a well-ventilated
location.
Important Information
SmartMedia Card Precautions
Important Information
Contact area
Keep clean and avoid
scratching this area.
Index area
Attach the supplied
Index label here.
SHARP
Write-protect area
Covering this area
with the supplied
Write-protect seal
protects the recorded
images against
accidental deletions.
Write-protect seal
Be careful not to
place the seal
outside the area.
Attach it completely.
• Avoid shocks and dropping.
Dropping, bending or subjecting the card to hard shocks
will cause damage to the card and the recorded image.
• Avoid static electricity and electrical noise.
Using or storing the card near such electrical phenomena
can corrupt or even cause total loss of the recorded
images.
• Avoid stains, foreign matter and finger prints on the
Contact area.
Wipe with a soft, dry cloth.
5
• Use the supplied Index labels and Write-protect seals.
Using other labels and seals may damage the card .
Do not reuse the seals once removed.
• When putting the SmartMedia card into the supplied
holder, hold the Index area to insert the Contact area
first.
• Do not put the SmartMedia card into your pocket.
It may apply excessive force and damage the card.
• Be aware of the temperature and humidity. Avoid using
or storing in dusty place. Do not expose to moisture,
water or salt water.
• Do not dispose of in fire. Keep out of fire.
• Note that a SmartMedia card has a service life.
Replace the card with a new one before it cannot store
images anymore because of deterioration.
• Do not eject the SmartMedia card while recording or
erasing images.
Also do not turn off the connected device while using the
Digital Recorder. It may cause total loss of the recorded
images or even destroy the card.
Cautions:
• USE THE DIGITAL RECORDER TO FORMAT A SMARTMEDIA
CARD. The Digital Recorder may not recognise the recorded
images on the card formatted by your computer.
• Using a floppy disk adapter can both store and delete images
even if the Write-protect area covered with the Write-protect
seal.
Dew Formation
• What is “dew formation”?
When cold water is poured into a glass, dew drops form on
the glass. This clinging of water drops is called dew
formation. Dew formation inside the Digital Recorder
causes malfunction. (e.g.recording images on the
SmartMedia card may not function properly.)
If dew formation mists the lens, acclimate it until the mist to
disappears.
Important Information
• When dew forms in your Digital Recorder, the lens and
the SmartMedia card.
Dew is likely to form in the following circumstances:
• when moving the Digital Recorder from a cold place to a
warm place.
• when placing the Digital Recorder in a cold room which
is then heated rapidly.
• when moving the Digital Recorder outdoors from an air
conditioned room.
• when placing the Digital Recorder in the direct path of air
blowing from an air conditioner.
• when placing the Digital Recorder in a humid room.
,,
,
,,
,,,,
,
Important Information
Plastic bag
1 Be sure to tightly seal the plastic bag containing the
Digital Recorder.
2 Remove the bag when the air temperature inside it
reaches the temperature of the surroundings.
• How to prevent trouble due to dew formation.
When using the Digital Recorder in a place where dew
formation is likely to occur, allow the Digital Recorder and
the SmartMedia card to acclimate to the surroundings for
about one hour.
For example, when bringing the Digital Recorder indoors
after skiing, place it in a plastic bag and allow it to adapt to
room conditions for some period of time.
Dew formation on the SmartMedia card prevents the card
storing or playing back images. In this case, allow the card
to acclimate to the surroundings for about two hours.
6
Important Information
Part Names & Index
For details on the use of each control, refer to the page number indicated in the brackets.
Important Information
Front view
Lens body
(CAMERA/PLAY select switch)
[pp. 23, 29]
POWER switch [p. 22]
Mode select switch
(MOVIE/STILL select switch)
[p. 22]
Operation button [p. 18]
MENU button [p. 18]
Grip
LCD monitor [pp. 9 through 13]
7
Hand strap loop [p. 21]
Important Information
Left view
Iris select switch [p. 53]
Shutter button [pp. 23, 26]
Microphone
Important Information
Speaker [p. 30]
Focus (Macro/Normal) select switch [p. 48]
DC IN 6V terminal [p. 16]
Lens
Bottom view
Tripod socket
Battery compartment
cover [pp. 14, 17]
Battery compartment [p. 14]
SmartMedia slot [p. 17]
8
Important Information
Indicators on the LCD Monitor
See page 55 for turning on and off the indicators on the LCD monitor.
Movie Recording Mode
1
6
FINE
Important Information
2
LAP ‰:‰‰:‰‰
REM ‰:‰1:‰2
7
8
9
0
3
4
OCT.27.2‰‰‰
1‰:31 AM INDOOR
5
1 MOVIE mode indicator (p. 23)
Indicates the Digital Recorder is in the Movie mode.
2 Recording/Pause indicator (p. 23)
: Recording
: Pausing
3 Zoom indicator (p. 25)
Appears when zooming in or out.
4 Date and time indicators (p. 20)
Indicates the current date and time.
5 White balance indicator (p. 51)
Indicates the white balance setting.
6 Movie resolution mode indicator (pp. 45 and 46)
Indicates the Movie resolution mode setting;
NORMAL FINE S-FINE 1/4VGA LP
9
q
7 Recording time and Remaining time (p. 23)
LAP: The time passed since you started the recording.
REM: The time left to record in the current mode
(The figures are approximations and depend on the Movie
Resolution mode.)
8 Time-lapse mode indicator (p. 49)
Indicates the Time-lapse setting.
: ×10 setting
: ×40 setting
: ×100 setting
9 BLC indicator (p. 47)
Appears when compensating the backlight on the subject.
0 Lighting indicator (p. 53)
Warns you in case of inappropriate lighting conditions.
: Too bright for recordings
: Too dark for recordings
q Battery power indicator (p. 28)
Indicates remaining power of the batteries.
Important Information
Movie Index Playback Mode
Movie Playback Mode
1
1
3
2
3
4
‰12
‰:‰3:‰1
6
7
8
9
OK[SHUTTER]
‰‰3
4
5
OCT.27.2‰‰‰
1‰:31 AM
0
5
1 MOVIE mode indicator (p. 29)
Indicates the Digital Recorder is in the Movie mode.
2 Battery power indicator (p. 28)
Indicates remaining power of the batteries.
3 Selecting frame (p. 29)
Indicates the currently selected image.
4 The number of the movie (p. 29)
Indicates the serial number of the framed movie.
5 Protect indicator (pp. 37 and 38)
Appears when the framed movie is protected.
1 Protect indicator (pp. 37 and 38)
Appears when the current movie is protected.
2 Continuous Playback indicator (p. 57)
Appears when the Continuous Playback mode is set.
3 Slow playback indicator (p. 31)
Appears when slowing the playback.
4 Volume indicator (p. 30)
Appears when adjusting the volume
5 Date and time indicators (p. 20)
Indicates the recording date and time.
6 Movie resolution mode indicator (pp. 45 and 46)
Indicates the Movie resolution mode setting for the current
movie.
7 The number of the movie (p. 29)
Indicates the serial number of the current movie.
8 Elapsed playback time (p. 29)
Indicates the time passed since you started the playback.
9 Pause indicator (p. 30)
Appears when pausing during the playback.
0 Battery power indicator (p. 28)
Indicates remaining power of the batteries.
10
Important Information
2
NORMAL
C-PLAY
SLOW
Important Information
Still Recording Mode
1
2
5
NORMAL
REM 12
6
7
8
Important Information
3
OCT.27.2‰‰‰
1‰:31 AM OUTDOOR
4
1 Still image resolution mode indicator (p. 46)
Indicates the Still image resolution mode setting;
NORMAL FINE
2 STILL mode indicator (p. 26)
Indicates the Digital Recorder is in the Still mode.
3 Date and time indicators (p. 20)
Indicates the current date and time.
4 White balance indicator (p. 51)
Indicates the white balance setting.
5 Remaining number of still images (p. 26)
Indicates the number you can record.
(The figures are approximations and depend on the Still
Image Resolution mode.)
11
9
6 Self-timer indicator (p. 27)
Appears when setting the Self-timer.
7 BLC indicator (p. 47)
Appears when compensating the backlight on the subject.
8 Lighting indicator (p. 53)
Warns you in case of inappropriate lighting conditions.
: Too bright for recordings
: Too dark for recordings
9 Battery power indicator (p. 28)
Indicates remaining power of the batteries.
Important Information
Still Index Playback Mode
Still Playback Mode
1
1
3
5
2
NORMAL
AUTO PLAY
6
3
1‰‰-‰‰12
Important Information
2
OK[SHUTTER]
1‰‰-‰‰12
4
4
OCT.27.2‰‰‰
1‰:31 AM
7
5
1 STILL mode indicator (p. 39)
Indicates the Digital Recorder is in the Still mode.
2 Battery power indicator (p. 28)
Indicates remaining power of the batteries.
3 Selecting frame (p. 39)
Indicates the currently selected image.
4 The number of the still image (p. 39)
Indicates the serial number of the framed still image.
5 Protect indicator (pp. 37 and 38)
Appears when the framed still image is protected.
1 Protect indicator (pp. 37 and 38)
Appears when the current still image is protected.
2 Auto Play mode indicator (p. 62)
Appears when setting the Auto Play mode.
3 Pause indicator (p. 62)
Appears when pausing during the Auto Play.
4 Date and time indicators (p. 20)
Indicates the recording date and time.
5 Still image resolution mode indicator (p. 46)
Indicates the Still image resolution mode setting for the
current still image.
6 The number of the still image (p. 39)
Indicates the serial number of the current still image.
7 Battery power indicator (p. 28)
Indicates remaining power of the batteries.
12
Important Information
Important Information
Warning Indicators
CLOCK SET
You have not yet set the built-in clock.
POWER OFF
The batteries are almost dead.
NO CARD
The SmartMedia card is not loaded
properly. Make sure that the correct side
of the card is facing up and insert the
correct end of the card into the slot.
NO FILE
The SmartMedia card has no
images recorded in the format the
Digital Recorder can recognise.
CARD FULL
FILE NO. FULL
CARD ERROR
NOT INITIALIZED
PROTECTED
You are trying to delete a protected
image. Unprotect it before deletion.
READ ERROR
Can not read the images in the
SmartMedia card. The Digital
Recorder possibly cannot play
back the images recorded by
another digital cameras.
Make backup copies of images on
other media, if necessary. And then
format the SmartMedia card.
The SmartMedia card’s capacity is
insufficient. Delete unnecessary
images from the card or replace
the card with new one.
WRITE ERROR
Cannot record the images on the
SmartMedia card. Check that the
battery power is sufficient and the
SmartMedia card is loaded properly.
The Digital Recorder has used up
all the assignable image numbers
for file names. Delete unnecessary
images from the card or replace
the card with capacity.
AUTO POWER OFF The power will be turned off about
five seconds later. To turn it on
again, slide the POWER switch.
The image files in the SmartMedia
card is corrupted or is recorded in
a format which is not compatible
with the Digital Recorder. Copy the
necessary images in your
computer’s hard disk and reformat
the SmartMedia card.
Now processing instructions. Wait
until this indicator disappears.
TEMP ERROR
The Digital Recorder becomes
warm to touch. Turn off the power
and do not use for a while.
CAN’T REC
Cannot record the images in the
Time-lapse Movie mode because
the recording time is too short. For
“×100” mode, recording time
should be more than 10 sec.
CAN’T DIVIDE
Cannot divide the movie.
The SmartMedia card is not formatted.
PROTECTED CARD The SmartMedia card is protected.
Remove the Write-protect seal.
13
BUSY
Preparations
Inserting and Removing the Batteries
To supply power to the Digital Recorder, use AA-size
batteries (alkaline, nickel cadmium (Ni-Cd) rechargeable or
nickel metal hydride rechargeable batteries). See
precautions on page 15.
4
Close the battery compartment cover (1), hold
down the cover (2) and slide it in the direction of
the arrow (3) until it clicks.
Precaution:
• Do not use different type batteries together.
1
2
3
Inserting batteries
Make sure the power of the Digital Recorder is
turned off.
2
Slide the battery compartment cover (1) to open it
in the direction of the arrow (2).
Note:
• Press and slide the battery cover until it is closed securely, or
the batteries push up the cover.
Removing Batteries
Take out the batteries in step 3 above.
Maximum Time for Continuous Recording
2
3
1
Load batteries, making sure their plus ( ) and
minus ( ) ends are facing as shown below.
The table below shows the approximate time that battery
power can last when the Digital Recorder continuously
records a movie at standard temperature (25°C (77°F)).
Battery type
Continuous recording time
AA-size Alkaline batteries
(supplied batteries)
60 min.
AA-size nickel metal hydride
rechargeable batteries (1450 mAh)
100 min.
14
Preparations
1
Preparations
Battery Handling Precautions
Preparations
Incorrect use or handling of batteries might cause them to
leak or burst and seriously damage the Digital Recorder. Be
sure to note the following important precautions to avoid
problems with batteries.
Cautions:
• NEVER USE MANGANESE BATTERIES. USE OF LITHIUM
BATTERIES IS NOT RECOMMENDED. USE:
• alkaline batteries (alkaline-manganese dioxide batteries)
• nickel cadmium (Ni-Cd) rechargeable batteries
• nickel metal hydride rechargeable batteries
NEVER USE DIFFERENT TYPE BATTERIES TOGETHER.
• When using commercially available batteries, refer to the
instructions that come with them.
• Never mix old batteries with new ones. It may shorten the
service lives of the new batteries, or cause the old batteries to
leak.
• Do not use different brand batteries together.
• Always make sure that plus ( ) and minus ( ) ends of the
batteries are facing correctly.
• Remove the dead batteries from the Digital Recorder
immediately. It might leak and cause serious damage to the
Digital Recorder, if left in the battery compartment for a long
time.
• If the batteries leak, never touch the chemical liquid. It might
damage your skin. In case you touch the liquid, wipe it off with
a cloth.
• Avoid shocking and dropping.
• Using the Digital Recorder in low temperatures (below 10°C
(50°F) around) shorten the battery life. We recommend that
you have spare batteries in such cases.
15
Notes:
• The batteries that power the Digital Recorder normally become
warm when they lose power. This is not a malfunction.
• Battery power is consumed even when the Digital Recorder is
turned off. If you are not going to use it for a period of time,
remove the batteries.
• Note that if power source is interrupted for more than 30
minutes, the date and time setting will be automatically
canceled. Set them again (see page 18).
Preparations
Powering the Digital Recorder from
an AC Outlet
Use the supplied AC adapter when recording or playing
back for a long time, or formatting a SmartMedia card.
Make sure the power of the Digital Recorder is
turned off.
2
Insert the DC cable plug of the AC adapter into the
DC IN 6V terminal on the Digital Recorder.
3
Insert the power plug of the AC adapter into a power
outlet.
Cautions:
Make sure to turn off the Digital Recorder when;
• Connecting and disconnecting the AC adapter.
• Inserting/removing the AC adapter into/from a power
outlet.
If not, it may cause recording failures or deletion of the
recorded images.
To DC IN 6V
terminal
Preparations
1
Power outlet
AC adapter
16
Preparations
Inserting and Removing a
SmartMedia Card
4
Close the battery compartment cover (1), hold
down the cover (2) and slide it in the direction of
the arrow (3) until it clicks.
This Digital Recorder uses a SmartMedia card for memory. It
will retain recorded images even if the batteries are depleted
or the power source is interrupted.
2
Preparations
Inserting a SmartMedia Card
1
Make sure the power of the Digital Recorder is
turned off.
2
Slide the battery compartment cover (1) to open it
in the direction of the arrow (2).
1
3
Note:
• Press and slide the battery cover until it is closed securely, or
the batteries push up the cover.
Removing a SmartMedia card
Pull out the SmartMedia card in step 3 above.
2
3
1
Insert a SmartMedia card in the direction of the
arrow and push it in as far as it will go.
• Make sure that the Contact area is facing up and that
you insert the end with a chipped corner into the slot.
Contact area
17
Chipped corner
Notes:
• Be careful not to drop the batteries when opening the battery
compartment cover.
• Do not use a 5 V SmartMedia card. Use the supplied
SmartMedia card or a commercially available card, which is
3.3 V type.
Preparations
Setting the Date and Time
2
Press the MENU button to display <MENU 1/2>
Set the built-in clock before the first use, and the Digital
Recorder automatically records the date and time with the
images.
<MENU1/2>
NORMAL
REC.MODE
MENU
Example:
ON
DISPLAY
OFF
BLC
Setting the date to October 27, 2000 (OCT. 27. 2000) and
the time to 10:30 am (10:30 AM).
BACKLIGHT
NORMAL
EXIT [MENU]
1
Slide the POWER switch (1) and then rotate the
lens body toward CAMERA (2).
PLAY
3
Press ' or " on the Operation button to move the
pointer to “CLOCK SET” in <MENU 2/2> (1) and
then press | (2).
• The CLOCK SET mode screen appears.
POWER
CAME
RA
<MENU2/2>
1
1
AUTO
W/B
TIME LAPSE
OFF
BEEP
ON
CLOCK SET
EXIT [MENU]
Note:
• If you turn on the Digital Recorder before setting the built-in
clock, the CLOCK SET mode screen appears. In this case,
proceed to step 4.
CLOCK
2
12H
24H
EXIT [MENU]
18
Preparations
2
Preparations
4
Press ' or " to select the 12-hour or 24-hour time
mode (1) and then press | (2).
6
• The second CLOCK SET mode screen appears.
• To return to the previous step, press \.
1
CLOCK
1
Press ' or " to select “27” (date) (1) and press |
(2).
12H
24H
2
OCT.27.1999 12:‰‰ AM
EXIT [MENU]
Preparations
7
CLOCK
2
Press ' or " to select “2000” (year) (1) and press
| (2).
1
JAN. 1.1999 12:‰‰ AM
OCT.27.2‰‰‰ 2
12:‰‰ AM
EXIT [MENU]
5
Press ' or " to select “OCT” (month) (1) and
press | (2).
1
8
Press ' or " to select “10 AM” (hour) (1) and
press | (2).
1
OCT. 1.1999 2
12:‰‰ AM
19
2
OCT.27.2‰‰‰ 1‰:‰‰ AM
Preparations
9
Press ' or " to select “30” (minutes).
OCT.27.2‰‰‰ 1‰:3‰ AM
10 Press the MENU button twice to turn off the menu.
Movie Recording mode
FINE
FINE
REM 17
Still Image Recording mode
LAP ‰:‰‰:‰‰
REM ‰:‰1:15
Preparations
• The data and time indicators appear and then the
built-in clock begins to work.
Notes:
• If you press the MENU button by mistake before finishing the
setting, the time then displayed on the LCD monitor is set as
the current time. In this case, proceed to step 4.
• The batteries power the built-in clock. In case of no power
source, the Digital Recorder backs up the clock for 30
minutes. Replace batteries or change the power source
meanwhile.
• Note that if power source is interrupted for more than 30
minutes, the date and time setting may be automatically
canceled. In this case, you should set them again.
OCT.27.2‰‰‰
1‰:3‰ AM
OCT.27.2‰‰‰
1‰:3‰ AM
Date and time indicators
20
Preparations
Attaching the Hand Strap
1 Hold the end of the strap and thread it through the
Using the Soft Case
1 After attaching the hand strap
Hand strap loop on the grip.
(see the left column), make
sure the lens section is set to
PLAY position (see page 29).
Then put the Digital Recorder
in the soft case with the
monitor screen facing down.
Preparations
2
2
Let the other end through as shown below (1) and
tie it up (2).
1
21
2
Close the cover and seal the
Velcro® closures.
Note:
• Let your belt through the loop of the soft case and you can
carry the Digital Recorder on your waist.
Basic Operations
Quick Reference
Precautions:
• Take care not to touch the lens with your fingers when handling
the Digital Recorder.
• Operate the switches slowly.
To Turn Off the Power
Slide the POWER switch again and hold it until the operation
screen disappears.
PLAY
POWER
CAME
RA
To Turn On the Power
Slide the POWER switch and hold for more than one second.
(It springs back when released.)
POWER
PLAY
CAME
RA
Switching the Movie Mode and the Still Mode
BUS
Y
Basic Operations
“BUSY”
Set the Mode select switch to MOVIE or STILL.
MOVIE mode
PLAY
CAME
RA
• After the “BUSY” indicator, a blue screen is displayed. It
may take time until the operation screen appears because
of the recording contents on the SmartMedia.
MOVIE
STILL
STILL mode
MOVIE
STILL
• Recording in the MOVIE mode is Movie Recording mode.
Recording in the STILL mode is Still Recording mode.
• Playback in the MOVIE mode is Movie Playback mode.
Playback in the STILL mode is Still Playback mode.
22
Basic Operations
2
Movie Recording
You can record moving subjects with sound. Before you start
recording, see pages 14 through 20 to prepare your Digital
Recorder.
MOVIE mode indicator
NORMAL
Precaution:
• Do not try to record images with low battery power. It may
cause malfunctions.
1
LAP ‰:‰‰:‰‰
REM ‰:‰1:15
OCT.27.2‰‰‰
1‰:31 AM
Slide the POWER switch (1), set the Mode select
switch to MOVIE (2) and then rotate the lens body
toward CAMERA (3).
3
Adjust the angle of the lens body to compose the
image on the LCD monitor.
3
Press the Shutter button to begin recording.
Recording time
PLAY
Basic Operations
POWER
MOVIE
STILL
CAME
RA
1
2
NORMAL
LAP ‰:‰‰:‰1
REM ‰:‰1:14
Remaning time
Note:
• If the warning indicator “NOT INITIALIZED” appears, format
the SmartMedia card by the Digital Recorder (see page 64).
23
Notes:
• The Digital Recorder automatically chooses the correct shutter
speed for the lighting conditions. Note that the slow shutter
speed set for the poor lighting may cause small image shakes.
And the image on the LCD monitor will be adversely affected.
• Using the Digital Recorder under fluorescent lights, mercury
lamps or sodium-vapour lamps causes flickers on the
recorded images. Sometimes those lightings affect tint of the
images.
• The Movie Recording mode is factory preset to NORMAL. If
you want to record movies in higher picture quality or for a
long time, change the resolution setting by selecting one
of five modes (see pages 45 and 46).
Basic Operations
To Finish Movie Recording
Press the Shutter button again.
• The Recording time indicator “LAP” returns 0:00:00.
NORMAL
LAP ‰:‰‰:‰‰
REM ‰:‰1:‰2
The Auto Power Off
The Digital Recorder is automatically turned off to save the
battery power whenever you do not perform any operation
for about three minutes. Slide the POWER switch again to
turn it on.
Basic Operations
24
Basic Operations
To Zoom In
Zooming
The digital zooming allows you to move visually closer or
farther from the subject without changing your position,
while the movie recording. Zoom range is 1-4×.
Basic Operations
1
Telephoto
Zooming out (when you want to
show the surroundings)
Precautions:
• During a movie recording in the 1/4 VGA mode (see pages
45 and 46) or during a still recording, you can not operate
zooming.
• Using this function causes some noise on the picture and
deteriorates the picture quality.
25
To Zoom Out
Press " (W) on the Operation button to get a wide field of
view (2).
Zooming in (when you want to center
attention on the subject)
Wide
angle
Press ' (T) on the Operation button to get a close-up view
(1).
PLAY
Zoom indicator
CAME
RA
2
Zoom in
Zoom out
Notes:
• To prevent small image shakes, press " to enlarge the view a
little.
• The zoom setting will return to “W” (zooming out) whenever the
power is turned off.
Basic Operations
3
Still Recording
You can record still images with operation similar to that of
film cameras. Before you start recording, see pages 14
through 20 to prepare your Digital Recorder.
Precaution:
• Do not try to record images with low battery power. It may
cause malfunctions.
1
Slide the POWER switch (1), set the Mode select
switch to STILL (2) and then rotate the lens body
toward CAMERA (3).
3
PLAY
POWER
MOVIE
STILL
RA
1
2
2
Adjust the angle of the lens body to compose the
image on the LCD monitor.
STILL mode indicator
NORMAL
OCT.27.2‰‰‰
1‰:31 AM
Remaining number
NORMAL
OCT.27.2‰‰‰
1‰:31 AM
REM 17
Notes:
• If the warning indicator “NOT INITIALIZED” appears, format
the SmartMedia card by the Digital Recorder (see page 64).
• The Digital Recorder automatically chooses the correct shutter
speed for the lighting conditions. Note that the slow shutter
speed set for the poor lighting may cause small image shakes.
And the image on the LCD monitor will be adversely affected.
• Using the Digital Recorder under fluorescent lights, mercury
lamps or sodium-vapour lamps causes flashs on the recorded
images. Sometimes those lightings affect tint of the images.
• The Still Recording mode is factory preset to NORMAL. If
you want to record still images in higher picture quality,
change the mode to FINE (see page 46).
REM 18
26
Basic Operations
CAME
Press the Shutter button to record the image.
Basic Operations
3
Recording with the Self-Timer
Press \ or | to select “ON”.
The Self-Timer allows you a time-lag of 10 seconds for Still
Recordings. Rotate the lens body 180° so the LCD monitor
faces the same direction as the lens, and you can always
see the Timer indicator.
<MENU2/2>
Set the Still Recording mode (see page 26), then
press the MENU button to display <MENU 1/2>.
Basic Operations
REC.MODE
NORMAL
DISPLAY
ON
BLC
OFF
BACKLIGHT
NORMAL
EXIT [MENU]
2
Press ' or " on the Operation button to move the
pointer to “SELF-TIMER” in <MENU 2/2>.
<MENU2/2>
SELF-TIMER
OFF
AUTO
W/B
ON
BEEP
CLOCK SET
EXIT [MENU]
27
ON
BEEP
CLOCK SET
EXIT [MENU]
4
Press the MENU button to turn off the menu.
• The Self-Timer indicator appears.
<MENU1/2>
MENU
AUTO
W/B
Precaution:
• When using the Self-Timer, fix the Digital Recorder on a tripod,
etc. to place it horizontally.
1
ON
SELF-TIMER
MENU
NORMAL
OCT.27.2‰‰‰
1‰:31 AM
REM 17
Self-Timer indicator
Basic Operations
5
Composing the image on the LCD monitor, adjust the
angle of the lens body.
6
Press the Shutter button to set the timer.
• The Timer indicator appears to flash in black and red
alternately until the start time is reached.
• The Shutter will be released automatically 10 seconds
after the Shutter button is pressed.
• To cancel the Self-Timer recording, press the MENU
button.
The Battery power indicator appears on the LCD monitor
whenever the power is on. It suggests remaining battery
power in 5 levels, as shown below. When the battery power
is very low, replace all four batteries with new ones
immediately.
(green)
(green)
(yellow)
(red)
Warns
by flashing
If the battery is almost dead, the Battery power indicator
flashes on the blued LCD monitor screen until the power is
turned off five seconds later.
Basic Operations
Timer indicator
Notes:
• Do not turn off the power or change the mode once the
Timer indicator appears.
• Whenever the Self-Timer recording finished, the Self-Timer
mode returns to “OFF”. Turn the Self-Timer “ON” every time
you want to record images with it.
Remaining Battery Power-Display
Notes:
• Use the Battery power indicator only as an indication.
• Battery consumption may vary depending on the operating
conditions.
• The Battery power indicator may not work properly for
nickel cadmium (Ni-Cd) rechargeable batteries.
28
Basic Operations
2
Movie Playback
The LCD monitor makes it possible to play back what you
have just recorded. You can also enjoy the sound through
the built-in speaker.
1
3
PLAY
Basic Operations
MOVIE mode indicator
Slide the POWER switch (1), set the Mode select
switch to MOVIE (2) and then rotate the lens body
to PLAY (3).
• The first scenes of the movies will displayed in a
thumbnail format (reduced size images) by the Movie
Index Playback mode.
PLAY
CAMERA
MENU
CAME
RA
OK[SHUTTER]
‰‰1
OK[SHUTTER]
‰‰5
The number of the movie
Note:
• If you have recorded more than nine movies, there are other
pages before and after the current page.
To go to the previous page, press '.
To go to the next page, press ".
3
Press \ or | on the Operation button to move the
frame to the desired image.
Press the Shutter button to play back the selected
movie in the full size.
The number of the movie
POWER
1
MOVIE
STILL
2
NORMAL
OCT.27.2‰‰‰
1‰:31 AM
‰‰3
‰‰5
‰:‰‰:‰2
Elapsed playback time
29
Basic Operations
Notes:
• To return to the first scene of the current movie, press \ once.
Pressing \ twice starts the previous movie. If there is no
previous movie, the last numbered movie starts.
Volume Control
During a movie playback, press ' or " on the Operation
button to adjust the volume of built-in speaker.
• Pressing | plays the next movie.
If there is no next movie, the first numbered movie starts.
Volume indicator
Increase
To Pause the Movie Playback
NORMAL
Decrease OCT.27.2‰‰‰
1‰:31 AM
Increase
Press the Shutter button. To resume the playback, press the
Shutter button again.
Pause indicator
NORMAL
‰‰5
‰:‰‰:1‰
To Return to the Movie Index Playback Mode
Note:
• The volume setting will be retained even after the Digital
Recorder is turned off.
Basic Operations
OCT.27.2‰‰‰
1‰:31 AM
Decrease
‰‰1
‰:‰‰:‰2
Speaker
Press the MENU button and hold it until the Movie Index
Playback mode screen appears.
MENU
30
Basic Operations
3
Slow
This function halves the normal speed of playback. You can
play the movie in slow motion.
1
Press the MENU button to turn off the menu.
• The Movie Index Playback mode screen appears.
Set the Movie Playback mode (see page 29), then
press the MENU button.
MENU
• <MENU 1/2> appears on the LCD monitor.
<MENU1/2>
MENU
OK[SHUTTER]
C-PLAY
OFF
SLOW PLAY
OFF
DISPLAY
ON
BACKLIGHT
NORMAL
4
‰‰2
Select the desired movie, and press the Shutter
button to play in slow motion.
Slow playback indicator
Basic Operations
EXIT [MENU]
2
1
OFF
SLOW PLAY
OFF
BACKLIGHT
ON
2
NORMAL
<MENU1/2>
C-PLAY
OFF
SLOW PLAY
ON
DISPLAY
BACKLIGHT
ON
NORMAL
C-PLAY
‰‰2
‰:‰‰:‰1
SLOW
<MENU1/2>
DISPLAY
31
NORMAL
Press ' or " on the Operation button to move the
pointer to “SLOW PLAY” (1) and then press \ or |
to select “ON” (2).
OCT.27.2‰‰‰
1‰:31 AM
Notes:
• You cannot play back sounds using this function.
• The Slow setting will return to “OFF” whenever the power is
turned off.
Basic Operations
Skipping
Fast Forward/Fast Reverse
During a movie playback, press and release immediately \
or | on the Operation button. It allows you to jump to the
first scene of the current or the next movie and automatically
start playing it again.
During a movie playback, press \ or | on the Operation
button for more than two seconds. This operation fastforwards or reverses the movie.
PLAY
CAME
RA
PLAY
\
|
RA
\
|
• To run forwards, press and hold |.
• To run backwards, press and hold \.
Notes:
• If you release the Operation button within two seconds, the
screen jumps to the first scene of the current (or next) movie.
• If the movie is extremely short, this function may not work.
32
Basic Operations
• To jump back to the first scene of the current movie, press
\. Each time you press \, it skips backwards by one movie.
• To jump forward to the first scene of the next movie, press |.
CAME
Basic Operations
Deleting Unwanted Movie One by One
2
Press the MENU button to display <MENU 1/2>.
This function allows you to delete unwanted movie one by
one.
<MENU1/2>
OFF
SLOW PLAY
OFF
MENU
C-PLAY
Precautions:
• Please protect your important movie against accidental
deletion. To delete a protected movie, unprotect it before the
deletion (see pages 37 and 38).
• Do not open the battery compartment cover while the Digital
Recorder delete a movie.
1
Slide the POWER switch (1), set the Mode select
switch to MOVIE (2) and then rotate the lens body
to PLAY (3).
Basic Operations
3
BACKLIGHT
1
MOVIE
STILL
NORMAL
EXIT [MENU]
3
Press ' or " on the Operation button to move the
pointer to “EDIT” in <MENU 2/2> (1) and then
press | (2).
• The EDIT mode screen appears.
<MENU2/2>
1
EDIT
PROTECT
PLAY
POWER
ON
DISPLAY
CAME
RA
FORMAT
BEEP
2
ON
EXIT [MENU]
EDIT
2
DELETE
DIVIDE
DELETE ALL
EXIT [MENU]
33
Basic Operations
4
Press |.
• The Movie Index Playback mode screen appears with
a “DELETE” frame.
6
Press the Shutter button.
DELETE?
DELETE
YES [SHUTTER]
NO
[ MENU
]
OK[SHUTTER]
5
‰‰2
7
Press \ or | to move the frame to the unwanted movie.
• The screen returns to the Movie Index Playback mode
with a “DELETE” frame. If you want to delete another
movie, repeat the procedure from step 5 to 7.
Basic Operations
DELETE
Press the Shutter button to delete the selected
movie.
8
Press the MENU button three times to display the
Movie Index Playback mode screen.
MENU
OK[SHUTTER]
‰‰1
Note:
• If you have recorded more than nine movies, there are other
pages before and after the current page.
To go to the previous page, press '.
To go to the next page, press ".
Note:
• To cancel the deletion, press the MENU button in step 6.
34