1
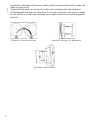
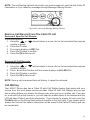
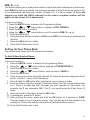
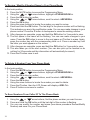
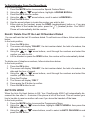
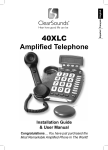
40XLC
Amplified Telephone
Installation Guide
& User Manual
Congratulations… You have just purchased the
Most Remarkable Amplified Phone In The World!
Congratulations on your purchase of
the 40XLC Amplified Phone from
ClearSounds Communication.
The 40XLC Phone has been designed specifically to meet your needs, blending an array
of valuable features with simplicity and style. The 40XLC Phone is truly the Most Remarkable Amplified Phone In The World!
This User’s Guide provides you with information to set-up and start using your 40XLC
Phone. Please read these instructions thoroughly before using your telephone.
Keep this manual for future reference.
Please save your sales receipt as proof of purchase in the event you need warranty
service.
Please visit our web site at www.clearsounds.com to:
· Register your product
It’s easy! Click on the Warranty Registration Tab, Complete the form and click
“submit”. It’s that simple!
· Download additional manuals and troubleshooting tips
(See back cover for details on warranty service.)
If you need assistance, please contact our Customer Solutions Hotline at:
877-784-1690.
2
Table Of Contents
Components
Conditions For Use
Features & Functions
Top View
Left side, Right side & Back side Views
Handset & Bottom View & Care of Phone
LCD Screen
Screen Display
Installation Steps
Installing the optional batteries
Setting the dialing mode
Programming ringer – volume & style
Programming memory dial buttons
Phone mounting – desk & wall use
40XLC Phone Operation
Making & Receiving A Call
Using the handset
Using the speakerphone
Using audio & telephone accessory jacks
Using the amplification function
Volume reset override
Outgoing speech volume
Last number redial
Flash button
Mute button
40XLC Caller ID Operation
Viewing your Caller ID display
Viewing incoming calls
Turn off new calls / message waiting indicator
Remove call record(s) from Caller ID
A specific call record
All call records
Set call waiting/Caller ID
Page 5
Page 6
Page 7
Page 8
Pages 9-10
Page 10
Page 10
Page 11
Page 11
Page 12
Pages 13-14
Pages 15-16
Page 17
Pages 17-18
Pages 18-19
Pages 19-20
Page 21
Page 21
Page 22
Page 22
Page 22
Pages 22-23
Pages 23-24
Page 24
Page 25
Page 25
Pages 25-26
3
Table Of Contents
40XLC Miscellaneous Feature Setting
Set language
Set area code / LDS code
LCD screen contrast
Date / Hour format
Adjust number size
Phone book
Add new number/name
Review /modify number/name
Delete number
Save number from Caller ID
Dial from the phone book
Recall/Delete one of the last 30 numbers
dialed
Auto On Hook
Troubleshooting Guide
Specifications
FCC Regulatory Compliance
Warranty and Service
4
Pages 26-27
Page 27
Page 28
Page 28
Page 29
Page 20
Page 30
Page 30
Page 30
Page 31
Page 31
Pages 31-32
Pages 32-33
Pages 33-34
Pages 34-35
Pages 36
Components
Check to be sure you have all items that come with your telephone. You should have a
Telephone base unit
Telephone handset
6 ft long telephone line cord
Owners manual
Handset
coil cord
8 inch short
telephone line
cord
AC adapter
Screwdriver
(not shown)
Wall plate adapter
(not shown)
5
Conditions for Use
Important Safety Instructions
Read and understand the Installation Guide & User Manual. When using your telephone
equipment, basic safety precautions should always be followed to reduce the risk of fire,
electric shock and injury to person, including the following.
WARNING: The 40XLC Phone is capable of amplifying sounds to a loud volume. It is
important to instruct all potential users of its proper operation. It is advised to adjust the
volume control to the minimum level (Low) when not in use and alert other users that
hearing damage can potentially result from misuse.
WARNING: To avoid the possibility of electrical shock, do not use this product near water
(For example, near a bathtub, wash basin, kitchen sink or laundry tub, in a wet basement
or near a swimming pool) while in the bathtub or shower or when you are wet. If the phone
becomes submerged in water, do not attempt to retrieve it until after you have unplugged
the line cord from the modular wall jack. Do not plug the phone back in until it has dried
completely.
WARNING: Avoid using the telephone during electrical storms. There may be a remote
risk of electric shock from lightning. If the electrical storm is present in your immediate
area, possibility of electrical shock exists.
WARNING: Do not use the phone if you suspect a gas leak in the area. The phone’s
electrical contacts could create a spark, which could ignite any heavy concentration of
leaking gas.
WARNING: Do not use liquid cleaners or aerosol cleaners on the telephone. Use a damp
cloth for cleaning.
WARNING: No telephone should ever be placed near an open radiator or heating register.
WARNING: Occasionally a power surge can occur on electrical lines without warning. With
any electrical device that you plug into an outlet, it is suggested you use a surge protector.
A surge protector will prevent power surges from damaging your telephone. Surge protectors are simple devices available at your local hardware store.
PLEASE SAVE THESE INSTRUCTIONS
6
Features & Functions
Figure #2
10
20
5
1
2
3
4
22
6
7
8
9
24
11
21
12
13
19
17
16
15
14 18
23
1. C (delete) button
2.
(up) button
3.
(down) button
4. OK (accept) button
5.
– Priority memory button
– Priority memory button
6.
7.
- Priority memory button
8. AMPLI – Amplification & tone
activation button
9. Volume control
10. Tone control
11. M1 – M8 One-Touch memory
dial buttons
12. PROG – Program (save) button
13. SPKR – Speakerphone button
14.
– Headset button
15. MUTE button
16. FLASH button
17. REDIAL button
18. New calls / message waiting indicator
19. In use indicator
20. Hook switch
21. Speaker
22. Caller ID Screen
23. Flashing incoming call indicator
(strobe light)
24. Lighted keypad
7
Features & Functions
Figure #3
2
Left side
3
4
1
Right side
Back
10
1.
2.
3.
4.
5.
6.
7.
8.
9.
10.
8
9
8
7
6
5
Speakerphone volume adjustment
Outgoing speech volume select switch (LO/NORMAL/HI)
Ringer Volume select switch (HI/LO/OFF)
Ringer / shaker / strobe select mode
Phone line jack
AC power adapter jack
Volume reset override switch (ON/OFF)
Optional bed shaker jack
Optional Audio/Neckloop jack (3.5mm jack)
Optional Telephone jack (2.5mm hands-free)
Features & Functions
Figure #4
Bottom
5
Handset
1
1.
2.
3.
4.
5.
2
3
4
Handset Boost button
Memory card to record speed dial numbers
Dialing mode select switch (T/P)
Battery compartment
Phone keyholes (mounts)
9
Care of Phone
Your telephone should be cleaned when necessary with a mild, non-abrasive detergent
solution. Unplug your phone and use a slightly damp cloth to wipe dirt from it. To avoid
damage, NEVER use an abrasive or strong solvent to clean any part of the phone. Keep
the phone out of direct sunlight. Avoid placing the phone in extremely humid conditions.
2
1
3
4
9
8
Figure #5
5
7
6
Screen example (on hook position)
1. Hours
2. Minutes
3. Power network icon
4. Number of calls
5.
6.
7.
8.
9.
Validation button
UP / DOWN arrow buttons
Cancel / Clear button
Month
Day
OK button is used to confirm action or a choice on the screen.
“UP / DOWN arrow” buttons are used to highlight or scroll through the menu.
C button is used to cancel or confirm an action/entry or clear a stored Caller ID call.
Your 40XLC Phone has a screen with different icons, which help you to use the telephone
The telephone is powered by battery (+battery indicator).
The telephone is powered by AC adapter.
Memory storing is required.
Screen contrast level.
“Mute” is activated.
Speakerphone is activated.
Precede the CID call record number.
To show new records.
10
Installation Steps
Installation of your ClearSounds™ 40XLC Amplified Phone is easy. There are some basic
steps you need to take when you set-up your 40XLC Phone for the first time.
1. Check parts list. (See page #5 for complete list)
2. Install (4) AAA Alkaline batteries (not included). This provides power to the Caller ID
Screen.
3. Set the dialing mode.
4. Choose desktop or wall mount.
5. Set ringer and auxiliary alert.
6. Program your memory dial buttons.
INSTALLING THE OPTIONAL BATTERIES
The batteries are necessary in case of network power failure to save stored numbers in
memory and are required for the “Phone Book” use.
1. Open the battery compartment door located on the bottom of your phone by unscrewing the battery compartment door and removing it from the bottom of your
phone (screwdriver provided).
2. Insert correctly 4 AAA alkaline batteries (purchased separately) in the battery compartment (See figure #6). Be sure to observe battery polarity as imprinted on the base
of the compartment.
3. Replace the battery compartment door and screw back in place.
4. The batteries will last approximately 1 year before needing replacement.
Figure #6 – Installing the batteries
NOTE: Always unplug the line cord before installing new batteries.
SETTING THE DIALING MODE
Set the dial mode switch on the bottom of the phone to “T” if you have Touch Tone service,
or “P” for Pulse dialing if you have rotary dialing service. Default is set to the “T” dialing
switch mode (See figure #7).
Figure #7 – Dialing mode switch
11
PROGRAMMING THE RINGER & AUXILIARY ALERT
Ringer Volume:
You can adjust the ringer volume of your 40XLC as high as 95+ dB. The ringer volume
adjustment is located on the right side of the telephone. The settings are OFF, LO, HI, (See
figure #8). Your phone comes with the ringer switched to HI. In additional to volume, you
can adjust the tone or melody of the ring.
: Off,
: Low,
: Hi
Figure #8 – Ringer Volume Switch
Ring Style:
Your 40XLC Phone allows you to choose from four different ring tones. You can choose a
new one by changing the settings as follows:
In the hook position
1. Press the MUTE button to access the special features (See figure #9).
2. Using the
or
arrow buttons (below the Caller ID Display), highlight <<SET
PHONE>>.
3. Press the OK (green) button.
4. Using the
or
arrow buttons, scroll to select <<SET RING>>.
5. Press OK button.
6. There are four (4) ring tones available. To hear each ring, use the
or
arrow button to highlight any one of the four and then press the OK button. Do this
with each one to find the best fit for you.
7. To save the ring tone, highlight the ring tone you want, and then press the C button
three (3) times until you are back to the time and date display. Or after your selection, do nothing for 20 seconds and the ring type will automatically be saved for the
next incoming call.
Figure #9 – Set The Ringer
Strobe & Optional Bed Shaker Ring Signaling:
Your ClearSounds™ 40XLC Telephone incorporates several options to alert you that the
to alert you that the phone is ringing. The loud, adjustable Ringer as well as the bright
Strobe and optional Bed Shaker or any combination of these allow you to customize the
phone to fit your needs.
12
Your 40XLC Phone is equipped with a bright STROBE light, which flashes a very bright
strobe when the phone rings (See figure #10). It’s almost impossible to miss telephone calls
when you select the Strobe Ringer.
Figure #10 – Strobe Ringer (Flashing incoming call indicator)
If you purchased the optional Bed Shaker, simply plug it into the shaker jack (See figure
#11) and place it between your mattress and box spring. Caution: For safety and correct
functionality considerations, your 40XLC Phone can only be guaranteed when used with
our ClearSounds™ Bed Shaker, model CS-SHK.
Figure #11 – Optional Bed Shaker Jack
A 3-position switch located on the right side of the phone allows for the settings below (See
figure #12). NOTE: The loud ringer will be triggered unless you have turned it “OFF”.
Bed Shaker & Strobe
Bed Shaker Only
Strobe Only
Figure #12 – Auxiliary Alert Switch
PROGRAMMING MEMORY DIAL BUTTONS
These memory dial buttons are empty. Should you choose to use this feature you will
need to select the telephone numbers for each button. It is recommended you store these
numbers during installation.
Your 40XLC Phone allows you to program three Priority numbers and eight frequently
dialed numbers into memory for future use (30 digits maximum for each button). We
suggest you program the emergency numbers for your local Police, Fire Station, Doctor or
Hospital. NOTE: Do not program 911 into any memory buttons!
13
To program your one-touch memory dial buttons please follow instructions below:
1. Lift the handset.
2. Press the PROG (program) button (See figure #13).
3. Using the keypad, dial the number you would like to save, including “1” and the area
code (if applicable). (See figure #14).
4. Press one of the Priority or Memory Dial buttons (M1 – M8) located on top of the
phone (See figure #15). Each button can be programmed (or reprogrammed using
the same procedure) for a phone number.
5. The Caller ID Screen will display <<SAVE OK>> (See figure #16).
6. To register your stored phone numbers, use the phonebook insert card located
under the base.
NOTE: Numbers will be lost if the phone is not receiving any power, either through the
phone line, batteries, AC adapter during a storm, power outage or if you disconnect the
phone. Entering a new number in the same location will automatically erase the previous
number.
Figure #13
Program Button
Figure #14
Telephone Keypad
Figure #15
Memory / Priority Buttons
Figure #16
LCD Display
If at any time you have questions about your telephone please contact our ClearSounds
Customer Service Department at: 1-800-965-9043.
14
PHONE MOUNTING INSTALLATIONS
The telephone may be placed on a shelf or table, or may be fixed to a wall using the
mounting bracket.
Plug the AC Adapter into the AC power back on the back of your phone, then into an
electrical outlet or surge protector, if you are using one. NOTE: The adapter is required
for the telephone to work correctly. If the adapter is accidentally unplugged (or in case
of power failure) and if the batteries are dead or not installed, minimal restricted phone
features only will work on the phone (make a call or answer incoming call).
IMPORTANT: Please remove the clear plastic Caller ID tab. This film tab is only for display
and to protect your Caller ID display during shipping.
Desk / Table Use
1. Connect one end of the 6ft telephone cord to the line jack on the back of your 40XLC
Phone and connect the other end to a modular phone jack (RJ11C).
2. Connect the handset coil cord (curly cord) to the handset and to the telephone
(See figure #17).
3. Lift the handset and listen for a dial tone. If you hear a dial tone, your phone is ready
to use. If there is no dial tone, check all your cords to make sure they are plugged in
securely.
Figure #17 – Desk Installation
Wall Mount Use
1. Slide the handset hanger tab out and reverse its position (rotate it 180 degrees).
Slide it back into place so that the hook points up (See figure #18). This will keep the
handset from falling out of the cradle when it is mounted on the wall.
2. Plug the 8in short phone cord into the telephone jack on the 40XLC, run phone cord
underneath wall plate adapter and through the opening.
3. Insert the Wall Plate adapter. Hold the wall plate adapter so that the raised mounting
pins line up with the phone’s keyholes on the 40XLC. Once the holes are lined up,
push the wall plate adapter in towards the 40XLC and then slide the plate upwards
until it is securely seated on the phone. (See figure #19)
4. With the Wall Plate adapter installed, plug the 8in short phone cord into the jack on
the wall.
5. Holding the phone slightly above the mounting screws on the wall jack, push the
phone against the mounting screws so they are hooked into upper and lower key15
hole slots on the back of the phone. Slowly slide the phone down until it snaps into
place (See figure #20).
6. Connect the handset coil cord (curly cord) to the handset and to the telephone.
7. Lift the handset and listen for a dial tone. If you hear a dial tone, your phone is ready
to use. If there is no dial tone, check all your cords to make sure they are plugged in
securely.
Figure #18 – Reversing The Hook
Figure #19 – Mounting The Wall Bracket
Figure #20 – Wall Installation
16
40XLC Phone Operation
MAKING AND RECEIVING A CALL
Making A Call Using The Handset
1. To make a call, lift the handset, listen for a dial tone and adjust your Volume & Tone
Settings. (See pages 19-21 for details on the amplification functions)
2. To dial a number you can:
a. Dial a number from the keypad
b. Press one of the Priority or Memory dial buttons (See pages 13-14 for instructions
on programming Priority/Memory Dial Buttons)
c. Dial from your Phone Book or Caller ID (See pages 29-31 for instructions on setting
up your Phone Book.)
3. On completion of the call, carefully replace the handset in the cradle.
Receiving/Answering A Call Using The Handset
1. While the phone is ringing, simply lift the handset and speak.
2. Adjust your Volume and Tone Settings if needed (See pages 19-21 for assistance)
3. On completion of the call, carefully replace the handset in the cradle.
USING THE SPEAKERPHONE
Your 40XLC Amplified Phone is also a full Speakerphone that offers volume adjustment up
to +15dB. This allows you to hear and speak hands-free.
Making A Call Using The Speakerphone
1. Press the “SPKR” (speakerphone) button for dial tone.
2. Adjust the volume to fit your needs. Move the Volume Adjustment Switch located to
the left side of the telephone beside the speaker (See figure #21).
3. To dial a number you can:
a. Dial a number from the keypad
b. Press one of the Priority or Memory dial buttons (See pages 13-14 for instructions
on programming Priority/Memory Dial Buttons.)
c. Dial from your Phone Book or Caller ID (See pages 29-31 for instructions on setting
up your Phone Book.)
4. On completion of the call, press the “SPKR” button again.
Figure #21 – Speakerphone Volume Control
17
Receiving/Answering A Call Using The Speakerphone
1. Press the “SPKR” (speakerphone) button while the phone is ringing to answer.
2. Adjust the volume to fit your need (Same as above).
3. On completion of the call, press the “SPKR” button again.
Switch between Handset and Speakerphone
While on a handset call, press the “SPKR” button and replace the handset in the cradle.
While on a speakerphone call, lift the handset.
USING AUDIO AND TELEPHONE HEADSET ACCESSORY JACKS
Your 40XLC Amplified Phone is equipped with both an Audio and Telephone Headset
Jack, providing total flexibility and multi-functionality (See figure #22). Both the Audio &
Headset jacks are amplified, allowing you to adjust both the tone and volume. (See pages
19-21 for instructions on the amplification features.) These jacks accommodate a variety of accessories including Neckloops, Headphones, Earbuds, Silhouettes, Cellular Accessories
and Cochlear Patchcords*.
*Caution: Before plugging any cord into your Cochlear processor, you should consult with
your implant manufacturer.
Audio/Neckloop Jack
Using the 3.5mm stereo/mono jack allows you to listen through your Neckloop or Headset
while speaking into the handset or speakerphone.
Telephone Headset Jack
Using the 2.5mm stereo jack that can accommodate many hands-free headsets allows for
total hands-free operation as you listen and speak through your hands-free headset.
Audio Jack
(only)
Telephone
headset
Jack
Figure #22
Audio & Telephone Headset Jack Location
Making A Call:
1. Plug your Neckloop, Headphones, Headset or other jack accessory into the Audio/
Neckloop Jack or Headset Jack.
2. Press the
(headset) button for dial tone (See figure #23).
3. Dial the number and wait for someone to answer.
18
a. If you are using the 3.5mm Audio/Neckloop Jack, and want to speak into the
handset, lift the handset and speak into it. Adjust your volume. On completion
of the call, carefully replace the handset in the cradle.
b. If you are using the 3.5mm Audio/Neckloop Jack, and want to speak into the
speakerphone, press the “SPKR” speakerphone button for hands-free operation, and talk into the speakerphone (the conversation will be heard through
both your audio equipment and over the speakerphone). Adjust your volume.
On completion of the call, press the “SPKR” speakerphone button.
c. If you are using the 2.5mm Headset Jack for hands-free communication, leave
the handset in the cradle, and talk into the headset microphone. Adjust your
headset button.
volume. On completion of the call press the
Figure #23 – Audio / Headset Jack Button
Receiving/Answering A Call:
1. Plug your accessory into the Audio/Neckloop Jack or Headset Jack.
2. If using the audio jack, press the “SPKR” or lift handset.
3. If using the headset jack, press the
(headset) button while the phone is ringing
to answer the call.
4. Depending on whether you are using the 3.5mm Audio/Neckloop Jack or 2.5mm
Telephone Headset Jack follow the directions above (A, B or C)
Using the Amplification Function
The 40XLC Phone has an “AMPLI” button that controls the loudness and tone of the
handset. Without pressing the “AMPLI” button, you are able to amplify the handset up to
30 dB of amplification. Once the “AMPLI” button is pressed, an extra level of amplification
is added providing 30 to 50 dB of gain and tone control.
Voice Amplification and Tone
Your 40XLC Phone is equipped with a specialized amplification function designed to fit
your needs. You can adjust the volume and tone (sound frequency range) of the incoming
voice by simply adjusting Volume and Tone Controls. To use the specialized amplification
boost and tone control features, follow these directions.
1. Once you have dialed the phone or answered a call, press the “AMPLI” (amplify)
button (See figure #24). This turns the incoming voice amplifier ON. When the amplifier is ON, you will see the red light on the left side of the “AMPLI” button light up.
i.e. “AMPLI”
19
2. Adjust the volume and tone to fit your needs by adjusting the VOLUME (See figure
#25) and TONE (See figure #26) controls until you find the right levels for you. The
Volume Control increases sound volume. Slide the Volume Control to the right
to increase the volume and slide it to the left to decrease the volume. The Tone
Control allows you to fit your specific hearing needs. Slide the Tone Control to the
left to boost the lower frequency range. Slide the Tone Control to right to boost the
high frequency range. This allows individuals with BOTH high frequency and low
frequency hearing loss to use the 40XLC Phone.
Figure #24 – Amplify Button
Figure #25 –Volume Control
Figure #26 – Tone Control
3. For additional, situational amplification, press and hold the HANDSET BOOST button located just below the earpiece on the inside of the handset (See figure #26). By
pressing and holding this additional handset boost button, you get an extra 10 dB
gain of amplification.
IMPORTANT NOTE: The Handset Boost button is designed to be used when listening
only. When you are ready to speak, release the button. Press it again when the extra
amplification is necessary. Failure to release the button when speaking will result in the
other party not hearing you. Use this additional handset boost button (See figure #27) for
the following reasons:
a.
b.
c.
d.
The caller has a very soft speech
There is a lot of background noise
You are in a noisy environment
The connection on the phone line is weak
Figure #27– Handset Boost Button
CAUTION: This telephone can produce very high (loud) sound levels. Repeated incremental exposure to amplification levels greater than 18 dB may be harmful to people
without hearing loss. Always adjust the volume control to the minimum setting after using
20
the phone and alert other users that hearing damage can potentially result from misuse.
Using the volume reset override
In standard mode, the phone will reset to normal sound levels when you hang up. This
allows people who do not require the level of amplification offered on the phone to use it.
If you would like to override the reset, simply turn the AUTO AMPLIFY switch on the back
of the phone to “ON” using the tip of a pencil or paper clip (See figure #28).
IMPORTANT: When the AUTO AMPLIFY switch is in the “ON” position, you do not need
to press the “AMPLI” (amplify) button. Your amplification setting will remain as set.
On any call, you can temporarily turn OFF and turn back ON the AUTO AMPLIFY feature
by pressing the “AMPLI” button.
Figure #28 – Volume Reset Override Switch
Using your 40XLC Amplified Phone with hearing aids
Your 40XLC Phone can be used with hearing aids equipped with a telecoil (T-coil). Adjust
your hearing aid “T-switch” to the “T” position. Make sure to hold the handset close to your
hearing aid.
Using the Outgoing Speech Volume
You can adjust the sending volume (outgoing volume up to 12 dB of gain) by using the
Speech Volume Control located on the right side of your 40XLC Phone. If your voice is
faint or weak, adjust the volume to “HI”. You can also decrease the volume as well. There
are three levels available “LO, NORMAL & HI” (See figure #29).
Figure #29 - Outgoing Speech Volume Switch
21
Tip: If you are using the boost feature along with the handset boost, we suggest you set
the SPCH VOL switch to HI. Any time you utilize the maximum amplification for listening,
it is normal for your outgoing speech volume to decrease. Therefore, it may be necessary
to turn the Speech Volume to HI.
Using The Last Number Redial
The REDIAL button is used to quickly redial the last number you dialed.
1. Lift the handset, listen for the dial tone
2. Press REDIAL button. The phone will redial up to 31 digits automatically.
NOTE: If you would like to dial from one of the last 30 numbers dialed (See page #31 for
instructions).
Using The Flash Button
The FLASH button is used to disconnect a call and re-establish dial tone or to switch over
to another caller if you use custom calling services such as Call Waiting or Three Way
Calling. Please contact your local telephone company for information on these services.
1. During a call press the FLASH button to access flash feature.
Using The Mute Button
The MUTE button allows the user to conduct a private conversation that you do not want
the person on the other end to hear.
1. Press and hold the MUTE button. You will still be able to hear the caller but they
cannot hear you during the mute operation.
2. To resume normal conversation, release the MUTE button.
40XLC CALLER ID OPERATION
NOTE: In order to utilize the Caller ID features, you must subscribe to Caller ID service
through your local phone company. There are fees for Caller ID services, and it may not be
available in all areas. This product can provide information only if both you and the caller
are in areas offering Caller ID service, and if both telephone companies use compatible
equipment.
Viewing Your Display Screen:
Your 40XLC Amplified Phone has a large LCD screen that provides useful information.
When the phone is not in use, the screen displays the following information:
Total & New Calls
The screen displays the total number of new calls to be reviewed. The total number of
calls received is also displayed. This shows you how many total calls are in your Caller ID
memory and how many of those are new (See figure #30).
No Calls
If you have viewed all of your calls in the Caller ID and have deleted all of them, the screen
will display NO CALL (See figure #31).
22
Battery Low Indicator
The battery power level icon is display on the screen when the AC adapter is not plugged
in or during a power outage. This will let you see the status of battery power. As the
batteries drain, the lines on the icon will disappear (See figure #32). When your AC adapter
is plugged in or power is restored, you will see a plug icon rather than a battery icon (See
figure #33).
Figure #30
Total & New Calls
Figure #31
No Call
Figure #32
Battery Power Indicator
Figure #33
AC Power Indicator
Message Waiting
If you have Voice Mail Service from your local phone company, your 40XLC Phone will
display MESSAGE WAITING if a recorded message has been left (See figure #34). The
Message Indicator light (See page #28) will flash until the message is retrieved.
Call Counter
Figure #34 – Message Waiting
Viewing Incoming Calls
If you subscribe to Caller ID service with your local phone service provider, this phone
stores all incoming calls with valid Caller ID information in the call history. Your LCD screen
will display the time and date, the caller’s phone number and name (if they are sent with
the call) as well as a count number (See figure #35). New calls are assigned a number
from 1 to 99. The most recent call will have the highest number. The call history numbers
appear in the upper right hand corner next to the time and date. New (un-reviewed) call
information shows NEW in the display. With each new call it will automatically turn on the
“New Calls / Message Waiting Indicator”, which is a small red light located on the lower
right-side of the phone’s visual ringer (next to the envelope icon).
NOTE: You must follow the instructions in “Set Area Code / LDS (Long Distance
Service) Code” for your phone to properly recognize and dial calls out of the Caller ID
stored calls (see page #27). You must program your area code so your phone can properly
recognize and dial calls.
23
NOTE: Those numbers can also be saved to your Phone Book (See pages 29-31 for instructions on setting up your phone book).
NOTE: Your 40XLC stores up to 99 call records before the memory becomes full. When
the next call comes in, the oldest record is automatically deleted.
Call Counter
Figure #35 – Caller ID Display
If you answer a call before information appears on the screen, it will not be stored in the
call history. Between the first and second rings the screen displays:
• Your caller’s name (15 letters are sent by your phone company).
• The caller’s area code and telephone number (area code is not display if it is programmed as the Home Area Code).
• The time and date of the call.
• The call’s position in call history.
NOTE: Call information is displayed for about 30 seconds.
Review Call History
To review earlier calls
In the hook position,
1. Using the
or
arrow buttons to scroll through the caller list.
2. To advance through call history from an earlier call, press the
DOWN arrow
button. When you have reach the end of the call history, the screen displays <<END
OF LIST>>.
Turn OFF the New Calls / Message Waiting Indicator Light
This red light (See figure #35) will remain lit unless you do one of the following in the hook
position:
1. If you do not have Caller ID or Message Waiting Service, your 40XLC will alert you
that you have missed a call by causing the red indicator light to flash. To turn OFF,
simply tap the
down arrow button once or until the light turns off.
2. If you only have Caller ID Service, your 40XLC will continue to flash unless you
review all new calls. To turn OFF, simply continue to tap the
down arrow button
to scroll through the Caller ID until the light turns off.
3. If you have Message Waiting Service through your local telephone company, your
40XLC will alert you that you have a message waiting after you have reviewed your
Caller ID or missed calls. To turn OFF, you will need to retrieve your message(s)
before the red light will go off.
24
NOTE: The red flashing light will return with your next missed call, next call with Caller ID
information or if you receive a message through Message Waiting Service.
Figure #35 - New Call/ Message Waiting Indicator
Remove Call Record From The Caller ID List
Remove A Specific Call Record
In the hook position,
1. Using the
or
arrow buttons to move into the list and select the required
number to delete.
2. Press the C button.
3. The screen displays <<DEL?>>.
4. Press the C button to confirm.
5. Press the OK button to exit.
Remove All Call Records
In the hook position,
3. Using the
or
arrow buttons to move into the list and select the required
number to delete.
4. Press & hold the C button until the screen displays <<ALL DEL?>>.
5. Press the C button to confirm.
6. Press the OK button to exit.
NOTE: Once a call is removed from call history, it cannot be retrieved.
Call Waiting
Your 40XLC Phone also has a Caller ID with Call Waiting feature that works with your
service from the local phone service provider. Caller ID with Call Waiting lets you see
who’s calling before you answer the phone even when you’re on another call. If you are
on a call and a 2nd call comes in, you will hear the audible beep in the handset and the
LCD will show Caller 2 and their information. If you choose to answer the call, press the
FLASH button or the Phone Hook button to transfer to the 2nd caller. If you choose not to
answer the 2nd call, the caller’s information will be stored in the Caller ID history and can
be viewed later.
25
Turn ON The Call Waiting Caller ID Feature
In the hook position,
1. Press the MUTE button to access the Programming Menu.
2. Using the
or
buttons, highlight <<SET PHONE>>.
3. Press the OK button to confirm.
4. Using the
or
arrow buttons, scroll to select <<CALL WAITING>>.
5. Press the OK button.
6. Using the arrow buttons to select <<ON>> or <<OFF>> to activate or deactivate the
function.
7. Press the OK button to confirm.
8. Press the C button twice to exit.
NOTE: When call waiting is OFF, Caller ID information for the 2nd caller will not be displayed.
You may need to change your phone service to use this feature. Contact your phone
service provider if:
• You have both Caller ID and Call Waiting, but as separate services (you may need
combined service)
• You have only Caller ID service or only Call Waiting service
• You don’t subscribe to any Caller ID or Call Waiting services
Display Screen Messages
PRIVATE NAME – The other party is blocking name information.
PRIVATE CALLER – The other party is blocking name and number information.
UNKNOWN NAME – Your phone company is unable to receive information about this
caller’s name.
UNKNOWN CALLER – Your phone company is unable to receive information about this
caller’s name and number.
OUT OF AREA – If a caller is in an area where the local phone company does not offer
Caller ID services or an area that is yet providing name & number information.
40XLC MISCELLANEOUS FEATURE SETTINGS
Set The Language
Your 40XLC Phone supports multiple languages. It is pre-set to American English (English1).
If you need to change the language, you can choose from 16 different languages. As listed
in the programming menu, these languages include: Norway, English1, China, Korean,
Greece, Austral, Turkish, English3, Spanish, Nederland, French, Germany, Poland, Sweden, Danish, and Finland. To change the language used for your Caller ID display:
26
In the hook position,
1. Press the MUTE button to access the Programming Menu.
or
arrow buttons, highlight/select <<SET PHONE>>.
2. Using the
3. Press the OK button to confirm.
4. Using the
or
arrow buttons to select <<SET LANGUAGE>>.
5. Press the OK button.
6. Using the arrow buttons to select the language you would like to set <<FRENCH>>
(for example)
7. Press the OK button.
8. Press the C button twice to exit.
NOTE: Do not change the language if you can not read it as all of the menu options will
change and it will be very difficult to change to English. If you change to a language you
can’t read follow this process 1. Press MUTE 2. Using the
arrow down button - tap
twice and press OK. 3. Tap the arrow down button 3 more times and press OK. 4. You
should see all the languages listed and select English1 then press OK. 5. Press the C
button twice.
Set Area Code / LDS (Long Distance Service) Code
Your ClearSounds 40XLC allows you to dial from your Caller ID memory and your phonebook. When you use your phone for the first time or if you have moved to a different area
code, you need to enter your area code into the phone. This assures that when dialing a
call out of memory or your phonebook, the number is formatted properly. To set your area
code & LDS Code:
In the hook position,
1. Press the MUTE button to access the Programming Menu.
2. Using the
or
arrow buttons, highlight <<SET PHONE>>.
3. Press the OK button to confirm.
4. Using the
or
arrow buttons, scroll to select <<SET AREA & LDS>>.
5. Press the OK button.
6. Using the arrow buttons, enter your area code. After each number press the OK button. The phone accommodates up to six (6) digits (allows for International codes).
Once you have entered your area code, even if you are not using all six (6) digits,
press the OK button until you reach the <<SET LDS CODE>> screen.
The LDS Code is your long distance code. In the U.S. your long distance code is 1. The
phone is pre-set for the U.S. NOTE: Do not change the LDS code unless you are leaving
the U.S.
1. Following step 6 of set area code, using the
or
arrow button, enter your
Long Distance Code (LDS).
2. Press the OK button to confirm.
3. Press the C button once to exit.
27
LCD / Screen Contrast Adjustment
You can adjust the contrast on the LCD screen to darken or lighten the screen. Your screen
has a backlight that automatically switches off after 15 seconds of inactivity.
In the hook position,
1. Press the MUTE button to access the Programming Menu.
2. Using the
or
arrow buttons, highlight <<SET PHONE>>.
3. Press the OK button to confirm.
4. Using the
or
arrow buttons to select <<LCD CONTRAST>>.
5. Press the OK button.
6. Using the arrow buttons to adjust the contrast level that most comfortable for
you.
7. Press the OK button (it will automatically return to time & date screen).
TIP: You can tilt the display as well to fit your needs.
Choosing The Date / Hour Format
If you have Caller ID service, the date and hour will be automatically set when you receive
your first call. If you currently do not have Caller ID service through you phone company,
please follow directions below.
You can change the format of the time and date to your preference.
Date format
You can choose between (2) two formats:
Day – Month or Month – Day
In the hook position,
1. Press the MUTE button to access the Programming Menu.
2. Using the
or
arrow buttons, highlight <<SET PHONE>>.
3. Press the OK button to confirm.
4. Using the
or
arrow buttons, scroll to select <<DATE FORMAT>>.
5. Press the OK button.
6. Using the arrow buttons, select <<DAY-MONTH>> or <<MONTH-DAY>>.
7. Press the OK button.
8. Press the C button twice to exit.
Hour format
You can choose between (2) two formats:
12 hours or 24 hours
In the hook position,
1. Press the MUTE button to access the Programming Menu.
2. Using the
or
arrow buttons, highlight <<SET TIME>>.
3. Press the OK button to confirm.
4. Using the
or
arrow buttons to select the desired digit.
5. Press the OK button to confirm and pass to the next digit.
6. Press the C button twice to exit.
28
DIM: X------x
This feature allows you to change the number of digits that can be displayed on the screen.
If the DIM:X function is activated, the maximum number of digits that can be shown is 18.
If it is deactivated, the maximum number of digits is 8. It is set to display 18 digits. We
suggest you leave the DIM:X activated as the caller’s complete number will not
appear on the screen if it is deactivated.
In the hook position,
1. Press the MUTE button to access the Programming Menu.
2. Using the
or
arrow buttons, highlight <<SET PHONE>>.
3. Press the OK button to confirm.
4. Using the
or
arrow buttons, scroll to select <<DIM: X---- x >>.
5. Press the OK button.
6. Using the arrow buttons to select <<ON>> or <<OFF>> to activate or deactivate the
function.
7. Press the OK button to confirm.
8. Press the C button twice to exit.
Setting Up Your Phone Book
Your phone book stores up to 99 names and numbers.
To Add A New Number/Name:
In the hook position,
1. Press the MUTE button to access the Programming Menu.
2. Using the
or
arrow buttons, highlight <<PHONE BOOK>>.
3. Press the OK button to confirm.
4. Using the
or
arrow buttons, scroll to select <<ADD>>.
5. Press the OK button.
6. Enter the phone number using the dial pad. To erase the previous digit press the C
button. Include 1 + area code if necessary.
7. Press & Hold the OK button after entering the correct phone number.
8. Enter the Name using the keypad. Press the number with the corresponding letter
on it. Press a number key until the letter you want appears on the screen. For
example, the 2 key represents ABC. For C, you would press the 2 key three (3)
times.
9. After each letter in the name, press the OK button.
10. To backspace, press the C button.
11. After entering the name, press and hold the OK button for 3 seconds to SAVE.
This also takes you to a new entry screen. (You can also pick up the handset or do
nothing for 20 seconds and the information will automatically be saved.)
12. Press the C button once to exit.
29
To Review / Modify A Number/Name In Your Phone Book:
In the hook position,
2. Press the MUTE button to access the Programming Menu.
3. Using the
or
arrow buttons, highlight <<PHONE BOOK>>.
4. Press the OK button to confirm.
5. Using the
or
arrow buttons, scroll to select <<REVIEW>>.
6. Press the OK button.
7. Using the arrow buttons to locate the number you want to review.
8. Press and Hold the OK button. The last digit in the phone number will be flashing.
This indicates you are in the modification mode. You can now make changes to your
phone number. Press the C button to backspace to erase the existing number.
9. After changes are complete, press and hold the OK button for 3 seconds to save.
10. The first space in the name will be flashing. You can now make changes to your
name. Press the OK button to move to the next space or C button to erase. Again,
press the number key with the corresponding letter on it. Press a number key until
the letter you want appears on the screen.
11. After changes are complete, press and hold the OK button for 3 seconds to save.
12. This also takes you to the next number. (You can also pick up the handset or do
nothing for 20 seconds and the information will automatically be saved.)
13. Press the C button once to exit.
To Delete A Number From Your Phone Book:
In the hook position,
1. Press the MUTE button to access the Programming Menu.
2. Using the
or
arrow buttons, highlight <<PHONE BOOK>>.
3. Press the OK button to confirm.
4. Using the
or
arrow buttons, scroll to select <<REVIEW>>.
5. Press the OK button.
6. Using the arrow buttons to locate the number you want to delete.
7. Press the C button, then the LCD Screen will display <<DEL?>>.
8. Press C button once more to confirm.
To Save Numbers From Caller ID To The Phone Book:
1. Using the
or
arrow buttons, find the phone number you want to save.
2. Press and Hold the OK button until the last digit of the number is flashing.
3. You can now modify the number and name (see above procedure Review/Modify
Number) and save it to your Phone Book.
30
To Dial A Number From The Phone Book:
In the hook position,
1. Press the MUTE button to access the Special Feature Menu.
2. Using the
or
arrow buttons, highlight <<PHONE BOOK>>.
3. Press the OK button to confirm.
4. Using the
or
arrow buttons, scroll to select <<REVIEW>>.
5. Press the OK button.
6. Use the arrow buttons to locate the number you wish to dial.
7. Either pick-up the handset, press the SPKR (speakerphone) button or, if you are
(headset) button. Your 40XLC
using either of the hands-free jacks, press the
Phone will automatically dial the number.
Recall / Delete One Of the Last 30 Numbers Dialed
You can call back the last 30 numbers dialed. To call back one of them, follow instructions
below:
In the hook position,
1. Press the OK button.
2. The screen will display “DIALED”, the last number dialed, the total of numbers, the
date and the hour of record.
3. Using the
or
arrow buttons, scroll through the numbers and select the
number you wish to dial.
4. Lift the handset or press the SPKR button, the number will be automatically dialed.
To delete one of telephone numbers, follow instructions below:
In the hook position,
1. Press the OK button.
2. The screen will display “DIALED”, the last number dialed, the total of numbers, the
date and the hour of record.
3. Using the
or
arrow buttons, scroll through the numbers and select the
number you wish to delete.
4. Press the C button.
5. The Screen will display “DEL?”
6. Press again the C button to confirm.
7. Press the OK button to exit.
AUTO ON HOOK
When the Auto On Hook feature is ON, Your ClearSounds 40XLC will automatically disconnect the line after 5 - 8 minutes if the phone is left off the hook. This will restore your
line to be able to receive another call even if you leave the handset off the base.
In the hook position,
1. Press the MUTE button to access the Programming Menu.
2. Using the
or
arrow buttons, highlight <<SET PHONE>> then press the
OK button to confirm.
3. Using the
or
arrow buttons, scroll to select <<AUTO ON HOOK>> and
press the OK button.
31
4. Using the arrow buttons, choose <<ON>> or <<OFF>>.
5. Press the OK button.
6. Press the C button twice to exit.
Troubleshooting Guide
No dial tone
1. Check that all phone cord connections (including the curly cord) and AC Adapter are
securely plugged into the telephone & wall jack.
2. Check that the phone is in the correct dialing mode, Touch-Tone / Pulse Setting.
3. Plug another phone into the jack to make sure your phone service is functioning
properly.
Call will not dial or dials very slowly
1. Check that the phone is in the correct dialing mode, Touch-Tone / Pulse Setting (See
page #11).
No audible ringer
1. Make sure the ringer is not set to the “OFF” position (See diagram #8).
2. Check the volume level of the ringer.
3. You may have too many extensions on your line. Try unplugging a few devices.
Having too many telephones /accessories can also create problems such as low
ringer volume or impaired quality during calls.
No Strobe Ringer and/or bed shaker will not activate
1. Make sure the strobe and/or shaker switch is turned “ON”(See diagram #12).
2. Make sure the Bed Shaker is plugged in all the way.
3. Make sure the Bed Shaker is plugged into the correct jack (See diagram #11).
No amplification
1. Check to see if the AMPLI amplify button is “ON” (See diagram #24). The red light
should be lit.
2. Check the AC Power Adapter and make sure it is plugged into the wall and into the
appropriate jack on the phone.
Noise, Static, Interference while using the handset
1. A filter may be required for homes with DSL line or near Radio towers.
There is a red light that continues to flash
1. You have un-reviewed Caller ID / Call Waiting information or missed a call (See
page #24).
2. Your Voice Mail account needs to be set-up as Visual Indicator only. Contact your
local phone company; if the account is setup as Audible or Audible/Visual indicator,
the light will contine to flash after reviewing your voice mail messages.
32
Difficulty storing numbers in memory
1. Make sure you are pressing the correct sequence of buttons for storing numbers.
2. If you are interrupted by the telephone company’s recorded announcement telling
you to hang up or by a loud buzzing noise, ignore and continue to store the numbers. Or hang up and store the number without lifting the handset or temporarily
disconnect the telephone line until you have programmed in all the numbers.
No numbers dialed when memory button is pressed
1. No number stored in that memory button.
2. Make sure phone number was programmed and saved in the memory (See pages
13-14).
3. Make sure programming is done in the correct dial mode (touch-tone or pulse dialing).
4. If your phone has been disconnected for a few hours the numbers stored will be
lost.
Caller ID information does not show
1. Make sure you are subscribed to Caller ID through your local phone company.
2. Check batteries.
No Caller ID information while on a call
1. Make sure your service provides Caller ID Information while you are on a call. This
is sometimes known as “Caller ID on Call Waiting” or “Type II Caller ID”.
2. Make sure you have the Caller ID – Caller Waiting feature on this phone set to ON
(See page 26).
3. The phone cannot display the information if another phone on the same line is in
use. Make sure all extensions are on hook.
Cannot dial out of Caller ID
1. Make sure you are subscribed to Caller ID through your local phone company.
2. Make sure your area code is set up properly (See pages 27).
Specifications
Maximum Gain:
42 dB in Wide band (300 to 3400Hz)
52 dB max Low Frequency (Bass 300 Hz)
52 dB max High Frequency (Treble 3400Hz)
Maximum Outgoing Gain:
+12 dB
Dimensions:
Size: 10.5” (with Caller ID screen flat) X 8” X 2”
Weight: 4.33 lbs
33
Power Requirements:
AC Power Adapter: Input: 120 VAC, 60Hz, 26W. Output: 12V DC 1000 mA
Batteries: (4) AAA Alkaline batteries (not included)
FCC Registration Notice
THE INFORMATION INFORMING THE USER OF HIS/HER AND THE TELEPHONE
COMPANY’S RIGHT AND OBLIGATION IS OUTLINED BELOW.
a) This equipment complies with Part 68 of the FCC rules and the requirements adopted
by the ACTA. On the bottom of this equipment is a label that contains, among other
information, a product identifier in the format US:AAAEQ##TXXXX. If requested,
this number must be provided to the telephone company.
b) All applicable certification jacks Universal Service Order Codes (USOC) for the
equipment is provided (i.e. RJ11C) in the package with each piece of approved
terminal equipment.
c) A plug and jack used to connect this equipment to the premises wiring and telephone network must comply with the applicable FCC Part 68 rules and requirement
adopted by the ACTA. A compliant telephone cord and modular plug is provided with
this product. It is designed to be connected to a compatible modular jack that is also
compliant. See installation instructions for details.
d) The REN is used to determine the number of devices that may be connected to the
telephone line. Excessive RENs on a telephone line may result in the devices not
ringing in response to an incoming call. In most but not all areas, the sum of RENs
should not exceed five (5.00). To be certain of the number of devices that may be
connected to a line, as determined by the total RENs, contact the local telephone
company. [For products approved after July 23, 2001, the REN for this product is
part of the product identifier that has the format US:AAAEQ##TXXXX. The digits
represented by 1.0B for US are the REN without a decimal point (e.g., 03 is a REN
of 0.3). For earlier products, the REN is separately shown on the label.]
e) If this equipment causes harm to the telephone network, the telephone company will
notify you in advance that temporary discontinuance of service may be required. But
if advance notice isn’t practical, the telephone company will notify the customer as
soon as possible. Also, you will be advised of your rights to file a complaint with the
FCC if you believe it is necessary.
f) The telephone company may make changes in its facilities, equipment, operation
or procedures that could affect the operation of the equipment. If this happens the
telephone company will provide advance notice in order for you to make necessary
modifications to maintain uninterrupted service.
g) Should you experience trouble with the equipment, please contact: ClearSounds
Communications Attn: Repair Center, 8160 S Madison St, Burr Ridge, IL 60527,
800-965-9043 V/TTY, 888-654-9219 FAX, e-mail: [email protected] for
repair or warranty information. If the equipment is causing harm to the telephone
34
network, the telephone company may request that you disconnect the equipment
until the problem is resolved.
h) Please follow instructions for repairing if any (e.g. battery replacement section);
otherwise do not alter or repair any part of device except as specified.
i) Connection to party line service is subject to state tariffs. Contact the state public
utility commission, public service commission or corporation for information.
j) NOTICE: If your home has specially wired alarm equipment connected to the telephone line, ensure the installation of the 40XLC Phone does not disable your alarm
equipment. If you have questions about what will disable alarm equipment, consult
your telephone company or a qualified installer.
k) This equipment is hearing aid compatible.
WARNING: Changes or modifications to this unit not expressly approved by the
party responsible for compliance could void the user’s authority to operate the
equipment.
NOTE: This equipment has been tested and found to comply with the limits for a Class B
digital device, pursuant to part 15 of the FCC Rules. These Limits are designed to provide
reasonable protection against harmful interference in a residential installation. This equipment generates, uses, and can radiate radio frequency energy and, if not installed and
used in accordance with the instructions, may cause harmful interference to radio communications. However, there is no guarantee that interference will not occur in a particular
installation. If this equipment does cause harmful interference to radio or television reception, which can be determined by turning the equipment off and on, the user is encouraged
to try to correct the interference by one or more of the following measures.
·
·
·
·
Reorient or relocate the receiving antenna.
Increase the separation between the equipment and receiver.
Connect the equipment into an outlet on a circuit different from that to which
the receiver is connected.
Consult the dealer or an experienced radio TV technician for help.
This product meets the applicable Industry Canada technical specifications.
The Ringer Equivalence Number is an indication of the maximum number of terminals allowed to be
connected to a telephone interface. The termination on an interface may consist of any combination of
devices subject only to the requirements that the sum of the Ringer Equivalence Number of all the devices
does not exceed five.
Should you experience trouble with this equipment, please contact: The Canadian Service Center is Hall
Telecommunications, 5477 R.R. #5, Hwy #6 North Guelph, Ontario, Canada N1H 6J2. Tel no: 519-8225420 Fax No: 519-822-5462 Contact person: Mr. Don Beam. The US Service Center is ClearSounds
Communications 8160 S Madison St - Burr Ridge, IL 60527 USA Tel No: 800-965-9043 V or 800-814-5359
TTY Fax No: 888-654-9219 e-mail: [email protected] Contact Name: Customer Service for repair or
warranty information. If the equipment is causing harm to the telephone network, the telephone company
may request that you disconnect the equipment until the problem is resolved.
35