1
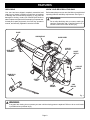
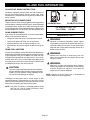
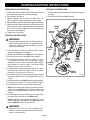
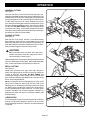
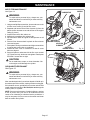
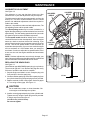
S
TO
P
OPERATOR'S MANUAL
2 CYCLE GASOLINE POWERED
RECIPROCATING SAW
MODEL NO. EJ101
SPECIFICATIONS:
Length of stroke
Strokes per minute
Length (without blade)
Engine Type
Displacement
Starting System
Carburetor
Fuel Tank Capacity
Net weight
1 in. (25.4mm)
0-2000 spm
17 in. (430 mm)
Air Cooled 2 Cycle Gasoline Engine
15.9 cc
Recoil
Diaphram
0.35 literes
11 lbs.
For Questions, Call 1-800-525-2579 in the U.S. or 1-800-265-6778 in Canada
www.ryobi.com
SAVE THIS MANUAL FOR FUTURE REFERENCE
d
or
st
n
TABLE OF CONTENTS
■ Table of Contents ........................................................................................................................................ 2
■ Introduction ................................................................................................................................................. 2
■ Rules For Safe Operation ........................................................................................................................... 2
■ Operation .................................................................................................................................................... 2
■ Maintenance ................................................................................................................................................ 2
■ Exploded View and Repair Parts List ......................................................................................................... 2
THANK YOU
CONTENTS OF CARTON
Thank you for purchasing this quality product. Your new saw
has been engineered and manufactured to Ryobi's high
standard for dependability, ease of operation, and operator
safety. Properly cared for, it will provide many hours of useful
service. You will find it to be a great labor saving device.
This operator’s manual provides you with easy-to-understand
operating instructions. Read the entire manual and follow all
the instructions to keep your new outdoor power tool in top
operating condition.
The following items are included in the carton:
• Model EJ101 Reciprocating Saw
• 4 mm Hex Key Wrench
• Spark Plug Wrench
• Blade Pack – Includes One Each Of The Following:
Steel Cutting Blade No. 51
Steel Cutting Blade No. 52
Wood Cutting Blade No. 53
• Operator's Manual
• Warranty Registration Card
CAUTION:
Carefully read through this entire operator's manual
before using your new saw. Pay close attention to the
Rules for Safe Operation, Warnings, and Cautions.
If you use your saw properly and only for what it is
intended, you will enjoy years of safe, reliable service.
PRODUCT REFERENCES, ILLUSTRATIONS AND
SPECIFICATIONS
All information, illustrations and specifications in this
manual are based on the latest product information
available at the time of printing. We reserve the right to
make changes at any time without notice.
Important Service Information
Service on this unit within and after the warranty period
should be performed only by a authorized service
technician. For service we suggest you return the tool to
your nearest Ryobi Authorized Service Center for repair.
When servicing use only identical Ryobi replacement
parts.
For the nearest Ryobi Authorized Service Center, call
1-800-525-2579 in the U.S. or 1-800-265-6778 in Canada.
DO NOT return the unit to the retailer.
Note: Proof of purchase will be required for warranty
service.
Page 2
CALIFORNIA EMISSION REGULATIONS
The engine of your mixer meets the 1995 to 1998
California emissions regulations. To ensure that your unit
continues to meet these regulations, refer to the following
information and instructions in this operator's manual.
These units are identified by the label on the engine of
your product. A typical identification label is shown.
IMPORTANT ENGINE INFORMATION
ENGINE DISPLACEMENT: 31cc
ENGINE FAMILY: SN4031UB24RA; EM
THIS ENGINE CONFORMS TO U.S. EPA PH1
AND 1995-1998 CALIFORNIA EMISSION
REGULATIONS FOR ULGE ENGINES.
REFER TO OPERATOR’S MANUAL FOR
MAINTENANCE SPECIFICATIONS
AND ADJUSTMENTS.
California Proposition 65 Warning:
WARNING
The engine exhaust from this product
contains chemicals known to the State
of California to cause cancer, birth
defects or other reproductive harm.
SPARK ARRESTOR
Note: For users on U.S. Forest Land and in the states of California, Maine, Oregon and Washington. All U.S. Forest
Land and the state of California (Public Resources Codes 4442 and 4443), Oregon and Washington require, by law that
certain internal combustion engines operated on forest brush and/or grass-covered areas be equipped with a spark arrestor,
maintained in effective working order, or the engine be constructed, equipped and maintained for the prevention of fire. Check
with your state or local authorities for regulations pertaining to these requirements. Failure to follow these requirements could
subject you to liability or a fine. This unit is not factory equipped with a spark arrestor. If these items are required in your
area, ask your local service dealer to install the Optional Spark Arrestor Kit.
Page 3
RULES FOR SAFE OPERATION
THE PURPOSE OF SAFETY SYMBOLS IS TO ATTRACT YOUR ATTENTION TO POSSIBLE DANGERS. THE
SAFETY SYMBOLS, AND THE EXPLANATIONS WITH THEM, DESERVE YOUR CAREFUL ATTENTION AND
UNDERSTANDING. THE SAFETY WARNINGS DO NOT BY THEMSELVES ELIMINATE ANY DANGER. THE
INSTRUCTIONS OR WARNINGS THEY GIVE ARE NOT SUBSTITUTES FOR PROPER ACCIDENT PREVENTION
MEASURES.
SYMBOL
MEANING
SAFETY ALERT SYMBOL:
Indicates danger, warning, or caution. May be used in conjunction with other symbols or
pictographs.
DANGER: Failure to obey a safety warning will result in serious injury to yourself or to others.
Always follow the safety precautions to reduce the risk of fire, electric shock and personal
injury.
WARNING: Failure to obey a safety warning can result in serious injury to yourself or to
others. Always follow the safety precautions to reduce the risk of fire, electric shock and
personal injury.
CAUTION: Failure to obey a safety warning may result in property damage or personal injury
to yourself or to others. Always follow the safety precautions to reduce the risk of fire, electric
shock and personal injury.
NOTE:
Advises you of information or instructions vital to the operation or maintenance of the
equipment.
WARNING:
Do not attempt to operate this tool until you have read thoroughly and understand completely all instructions, safety
rules, etc. contained in this manual. Failure to comply can result in accidents involving fire, electric shock, or
serious personal injury. Save operator's manual and review frequently for continuing safe operation, and instructing
others who may use this tool.
WARNING:
The operation of any reciprocating saw can result in foreign objects being thrown into your eyes,
which can result in severe eye damage. Before beginning power tool operation, always wear
safety goggles or safety glasses with side shields and a full face shield when needed. We
recommend Wide Vision Safety Mask for use over eyeglasses or standard safety glasses with
side shields.
Look for this symbol to point out important safety precautions.
It means attention!!! Your safety is involved.
Page 4
RULES FOR SAFE OPERATION
READ ALL INSTRUCTIONS
■ KNOW YOUR POWER TOOL - Read operator's
manual carefully. Learn its applications and limitations as well as the specific potential hazards related to this tool.
■ KEEP GUARDS IN PLACE and in working order.
■ KEEP WORK AREA CLEAN. Cluttered areas and
benches invite accidents.
■ AVOID DANGEROUS ENVIRONMENT. Don't use
power tool in damp or wet locations or expose to
rain. Keep work area well lit.
■ KEEP CHILDREN AND VISITORS AWAY. All visitors should wear safety glasses and be kept a safe
distance from work area. Do not let visitors contact
tool or extension cord.
■ STORE IDLE TOOLS. When not in use, tools
should be stored in a dry, high or locked-up place out of the reach of children.
■ DON'T FORCE TOOL. It will do the job better and
safer at the rate for which it was designed.
■ USE RIGHT TOOL. Don't force small tool or attachment to do the job of a heavy duty tool. Don't use tool
for purpose not intended - for example - Don't use
a circular saw for cutting tree limbs or logs.
■ WEAR PROPER APPAREL. No loose clothing or
jewelry to get caught in moving parts. Rubber
gloves and nonskid footwear are recommended
when working outdoors. Also, wear protective hair
covering to contain long hair and keep it from being
drawn into air vents.
■ ALWAYS WEAR SAFETY GLASSES. Everyday
eyeglasses have only impact-resistant lenses; they
are NOT safety glasses.
■ PROTECT YOUR LUNGS. Wear a face or dust
mask if operation is dusty.
■ PROTECT YOUR HEARING. Wear hearing protection during extended periods of operation.
■ SECURE WORK. Use clamps or a vise to hold
work. Both hands are needed to operate the tool.
■ DON'T OVERREACH. Keep proper footing and
balance at all times. Do not use on a ladder or
unstable support.
■ MAINTAIN TOOLS WITH CARE. Keep tools sharp
at all times, and clean for best and safest performance. Follow instructions for lubricating and changing accessories.
■ DISCONNECT TOOLS. When not in use, before
servicing, or when changing attachments, blades,
bits, cutters, etc., all tools should be disconnected
from power supply.
■ REMOVE ADJUSTING KEYS AND WRENCHES.
Form habit of checking to see that keys and adjusting wrenches are removed from tool before turning
it on.
■ KEEP BLADES CLEAN AND SHARP. Sharp
blades minimize stalling and kickback. Also, keep
blades properly tightened at all times.
■ KEEP HANDS AWAY FROM CUTTING AREA.
Keep hands away from blades. Do not reach underneath work while blade is cutting. Do not attempt to
remove material while blade is cutting.
■ NEVER USE IN AN EXPLOSIVE ATMOSPHERE.
Normal sparking of the motor could ignite fumes.
■ KEEP HANDLES DRY, CLEAN, AND FREE FROM
OIL AND GREASE. Always use a clean cloth when
cleaning. Never use brake fluids, gasoline, petroleum-based products or any strong solvents to
clean your tool.
■ STAY ALERT. Watch what you are doing and use
common sense. Do not operate tool when you are
tired. Do not rush.
■ CHECK DAMAGED PARTS. Before further use of
the tool, a guard or other part that is damaged
should be carefully checked to determine that it will
operate properly and perform its intended function.
Check for alignment of moving parts, binding of
moving parts, breakage of parts, mounting, and any
other conditions that may affect its operation. A
guard or other part that is damaged should be
properly repaired or replaced by an authorized
service center unless indicated elsewhere in this
instruction manual.
■ DO NOT USE TOOL IF SWITCH DOES NOT
TURN IT ON AND OFF. Have switches replaced by
an authorized service center.
■ CUTTING INTO ELECTRICAL WIRING IN WALLS
CAN CAUSE BLADE AND METAL PARTS TO
BECOME ELECTRICALLY LIVE. Grasp only the
handle(s) provided on the tool and be sure that
hidden electrical wiring, water pipes, or any mechanical hazards are not in blade path.
■ Inspect for and remove all nails from lumber before
cutting.
Page 5
RULES FOR SAFE OPERATION
■ DRUGS, ALCOHOL, MEDICATION. Do not operate tool while under the influence of drugs, alcohol,
or any medication.
■ WHEN SERVICING USE ONLY IDENTICAL
RYOBI REPLACEMENT PARTS.
■ WARNING: TO AVOID POSSIBLE SERIOUS INJURY, KEEP HANDS AND FINGERS FROM BETWEEN THE MOTOR HOUSING AND SAW
BLADE CLAMP.
■ SAVE THESE INSTRUCTIONS. Refer to them
frequently and use them to instruct others who may
use this tool. If you loan someone this tool, loan
them these instructions also.
•
•
•
WHILE OPERATING
•
SAVE THESE INSTRUCTIONS
•
BEFORE OPERATING
•
•
•
•
•
•
•
Read the instructions carefully. Be familiar with the controls
and proper use of the unit.
Do not operate this unit when tired, ill, or under the
influence of alcohol, drugs, or medication.
Children and teens under the age of 15 must not use the
unit, except for teens guided by an adult.
Inspect the unit before use. Replace damaged parts.
Check for fuel leaks. Make sure all fasteners are in place
and secure. Replace blades that are cracked, chipped, or
damaged in any way. Make sure blades are properly
installed and securely fastened. Make sure the shoe is
secured properly and positioned as recommended. Failure
to so can result in personal injury to the operator and
bystanders, as well as damage to the unit.
Be aware of the risk of injury to the head, hands and feet.
Clear the work area before each use. Remove all objects
such as nails or wire which can contact the blade. Clear
the area of children, bystanders, and pets. At a minimum,
keep all children, bystanders, and pets outside a 50 feet
(15.2 m) radius; there still may be a risk to bystanders
from thrown objects. Bystanders should be encouraged
to wear eye protection. If you are approached, stop the
engine immediately.
Squeeze the throttle control and check that it returns
automatically to the idle position. Make all adjustments or
repairs before using unit.
SAFETY WARNINGS FOR GASOLINE ENGINES
• WARNING: Gasoline is highly flammable, and its vapors
•
•
can explode if ignited. Take the following precautions:
Store fuel only in containers specifically designed and
approved for the storage of such materials.
Always stop the engine and allow it to cool before filling
the fuel tank. Never remove the cap of the fuel tank, or add
fuel, when the engine is hot. Never operate the unit
without the fuel cap securely in place. Loosen the fuel
tank cap slowly to relieve any pressure in the tank.
Mix and add fuel in a clean, well-ventilated area outdoors
where there are no sparks or flames. Slowly remove the
fuel cap only after stopping engine. Do not smoke while
fueling or mixing fuel. Wipe up any spilled fuel from the
unit immediately.
Avoid creating a source of ignition for spilled fuel. Do not
start the engine until fuel vapors dissipate.
Move the unit at least 50 feet (15.2 m) from the fueling
source and site before starting the engine. Do not smoke,
keep sparks and open flames from the area while adding
fuel or operating the unit.
•
•
•
•
•
•
•
•
•
•
•
•
•
Page 6
Never start or run the unit inside a closed room or building.
Breathing exhaust fumes can kill. Operate this unit only in
a well ventilated area outdoors.
Wear safety glasses or goggles that are marked as
meeting ANSI Z87.1-1989 standards, and ear/hearing
protection when operating this unit. Wear a face or dust
mask if the operation is dusty.
Do not wear loose clothing, jewelry, sandals or go barefoot.
Secure hair above shoulder level.
This unit has a clutch. The blade remains stationary when
the engine is idling. If it does not, have the unit adjusted
by an authorized service technician.
Be sure the blade is not in contact with anything before
starting the unit.
Use the unit only in daylight or good artificial light.
Avoid accidental starting. Be in the starting position
whenever pulling the starter rope. The operator and unit
must be in a stable position while starting. See Starting/
Stopping Instructions.
Use the right tool. Only use this tool for the purpose
intended.
Do not overreach. Always keep proper footing and balance.
Always hold the unit with both hands when operating.
Keep hands, face, and feet at a distance from all moving
parts. Do not touch the blade when it is rotating.
Do not touch the engine or muffler. These parts get
extremely hot from operation. When turned off they
remain hot for a short time.
Do not operate the engine faster than the speed needed
for the cut being made. Do not run the engine at high
speed when not cutting.
If you strike a foreign object, stop the engine immediately
and check for damage. Do not operate before repairing
damage. Do not operate the unit with loose or damaged
parts.
Stop and switch the engine to off for maintenance, repair,
or for changing blades.
RULES FOR SAFE OPERATION
•
•
•
Use only genuine Ryobi replacement parts when servicing
this unit. These parts are available from your authorized
service dealer. Do not use parts, accessories or
attachments not authorized by Ryobi for this unit. Doing
so could lead to serious injury to the user, or damage to
the unit, and void your warranty.
Keep unit clean from foreign materials.
To reduce fire hazard, replace faulty muffler and spark
arrestor, keep the engine and muffler free from debris,
excessive grease, or carbon build up.
WHILE OPERATING WITH EDGER ADD-ON
•
•
Make sure the blade is installed correctly and secure.
Do not attempt to touch or stop the blade when it is
moving.
• A coasting blade can cause injury while it continues to
reciprocate after the engine is stopped or the throttle
control is released. Maintain proper control until the blade
has completely stopped moving.
• If you strike or become entangled with a foreign object,
stop the engine immediately and check for damage. Have
any damage repaired before attempting further operations.
Do not operate unit with a bent, cracked or dull blade.
Discard blades that are bent, warped, cracked or broken.
• Stop the engine IMMEDIATELY if you feel excessive
vibration. Vibration is a sign of trouble. Inspect thoroughly
for loose nuts, bolts or damage before continuing. Repair
or replace affected parts as necessary.
BEFORE OPERATING
•
•
•
•
•
•
OTHER SAFETY WARNINGS
•
•
•
•
Never store the unit, with fuel in the tank, inside a building
where fumes may reach an open flame or spark.
Allow the engine to cool before storing or transporting. Be
sure to secure the unit while transporting.
Store the unit in a locked up and dry or high and dry place
to prevent unauthorized use or damage, out of the reach
of children.
Never douse or squirt the unit with water or any other
liquid. Keep handles dry, clean and free from debris.
Clean after each use, see Cleaning and Storage
instructions.
Page 7
Wipe up any spilled fuel immediately. If fuel has been
spilled, allow it to dry completely before starting the
engine.
Thoroughly inspect the mixer for loose or damaged
parts before each use. Do not use until adjustments or
repairs are made.
Avoid accidental starting. Be in the starting position
whenever pulling the starter rope.
Keep all bystanders, especially children, and pets at
least 50 ft. (15.2 m) away from the area.
Before starting, make sure the mixing head is not in
contact with anything.
Always remain alert. To prevent injury to yourself and
others, do not operate this mixer if you are fatigued.
FEATURES
UNPACKING
KNOW YOUR RECIPROCATING SAW
Your saw has been shipped completely assembled and
ready for use. Inspect it carefully to make sure no breakage
or damage has occurred during shipping. If any parts are
damaged or missing, contact your nearest Ryobi dealer to
obtain replacement parts before attempting to operate saw.
A blade pack, spark plug wrench, 4 mm hex key, operator's
manual, and warranty registration are also included.
Before attempting to use your saw, familiarize yourself with all
operating features and safety requirements. See Figure 1.
WARNING:
Do not allow familiarity with your saw to make you
careless. Remember that a careless fraction of a
second is sufficient to inflict severe injury.
BLADE
GASOLINE CAP
CHOKE LEVER
LOCK-ON
BUTTON
BASE (SHOE)
ASSEMBLY
S
TO
P
ON/OFF
SWITCH
LOCK-OFF
LEVER
SPARK PLUG
WRENCH
STARTER
ROPE
SWITCH
TRIGGER
4 MM
HEX KEY
Fig. 1
WARNING:
If any parts are missing, do not operate your saw until the missing parts are replaced. Failure to do so could result
in possible serious personal injury.
Page 8
FEATURES
SWITCH
ON (I)
See Figure 2.
Your saw is equipped with an On/Off Switch for starting and
stopping the engine. You must slide the switch forward to the
ON (I) position in order to allow for the engine to be started
when pulling starter rope. Slide the switch back to OFF (0)
position to stop engine.
LOCK-ON
BUTTON
S
TO
P
OFF (O)
LOCK-OFF LEVER
See Figure 2.
Your saw is also equipped with a Lock-Off Lever to prevent
accidental depression of the switch trigger. You must depress
the lock-off lever in order to depress the switch trigger when
starting saw.
S
TO
P
ON/OFF
SWITCH
LOCK-OFF
LEVER
LOCK-ON BUTTON
See Figure 2.
Your saw is equipped with a lock-on feature, which is
convenient when continuous cutting for extended periods of
time is required. To lock-on, depress the lock-off lever,
depress the switch trigger, push in and hold the lock-on
button located on the side of the handle, then release switch
trigger. Release "lock-on" button and your saw will continue
running.
To release the lock, depress the switch trigger and release
it. DO NOT lock the trigger on heavy jobs where your saw
may have to be stopped quickly.
TO
DECREASE
The engine of your saw should never be running
when you are assembling parts, making adjustments,
installing or removing blades, when cleaning, or
when not in use. Stopping the saw's engine and
letting it cool will prevent accidental contact with the
blade, muffler, etc. that could cause serious injury.
Disconnect the spark plug to make sure the saw will
not start.
When using your saw with the switch lock-on, keep
your finger near the trigger and be prepared to
disengage the "lock-on" feature at all times. Failure
to do so could result in loss of control leading to
possible serious injury.
WARNING:
Before connecting your saw to power supply source,
always check to be sure it is not in "Lock-on" position
(depress and release switch trigger). Failure to do so
could result in accidental starting of saw resulting in
possible serious injury. Also, do not lock the trigger
on jobs where your saw may need to be stopped
suddenly.
Fig. 2
WARNING:
WARNING:
If you have the "lock-on" feature engaged during use and your
saw runs out of gasoline, disengage the "lock-on" feature
immediately.
TO
INCREASE
SWITCH
TRIGGER
BLADE SELECTION
To obtain the best performance from your saw it is important
to select a specific blade for the particular application and
type of material you wish to cut. By doing this you will get a
smoother faster cut and prolong blade life. Replacement
blades for this saw are available from your nearest Ryobi
dealer.
NO. 51
VARIABLE SPEED
See Figure 2.
Operator control and adjustment of speed and power is
controlled by the switch trigger. The speed and power of your
saw can be increased or decreased by the amount of switch
trigger depression.
NO. 52
NO. 53
Fig. 3
Page 9
OIL AND FUEL INFORMATION
OIL AND FUEL MIXING INSTRUCTIONS
Old and/or improperly mixed fuel are the main reasons for
the unit not running properly. Be sure to use fresh, clean
unleaded fuel. Follow the instructions carefully for the proper
fuel/oil mixture.
+
Pb
DEFINITION OF BLENDED FUELS
Today's fuels are often a blend of gasoline and oxygenates
such as ethanol, methanol or MTBE (ether). Alcohol-blended
fuel absorbs water. As little as 1% water in the fuel can make
fuel and oil separate. It forms acids when stored. When using
alcohol-blended fuel, use fresh fuel (less than 60 days old).
UNLEADED GAS
RYOBI 2 CYCLE OIL
1 US GALLON + 4.0 FL. OZ.
(3.8 LITERS)
(120 ML)
USING BLENDED FUELS
If you choose to use a blended fuel, or its use is unavoidable,
follow recommended precautions.
• Always use fresh fuel mix per your operator's manual.
• Use the fuel additive STA-BIL® or an equivalent.
• Always agitate the fuel mix before fueling the unit.
• Drain the tank and run the engine dry before storing the
unit.
MIXING RATIO – 32:1
WARNING:
Gasoline is extremely flammable. Ignited Vapors
may explode. Always stop the engine and allow it to
cool before filling the fuel tank. Do not smoke while
filling the tank. Keep sparks and open flames at a
distance from the area.
USING FUEL ADDITIVES
The use of fuel additive, such as STA-BIL® Gas Stabilizer or
an equivalent, will inhibit corrosion and minimize the formation
of gum deposits. Using a fuel additive can keep fuel from
forming harmful deposits in the carburetor for up to six (6)
months. Add 0.8 oz. (23 ml.) of fuel additive per gallon of fuel
according to the instructions on the container. NEVER add
fuel additives directly to the unit's fuel tank.
WARNING:
Remove fuel cap slowly to avoid injury from fuel
spray. Never operate the unit without the fuel cap
securely in place.
WARNING:
Add fuel in a clean, well ventilated area outdoors.
Wipe up any spilled fuel immediately. Avoid creating
a source of ignition for spilt fuel. Do not start the
engine until fuel vapors dissipate.
CAUTION:
For proper engine operation and maximum reliability,
pay strict attention to the oil and fuel mixing instructions
on the 2-cycle oil container. Using improperly mixed
fuel can severely damage the engine.
NOTE: Dispose of the old fuel/oil mix in accordance to
Federal, State, and Local regulations.
Thoroughly mix the proper ratio of 2-cycle engine oil with
unleaded gasoline in a separate fuel can. Use a 32:1 fuel/oil
ratio. Do not mix them directly in the engine fuel tank. See the
table below for specific gas and oil mixing ratios.
NOTE: One gallon (3.8 liters) of unleaded gasoline mixed
with one 4 oz. (120 ml.) bottle of RYOBI 2 CYCLE
OIL makes a 32:1 fuel/oil ratio.
Page 10
STARTING/STOPPING INSTRUCTIONS
PREPARING FOR OPERATION
STOPPING INSTRUCTIONS
1. Mix gas with oil. Fill fuel tank with fuel/oil mixture. See Oil
and Fuel Mixing Instructions on previous page.
2. Do not overfill or spill fuel.
3. Replace gasoline cap on gas tank. Make sure it is
securely tightened before attempting to start engine.
4. Make sure all screws and fasteners are tightened securely.
5. Check the throttle cable and make sure it moves smoothly
without excessive play. If adjustments are needed, loosen
the lock nut securing the adjustment screw and adjust as
necessary to eliminate play.
6. Tighten lock nut securely.
1. Release switch trigger and allow the engine to cool down
by idling.
2. Slide the On/Off Switch to OFF position.
PRIMER
BULB
CHOKE
LEVER
LOCK-ON
BUTTON
STARTING INSTRUCTIONS
WARNING:
Avoid accidental starting. Be in the starting position
when pulling the starter rope. The operator and unit
must be in a stable position while starting to avoid
serious personal injury.
1. Place the saw on a clear, firm, and flat surface. Do not
start saw by holding it in one hand.
RUN
POSITION
STARTER
ROPE
2. Slide the On/Off Switch to the ON position. See Figure 4.
SWITCH
TRIGGER
ON (I)
Operate this unit only in a well ventilated area
outdoors. Carbon monoxide exhaust fumes can be
lethal in a confined area.
Page 11
TO
P
LOCK-OFF
LEVER
WARNING:
FULL
CHOKE
POSITION
OFF (O)
S
3. Place the choke lever in the FULL choke position.
4. Lock the switch trigger in "lock-on" position. To "lockon"; depress the lock-off lever, pull the switch trigger,
depress the lock-on button, release the switch trigger,
then release the lock-on button. The switch trigger
should now be in "lock-on" position.
5. Fully press and release primer bulb slowly 5 to 7 times.
Fuel should be visible in the bulb. If fuel is not visible,
press three (3) more times, or until it is.
6. Pull starter rope briskly until the engine pops or sounds
as though it wants to run. Normally this takes from 2 to
5 pulls.
7. Place the choke lever in PARTIAL (center) choke position.
8. Pull starter rope briskly 1 to 3 times to start the engine.
9. If the engine does not start, repeat the steps above.
NOTE: If the engine floods while trying to start, place the
choke lever in the RUN position. Pull the starter rope
briskly. The engine should start within three (3) to eight
(8) pulls.
10. Once the engine starts, let it warm up for 5 to 10 seconds,
then place the choke lever in the RUN position.
NOTE: Choking is unnecessary when starting a warm
engine. Slide the On/Off Switch to the ON position and
start in PARTIAL (center) choke position.
ON/OFF
SWITCH
Fig. 4
OPERATION
WARNING:
BLADE CLAMP
BLADE
The engine of your saw should never be running
when you are installing or removing blades. Stop the
engine and let it cool to prevent accidental contact
with the blade, muffler, etc. that could cause serious
injury. Disconnect the spark plug to make sure the
saw will not start.
4 MM
HEX KEY
PIN
TO INSTALL BLADES
See Figure 5.
■ Use the 4 mm hex key provided with this saw.
■ Loosen the blade clamp screw enough to permit the saw
blade to be inserted over the pin between blade clamp
and saw bar.
NOTE: It is not necessary to remove the blade clamp from
the tool or the blade clamp screw from the blade clamp to
change the blade.
■ Align and place the hole in the shank of the blade on the
pin in the saw bar.
■ Tighten blade clamp screw securely. Do not overtighten
screw or use an aid with hex key.
■ Remove hex key. Put it in a safe place for future use, such
as a tool box.
NOTE: There may be times when the blade clamp sticks to
the saw bar and will not loosen enough to allow blades to be
installed or removed. If this happens, loosen the blade clamp
screw with the hex key, then tap lightly on the end of the hex
key with a mallet. See Figure 5.
BLADE
CLAMP SCREW
SAW BAR
PIN
BLADE CLAMP
BLADE CLAMP
SCREW
BLADE
LOCK
WASHER
Fig. 5
4 MM
HEX KEY
BASE (SHOE) ASSEMBLY
See Figure 6.
The base assembly of your reciprocating saw pivots up and
down approximately 15° in both directions. It also is adjustable,
allowing the use of the blade teeth at different positions on
the blade.
TO CHANGE POSITIONS OF THE BASE ASSEMBLY:
■ Loosen the set screw on bottom of the gear frame with the
4 mm hex key provided with this saw.
■ Reposition base assembly to desired position.
■ Retighten set screw securely. Do not overtighten screw
or use an aid with hex key.
■ Remove hex key and store it in a tool box or other safe
place for future use.
Page 12
BASE (SHOE)
ASSEMBLY
15° PIVOT
SET
SCREW
Fig. 6
OPERATION
GENERAL CUTTING
S
TO
P
See Figure 7.
Hold your saw firmly in front of and clearly away from you.
Make sure saw blade is clear of any foreign material. Be sure
material to be cut is held firmly. Small work pieces should be
securely clamped in a vise or with clamps to the work bench
or table. Mark the line of cut clearly. Depress the lock-off
lever, then pull switch trigger to start the cutting action. Place
the base assembly against the work, then move the blade
into the work. DO NOT FORCE. Use only enough pressure
to keep the saw cutting. Let the blade and saw do the work.
Use of excessive pressure that causes bending or twisting of
the blade may result in broken blades.
PLUNGE CUTTING
See Figure 8.
Mark the line of cut clearly. Choose a convenient starting
point inside the area to be cut out and place the tip of the
blade over that point. Rest front edge of base assembly on
work and hold firmly in position. Depress the lock-off lever,
then pull switch trigger to start the cutting action.
CAUTION:
Fig. 7
STO P
Make sure blade does not touch work until motor
reaches full speed, since this could cause loss of
control resulting in serious injury.
With saw blade at full cutting speed, slowly tilt saw downward
until tip of blade starts cutting work. After blade penetrates
work, tilt saw until blade is perpendicular to the work.
METAL CUTTING
TO
P
Fig. 8
S
See Figure 9.
Metals such as sheet steel, pipe, steel rods, aluminum,
brass, and copper may be cut with your saw. Be careful not
to twist or bend the saw blade. DO NOT FORCE. We
recommend cutting oil when cutting most soft metals and
steel. Cutting oil will also keep blades cool, increase cutting
action, and prolong blade life.
Never use gasoline since normal sparking of motor could
ignite fumes. Clamp the work firmly and cut close to the
clamping point to eliminate any vibration of the work being
cut. When cutting conduit pipe or angle iron, clamp work in
a vise if possible and cut close to the vise. To cut thin sheet
material, "sandwich" the material between hardboard or
plywood and clamp the layers to eliminate vibration and
material tearing.
LUBRICATION
All of the bearings in this tool are lubricated with a sufficient
amount of high grade lubricant for the life of the unit under
normal operating conditions. Therefore, no further lubrication
is required.
Page 13
Fig. 9
MAINTENANCE
WARNING:
When servicing use only identical Ryobi replacement parts. Use of any other parts may create a hazard or cause
product damage.
NOTE: Some maintenance procedures may require special
tools or skills. If you are unsure about these
procedures take your unit to an authorized service
center.
MAINTENANCE SCHEDULE
These required maintenance procedures should be
performed at the frequency stated in the table. They should
also be included as part of any seasonal tune-up.
WARNING:
Always wear safety goggles or safety glasses with
side shields during power tool operation or when
blowing dust. If operation is dusty, also wear a dust
mask.
WARNING:
To prevent serious personal injury, never do
maintenance or repairs with unit running. Always do
maintenance and repairs on a cool unit. Disconnect
spark plug wire to make sure the unit will not start.
FREQUENCY
MAINTENANCE REQUIRED
REFER TO:
Before Starting Engine
Fill fuel tank with correct oil and fuel mixture.
Page 11
Every 10 Hours
Clean and re-oil air filter.
Page 16
Every 50 Hours
Clean carbon build up from muffler
Page 16
Every 50 Hours
Check spark plug condition and gap.
Page 17
Page 14
MAINTENANCE
AIR FILTER MAINTENANCE
See Figure 12.
CARBURETOR
SCREWS
WARNING:
To avoid serious personal injury, always turn your
saw off and allow it to cool before you clean or do any
maintenance on it.
1. Using a small phillips screwdriver, loosen and remove the
air filter cover screws (2) and air filter cover.
2. Separate and remove the air filter elements (2) from the
plastic air filter element cover and air filter cover support
casing (2 pieces).
3. Inspect elements for dirt, stains, etc.
4. Wash both in gasoline, then squeeze dry.
5. Dip elements in SAE 30 engine oil and squeeze out all
excess.
6. Place air filter elements back in plastic air filter element
cover and support.
7. Place plastic casing on carburetor and align screws holes
in casing with screw holes on carburetor.
8. Position air filter cover on carburetor so that all screw
holes are aligned.
9. Secure all parts to carburetor with air filter cover screws
(2). Tighten securely, but do not over tighten. Plastic parts
will break if screws are too tight.
AIR FILTER
COVER
AIR FILTER
ELEMENT SUPPORT
AIR FILTER
ELEMENTS
AIR FILTER
ELEMENT COVER
Fig. 12
CAUTION:
Do not sand blast, scrape, or clean electrodes. Grit
in the engine could damage the cylinder.
CLEAN MUFFLER EXHAUST
See Figure 13.
WARNING:
To avoid serious personal injury, always turn your
saw off and allow it to cool before you clean or do any
maintenance on it.
After extended periods of use carbon deposit will build up in
the exhaust port of the muffler, causing it to become clogged.
If this situation occurs, periodically remove the carbon build
up with a slotted screwdriver. Be careful, do not damage the
muffler, piston, or cylinder.
NOTE: If an excessive amount of carbon builds up, causing
a loss of power, take your saw to an authorized service
center to be cleaned by a authorized service technician. It
may be necessary for him to remove the muffler and clean
both the muffler and cylinder.
Page 15
MUFFLER
Fig. 13
MAINTENANCE
CARBURETOR ADJUSTMENT
LOW SPEED
NEEDLE
HIGH SPEED
NEEDLE
H
L
See Figure 10.
The carburetor on your saw has been factory set. After
extended use of your saw adjustments may be required.
The high speed needle has been permanently set from the
factory at 1-1/4 turns counterclockwise from the closed
position. No additional adjustments should be required or
made to this needle.
However, it is possible to make two basic adjustments; The
idle adjusting screw and low speed needle.
The idle adjusting screw may be turned clockwise for a
higher idle speed setting or counterclockwise for a lower idle
speed setting. The idle rotating speed should be just under
the speed required to make the blade reciprocate.
The low speed needle should be initially set at 1-1/4 turns
counterclockwise from the closed position. Once the engine
warms up, check to see how rich the fuel is burning. If you
notice excessive smoke from the exhaust system it is burning
too rich. Turn the low speed needle 1/8 turn clockwise (in
toward the closed position). If you turn it too much the engine
will not accelerate or it will hesitate when you attempt to
accelerate. Continue to adjust the low speed needle 1/16 of
a turn at a time until the engine stabilizes and accelerates
properly.
NOTE: Careless adjustments can seriously damage your
saw. Carburetor adjustments should be made by a authorized
service technician at an authorized service center.
IDLE
ADJUSTING
SCREW
Fig. 10
REPLACING THE SPARK PLUG
See Figure 11.
Use a Resistor type NGK BMR6A spark plug (or equivalent).
The correct air gap is 0.7 mm. Remove the plug after every
50 hours of operation and check its condition.
1. Stop the engine and allow it to cool. Grasp the plug wire
firmly and pull it from the spark plug.
2. Clean around the spark plug. Remove the spark plug from
the cylinder head using the spark plug wrench provided.
3. Replace cracked, fouled, or dirty spark. Set the air gap at
0.7 mm using a feeler gage. See Figure 11.
CAUTION:
Do not sand blast, scrape, or clean electrodes. Grit
in the engine could damage the cylinder.
4. Install a correctly gapped spark plug in the cylinder head.
Tighten securely using the spark plug wrench provided.
If using a torque wrench torque to:
110-120 in.•lb. (12.3-13.5 N•m).
Do not over tighten.
Page 16
0.7 mm
Fig. 11
CLEANING AND STORAGE
LONG TERM STORAGE
WARNING:
To avoid serious personal injury, always turn your
saw off and allow it to cool before you clean or do any
maintenance on it.
GENERAL
Avoid using strong detergents or solvents when cleaning
plastic parts. Most plastics are susceptible to various types
of commercial solvents and may be damaged by their use.
Use a small brush to clean off the outside of the unit.
Household cleaners that contain aromatic oils such as pine
and lemon, and solvents such as kerosene, can damage
plastic housing or handle. Use soft, clean cloths to remove
dirt and wipe off any moisture.
WARNING:
Do not at any time let brake fluids, gasoline, petroleumbased products, penetrating oils, etc. come in contact
with plastic parts. They contain chemicals that can
damage, weaken, or destroy plastic.
If the unit will be stored for an extended time, use the
following storage procedure.
1. Drain all fuel from the fuel tank and drain into a container
with the same 2-cycle fuel mixture. Do not use fuel that
has been stored for more than 60 days. Dispose of the old
fuel/oil mix in accordance to Federal, State, and Local
regulations.
2. Start the engine and allow it to run until it stalls. This
ensures that all fuel has been drained from the carburetor.
3. Allow the engine to cool. Remove the spark plug and put
1 oz. (30 ml.) of any high quality motor oil or 2-cycle oil into
the cylinder. Pull the starter rope slowly to distribute the
oil. Reinstall the spark plug.
NOTE: Remove the spark plug and drain all of the oil from the
cylinder before attempting0 to start the trimmer after storage.
4. Thoroughly clean the unit and inspect for any loose or
damaged parts. Repair or replace damaged parts and
tighten loose screws, nuts or bolts. The unit is ready for
storage.
TRANSPORTING
STORAGE
•
•
•
•
•
Never store the unit with fuel in the tank where fumes may
reach an open flame or spark.
Allow the engine to cool before storing.
Store the unit locked up to prevent unauthorized use or
damage.
Store the unit in a dry, well ventilated area.
Store the unit out of the reach of children.
•
•
•
•
Allow the engine to cool before transporting.
Secure the unit while transporting.
Drain fuel from unit.
Tighten fuel cap before transporting.
ACCESSORIES
2 – Cycle Oil
Spark Plug
Fuel Cap
blades
Ryobi
Page 17
TROUBLESHOOTING
ENGINE WILL NOT START
CAUSE
On/Off Switch is in OFF position
Empty fuel tank
Primer bulb wasn't pressed enough
Engine flooded
Old or improperly mixed fuel
Fouled spark plug
ACTION
Turn On/Off Switch to ON
Fill fuel tank with properly mixed fuel
Press primer bulb fully and slowly 5-7 times
Use starting procedure with choke lever in the
RUN position
Drain gas tank / Add fresh fuel mixture
Replace or clean the spark plug
ENGINE WILL NOT IDLE
CAUSE
Air Filter is Plugged
Old or improperly mixed fuel
Improper carburetor adjustment
ACTION
Replace or clean the air filter
Drain gas tank / Add fresh fuel mixture
Adjust per instruction Pg. 21
ENGINE WILL NOT ACCELERATE
CAUSE
Old or improperly mixed fuel
Improper carburetor adjustment
Cutting attachment bound with grass
Dirty air filter
ACTION
Drain gas tank / Add fresh fuel mixture
Take to an authorized service dealer for
carburetor adjustment
Stop the engine and clean the cutting attachment
Clean or replace the air filter
ENGINE LACKS POWER OR STALLS WHEN CUTTING
CAUSE
Old or improperly mixed fuel
Improper carburetor adjustment
ACTION
Drain gas tank / Add fresh fuel mixture
Take to an authorized service dealer for
carburetor adjustment
Page 18
NOTES
Page 19
OPERATOR'S MANUAL
2 CYCLE GASOLINE POWERED
RECIPROCATING SAW
MODEL NO. EJ101
• SERVICE
Now that you have purchased your tool, should a need ever exist for repair parts or
service, simply contact your nearest Ryobi Authorized Service Center. Be sure to
provide all pertinent facts when you call or visit. Please refer to the insert or call 1-800525-2579 in the United States or 1-800-265-6778 in Canada for your nearest Ryobi
Authorized Service Center.
• MODEL NO. AND SERIAL NO.
The model number of this tool will be found on a plate attached to the motor housing.
Please record the model number and serial number in the space provided below.
• HOW TO ORDER REPAIR PARTS
WHEN ORDERING REPAIR PARTS,
ALWAYS GIVE THE FOLLOWING INFORMATION:
•
MODEL NUMBER EJ101
•
SERIAL NUMBER
RYOBI AMERICA CORP.
1424 Pearman Dairy Road
Anderson, SC 29625
Post Office Box 1207
Anderson, SC 29622-1207
Phone 1-800-525-2579
972000-634
8-99
RYOBI CANADA INC.
Post Office Box 910
Cambridge, Ontario N1R 6K2
Phone 1-800-265-6778
Printed in U.S.A.