1
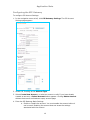
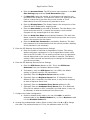
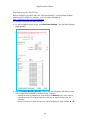
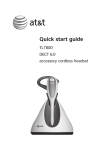
Application Note Configuring the Synapse® SB67070 SIP Gateway for Broadvox GO! SIP Trunking © 2012 Advanced American Telephones. All Rights Reserved. AT&T and the AT&T logo are trademarks of AT&T Intellectual Property licensed to Advanced American Telephones, San Antonio, TX 78219. Synapse® is a registered trademark of Advanced American Telephones. Rev. 1 01/12 Table of Contents About Synapse® and the Synapse SB67070 SIP Gateway..................................... 2 Purpose, Scope, and Audience ......................................................................... 3 Ordering SIP Trunking from Broadvox ............................................................... 3 Synapse SIP Gateway Deployment Information .................................................. 3 Synapse External IP Address ........................................................................ 4 Sending Calls to Broadvox............................................................................ 4 SRV Records .............................................................................................. 6 Preferred and Alternate Codecs..................................................................... 6 If the SIP Gateway Is Behind a Firewall.......................................................... 6 Installing the SB67070 SIP Gateway ................................................................. 8 Configuring Synapse for Broadvox SIP Trunking ................................................. 8 Logging In to Synapse as Administrator ......................................................... 8 Configuring the SIP Gateway .......................................................................10 Configuring the Dial Plan.............................................................................13 1 Application Note About Synapse® and the Synapse SB67070 SIP Gateway Synapse is an IP-based PBX system that integrates seamlessly into an existing Local Area Network (LAN). A Synapse system can include any or all of the following devices: SB67010 PSTN Gateway SB67050 Analog Terminal Adapter (ATA) SB67060 T1 Gateway SB67030, SB67031, or SB67020 Desksets SB67070 SIP Gateway To deploy Broadvox GO! SIP Trunking service, the Synapse system must include a SB67070 SIP Gateway. The SB67070 SIP Gateway allows the Synapse system to make and receive external calls via a SIP Trunk Service Provider. Currently, one SIP Gateway and four SIP accounts are supported on a single Synapse system. SB67070 SIP Gateway Features: A LAN 10/100 BaseT Ethernet port connects to the existing Synapse network. A four-line LCD display with four hard keys provides status information, such as the device IP address, and allows basic network configuration and firmware upgrades. Device configuration and system configuration, such as SIP Account information, through the Web User Interface (WebUI). Up to 16 simultaneous voice calls are supported. Additional System features, including Direct Inward Dial (DID) and multiple Auto Attendants. For more information about Synapse, visit http://telephones.att.com/smb. Figure 1: Typical Synapse System Connection to SIP Trunk Service Provider Over a Public Network 2 Application Note Purpose, Scope, and Audience This technical application note describes the configuration of the SB67070 SIP Gateway for the Broadvox GO! SIP Trunking service. This document is suitable for use by anyone deploying the Broadvox GO! SIP Trunking service in conjunction with the Synapse system with SB67070 SIP Gateway. This document has a technical audience in mind – specifically IT professionals with some experience in PBX administration and familiarity with VoIP technologies. This document is not for business administrators or people in other non-technical careers. In order to successfully use this document to deploy Broadvox GO! SIP Trunking service, you will need to possess the following skills, or have access to professionals or consultants with the following skills: Familiarity with network troubleshooting tools, including: o Wireshark/Ethereal o dig/nslookup o ping o traceroute Familiarity with the Synapse PBX system, including: o Trunk configuration o Dial plan configuration o Extension configuration o Mailbox configuration Familiarity with Session Initiation Protocol (SIP) An understanding of all seven layers of the Open System Interconnection (OSI) model A complete understanding of your internal network structure, Network Address Translation (NAT) setup, and firewall setup A complete understanding of your public Internet connectivity Broadvox can only provide support for Synapse to the extent covered in this Technical Application Note and the included reference configuration, so if your level of technical expertise does not include the above skills, it is recommended that you obtain the services of a software professional. Ordering SIP Trunking from Broadvox When ordering your service from Broadvox, you must specify the following requirements to ensure that the service is initially compatible with the Synapse SIP Gateway: Routing priority should be dynamic first, static second Dialed number must be in the “To” header field The Gateway will be operating behind a NAT. Synapse SIP Gateway Deployment Information Before you begin deploying the Synapse SIP Gateway, please locate the following information. If you have questions about any item, refer to the descriptions and additional details provided on the pages that follow. 3 Application Note SIP Gateway IP Address: ______.______.______.______ (on the SIP Gateway LCD) Max Calls: __________ Preferred Codec: ulaw G.711 Alternate Codec: G.729 Is Synapse Behind a Firewall?: Yes Is There a Local Firewall?: No Yes No Synapse External IP Address Your SIP Gateway will use a private IP address of the form 192.168.x.x, 172.16.x.x – 172.31.x.x, or 10.x.x.x. This internal address is not routable on the public Internet. In order for your SIP Gateway to connect to the Broadvox Session Border Controller (SBC), you must translate your private IP address into a public IP address using a Network Address Translator (NAT). When the SIP Gateway is behind a NAT, your public IP address will typically be the public IP address of your NAT. You may also have a static, one-to-one mapping of a public IP address to your private IP address. In this case, your public IP address will not match the IP address of your NAT, but you can look up the correct public IP address in your NAT configuration. If in doubt, you can perform a network packet capture using Wireshark (previously called Ethereal) on the public side of your NAT while simultaneously issuing some form of Internet request on your Synapse server. Sending Calls to Broadvox In your Welcome letter, Broadvox provides IP addresses to which you may send calls, and from which you should be prepared to receive calls. At the top of your technical welcome letter, you will see a table like this one which shows your account number, turn-up ticket number, and trunk number. This information should be provided to Broadvox when you call for assistance to expedite support. Figure 2: Welcome Letter Account Information The third page of the welcome letter contains a table of the IP addresses and ports you need to allow through your firewall. Note that the table included here is an example and may be out of date. 4 Application Note Figure 3: Firewall Configuration Information The third page also contains the IP address and DNS information you should use for configuring your trunk. We recommend you use the DNS A record entries, which the SB67070 SIP Gateway supports. Figure 4: Trunk Destination Information Also on the third page, you will find a section containing information about how Broadvox has provisioned your SIP trunk. You should carefully review this information to ensure it is configured as you specified when you ordered the service. Admin E-mail: Trunk Type: BTN & Username: Password: TCP: TLS: SRTP: Dialed Number In: NAT Allowed: Yes Simultaneous Calls: [email protected] GO!Anywhere (or other Broadvox service) 5551234567 To-URI 3 (however many you ordered) Figure 5: Broadvox Provisioning Details The 'Admin E-mail' lists the E-mail address which will receive alerts from the Fusion platform when various recognizable events occur. These events include things such as calls being blocked because they would cause you to exceed the simultaneous call sessions you purchased. Finally, on the fourth page, you will find two sections that specify how Broadvox is configured to send calls to your Synapse system and how Broadvox is configured to 5 Application Note receive calls from your system. These two sections are only utilized if you provided static IP address information or DNS information. Broadvox can send calls to entirely separate systems from the ones it is configured to receive calls from. This allows you to split your inbound and outbound traffic for any reason you may have, including but not limited to load distribution over several systems or multiple Internet connections. In addition, Broadvox can randomly load-balance calls across several systems using an identical priority for the Send-To records. These options should allow you to engineer your traffic flow to suit your particular needs. Figure 6: Signaling Configuration SRV Records Service records (SRV) are a form of Domain Name System (DNS) record. They contain information about where to send requests for a particular service offered at a specific domain. In the case of Broadvox GO! SIP Trunking, they provide the IP addresses, port numbers, and preferences to use for sending SIP calls over UDP to Broadvox. The SRV location to use for sending calls to Broadvox for each of your trunk groups is in your Welcome letter. Preferred and Alternate Codecs Broadvox allows you to select preferred and alternate codecs to simultaneously meet your bandwidth requirements and provide greater end-to-end support. In the event that your destination party or your destination party’s carrier cannot support your preferred codec or alternate codecs, Broadvox will automatically transcode your call to a supported codec. When configuring codecs, please keep in mind that G.711 μLaw (ulaw) consumes approximately 87.2 Kbps of bandwidth per simultaneous call. G.729 Annex B (g729) will consume approximately 31.2 Kbps of bandwidth per simultaneous call. Also, keep in mind that G.711 offers superior call quality when compared to G.729, but only if you have enough bandwidth to support all of your simultaneous calls. If the SIP Gateway Is Behind a Firewall If the SIP Gateway is behind a NAT, then it is almost certainly behind a firewall. It is also possible that the SIP Gateway uses a public IP address but is still behind a firewall. If you use a Cisco PIX, SonicWALL, Shorewall, Firebox, or any other brand of firewall, you may need to perform additional configuration steps on the firewall 6 Application Note device to allow the SIP Gateway to function properly. Additionally, you may be using an Application Gateway such as an Ingate SIParator. These devices will also need additional configuration to allow the SIP Gateway to function properly. Configuring your firewall or application gateway is beyond the scope of this document. In general, you will need to allow UDP port 5060 in both directions, as well as UDP ports 1024 to 65535 for RTP. We recommend only opening these ports for the Broadvoxprovided IP addresses. 7 Application Note Installing the SB67070 SIP Gateway To install the SIP Gateway, see the Synapse Installation Guide (for software 1.10.4 or later) available at http://telephones.att.com/synapseguides. Configuring Synapse for Broadvox SIP Trunking The Synapse WebUI allows you to configure the SIP Gateway for Broadvox SIP Trunking service. Logging In to Synapse as Administrator To access the Synapse WebUI and log in: 1. Connect your computer to the same IP subnet as the Synapse system, or ensure that devices on different subnets are able to communicate. You can connect your computer to the PC port on the back of a Deskset. 2. On the Deskset, press MENU then 4. The Deskset Information screen appears. 3. Find the IP address on the Deskset Information screen. 4. Open a browser. Depending on your browser, some of the pages presented here may look different and have different controls. 5. Type the Deskset IP Address in the browser address bar and press Enter. The Login page appears. 6. Enter admin in the Login Name field and 12345 in the Password field, then click Login. You can change your Admin ID and password once you are logged in. 7. Click topics from the navigation list on the left side of the WebUI to see them. For your security, the WebUI times out after 10 minutes, so if it is idle for that time, you must log in again. 8 Application Note 9 Application Note Configuring the SIP Gateway To configure SIP Account Settings: 1. In the navigation menu at left, click SIP Gateway Settings. The SIP Account Settings page appears. 2. Select SIP Trunking as the Account Type. 3. Select Create New Account, or select an account to edit. If you have already created an account, a Delete Account button appears. Clicking Delete Account deletes the account and loads an empty account page. 4. Enter the SIP Gateway Basic Settings. a. Enable or Disable the account. You must enable the account before it can be used. Disabling the account does not erase the settings associated with the account. 10 Application Note b. Enter the Account Name. The SIP account name appears on the Dial Plan Settings page and the Trunk Reservation page. c. For Max Calls, enter the number of simultaneous call sessions you purchased from Broadvox. The maximum value is 16. Setting the Max Calls to a value that is less than the current number of Trunk Reservations for the SIP Account will generate an error. d. Enter the Display Name. The Display Name is the text portion of the Caller ID that is displayed for outgoing calls. e. Enter the User Name as provided by Broadvox. The User Name, also known as the Account ID, is usually the company's main number. Synapse will only accept digits for a User Name. f. Enter the Auth User Name as provided by Broadvox. The Auth User Name is used for authentication with the service provider and in most cases is the same as the User Name. g. Enter the Auth User Password as provided by Broadvox. The Auth User Password is for authentication with the service provider. Masking of this password is not necessary. 5. Enter the SIP Gateway Account Registration Settings. a. Enter the number of seconds for Registration Expires. This setting applies to dynamic registration. It is a re-registration timeout value sent to the SIP Provider. This is usually overriden by a re-registration interval determined by the service provider’s response. The default setting is 3600 seconds and should only be changed on the advice of your service provider. 6. Enter the SIP Gateway Account Server Settings. a. Enter the SIP Server address or URL. This is the SIP Server Hostname from your Broadvox Welcome letter. b. If necessary, enter the SIP Server Port. Port 5060, the default setting, is typically used for SIP transmission. c. (Optional) Enter the Registrar Server address or URL. d. (Optional) Enter the Registrar Server Port. If a Registrar Server address or URL is entered in the field above, it may not be necessary to enter a Registrar Server Port. e. (Optional) Enter the Outbound Proxy Server address or URL. f. (Optional) Enter the Outbound Proxy Server Port. If an Outbound Proxy Server address or URL is entered in the field above, it may not be necessary to enter an Outbound Proxy Server Port. 7. Configure the Codec Configuration. a. Enable or disable audio codecs. You can click Add > to add the selected codec to the Enabled Codecs list, or click < Remove to add it to the Disabled Codecs list. 8. Arrange the enabled audio codecs. Select a codec, then click or to change the order. The preferred codec is G.711u; the alternate codec is G.729. 11 Application Note The SIP Gateway uses the audio codecs in the order they are listed on a per call basis. You can choose codecs based on the speed versus audio performance required. 9. Click Apply to save your changes. The SIP Gateway Registration LED should turn green when the SIP Gateway has successfully registered to Broadvox. 12 Application Note Configuring the Dial Plan Before configuring the Dial Plan, see “Dial Plan Settings” in the Synapse System Administrator’s Guide (for software 1.10.4 or later) available at http://telephones.att.com/synapseguides. To configure Synapse Dial Plan settings: 1. In the navigation menu at left, click Dial Plan Settings. The Dial Plan Settings page appears. 2. Set the Default Routing Priority. Ensure that the Broadvox SIP Account that you configured is included in the priority list. You can: exclude a trunk by selecting it, then clicking < Remove. You may want to exclude a trunk if it is being used for a fax line or a door phone line, for example. move a trunk up or down the priority list by selecting it, then clicking or . 13 Application Note 3. Set the Call Log/Messages Prefix according to your Dialing Rules. You can enter a maximum of eight digits using only the characters 0–9, #, *, or P. Leave the field blank if the Dialing Rules do not use a number for external line access. 4. Enter or modify Dialing Rule patterns. For more information, see “About Dialing Rules” in the Synapse System Administrator’s Guide. 5. Select a Route for each Dialing Rule pattern as required. The list of routes includes all available trunks in the system, as well as the Default Routing Priority. 6. Click Apply to save these settings. 14