1
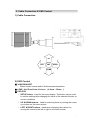
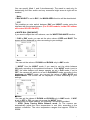
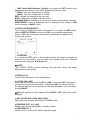
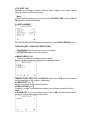
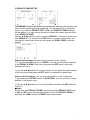
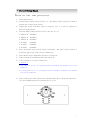
Digital Day & Night IR Color Camera 설명서용 서 MANUAL IR LED type Without IR LED type The lightning flash with an arrowhead symbol, within an equilateral triangle is intended to alert the user to the presence of un insulated Dangerous voltage within the product's enclosure that may be of sufficient magnitude to constitute a risk of electric shock to persons. The exclamation point within an equilateral triangle is intended to alert the user to the presence of important operating and maintenance (Servicing) instructions in the literature accompanying the appliance. INFORMATION - This equipment has been tested and found to comply with limits for a Class A digital device, pursuant to part 15 of the FCC Rules. These limits are designed to provide reasonable protection against harmful interference when the equipment is operated in a commercial environment. This equipment generates, uses, and can radiate radio frequency energy and, if not installed and used in accordance with the instruction manual, may cause harmful interference to radio communications. Operation of this equipment in a residential area is likely to cause harmful interference in which case the user will be required to correct the interference at his own expense. WARNING - Changes or modifications not expressly approved by the manufacturer could void the user’s authority to operate the equipment. CAUTION: To prevent electric shock and risk of fire hazards: Do NOT use power sources other than that specified. Do NOT expose this appliance to rain or moisture. This installation should be made by a qualified service person and should conform to all local codes 2 ■ Warning The camera needs periodic inspection. Contact an authorized technician for inspection. Stop using your camera when you find a malfunction. If you use your camera around smoke or unusual heat for a long time, fire may be caused. Do not install the camera on a surface that can not support it. Unless the surface is suitable, it could cause falling or other hazards. Do not hold plug with wet hands. It could cause an electric shock. Do not disassemble the camera. It may result in fire, electric shock or other hazards. Do not use the camera close to a gas or oil leak. It may result in fire or other hazards. 3 ■ Precautions Only use the camera under conditions where temperatures are between -10°C and +50°C. Be especially careful to provide ventilation when operating under high temperatures. It can cause the image quality to be poor. Severe lighting change or flicker can cause the camera to work improperly. It is one of the most important parts of the camera. Be careful not to be stained by fingerprint. It can cause malfunctions to occur. It can damage the CCD. If it gets wet, wipe it dry immediately. Liquids can contain minerals that If it is exposed to radioactivity, corrode the electronic components. For heated CCD, it will be out of order. ■ Contents 1.Features ------------------- 5 2. Components ------------------- 6 3. Names and functions of parts ------------------- 6 4. Setup Menu Operation ------------------- 7 5. Troubleshooting ------------------- 18 6. Protocol Setting ------------------- 19 7. Specifications ------------------- 20 4 1. Features ☺Horizontal Resolution 600 TV Lines Clear image quality has been achieved by employing a SONY CCD with 410,000 (Effective) pixels, which provides a horizontal resolution of 600 TV lines. ☺DAY & NIGHT This camera has a function that automatically selects the mode that is appropriate for daytime or night-time conditions. The COLOR mode operates in daytime conditions to provide optimum colors, and BW mode operates in nighttime conditions to enhance the definition of the image. ☺Electronic IRIS The electronic IRIS function enables continuous automatic control of the shutter between 1/60~1/120,000 seconds. ☺PRIVACY Function The PRIVACY function conceals the areas you do not wish to appear on the screen. ☺CCVC (Camera Control Via Coaxial cable) This is a remote control function that overlaps the coaxial cable (for a transfer of the Video signal) with the control signal. In installation or repair, this helps you control the communication controller (optional) without additional cabling. * Coaxial controller (Option SCX-RD100). ☺High Sensitivity The built-in high sensitivity SONY COLOR CCD enables a clear image even in 0.3Lux (0.1Lux B/W) or as low as 0.0004Lux with SENS-UP. ☺DNR (Digital Noise Reduction) The amount of low luminance noise has been significantly reduced, and the signal-to-noise ratio (S/N ratio) as well as horizontal resolution has been improved, resulting in a clear and sharp image display even in the dark. ☺Controlled by OSD Menu The camera can be controlled by selecting text displayed on the monitor screen. ☺Additional Functions Sens-up, Motion Detection, Mirror functions are also available. 5 2. Cable Connection & OSD Control 1) Cable Connection UP LEFT SET RIGHT DOWN 2) OSD Control ① 3AXIS BRACKET - Please loosen screws and fix tilted and panned position. ③ LENS : Vari-Focal Auto Iris Lens ( 6.0mm ~ 50mm ) ③ OSD PCB - SETUP button : Used for the menu display. This button can be used to confirm settings after changing the value of the selected function or current conditions. - UP & DOWN buttons : Used for selecting items by moving the cursor up or down on the menu screen. - LEFT & RIGHT buttons : Used when changing item values, by moving the cursor to the left or right on the menu screen 6 3. Setup Menu Operation □ USING ICONS IN THE MENU ◆ (EXIT) Exits the menu setting. Before you exits the menu setting, select SAVE to save your settings, or select QUIT to cancel. ◆ (RET) Returns to the previous menu ◆ (HOME) Returns to the main menu. ◆ (SAVE) Used to save your settings of MASK AREA, PRIVACY ZONE and more. Once you save your settings, they will remain even if you select QUIT in the menu. ◆ (DEL) Used to deletes your settings of MASK AREA, PRIVACY ZONE and more. Once you delete your settings, they will not be restored even if you select QUIT in the menu. □ OSD Menu Structure MAIN MENU CAMERA SET INTELLIGENCE PRIVACY ZONE OTHER SET COMMUNICATION SYSTEMINFO LANGUAGE CAMERA SET CAMERA ID IRIS AGC(MOTION) DNR SHUTTER SENS-UP FLICKERLESS DAY/NIGHT WHITE BAL DIGITALZOOM DETAIL V-SYNC AGC COLOR SUP REVERSE POSI/NEGA PIP DIS INTELLIGENCE MOTION MASK AREA DISPLAY SENSITIVITY RESOLUTION ALARM OUT PRIVACY ZONE PRIVACY SET STYLE OTHER SET FACTORY DEFAULTS OSD COLOR Description Camera related functions and data. Motion detection, and more. Privacy related settings Configure for Factory Defaults, and more. Communication set. Displays the system information. Select a language on the OSD menu. Description ON/OFF, Make the camera ID and set the place. 54 characters.(2 line) ALC (Video/DC)/ELC, Select lens and control the iris level. Setting the BLC function. Setting the Max Gain under the low light. Digital Noise Reduction fucntion Set the shutter speed. (High shutter speed) Set the shutter speed. (Slow shutter speed) Shutter speed : NTSC(1/60 →1/100sec), PAL (1/50 →1/120sec) Day / Night Mode (COLOR/BW/AUTO/EXT), Level set. White Balance Mode (ATW1/ATW2/AWC/MANUAL) Digital Zoom ratio set (x1 ~ x10 : x0.1 step) Aperture gain set Internal/Line lock mode set Color suppression amount at the AGC function Horizontal/Vertical Reverse Positive or Negative Video output set Picture In Picture at Digital Zoom operation Digital Image Stabilization set Description Motion detection function Set the motion detection exception area Motion Detection display ON/OFF Motion Detection sensitivity Motion Detection resolution Alarm out set Description Set the privacy zone Set the privacy style (Mosaic, Color, etc) Description Set the privacy zone OSD menu color set 7 □ MAIN MENU ◆ CAMERA SET Configure Camera related functions and data. ◆ INTELLIGENCE You can configure the settings of motion detection and more. ◆ PRIVACY ZONE You can configure the privacy related settings. ◆ OTHER SET You can configure for Factory Defaults, and more. ◆ COMMUNICATION Configures the settings regarding the UART communication. ◆ SYSTEM INFO. Displays the system information including the camera version and communication settings. ◆ LANGUAGE Select a preferred one from the supported languages. 1) CAMERA SETUP Setup the general functions of zoom ▲▼◄►switch to select a menu item. camera module. Use the ● CAMERA ID [OFF, ON] The CAMERA ID menu is used for you to assign a unique name to a camera. If you press the SET switch with the CAMERA ID menu selected, you will see the appropriate screen. You can enter up to 54 alphanumeric or special characters for the CAMERA ID. Select LOCATION and press the SET switch to move the display position of the CAMERA ID. 8 ● IRIS [ALC, ELC] The IRIS menu is used if you want to adjust the intensity of radiation incoming to the camera. ● ALC (Automatic Light Control) ①If you press the SET switch with an ALC based sub menu selected, you will see the appropriate screen. The LENS menu is used if you select a type of the AI lens. For normal operation, you must select DC for a DC-type lens, and select VIDEO for a VIDEO type lens. The LEVEL menu is used to adjust the overall brightness, where “+” will increase the brightness and “.” will decrease it. ② If you set the BACKLIGHT option to BLC, you will see a menu where you can set the BLC area. You can set the desired BLC zone by defining the size and location. If you use an ordinary camera in a scene with an intensive back light, the object will be displayed dark on the monitor affected by the back light. To solve this problem, you can use the BLC (Back Light Compensation) function to improve the sharpness of the image in such a high contrast scene. ● ELC (Electronic Light Control) ① If you press the SET switch when the ELC sub menu is selected, the corresponding screen appears. You can make the ELC (Electronic Light Control) function active or not. ② In similar to ALC setting, you can specify the BLC area. 9 ●AGC[OFF, VERYLOW, LOW, MID, HIGH, VERYHIGH, USER, FIX] The AGC (Auto Gain Control) menu is used to set the AGC level of the camera. When the AGC is active, the camera automatically increases the sensitivity by amplifying the Video signal when the strength of the signal falls below the normal value. If OFF or FIX mode is selected in the SENS-UP menu, you can specify the AGC level. If you press the SET switch with a USER sub menu selected, you will see the appropriate screen. In USER mode, you can break down the level in 16 steps from VERY LOW to VERY HIGH to your preference. If you press the SET switch with a FIX sub menu selected, you will see the appropriate screen. As a fixed value of the AGC gain is used in FIX mode, you can select one of the 16 detailed levels from VERY LOW to VERY HIGH before fixing it. FIX mode is not available if you set the BACKLIGHT ※Note: - If the DAY/NIGHT menu of the CAMERA SET is set to AUTO, the AGC menu will be deactivated. - If FLICKERLESS is set to ON, the AGC FIX mode will be disabled. ●MOTION [S.SLOW, SLOW, NORM, FAST, F.FAST] The MOTION menu is used to adjust the strength of the AGC level for a control of the camera motion. This is available only if the SENS-UP menu is set to AUTO. You can select one from S.SLOW, SLOW, NORM, FAST and F.FAST for the AGC level. If you monitor a fast moving object in a low contrast scene, select F.FAST while select S.SLOW for a hardly moving object in the same lighting condition. ※Note: - If the DAY/NIGHT menu of the CAMERA SET is set to AUTO, the MOTION menu will be deactivated. ●DNR [OFF, LOW, MID, HIGH, USER (1~16)] You can configure the DNR (Digital Noise Reduction) related settings. Reduces the noise on the screen. This is especially useful for a severely distorted screen. You can set the level if you set DNR to USER. 10 ●SHUTTER [OFF, AUTO1/100(PAL:1/120), AUTO1/250, AUTO1/500, AUTO1/1000, AUTO1/2000, AUTO1/4000, AUTO1/10K, 1/100(PAL:1/120), 1/250,1/500, 1/1000, 1/2000, 1/4000, 1/10K, EXT] The SHUTTER menu is used to set the fixed high-speed electronic shutter, auto high speed electronic shutter and external high speed electronic shutter (EXT). You can select one of 7 options from 1/100(PAL:1/120) to 1/10K for the fixed high speed electronic shutter, which is mostly used for imaging a fast moving object. The auto high speed electronic shutter operates as the fixed high speed shutter in a high contrast scene but automatically focuses the target if the iris opens fully in a low contrast scene like in ELC mode. When it gets brighter back, the mode will switch to the fixed high speed electronic shutter mode. However, the auto high speed shutter operates properly only in a camera featuring a DC or VIDEO lens. ※Note: -If IRIS mode is set to ELC, the SHUTTER menu will be deactivated as you adjust the brightness using the electronic shutter.-If the SENS-UP function is set to AUTO, only items of OFF and AUTO are available in the SHUTTER menu.-If the SENS-UP mode is set to FIX, the SHUTTER menu will be deactivated.-If the FLICKERLESS function is set to ON, the SHUTTER menu will be deactivated. ● SENS-UP[OFF, AUTOX2, AUTOX4, AUTOX6, AUTOX8, AUTOX12, AUTOX16, AUTOX24, AUTOX32, AUTOX48, AUTOX64, AUTOX96, AUTOX128, AUTOX256, FIXX2,FIXX4, FIXX6,FIXX8, FIXX12, FIXX16, FIXX24, FIXX32, FIXX48, FIXX64, FIXX96, FIXX128, FIXX256] Automatically detects the ambient level of darkness in the dark or low contrast scene to extend the accumulated time, keeping the image bright and sharp; It can be also used as FIX mode. ※Note: -If the SHUTTER option is set to fixed electronic shutter or EXT mode, the SENS-UP menu will be deactivated.-If FLICKERLESS is set to ON, the FIX mode of the SENSUP menu will be disabled.-If the IRIS menu is set to ELC, the electronic shutter will control the brightness so the SENS-UP function can not be set to FIX mode, but to OFF or AUTO mode.-If the SHUTTER menu is set to AUTO, the SENS-UP menu can be set to either OFF or AUTO mode. ● FLICKERLESS [OFF, ON]If set to ON, the shutter speed will be fixed to 1/100(PAL:1/120) second. This will prevent possible screen distortion due to a mismatch between the vertical sync frequency and the blinking frequency of the lighting. ※Note: -If the IRIS function is set to ELC, the Flickerless menu will be deactivated. If the SHUTTER menu is set to AUTO, FIX or EXT mode, the FLICKERLESS menu will be deactivated. -If the SENS-UP function is set to FIX mode, the FLICKERLESS menu will be deactivated. -If AGC is set to FIX mode, the FLICKERLESS function will be disabled. ● DIS [OFF, ON] Digital Image Stabilization will set the anti-shake compensation. 11 ※ Note : -If you set DIS to ON, the compensation area will be enlarged as set in the digital zoom factor. -If you set the digital zoom factor to greater than the enlarged zoom factor for the compensation, the DIS function will be deactivated. ● DAY/NIGHT[DAY, NIGHT, AUTO, EXT] ◇ DAY If set to DAY, it will be fixed to DAY mode regardless of the ambient conditions. ◇NIGHT If set to NIGHT, it will be fixed to Black-and-White mode regardless of the ambient conditions. If you press the SET switch with a NIGHT sub menu selected, you will see a menu where you can set Burst to OFF/ON. If BURST is set to ON, the Burst signal will output together with the black-andwhite composite video signal. If BURST is set to OFF, the Burst signal does not output. You can set the BURST option to OFF/ON, or select to output the Burst signal in NIGHT mode. ◇AUTO the camera will automatically switch between DAY and NIGHT modes, according to the lighting condition. If you press the SET switch with an AUTO based sub menu selected, you will see the appropriate screen. You can set the BURST option to OFF/ON, or select to output the Burst signal in NIGHT mode. You can select from LOW, MID and HIGH for the brightness of DAY→NIGHT, which is a brightness level in switching from the color filter to Blackand-White. Closing to LOW from HIGH will switch the filter in a low contrast scene. The DWELL TIME of DAY→NIGHT is a time required to determine the need for switching the filter. You can select from LOW, MID and HIGH for the brightness of NIGHT→DAY, which is brightness level in switching from the Black-and-White filter to color. Closing to LOW from HIGH will switch the filter in a low contrast scene. The DWELL TIME of NIGHT→DAY is a time required to determine the need for switching the filter. The MASK menu is used to prevent a filter switch error or inability of determining the switch in existence of a high spot light source at night. If you press the SET switch in item 1 or 2 of the MASK menu, you will see a menu where you can specify an area to mask. 12 You can specify Mask 1 and 2 simultaneously. The mask is used only for determining the filter switch and any excessive bright area at night will be masked. ※Note: -If BACKLIGHT is set to BLC, the MASK AREA function will be deactivated. ◇ EXT This enables an auto switch between DAY and NIGHT modes using the interface with the external sensor. (For IR LED models, inside CDS sensor will control IR LED ON/OFF.) ● WHITE BAL [DAY/NIGHT] If you want to adjust the color scheme, use the WHITE BALANCE function. ◇ DAY in DAY mode, you can set the color values of RED and BLUE. The screen will be displayed in colors according to your settings. ※Note: -You can set the values of R-GAIN and B-GAIN only in AWC mode. ◇ NIGHT Use the NIGHT mode if you want to set the white balance differently according to the ambient luminance. If the NIGHT mode is set to OFF, the white balance will always operate as set in DAY mode; if not to OFF, the camera will switch to as set in DAY/NIGHT mode according to the brightness. In NIGHT mode, you can set the values of RED, BLUE and BRIGHTNESS. The screen will be displayed in colors according to your settings. ※ Note: -You can set the values of R-GAIN and B-GAIN only in AWC mode. -If AGC is set to OFF or FIX, you can not access the NIGHT menu. For adjusting the white balance, the following 5 modes are provided: ◇ ATW1 (Auto Tracing White Balance mode 1): The camera can automatically adjust the color temperature in real time, according to the ambient conditions. The color temperature ranges from approx. 2500K to 9300K. 13 ◇ AWC (Auto White Balance Control):If you press the SET switch in the appropriate item position, Auto White Balance will perform once. ◇ 3200K : Set color temperature to 3200K ◇ 5600K : Set color temperature to 5600K RED : Adjusts the strength of the red color. BLUE : Adjusts the strength of the blue color. R-GAIN/B-GAIN: Enables you to set the current color temperature manually. BRIGHTNESS: Select a brightness level in switching from setting in DAY mode to setting in NIGHT mode. ● DIGITAL ZOOM [ON/OFF] You can set the digital zoom factor and position. If you press the SET switch with the DIGITAL ZOOM function set to ON, you will seethe appropriate screen. When the zoom factor and position are defined, the digital zoom function will operate. ◇ LOCATION: If you press the SET switch in the condition where the image is enlarged as much as the ratio setting, you can watch an invisible area of the effective screen as well using the ▲▼◀▶switch. ※ NOTE: -The DIGITAL ZOOM function enlarges the pixel itself, which can cause deterioration of the quality. ● DETAIL [0~3] Controls the horizontal or vertical distinction. ● V-SYNC [INT,LINE] Select the vertical sync mode for INT or LINE. If you select INT, the camera will use the internal synchronization. If selecting LINE, the camera will use the external power source frequency for the synchronization. You can adjust the LL-PHASE. ※Note: No input the L-Pulse signal will fix V-SYNC to INT, which can not be changed. ● AGC COLOR SUP [LOW, MID, HIGH] Adjust the color scheme according to the AGC value. ● REVERSE [OFF, H, V, H/V] Mirrors video signals horizontally, vertically, or both. ● POSI/NEGA [+, -] Outputs as it is or mirror the video brightness signal. 14 ● PIP [OFF, ON] Displays a sub image together with the main image on the same screen using the Picture in Picture function. ※Note: -If more than one privacy zone is set and the PRIVACY SET is set to ON, the PIP function will be deactivated. 2). INTELLIGENCE You can set the motion detection and tracking in the INTELLIGENCE menu. ● MOTION [OFF, TRACKING, DETECTION] ◇ TRACKING Detects and tracks a moving object. ◇ DETECTION Detects a moving object. ● MASK AREA [1~4] Specify a detection exception area to mask. Select a mask number and specify the size and position. ●DISPLAY [ON, OFF] With the DISPLAY option set to ON, a motion function will be displayed on the screen, if detected. ● SENSITIVITY [1 ~ 7] Set the sensitivity of the motion detection. ● RESOLUTION [1 ~ 5] If setting it to high, the camera can detect even a trivial movement of the target. ● ALARM OUT If you set a desired menu item to ON, the camera will sound an alert if it detect the appropriate motion. 15 3) PRIVACY ZONE SETUP The PRIVACY function will protect your privacy by screening the privacy area that you have specified during monitoring. You can specify up to 12 privacy zones. If you set the PRIVACY SET to ON, your PRIVACY ZONE settings will be applied. You can change the style to adjust the mosaic size and color of the PRIVACY ZONE. Use the ▲▼◀▶switch to select one from PRIVACY 1 through 8. Select one from PRIVACY1~12 and press the SET switch to confirm your setting. You can specify a pixel that moves as you change the PIXEL LEVEL to set the position. How to set the point: You can set each position of the 4 points. ① If you press the SET switch in <POINT>, you will see the points available in the PRIVACY ZONE. Each time you press the SET switch, the points available will move. ② Use the ▲▼◀▶switch to set the position of each point. Set each position of the four points and press the SET switch to complete the positioning. How to set the position: You can move the position of the overall area. ① By pressing the SETUP switch in <POSITION>, you can move the overall position of the privacy zone. ② Use the ▲▼◀▶switch to move the position and press the SET switch to confirm it. ※ Note: If more than one PRIVACY ZONE is specified and the PRIVACY SET is set to ON, the PIP function will be deactivated. If the 12th PRIVACY ZONE is specified, the LINE function of FENCE will be deactivated. 16 4) OTHER SET ● FACTORY DEFAULTS All the settings will be restored to the factory default. However, the settings of PROTOCOL, BAUDRATE, ADDRESS and LANGUAGE will not be restored to the default. ● OSD COLOR [BW, R/G/B] You can set the OSD (On-screen Display) color to COLOR or B/W. 5) COMMUNICATION The COMMUNICATION menu is used to configure the settings regarding UART communications. Use the connector of the camera to connect to UART Use the ▲▼◀▶switch to specify the protocol and baud rate for communications. ● PROTOCOL [SAMSUNG, PELCO-P/D, VICON, PANASONIC, PHILIPS, ERNA, DIAMOND, VCLTP, KALATEL Select a communication protocol. ● BAUD RATE [2400, 4800, 9600, 19200, 38400 Select a baud rate. ※ Note: The baud rate differs, depending on the specified protocol. ● ADDRESS [0~255] Select an address. 6) SYSTEM INFORMATION You can view the system information including the protocol, address, baud rate, serial number, camera version, and EEPROM version. 7) LANGUAGE SET UP The camera supports 5 different languages. Select a preferred language. 17 5. Troubleshooting If there are problems in operation, please refer to the items below. If the problem persists, please contact the agent you purchased this product from. Problems Nothing appears on the screen. The video image is not clear. The screen is dark. There is a problem with the camera operation. The MOTION DETECTION function is not working. Colors are not quite right. The screen is flickering. COLOR mode is not working. SENS-UP function is not Working. Troubleshooting • Please check the power connection. • Please check the video signal line connection. • Please check and make sure that the auto lens switch is set to DC (VIDEO) when using a VIDEO (DC) lens. • Please check if the lens is clean. Please clean the lens with a clean cloth or brush. • Please adjust the contrast feature of the monitor. • Please readjust the back focus of the camera. • Please adjust the contrast feature of the monitor. • If you have an intermediate device, set the 75 / Hi-z properly, and check the terminals. • Please check if an auto iris lens is being used and adjust the brightness level. • Please check if an appropriate power source to the camera complies with the manufacturer's Standard requirement, or if the voltage keeps changing. • Please check if 'MOTION DETECTION' mode is turned on. • Please check if the MD LEVEL is too low. • Please check the setting of the MD AREA. • Please check the 'WHITE BAL' setting • Please check if the camera is facing directly into sunlight or fluorescent light. • Please check if an auto iris lens is being used. • Please check the connection of the lens connector cable. • Please check if the AGC menu is set to the OFF position. • Please check if the AGC menu is set to the OFF position. • Please check if the SHUTTER menu is set to MANUAL mode. 18 6. Protocol Setting Manual How to set the protocol 1. Turn off the power 2. Set the Rotary Hexa Switch (0~F) to ‘0’. The Rotary Hexa Switch is located in bottom side of the below picture. 3. Supply the power and then wait for around 3 sec -> It will be entered to Protocol setting mode. 4. Turn the Rotary Hexa Switch (0~F) to any one of 1~6. 1: PELCO-D 2400BPS 2: PELCO-D 4800BPS 3: PELCO-D 9600BPS 4: D-MAX 2400BPS 5: D-MAX 4800BPS 6: D-MAX 9600BPS 5. Press down the mini joystick button (vertically). The mini joystick button is located in upper side of the picture. (Menu key) 6. Turn off the power (Fished the selection of protocol) 7. Select Camera ID with Rotary Hexa Switch (0~F) 8. 1~E: Possible to be set for Camera ID. ☞ Caution ☜ 0: Not allowed to be set – It is using for protocol setting ID. Not allowed to be set for Camera ID F : Not allowed to be set – It is using for Lock ID of automatic zoom/focus. Not allowed to be set for Camera ID 9. Turn on the power and connect the communication line to check the operation. * No need additional protocol setting once it is set. 19 How to set the Camera ID 1. Turn off the power of Camera. 2. Select one value among 1~E for the Rotary Hexa switch in bottom side of the picture. ☞ Caution ☜ 0: not allowed to be set - It is using for protocol setting ID. Not allowed to be set for Camera ID F : Not allowed to be set – It is using for Lock ID of automatic zoom/focus. Not allowed to be set for Camera ID 3. Turn off the power of Camera 4. Turn on the power again. 5. Start to communicate with the changed ID. How to operate the LENS (with Switch) 1. Move the joystick up/down/left/right. Press down the joystick for menu call (vertically). It is changed to Lens operating mode if there is no any key input for 6 sec. after menu calling. But menu OSD is displaying on the screen, you can press the menu key to call the menu again. The protocol on OSD menu and the camera ID are set with the rotary switch on the back side of camera. Therefore setting by joystick is no meaning. 2. Electrical Locking of Lens Set the rotary switch (0~F) for ‘F’ after power off. And turn on the camera. The of joystick is only available for OSD operating but not Lens operating. Lens is not working by network communication 20 How to operate the Camera by Networking 1. Control the camera by the connected Keyboard after setting of Baudrate and Protocol ID. In case using PELCO-D protocol, the calling key is Preset 30. Use Preset key as menu key because there is no menu key in PELCO-D. But D-MAX supplies a menu key. - The lightness of LED can be controlled in both PELCO-D and D-MAX protocol. Preset 1 is for the increasing of the lightness, Preset 2 is for the decreasing of the lightness. Once it is set, the current value is saved to the memory to keep the operation as the setting even after power off. (The controlling of current is available on night time) 21 7. Specifications Sub-items CCD Device Total Pixel Effective Pixel Inter. H/V Sync LL H/V Sync Horizontal Resolution Minimum illumination (F1.2) S/N Ratio OSD Privacy Zone Day & Night Motion Detection D-Zoom High Speed Shutter Flickerless Sens Up (Low Shutter) BLC AGC ALC(Auto Level Control) ELC(Electronic Level Control) Camera ID White Balance DNR DIS Etc. Function Alarm Output Remote Control Video Output Power Input Power Consumption Operating Temperature Operating Humidity Dimension NTSC PAL SONY 1/3" CCD SONY 1/3" CCD 811 x 508 795 x 596 768 x 494 752 x 582 15,734/59.94Hz 15,625/50Hz 15,750/60Hz 15,625/50Hz More than 560(Color) / 600(BW)TV Lines Color mode 50 IRE 25 IRE 15 IRE Sens Off 0.4 Lux 0.2 Lux 0.12 Lux 0.0007 0.0004 Sens x256 0.001 Lux Lux Lux BW mode 50 IRE 25 IRE 15 IRE Sens Off 0.04 Lux 0.02 Lux 0.012 Lux 0.00007 0.00004 Sens x256 0.0001 Lux Lux Lux 52dB E/F/S/J/P, (E/K) E/F/G/S/I,(Chinese) 8ea(Polygonal Method,4points) Out put the Filter changing signal Off/On (Advanced) x1~x10 (x0.1STEP) 1/60(1/50)~1/10Ksec Off/On x2 ~ x256 Off/On(Area Setting) Off/On(Max. Level Setting) AI Lens (DC/VIDEO) Off/On ( ~ 1/200Ksec) Off/On(Max.54ea/2Line) ATW1/ATW2/AWC/MANUAL(ATW1:2500~9300°K,A TW2:2000~10000°K) Off/On (Adaptive 3D+2D) Off/On Detail,Reverse(H/V),Posi/Nega,PIP 1ea(Open Collector) UART(Txd/RXd,3Vp-p)CCVC(withSCX-RD100) VBS1.0Vp-p(75ohmTerminated) DC+12V±10% DC12V / 2000Ma (IR LED ON) Absolute:-10°C~+50°C Less than 90% 88mm x 95mm x 124mm 22 23