1
user manual
Thank you for purchasing this Samsung product.
To receive more complete service, please register
your product at
www.samsung.com/register
Model _____________ Serial No. _____________
✎ If you have any questions, please call us at 1-800-SAMSUNG (1-800-726-7864) for assistance.
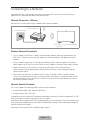
Important Safety Instructions
Warning! Important Safety Instructions
CAUTION
This symbol indicates that high voltage is
present inside. It is dangerous to make any kind
of contact with any internal part of this product.
RISK OF ELECTRIC SHOCK DO NOT OPEN
CAUTION: TO REDUCE THE RISK OF ELECTRIC SHOCK, DO
NOT REMOVE COVER (OR BACK). THERE ARE NO USER
SERVICEABLE PARTS INSIDE. REFER ALL SERVICING TO
QUALIFIED PERSONNEL.
This symbol indicates that important literature
concerning operation and maintenance has
been included with this product.
Ř The slots and openings in the cabinet and in the back or bottom are provided for necessary ventilation. To ensure reliable operation of this
apparatus, and to protect it from overheating, these slots and openings must never be blocked or covered.
− Do not place this apparatus in a confined space, such as a bookcase, or built-in cabinet, unless proper ventilation is provided.
− Do not place this apparatus near or over a radiator or heat register, or where it is exposed to direct sunlight.
− Do not place vessels (vases etc.) containing water on this apparatus, as this can result in a fire or electric shock.
Ř Do not expose this apparatus to rain or place it near water (near a bathtub, washbowl, kitchen sink, or laundry tub, in a wet basement, or
near a swimming pool etc.). If this apparatus accidentally gets wet, unplug it and contact an authorized dealer immediately.
Ř This apparatus uses batteries. In your community, there might be environmental regulations that require you to dispose of these batteries
properly. Please contact your local authorities for disposal or recycling information.
Ř Do not overload wall outlets, extension cords or adaptors beyond their capacity, since this can result in fire or electric shock.
Ř Power-supply cords should be placed so that they are not likely to be walked on or pinched by items placed upon or against them. Pay
particular attention to cords at the plug end, at wall outlets, and the point where they exit from the appliance.
Ř To protect this apparatus from a lightning storm, or when it is left unattended and unused for long periods of time, unplug it from the wall
outlet and disconnect the antenna or cable system. This will prevent damage to the set due to lightning and power line surges.
Ř Before connecting the AC power cord to the DC adaptor outlet, make sure the voltage designation of the DC adaptor corresponds to the
local electrical supply.
Ř Never insert anything metallic into the open parts of this apparatus. Doing so may create a danger of electric shock.
Ř To avoid electric shock, never touch the inside of this apparatus. Only a qualified technician should open this apparatus.
Ř Make sure to plug the power cord in until it is firmly seated. When unplugging the power cord from a wall outlet, always pull on the power
cord's plug. Never unplug by pulling on the power cord. Do not touch the power cord with wet hands.
Ř If this apparatus does not operate normally - in particular, if there are any unusual sounds or smells coming from it - unplug it immediately
and contact an authorized dealer or service center.
Ř Be sure to pull the power plug out of the outlet if the TV is to remain unused or if you are to leave the house for an extended period of time
(especially when children, elderly or disabled people will be left alone in the house).
− Accumulated dust can cause an electric shock, an electric leakage or a fire by causing the power cord to generate sparks and heat or
the insulation to deteriorate.
Ř Be sure to contact an authorized service center for information if you intend to install your TV in a location with heavy dust, high or low
temperatures, high humidity, chemical substances, or where it will operate 24 hours a day such in an airport, a train station, etc. Failing to
do so may lead to serious damage of your TV.
Ř Use only a properly grounded plug and wall outlet.
− An improper ground may cause electric shock or equipment damage. (Class l Equipment only.)
Ř To turn this apparatus off completely, you must disconnect it from the wall outlet. Consequently, the wall outlet and power plug must be
readily accessible at all times.
Ř Do not allow children to hang onto the product.
Ř Store the accessories (battery, etc.) in a location safely out of the reach of children.
Ř Do not install the product in an unstable location such as a shaky self, a slanted floor or a location exposed to vibration.
Ř Do not drop or apply any shock to the product. If the product is damaged, disconnect the power cord and contact a service center.
Ř To clean this apparatus, unplug the power cord from the wall outlet and wipe the product using a soft, dry cloth. Do not use any chemicals
such as wax, benzene, alcohol, thinners, insecticide, air fresheners, lubricants, or detergent. These chemicals can damage the appearance
of the TV or erase the printing on the product.
Ř Do not expose this apparatus to dripping or splashing.
Ř Do not dispose of batteries in fire.
Ř Do not short-circuit, disassemble or overheat the batteries.
Ř There is danger of an explosion if you replace the batteries used in the remote with the wrong type of battery. Replace
only with the same or equivalent type.
Ř WARNING - TO PREVENT THE SPREAD OF FIRE, KEEP CANDLES OR OTHER OPEN FLAMES AWAY FROM THIS
PRODUCT AT ALL TIMES.
English - 2
Contents
Basic Fea
atures
Network Configuration
n
5
Using the Remote Control
6 Inserting the Batteries (AAA X 2)
21
7
Using the Smart Touch Control
8 Connecting to the TV
8 Inserting the Batteries (AAA X 2)
9 Low Battery Power Warning
10
Using the touch pad
10 Changing Channels by Entering Numbers
11 Show Status and Notification Banner
11 Recommended
11 History
11 Searching
11 Using the Virtual Remote Control
12
13
14
15
17
18
Turning on the TV
Built-in TV Camera and Microphone
13 Extending the TV Camera
13 Retracting the Camera
Connecting the TV to One Connect
External Device Connections
15 Remove the Connection Cover
15 TV - Back
16 One Connect - Front
Switching Between Video Sources
Universal Remote Setup
18 Add the External Device
Connecting to a Network
21 Network Connection - Wireless
21 Wireless Network Precautions
21 Network Security Protocols
22 Network Connection - Wired
3D Basics
s
23
3D Active Glasses
23 Pairing 3D Active Glasses
25 Watching 3D Video
Troublesh
hooting
g and Other
Informatio
on
26
27
What is Remote Support?
TV Upgrade using One Connect
(sold separately)
28
29
Troubleshooting
Mounting the TV on the Wall Using
the Wall Mount Kit (Optional)
31
32
32
33
Eco Sensor and Screen Brightness
Maintenance
Providing Proper Ventilation for Your TV
Securing the TV to the Wall
Viewing th
he e-M
Manual
Specificattions
19
35
35
Viewing the e-Manual
19 Scrolling a Page
19 Using the Top Icons
19 Returning to the Home Page
19 Searching the Index
20 Searching Pages
20 Closing the e-Manual
20 Jumping to a Menu Item
20 Updating the e-Manual
Specifications
Licenses
Guides
36
38
Warranty Information
Regulatory Compliance Statements
(For 3D Active Glasses)
39
English - 3
SAMSUNG BRAND PRODUCTS
39 LIMITED WARRANTY TO
ORIGINAL PURCHASER
Figures and illustrations in this User Manual are provided for reference only and may differ from the actual
product appearance. Product design and specifications may change without notice.
Features of your new TV
Ř 3D: This new feature enables you to view 3D content.
Ř SMART HUB:
This TV features Smart Hub, a multi-purpose entertainment and family center. With Smart Hub, you
can surf the web, download applications, and stay in touch with family and friends through social
networking services. In addition, you can view or play photo, video, and music files stored on external
storage devices.
Press the ™ button to launch Smart Hub. Choose a service using the icons displayed in the top part of
the screen.
Smart Hub services and functionality include:
Social: Watch the latest YouTube videos and your and your friends' video posts on Facebook and
Twitter. You can also make video calls to friends by the TV camera.
Apps: Samsung Apps offers an extensive collection of free and paid news, sports, weather, and
gaming content you can directly download to and enjoy on your TV.
On TV: Check a listing of programs that are currently airing or are scheduled to air.
Movies & TV Shows: Purchase and watch movies and series without a separate external device.
Photos, Videos & Music: Play back photo, video, and music files from an external storage device.
Ř Anynet+ (HDMI-CEC): This allows you to control all connected Samsung devices that support
Anynet+ with your Samsung TV’s remote.
Ř e-Manual: Provides a detailed, on-screen user's manual built into your TV.
Ř SMART Interaction: Using this function, you can access and control menu options and functions
using motions.
Ř Device Manager: Use the TV features with a USB or Bluetooth keyboard and mouse.
Ř MHL & Screen Mirroring: Displays mobile device screens on your TV using a wired or wireless
connection.
English - 4
Using the Remote Control
Learn where the function buttons are on your remote. Especially note these: SOURCE, MUTE, VOL, CH,
MENU, TOOLS, E, INFO, CH LIST, RETURN, and EXIT.
✎ This remote control has Braille points on the Power, Channel, and Volume buttons and can be used
by visually impaired persons.
Displays and selects the available video
sources.
Turns the TV on and off.
STB: Turn on and off the satellite or cable
set-top box connected to the TV.
STB GUIDE: Displays the STB's EPG
(Electronic Program Guide).
STB MENU: Opens the STB's OSD (Menu).
✎ These buttons are only available when
the universal remote control is set and
TV turns on.
Turn on the backlight for the buttons.
The backlight lasts for only a few seconds.
Turns the remote control light on or off.
When on, the buttons become illuminated
for a moment when pressed. (Using the
remote control with this button set to On
will reduce the battery usage time.)
Gives direct access to channels.
Press to select additional digital channels
being broadcast by the same digital station.
For example, to select channel ‘54-3’, press
‘54’, then press ‘-’ and ‘3’.
Returns to the previous channel.
Cuts off the sound temporarily.
Changes channels.
Adjusts the volume.
Brings up Smart Hub applications. See the
e-Manual chapter, Smart TV Features >
Smart Hub.
Displays channel lists on the screen.
Opens the OSD (Menu).
Displays the EPG (Electronic Program
Guide).
Quickly selects frequently used functions.
Displays information on the TV screen.
Moves the cursor, selects the on-screen
menu items, and changes the values seen
on the TV's menu.
Returns to the previous menu.
Use these buttons according to the
directions on the TV's screen.
Exits the menu.
B
C
Use these buttons in a specific feature.
Use these buttons according to the
directions on the TV's screen.
English - 5
D
NETFLIX: Run the NETFLIX application.
STATUS: The notification banner is
shown at the top of the screen. See the
e-Manual chapter, Smart TV Features >
Notification.
AMAZON: Run the AMAZON application.
SEARCH: Run search function. See the
e-Manual chapter, Smart TV Features >
Search.
RECOMMEND: Displays a list
of scheduled-to-air program
recommendations. See the e-Manual
chapter, Smart TV Features > On TV.
MORE: Displays a virtual remote control
on the screen. See the e-Manual chapter,
Controlling the TV > Virtual Remote
Control.
Inserting the Batteries (AAA X 2)
Match the polarity of the batteries to the symbols in the battery compartment.
✎ NOTE
− Use the remote control within 23 feet of the TV.
− Bright light may affect the performance of the remote control. Avoid using when near special
fluorescent lights or neon signs.
− The color and shape may vary depending on the model.
English - 6
Using the Smart Touch Control
Use Voice Recognition function with
the microphone embedded in remote
control.
✎ The Voice Recognition function
can be affected by unclear
pronunciation, voice level, or
surrounding noise.
TV
STB
MIC
Turn on and off the satellite or cable
set-top box connected to the TV.
For this, the Smart Touch Control must
be configured as a universal remote
control. See the e-Manual chapter,
Controlling the TV > Universal
Remote Setup.
Turns the TV on and off.
VOICE
MUTE
MUTE: Cuts
off the sound
temporarily.
VOICE: Take your voice command and
enter a text using your voice.
SOURCE
Displays and selects the available video
sources.
CH
Changes channels.
VOL
MORE
Displays a virtual remote panel on the
screen. See the e-Manual chapter,
Controlling the TV > Using the Virtual
Remote Control.
Adjusts the volume.
LIGHT: Turn on the backlight for the
buttons. The backlight lasts for only a
few seconds. Turns the remote control
light on or off. When on, the buttons
become illuminated for a moment when
pressed. (Using the remote control with
this button set to On will reduce the
battery usage time.)
DVR: This button is only available
when the Smart Touch Control is
configured to function as a universal
remote control to control a set-top box.
Run DVR (Digital Video Recording) in
set-top box.
MENU: Opens the OSD.
3D: Turns the 3D function on or off.
See e-Manual chapter,
TV Viewing > 3D TV.
Touch Pad
Ř Drag on the touch pad to move the
focus on the screen.
Ř Press the touch pad to run,
activate, or select the highlighted
item.
Ř Press and hold the touch pad to
display the Channel List.
LIGHT
RETURN
EXIT
DVR
MENU
3D
GUIDE
Displays the EPG
(Electronic Program Guide).
SMART HUB
Brings up Smart Hub applications.
See the e-Manual chapter, SMART TV
Features > Smart Hub.
✎ To exit an application that is
running easily, press the ™
button.
Returns to the previous menu.
English - 7
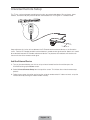
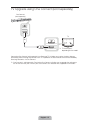
Connecting to the TV
In order to operate the TV using a Smart Touch Control, you must first pair it to the TV via Bluetooth.
However, the Smart Touch Control is only available for the paired Samsung TV.
✎ We recommend to use the Smart Touch Control in less than 20ft(6m). A usable distance may differ
depending on the wireless environmental conditions.
1. To turn on the TV, point the Smart Touch Control at the remote control receiver of the TV and press the
P button. The remote control receiver's location may vary depending on the model.
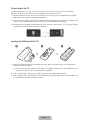
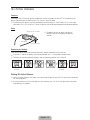
2. A Bluetooth icon will appear at the bottom left of the screen as shown below. The TV will then attempt
to connect to the Smart Touch Control automatically.
<Attempting to connect and completion icons>
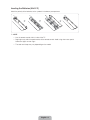
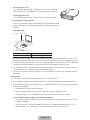
Inserting the Batteries (AAA X 2)
1
2
3
1. Slightly lift the battery cover using a plastic card. Next, pull on the cover’s notch with a fingernail to
remove the cover completely.
✎ Check the location of the battery cover groove. The groove's location may vary depending on the
type of Smart Touch Control is provided with the product.
2. Insert 2 AAA batteries, making sure to align the positive and negative ends correctly.
3. Align the battery cover with the back of the remote control, and then press down along the edges until
it is completely attached to the remote control.
English - 8
Reconnecting the Smart Touch Control
If the Smart Touch Control stops operating or works abnormally, replace the battery as this may be caused
by insufficient battery power. If the problem persists, press the PAIRING button on the Smart Touch Control
to restore pairing with the TV. The PAIRING button cannot be accessed without removing the Smart Touch
Control's battery cover. Within a distance between 1ft to 13.1ft(30cm to 4m), point the Smart Touch
Control to the TV receiver and press the PAIRING button. When pairing is complete, the pairing image
displays at the bottom left of the TV screen.
<The Smart Touch Control's pairing button>
Low Battery Power Warning
If the battery becomes low while using the Smart Touch Control, the following alarm window appears at the
bottom of the left screen. If the alarm window pops up, replace the batteries of the Smart Touch Control.
Use alkaline batteries for longer usage.
<Low battery alarm window>
English - 9
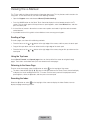
Using the touch pad
Use the touch pad to implement various commands. Navigate to Tutorial (System > Device Manager >
Smart Touch Control Settings > Tutorial) to view an on-screen guide to using the Smart Touch Control.
Dragging
Pressing
Drag on the touch pad to move the focus, pointer, or highlight in the
direction the finger is dragging.
Press the touch pad to select the item highlighted or in focus.
When watching TV, press and hold the touch pad for 2 seconds displays
the channel list. On some apps, press and hold the touch pad for 2
seconds displays a list of functions available for the app.
Changing Channels by Entering Numbers
While watching TV, tap on the protruding line on the left or right edge of
the touchpad to bring up the numerical input window on the screen. Use
your finger to enter the number for the channel you want to watch. The
recognized number is displayed on the screen and the TV switches to
the corresponding channel. However, the number you have entered may
not be recognized properly by the TV. Refer to the guide below to ensure
that your numerical entries are recognized accurately.
Numerical Input Guide
Refer to the diagrams below when entering numerical values. The TV may not recognize your entries if you
do not follow the sequences shown below.
English - 10
Show Status and Notification Banner
Press the MORE button on the Smart Touch Control and then select STATUS on the virtual remote panel
that appears on the screen. The status and notification banner appears at the top of the screen. For more
information about using the status and notification banner, refer to e-Manual > SMART TV Features >
Status and Notification.
Recommended
Press the RECOMM. / SEARCH button and then select the Recommended from the list on bottom of the
screen. This shows the current/scheduled program and application recommendations.
Select a program that is currently airing to jump to the corresponding channel or a program that is
scheduled to air to set up a Schedule Viewing setting. Refer to e-Manual > SMART TV Features > On TV
for more information.
Select an application to launch. Samsung Apps will launch if the selected application is not installed on the
TV. Refer to e-Manual > SMART TV Features > Apps > Samsung Apps for more information.
History
Press the RECOMM. / SEARCH button and then select History from the list displayed at the bottom of
the screen. This displays an interactive list of recently accessed channels, media content and applications.
Searching
Press the RECOMM. / SEARCH button on the Smart Touch Control. The list appears at the bottom of the
screen. Press the RECOMM. / SEARCH button again. The keypad will appear on the screen. Enter search
criteria to search not only many apps and their contents on the TV but also the Web.
Refer to e-Manual > SMART TV Features > Searching for more information.
Using the Virtual Remote Control
Press the MORE button to display the virtual remote panel on the TV screen. The virtual remote panel
consists of the number panel, a playback control panel, and the quick access panel. Use the touch pad to
highlight and select icons, numbers, and buttons on the panels.
✎ The displayed virtual remote panel on the TV screen may differ depending on the country.
Channel History
D
E
F
G
Netflix
STATUS
S
No Channel numbers
have been saved.
INFO
TOOLS
Amazon
PIP
P.Size
Ext. Speaker
CC
MTS
Web
Brow...
P.Mode
e-Manual
B
TOOLS
3D
STATUS
MENU
Changing the Virtual Remote Panel
You can change which virtual remote panel is displayed on the TV screen. To shift between panels, move
the focus highlight beyond the left or right edge of the displayed panel.
Use left/right scroll function on the touch pad to change the panel easily.
English - 11
Change a position of the Virtual Remote Panel
Press the MORE button on the Smart Touch Control. The virtual remote panel appears on the screen.
Press and hold the touch pad for one second. Users can change a position of the virtual remote panel of
the screen.
Using the Number Panel
Use the number panel to enter numbers on a keypad screen or webpage or to change the channel while
watching TV. Changing the channel using the number pad leaves a record, allowing you to easily return to
previous channels.
Using the Playback Control Panel
Use the playback control panel to pause, rewind, fast forward, skip to the next file, select a function with
the a, b, {, } buttons, and much more while enjoying media content.
Using the Quick Access Panel
Use the buttons on the quick access panel to bring up the TV's INFO, TOOLS, or e-Manual screens. Note
that the buttons that appear may vary depending on the operating mode of the Smart Touch Control (with
the TV only, as a universal remote, etc.).
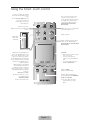
Turning on the TV
Turn on the TV using the P button on the Smart Touch Control or TV panel.
✎ The first time you turn on your TV, it will immediately start the initial setup.
✎ The product color and shape may vary depending on the model.
✎ The TV’s Controller, a small joy stick like button on the rear right side of the TV, lets you control the TV
without the remote control.
Camera
Open Smart Hub.
Open the menu.
m
R
Select a source.
P
Turn off the TV.
TV Controller
The control stick is located at the
lower-left corner on the back of the TV.
✎ The shape of TV stand may differ
depending on the model.
TV
MI
C
SO
UR
CE
VO
L
VO
IC
MO
RE
E
CH
ST
B
Remote control sensor
When you use the Smart Touch Control,
the standby LED does not respond,
except when you press the P button.
LIGH
T
DV
R
RE
TU
EX RN
IT
ME
NU
SM
AR
3D
T HU
B
GU
ID
E
English - 12
Built-in TV Camera and Microphone
This TV features a built-in TV camera and microphone that you can use for the Motion Control, Voice
Recognition, and Face Recognition features. You can also use the camera's angle adjustment knob to
change the camera's viewing angle.
From the Top
From Behind
Microphone
Knob for camera's angle adjustment
Lens
Microphone
Do not touch the lens while operating the TV camera.
You can leave fingerprints that may affect the image quality.
If the lens gets dirty, clean it using a soft piece of cloth.
Extending the TV Camera
To use the TV camera, you must first extend it.
Gently push the camera in without touching the lens until you hear a click. The camera pops up.
Retracting the Camera
If you are not using the TV camera, keep it retracted inside the TV. The Motion Control and Face
Recognition features cannot be used while the TV camera is in the retracted state, but Voice Recognition
will still be available.
Gently push the camera in without touching the lens until you hear a click.
English - 13
Connecting the TV to One Connect
One Connect must be connected to the TV via the One Connect cable before connecting an external
device. The One Connect cable has two different ends, Connect the TV to One Connect referring to the
diagram.
One Connect
<One Connect-end Connector>
<TV-end Connector>
TV
✎ TV stand type is
depending on the model.
<One Connect-end Connector>
<TV-end Connector>
[ The connectors at both ends of the One Connect cable are different from each
other in shape. When connecting the One Connect cable to the TV, make sure that
the right connector is plugged into the TV. Otherwise, it may cause product failure.
English - 14
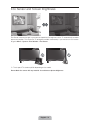
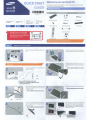
External Device Connections
Remove the Connection Cover
TV - Back
✎ TV stand type is depending
on the model.
English - 15
One Connect - Front
IJI!811lD(hrd ... dot..) lloMao
(Hil06V1A)
I
....
11511
•'---------
~11511
I
•
••• ---------~
...
----lit~
ti
~ zz
0~
ww
- i l~l
}~
Home Thalltar
(HDMI IN 3 (ARC))
I
I
·~:
I
~-
( HDMIIN 1 (STll))
(HD~ ~~ ~
••
I i - - - I 2~1~
..
1!:
~
-liiz
"~Q
itrl~
I~
~
~ ~~
•
•
•
•
DVDPia)'W"
10,.. ) .
1
0J
••.....
Spookienl
g~
ii!O
~
0
"'
r---
II
@1
J
I
I
I
®)+-
I
I
•"'·-----~
-~
- -- ~ l~t
u-... Ramolo Conlrol
English - 16
Switching Between Video Sources
Press the SOURCE button to switch between devices connected to the TV.
For example, to switch to a game console connected to the second HDMI connector, press the SOURCE
button. From the Source list, select HDMI2. The connector names may vary depending on the product.
Select Tools at the upper-right corner of the source screen to access the following functions.
Ř Edit Name: Lets you associate a device name to an input source.
You can select the following device names in the Edit Name option:
VCR / DVD / Cable STB / Satellite STB / PVR STB / AV Receiver / Game / Camcorder / PC / DVI
PC / DVI Devices / TV / IPTV / Blu-ray / HD DVD / DMA
To associate a device name to an input source, follow these steps:
1. Select Tools in the upper right corner of the source screen.
2. Select Edit Name.
3. Find the input source you want in the Source list (HDMI1, HDMI2, Component, etc.).
4. Select the blank field next to the input.
5. In the device name list that appears, select the name of the device attached to the input.
When you view the Source list, the device name and the input port will be displayed together.
− If you have connected a PC to the HDMI IN 2 (DVI) port with an HDMI cable, select PC from the
device name list.
− If you have connected a PC to the HDMI IN 2 (DVI) port with an HDMI to DVI cable, select DVI PC
from the device name list.
− If you connected an AV device to the HDMI IN 2 (DVI) port with an HDMI to DVI cable, select DVI
Devices from the device name list.
Ř Information: View detailed information about the connected devices.
Ř Refresh: Select if a connected device does not appear in the list. If the list does not show the device
after selecting Refresh, check the status of the TV-to-device connection.
Ř Remove USB: Remove the USB device from the list safely. This function is only available when the
USB device selected.
Universal Remote Setup: Use to configure universal remote control settings. Using the universal remote
control, you can control external devices connected to the TV, such as a set-top box, Blu-ray player, and
AV receiver.
English - 17
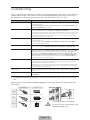
Universal Remote Setup
This TV has a universal remote control feature that lets you control cable boxes, Blu-ray players, home
theaters, and other third-party external devices connected to the TV using the TV's remote control.
2 inches
Keep a distance of 2 inches at least between the IR Extender and the external device, as the illustration
shows. Face the IR Extender toward the external device’s remote control signal receiver. Note that it should
be no obstacle between IR Extender and external device. The presence of an obstacle will interfere with
the transmission of the remote control signal.
Add the External Device
1. Turn on the external device you wish to set up universal remote function for and then press the
SOURCE to bring up the Source screen.
2. Select Universal Remote Setup from the top of the screen. This initiates the universal remote setup
process.
3. Follow the on-screen instruction and set up the universal remote control. If it does not work, set up the
remote control by entering the model number manually.
English - 18
Viewing the e-Manual
This TV has a built-in e-Manual that contains information about your TV's key features and instructions for
using them. To view the e-Manual, use one of the following methods:
Ř Open the Support menu and choose e-Manual (Troubleshooting).
Ř Press the MORE button on the Smart Touch Control to display the virtual remote panel on the TV
screen. Flick the touch pad until the quick access panel appears, select the e-Manual icon, and then
press the touch pad.
✎ In the e-Manual, words in blue refer to screen menu options and words in light blue refer to remote
control buttons.
✎ A printable version of this guide is also available at www.samsung.com/support.
Scrolling a Page
To scroll a page, use of one of the following methods:
Ř Place the focus on the
or
button at the right edge of the screen, and then press the touch pad.
Ř Drag or flick up or down the line on either the left or right edge of the touch pad.
Ř Place the focus on the
touch pad.
or
button at the right edge of the screen, drag or flick up or down on the
Using the Top Icons
Use the Back, Forward, and Opened pages icons on the top left of the screen to navigate through
pages. These icons are available after you have viewed two or more pages.
Returning to the Home Page
To return to the home page, select the a button or select
on the top right of the screen.
✎ To select a letter button (a, b, {, }), press the MORE button on the Smart Touch Control to display
to display the virtual remote panel on the TV screen. Flick the touch pad until the playback control
panel appears, select the a button, and then press the touch pad.
Searching the Index
Select the b button or select
on the top right of the screen to display the index. Select a term to
display the page containing the term.
English - 19
Searching Pages
Select the { button or select
on the top right of the screen, and enter search criteria. Select a page
from the list of search results to display it.
Closing the e-Manual
To close the e-Manual, press and hold the RETURN button or select
screen or press EXIT button.
at the upper-right corner of the
Jumping to a Menu Item
To jump directly to the menu item that is described in the current section, select
. It is possible to
jump from a menu item directly to the related section in the e-Manual. On a menu screen, press the MORE
button on the Smart Touch Control and then select e-Manual on the virtual remote panel that appears on
the screen.
✎ This feature may not be available, depending on the menu.
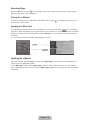
Picture
Picture Mode
Standard
۷
Backlight
14
۷
Contrast
100
۷
Brightness
45
۷
Sharpness
50
۷
Color
50
۷
Tint (G/R)
G50
e-Manual
Try Now
R50
Updating the e-Manual
Press the ™ button and select Apps, and then select More Apps. The e-Manual can be updated in the
same way with an application update.
On the More Apps screen, select Update Apps, and then select e-Manual from the list. The e-Manual
starts updating to the latest version. However, Update Apps appears on the screen only when the update
is required.
English - 20
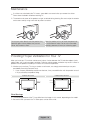
Connecting to a Network
Connecting the TV to a network gives you access to online services such as Smart Hub and lets you
update the TV's software online directly from Samsung.com.
Network Connection - Wireless
Connect the TV to the Internet using a standard wireless router or modem.
Wireless IP Router or Modem
that has a DHCP Server
The LAN Port on the Wall
LAN Cable (Not Supplied)
✎ The shape of TV stand may differ depending
on the model.
Wireless Network Precautions
Ř This TV supports the IEEE 802.11a/b/g /n communication protocols. Samsung recommends using
IEEE 802.11n. Otherwise, when you play video over a network connection, the video may not play
smoothly.
Ř To use a wireless network, the TV must be connected to a wireless router or modem. If the wireless
router supports DHCP, the TV can use a DHCP or static IP address to connect to the wireless network.
Ř Select a channel that is not currently in use for the wireless router. If the channel set for the
wireless router is currently being used by another device, the result is usually interference and/or a
communications failure.
Ř Most wireless networks have an optional security system. To enable a wireless network's security
system, you need to create a security key using characters and numbers, and then enter that key into
the router through its menu. You then must enter this security key into any other devices you want to
connect to the wireless network.
Network Security Protocols
The TV only supports the following wireless network security protocols:
Ř Authentication Modes: WEP, WPAPSK, WPA2PSK
Ř Encryption Types: WEP, TKIP, AES
In compliance with the newest Wi-Fi certification specifications, Samsung TVs do not support WEP or TKIP
security encryption in networks running in the 802.11n mode.
If the wireless router supports WPS (Wi-Fi Protected Setup), you can connect the TV to your network using
PBC (Push Button Configuration) or a PIN (Personal Identification Number). WPS automatically configures
the SSID and WPA key settings.
Your Smart TV cannot connect to uncertified wireless routers.
English - 21
Network Connection - Wired
There are three main ways to connect your TV to your network using cable, depending on your network
setup. They are illustrated below:
One Connect
The Modem Port
on the Wall
External Modem
(ADSL / VDSL / Cable TV)
Modem Cable (Not Supplied)
The Modem Port
on the Wall
LAN Cable (Not Supplied)
One Connect
External Modem
(ADSL / VDSL / Cable TV)
Modem Cable
(Not Supplied)
IP Router that has a
DHCP Server
LAN Cable
(Not Supplied)
LAN Cable
(Not Supplied)
One Connect
The LAN Port
on the Wall
LAN Cable (Not Supplied)
✎ The TV does not support network speeds less than or equal to 10Mbps.
✎ Use Cat 7 cable for the connection.
English - 22
3D Active Glasses
Features
Samsung's SSG-5100GB 3D glasses enable you to view 3D images on your 3D TV. The Samsung 3D
glasses communicate with Samsung 3D TVs via the 2.4GHz RF band.
✎ The Samsung 3D glasses are only compatible with Samsung D, E, and F series 3D TV's that were
released in 2011, 2012, and 2013. These 3D glasses cannot be connected to other Bluetooth devices.
Parts
✎ For details on how to attach the glasses'
LED Indicator & Power Button
temples, refer to the separate 3D glasses
manual.
Battery Cover
Liquid crystal shutter
Replacing the Battery
If the red LED blinks every two seconds continually, replace the battery with a new one.
✎ Insert the "+" side of the battery into the side marked with "+" in the battery compartment.
✎ To check the remaining battery capacity, refer to the pairing section in this manual.
Pull the battery cover
downward
Open the battery cover
Remove the battery
Replace the battery
Push the battery cover Close the battery cover
downward
Pairing 3D Active Glasses
✎ What is Pairing? Pairing is the process of connecting 3D glasses and a 3D TV so that the two devices
can exchange data.
✎ Ensure your Samsung TV and 3D glasses are no farther than 19.5 in (50 cm) apart from each other
while pairing is in progress.
English - 23
Ř Turning the glasses on
Press the power button briefly. The green LED turns on for 3 seconds.
(Make sure that 3D is activated on the TV before using the 3D glasses.)
Ř Turning the glasses off
Press the power button briefly. The red LED turns on for 3 seconds.
Ř Performing the pairing process
Turn the TV on and let it power up completely. Press and hold the Power
button on the glasses. The green and the red LEDs blink alternately for 2
seconds.
Ř Operating range
Recommended pairing distance
50cm
2~6m
Recommended viewing distance
Recommended viewing distance
Recommended pairing distance
2~6m (6.5 to 19.5 ft)
50 cm or less (19.5 in)
✎ Once the 3D glasses are paired, the remaining battery capacity is displayed on the TV screen. (This
feature only applies to Samsung F series 3D TVs and 3D glasses that have been available since 2013.)
✎ If you keep trying to pair the glasses and the TV after pairing has failed, the battery level will decrease
significantly. However, the battery level will recover to a certain degree in about a minute.
✎ The working distance is affected by the presence of obstacles (a person, metal, walls, etc.) between
the glasses and the TV and the strength of the Bluetooth signal.
✎ Turn off the 3D glasses when they are not in use. If you leave the 3D glasses on, the battery lifespan
decreases.
Pairing steps
1. Turn on the TV, and then move the glasses within 19.5 inches of the TV.
2. Press the power button on the 3D glasses briefly. The 3D glasses will power on and pairing will start.
3. The message “3D glasses are connected to TV.” will be displayed on the TV screen when the pairing is
successfully completed.
Ř If pairing fails, the 3D glasses will power off.
Ř If the first attempt to pair fails, power the TV off and on again and perform step 2.
Ř How to pair again: Press the power button on the 3D glasses for more than 1 second.
You must pair the glasses again in the following situations:
− If the 3D glasses do not function, even when the power button is pressed, especially if the TV has
just been a repaired.
− If you want to play 3D content on another Samsung 3D TV model that belongs to the D, E, or F
series released in 2011 through 2013. You must pair the glasses with the other TV.
English - 24
Watching 3D Video
Some 3D modes may not be available depending on the format of the image source.
To watch in 3D, you must wear 3D Active Glasses and turn the glasses on by pressing the power button.
1. Go to the 3D screen. (Picture > 3D)
2. Select the 3D Mode. The 3D Mode screen appears.
3. Set the 3D Mode of the image you want to view.
Troubleshooting
If you encounter...
Try this...
Replace the battery.
The 3D glasses should be close to the TV. Make sure that the distance
My 3D glasses do not work. between the TV and your 3D glasses is less than 19.5 feet (6m) in a
straight line.
The LED keeps blinking
Check the 3D function settings of your TV.
The battery is dead. Replace the battery.
Specifications (Model Number: SSG-5100GB)
Optics
Shutters
Recommended
operating
distance
Weight
Glasses
21.5g/.76 oz. (including the battery: 24.0±0.5g/.85.±.018oz. )
Power
Glasses
One 3V lithium/manganese dioxide battery 3V (CR2025)
Glasses
0.85mA (Average)
Battery
Type
Operating time
Power
consumption
Operating
conditions
Operating
temperature
Custody
temperature
Liquid crystal
Transmittance
36±2%
2 ~ 6m (6.5 to 19.5 ft)
Field Rate
120 fields/second
165mAh, 3.0V (CR2025)
150 hours
50 °F ~ 104 °F (10°C ~ 40°C)
-4 °F ~ 113 °F (-20°C ~ 45°C)
✎ Product specifications may be changed without notice in order to enhance product performance.
✎ The continuous operating time may differ depending on the wireless communication environment and
usage conditions.
English - 25
What is Remote Support?
Samsung Remote Support service offers you one-on-one support with a Samsung Technician who can
remotely:
Ř Diagnose your TV
Ř Adjust the TV settings for you
Ř Perform a factory reset on your TV
Ř Install recommended firmware updates
How Does it Work?
Having a Samsung Tech remotely service your TV is easy.
1. Call the Samsung
Contact Center
and ask for remote
support.
2. Open the menu
on your TV and
go to the Support
section.
3. Select Remote
Management and
Provide the Pin# to
the agent.
English - 26
4. The agent will then
access your TV.
That's it!
TV Upgrade using One Connect (sold separately)
One Connect
(sold separately)
TV
✎ TV stand type is
depending on the model.
Connecting One Connect (sold separately) to a Samsung TV will allow you to enjoy the latest features
and content without having to purchase a new TV. Experience the latest features and services offered by
Samsung Electronics via One Connect.
✎ One Connect is sold separately. Purchasing One Connect will allow you to upgrade the software to
the version from the year in which your One Connect was released. Not supported on all models.
English - 27
Troubleshooting
If the TV seems to have a problem, first review this list of possible problems and solutions. Also, review the
Troubleshooting Section in the e-Manual. If none of the troubleshooting tips apply, visit www.samsung.
com/support or call Samsung Customer Service at 1-800-SAMSUNG (1-800-726-7864).
Issues
Solutions and Explanations
Flickering and Dimming
If your Samsung Television is flickering or dimming sporadically, you may need to disable some of the
energy efficiency features.
Disable Energy Saving (System > Eco Solution > Eco Sensor) and/or Energy Saving (System > Eco
Solution > Energy Saving) and check again.
Component Connections /Screen Color
If you find that the color on your Samsung television screen is not correct or the black and white colors
are off, run a Self Diagnosis Picture Test (Support > Self Diagnosis > Picture Test).
If the picture problem is caused by the TV, the problem should be visible in the Picture Test. If the problem
is not visible, next confirm that the TV's video input ports are connected to the correct external video
device output ports and that none of the connections are loose. Finally, if possible, test your external
video devices by connecting them to another TV.
Screen Brightness
If you find that the colors on your Samsung TV are correct but just a little too dark or bright, try adjusting
the following settings first.
Navigate to Picture and adjust Backlight, Contrast, Brightness, Sharpness, Color, Tint (G/R) and
other picture quality adjustment settings.
Auto Motion Plus/Blur
If you find that there is a blur or “ghost” shadow to the images on your television screen, you might be
able to correct the issue using Auto Motion Plus (Picture > Picture Options > Auto Motion Plus).
Unwanted Powering Off
If your Samsung TV appears to turn off by itself, try disabling some of the TV's energy efficiency and
automatic off features. Check if Sleep Timer (System > Time > Sleep Timer) has been enabled. Sleep
Timer automatically turns off the TV after an amount of time that you select. If the Sleep Timer has not
been enabled, see if No Signal Power Off (System > Eco Solution > No Signal Power Off) or Auto
Power Off (System > Eco Solution > Auto Power Off) has been enabled. No Signal Power Off turns
off the TV if no signal has been received by the TV for a specified period time. Auto Power Off turns off
the TV if there has been no user input in four hours.
Trouble Powering On
When the TV is turned on, the remote control receiver flashes 5 times before the screen turns on.
If you find that you are having problems powering on your Samsung television, there are a number of
things to check before calling the service department.
If the power cord is connected properly and the remote control is operating normally, the problem might
be with the antenna cable connection or the cable/satellite box not being turned on. Check the antenna
connection or turn on the cable/satellite box.
Stand Assembly
If you have any trouble assembling the stand, review the stand assembly instruction in the Quick Start
Guide.
Cannot Find a Channel
Re-run Setup (Go to Menu > System > Setup) or run Auto Program. (Go to Menu > Broadcasting >
Auto Program).
✎ For detailed troubleshooting information, watch the troubleshooting videos at www.samsung.com/
spsn.
Make sure you have the correct cable before plugging it in. Illustrations of common plugs and ports are
shown below.
Cable Plugs
Ports
HDMI
USB
Do not plug cables in upside down.
Optical
Warning
English - 28
Be sure to check the orientation of the
plug before plugging it in.
Issues
Solutions and Explanations
The TV won’t turn on.
Ř Make sure the AC power cord is securely plugged in to the wall outlet and the TV.
Ř Make sure the wall outlet is working.
Ř Try pressing the P button on the TV to make sure the problem is not the remote. If the TV turns on,
refer to “Remote control does not work” below.
There is no picture/video.
Ř Check the cable connections. Remove and reconnect all cables connected to the TV and external
devices.
Ř Set the video outputs of your external devices (Cable/Sat Box, DVD, Blu-ray etc) to match the TV's
input connections. For example, if an external device’s output is HDMI, it should be connected to an
HDMI input on the TV.
Ř Make sure your connected devices are powered on.
Ř Be sure to select the correct input source.
Ř Reboot the connected device by unplugging it, and then reconnecting the device’s power cable.
The remote control does not work.
Ř Replace the remote control batteries. Make sure the batteries are installed with their poles (+/–) in the
correct direction.
Ř Clean the sensor’s transmission window on the remote.
Ř Try pointing the remote directly at the TV from 5~6 feet away.
The cable/set top box remote control
doesn’t turn the TV on or off or adjust the
volume.
Ř Program the Cable/Set remote control to operate the TV. Refer to the Cable/Set-Top-Box user
manual for the SAMSUNG TV code.
✎ This TFT LED panel uses a panel consisting of sub pixels which require sophisticated technology to
produce. There may be, however, a few bright or dark pixels on the screen. These pixels will have no
impact on the performance of the product.
✎ To keep your TV in optimum condition, upgrade to the latest software. Use the Update Now or Auto
Update functions on the TV's menu (Screen Menu > Support > Software Update > Update now or
Screen Menu > Support > Software Update > Auto Update).
Mounting the TV on the Wall Using the Wall Mount Kit
(Optional)
Wall or Ceiling Mounting
If you mount this product on a wall, it should be mounted only as recommended by the
manufacturer. Unless it is correctly mounted, the product may slide or fall, causing serious
injury to a child or adult, and serious damage to the product.
Installing the Wall Mount Kit
The wall mount kit (sold separately) lets you mount the TV on the wall.
For detailed information about installing the wall mount, see the instructions provided with the wall mount.
We recommend you contact a technician for assistance when installing the wall mount bracket. We do not
advise you to do it yourself. Samsung Electronics is not responsible for any damage to the product or injury
to yourself or others if you select to install the wall mount on your own.
To order the wall mount kit, contact Samsung Customer Care at 1-800-SAMSUNG (1-800-726-7864).
English - 29
Installing a Wall Mount Using the Wall Mount Adapter
✎ For more detailed information, refer to the User Manual
of the Wall Mount Kit.
✎ The shape of TV stand may differ depending on the model.
VESA Wall Mount Kit Notes and Specifications
✎ Install your wall mount on a solid wall perpendicular to the floor. Before attaching the wall mount to
surfaces other than plaster board, please contact your nearest dealer for additional information. If you
install the TV on a ceiling or slanted wall, it may fall and result in severe personal injury.
✎ NOTE
Ř Standard dimensions for wall mount kits are shown in the table below.
Ř Samsung wall mount kits contain a detailed installation manual, and all parts necessary for
assembly are provided.
Ř Do not use screws that do not comply with VESA standard screw specifications.
Ř Do not use screws that are longer than the standard length or do not comply with VESA standard
screw specifications. Screws that are too long may cause damage to the inside of the TV set.
Ř For wall mounts that do not comply with the VESA standard screw specifications, the length of the
screws may differ depending on the wall mount specifications.
Ř Do not fasten the screws too firmly. This may damage the product or cause the product to fall,
leading to personal injury. Samsung is not liable for these kinds of accidents.
Ř Samsung is not liable for product damage or personal injury when a non-VESA or non-specified
wall mount is used or the consumer fails to follow the product installation instructions.
Ř Do not mount the TV at more than a 15 degree tilt.
Ř Always have two people mount the TV on to a wall.
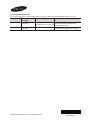
Product Family
TV size in inches
VESA screw hole specs
(A * B) in millimeters
40 - 46
200 X 200
Standard Screw
Quantity
M8
4
LED-TV
[Ultra Slim]
50 - 75
400 X 400
Do not install your Wall Mount Kit while your TV is turned on. It may result in personal
injury from electric shock.
English - 30
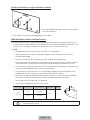
Eco Sensor and Screen Brightness
Eco Sensor measures the light in your room and optimizes the brightness of the TV automatically to reduce
power consumption. This causes the TV to brighten and dim automatically. If you want to turn this function
off, go to Menu > System > Eco Solution > Eco Sensor
✎ The shape of TV stand may differ depending on the model.
Do not block the sensor with any material. It can decrease picture brightness.
English - 31
Maintenance
✎ If a sticker was attached to the TV screen, some debris can remain after you remove the sticker.
Please clean the debris off before watching TV.
✎ The exterior and screen of the product can get scratched during cleaning. Be sure to wipe the exterior
and screen carefully using a soft cloth to prevent scratches.
Do not spray water directly onto the product. Any
liquid that goes into the product may cause a
failure, fire, or electric shock.
Clean the product with a soft cloth dampened with
a small amount of water. Do not use a flammable
liquid (e.g. benzene, thinners) or a cleaning agent.
Providing Proper Ventilation for Your TV
When you install your TV, maintain a distance of at least 4 inches between the TV and other objects (walls,
cabinet sides, etc.) to ensure proper ventilation. Failing to maintain proper ventilation may result in a fire or a
problem with the product caused by an increase in its internal temperature.
✎ Whether you install your TV using a stand or a wall-mount, we strongly recommend you use parts
provided by Samsung Electronics only.
Ř If you use parts provided by another manufacturer, it may cause difficulties with the product or result
in injury caused by the product falling.
Installation with a stand.
Installation with a wall-mount.
4 inches
4 inches
4 inches
4 inches
4 inches
4 inches
4 inches
Other Warnings
✎ The actual appearance of the TV may differ from the images in this manual, depending on the model.
✎ Be careful when you touch the TV. Some parts can be warm or hot.
English - 32
Securing the TV to the Wall
Caution: Pulling, pushing, or climbing on the TV may cause the
TV to fall. In particular, ensure your children do not hang on or
destabilize the TV. Doing so may cause the TV to tip over, causing
serious injuries or death. Follow all safety precautions provided
in the Safety Flyer included with your TV. For added stability
and safety, you can purchase and install the anti-fall device as
described below.
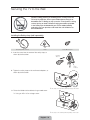
Installing the Safety strap (sold separately):
Safety strap (BN96-15753A)
Holder
Screw (M8 X L28) 2ea
1. Insert the screw into the center of the safety strap, as
shown by the illustration.
Fastening
direction
Holder
Protrusion
2. Tighten the safety strap on the wall mount adapters, as
shown by the illustration.
✎ The shape of TV stand may differ depending on the model.
3. Fasten the Holder to the cabinet using a wood screw.
✎ Using an M5 x L35 or a larger screw.
✎ The shape of TV stand may differ depending on the model.
English - 33
4. Fasten the Holder with a screw the same way used when attaching it to a cabinet. Make sure to stretch
the Holder cord tight. If the rack is made of steel or glass, attach the holder onto the wall.
✎ When attaching the holder onto a wall, use an anchor compatible with the wall's material. When
attaching the holder onto a wall, use an anchor compatible with the wall material.
Anchor
✎ The shape of TV stand may differ depending on the model.
✎ Install the TV close to the wall so that it does not fall.
✎ When attaching the safety strap cord to the wall, tie the cord level with the ground or slanted
downwards for safety purposes.
✎ Check the cord occasionally to make sure it is secure.
✎ Before moving the TV, separate the connected cord first.
5. Verify all connections are properly secured. Periodically check the connections for any sign of fatigue or
failure. If you have any doubt about the security of your connections, contact a professional installer.
IMPORTANT INFORMATION
If a television is not positioned in a sufficiently stable location, it can be potentially hazardous due to
falling. Many injuries, particularly to children, can be avoided by taking simple precautions such as:
Ř Using cabinets or stands recommended by the manufacturer of the television.
Ř Only using furniture that can safely support the television.
Ř Ensuring the television is not overhanging the edge of the supporting furniture.
Ř Not placing the television on tall furniture (for example, cupboards or bookcases) without anchoring
both the furniture and the television to a suitable support.
Ř Not standing the televisions on cloth or other materials placed between the television and
supporting furniture.
Ř Educating children about the dangers of climbing on furniture to reach the television or its controls.
English - 34
Specifications
Display Resolution
3840 x 2160
Environmental Considerations
Operating Temperature
Operating Humidity
Storage Temperature
Storage Humidity
50°F to 104°F (10°C to 40°C)
10% to 80%, non-condensing
-4°F to 113°F (-20°C to 45°C)
5% to 95%, non-condensing
Stand Swivel (Left / Right)
0˚
Model Name
UN55F9000
UN65F9000
Screen Size
(Diagonal)
55˝ Class
(54.6 measured diagonally)
65˝ Class
(64.5 measured diagonally)
Sound
(Output)
Dimensions (W x H x D)
Body
With stand
Weight
Without Stand
With Stand
✎
✎
✎
✎
70W (15W X 2, woofer 20W X 2)
49.0 x 28.2 x 1.5 inches
(1245.6 x 717.8 x 38.6 mm)
49.0 x 29.7 x 12.2 inches
(1245.6 x 756.9 x 310.2 mm)
57.5 x 32.9 x 1.6 inches
(1462.3 x 837.8 x 40.7 mm)
57.5 x 34.4 x 13.0 inches
(1462.3 x 874.7 x 330.3 mm)
48.9 lbs (22.2 kg)
52.0 lbs (23.6 kg)
70.7 lbs (32.1 kg)
75.3 lbs (34.2 kg)
Design and specifications are subject to change without prior notice.
The actual appearance of the TV may differ from the images in this manual, depending on the model.
This device is a Class B digital apparatus.
For information about the power supply, and more information about power consumption, refer to the
label attached to the product.
✎ Typical power consumption is measured according to Energy Star Program requirements for
Televisions.
Dispose unwanted electronics through an approved recycler.
To find the nearest recycling location, go to our website:
www.samsung.com/recyclingdirect or call, (877) 278 - 0799
Standby mode
To decrease power consumption, unplug the power cord when you don't intend to use the TV for a long
time.
Licenses
English - 35
Warranty Information
Federal Communication Commission
Interference Statement
FCC Radiation Exposure Statement:
This equipment has been tested and found
to comply with the limits for a Class B digital
device, pursuant to Part 15 of the FCC Rules.
These limits are designed to provide reasonable
protection against harmful interference in a
residential installation. This equipment generates,
uses and can radiate radio frequency energy
and, if not installed and used in accordance with
the instructions, may cause harmful interference
to radio communications. However, there is no
guarantee that interference will not occur in a
particular installation. If this equipment does cause
harmful interference to radio or television reception,
which can be determined by turning the equipment
off and on, the user is encouraged to try to correct
the interference by one of the following measures:
Ř Reorient or relocate the receiving antenna.
Ř Increase the separation between the equipment
and receiver.
Ř Connect the equipment into an outlet on a
circuit different from that to which the receiver is
connected.
This equipment complies with FCC radiation
exposure limits set forth for an uncontrolled
environment. This equipment should be installed
and operated with minimum distance 20cm
between the radiator & your body.
This Class B digital apparatus complies
with Canadian ICES-003.
Cet appareil numérique de la classe B conforme á
la norme NMB-003 du Canada.
This device complies with Industry Canada licenseexempt RSS standard(s). Operation is subject to
the following two conditions: (1) this device may not
cause interference, and (2) this device must accept
any interference, including interference that may
cause undesired operation of the device.
Le présent appareil est conforme aux CNR
d'Industrie Canada applicables aux appareils radio
exempts de licence. L'exploitation est autorisée
aux deux conditions suivantes: (1) l'appareil ne
doit pas produire de brouillage, et (2) l'utilisateur
de l'appareil doit accepter tout brouillage
radioélectrique subi, même si le brouillage est
susceptible d'en compromettre le fonctionnement.
Ř Consult the dealer or an experienced radio/TV
technician for help.
For product available in the USA/Canada market,
only channel 1~11 can be operated. Selection of
other channels is not possible.
FCC Caution: Any changes or modifications not
expressly approved by the party responsible for
compliance could void the user’s authority to
operate this equipment.
This device and its antenna(s) must not be colocated or operation in conjunction with any other
antenna or transmitter.
This device complies with Part 15 of the FCC
Rules. Operation is subject to the following two
conditions: (1) This device may not cause harmful
interference, and (2) this device must accept any
interference received, including interference that
may cause undesired operation.
For product available in the USA/Canada market,
only channel 1~11 can be operated. Selection of
other channels is not possible.
This device and its antenna(s) must not be colocated or operation in conjunction with any other
antenna or transmitter.
Under Industry Canada regulations, this radio
transmitter may only operate using an antenna
of a type and maximum (or lesser) gain approved
for the transmitter by Industry Canada. To reduce
potential radio interference to other users, the
antenna type and its gain should be so chosen that
the equivalent isotropically radiated power (e.i.r.p.)
is not more than that necessary for successful
communication.
IC Radiation Exposure Statement:
This equipment complies with IC RSS-102 radiation
exposure limits set forth for an uncontrolled
environment. This equipment should be installed
and operated with minimum distance 20cm
between the radiator & your body.
English - 36
IMPORTANT WARRANTY INFORMATION
REGARDING TELEVISION FORMAT
VIEWING
✎ See the warranty card for more information on
warranty terms.
Wide screen format LED Displays (with 16:9 aspect
ratios, the ratio of the screen width to height) are
primarily designed to view wide screen format
full-motion video. The images displayed on them
should primarily be in the wide screen, 16:9 ratio
format, or expanded to fill the screen, if your model
offers this feature, with the images constantly in
motion. Displaying stationary graphics and images
on the screen, such as the dark sidebars on nonexpanded standard format television video and
programming, should be limited to no more than
5% of the total television viewing time per week.
Additionally, viewing other stationary images and
text such as stock market crawls, video game
displays, station logos, web sites or computer
graphics and patterns, should be limited as
described above for all televisions. Displaying
stationary images that exceed the above guidelines
can cause uneven aging of LED Displays that
leave subtle, but permanent burned-in ghost
images in the LED picture. To avoid this, vary the
programming and images, and primarily display
full screen moving images, not stationary patterns
or dark bars. On LED models that offer picture
sizing features, use these controls to view different
formats as a full screen picture.
Be careful about the television formats you select
and the length of time you view them. Uneven LED
aging as a result of format selection and use, as
well as burned in images, are not covered by your
Samsung limited warranty.
Ř SAMSUNG ELECTRONICS NORTH
AMERICAN LIMITED WARRANTY STATEMENT
Subject to the requirements, conditions,
exclusions and limitations of the original Limited
Warranty supplied with Samsung Electronics
(SAMSUNG) products, and the requirements,
conditions, exclusions and limitations contained
herein, SAMSUNG will additionally provide
Warranty Repair Service in the United States
on SAMSUNG products purchased in Canada,
and in Canada on SAMSUNG products
purchased in the United States, for the warranty
period originally specified, and to the Original
Purchaser only.
The above described warranty repairs must be
performed by a SAMSUNG Authorized Service
Center. Along with this Statement, the Original
Limited Warranty Statement and a dated Bill of
Sale as Proof of Purchase must be presented
to the Service Center. Transportation to and
from the Service Center is the responsibility of
the purchaser. Conditions covered are limited
only to manufacturing defects in material or
workmanship, and only those encountered in
normal use of the product.
Excluded, but not limited to, are any originally
specified provisions for, in-home or on-site
services, minimum or maximum repair times,
exchanges or replacements, accessories,
options, upgrades, or consumables.
For the location of a SAMSUNG Authorized
Service Center, please call toll-free:
− In the United States: 1-800-SAMSUNG (1800-726-7864)
− In Canada: 1-800-SAMSUNG
Still image warning
Avoid displaying still images (such as jpeg picture
files), still image elements (such as TV channel
logos, stock or news bars at the screen bottom
etc.), or programs in panorama or 4:3 image format
on the screen. Constantly displaying still pictures
can cause image burn-in on the LED screen, which
will affect image quality. To reduce risk of this effect,
please follow the recommendations below:
Ř Avoid displaying the same TV channel for long
periods.
Ř Always try to display any image in full screen.
Use the TV set’s picture format menu for the
best possible match.
Ř Reduce brightness and contrast to avoid the
appearance of after-images.
Ř Use all TV features designed to reduce image
retention and screen burn. Refer to the
e-Manual for details.
English - 37
Regulatory Compliance Statements
(For 3D Active Glasses)
FCC COMPLIANCE
Federal Communication Commission Interference Statement
1. Changes or modifications not expressly approved by the party responsible for compliance could void
the user’s authority to operate the equipment.
2. NOTE: This equipment has been tested and found to comply with the limits for a Class B digital device,
pursuant to Part 15 of the FCC Rules. These limits are designed to provide reasonable protection
against harmful interference in a residential installation. This equipment generates, uses and can radiate
radio frequency energy and, if not installed and used in accordance with the instructions, may cause
harmful interference to radio communications. However, there is no guarantee that interference will not
occur in a particular installation. If this equipment does cause harmful interference to radio or television
reception, which can be determined by turning the equipment off and on, the user is encouraged to try
to correct the interference by one or more of the following measures:
Ř Reorient or relocate the receiving antenna.
Ř Increase the separation between the equipment and receiver.
Ř Connect the equipment to an outlet on a circuit different from that to which the receiver is connected.
Ř Consult the dealer or an experienced radio/TV technician for help.
FCC Caution: Any changes or modifications not expressly approved by the party responsible for
compliance could void the user’s authority to operate this equipment.
This device complies with Part 15 of the FCC Rules. Operation is subject to the following two conditions:
(1) This device may not cause harmful interference, and (2) this device must accept any interference
received, including interference that may cause undesired operation.
CALIFORNIA USA ONLY
This perchlorate warning applies only to primary CR
(Manganese Dioxide)
Lithium coin cells in the product sold or distributed ONLY in California USA
" Perchlorate Material - special handling may apply,
See www.dtsc.ca.gov/hazardouswaste/perchlorate."
English - 38
SAMSUNG BRAND PRODUCTS
LIMITED WARRANTY TO ORIGINAL
PURCHASER
This SAMSUNG brand product, as supplied and distributed by
SAMSUNG and delivered new, in the original carton to the original
consumer purchaser, is warranted by SAMSUNG against manufacturing
defects in materials and workmanship for period of: (90 Days Parts and
Labor for Commercial Use)
Categories
LCD/LED TV
Plasma Display
Parts
1 Year
1 Year
Projector
2 Year
(Excluding Lamp **)
PICO & LED
1 Year
Pocket Projector
3D Glasses
1 Year
Labor
1 Year
Size
40”
and Larger
37”
and Smaller
1 Year
All
2 Year
All
1 Year
All
1 Year
-
Service
Carry-In or In
Home
Carry-In
Carry-In or In
Home
Carry-In or
Pick up
Carry-In or
Pick up
Carry-In or
Pick up
** 180 Days after Purchasing and 600 Hours of Use Lamp on Projector
This limited warranty begins on the original date of purchase, and is valid
only on products purchased and used in the United States. To receive
warranty service, the purchaser must contact SAMSUNG for problem
determination and service procedures. Warranty service can only be
performed by a SAMSUNG authorized service center. The original dated
bill of sale must be presented upon request as proof of purchase to
SAMSUNG or SAMSUNG's authorized service center.
SAMSUNG will repair or replace this product, at our option and at no
charge as stipulated herein, with new or reconditioned parts or products if
found to be defective during the limited warranty period specified above.
All replaced parts and products become the property of SAMSUNG
and must be returned to SAMSUNG. Replacement parts and products
assume the remaining original warranty, or ninety (90) days, whichever is
longer.
Certain products are eligible for In-home service at Samsung’s discretion.
To receive in-home service, the product must be unobstructed and
accessible to service personnel. If during in-home service, repair cannot
not be completed, it may be necessary to remove, repair and return
the product. If in-home service is unavailable, SAMSUNG may elect,
at our option, to provide for transportation of our choice to and from a
SAMSUNG authorized service center. Otherwise, and for 37" and smaller
LCD/LED TV, transportation to and from the SAMSUNG authorized
service center is the responsibility of the purchaser.
This limited warranty covers manufacturing defects in materials and
workmanship encountered in normal, and except to the extent otherwise
expressly provided for in this statement, noncommercial use of this
product, and shall not apply to the following, including, but not limited to:
damage which occurs in shipment; delivery and installation; applications
and uses for which this product was not intended; altered product or
serial numbers; cosmetic damage or exterior finishes; accidents, abuse,
neglect, fire, water, lightning or other acts of nature; use of products,
equipment, systems, utilities, services, parts, supplies, accessories,
applications, installations, repairs, external wiring or connectors not
supplied or authorized by SAMSUNG which damage this product or
result in service problems; incorrect electrical line voltage, fluctuations and
surges; customer adjustments and failure to follow operating instructions,
cleaning, maintenance and environmental instructions that are covered
and prescribed in the instruction book; reception problems and distortion
related to noise, echo, interference or other signal transmission and
delivery problems; brightness related to normal aging, or burnedin images. SAMSUNG does not warrant uninterrupted or error-free
operation of the product.
THERE ARE NO EXPRESS WARRANTIES OTHER THAN THOSE
LISTED AND DESCRIBED ABOVE, AND NO WARRANTIES WHETHER
EXPRESS OR IMPLIED, INCLUDING, BUT NOT LIMITED TO, ANY
IMPLIED WARRANTIES OF MERCHANTABILITY OR FITNESS FOR
A PARTICULAR PURPOSE, SHALL APPLY AFTER THE EXPRESS
WARRANTY PERIODS STATED ABOVE, AND NO OTHER EXPRESS
WARRANTY OR GUARANTY GIVEN BY ANY PERSON, FIRM OR
CORPORATION WITH RESPECT TO THIS PRODUCT SHALL BE
BINDING ON SAMSUNG. SAMSUNG SHALL NOT BE LIABLE FOR
LOSS OF REVENUE OR PROFITS, FAILURE TO REALIZE SAVINGS
OR OTHER BENEFITS, OR ANY OTHER SPECIAL, INCIDENTAL OR
CONSEQUENTIAL DAMAGES CAUSED BY THE USE, MISUSE OR
INABILITY TO USE THIS PRODUCT, REGARDLESS OF THE LEGAL
THEORY ON WHICH THE CLAIM IS BASED, AND EVEN IF SAMSUNG
HAS BEEN ADVISED OF THE POSSIBILITY OF SUCH DAMAGES. NOR
SHALL RECOVERY OF ANY KIND AGAINST SAMSUNG BE GREATER
IN AMOUNT THAN THE PURCHASE PRICE OF THE PRODUCT SOLD
BY SAMSUNG AND CAUSING THE ALLEGED DAMAGE. WITHOUT
LIMITING THE FOREGOING, PURCHASER ASSUMES ALL RISK AND
LIABILITY FOR LOSS, DAMAGE OR INJURY TO PURCHASER AND
PURCHASER’S PROPERTY AND TO OTHERS AND THEIR PROPERTY
ARISING OUT OF THE USE, MISUSE OR INABILITY TO USE THIS
PRODUCT SOLD BY SAMSUNG NOT CAUSED DIRECTLY BY THE
NEGLIGENCE OF SAMSUNG. THIS LIMITED WARRANTY SHALL NOT
EXTEND TO ANYONE OTHER THAN THE ORIGINAL PURCHASER
OF THIS PRODUCT, IS NONTRANSFERABLE AND STATES YOUR
EXCLUSIVE REMEDY.
Some states do not allow limitations on how long an implied warranty
lasts, or the exclusion or limitation of incidental or consequential
damages, so the above limitations or exclusions may not apply to you.
This warranty gives you specific legal rights, and you may also have other
rights which vary from state to state.
To obtain warranty service, please contact SAMSUNG at:
Samsung Electronics America, Inc.
85 Challenger Road
Ridgefield Park, NJ 07660-2112
1-800-SAMSUNG (7267864) – www.samsung.com
1-800-749-0260: Projectors only
English - 39
Contact SAMSUNG WORLD WIDE
If you have any questions or comments relating to Samsung products, please contact the SAMSUNG customer care center.
Country
CANADA
U.S.A
Customer Care
Center
1-800-SAMSUNG
(726-7864)
1-800-SAMSUNG
(726-7864)
Web Site
Address
www.samsung.com/ca (English)
Samsung Electronics Canada Inc., Customer
www.samsung.com/ca_fr (French) Service 55 Standish Court Mississauga,
Ontario L5R 4B2 Canada
www.samsung.com/us
Samsung Electronics America, Inc. 85
&KDOOHQJHU5RDG5LGJH¿HOG3DUN1-
© 2013 Samsung Electronics Co., Ltd. All rights reserved.
BN68-05426A-01
QUICK START
GUIDE
Welcome to your new Smart TV!
The fo llowing inst ruct ions cover assembling, connecting, and setting up your new TV. Make
sure you h ave t he accessories listed below.
Included in the box
111111111~111111111101111111111111
Remote Control
Stand Parts and Cables
BN68-05427 A-00
Attach the TV to
the Stand
Insert the
batteries into the
remote control
Connect video
devices
Power on and
start the initial
setup
SmartTouch Control
Power cord
Batteries (AAA x 4)
Component adapter
RCA Adapter x 2
a
One connect
Warning: Screens can be damaged
from direct pressure when handled
incorrectly. We recommend lifting the
TV by the edges, as shown .
Step 7
Attach the TV to the Stand
Open the package, and take the cushioning out
of it.
Lay the TV on a soft surface, screen side down.
Use the packing material to protect the screen.
5
Holding the stand parallel to the screen, slide
the stand legs into the notches on the back of
the TV.
2
Put a base, legs and screws off to assemble the
stand out of the box.
- - - ---------------------------------------------
:: (
Base
f,
Leg
I!: a
Screws
'--------------------------------------------------------·
~
~
Base may differ depending on the model.
Accessories may be located at different positions,
depending on the model.
Fit the base and legs together, making sure that
the legs are correctly aligned with the base. See
the diagram below.
~
Insert 4 screws and secure the stand to the TV.
~
Base may differ depending on the model,
Base may differ depending on the model.
Insert 2 screws through the base into each leg
as shown, and then secure the legs to the base
with a screwdriver.
~
~x4(M4XL12)
Base may differ depending on the model.
r·--------------------------
8
When placing the product on a console or shelf,
make sure that the stand does not protrude
beyond the edge of the console or shelf. This
may cause the product to fall off and result in a
malfunction or injury.
Step 2
Connect video devices
We recommend using high speed HDMI connections whenever possible for the best picture quality. Use the included AV adapter to connect older devices.
~
Please check the shape oft he plugs to make to avoid Inserting upside down.
The displayed Image may differ depending on the model.
~
Good Connection :Component and AV
Best Connection: HDMI
We suggest using HDMI whenever
possible.
Component
HDMI 1 is the default port for a
cable or satellite set-top box.
-
HDMIPort
Use the other ports for Blu-ray
players, game consoles, and other
devices.
AV
Wired Ethernet
HDMICable
Match the colors on your device's cables to the colors
on the ports. Connect the yellow composite video out
connector from an AV device to the yellow AV IN port.
USB Connections
You can connect USB storage devices
to the USB ports and enjoy personal
photos, videos, and music.
•,
... _______
.
--------------- . ,
''
'
Connect the cable
from the antenna or
cable TV outlet.
Connect the IR extender to the IR Out
port to control external devices connected to the TV using the Smart Touch Control. For more detailed information, refer
to the "Universal Remote Control Setup"
section on the User manual.
Step 3
Using the Smart Touch Control
You can connect home theater systems to the OPTICAL or
AUDIO OUT ports.
u._u
or
Ill
Troubleshooting
Insert the batteries into the remote control
The stand is wobbly or crooked
With the tip of a credit card (or similar item), use a twisting motion to remove the remote back
cover.
Make sure the arrows on the stand are properly aligned.
The TV won't turn on
Make sure all cables are fully inserted, and that the remote has batteries installed.
I don't know where to plug In <device>
0
0
Devices without HDMI may require the included AN adapter.
I have extra parts
The TV includes some optional parts to help with wall mounting and cable routing.
~
Check the location ofthe battery cover groove. The groove's location may vary depending on
the type of Smart Touch Control Is provided with the product.
Using the touch pad
navigation
selection
scrolling
If you experience issues, please do not take the TV back
to the store.
In the United States of America, call us at
1-800-SAMSUNG (1-800-726-7864) or visit us at www.
samsung.com or www.samsung.com/spsn for support
and warranty service.
For other countries, refer to "Contact SAMSUNG
WORLDWIDE" in the user guide.
To control the highlight, move
your thumb across the pad.
To select an item, press the
pad until you feel a click.
Move your thumb along the
ridges to quickly scroll through
items.
Step 4
Power on and start the initial setup
Information required:
• Wi-Fi network password (if you use one)
• Zipcode
• Cable or satellite provider info
Congratulations on your new Smart TV!
<TV>
<One Connect>
[One Connect Cable Connection Guide]
A
Caution: Identify direction
and polarity of the cable
prior to connection
One Connect Cable
1)
The headers at both ends of the One Connect cable are different
from each other in shape. When connecting the One Connect cable
to the 1V, make sure that the right connector is plugged into the 1V
Otherwise, it may cause product failure.
2) When plugging the One Connect cable's headers, make sure that the
arrow mark on the header faces upward. Forcing the header with the
upside down into the connector may cause product failure.
-&£
[Manuel de branchement du cable One Connect]
1) Les connecteurs situes aux extremrtes du cable One Connect n'ont pas Ia meme forme.
Assurez-vous de brancher le bon connecteur du cable One Connect au televiseur. Un mauvais
branchement pourrart provoquer un dysfonctionnement du produit.
a
2) Lorsque vous branchez les connecteurs du cable One Connect, veillez ce que Ia fti>che
presente sur ces demiers sort face vers le haut. Si vous inserez de force le connecteur face vers
le bas, vous risquez de provoquer un dysfonctionnement du produrt.
[Guia de ligac;:iio do cabo do One Connect]
1) Les ernbases aux extremMs du cable One Connect ant, chacune, leur propre forme.
Lorsque VOUS branchez le cable One Connect au te!Eiviseur, assurez-vous de brancher le bon
connecteur. Sinon, cela peut entrainer une defaillance du televiseur.
2) Lorsque vous branchez les embases du cable One Connect, assurez-vous que Ia fleche
indiquee sur les embases donne vers le haut. Si vous introduisez avec force l'embase en sens
inverse dans le connecteur, cela peut endommager le ttlleviseur.
[Guia de conexiio do cabo do One Connect]
1) As fiches nas extremidades do cabo do One Connect sao d~erentes. Ao ligar o cabo do One
Connect ao televisor, certifique-se de que liga o conector correcto ao televisor. Caso contn\rio,
o produto pode ficar danificado.
2) Quando ligar as fiches do cabo do One Connect, certifique-se de que a maroa da seta das
fichas fica vortada para cima. Se for92r a entrada da ficha no conector, com a maroa da seta
vortada para baixo, o produto pode ficar danificado.
[Guia de conexi6n del cable One Connect]
75
[Guide de branchement pour le cAble One Connect]
1) As pontes ern arnbas as extremidades do cabo do One Connect tam formate d~erentes uma
de outra. Ao conectar o cabo do One Connect 1V, certifique-se de que o conector correto
esteja ligado a Til. Caso contrario, podera causar defertos no produto.
a
2) Ao conectar as pontes do cabo do One Connect, certifique-se de que a seta esta vortada para
cima. For92r a ponta com a seta para baixo ao conectar pode provocar falha do produto.
!II
1) Los cabezales de ambos extremos del cable One Connect tienen una forma drterente. Cuando
conecte el cable One Connect al televisor, asegurese enchufar el conector correcto. De lo
contrario, el producto podrla funcionar mal.
2) Cuando conecte los cabezales del cable One Connect, asegurese de que Ia flecha del cabezal
este cara arriba. Si fuerza Ia introducci6n del cabezal cara abajo en el conector, el producto
podria funcionar mal.
1111111111111111111111111111111111111111
BN68-05418B-OO
IMPORTANT SAFETY PRECAUTIONS
• Placing the television on a platform, stand, cabinet, table or other surface which is:
-
recommended by Samsung or sold with the product;
-
secure and stable;
-
sufficiently wider in the base than the base measurement of the television;
strong and large enough to support the size and weight of the television.
• Positioning the television close to the wall to avoid the possibility of the television falling when pushed.
• Ensuring your television is installed by an authorized Samsung installer.
• Following the instructions for wall mounting in the installation manual and using the mounting equipment supplied by Samsung.
• Placing the television toward the back of the furniture or surface on which it is placed.
• Ensuring that the television does not hang over the edge of the furniture or surface on which it is placed .
• Not hanging anything from or on the television.
• Anchoring both the television and the furniture on which it is placed to a suitable support especially in the case of tall furniture, such as
• cupboards or bookcases which exceed one metre in height. This can be done by using sturdy brackets, safety straps or mounts that
are made specifically for flat screen televisions.
• Not placing any material between the television and the furniture on which it is placed.
• If the furniture on which the television is placed has drawers, cabinets or shelves under the television, taking steps to prevent children
from climbing, such as installing safety latches so the doors cannot be opened.
• Keeping pets away from the television
• Educating children about the dangers of climbing on furniture to reach the television or its control.
Failure to take these safety precautions may cause the television to fall from the stand or mounting equipment,
causing damage or serious injury.
Regulatory Compliance Statements
-
Federal Communications Commission (FCC) - USA
Industry Canada Equipment Standard for Digital Equipment (ICES-003) - Canada
Voluntary Control Council for Interference (VCCI) - Japan
Bureau of Standards Metrology and Inspection (BSMI) - Taiwan
Korea Communications Commission(KCC) - Republic of Korea
Italian Post Ministry (Homologation) - Italy
FCC Class A Notice
This device complies with part 15 of the FCC Rules. Operation is subject to the following two conditions:
1 . This device may not cause harmful interference, and
2. This device must accept any interference received, including interference that may cause undesired operation.
lEI
This equipment has been tested and found to comply with the limits for a Class A digital device, pursuant to Part 15 of the. FCC Rules.
These limits are designed to provide reasonable protection against harmful interference when the equipment is operated in a commercial
environment. This equipment generates, uses, and can radiate radio frequency energy and, if not installed and used in accordance with
the instruction manual, may cause harmful interference to radio communications. Operation of this equipment in a residential area is
likely to cause harmful interference in which case the user will be required to correct the interference at his own expense.
FCC Class B Notice
This device complies with part 15 of the FCC Rules. Operation is subject to the following two conditions:
1. This device may not cause harmful interference, and
2. This device must accept any interference received, including interference that may cause undesired operation.
lEI
This equipment has been tested and found to comply with the limits for a Class B digital device, pursuant to Part 15 of the FCC
Rules. These limits are designed to provide reasonable protection against harmful interference in a residential installation. This
equipment generates, uses and can radiate radio frequency energy and, if not installed and used in accordance with the instructions,
may cause harmful interference to radio communications. However, there is no guarantee that interference will not occur in a
particular installation . If this equipment does cause harmful interference to radio or television reception, which can be determined by
turning the equipment off and on, the user is encouraged to try to correct the interference by one or rnore of the following measures:
- Reorient or relocate the receiving antenna.
- Increase the separation between the equipment and receiver.
- Connect the equipment into an outlet on a circuit different from that to which the receiver is connected.
- Consult the dealer or an experienced radio/TV technician for help.
User Information
Changes or modifications not expressly approved by the party responsible for compliance could void the user's authority to operate the
equipment. If necessary, consult with your dealer or an experienced radio/television technician for additiona suggestions. You may find the
booklet called How to Identify and Resolve Radio/TV Interference Problems helpful. This booklet was prepared by the Federal Communications
Commission. It is available from the U.S. Government Printing Office. Washington, DC 20402, Stock Number 004-000-00345-4.
The party responsible for product compliance:
SAMSUNG ELECTRONICS CO., LTD.
America QA Lab of Samsung
3351 Michelson Drive
Suite #290, Irvine, CA92612 USA
Warning
User must use shielded signal interface cables to maintain FCC compliance for the product. Provided with t his monitor is a detachable
power supply cord w ith IEC320 style tenminations. It may be suitable for connection to any UL Listed personal computer with similar
configuration. Before making the connection, make sure the voltage rating of the computer convenience outlet is the same as the monitor
and that the ampere rating of the computer convenience outlet is equal or exceeds the monitor voltage rating . For 120 Volt applications,
use only UL Listed detachable power cord with NEMA configuration 5 -15P type(parallel blades) plug cap. For 240 Volt applications use
only UL Listed detachable power supply cord with NEMA configuration 6-15P type (tandem blades) plug cap. This television receiver
provides display of television closed captioning in accordance with Section 15.11 9 of the FCC rules. (TV broadcast receivers with picture
screens 13 inches or larger in diameter models only)
ICES-003 Class A Notice - Avis NMB-003, Classe A
This Class A digital apparatus complies with Canadian ICES-003.
Cet appareil numerique de Ia classe A est conforme a Ia norme NMB-003 du Canada.
ICES-003 Class B Notice -Avis NMB-003, Classe B
This Class B digital apparatus complies with Canadian ICES-003.
Cet appareil numerique de Ia classe B est conforme a Ia norme NMB-003 du Canada.
VCCI Class A Notice
~~~~~- ~5~A~~a~~~~~.
~~~~~~Jfnl:l:l~-flm~.Q ct;.~twri!l~sl ~~~ ~ ~ ciJ<N:J LJ a:~.
~~:ti'€1f::fi-flm~tJ~~;JJtJMm~~9 .QJ: .:;~* ~n.Q ~ c tJ<N:J LJ a:~ .
VCCI Class B Notice
~~~~~- ~5~s
~~a~~~~~.
~ ~~Iifi. ~Ji!Jitl~-flm~ .Q ~ c ~Ell¥! c L- -c l. 'a=:~iJ\ ~ ~~~iJ<5 :;;t~'T
n.Qc. :W:rsllf~~sl~~~~~ciJ~N:JLJ-a:~.
JfJ(f&mBJll=f::~-:> "'(IE l., l. 'lf5l LJ t_&l.' ~ l., "'Cl' ~ L'•
v t:::; 3
/:W:i~Wf:::i.!iji L- -c
it.lfl ~
CCC Class A notice - China
~~AR~M. ~~m~$~. -~M~~~--~-*~M.
~~Mffi~l'. ~~~~mP~X~tt*UW~~ff~m~ .
BSMI Class A Notice
The following statement is applicable to products shipped to Taiwan and marked as Class A on the product
compliance label.
!jf-f!j(J!ffj:tf:
-~~••m•~£·~~tt~~~~m~·~~-~~M•~•·~••mmT·
f~ffl1§"1H1Z:~>J(t*I& ;1ft®~ &"i'fl!Jm:
CE
•
BSMI Class A Notice
Products with the CE marking comply with the EMC Directive(2004/1 08/EC) and the Low Voltage
Directive(2006/95/EC) issued by the Commission of the European Community.
Compliance with these directives implies conformity to the following European Norms:
- EN55022: Radio Frequency Interference
- EN55024: Electromagnetic Immunity of Information Technology Equipment
- EN61 000-3-2: Power Line Harmonics
- EN61 000-3-3: Voltage Fluctuations
- EN55013: Radio disturbance characteristics of broadcast receivers and associated equipments
- EN55020: Electromagnetic immunity of broadcast receivers and associated equipm
European Class A Warning
(If the user manual declares the product as Class A, following statement applies.)
This is a class A product. In a domestic environment this product may cause radio interference in which case the user may be
required to take adequate measures.
AE- 7/7/
(gj.!p.~ '6f~~tf7/XfXH)
Ol 7171~ ~!f!.§(AE-) -t:j;qii.f~:j~717I£Ai ll!"DH:A~ .!f.~ A~§:A~~ Ol.g~ 9-2.Jo~AI711:1~2.~[J;j, 7~~.2j.Q.j :AIQlOiiAi
A~§o~~ ~~ ~~o£ ~Liq.
BE- 7/7/
(7f~~ '6f~~tf7/XfXH)
Ol 7171~ 7~~§(88-) -t:j:A~~~~717I£Ai 9-£ 7~~0UAi A~§o~~ ~~ ~~o£ o~O:l. 2~ :AIQlOUAi A~§W
'l,l~Liq.
Italian Homologation Notice
Questo apparecchio e fabbricato in conformita al D.M.28.08.95 n.548
ed in particolare a quanto specificate nell Art.2, comma 1.
Questo apparecchio e fabbricato nella U.E. in conformita al D.M.28.08.95 n.548
Art.2, comma 1 ed al D.M.26.03.92 Art.1
- For products produced in countries except European Community
Questo apparecchio e fabbricato in conformita al D.M.28.08.95 n.548
ed in particolare a quanto specificate nell Art.2, comma 1.
- For products produced in European Community
Questo apparecchio e fabbricato nella U.E. in conformita al D.M.28.08.95 n.548
Art.2, comma 1 ed al D.M.26.03.92 Art.1
"*-
Important Safety Instructions {UL Only)
1.
Read these instructions.
2. Keep these instructions.
3.
4.
5.
6.
7.
8.
9.
10.
11.
12.
13.
14.
Heed all warnings.
Follow all instructions.
Do not use this apparatus near water.
Clean only with dry cloth.
Do not block any ventilation openings, Install in accordance with the manufacturer's instructions.
Do not install near any heat sources such as radiators, heat registers, stoves, or other apparatus
(including amplifiers) that produce heat.
Do not defeat the safety purpose of the polarized or grounding-type plug. A polarized plug has
two blades with one wider than the other. A grounding type plug has two blades and a third grounding prong. The wide blade or the
third prong are provided for your safety. If the provided plug does not fit into your outlet, consult an electrician for replacement of the
obsolete outlet.
Protect the power cord from being walked on or pinched particularly at plugs, convenience receptacles, and the point where they exit
from the apparatus.
Only use attachments/accessories specified by the manufacturer.
Use only with cart, stand, tripod, bracket, or table specified by the manufacturer, or sold with the apparatus. When a cart is used, use
caution when moving the cart/apparatus combination to avoid injury from tip-over.
Unplug this apparatus during lightning storms or when unused for long periods of time.
Refer all servicing to qualified service personnel. Servicing is required when the apparatus has been damaged in any way, such as
power-supply cord or plug is damaged, liquid has been spilled or objects have fallen into the apparatus, the apparatus has been
exposed to rain or moisture, does not operate normally, or has been dropped.
• Ventilation
Do not place the apparatus in a rack or bookcase. Ensure that there is adequate ventilation and that you've followed that manufacturer's
instructions for mounting and installation.
MPR II Compliance (MPR II applied model only)
This monitor complies with SWEDAC(MPR II) recommendations for reduced electric and magnetic fields.
Mercury Statement (LCD Monitor, LCD TV, DLP Projection TV, Projector for USA only)
Contains Mercury, Dispose According to Local, State or Federal Laws
Wiring the Mains Power Supply Plug(UK Only)
IMPORTANT NOTICE
The mains lead on this equipment is supplied with a moulded plug incorporating a fuse. The value of the fuse is indicated on the pin face
of the plug and, if it requires replacing, a fuse approved to BSI1362 of the same rating must be used.
Never use the plug with the fuse cover omit1ed if the cover is detachable. If a replacement fuse cover is required, it must be of the same
colour as the pin face of the plug. Replacement covers are available from your dealer.
If the titled plug is not suitable for the power points in your house or the cable is not long enough to reach a power point, you should
obtain a suitable safety approved extension lead or consult your dealer for assistance. However, if there is no alternative but to cut off the
plug, remove the fuse and then safely dispose of the plug.
Do NOT connect the plug to a mains socket as there is a risk of shock hazard from the bared flexible cord.
IMPORTANT
The wires in the mains lead are coloured in accordance with the following code:
BLUE- NEUTRAL BROWN- LIVE
As these colours may not correspond to the coloured markings identifying the terminals in your plug, proceed as follows:
The wire coloured BLUE must be connected to the terminal marked with the letter N or coloured BLUE or BLACK. The wire coloured
BROWN must be connected to the terminal marked with the let1er Lor coloured BROWN or RED.
WARNING:
DO NOT CONNECT EITHER WIRE TO THE EARTH TERMINAL, WHICH IS MARKED WITH THE LETTER E OR BY THE EARTH SYMBOL
, OR COLOURED GREEN OR GREEN AND YELLOW.
Russia Only - PCT Notice
~u
AB57
MPR II Compliance (MPR II applied model only)
This monitor complies with SWEDAC(MPR II} recommendations for reduced electric and magnetic fields.
EU Eco-Label (EU Eco-Label applied model only)
Products which have model codes that end in XU are intended for the UK market. Samsung has not applied for Ecolabels for products with this
specific model code.
***
*
c- *
* ~ *
*
*
EU'){:C
Better for the environment. ..
• High Energy Efficiency
• Reduced C02 emissions
• Designed to facilitate repair and recycling
Ecolabel
... better for you.
www.ecolabel.eu
[~__E_U_E_c_o_la_b_e_I:_H_U_I0_2_2I_0_2__]
SAMSUNG Electronics makes an effort to develop environment-friendly product that minimizing an impact to environment through whole
process from getting raw materials, production, transportation, usage and end-of-life disposal by adding 'environment' on function, price,
quality, design that were the essence for product development.
These environmental characteristics are endorsed by the award of the European Eco-label (also known as the Euro Flower) issued by
the European Commission as approval of the product environmental status for energy saving, facilities for recycling and a host of other
features. The full list of criteria and more information on the ecolabel canbe found at t he web-site address: http://www.ecolabel.eu
Recycling Information (Take-back offer)
For recycling information for our products, please contact the company corresponding to your region of residence.
For those who reside in other countries, please contact a nearest local Samsung dealer for recycling information for the products to be treated
in environmentally acceptable way.
The information of Regional Takeback Schemes can be found at Samsung's web-site.
http://www.samsung.com/recycling_compliance
CIS Only
®
C~Meon «He A11Sl n~Ll.leBo~ npOAYKLI~~» np~MeHSleTCSl e cooTeeTCTB~e c TeXHW·l9CK~M pernaMeHTOM
TaMo>KeHHoro co103a «0 6e3onacHOCT~ ynaKOBK~» 005/2011 ~ yKa3bteaeT Ha TO, YTO ynaKOBKa AaHHoro
npoAyKTa He npeAHa3HaYeHa AJ1Sl noeTopHoro ~cnonbJOBaH~Sl ~ noAile>K~T YT~11~3al..l~~- YnaKOBKY
,[laHHOro npOAYKTa 3anp91J.189TCSl ~Cn011b30B8Tb AJlSl xpaHeH~Sl n~Ll.leBO~ npOAYKLI~~-
0
C~MBOn «nemf! Me6~yca» yKa3btBaeT Ha B03MO>KHOCTb yn1111!13al.llillil ynaKOBKI!I. CliiMBOn MO>KeT
6btTb ,QononHeH o6o3Ha'-!eHI!IeM MaTepl!lana ynaKOBKiil B Blii,Qe lllil¢posoro lil/lilnlil 6yKBeHHoro
o6o3Ha'-leHI!IR
®
{)
CliiMBOn KeAeHAiK OAai\Tbll-\ 005/2011 TeXHiiiKaflbl~ pernaMeHTiHe ca~Kec ~onAaHbtna,Qbl >KaHe OCbl
eHiMHi11 ~amaMaCbiH eKiHwi peT na~AanaHyfa apHanMafaHbiH >KaHe >KOIOfa >KaTaTbiHbiH KepceTe,qi.
Ocbl eHiMHi11 ~amaMaCbiH a3bi~-TV11iK eHiM,qepiH cal\fay ywiH na~,qanaHyfa Tbl~biM canbtH8Abl.
CliiMBOn ~amaMaHbl >KOIO MVMKiH,qiriH KepceTe,qi. CI!IMBon caHAbl~ KOA >t<aHe/HeMece apin
6enrinepi TypiH,qeri ~amaMa MaTepl!laflbiHbll1 6enriciMeH TOflbll\fblpblflYbl MVMKiH.
1111111111111111111111111111111111111111111
BN68-04972A-01