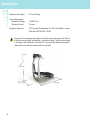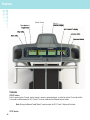
1
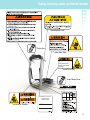
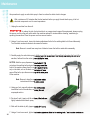
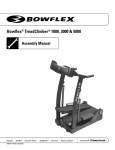
Manual en Español Latino Americano: http://support.nautilus.com
Owner’s Manual
Welcome to TreadClimber® by Bowflex®!
You are about to experience a transformation that will not only shape your body but will also change your outlook
on life. We thank you for investing your time and money in your TreadClimber® fitness machine. We are so confident in your purchase that we guarantee your results. If you don’t see results in the first six weeks, you can get
your money back (less shipping and handling) – guaranteed (see “100% Satisfaction Guarantee”).
Use this Owner’s Manual as a guide to getting started on your TreadClimber® workouts and for tips to keep your
machine well maintained.
Yours in Health,
The Bowflex® Family
Table of Contents
Important Safety Instructions ................................. 3
Safety Warning Labels and Serial Number............. 5
Specifications ........................................................ 8
Features ................................................................. 9
Operations ............................................................ 14
Before You Start .................................................. 22
Moving Your Machine ........................................... 28
Leveling Your Machine ......................................... 29
Maintenance ......................................................... 30
Walking Belt Alignment ......................................... 33
Walking Belt Electrostatic Reduction .................... 34
Troubleshooting .................................................... 38
Body Weight Loss Guide ...................................... 40
100% Satisfaction Guarantee ............................... 51
To validate warranty support, keep the original proof of purchase and record the following information:
Serial Number __________________________ Date of Purchase ____________________
To register your product warranty, go to: www.bowflex.com/register
Or call 1 (800) 605–3369.
If you have questions or problems with your product, please call 1 (800) 605–3369.
Nautilus, Inc., (800) NAUTILUS / (800) 628-8458, www.NautilusInc.com - Customer Service: North America (800)
605-3369, [email protected] | outside U.S. +01-360-859-5180, [email protected] | Printed in China |
© 2011 Nautilus, Inc.
2
Important Safety Instructions
This icon means a potentially hazardous situation which, if not avoided, could result in death or serious
injury.
Before using this equipment, obey the following warnings:
Read and understand the complete Owner's Manual. Keep the Owner’s Manual for future reference.
Read and understand all Warnings on this machine. If at any time the Warning stickers become loose,
unreadable or dislodged, contact Nautilus® Customer Service for replacement stickers.
To reduce the risk of electrical shock or unsupervised usage of the equipment, always unplug
the power cord from the wall outlet and/or the machine and wait 5 minutes before cleaning, maintaining or
repairing the machine. Place the power cord in a secure location.
WARNING To decrease the risk of burns, electric shock, or injury to persons, read and understand the
complete Owner’s Manual. Failure to follow these guidelines can cause a serious or possibly fatal electrical shock
or !other
D Aserious
N G E injury.
R
• Children must not be let on or near to this machine. Moving parts and other features of the machine can be
dangerous to children.
!
!
CAUTION
• Not intended for use by anyone under 14 years of age.
• Consult a physician before you start an exercise program. Stop exercising if you feel pain or tightness in your
chest, become short of breath, or feel faint. Contact your doctor before you use the machine again. Use the
values calculated or measured by the machine’s computer for reference purposes only.
• Before each use, examine this machine for damage to power cord, power receptacle, loose parts or signs of
wear. Do not use if found in this condition. Contact Nautilus® Customer Service for repair information.
• The machine should never be left unattended when plugged in. Unplug from outlet when not in use, and before
putting on or taking off parts.
• Keep power cord away from heat source and hot surfaces.
• This machine must be connected to an appropriate, dedicated electrical circuit. Nothing else must be
connected to the circuit.
• Always connect the power cord to a circuit capable of handling 10 amperes with no other loads applied.
• Connect this machine to a correctly grounded outlet; consult a licensed electrician for assistance.
• Do not operate where aerosol products are being used.
• Do not let liquids touch the electronic controller. If it does, the controller must be inspected and tested for safety
by an approved technician before it can be used again.
• The electrical wiring for the residence in which the machine will be used must obey the applicable local and
provincial requirements.
• Maximum user weight limit: 300 lbs. (136 kg). Do not use if you are over this weight.
3
Important Safety Instructions
• This machine is for home use only.
• Do not wear loose clothing or jewelry. This machine contains moving parts. Do not put fingers or other objects
into moving parts of the exercise equipment.
• Always wear rubber soled athletic shoes when you use this machine. Do not use the machine with bare feet or
only wearing socks.
• Set up and operate this machine on a solid, level, horizontal surface.
• Use caution when you step on and off the machine. Use the supplied foot support platforms for stability before
walking on the moving belt.
• The normal design and operation of this machine allows for the treadles to move independently of each other
when a person steps on, or exerts force or pressure, on the treadles. Be aware that treadle movement can
occur when the machine is unplugged or the safety key removed. Always take care to insure that fingers do not
get caught between the treadles, and to prevent injury never allow children or pets around the machine.
• Do not operate this machine outdoors or in moist or wet locations.
• Keep at least 19.5” (1/2 m) on each side of the machine and 79” (2 m) behind the machine clear. This is the
recommended safe distance for access and passage around and emergency dismounts from the machine.
Keep third parties out of this space when machine is in use.
• Do not over exert yourself during exercise. Operate the machine in the manner described in this manual.
• Perform all regular and periodic maintenance procedures recommended in the Owner’s Manual.
• Read, understand, and test the Emergency Stop Procedure before use.
• Keep the walking belt clean and dry.
• Do not drop or put objects into any opening of the machine.
• This machine is designed for walking. Do not try to run on this machine.
• Keep your hands on the support Handlebars and stay as near the front of the machine as is comfortable in
order to stay in balance on the Treadles.
• Keep your foot in the center of each Treadle, do not let your feet cross in front of your body as you increase the
speed.
• Use this machine only for its intended use as described in this manual. Do not use attachments not
recommended by the manufacturer.
• Exercise on this machine requires coordination and balance. Be sure to anticipate that changes in speed, the
angle of Walking Decks, and resistance level can occur during workouts, and be attentive in order to avoid loss
of balance and possible injury.
• This product contains magnets. Magnetic fields can interfere with the normal use of certain medical devices at
a close range. Users may come into proximity of the magnets in the assembly, maintenance, and/or use of the
product. Given the obvious importance of these devices, such as a pacemaker, it is important that you consult
with your medical provider in connection with the use of this equipment. Please consult the “Safety Warning
Labels and Serial Number” section to determine the location of the magnets on this product.
4
Safety Warning Labels and Serial Number
* beside power inlet
002-2268
9.
* Safety Key
* under Rear Step
-Moving parts can crush and
cut.
-Keep guards in place.
-Lock out power before
servicing.
* under Rear Step
* under Motor Cover
AAAAAAVVVYYWW9999
•
CALIFORNIA 93120 PHASE 2
COMPLIANT FOR
FORMALDEHYDE
•
* on inside of Treadles
5
Safety Warning Labels and Serial Number
Grounding Instructions
This product must be electrically grounded. If a malfunction occurs, correct grounding decreases the risk of
electric shock. The power cord is equipped with an equipment-grounding conductor, and must be connected to an
outlet that is properly installed and grounded.
The electrical wiring must comply with all applicable local and provincial standards and
requirements. Incorrect connection of the equipment-grounding conductor can result in a risk of
electric shock. Consult a licensed electrician if you are not sure that the machine is correctly
grounded. Do not change the plug on the machine – if it does not fit the outlet, have a correct
outlet installed by a licensed electrician.
If you connect the machine to an outlet with GFI (ground fault interrupt) or AFI (arc fault interrupt), machine
operation can cause the circuit to trip.
If an extension cord or surge protector is used with this machine, make sure that it is a heavy duty model
rated at 15A operation, and accepts an equipment-grounding conductor. Do not connect other appliances
or devices to the extension cord or surge protector in combination with this machine.
6
Safety Warning Labels and Serial Number
Emergency Stop Procedure ( Safety Key
Port )
The TreadClimber® machine is equipped with a Safety Key
that can prevent serious injury, as well as prevent children
from playing with and/or being injured on the machine. If
the Safety Key is not correctly inserted into the Safety Key
Port, the belts will not operate.
Always attach the Safety Key Clip to your clothing
during your workout.
When you use the machine, only remove the
Safety Key in an emergency. When the key is
removed while the machine is in operation, it will stop quickly, which could cause the loss of balance and
possible injury.
For safe storage of the machine and to prevent unsupervised operation of the machine always remove
the Safety Key and disconnect the power cord from the wall outlet and machine AC input. Place the power
cord in a secure location.
The Console will display “EStP” for a Safety Key fault. The TreadClimber® machine will pause a workout when the
Safety Key is removed. Inspect the Safety Key and be sure it is connected to the Console correctly. Push the
START button to resume the workout.
7
Specifications
Maximum User Weight:
300 lbs (136 kgs)
Power Requirements:
Operational Voltage:
Operating Current:
120VAC 60 Hz
10A max
Regulatory Approvals:
c-ETL-us mark. Evaluated per UL 1647 Fourth Edition, January
2008 and CAN/CSA-C22.2. 68-92.
This product, its packaging, and components contain chemicals known to the State of
California to cause cancer, birth defects, or reproductive harm. This Notice is provided
in accordance with California’s Proposition 65. If you would like additional information,
please refer to our web site at www.nautilus.com/prop65.
53”
(134 cm)
30” (77 cm)
8
51” (129 cm)
Features
Safety Key Port
Smart phone / MP3 player holder
Console
Bottle Holder
Handlebars
Workout Cylinder
Walking Belt
Adjustment Bolt
Treadle
Side Foot
Support Platform
Transport Hand Bar
Walking Belt Guide
Leveler
Walking Belt
Rear Step
Transport Wheel
Power Switch
9
Features
Speed display
Time display /
weight value
Stop button
Start button
Calorie /
Distance display
G.O. Coach™ display
Increase button
Decrease button
Console
START button
Push to power up the Console, start a workout, resume a paused workout, or select an option. Push and hold for
2 seconds to shift between the G.O. Coach™ workout mode and the Manual workout mode.
Note: During the Manual TreadClimber® workout mode, the G.O. Coach™ display will be blank.
STOP button
10
Features
Push to pause a workout, exit the Console Service/ Setup mode, or end a
paused workout.
Time display / weight value
Counts in minutes and seconds the total time of your workout (e.g. 15:42
minutes).
Shows the weight value for the G.O. Coach™ user and the Manual Workout
mode in LBS (pounds) or KG (kilograms). The default value for Weight is 150
lbs.
Speed display
Shows your climbing rate in miles (MI) or kilometers (KM) per hour to one
decimal (e.g. 3.4 MI). MI is the default setting.
Calorie / Distance display
Shows the Calorie or Distance values. The Calorie display counts your total
calories.
Note: When you reach “9999”, the Calorie display will rollover to a
value of “0”.
The display alternates between the Calorie and Distance values every 2
seconds. The Distance display shows your workout distance in miles (MI) or
kilometers (KM). Miles is the default setting.
Note: When you workout a distance more than “99.99”, the display will rollover to “0.00”.
G.O. Coach™ display
The display shows the weekly progress toward the 90 minute, G.O. Coach™ goal for one user. The weekly goal
consists of three columns of thirty minutes, each segment of a column is 3.3 minutes.
Note: This display is blank in Manual TreadClimber® workout mode.
Increase button
Push to increase the speed of the belts, increase a value for weight, or move
through a list of options.
Decrease button
Push to lower the speed of the belts, decrease a value for weight, or move through a list of options. Push and hold
11
Features
for 2 seconds to access the Weight value in Idle mode.
Hydraulic Setting Cylinders
Your TreadClimber® machine uses Hydraulic Cylinders to absorb your steps and cushion your joints, decreasing
your overall fatigue and reducing muscle strain. The displacement of the Treadles is adjusted by the dials on the
Hydraulic Cylinders. The MIN setting is the minimum amount of Treadle movement, the MAX is the maximum
12
Features
movement. The closer the dial is set to the MAX setting, the more the Treadle will travel. This results in a more
intense workout.
Begin with each cylinder set to the central, white dot on the dial. If this setting allows too much Treadle travel,
adjust the dial toward the MIN (clockwise) setting until you are comfortable with the amount of travel. If you find
that the Treadles do not move enough to fully cushion your steps, adjust the dial setting toward the MAX (counterclockwise) setting, allowing more Treadle movement. The Treadles should be set so they displace enough to
absorb the impact of your stepping motion, approximately 3 inches. Although the settings dial can move continuously in either direction, it is recommended not to turn the dials through the red range.
Do not change the intensity settings of the Cylinders during a workout. Stop the workout and step off the
machine before you adjust the resistance level.
Note: “Bottoming out” occurs when the Treadle travels through too great a range of motion. When this occurs, the Treadles hit against the base on the down step. To reduce Treadle travel, turn the setting
dial toward MIN or increase the belt speed.
It may be helpful to note your dial setting for future reference when there are multiple users of the machine.
13
Operations
Fitness Basics
Frequency
To maintain good health, lose weight and improve your cardiovascular endurance, use the TreadClimber® fitness
machine a minimum of 3 times per week, 30 minutes each day.
If you are new to exercise (or returning to a regular exercise program), and you are unable to comfortably complete 30 minutes of
continuous exercise at one time, just do 5 – 10 minutes, and gradually increase your workout time until you can reach 30 minutes
total.
If your schedule is busy, and you are unable to fit 30 minutes of continuous exercise into your day, try accumulating 30 minutes by
doing multiple shorter workouts on the same day. For example, 15 minutes in the morning and 15 minutes in the evening.
For best results, combine your TreadClimber® fitness machine workouts with a strength training program using a Bowflex® home
gym or Bowflex® SelectTech® dumbbells, and follow the Bowflex® Body Weight Loss Plan that comes with your machine.
Consistency
Busy work schedules, family obligations and daily chores can make it difficult to fit regular exercise into your life.
Try these tips to increase your chances of success:
Schedule your workouts the same way you schedule meetings or appointments. Select specific days and times
each week, and don’t change your workout times unless it is absolutely necessary.
Make a commitment to a family member, friend or spouse, and encourage each other to stay on track each week.
Leave messages with friendly reminders to be consistent, and keep each other accountable.
Make your workouts more interesting by alternating between steady state (single-speed) workouts and interval
training (varied speed) workouts. The TreadClimber® fitness machine is even more fun when you add this kind of
variety.
Apparel
It is important to wear appropriate, safe and comfortable footwear and clothing when using the
TreadClimber® fitness machine, including:
• Rubber-soled athletic walking or running shoes.
• Exercise clothing that allows you to move freely, and keep comfortably cool.
• Athletic support that provides stability and comfort.
14
Operations
Warm-Up *
Before you use your TreadClimber® fitness machine, consider doing these dynamic warm-up stretches, which will
help prepare your body for the workout:
Dynamic Knee Hug
Stand with the feet together. Bring one knee forward and up
toward the chest. Place the hands around the shin and pull
the knee into the chest. Release the stretch by putting the
foot on the floor. Each repetition of the sequence should take
1 to 3 seconds. Repeat as a continuous, controlled, fluid sequence 10 or 20 times. Repeat the stretch with the other leg.
Dynamic Knee Bend
Stand with the feet together. Raise the heel of one foot
toward the gluteals. Release the stretch by putting the foot on
the floor. Each repetition of the sequence should take 1 to 3
seconds. Repeat as a continuous, controlled, fluid sequence
10 or 20 times. Repeat the stretch with the other leg.
Dynamic Knee Kick
Stand tall and hold one leg up with the hands at hip height,
keeping the knee bent. Hold onto a wall for balance with one
hand, if necessary. Straighten the knee as far as comfortably
possible. Release the stretch by bending the knee. Each repetition of the sequence should take 1 to 3 seconds. Repeat
as a continuous, controlled, fluid sequence 10 or 20 times.
Repeat the stretch with the other leg.
15
Operations
Dynamic Twist
Stand with the feet shoulder-width apart. Bend the elbows;
hold the arms out to the sides. Twist the upper body to one
side and then the other side as far as comfortably possible.
Each repetition of the sequence should take 1 to 3 seconds.
Repeat as a continuous, controlled, fluid sequence 10 or 20
times
Dynamic Bent Knee Heel Press
Stand with one foot forward and one foot back, hip-width
apart and feet facing forward. Bend both knees putting
weight on the back heel. Release the stretch by returning
to the start position. Each repetition of the sequence should
take 1 to 3 seconds. Repeat as a continuous, controlled,
fluid sequence 10 or 20 times. Repeat the stretch with the
other leg. Touch a wall or hold onto something for balance, if
necessary.
Dynamic Side Reach
Stand with the feet apart, the knees slightly bent and the
arms at the sides of the body. Reach with one hand above
the head and lean over to the opposite side. Release the
stretch by returning to the start position. Then reach with the
other hand to the opposite side. Use the other arm to support
the body weight on the thigh, if necessary. Each repetition
of the sequence should take 1 to 3 seconds. Repeat as a
continuous, controlled, fluid sequence 10 or 20 times.
* Source: Jay Blahnik’s Full-Body Flexibility, Second Edition, 2010. HumanKinetics.com.
16
Operations
Workouts
Follow these guidelines to ease yourself into a weekly exercise regimen. Use your judgment and/or the advice of
your physician or health care professional to find the intensity and level of your workouts.
Consult a physician before you start an exercise program. Stop exercising if you feel pain or tightness in
your chest, become short of breath, or feel faint. Contact your doctor before you use the machine again.
Use the values calculated or measured by the machine’s computer for reference purposes only.
Steady State and Interval Training are 2 types of workouts you can do on your TreadClimber® fitness machine:
Steady State workouts
A Steady State workout involves slowly increasing your workout speed to a challenging, but comfortable speed
you can hold for most of your workout. For example, holding a 3.0 MPH walking pace for the entire workout,
except during the warm-up and cool-down. Steady State workouts help you build exercise confidence, stamina
and endurance, and are essential to a well-rounded cardiovascular training program.
Interval Training workouts
An Interval Training workout involves adjusting your speed faster and slower for specific lengths of time to raise
and lower your breathing rate, heart rate and calorie burn. Here is a sample Interval Training workout:
•
•
•
•
•
•
•
7 minutes walking at a slow, easy, comfortable speed.
1 minute walking at a more challenging speed that is approximately 50% faster.
7 minutes walking at a slow, easy, comfortable speed.
1 minute walking at a more challenging speed that is approximately 2x faster.
7 minutes walking at a slow, easy, comfortable speed.
1 minute walking at a more challenging speed that is approximately 50% faster.
6 minutes walking at a slow, easy, comfortable speed.
Interval Training workouts provide variety, help minimize overuse injuries (that sometimes occur from doing only
Steady State workouts), maximize calorie burn and improve fitness.
The TreadClimber® fitness machine is designed to cushion your joints and muscles, and both Steady State and
Interval Training workouts should feel much more comfortable than walking or running outside on a hard surface
or a treadmill.
17
Operations
Workout Schedule
Here is a beginner, intermediate and advanced sample workout schedule. With each of these sample workout
schedules, do not move on to the next week until the current week feels easier and comfortable.
Week 1
Beginner
18
Week 4
Week 5
Steady State
Steady State
Interval Training
Interval Training
Steady State
Steady State
Interval Training
Steady State
Steady State
Steady State
Steady State
Steady State
Interval Training
Interval Training
Week 2
Week 3
Week 4
Week 5
Steady State
Steady State
Interval Training
Steady State
Interval Training
Steady State
Interval Training
Steady State
Interval Training
Steady State
Steady State
Steady State
Interval Training
Steady State
Interval Training
Week 1
Advanced
Week 3
Steady State
Week 1
Intermediate
Week 2
Week 2
Week 3
Week 4
Week 5
Steady State
Interval Training
Interval Training
Interval Training
Interval Training
Interval Training
Steady State
Steady State
Steady State
Interval Training
Steady State
Interval Training
Interval Training
Interval Training
Interval Training
Operations
Workout Log
Use this log to track your workouts and progress. Tracking your workouts helps you stay motivated and achieve your goals.
Date
Cylinder
Setting
Distance
Time
Calories
Average
Speed
Workout Cylinder
(for reference only)
Cylinder Reference Setting:
12
11
10
9
8
7
6
5
4
3
2
1
0
19
Operations
Cool-Down *
When you are done using your TreadClimber® fitness machine, consider doing these relaxing stretches, which will
help your body recover from the workout and make you more flexible:
Lying Leg Raise
Lie on the floor face up with the legs slightly bent. Lift one leg
up toward the ceiling, keeping the knee straight. Place the
hands (or a strap) around the thigh and move the leg closer
to the head. Hold the stretch for 10 to 30 seconds. Repeat the
stretch on the other leg. Keep the head on the floor and do
not round the spine.
Side Lying Knee Bend
Lie on the floor on one side of the body and rest the head on
the lower arm. Bend the top knee and hold the ankle with the
same-side hand, then pull the heel toward the gluteals. Hold
the stretch for 10 to 30 seconds. Lie on the other side and
repeat the stretch with the other leg. Remember to hold the
knees close together.
Lying Figure Four
Lie on the floor face up with the legs bent. Place one foot
across the thigh of the opposite leg in the figure four position.
Reach for the leg on the floor and pull it toward the chest.
Hold the stretch for 10 to 30 seconds. Repeat the stretch with
the other leg. Keep the head on the floor.
* Source: Jay Blahnik’s Full-Body Flexibility, Second Edition, 2010. HumanKinetics.com.
20
Operations
Seated Twist
Sit on the floor and extend the legs straight out in front of the
body with the knees slightly bent. Place one hand on the floor
behind the body and the other hand across the thigh. Twist
the upper body as far as comfortably possible to one side.
Hold the stretch for 10 to 30 seconds. Repeat the stretch on
the other side.
Seated Figure Four
Sit on the floor and extend one leg straight out in front of the
body. Place the foot of the other leg across the thigh in the
figure four position. Move the chest toward the legs, pivoting
at the hip. Hold the stretch for 10 to 30 seconds. Repeat on
the other leg. Use the arms to support the back.
Dynamic Heel Drop
Place the ball of one foot on the edge of a step or staircase.
Place the other foot slightly in front. Lower the heel of the
back foot as far as comfortably possible, keeping the knee
straight. Release the stretch by lifting the heel as high as
comfortably possible. Each repetition of the sequence should
take 1 to 3 seconds. Repeat as a continuous, controlled, fluid
sequence 10 or 20 times. Repeat the stretch with the other
leg
21
Operations
Before You Start
Consult a physician before you start an exercise program. Stop exercising if you feel pain or tightness in
your chest, become short of breath, or feel faint. Contact your doctor before you use the machine again.
Use the values calculated or measured by the machine’s computer for reference purposes only.
1. Place the TreadClimber® fitness machine in your workout area.
Place the machine on a clean, hard, level surface, free from unwanted material or other objects that may
hamper your ability to move freely. A rubber mat can be used below the machine to prevent the release of
static electricity and protect your flooring.
The machine can be moved by one or more persons. Make sure that your own physical strength is capable of safely moving the machine.
2. Adjust the intensity settings on the Hydraulic Cylinders.
Note: Initially, the settings on each cylinder should match. Begin with each cylinder set to the central,
white dot on the dial.
3. Connect the power cord to the machine and into a grounded AC Wall Outlet.
Note: The TreadClimber® fitness machine is designed to plug directly into a properly wired and grounded
three prong 120V outlet. If an extension cord must be used, be sure it is a heavy duty model, rated
for 15A.
Put the power cord alongside the machine, out of your way when you dismount the machine. Avoid
stepping on the power cord and plug.
4. Examine below the Treadles for any objects. Be sure it is clear below the machine.
5. Switch on the power. Power is now supplied to the machine.
6. Straddle the belts and stand on the Side Foot Support Platforms. Put the Safety Key into the Safety Keyhole
and clip the Safety Key cord to your clothing.
• The Safety Key must be correctly put into the Safety Keyhole for the Belt Motor to engage.
• Always attach the Safety Key Clip to your clothing during workouts.
• If there is an emergency, pull out the Safety Key to shut off the power to the Belt Motor. This will quickly stop
the belts (brace yourself- this is an abrupt stop).
22
Operations
7. Select your workout mode (G.O. Coach™ Workout Mode or Manual TreadClimber® Mode).
Note: If you are not the main user of this machine, be sure the G.O. Coach™ display is blank. If the G.O.
Coach™ display is visible, push and hold the START button for two seconds until it is blank.
8. Push the START button, and begin your workout when the belts are up to speed.
Keep your hands on the support Handbars and stay as near the front of the machine as is comfortable in
order to stay in balance on the Treadles.
Keep your foot in the center of each Treadle, do not let your feet cross in front of your body as you
increase the speed.
When you are experienced and comfortable with the action of the machine, you may wish to allow your arms to
swing freely in a natural walking motion. This workout will activate your core muscles. It should only be done by
those comfortable with not holding on to the Handlebars.
Power Up / Idle Mode
The Console will enter Power Up mode when initially plugged into a power source and any button is pushed.
The belts will only move after a 3 second, audible beep countdown.
Note: The Console will start in the G.O.Coach™ Workout mode.
Shut Off (Sleep Mode)
If the Console does not receive any input for five minutes, it will automatically shut off.
Note: The Console does not have an On/Off switch.
23
Operations
Push the START button to start (wake up) the Console.
G.O. Coach™ Workout Mode
The G.O. Coach™ Workout mode provides one user a weekly, goal oriented workout— 30 minutes a workout
(each column), 3 workouts a week for a total of 90 minutes (all 3 columns). As you workout, the active column will
build over thirty minutes. When fully built, the next column will activate for your next workout.
Workout 1.
Workout 2.
Workout 3
When you reach the weekly goal of all three columns, the display will clear with an audible sound, and a blank
series of columns will begin.
90 minutes is the encouraged, weekly goal. The Console records your workout time value, so you can stop your
G.O. Coach™ Workout and continue it later. If you plan to workout more or less than 90 minutes over the week, it
might be helpful to track your workouts or establish a weekly workout routine.
Note: For accurate goal tracking, only the main user of the machine should workout in this mode. The
G.O. Coach™ Console will save the time of each workout and apply it toward the goal.
The Console will start in G.O. Coach™ workout mode. The G.O. Coach™ display is active when in this mode.
24
Operations
Manual TreadClimber® Mode
The Manual TreadClimber® Mode allows the machine to be used without affecting the G.O. Coach™ weekly goal.
Manual Mode lets other users workout on the TreadClimber® machine besides the main user. No result information is tracked from the manual mode.
At the end of a Manual Mode workout, the Console will display your results, erase them, and be ready for the next
manual workout.
Note: The G.O.Coach™ display is blank when in this mode. If the G.O. Coach™ display is visible, push and
hold the START button for two seconds until the display is blank.
To begin a manual TreadClimber® workout:
1. Check and be sure the Console is in the Manual TreadClimber® Mode (G.O. Coach™ display is blank).
2. If the display is blank, push START.
3. Your Manual TreadClimber® Workout will begin after the three second, audible beep countdown.
25
Operations
Note: Be sure to read the “Before You Start” section of your manual.
Program Your Weight
The weight values for the G.O. Coach™ user and the Manual Workout mode
can both be programmed into the Console. With a more precise value for your
weight, the Console can supply a more accurate value for calories.
1. Select your preferred workout mode (G.O. Coach™ mode or Manual TreadClimber® mode). To shift between
modes, push and hold the START button for 2 seconds.
2. Push and hold the Decrease button for 2 seconds. The Console will show the default weight of 150 pounds or
the last weight entered for this mode.
3. Adjust the value with the Increase and Decrease buttons, and push START. An audible beep will confirm your
input. This value will be remembered until adjusted.
Results
When a workout ends, the Console will show the workout results. Your results are shown in sequence (time,
average speed, calories, and distance) three times.
Note: If the Console does not receive any further input after 5 minutes, the Console will shut off.
Pausing or Stopping a Workout
1. With a firm hold on the Handlebars, step off of the belts and onto the Side Foot Support Platforms on either
side of the Treadles.
2. Push STOP to pause the workout. The belts will slow to a complete stop.
Note: If a paused workout is not restarted in 5 minutes, the machine will shut down and clear all workout
values.
3. To restart your workout, push the START button. To end your workout, push STOP again. The Console will
display your results.
To prevent unsupervised operation of the machine always remove the Safety Key and disconnect the
power cord from the wall outlet and machine AC input. Place the power cord in a secure location.
26
Operations
Console Service / Setup Mode
The Console has a Service / Setup Mode. Some options in the Service / Setup Mode can be adjusted to your
preferences, but most are helpful for service of the machine. To access the Service / Setup Mode, hold down the
Increase and Decrease buttons for 2 seconds.
Order
Display
Option
Description
1
Unit
Units
Select your preferred unit of measurement; “Lb” = English Imperial, “Si”
= metric
2
brt
Brightness
Control the contrast level of the Console; “8” = maximum intensity, “1” =
minimum
3
LOG
Error Log *
Displays error codes, starting with the most recent
4
Con
Console Version
*
Displays the software version
5
dr
Drive Version *
Displays the drive version
6
HrS
Device Usage
Displays total number of hours and minutes used
7
diSt
Device Mileage
Displays total mileage
8
HiSt
Motor Current
History *
Displays the average motor current for the current maintenance interval.
Push the Decrease button to view the averages of previous intervals.
9
Hd
Hardware Type *
Displays the hardware type
10
Curr
Motor Current *
Displays the current of the motor
11
CoAS
Coast Time *
A test to see how long until the belts stop.
12
LooP
Loop Back *
A test to see if the Console is receiving data.
13
CSn
Console Serial
Number
Displays the serial number of the Console across all the displays
14
dSn
Drive Serial
Number *
Displays the serial number of the Motor Control Board across all the
displays
15
dES
Drive Error
Statistics *
Displays the latest hard error statistics for the Motor Control Board. Push
the Increase and Decrease buttons to view all error statistics.
* for Service Technicians
Use the Increase and Decrease buttons to cycle through the Options. To change the value of an Option, push
START and use the Increase and Decrease buttons to select the desired value. Push START to assign the new
value to the Option.
Push STOP to exit an Option and the Service / Setup Mode.
27
Operations
Moving Your Machine
The TreadClimber® fitness machine weighs approximately 158 lbs (71.8 kg) when fully assembled and requires
caution when being moved. Use the Transport Hand Bar found under the front of the machine to move it. To get
access to the Transport Hand Bar, turn the Levelers until you have sufficient clearance between the machine and
floor.
Use the transport wheels to roll your fitness machine to the new location. Lower your machine slowly into its new
location without injury to your head or fingers.
Do not use the uprights, handlebars, treadles, or the Console to lift or move the machine. Injury to you or
damage to the machine can occur.
The machine may be moved by one or more persons depending on their physical abilities and capacities.
Make sure that you and others are all physically fit and able to move the machine safely.
Place the machine on a clean, hard, level surface, free from unwanted material or other objects that may
hamper your ability to move freely. A rubber mat should be used below the machine to prevent the release
of static electricity and protect your flooring.
For safe storage of the machine and to prevent unsupervised operation of the machine always remove the
Safety Key and disconnect the power cord from the wall outlet and the AC input. Place the power cord in a
secure location.
28
Operations
Machine Mat
The Bowflex® TreadClimber® Machine Mat is an optional accessory that helps keep your workout area clear and
adds a layer of protection to your floor. The rubber machine mat provides a non-slip, rubber surface which limits
static discharge and reduces the possibility of display or running errors. If possible, put your Bowflex® TreadClimber® Machine Mat in your selected workout area before you begin assembly.
To order the optional machine mat, go to: www.bowflex.com, or call 1 (800) 605–3369.
Leveling Your Machine
Levelers are found on the front of the TreadClimber® machine. Make sure the TreadClimber® machine is level and
stable before you exercise. To adjust:
1. Loosen the upper locking nut.
2. Turn the leveler to adjust the height.
3. Tighten the upper locking nut to lock the
leveler.
Do not adjust the levelers to such a height
that they detach or unscrew from the
machine. Injury to you or damage to the
machine can occur.
13 mm
29
Maintenance
Read all maintenance instructions fully before you start any repair work. In some conditions, an assistant is
required to do the necessary tasks.
Equipment must be regularly examined for damage and repairs. The owner is responsible to make sure
that regular maintenance is done. Worn or damaged components must be repaired or replaced
immediately. Only manufacturer supplied components can be used to maintain and repair the equipment.
To reduce the risk of electrical shock or unsupervised usage of the equipment, always unplug
the power cord from the wall outlet and/or the machine and wait 5 minutes before cleaning, maintaining or
repairing the machine. Place the power cord in a secure location.
Daily:
Before each use, inspect for loose, broken, damaged, or worn parts. Do not use the machine if any
of these conditions exist. Use a dry cloth to wipe off any perspiration after each use.
Weekly:
Check for smooth roller operation. Clean the machine to remove dust, dirt, or grime. Clean the top
of the belt with a slightly damp, soapy cloth and wipe carefully and thoroughly with a dry cloth. Do
not let any liquid get below the belts or into the Base Frame.
Monthly:
Make sure all bolts and screws are tight. Tighten if necessary.
NOTICE: Do not clean with a petroleum based solvent or an automotive cleaner. Be sure to keep
the Console free of moisture.
30
Maintenance
Walking Belt and Deck Lubrication
The TreadClimber® machine is equipped with a low maintenance deck and belt system. Belt friction can affect the
function and life of the machine. Your TreadClimber® fitness machine came with a starter supply of lubrication for
the belts.
Lubrication Schedule
User Level
Total Workout Hours per Week
When to Lubricate
Light
less than 3 hours
every 3 months
Moderate
3 to 5 hours
every 2 months
Heavy
5 or more hours
every month
We recommend that you use one of the following:
• Lube-N-Walk® Treadmill Lubrication Kit (available from www.bowflex.com or your local specialty fitness dealer)
• 100% pure silicone, available at most hardware and auto parts stores.
As you use your fitness machine, the Console will show “LUbE” at set times. This is only a reminder and should
be added to your inspection schedule. Only apply lubricant as necessary. Push the START button to accept the
reminder.
For the best results lubricate the Treadles periodically with a silicone lubricant, using the following instructions:
1. Unplug the machine fully from the wall outlet, and remove the power cord from the machine. Place the power
cord in a secure location.
2. Carefully lift each belt and apply silicone lubricant in the center of the Treadle deck along the entire reachable
length of the deck. Apply 0.5 to 1.5 oz. of the lubricant on the deck underneath each belt.
NOTICE: Always use a 100% pure silicone lubricant. Do not use a degreaser like WD-40® or a
petroleum based product as this could seriously impact performance.
Note: The Walking Belts may need to be loosened to allow for access during lubrication. Consult the
“Adjusting the Walking Belts” procedure if necessary.
3. Connect the power cord back into the machine and then into the wall outlet.
4. Stay to one side of your machine.
31
Maintenance
5. Switch on your machine and start the belts at the slowest speed. Let the belts operate for approximately 15
seconds.
6. Switch off your machine.
7. Take care to clean up any excess lubricant from the Treadles. We also recommend a periodic inspection of the
Treadle surfaces below the belts. If the decks appear worn, contact a TreadClimber® Representative (refer to
the Contacts section of this manual).
To decrease the possibility of slipping, be sure the Treadle area is free from grease or oil. Clean off any
excess oil from the machine surfaces.
Walking Belt Alignment
The walking belts need to be adjusted if they are out of center enough to cause a rubbing or scraping sound.
32
Maintenance
Adjustments can be made at the Front Roller of each Treadle.
Adjusting the Walking Belts – While operating the machine, notice where the belts run on each Treadle. The
Walking Belt Adjustment Bolts are on the front end of each Roller. If the belt is tracking too far to the right, use a
properly sized Hex Key to turn the right adjustment bolt clockwise on that belt in full turn increments. If the belt
tracks too far to the left, do the same thing on the left adjustment bolt.
Note: Do not turn the bolts counterclockwise when you adjust the belt alignment.
Belt Tension Adjustment – Check the belt tension only when the machine is unplugged. From the belt’s
midpoint, a correctly tensioned belt should only have an inch of give. To check, pull the belt upward at its midpoint
and measure the distance to the deck. If the distance is more than an inch, the belt is loose. To tighten, turn both
Walking Belt Adjustment Bolts clockwise one-half a turn and check tension again. Repeat this step if necessary.
Note: Bolts are turned counterclockwise equally to decrease belt tension.
Walking Belt Electrostatic Reduction
Your TreadClimber® machine may develop a static charge caused by the movement of the walking belts. Follow
Walking Belt
Adjustment Bolts
33
Maintenance
this procedure to apply an anti-static spray to them to reduce the static electric charges.
Wait a minimum of 60 minutes after the last workout before you apply the anti-static spray, to let hot
electrical components cool to room temperature.
1. Unplug the machine from the wall.
To reduce the risk of electrical shock or unsupervised usage of the equipment, always unplug
the power cord from the wall outlet and/or the machine and wait 5 minutes before cleaning, maintaining or
repairing the machine. Place the power cord in a secure location.
2. Using a 5 mm hex wrench, loosen the tension adjustment bolts for the walking belts to let them slide easily.
Turn the bolts counterclockwise to decrease the tension.
Note: Be sure to record how many turns it takes to loosen the bolts to assist with reassembly.
3. Carefully apply the anti-static spray to lightly cover the top surface of the walking belts along the front of the
machine, farthest from the motor (green highlighted area).
NOTICE: Hold the spray dispenser approximately 6” (13
cm) above the walking belt and point the spray toward the
front of the machine, away from the motor. Apply the spray
only on the belts, not on the deck or mechanism. If spray
goes off the belts, wipe the excess spray off the other parts
of the machine.
Note: Be sure to obey the manufacturer safety
instructions for the anti-static product.
4. Using your foot, manually advance the walking belts
toward the back of the machine, exposing the next
unsprayed section.
5. Do steps 3 and 4 again until all sections of the belts are
lightly coated with anti-static spray.
6. Wait until the belts dry fully (approximately 2-4 hours).
34
7. Using a 5 mm hex wrench, tighten the tension adjustment bolts for the walking belts. Turn the bolts clockwise to
Maintenance
increase the tension.
8. Plug in the machine and turn on the power.
9. Inspect the walking belt alignment and tension before using the machine. Refer to the walking belt alignment
and belt tension adjustment procedures.
Note: Repeat the procedure to apply anti-static spray if static electric discharge occurs again. The
machine will accumulate more static electric charge when the surrounding air is drier. Be sure to
obey the manufacturer safety instructions for the anti-static product.
35
Maintenance
Maintenance Parts
Console / Handlebar Assembly
Left Upright
Treadle Assembly
Power Cord
Cylinders
Safety Key
Right Upright
Rear Step
Rear Cover
Base Upright
36
Maintenance
Maintenance Parts (Treadle Assembly)
IGUS Bushing
A/C Inlet
Side Foot Support
Platform
Treadle Stop
Front Roller
Walking Belt
Lower Walking
Adjustment
Belt Guide
Screw
Rear Roller
Walking Belt
Guide
Motor Control
Board
Drive Belt
Drive Motor
37
Troubleshooting
Condition/Problem
Things to Check
Unit will not power up/turn on/start Outlet
Power cord not plugged
in
Make sure the power cord is firmly secured to
A/C inlet on the unit and firmly inserted into a
non-GFI wall socket.
Power switch turned off
Make sure the power switch at the rear of the
unit is in the “ON” position. Switch will light up
red to indicate power is present.
Safety key not plugged
in
Plug Safety Key into Console (See Safety Key
(Emergency Stop Procedures) within Features
section).
Speed displayed is not accurate
Display set to wrong unit Change display units.
of measure. (English/
Metric)
Walking belt misalignment
Rear belt guides
Belts should ride on top of triangular black belt
guides at rear of treadles.
Tracking adjustment
Belts are not required to be perfectly centered
and are typically farther out in the rear than
they are in the front. This may vary depending
on user’s stride. If belt is tracking to one side
far enough to cause rubbing of belt, consult the
“Adjusting the Walking Belts” procedure.
Belt alignment
Check walking belt alignment. Belt contact with
metal guides under Treadle can make a loud
grinding sound. If belts are misaligned, adjust
walking belt.
Rollers or motor
Contact Customer Care for further assistance.
Hesitation or belt slipping when
walking on unit
Walking belt tension
Adjust walking belt tension by following the
“Adjusting the Walking Belt” procedure.
Knocking noises when unit is
operating
Igus bushing
If knocking sound seems to be coming directly
from the rear roller, check Igus (yellow “hat”
shaped) bushings and replace if cracked.
Hydraulic cylinder bolts
Check and tighten both upper and lower bolts
that connect the hydraulic cylinders to the unit.
Speed dependent grinding or
scraping noise
38
Solution
Make sure outlet is functioning correctly. Verify
this by plugging another device (ex: lamp) into
the outlet. If outlet is connected to a light switch,
check to make sure it is on. If outlet is not
functioning find a working outlet.
Troubleshooting
Condition/Problem
Belts stop turning while in use
Things to Check
Solution
Safety key
Plug Safety Key into Console (See Safety Key
(Emergency Stop Procedures) in Features section).
Motor overload
Unit may be overloaded and drawing too much
current, causing unit to shut power down to
protect motor. Consult belt lubrication schedule
to determine if belts need lubrication, check
walking belt tension, and restart unit.
Outlet
Outlet may not have enough power available
for the machine due to other devices on same
circuit. Remove any devices from power circuit
and restart machine.
Console displays “C”, “S”, or “H”
with a number
Console
Cycle power off and on to clear the error. If
issue recurs be sure to note the display code
and contact Customer Service for further assistance.
Console displays “LUbE” code
Belt lubrication
Consult lubrication schedule and apply if necessary. Push START button.
39
Bowflex® Body Weight Loss Guide
Introduction and Overview
Welcome to the Bowflex® Body Weight Loss Guide. This guide is designed to be used with your Bowflex® equipment and will help you:
• Lose weight and get lean
• Improve your health and wellness
• Increase your energy and vitality
By focusing on the main three elements of the Bowflex® Body Weight Loss Guide- quality, balance, and consistency- you’ll be able to reach and maintain your weight loss and fitness goals for the next six weeks and beyond.
• Quality – The emphasis of this plan is on eating more whole foods and getting the most nutrients from your
calories as possible. Making the majority of your diet from foods that have a single ingredient (for example
fruits, vegetables, fish, lean protein, eggs, beans, nuts, and whole grains) provides the vitamins, minerals,
fiber, protein, and healthy fats your body needs.
• Balance – Each of the meals and snacks in this guide have a source of fiber or smart carbohydrate, protein,
and healthy fat to keep your energy levels consistent throughout the day to fuel your workouts. By having
this balance you’ll feel fuller longer, which is critical to weight loss success.
• Consistency – Getting about the same number of calories each day is important for your metabolism and
your mindset. If you overdo it one day, don’t try to make up for it the next day by not eating or cutting your
calories drastically. Get right back on track by following this guide!
Results & Expectations
Results will vary depending on your age, starting weight, and exercise level but on average you can expect to lose
1-3 lbs per week and experience increased energy levels.
5 Tips for Long-Term Success
1. Keep a food log including hunger levels and water intake. Free online food logs and mobile apps are available at www.myfitnesspal.com and www.loseit.com
2. Weigh and/or take measurements weekly – no more and no less. Weighing weekly rather than daily or
every other day is best. You’ll track your progress and keep yourself in check without getting discouraged if
the scale doesn’t move for a few days. And remember, weight is just a number and it’s influenced by muscle
gain as well as fat loss. Feeling how your clothes fit can often be a better indicator of progress as your body
adapts to exercise and nutrition changes.
3. Measure portions – To avoid portion creep, use measuring cups and spoons for grains (rice, pasta, cereal), beans, nuts, oils, and dairy. Use the Portion Sizes Guide for other foods.
4. Plan ahead – Make a meal plan for the week or log your food a day in advance. Planning sets you up for
success, especially for social events and eating out.
5. Practice your desired long-term habits – It’s easy to justify poor eating choices when you’re only focused
on the short term. Focus on the long term satisfaction of a slimmer, healthier you rather than the temporary
gratification you’ll get from splurging.
40
Bowflex® Body Weight Loss Guide
How to Use this Guide
• Eat breakfast within 90 minutes of waking up and balance your meals and snacks throughout the day
– Don’t go longer than 5-6 hours without eating
– If you’re not used to eating breakfast, start out small with a piece of fruit and have something else 1-2
hours later. Your body adapts to not eating breakfast, but as soon as you start eating early in the day and
cutting back on dinner portions you’ll notice your hunger will increase. This is a good sign your metabolism is working!
• Mix and match meal options
– Select 1 option from the appropriate meal plan (male or female) for breakfast, lunch, and dinner, paying
close attention to portion sizes
– Select 1-2 snack options per day
– You have the option to substitute one snack for one treat under 150 calories
– Use the meal plan, sample options, and grocery list to create your own meals for more variety
– You can swap out any type of protein, vegetables or smart carbs for the suggested meal options. For
example:
•
Turkey for tuna
•
Any fish or seafood for chicken
•
Cooked vegetables instead of salad
• Eat your calories
– Cut out high calorie beverages like soda, juices, coffee drinks, and alcohol
– Stick with water, unsweetened tea, and coffee. Aim for a minimum of 64oz (1.9 liters) of water per day to
stay well hydrated
• If you’re still hungry after or in between meals:
– Have a glass of water and wait 15-20 minutes. Many times we mistake thirst (or even boredom!) for
hunger. Wait out the initial urge to eat and sometimes it will pass.
– If you’re still hungry after waiting 15-20 minutes have a snack or mini-meal with fruit, vegetables, and
protein.
If your goal is muscle gain or strength:
• Use the same meal plan but increase portion sizes in the same ratios to increase the total number of calories
you eat every day. For example, increase portion sizes of protein and smart carbs at meals by 50%. Adding a
snack is another option to meet your body’s increased calorie needs in order to gain muscle and strength.
• Focus on post-workout nutrition by having one of your snacks within 30 minutes after you complete your
workout. Make sure to have a combination of carbohydrates such as fruit with protein (yogurt, milk, or protein
powder) to promote muscle growth and recovery. Chocolate milk is also a great option.
41
Bowflex® Body Weight Loss Guide
Meal Plan Overview
The female meal plan provides about 1400 calories, and the male plan provides about 1600 calories, of high
quality nutrition to not only help you lose weight and feel great but get the most out of your calories. The vitamins,
minerals, and antioxidants from eating mostly whole foods help support optimal health. These calorie levels will
result in healthy weight loss for the majority of people. Keep in mind that everyone’s metabolism is very different
depending on age, height, weight, activity level, and genetics. Pay close attention to your weight, hunger levels,
and energy and adjust your calories if needed.
Follow these guidelines if you’re over 55:
• If you’re over 55, you need fewer calories because your metabolism slows as you age. Stick with three
meals with one optional snack per day.
Follow these guidelines if you’re under 25:
• If you’re under 25 you may need more calories. Add another snack if you feel low on energy or are extremely hungry.
Breakfast
Breakfast includes a smart carb, fruit, and a source of protein, which will also have fat. With a balance of carbohydrates and fiber from the smart carb and fruit combined with protein and fat, you’ll energize your day and help
control hunger levels throughout the day.
Snacks
Each snack is a balance of carbohydrates and protein to keep your blood sugar more consistent, which means
you won’t experience hunger and energy level spikes and drops.
This happens when you have a high carb-only snack like chips, candy, soda, crackers, or pretzels.
Lunch and Dinner
Lunch combines filling fiber from vegetables and smart carbs with a lean, or low-fat, protein. The healthy fat can
come either from the protein added during cooking (nuts on a salad) or as a dressing or sauce (such as oil and
vinegar salad dressing).
42
Bowflex® Body Weight Loss Guide
Here’s an overview of what an ideal day looks like:
(See Portion Size Guide for proper serving sizes)
Breakfast
Snack #1
smart
rich
carbs
carb
protein
fruit
smart
carb
protein
veggies
protein/fat
Snack #2
Lunch
smart
carb
protein
healthy
fat
smart
carb
protein
veggies
Dinner
smart
carb
protein
healthy
fat
veggies
43
Bowflex® Body Weight Loss Guide
44
Breakfast Options
Fruit
Smart Carb
Protein/Fat
Fruit and Nut Oatmeal Cook plain
oats in water. Top with fruit, nuts,
milk, cinnamon, and honey.
Berries or banana
Plain oats
(Regular or quickcook)
Nuts and milk
Egg Muffin Cook egg/s. Toast bread Tomato
and top with 1 slice of cheese, 1 slice
of ham, and tomato.
English muffin or
sandwich thin
Egg, ham, and
cheese
Yogurt Power Parfait Top yogurt
with fruit. Sprinkle with 1 serving of
nuts, 2-3 tbsp wheat germ, or ground
flaxseed, 1 tbsp oats, and cinnamon.
Chopped fruit of your
choice
Oats, wheat germ,
and ground flaxseed
Plain non-fat Greek
yogurt and nuts
On the Go PB & Apple Sandwich
Toast bread. Spread on peanut butter, thin slices of ½ an apple, and 1
teaspoon of honey.
Sliced apple
Sandwich thin, bread,
or bagel thin
Peanut butter
Lunch & Dinner Options
Lean Protein
Smart Carb
Veggies
Pork Loin, Sweet Potato & Green
Beans
Grilled or baked pork
loin
Baked sweet potato
Green beans
Chicken Stir Fry
Flavor with 2 tablespoon teriyaki
sauce
Chicken breast or
boneless skinless
thigh
Brown or wild rice
Mixed stir fry vegetables
(fresh or frozen)
Steak Tacos with Side Salad (3 for
males, 2 for females) Top with salsa,
cilantro, and sprinkle of shredded
cheese
Flank or sirloin steak
Corn tortillas
Salad
Whole Wheat Pasta with Shrimp
or Cannellini Beans & Marinara
Sauce
Shrimp (frozen or
fresh) or cannellini
beans
Whole wheat pasta
Steamed broccoli
Bunless Burgers with Oven Fries,
Corn, & Salad
Grill burgers. Bake sliced potatoes
on sprayed cookie sheet for 25-30
minutes @ 425°F.
93% lean ground beef Oven baked fries
or turkey
Corn on the cob +
side salad
Tuna & Avocado Wrap with Vegetable Soup
Use 3oz of tuna (1 can). Top with lettuce, tomato, avocado, and mustard.
Tuna
Vegetable soup
(homemade or lowsodium canned)
High-fiber wrap
Bowflex® Body Weight Loss Guide
Snack Options
Smart Carb
Protein
1 medium apple
10-15 almonds
Baby carrots
2 tbsp hummus
1 serving of crackers*
1 string cheese
Energy or protein bar with <200 calories*
*See www.Bowflex.com/Resources for brand recommendations
Optional Treats
You have the choice of replacing Snack #2 with a 100-150 calorie treat. You can have an
optional treat every day but for optimal health it is recommended to limit small splurges to 3-4
times per week. Use the approach that works best for you. Here are a few examples:
• ½ cup lowfat ice cream
• 1 small bag of baked potato chips
• 4oz of wine or 12oz light beer
• 3 cups of air-popped or light popcorn
Sample 3 Day Plan
Based on each of the meal options listed above, a typical 3 day plan could look like this:
Day 1
Day 2
Day 3
Breakfast
Egg muffin
Power yogurt parfait
Fruit + nut oatmeal
Snack 1
Apple with almonds
Nut Thins + string cheese
Baby carrots and hummus
Lunch
Tuna & avocado wrap with
soup
Leftovers from dinner- day 1 Leftovers from dinner- day 2
Optional Snack
2 or Treat
½ cup ice cream bar
Energy bar
100 calorie bag of light
popcorn
Dinner
Shrimp pasta
Chicken stir fry
Bunless burgers
®
45
Bowflex® Body Weight Loss Guide
Portion Size Guide
Each of the items listed are for one serving
MALE
FEMALE
PROTEIN
2 eggs
5oz chicken, fish, lean meat, or tofu
2/3 cup beans or lentils*
1 cup greek yogurt*
1.5oz cheese*
1 egg
3oz chicken, fish, or lean meat
1/2 cup beans or lentils*
1/2 cup greek yogurt*
1.5oz cheese*
1 cup = baseball
HEALTHY FAT
2 Tblspn peanut or nut butter*
2 tspn olive, flax, or walnut oil
1/4 cup of nuts
1/3 medium avocado
1 tblspn peanut or nut butter*
1 tspn olive, flax or walnut oil
1/8 cup or 2 tablespoons of nuts
(approx.15 almonds)
1/4 medium avocado
1/2 cup = lightbulb
SMART CARB
1 cup cooked grains (1/2 cup raw): oats,
brown rice, quinoa, pasta
1 medium sweet or regular potato
2 corn tortillas
1 slice of bread (or 2 light slices equaling
120 calories or less)
1 english muffin, sandwich thin, or highfiber wrap
1/2 cup cooked (1/4 cup raw) grains
1/2 medium sweet potato or
regular potato
2 corn tortillas
1 slice of bread (or 2 light slices equaling
120 calories or less)
1 english muffin, sandwich thin, or highfiber wrap
FRUIT
1 medium apple, orange, or pear
1 small banana (length of your hand)
1 cup berries or chopped fruit
1/4 cup dried fruit (fresh or frozen is
optimal)
1 oz or 2 tbsp
= golf ball
1/4 cup nuts
= Altoids tin
Vegetables* You can have unlimited vegetables except for peas and corn; stick with
1/2 cup serving
2 cups spinach or lettuce = 2 cupped
hands
1 cup raw vegetables
1/2 cup cooked vegetables
6oz low sodium vegetable juice
46
3 oz chicken or meat
= deck of cards
Bowflex® Body Weight Loss Guide
OPTIONAL TREATS
1 medium potato
= computer mouse
1/2 cup lowfat ice cream
1 small bag of baked potato chips
1oz dark chocolate
4oz of wine or 12oz light beer
3 cups air-popped or light popcorn
* some foods are a combination of protein and carbs or protein and fat
1 medium piece of
fruit = tennis ball
1 -1/2 oz cheese
= 3 dice
Grocery List
BREAD & GRAINS
100% whole wheat bread
Sprouted grain breads
Light or whole wheat english muffins
Sandwich or bagel thins
Corn or low-carb whole wheat tortillas
High-fiber wraps
Plain oats: 1 minute or old fashioned
Whole grains: brown rice, bulgar, barley, quinoa,
couscous
Tips: Look for 100% whole wheat as the first ingredient.
Look for 4g of fiber per slice or 5g per 2 slices of light or
diet bread. Aim for bread with less than 100 calories per
slice.
47
Bowflex® Body Weight Loss Guide
DAIRY & DAIRY ALTERNATIVES
CRACKERS, SNACKS & ENERGY BARS
Plain non-fat greek yogurt
Kefir (yogurt like drink)
Organic low-fat milk
Enriched almond or soy milk
Cheese: feta, parmesan, mozzarella, light havarti,
provolone, swiss, string cheese, or single serving
packages
Any unsalted nuts or seeds
Air-popped or light popcorn
Edamame in the pod
MEAT, FISH, POULTRY & PROTEIN
Wild game
Salmon, halibut, tuna, tilapia, shrimp,
catfish, scallops, or crab
Pork loin, pork chops, or pork roast
Chicken or turkey breast or thighs (no skin)
Eggs and 100% egg whites
Lean beef: sirloin, chuck, round, tenderloin, 93% lean
(organic and grass fed is best)
Canned salmon or tuna (in water)
Nitrate-free, reduced sodium ham, turkey, chicken, or
roast beef lunch-meat
Any type of bean, dry or canned low-sodium varieties
Tofu and tempeh
Tips: Look for “Choice” or “Select” cuts of meat rather
than “Prime”.
Prime cuts are fattier. Limit intake of highly processed
meat and imitation meat products like sausage, bacon,
pepperoni, and hot dogs to once a week or less.
FROZEN FOODS
All vegetables without sauce
All fruit
Grains and grain medleys
Energy bars
Crackers
Hummus
Tips: Limit crackers, pretzels, and chips to 2-3
servings per week. Always pair with protein such
as hummus, cheese, or nuts. Look for energy bars
with less than 200 calories and 20g of sugar and at
least 3g of protein and 3g of fiber. Look for crackers
with less than 130 calories and 4g or less of fat per
serving.
FATS & OILS
Avocado
Olive, grapeseed, walnut, sesame, or flaxseed oil
Butter/spreads: look for products free of trans fats
and partially hydrogenated oils on the ingredient list.
Tips: Light olive oil refers to the flavor, not the calorie
content. Always measure oil and butter. Even if a
fat is considered healthy, it’s still very high in calories
and portions need to be controlled.
DRESSINGS, CONDIMENTS & SAUCES
Vinegars: rice, wine, balsamic
All fresh or dried herbs and spices
Mustard
Salsa and chili sauce
Marinara sauce with no high-fructose corn syrup
Lemon and lime juice
Bottled minced garlic and ginger
Low-sodium soy sauce
Tips: Look for products free of MSG, added colors,
and high fructose corn syrup. Look for sauces under
50 calories per serving. Avoid cream based sauces
and dressings like ranch, bleu cheese, and alfredo.
All fruits and vegetables, fresh and frozen, are great choices. Since every meal has one or both, your shopping
cart should reflect this.
48
Bowflex® Body Weight Loss Guide
Keep It Going
Tips for continued weight loss and maintaining changes
• Keep weighing yourself weekly, even after you’ve reached your goal weight
• Continue keeping a food log. If you have your meal plan well-established, log your food every other week
to keep yourself on track. Don’t feel like you have to do it every day.
• Prepare for plateaus. The scale might not budge for a few weeks or even months after some initial weight
loss. This is normal and to be expected. It’s the body’s natural process for adjusting to your new lower
weight. Stay focused on your long-term goal, celebrate your successes and changes, and mix up your
workouts to help overcome the plateau.
• Calorie adjustments for maintaining weight loss. Once you’ve reached your goal weight, you can
increase your calories 100-200 per day as long as your activity level stays the same
• Treat yourself. Have a non-food reward for each goal you hit such as a massage, a new outfit, or an outing
with friends and family
• Use the resources below to find new recipes, get expert advice, and support to stay motivated
Resources
Downloadable Resources from Bowflex® Website (www.Bowflex.com/Resources)
• Grocery Shopping List for Fridge (Blank Form)
• 7 Day Meal Planning Form
• Additional Dinner Options
• Pre and Post Workout Fueling Guide
Questions & Support
• Ask questions, post suggestions, and connect with our online Bowflex® Dietitian on the Bowflex® Facebook
page
Recipes
• www.wholeliving.com
• www.eatingwell.com
• www.whfoods.org
• www.livebetteramerica.org
Online food logs
• www.myfitnesspal.com
• www.loseit.com
49
100% Satisfaction Guarantee
We want you to know that your TreadClimber® machine is a superior product. Your satisfaction is guaranteed. If,
for any reason, you are not 100% satisfied with your TreadClimber® machine, please follow the instructions below
to return your merchandise and receive a refund of the purchase price, less shipping and handling.
This TreadClimber® Satisfaction Guarantee applies only to merchandise purchased by consumers directly from
Nautilus, Inc. This guarantee does not apply to sales made by dealers or distributors.
1. Call a TreadClimber® Representative at 1-800-605-3369 for a Return Authorization Number (RMA). An RMA
will be granted if:
a. The TreadClimber® exercise machine was purchased directly from Nautilus, Inc.
b. The request to return the product is within 6 weeks of the delivery date of your merchandise.
2. If an RMA is granted, the following instructions will prevent delays in the processing of your refund.
a. The merchandise must be returned to the address given to you at the time of the Return Authorization
Call.
boxes.
b. All returned merchandise must be properly packaged in good condition, preferably in the original
c. The exterior of the boxes should be marked clearly with:
Return Authorization Number
Your Name
Your Address
Your Phone Number
d. Additionally, a piece of paper with your name, address and phone number or copies of your original
invoice should be placed in each box of merchandise.
e. Your RMA number is time sensitive. Your shipment must be post marked within two weeks from the
date the TreadClimber® Representative issued the Return Authorization Number.
Note: You are responsible for return shipping and for any damage or loss to merchandise that occur during
return shipment. Nautilus recommends that you obtain tracking numbers and insure your shipment.
Unauthorized Returns
Nautilus, Inc. defines an unauthorized return as any merchandise returned to our facilities without a valid and
current Return Merchandise Authorization (RMA) number issued by Nautilus. Failure to properly mark packages
with a valid RMA number, or allowing an RMA number to expire, will cause Nautilus, Inc. to consider a return
unauthorized. Any merchandise returned without a RMA number will not be subject to a refund or credit and
Nautilus will discard the product. The customer assumes all shipping and handling charges for any unauthorized
return.
51
Nautilus®
003-3769.010114.D
Bowflex®
Schwinn®
Universal®