1
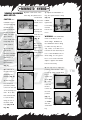
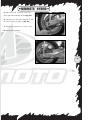
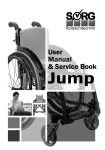
MINIMOTO™ HYBRID
Contents
Page
Introduction
2
MINIMOTO™ HYBRID
Owner’s manual and safety information
3
Warnings
Electrical hazard
Vehicle assembly and set up
4-5
6
7-8
Installing the main fuse
9
Brake adjustment
9
Storage carry area
9
Battery charging information
10
Steps to charge battery
11
Battery care
12
Riding rules
13
Pre-ride checklist
14
How to ride your MINIMOTO™ HYBRID Bike
15
Special safety warnings
15
Periodic brake adjustment
16
Tire inflation procedure
16
Tire repair
17
Replacing the main fuse
17
If you lose the keys
18
Replacing the battery
19
1
Replacing the chain if it “Pops off”
20 - 21
Battery disposal
22
Troubleshooting
23 - 24
Limited warranty and registration
25
Registration card/Vin number
26
Appendix — spare part list
27 - 28
MINIMOTO™ HYBRID
Introduction:
Congratulations of your purchase of the MINIMOTO™ HYBRID bicycle. The unique Hybrid mechanism
inside the drive train allows a “power assist” of the normal peddling of the bike. You can use it to
stretch out your coasting or even to help to make an incline easier to accomplish. The pedalling allows
you the freedom to go anywhere a bicycle can go without worrying if the batteries run down. The system includes a quick charging system that will give the batteries up to 80% of their charge in as little
as 5 hours.
Please read the instructions in the booklet carefully and keep them in a safe place.
2
MINIMOTO™ HYBRID
MINIMOTO™ HYBRID
IMPORTANT!!! Before
we begin:
Owner’s manual and safety instructions
Like any two wheeled vehicle, riding the
Carefully read this manual completely before
MINIMOTO™ HYBRID bike can be extremely
operating your electric MINIMOTO™ HYBRID
hazardous. It is your responsibility to follow
bike. Keep this manual in a safe place for
this manual for the proper set up, inspection,
future reference. Be sure you thoroughly
riding procedure, protective gear required, and
understand how to operate the components
rules of the road to reduce the risk of serious
of your MINIMOTO™ HYBRID bike.
injury.
Note:
The age recommendation is only an estimate.
throughout this manual there are
many “warnings”.
Be sure to read and
If the rider is too small, too large, or too old
understand all of these “warnings”. Please
to comfortably fit on the MINIMOTO™ HYBRID
play extremely close attention to these
bike, he/she should not attempt to ride it.
areas as serious injury or even death may
The MINIMOTO™ HYBRID bike is not designed
result in failing to do so.
for or intended to be used by of anyone under
the age of 8.
WARNING:
This vehicle is a serious
machine and should be treated with respect
Keep away from small children.
when riding. It can obtain speeds that only
qualified riders of the proper age and maturity should attempt.
This vehicle can obtain speeds that only
qualified riders of the proper age, size, and
maturity should attempt. That decision
rests entirely on the observation and discretion of the direct supervising adult.
FOR
WEBSITE INFORMATION OR REGISTRATION AND CUSTOMER
SERVICE GO TO
www.teamminimoto.com
3
MINIMOTO™ HYBRID
WARNINGS:
5) The rider of a MINIMOTO™ HYBRID should
always wear appropriate footwear. Open-toed
This product is meant for outdoor use only
shoes should never be allowed. Keep shoe
and only on private property. Never ride your
laces and pant legs away and clear of the
MINIMOTO™ HYBRID bike on public streets,
wheels.
alleys, or other public roads or thoroughfares.
IT MUST NEVER BE RIDDEN IN ANY AREA
6) The rider must wear a safety helmet, elbow
THAT COULD POTENTIALLY DO HARM TO
and kneepads to avoid injury if falling. Failure
HUMANS, ANIMALS, OR PROPERTY DAMAGE.
to wear a standard approved helmet may
result in serious personal injury or death.
NEVER RIDE AROUND THE VICINITY OF SMALL
CHILDREN WHO MAY ENTER YOUR PATH.
7) The MINIMOTO™ HYBRID is never to be ridden by more than one person at a time. In
Special notes for supervising adults of the
addition, it is not designed to pull or tow any-
rider:
thing behind it as it may result in serious
damage to the motor or internal parts. Do not
1) The decision to allow a rider to ride the
MINIMOTO™ HYBRID must be done with the
exceed the maximum capacity of 175 lbs (80
kg).
permission of a directly supervising adult.
The directly supervising adult must read and
4
8) The MINIMOTO™ HYBRID cannot be used
follow all of the contents of the owners manu- on wet surfaces or in wet weather. Never
al before making this decision.
immerse any part of the MINIMOTO™ HYBRID
in water. Moisture can damage the motor,
2) The rider must have previous experience in
switches, and drive components.
riding electric powered vehicles before
attempting to ride the MINIMOTO™ HYBRID.
9) The MINIMOTO™ HYBRID should never be
It is the responsibility of the supervising adult ridden in mud, puddles, water, ice, slick or
to ensure the rider has the specific talent,
bumpy surfaces. It is not designed to go over
physical ability, and training before allowing
curbs or extreme terrain changes in the road-
them to attempt to ride the Hybrid.
way.
3) The MINIMOTO™ HYBRID is never to be rid- 10) The electric motor can become hot when
den indoors. Indoor flooring and carpets can
in use. Do not touch it at anytime and handle
be damaged from abrasive contact with the
it carefully.
tires. The manufacturer will not be responsible for any indoor damage if the MINIMOTO™
11) Never use your MINIMOTO™ HYBRID
HYBRID is used in this manner.
while using personal radios or headphones.
4) The MINIMOTO™ HYBRID is designed to
12) Do not use your MINIMOTO™ HYBRID for
run on clean, flat, dry, and generally hard sur-
stunt riding, ramp jumping, acrobatics or simi-
faces by persons over 8 years of age. It
lar activities.
should not be used on gravel or grass.
MINIMOTO™ HYBRID
WARNINGS: (Cond’t)
15) SB 1918 (CALIFORNIA) declaration:
13) Never inflate the tires beyond 45PSI.
Your insurance policies may not provide cover-
The recommended tire pressure is 40 PSI.
age for accidents involving the use of this
Inflation of the tires should be by adults only.
product. To determine if coverage is provid-
Serious injury or death may result in over
ed, contact your insurance company or agent.
inflation of the tires occurs. Avoid filling the
tires at a gas station. The greater pressure
of a gas station air pump makes a blowout
of the tire possible. This may result in serious injury or death. Never use non-MINIMOTO™ replacement parts.
14) If there is any problem or question with
the MINIMOTO™ HYBRID , please contact the
Minimoto Service Center by calling the toll
free number:
1-800-434-6178
between the hours of 8 am to 4 pm EST, Monday
through Friday (excluding holidays).
Warnings
Warning: Over tightening the stem bolt or headset
assembly may cause damage to the bicycle and/or injury
to the rider.
Ensure all bearings are lubricated, run freely and display
no excess movement, grinding or rattling.
Check headset, wheel bearings, pedal bearings and
bottom bracket bearings.
Periodically inspect the seat clamp lever for tightness.
Ensure the seat post is properly tightened before each use.
The minimum leg length dimension is 64 cm / 25 inches.
This drawing illustrating the leg length dimension of rider
and method of measurement of this dimension.
or by email:
[email protected]
Do not return the product to
the store. Contact the
Minimoto Service Center.
Authorized service is only available through the official
Minimoto Service Center.
Spare tires, inner tubes, battery, and replacement parts
can be obtained through the
Minimoto Service Center.
Service Center Address:
Toy Quest
c/o Minimoto Service Center
1800 N. 9th Street
Indianola, Iowa 50125
For safe and comfortable riding there should be a
clearance of between 25mm and 50mm between the
groin area of the intended rider and the top tube of the
bicycle frame, while the rider straddles the bicycle with
both feet flat on the ground.
5
MINIMOTO™ HYBRID
ELECTRICAL HAZARD:
WARNING
f) Never use Minimoto™ parts, battery, or
components in any other products or vehicles
other than the MINIMOTO™ HYBRID.
CAUTION!
Replacing or substituting parts with other
vehicles can result in overheating, fire, or
THIS IS AN ELECTRICALLY OPERATED PRODUCT AND SHOULD BE OPERATED WITH CARE.
KEEP AWAY FROM SMALL CHILDREN.
BEFORE RIDING, ALWAYS MAKE SURE THAT
THE BATTERY RETAINER IS FIRMLY IN PLACE
AND HOLDING THE BATTERY SECURELY.
PREVENTING A FIRE:
explosion. Only use MINIMOTO™ parts, battery or components in the MINIMOTO™
HYBRID because using or substituting other
parts can result in overheating, fire, explosion
or mechanical breakdown.
g) The battery is to be handled by ADULTS
ONLY. The battery is heavy and contains a
lead-acid electrolyte. Dropping the battery
a) Never modify the electrical system or bat-
can result in serious injury.
tery charger. Modifications of these systems
can result in fire, serious injury and damage
to the electrical components.
h) Never allow children to recharge the battery. Charging the battery must be done by
ADULTS ONLY. A child could be injured when
6
b) To avoid damaging the battery, do not use
involved in the operations of battery charging
the charger if it has been struck, dropped or
or use of electrical devices.
damaged in any way.
i) Make sure that all battery contacts or conc) Do not expose the battery to high tempera- nectors are clean and free of excessive wear
tures as this may cause the battery to
or damage whenever the battery is charged.
explode.
If ANY damage is detected, DO NOT USE the
charger or battery until you have replaced the
d) Never allow the battery charger to become
worn or damaged part.
wet, and never place it in water.
j) Always remove the Key when your MINIMOe) Use of the wrong type of battery or charger TO™ is not in use to ensure the power is off.
could cause a fire or explosion resulting in
Prevent any unauthorized riders from attemptserious injury.
ing to ride the bike.
MINIMOTO™ HYBRID
VEHICLE ASSEMBLY
AND SET UP:
4) After a few turns of the
7) Adjust the handlebars so
Allen Key, the plastic cover
they are square with the body
should slide
(Fig. 5).
CAUTION: The
off. Throw the
FIRMLY
included tools to
plastic cover
tighten the
set up and charge
away.
lever clamp
the Minimoto™
until the
Hybrid should be
5) Slide the
bars do not
used by an ADULT
steering col-
move.
Fig 1
Fig 5
ONLY. The pack-
umn into the
age contains
front fork
WARNING:
some small parts.
(Fig. 4).
must not be able to move
The handlebars
while riding!. ALWAYS test
Keep away from
6) Use the
the handlebars before riding
Allen key to
to make sure they will not
tighten the
slip, rotate, or are able to be
remove the
steering col-
forced from their desired posi-
Minimoto™ Hybrid
umn firmly so
tion. If the handlebars move
from the package
it won’t move.
while riding, it is very possi-
small children.
1) Completely
Fig 2
and support it
ble to loose control and fall.
with the use of
Adjust or tighten the handle-
the kickstand
bars as necessary.
(Fig. 1).
8) You may need to adjust the
2) Locate all of
Fig 3A
position of the throttle. This
the parts before
is done by using a small Allen
discarding the
key to
package (Fig. 2).
release the
screw (Fig.
3) The first step
6). Next,
is to remove a
rotate the
protective plastic
throttle
cover from the end
of the steering col-
Fig 3B
Fig 6
the best
umn. Do to this,
position
first unscrew and
(Fig. 7)
loosen the bolt
and retight-
using an one of
en FIRMLY
the Allen head
with the
keys (Fig. 3A &
Fig. 3B).
control into
small Allen
Fig 4
key.
Fig 7
7
MINIMOTO™ HYBRID
VEHICLE ASSEMBLY AND SET UP: (Cond’t)
9) Slide the seat into the frame (Fig. 8). Make sure that the
indentation marks on the tube are NOT VISIBLE when tightening. If
you can see these marks, the bike seat is UNSAFE to be ridden.
Slide the seat further down and retighten.
10) Locate the RIGHT and LEFT markings on the Foot Pedals (Fig.
9). Screw them by hand into the right and left side of the bike
pedal arms. Tighten them firmly using the included wrench.
Fig 8
L
Fig 9
8
R
MINIMOTO™ HYBRID
INSTALLING THE MAIN FUSE:
BRAKE ADJUSTMENT:
The MAIN FUSE MUST be installed before
IMPORTANT!
charging or the bike will not charge.
inspect the adjustment of
You must
the hand brake before
Locate the Main attempting to ride on your
Fuse near the
MINIMOTO™ HYBRID bike.
flexible cable
Fig 18A
between the
The brakes will need to be
plastic body
adjusted over time.
and the motor.
Tightening or loosening the
(Fig. 18A)
brake adjustment knob can
[NOTE: There
obtain minor brake adjust-
is a tag to help you locate this. Remove the
ments. This knob is locat-
tag after you have found the Main Fuse loca-
ed next to the hand brake.
tion].
To do this adjustment,
Fig 10
Fig 11
loosen the nut and turn the conical shaped
Unscrew the
knob to adjust the brake (Fig. 10). Retighten
Fuse Cap and
the knob with the nut when the appropriate
place the Fuse
feel of the brake is found (Fig. 11).
in the holder.
(Fig. 18B)
If the brakes need a more
Tighten the
drastic adjustment, use the
Fuse cap until
wrench to loosen the nut
secure.
that connects the cable to
the rear wheel (Fig. 12).
When the nut is loosened,
Fig 12
pull the brake cable tight
Fig 18B
until there is no slack in
the cable. Retighten the
IMPORTANT!
nut securely (Fig. 13) and
check the brakes again
In the event of extraordinary heat or temporary malfunction of the brake after a pro-
before riding.
Fig 13
longed or aggressive use, stop riding the bike
immediately. Call the Minimoto Customer
Service Center at the Toll-free number before
further use.
STORAGE CARRY AREA:
Behind the rear seat is a storage carry area
for you to carry small items (such as school
books). Hold your items down by using
bungee cords or rubber bands (not included).
9
MINIMOTO™ HYBRID
BATTERY CHARGING
INFORMATION:
IMPORTANT:
The new battery provided in
•
Remove old or dead batteries from the
MINIMOTO™ HYBRID bike if they do not
accept a charge.
•
Never use the charger in an enclosed
space. Always ensure adequate
ventilation.
•
Never cover the electric mini bike or the
charger during charging.
•
Should anything abnormal happen to the
electric mini bike or charger, switch off the
mains supply immediately and contact
your dealer.
the MINIMOTO™ HYBRID bike MUST BE
charged for at least 12 hours before using for
the first time.
The charger MUST be used only in a clean,
dry area. In addition:
•
Battery charging must be done by ADULTS
only.
•
The battery must be upright when
charging.
•
The charger is not a toy.
•
Do not short-circuit the battery.
•
Do not charge the battery on any delicate
surfaces (such as a counter top).
•
Only use the provided charger to charge
the battery.
IMPORTANT:
Under normal conditions, the battery will
reach full charge in 8 to 20 hours of charging
time. The difference in time depends on the
10
local power output in your area, the type of
outlet you use, and the condition of the battery.
NOTE:
Do not connect the charger to a
surge protector. You should only plug the
charger directly into a standard electric wall
•
Only use a MINIMOTO™ HYBRID bike
battery or battery when operating.
outlet. Surge protectors can slow down the
charging process.
MINIMOTO™ HYBRID
STEPS TO CHARGE BATTERY:
NOTE: When
properly charging the RED LED
light will be ON. If the GREEN LED is ON,
1) Turn the Key to the OFF position.
2) Pop open the
protective rubber
cover of the charg-
then battery is fully charged OR the connector
is not plugged into the charging port. Check
to see that the charging port is fully engaged
when first attempting to charge.
ing receptacle and
the plug the charger into the port.
Fig 14
(Fig. 14).
3) Plug the cord of the charger into a standard 120 V wall socket. Make sure the wall
switch is in the ON position and electricity is
reaching the socket.
11
MINIMOTO™ HYBRID
BATTERY CARE:
•
Charge the battery after each use.
If a battery appears to be leaking, avoid con-
•
Avoid running the battery completely as
this will greatly shorten their useable life.
•
Never leave the battery in an uncharged
condition. This will permanently damage it
and prevent it from being able to hold any
charge.
•
Disconnect the battery from the wiring if
the MINIMOTO™ HYBRID is to be stored
more than 2 months.
•
Do not store the batteries in temperatures
above 75 degrees F or lower than
–8 degrees F.
•
Check to make sure the batteries are
securing in place before riding the
HYBRID. Tighten the battery retainer if
necessary.
tact with the leaking materials. Place the battery in a plastic bag.
WARNING:
This liquid and contents of the
battery are highly acidic. Wash your hands
immediately and thoroughly for a minimum of
15 minutes. Call a physician. Do not touch
your face or eyes.
If acid is internally
ingested, IMMEDIATELY give water, milk, egg
whites, or milk of magnesia. Never give
emetics or induce vomiting. CALL A PHYSICIAN IMMEDIATELY.
12
•
Use ONLY a MINIMOTO™ HYBRID
battery.
•
Never charge the battery for more than
30 hours
Country
Input
Output
U.S./Canada
Taiwan/Japan
A.C. 100-120V
60Hz
d.c. 12V 1500mA
U.K./Hong Kong/
Singapore/Malaysia/
Africa
A.C. 220-240V
50Hz
d.c. 12V 1500mA
Europe/Germany/
Israel
A.C. 220-230V
50Hz
d.c. 12V 1500mA
Australia/
New Zealand/China
A.C. 240V 50Hz
d.c. 12V 1500mA
Polarity
Shape
MINIMOTO™ HYBRID
RIDING RULES:
6) Do not use the MINIMOTO™ HYBRID for
jumping, stunts or tricks. This product has
Direct adult supervision is required when rid-
not been designed for such use.
ing.
7) Do not touch the motor or wheels while
Adults should teach the appropriate safety
they are rotating.
rules and methods before allowing anyone to
ride the MINIMOTO™ HYBRID. The rules
8) Keep hands, face, feet and hair away from
should be reviewed with any children in the
all moving parts.
vicinity that may want to ride the mini-bike.
9) Do not ride down or across steep inclines.
1) The following areas are to be avoided
The MINIMOTO™ HYBRID can reach unsafe
when riding the MINIMOTO™ HYBRID:
speeds, loose traction, or slide or collide with
other objects. Ride only on level ground.
a. Cars or traffic
10) Never ride near flammable liquids or
b. Streets or alleys
vapors such as gasoline, acetone or paint
thinner. Keep all flammable materials away
c. Steps, curbs or steep inclines
from the MINIMOTO™ HYBRID.
d. Swimming pools, puddles, ice, or bodies
of water
11) Never where headphones or use a cell
phone when operating.
e. Any area that could potentially cause harm 12) Ride defensively. Remember that others
to humans, animals, or property. Ride
around you may not see you or may be to
only in areas where permission has been
involved in their own actions.
granted.
2) Do not use on roads or public streets, as
13) Learn about and observe your local laws
this is illegal and dangerous.
regarding use.
3) Never ride the MINIMOTO™ HYBRID at
14) Riders must be over the ages of 8. Keep
night
away from small children.
4) Never ride with more than one rider.
Maximum allowable weight of the rider should
not exceed 175 lbs (80kg).
5) Always wear appropriate shoes, clothing,
and protective gear. Protective gear includes
the use of a helmet, knee pads, and elbow
pads (not included).
13
MINIMOTO™ HYBRID
PRE-RIDE CHECKLIST:
Your MINIMOTO™ HYBRID bike is just like any
vehicle. It requires routine maintenance,
service, and inspection to operate reliably
and safely. The following list must perform
each check from the list below before each
ride.
•
14
•
Check that the brake lever is tight on the
handlebar.
•
Pull the brake lever to make sure that:
Look over the entire unit to ensure that
there are no visible problems with the
MINIMOTO™ HYBRID.
•
Check that the handlebar nut is TIGHT.
•
Check the tires, ensuring there are no
cuts or exposed cords or THE TIRES ARE
deflated.
•
Check that all cables and wires are not
frayed, cut or broken.
1.
The brake releases automatically.
2.
The brake holds the MINIMOTO™
HYBRID bike from being pushed
forward.
•
Check that the throttle control is tight on
the handlebar.
•
Check that all 4 axle nuts are tight and
the wheels do NOT WOBBLE as if they
appeared loose.
MINIMOTO™ HYBRID
HOW TO RIDE YOUR
MINIMOTO™ HYBRID BIKE:
SPECIAL SAFETY WARNINGS:
1) When accelerating please ensure that you
NOTE:
It will take a little practice to get
start slowly & precisely.
used to riding. Take it slowly and start in a
location that is very open and away from
2) The brakes are designed to control speed
obstacles or obstructions.
as well as stop the vehicle. Practice braking
for slow-down and smooth stopping.
1) Move the Kickstand up.
3) Never operate the throttle control when the
2) Put the key in the lock and move it to the
ON position
wheels are off the ground or the bike in an
upside down position.
(Fig. 15)
(Note: the
bike will NOT
RUN unless the
key is in the
Fig 15
lock)
3) Mount and ride the Hybrid bike as you
would any normal bicycle. DO NOT USE THE
ELECTRIC POWER TO ATTEMPT A TAKE OFF
4) Once you are riding and
have attained a comfortable ride, move the throttle
control switch down slowly
(Fig. 16). You will feel the
electric motor start to kick
Fig 16
in.
5) Ride and pedal normally. Use the electric
motor for going up inclines or for additional
coasting.
NOTE:
Continuous use of the electric motor
will reduce the total running time dramatically.
Try to use the battery assist when you need
or want it the most.
6)
BE CAREFUL:
The MINIMOTO™ HYBRID
bike can reach speeds up to 10 MPH on a
level surface (depending on the surface terrain and the weight of the rider).
15
MINIMOTO™ HYBRID
PERIODIC BRAKE ADJUSTMENT: TIRE INFLATION PROCEDURE:
As the brakes are used, they may require an
WARNING:
occasional adjustment to keep them at peak
ONLY BY AN ADULT. NEVER inflate the tires
performance. To do this, adjust the hand
above 45 PSI.
brake by turning the screw nut (Fig. 17) of
pressure is 40 PSI. Tires should be inflated
Tire inflation must be done
The recommended tire
the hand brake.
with a standard “bicycle” type pump.
Start the motor
Inflation at an Automobile service station can
and try the
easily result in over inflation of the tires.
brake to see if
Over inflation of the tires can result in seri-
it works proper-
ous injury or even death.
ly before riding.
Fig 17
Before inflating any tire, make sure the key is
removed from the lock.
To inflate the tires, unscrew the protective
cap from the valve stem and attach the bicycle pump as you would with any bicycle.
16
MINIMOTO™ HYBRID
TIRE REPAIR:
REPLACING THE MAIN FUSE:
In the event that a tire should consistently
The main fuse is located near the flexible
loose air pressure, the tires can be repaired
cable that runs from the body to the electric
at a local bicycle repair shop. The tires have
motor.
an inner tube construction.
WARNING:
Inspect tires regularly.
If the fuse is blown, the
MINIMOTO™ HYBRID
1) If the tire tread is worn to the point where
BIKE will completely
the grooves are difficult to see, replace the
shut down. Unscrew
tire(s) immediately.
the fuse cap and
inspect the fuse to see
2) If the tire tread shows uneven wear, check
if it is broken (Fig 18).
the axle to make sure the wheel is loaded
Some replacement
evenly and correctly. Uneven wear may be a
fuses are included with
sing of uneven loading.
your Minimoto™. If you
3) If the rims (wheels) are bent or cracked,
they must be replaced.
Fig 18A
should require more, a
replacement can be
found at any local automotive parts store. The
17
type of the fuse is 25A.
DO NOT ATTEMPT to
use a larger Amperage
fuse than specified as
this may result in the
burning of the electrical
circuits.
Fig 18B
MINIMOTO™ HYBRID
IF YOU LOSE THE KEYS:
Take your MINIMOTO™ HYBRID bike to local Locksmith. For a charge, they will be able to create a new key.
NOTE:
Keys can be obtained by calling the Minimoto Service Center for a
fee. You can have your key duplicated at any Key Shop or kiosk. It is a good idea to store an
extra key in a safe place.
18
MINIMOTO™ HYBRID
REPLACING THE BATTERY:
7) Reposition the battery in the location of
the old battery.
1) Remove the Key from the Lock
8) Retighten the battery retainer so the
2) Remove all
battery securely held. Reconnect the plugs.
bolts from the
main body. (Fig.
9) Replace main body, and seat in reverse
19)
order
10) Charge the new battery before attempt-
3) Carefully separate the right and
Fig 19
left main body off of the frame
ing to ride again.
NOTE:
Do
not remove it entirely from the bike — just lift
Non-rechargeable battery is not to be
charged.
off and to the side.
4) Unscrew and
Battery charging must be done by ADULTS only.
loosen the battery
Only battery of the same or an equivalent type
retainer. (Fig. 20)
as the recommended battery is to be used.
5) Carefully discon- Use only Minimoto™ replacement batteries.
nect the electrical
Fig 20
plug between the
Battery is to be inserted with the correct polarity.
battery and the
wiring harness.
(Fig. 21)
Remove old or dead battery from the
MINIMOTO™ HYBRID BIKE. If they do not accept
a charge.
6) Remove the battery.
Fig 21
Do not short-circuit the battery and the connectors.
19
MINIMOTO™ HYBRID
REPLACING THE CHAIN IF IT
“POPS OFF”:
It is possible that under extreme conditions
one of the chains may pop off.
If this occurs, the motor will run but the rear
wheel will not turn under power. The chain
can be replaced onto it’s original position by
following these instructions:
Fig 22
WARNING:
Whenever removing the protec-
tive chain cover, YOU MUST DISCONNECT the
battery. This will ensure no possibility of the
motor or chain running accidentally while
working in this area. Refer to the section on
“Replacing the battery” in this instruction
manual for this operation.
1) Support the bike so that the rear wheel is
20
not touching the ground
Fig 23
IMPORTANT:
Make sure the bike will not
fall over in this process. Work on a work
bench or in a area with plenty of space.
2) Remove the four phillips head screws of
the chain cover (Fig. 22).
3) Unsnap and slide apart the upper and
lower chain cover (Fig. 23).
4) Place the chain over the MOTOR gear or
(smallest gear) first. Use your fingers to keep
some tension on it (Fig. 24).
Fig 24
MINIMOTO™ HYBRID
5) Place the chain on the top of the rear
wheel gear about half way around (Fig. 25).
6) Carefully move the wheel and gear so that
the entire chain pops back on (Fig. 26).
7) Replace the chain cover in reverse order.
8) Reconnect the battery.
Fig 25
21
Fig 26
MINIMOTO™ HYBRID
BATTERY DISPOSAL:
Always dispose of unwanted or used battery in a safe and environmentally friendly manner.
DO NOT throw the battery into your regular household trash. Law prohibits the disposal of
lead-acid battery by incineration, placing them in a landfill, or mixing them with other rubbish.
NEVER expose the battery to FIRE. The battery may leak or explode.
Always return your unwanted battery to a local federal or state approved lead-acid recycling
center or an authorized automobile battery seller. For residents in the states of Florida and
Minnesota, it is ILLEGAL for anyone to attempt to dispose of lead-acid battery in a municipal
waste stream.
22
MINIMOTO™ HYBRID
TROUBLE SHOOTING:
Problem
Probable Cause
Solution
The Hybrid bike does not
run on electric power.
1)
2)
3)
4)
1) Make sure the key is in the lock and in the
“ON” position.
2) Charge the battery.
3) Inspect the fuse to see if it is blown.
replace if necessary.
4) Check to see if the wall socket is in the
“ON” position and the red light is on the
charger.
5) If the battery is old or has been abused, it
will need to replaced
6) Check all connectors.
The key is not in the lock.
The battery is low.
The fuse is blown.
The charger is not working.
5) The battery is dead.
6) The wires are loose.
The Hybrid bike motor
was running but it suddenly
stopped.
1) Low battery voltage.
2) Blown fuse.
3) Loose connectors.
4) The brake is not properly adjusted.
1) The charger is still connected.
The Hybrid bike key is in
2) The brake is too tight.
“ON” position but when I
3) The fuse is blown.
move the throttle switch, the
back wheel won’t turn
under electric power.
1) The electronic circuit will AUTOMATICALLY
DETECT when the voltage is too low for the
bike to run. Recharge the battery.
2) Inspect and replace the fuse.
3) Check all electrical connections.
4) Adjust the brake as described in this
manual.
1) Disconnect the charger.
2) Adjust the brake to loosen the tire.
3) Check the fuse, replace if necessary.
23
The brake is too tight
or loose.
The brake cable is out of adjustment.
Adjust the brake cable to proper tension.
The handlebar moves when
I ride the bike.
The handlebar stem is too loose.
Tighten the nut on the top of the steering
column and adjust the handlebar.
The charger gets warm
when I recharge the
batteries.
This is normal.
No action necessary.
The battery only lasts about
15 minutes when I ride the
bike under continuous
power.
This is normal. The battery power is
intended for coasting or for extra power
when needed.
No action necessary. Recharge the battery
normally.
The battery makes a slight
sizzling or gurgling sound
when it recharges.
This is normal.
No action required.
MINIMOTO™ HYBRID
Problem
Probable Cause
Solution
The fuse blows too often.
To much current is being used to power
the bike.
1) Make sure the weight limit is not being
exceeded.
2) Do not ride the bike up a steep grade
without pedal assistance.
3) The riding surface is too rough, run on a
smoother surface.
4) You are resting your feet on the ground
when beginning to take off — start to pedal
your bike first, then use the electric power
assist.
The red LED always
stays on.
1) The battery is not being properly
charged.
2) The battery is too old or has been abused.
3) You are not plugged directly into a wall
socket.
1) Make sure all connectors are clean. Repair
if necessary and the plug is properly placed
in the bike’s receptacle.
2) Replace the battery.
3) Don’t use a “surge protector”. plug the
charger directly into a wall socket.
The Hybrid bike runs
sluggishly.
1) The battery is undercharged.
2) The battery is old.
1) Charge the battery
2) Even under perfect conditions, the battery
will only last about 1 to 2 years. If your
battery is old or has been abused or left
uncharged for a long period of time, it may
need replacing.
3) Try to run on smooth, flat surfaces only
3) The conditions and surfaces you are on
are too extreme.
4) The bike is overloaded.
4) Make sure the rider does not exceed the
175 lb LIMITATION.
24
If you have tried these solutions but the problem still exists, contact the Minimoto™ Service
Center for advice or assistance. They will assist you in getting quickly on the road. PLEASE
CHARGE THE BATTERY FULLY (if possible) before calling the center as this will speed up the
checklist. Have the HYBRID near the phone so you can do the various tests quickly.
www.teamminimoto.com
or email
[email protected]
MINIMOTO™ HYBRID
LIMITED WARRANTY AND
REGISTRATION:
This warranty does not cover, and is intended
to exclude, any liability on the part of the
manufacturer, whether under this warranty or
The manufacturer warranties this product,
implied by law or any indirect or consequen-
including the batteries, to be free of manufac-
tial damages for breach of warranty.
turing defects for a period of 180 days from
Toyquest’s and the manufacturer’s liability
the date of purchase. This limited warranty
hereunder is expressly limited to the replace
does not cover the normal wear and tear,
of goods not complying with the warranty of,
tires, inner tubes, cables, or any damage, fail-
or at Toyquest’s election, to the repayment of
ure, or loss caused by improper assembly, set and amount equal to the purchase price of
up, storage, or maintenance of the
the product in question. Some states do not
MINIMOTO™ HYBRID. PLEASE SAVE YOUR
allow the exclusion or limitation so this limita-
ORIGINAL SALES RECEIPT.
tion may not apply to you.
The warranty is VOID if the product is used in
WARRANTY DOES NOT INCLUDE REPLACE-
any other manner than recreation or trans-
MENT NORMAL WEAR AND TEAR OF EITHER
portation, is modified, or used in for commer-
BRAKE PADS OR TIRES. IT ALSO DOES NOT
cial purposes. The warranty does not cover
INCLUDE BODY OR FRAME PARTS DAMAGED
the vehicle or battery damaged by unreason-
DO TO ACCIDENT, ABUSE, OR IMPROPER
able use, neglect, accident, abuse, misuse,
ASSEMBLY.
improper service, or other causes not arising
out of defects or workmanship.
Check local laws and regulations in your area
before riding to determine where you can
Evidence of any attempt of repair done by the
consumer (other than tires and normal adjustments) will void the warranty.
legally ride your MINIMOTO™ HYBRID.
25
MINIMOTO™ HYBRID
REGISTRATION CARD:
VIN NUMBER:
To obtain warranty repairs or assistance, you
Each MINIMOTO™
must contact the Minimoto Repair Center
HYBRID bike has a
before the warranty expires.
unique VIN (vehicle
identification num-
Contact is most easily arranged by email:
ber) inscribed on
the chassis. The
[email protected]
Fig 27
It is also possible to register by mailing the
is located under the bike near where the
included form to the following address:
pedal arms connect with bike frame: (Fig.
location of this VIN
27). You will need to locate this information
Toy Quest
when registering and applying for warranty
C/O Minimoto Service Center
service.
1800 N. 9th Street
Indianola, Iowa 50125
PLEASE SAVE YOUR ORIGINAL
RECEIPT.
This warranty gives you specific legal rights,
and you may also have other rights that vary
26
from state to state.
MINIMOTO™ HYBRID
APPENDIX:
REPLACEMENT PARTS LIST for MINIMOTO™ HYBRID.
Spare Part Number
Spare Part Name
15428-MIS-001
12 volt battery
15428-MIS-002
12 volt battery charger
15428-ASM-001
Right side body
15428-ASM-002
Left side body
15428-MIS-003
Seat assembly
15428-ASM-003
Handle assembly top
27
15428-ASM-004
Handle assembly bottom
15428-ASM-005
Chain cover
15428-ASM-006
Motor cover
15428-MIS-004
Electronic module
15428-MIS-001
Key
Qty : 3
15428-MIS-005
Key switch
15428-MIS-007
Fuse holder
15428-MIS-008
Fuse
Qty : 2
MINIMOTO™ HYBRID
Spare Part Number
Spare Part Name
15428-MIS-009
Front Tire and hub
15428-MIS-010
Rear Tire & brake assembly
15428-MIS-011
Drive chains
Qty : 2
15428-MIS-012
Nut and bolt assortment
15428-MIS-013
Charging port
15428-ASM-007
Charging port cover
15428-MIS-014
Motor
15428-ASM-008
Frame
15428-MIS-015
Label sheet
15428-MIS-016
Kickstand
15428-MIS-017
Throttle switch assembly
15428-MIS-018
Brake switch assembly
15428-MIS-019
Brake cable
15428-MIS-020
Tool kit
28
Important: You must
charge your MINIMOTO™
HYBRID a
minimum of 12 hours
before you can use it.
RECHARGE the battery
EACH TIME you use it.
TO PROTECT THE LIFE
OF THE BATTERY,
recharge the battery
at least once a month.
FOLLOW ALL SAFETY
RULES AND SET UP
INSTRUCTIONS IN THIS
MANUAL THOROUGHLY.
FAILURE TO DO SO
MAY VOID YOUR
WARRANTY.
DO NOT RETURN THE
MINIMOTO™ HYBRID
TO THE STORE! IF YOU
ARE MISSING PARTS OR
NEED ASSISTANCE,
PLEASE CONTACT US
BY:
email at
[email protected]
OR call us TOLL-FREE by:
1-800-434-6178
8 AM TO 4 PM EST,
Monday through Friday,
(excluding holidays)
# 15428
Toy Quest
Los Angeles, CA 90064. All Rights Reserved. Made in China.
15428
www.toyquest.com
Conforms to ASTM F963. Colors and content may vary.
15428 1.0(08/04)