1
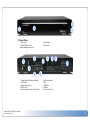
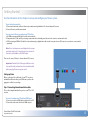
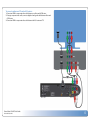
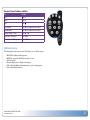
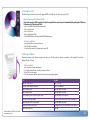
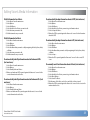
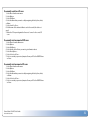
Escient® Vision™ VS server/player & VC player User’s Guide Version: M51003-02A3 Welcome Congratulations and thank you... Warnings and Precautions Vision Contents VS-100 / VS-200 & VC-1 What You Need to Setup Vision Vision at a Glance VS Series Server/Players VC Series Players VS & VC Series Components VX Series Servers Getting Started Use the information in this chapter to set up and configure your Vision system. Setting up Vision Step 1: Connecting the audio and video cables Step 2: Connect an Ethernet cable Step 3: Connect the power cord Step 4: Turn on your TV and select the input Configuring Vision Language Settings Escient EULA Display Settings Network Settings Escient Vision VS & VC User’s Guide Version: M51003-02A3 8 Importing Your Media 8 9 9 9 9 10 10 11 12 12 13 13 13 13 16 16 16 17 Importing Movies and Videos Importing Music Importing Photos Using Vision Basic Navigation Using The Remote Control Advanced Features of the Remote Control Universal Remote Control Capabilities Escient IR Code Banks Direct Access to Main Source Menus Transport Controls for Movies and Music Additional Features Watching a DVD Watching a Movie or Video Listening to a CD Listening to Music Viewing Photos Listening to Rhapsody Music What is Rhapsody? 18 18 19 19 20 20 20 20 20 20 21 21 22 22 23 23 24 25 25 17 17 17 17 2 Changing Vision’s Settings To specify what to do when you insert a DVD To specify what to do when you insert a CD To specify the format for storing music imported using the front panel drive To change the language for the on-screen menus To adjust the screen saver settings To adjust the now playing auto return time-out To set the time zone To adjust the TV resolution To Set the Digital Audio Outputs for Movies and DVD Playback To change the Ethernet network settings To test the network settings To change the server name To show or hide Rhapsody in the main menu To manage Rhapsody account information To connect to another Escient server To configure network storage locations To check for connected external disc changers To get information about external disc changers and their slots To enable parental controls To set the movie rating level for parental controls To configure the USB to serial port adapters To configure the remote control To view information about your Vision To view information about the content on your Vision To delete movies and music from your Vision To delete photos from your Vision To restart your Vision To shutdown or power off your Vision To manually check for software updates using your Internet connection Escient Vision VS & VC User’s Guide Version: M51003-02A3 26 Editing Vision’s Media Information 26 26 26 26 26 26 26 26 27 27 27 27 27 27 27 27 27 27 27 27 27 28 28 28 28 28 28 28 28 28 29 To Edit Information for a Movie 29 To Edit Information for Music 29 To automatically identify information about all unknown DVDs 29 (text and cover) 29 To automatically identify information about all unknown CDs (text and cover) 29 To automatically lookup information about a DVD (text and cover) 29 To automatically lookup information about a CD (text and cover) 29 To manually search for information about a Movie (text and cover) 29 To manually search for a CD cover 30 To manually select an imported DVD cover 30 To manually select an imported CD cover 30 3 Tips and Troubleshooting Pre-Installation Region Coding Video Outputs Concurrent Operations VS Server Limits VX Server Limits Determining your Vision’s IP Address Controlling Vision from Your Computer Connecting to Vision’s Network Shares Sharing Vision’s Music with FireBall Media Servers Supported File Types Sharing FireBall Music with your Vision Media Server Accessing your iPod Music with a Vision Media Server Escient Early Detection Monitoring System (EDMS) Service and Support Finding your Vision serial number Contacting Escient Technical Support Important Care and Cleaning Information Using Connectors and Ports Keeping Vision Within Acceptable Temperatures Keeping the Outside of Vision Clean 31 Specifications 31 31 31 32 32 32 32 32 32 32 33 33 33 33 Video Specifications Analog Video Digital Video Audio Specifications Physical Specifications Power Consumption 3rd Party Certifications FCC Part 15, Subpart B Vision FAQ Movies Q&A Music Q&A Photo Related Q&A Networking Q&A Technical Q&A Version: M51003-02A3 35 35 35 35 35 35 35 35 36 36 36 37 37 37 34 Escient End User License Agreement 38 34 34 34 34 34 34 Third Party End User License Agreements Gracenote® End User License Agreement Macrovision U.S. Patent Information U.S. Patent Nos. Escient Vision VS & VC User’s Guide 35 41 41 41 41 4 Music never looked so good Rhapsody delivers millions of songs to your Escient Vision Welcome Congratulations and thank you... ...for purchasing the Escient Vision Media Server or Player! This user’s guide describes the features and proper use of the Vision VS and VC Series products. At the time of printing, the screen shot images in this user’s guide matched the product’s user interface screens. However, since Vision has the capability of downloading software updates and enhancements, the resulting screen updates may no longer match the images in this user’s guide. Please check the Escient web site for more information about software updates. Escient Vision VS & VC User’s Guide Version: M51003-02A3 8 Warnings and Precautions • CAUTION - Danger of explosion if the battery in the IR remote is incorrectly replaced. Replace only with the same or equivalent type. • Do not use this apparatus near water. • Clean only with a dry cloth. • Do not block any ventilation openings. • Do not install near any heat sources such as radiators, heat registers, stoves, or other apparatus (including amplifiers) that produce heat. • To reduce the risk of electric shock, do not remove the cover. No user serviceable parts are inside. Refer servicing to qualified service personnel. • To prevent electric shock, do not use a 3 wire to 2 wire adapter plug. • A three prong grounded outlet is required. • You are cautioned that any change or modification not expressly approved in this manual or a proved in writing by an authorized representative of Escient could void your warranty and/or your authority to operate this equipment. • Prolonged use of any video device that produces a static (non-moving, non-changing) or repetitive image on your projector, television or plasma display device can cause “screen burn-in”. You are encouraged to leave the screen saver turned on and set to the lowest possible “time-out” duration. This device uses the main plug (power cable) as the means to disconnect the unit, this unit remains powered unless disconnected from the main (power) source. Vision Contents VS-100 / VS-200 & VC-1 Power Cable Ethernet Cable Remote Control Two AA Batteries What You Need to Setup Vision • A widescreen high definition TV with an HDMI, DVI, or component video port and analog or digital audio ports. • An HDMI, HDMI to DVI, or component video cable and analog or digital audio cables • A Gigabit Ethernet switch (not a hub). The switch must be connected to a network router with broadband Internet access (DSL, Cable, LAN, FIOS) • A/V Receiver and surround sound speaker system (optional) Note: The VC Series products must be installed with at least one Vision VS Series or VX Series product to be able to access stored music, movies, videos, and photos as the VC does not contain any hard drives for internal storage of media. Escient Vision VS & VC User’s Guide Version: M51003-02A3 9 Vision at a Glance VS Series Server/Players 1. Power Button and Status LED 2. Disc Eject Button 3. IR Receiver 1. Power Connector 2. Digital Audio Out (Coax and Optical) 3. IR In 4. HDMI Out 5. HDMI In (x4) Escient Vision VS & VC User’s Guide Version: M51003-02A3 4. USB Port 5. DVD/CD Drive 6. Redundant 500GB or 1TB internal hard drives 6. S-Video Out 7. Gigabit Ethernet Port 8. Component and Composite Video Out 9. USB Port (x2) 10. Analog Audio Out 10 VC Series Players 1. IR Receiver 2. DVD/CD Combo Drive (behind metal flip down door) 1. Digital Audio Out (Coax and Optical) 2. S-Video Out 3. Gigabit Ethernet Port 4. USB Port (x2) 5. Component and Composite Video Out Escient Vision VS & VC User’s Guide Version: M51003-02A3 3. Power Button 4. Status LED 6. Analog Audio Out 7. IR In 8. HDMI Out 9. HDMI In 10. Power Connector 11 VS & VC Series Components Front Panel LED - Will flash red until the system is ready, at which point it will turn blue. Solid red indicates that the system is in Standby mode (video off ). IR Receiver - Use with the included handheld IR remote to control the Vision Power Button - Press and release to toggle the Vision between standby and on. Hold for 5 seconds to force the unit to shutdown (power LED turns off ). Press the power button again to power up. Eject Button - Press and release to eject the internal optical disc tray. USB port (front panel) - Use to connect a USB keyboard and mouse to control the Vision Power port - Plug the included AC power cord into Vision S-Video port - Connect Vision to a standard definition TV that has an S-Video port using a high quality S-Video cable. Composite Video port - Connect Vision to a standard definition TV that has a composite video port using a high quality video cable. Coax digital audio port - Connect Vision to a home theater A/V receiver that has a coax digital audio port, using a high quality coax digital cable. Optical digital audio port - Connect Vision to a home theater A/V receiver that has an optical digital audio port, using a high quality optical digital audio (also called a S/PDIF or TOSLINK) cable. Analog audio ports - Connect Vision to a widescreen high definition TV or home theater A/V receiver with analog audio port (red and white), using an analog audio cable. Gigabit Ethernet port - Connect Vision to your Gigabit Ethernet switch using a Cat 5e or Cat 6 rated cable. USB ports (back panel) - Use to connect one or more USB to RS-232 DB-9 Serial adapters to control external changers or to control Vision from external control systems using the Escient RS-232 control protocol. IR port - Connect Vision to an external wired IR control system using a stereo 1/8” cable where the sleeve is ground, ring is power, and tip is signal. HDMI input ports - Connect Vision to an external disc changer that has an HDMI port or to an Escient CH-1 adapter kit to pass component video + digital audio from a Sony 777ES Mega changer, using a high quality HDMI cable VX Series Servers The VX Series products provide the ability to add more storage to VS based installations and provides central network storage for multiple VC based installations. The VX Series is only storage. You can’t connect a VX to a TV. For example, you could install 4 VC Series players in four different rooms of the house and access one to four VX Series storage devices located in the central equipment room. HDMI Output port - Connect Vision to a widescreen high definition TV that has an HDMI port using a high quality HDMI cable, or a DVI port using an HDMI to DVI cable. Component Video ports - Connect Vision to a widescreen high definition TV that has component video (Y, Pb, and Pr) ports using a high quality component video cable with green, blue, and red connectors. Escient Vision VS & VC User’s Guide Version: M51003-02A3 12 Getting Started Use the information in this chapter to set up and configure your Vision system. To get started you need to: 1.Connect audio and video cables to Vision and your widescreen high definition TV or home theater A/V receiver 2.Connect Vision to your Ethernet network You can connect Vision to a widescreen TV that has: 1.An HDMI port using an HDMI cable for both video and audio 2.Component video (Y, Pb, and Pr) ports using a component video cable with green, blue, and red connectors, and an audio cable 3.A DVI port using an HDMI-to-DVI cable for video and an analog or digital audio cable. (audio is not passed over a DVI connector so you have to connect audio separately) Note: Vision’s startup screens are displayed on the component video output only. It may take up to two minutes for the video to be available on the HDMI output. You can also connect Vision to a home theater A/V receiver. Important: Read all of the following installation instructions and the safety information in the included carefully before you plug Vision into a power outlet. Setting up Vision Before you begin, look at the back of your TV or receiver and find the audio and video ports. Make sure you have the appropriate cables for your setup. Step 1: Connecting the audio and video cables Choose the setup that matches the ports on your TV or A/V receiver. To connect a widescreen TV with an HDMI port: 1.Connect one end of an HDMI cable to the back of your TV. 2.Connect the other end to the Vision’s HDMI out port. Escient Vision VS & VC User’s Guide Version: M51003-02A3 13 To connect a widescreen TV with a component video and analog audio ports: 1.Connect the green, blue, and red connectors on one end of a component video cable to the Y, Pb, and Pr ports on your TV and the connectors on the other end to Vision. 2.Connect an analog audio cable with red and white connectors between Vision and your TV. To connect a widescreen TV with a DVI port: 1.Connect an HDMI-to-DVI cable to the DVI port on your TV and the HDMI port on your Vision. 2.Connect an analog audio cable with red and white connectors between Vision and your TV. Escient Vision VS & VC User’s Guide Version: M51003-02A3 14 To connect a widescreen TV and an A/V receiver: 1.Connect an HDMI or component video cable between your Vision and A/V Receiver. 2.If using a component video cable, connect a digital or analog audio cable between Vision and A/V Receiver. 3.Connect an HDMI or component video cable between the A/V receiver and TV. Escient Vision VS & VC User’s Guide Version: M51003-02A3 15 Step 2: Connect an Ethernet cable Connect a Cat 5e or Cat 6 rated Ethernet cable from your gigabit Ethernet switch to the Ethernet port on the back of Vision. Step 3: Connect the power cord Plug one end of the power cord into the back of Vision and the other end into a power outlet. Note: Escient recommends the use of a UPS (uninterruptible power supply) with surge suppression for all Vision products. Step 4: Turn on your TV and select the input If your connections are OK, you should see the Vision splash screen on your TV as the Vision is starting. Note: Refer to the CH-1 changer accessory kit documentation for connecting external changers. Escient Vision VS & VC User’s Guide Version: M51003-02A3 16 Escient EULA Press the down arrow key on the remote as you read through the Escient End User License Agreement. Once you have read the entire agreement, the Accept and Decline buttons are enabled. You must accept the terms of the EULA by highlighting the Accept button and pressing OK on the remote in order to continue using Vision. If you do not accept the terms of the EULA, please return the product to your Escient dealer. Display Settings Vision will attempt to automatically determine your TV’s resolution and sync with it. If the picture does not fill the screen, is, cut off, or too small, you may have to set the resolution manually. Network Settings If your network is setup to dynamically assign IP addresses using DHCP, Vision will automatically detect your network and configure itself. If you don’t use DHCP, the automatic network configuration will fail and you will have to manually enter your IP address, subnet mask, router address, and DNS addresses. Follow the on-screen instructions for manually configuring and testing your network settings. Escient Vision VS & VC User’s Guide Version: M51003-02A3 6Network Settings Select one of the available languages for Vision’s on-screen user interface using the blue keys (up, down, and OK) on the remote. 6Display Settings Language Settings 6Escient EULA The first time you use Vision you be prompted to select a language. After doing so, you will be asked to ready and accept the Escient End User License Agreement. Vision will then automatically attempt to connect to the Internet through your home network to register and check for any software updates. If any of these steps fail, simply follow the on screen instructions as you follow the next section. 6Language Settings Configuring Vision 6Splash screen Note: The initial Vision startup process takes several minutes. A startup screen with the Vision logo is displayed on the component video output only during the startup process. If your TV screen is still blank after the startup process, make sure the input selected on your TV matches the input the Vision is connected to. See “Tips and Troubleshooting” at the end of this guide, and see the documentation that came with your TV for information about switching inputs. 17 Importing Your Media Vision allows unprecedented ease of use for managing your movies, music, videos, and photos from any room of your home. Using Vision, you can watch or listen to: • A DVD or CD inserted into the front panel drive • Movies and videos that were imported into the Vision system • Music that was imported into the Vision system • Photo slideshows that were imported into the Vision system • Rhapsody Direct subscription music service (over 4 million songs!) • Music stored on Escient FireBall music servers • Music stored on your Apple iPod (using the Escient FP-1) When you import media into Vision, it will automatically download all of the information about the movie (actors, genre, running time, description, cover art, etc…) or music (artist, album, track, cover art, etc…) using your Internet connection and build a library of information that allows you to easily browse, select, and play anything in your collection from any room of your home using the simple and intuitive on-screen user interface and wireless remote. Importing Movies and Videos Most commercial DVD discs can be imported to the Vision system using the front panel drive. Movies and videos that you have created yourself can be imported from your PC over the network. To import DVD discs: 1.Insert the DVD into the front panel optical disc drive. 2.The movie will automatically start playing. 3. Press the Back or Stop key on the IR remote to return to the DVD/CD Player menu. 4. Select the Import menu item. 5. Read and confirm the import agreement. The DVD will be imported into the Vision system. Press the Back button to return to the DVD/CD Player menu once the import is complete. To import movies and videos from your computer: 1.Connect to your Vision using its IP address or its Server Name if you are have a Windows network. 2.Select the IMPORT volume. 3.Drag your movies/videos from your PC to the IMPORT folder. 4.When the import is complete, the movie will be added to the Movies library on your Vision. If Vision is unable to determine the name of the movie (such as the case if you import a home movie) it will appear as “Unknown”. You can edit the metadata for your movie/video to change how it appears in the Movies library. Escient Vision VS & VC User’s Guide Version: M51003-02A3 18 Importing Music Music CDs can be imported to the Vision system using the front panel drive or imported from your PC/Mac over the network. To import CD discs: 1.Insert the CD into the front panel optical disc drive. 2.The CD will automatically start playing. 3. Press the Back or Stop key on the IR remote to return to the DVD/CD Player menu. 4. Select the Import menu item. 5. Select either Start Import to import all tracks on the CD or select Select/Unselect Tracks to only record some of the tracks. The CD will be imported into the Vision system. Press the Back button to return to the DVD/CD Player menu once the import is complete. To import digital audio files from your computer: 1.Connect to your Vision using its IP address or its Server Name if you are have a Windows network. 2.Select the IMPORT volume. 3.Drag your digital music files from your PC to the IMPORT folder. 4.When the import is complete, the movie will be added to the Music library on your Vision. If Vision is unable to determine the artist, album, or track information for the music files, they will appear as “Unknown”. You can edit the metadata for your music to change how it appears in the Music library. Importing Photos Digital photos can be imported to the Vision system from your PC over the network. To import digital photo files from your computer: 1.Connect to your Vision using its IP address or its Server Name if you are have a Windows network. 2.Select the PHOTOS volume. 3.Drag folders of photos from your PC to the PHOTOS folder. 4.When the import is complete, the name of the folder will be added to the Photo library on your Vision. For example: If you want to import photos of your family vacation onto your Vision, create a folder called “Summer Vacation” on your PC and place the photos that you want to import into Vision inside. After you copy this folder to your Vision, you will have a slideshow called “Summer Vacation” under the Photo library on your Vision. Escient Vision VS & VC User’s Guide Version: M51003-02A3 19 Using Vision Make sure that the remote is set to send the correct IR codes to Vision by pressing the R1 key located at the top left of the remote. This section describes how you use Vision to watch, listen, and view your media using the Vision IR remote In order to access your Vision media, you will need to interact with the onscreen user interface. The included wireless infrared remote control allows you to control every feature of Vision with only a few buttons. Basic Navigation Using The Remote Control Use the IR remote to control Vision and navigate through your content. Using only the blue keys on the remote, you can access almost every feature of Vision. To Do this Scroll through menu items one at a time Press UP or DOWN Select a menu item Press OK Return to the previous screen Press BACK or LEFT Return to the main menu Press HOME See optional features for the currently highlighted item Press OPTS Scroll through menu items a screen at time Press PAGE UP or DOWN Escient IR Code Banks The Escient remote is also designed to control multiple Escient products and as such contains the ability to control four different Escient products assigned to code banks R1 – R4 on the remote. These banks are identical to the FB1 – FB4 code banks on other Escient FireBall remotes. Note: Vision will respond to IR code bank R1 by default. Direct Access to Main Source Menus To Do this Go directly to the Movies menu Press VIDEOS Go directly to the Music menu Press MUSIC Go directly to the Photos menu Press PHOTOS Go directly to the Rhapsody menu Press RADIO Go directly to Setting menu Press SETUP Advanced Features of the Remote Control Universal Remote Control Capabilities The Escient remote has the ability to control four non-Escient products such as a TV, Cable/Satellite box, Receiver, or DVD player. Please refer to the Escient “Remote Control Guide (Vision)” (available on the Escient web site: http:// www.escient.com/support/manualsdocs.html) for details on configuring the Escient remote to control other products. Escient Vision VS & VC User’s Guide Version: M51003-02A3 20 Transport Controls for Movies and Music To Do this Play Press Pause Press ; Stop Press g Scan Forward Press 8; Press again to increase speed Scan Backward Press 7; Press again to increase speed Change Chapters / Tracks Press 9 or : Go directly to DVD menu Press MENU Go directly to the DVD top menu Press MENU twice Additional Features The following keys on the remote control allow direct access to Vision features: • MENU/VIEW = Displays Now Playing screen. • RECORD x2 = Imports the CD/DVD present in the +1 drive. • PLAY = Clears field. • OK at Now Playing screen = Displays current queue. • ADD = Adds the highlighted artist, album, track, or genre to the play queue. • PLAY = Initiates play from queue.) Escient Vision VS & VC User’s Guide Version: M51003-02A3 21 Watching a DVD The built-in optical drive that is used to import DVDs and CDs can also be used to play a DVD on the local TV. Enable Display and Play Mode for DVDs: First make sure that DVDs inserted into the front panel drive do not import automatically by setting the DVD Insert Preferences to “Display and Play”: 1.Choose DVD/CD Player from the main menu. 2.Choose Preferences. 3.Choose DVD Insert. 4.Choose Display and Play. 5.Press BACK until you are back at the DVD/CD Player menu. To watch a DVD disc: 1.Insert the DVD disc you want to watch. 2.The DVD will load and play. 3.Use the Vision remote to navigate the DVD Menu and start watching Watching a Movie or Video Watching a movie or video off of the Vision system couldn’t be easier. Use the remote to browse your movie collection by Cover, Title, Genre, MPAA Rating, Actor/Cast, or Director. To watch a Movie or Video: 1.Choose Movies from the main menu. 2.Locate the movie or video you want to watch. 3.Press PLAY on the remote to play the movie or press OK for more options. 4.The movie or video will begin playing from the start of the first chapter, bypassing the previews. Escient Vision VS & VC User’s Guide Version: M51003-02A3 To Do this Play a movie from where you last stopped playing it Choose Resume Play a movie from the beginning of chapter 1, bypassing the previews. Choose Play Movie Play the DVD from the beginning including a trailers and warnings Choose Play Disc Access a DVD’s original menu Choose DVD Menu Play the current movie Press or OK 22 Listening to a CD The built-in optical drive that is used to import DVDs and CDs can also be used to play a CD. Enable Display and Play Mode for CDs: First make sure that CDs inserted into the front panel drive do not import automatically by setting the CD Insert Preferences to “Display and Play”: 1.Choose DVD/CD Player from the main menu. 2.Choose Preferences. 3.Choose CD Insert. 4.Choose Display and Play. 5.Press BACK until you are back at the DVD/CD Player menu. To listen to a CD disc: 1.Insert the CD disc you want to listen to. 2.The CD will load and play. 3.Use the Vision remote to change tracks on the CD. Listening to Music Listening to music on the Vision system is also very easy. Use the remote to browse your music collection by Cover, Artist, Album, Track, or Genre. To listen to Music: 1.Choose Music from the main menu. 2.Locate the artist, album, or track you want to listen to. 3.Press PLAY on the remote. 4.The selected music will be added to the play queue and begin playing. Escient Vision VS & VC User’s Guide Version: M51003-02A3 To Do this Play the current track Press or OK Play the current album (all tracks) Press or OPTIONS Play something now Press OPTIONS, Play Now Play something next Press OPTIONS, Play Next Add something to the end of the play queue Press OPTIONS, Add to Queue See what is currently playing Select Music from the main menu, Now Playing Play all albums for the current artist Press OPTIONS, Play Now Play music from several genres Highlight a Genre, Press OPTIONS, Add to Queue Skip to the next song Press : 23 To manage the Now Playing Queue: Music is always added to a play queue. You can view, edit, clear, and save the queue as a playlist if you like. 1.Select Music/Now Playing to display the Now Playing screen To Do this Display the play queue Press OK from the Now Playing screen Clear the play queue Press OPTIONS, Clear Queue Reorder tracks in the queue Press 3or to move the highlighted track up or down Remove a track from the queue Press OPTIONS, Remove Track Add music to an existing Playlist Press OPTIONS, Add to Existing Playlist Add music to a new Playlist Press OPTIONS, Add to New Playlist Viewing Photos Photos that you have previously imported into Vision will appear under the name of the enclosing folder that you imported from your PC. To view photos on Vision: 1.Choose Photos from the main menu. 2.Choose Slideshows. 3.Choose a Slideshow by name. 4.The photos in the selected slideshow will be displayed according to your Photo Options. To Do this Pause a slideshow Press ; Resume a slideshow Press ;or Skip to the next photo Press : Skip back to the previous photo Press 9 Change how long each photo is displayed Select Photos, Options, Duration, OK to cycle the available durations. Display photos in order or randomly Select Photos, Options, Random to toggle Random on/off. Turn the transition fade effect on or off Select Photos, Options, Fade to toggle Fade on/off. Scale each image to fit your display horizontally or vertiSelect Photos, Options, Zoom to toggle Zoom on/off. cally Select a different playlist to play while viewing photos Escient Vision VS & VC User’s Guide Version: M51003-02A3 Select Photos, Options, Soundtrack 24 Listening to Rhapsody Music What is Rhapsody? Rhapsody is a membership-based music service that gives you unlimited access to a catalog of millions of full length, CDquality tracks. Listen whenever you want, get personalized music suggestions tailored to your musical tastes, and take your music with you wherever you go. Vision comes with a free 30-day trial account for the Rhapsody Unlimited service. After 30 days you can sign up for a low monthly fee to continue listening to all of your Rhapsody music. For more information, please visit www.rhapsody. com on the web. To setup your Rhapsody Account 1.Select Rhapsody from the main menu. 2.Follow the on-screen instructions for entering your existing Rhapsody account information or starting the free Rhapsody Trial. To select and play Rhapsody music: 1.Select Rhapsody from the main menu. 2.Select Search to search the Rhapsody service by Artist, Album, or Track or select Rhapsody Music Guide to manually locate music by navigating through Genres, Artists, Albums, New Releases, Recommendations, etc… 3.Press the OPTIONS key on the remote and selection one of the following: 4.Play Now – Play the music now 5.Play Next – Play the music after the current song ends 6.Add to Queue – Add the music to the end your play queue 7.Add to My Rhapsody Library – to mark the music so it can be located and played faster using “My Rhapsody” (see below). 8.You can also press PLAY to play the current Album or Track immediately. Note: You can play three different streams at a time using one Rhapsody account. This means that you can enter the same Rhapsody user name and password into all of your Vision devices and listen to Rhapsody on any three at one time. Escient Vision VS & VC User’s Guide Version: M51003-02A3 To Do this Play the current track Press or OK Play the current album (all tracks) Press or OPTIONS Play something now Press OPTIONS, Play Now Play something next Press OPTIONS, Play Next Add something to the end of the play queue Press OPTIONS, Add to Queue See what is currently playing Select Rhapsody from the main menu, Select Now Playing Play music from several genres Highlight a Genre, Press OPTIONS, Add to Queue Skip to the next song Press : To listen to Rhapsody Channels: 1.Select Rhapsody from the main menu. 2.Select Rhapsody Channels. 3.Navigate the menus to locate a Rhapsody Channel. 4.Press OK or PLAY to start playing the station. Note: Rhapsody Channels allows you to skip to the next song by pressing the : key on the remote. To access your favorite Rhapsody albums and tracks: My Library is used to save your favorite Rhapsody Artists, Albums, and Tracks so its easier to find and play the music you like. Any Album or Song can be added to My Library by using the OPTIONS key on the remote when browsing the Rhapsody Music Guide. 1.Select Rhapsody from the main menu. 2.Select My Library. 3.Navigate the menus to locate the Artist, Album, or Track you want to play. 4.Press OK or PLAY to start playing the music. To remove something from My Library: 1.Select Rhapsody from the main menu. 2.Select My Library. 3.Navigate the menus to locate the Artist, Album, or Track you want to remove. 4.Press OPTIONS, from My Library. 25 Changing Vision’s Settings To specify what to do when you insert a DVD 1.Select DVD/CD Player 2.Select Preferences 3.Select DVD Insert 4.Select Import and Eject to automatically import (then eject) a DVD inserted into the front panel disc drive, or select Display and Play to automatically play any DVD inserted into the front panel disc drive. To specify what to do when you insert a CD 1.Select DVD/CD Player 2.Select Preferences 3.Select CD Insert 4.Select Import and Eject to automatically import (then eject) a CD inserted into the front panel disc drive, or select Display and Play to automatically play any CD inserted into the front panel disc drive. To specify the format for storing music imported using the front panel drive 1.Select DVD/CD Player 2.Select Preferences 3.Select CD Import 4.Select the desired format to store music that you import using the front panel: 5.MP3 encoder (most compatible with other devices) 6.FLAC (same quality as the original CD with a 50% savings in storage space) 7.WAV (exact copy of the original CD – uses the most disc space) 8.If you selected the MP3 Encoder, select the bitrate or quality for MP3 formatted files. The higher the bitrate, the better the quality and the more space required for each track. Escient Vision VS & VC User’s Guide Version: M51003-02A3 Use the Setup menu to manage Vision’s global settings. For all of the following tasks, select SETUP from the main menu and then proceed with the steps listed… To change the language for the on-screen menus 1.Select Language 2.Select On Screen User Interface 3.Select the desired language To adjust the screen saver settings 1.Select General 2.Select Screen Saver 3.Select the desired time to wait (with no user interaction) before starting the screen saver. To adjust the now playing auto return time-out 1.Select General 2.Select Now Playing Auto-Return 3.Select the desired time to wait (with no user interaction) before automatically switching to the Now Playing screen from any other screen. This feature is active only when music is playing. To set the time zone 1.Select General 2.Select Time Zone 3.Select the time zone where your Vision is located. This is used to set the internal clock and to periodically check for automatic updates during off hours. To adjust the TV resolution 1.Select TV Resolution 2. Select Set Defaults to set the HDMI output to 480p and the analog outputs to 480i, or... 3. Select Change Resolution and select the TV resolution that best matches your TV. 26 To Set the Digital Audio Outputs for Movies and DVD Playback To configure network storage locations To change the Ethernet network settings To check for connected external disc changers 1.Select Movie Audio 2. Select 5.1 Surround if you are connecting to a 5.1 surround sound system or 3. Select Stereo Downmix if you are connecting to a 2 channel stereo sound system. 1.Select Network 2.Select Ethernet 3.Select IP Address Type 4.DHCP (default) to automatically configure your network settings from your router or 5.Manual to manually configure the IP Address Settings: IP, gateway, subnet, and DNS addresses for your network. To test the network settings 1.Select Network 2.Select Ethernet 3.Select Test Settings To change the server name 1.Select Network 2.Select Server Name 3.Enter the name that you want to appear on your network when you access your Vision from your PC or another Escient product. To show or hide Rhapsody in the main menu 1.Select Network 2.Select Rhapsody 3.Select Service On or Off To manage Rhapsody account information 1.Select Network 2.Select Rhapsody 3.Select Enter Account Information 4.Enter your Rhapsody user name and password To connect to another Escient server 1.Select Network 2.Select Network Storage 3.Select up to 4 Escient storage devices (VS or VX Vision servers) to store all of your imported media. Servers will be filled in order from top to bottom. 1.Select Changer Management 2.Select Discover Changers 3.Wait as each HDMI and USB port is checked for a connected external disc changer. To get information about external disc changers and their slots 1.Select Changer Management 2.Select Statistics 3.View information about what is stored in your external disc changers. To enable parental controls 1.Select Parental Controls 2.Select Password Protection 3.Enter a numeric password that has no more than 8 digits. This password will be required to view movies which are rated at or higher than your Movie Rating Level To set the movie rating level for parental controls 1.Select Parental Controls 2.Select Movie Ratings 3.Select a movie rating for displaying movies without a password. Note: All movies with an MPAA rating at or below the selected level will be shown in the Movies library without entering a password. To configure the USB to serial port adapters 1.Select External Control 2. Select Serial Port Manager 3. Select external control until the desired serial port name to be used for external control is shown, or until “disable” appears to disable external control. 1.Select Network 2.Select Connect to Server 3.Select up to 4 Escient devices to connect to Escient Vision VS & VC User’s Guide Version: M51003-02A3 27 To configure the remote control To shutdown or power off your Vision To view information about your Vision To manually check for software updates using your Internet connection 1.Select External Control 2.Select IR Remote 3.Select which bank or set of IR codes for Vision to respond to. The selected bank (R1, R2, R3, or R4) should correspond to the selected bank of codes on your IR remote. The default is Escient – R1. 1.Select Utilities 2.Select System Information 3.View information about your Vision system. 1. Select Utilities 2. Select Restart System 3. Select Shutdown or Press and hold the front panel power button for about 10 seconds until the LED turns off. 1. Select Utilities 2. Select Software Update 3. Select Check for Update To view information about the content on your Vision 1.Select Utilities 2.Select My Content 3.Select Movies, Music, or Photos 4.View information about the selected type of media. To delete movies and music from your Vision 1.Select Utilities 2.Select Delete Media 3.Select Movies or Music 4.Navigate the list and locate the media you want to delete from your Vision system. 5.Press the OPTIONS button on the remote. 6.Select DELETE to confirm the permanent removal of the selected media. To delete photos from your Vision Deleting Photos can only be accomplished from a PC over your network. 1.Connect to your Vision using its IP address or its Server Name if you have a Windows network. 2.Select the PHOTOS volume 3.Delete the folders or individual photos that you want removed from your Vision by dragging them from the PHOTOS volume to the trash on your PC. To restart your Vision 1. Select Utilities 2. Select Restart System 3. Select Restart Escient Vision VS & VC User’s Guide Version: M51003-02A3 28 Editing Vision’s Media Information To Edit Information for a Movie 1.Select Movies from the main menu 2.Select Options. 3.Select Edit Movies 4.Select the title for the Movie you want to edit 5.Select the item your want to edit. 6.Edit the item and save your results. To Edit Information for Music 1.Select Music from the main menu 2.Select Options. 3.Select Edit Music 4.Select the album that you want to edit by navigating the list by Genre, Artist, or Album. 5.Select the item your want to edit. 6.Edit the item and save your results. To automatically identify information about all unknown DVDs (text and cover) 1. Select Movies from the main menu 2. Select Options 3. Select Identify Unknown Movies 4. Wait as each unknown DVD is queried against the Gracenote® servers for the correct information about the disc. To automatically identify information about all unknown CDs (text and cover) 1. Select Music from the main menu 2. Select Options. 3. Select Identify Unknown Music 4. Wait as each unknown CD is queried against the Gracenote® servers for the correct information about the disc. Escient Vision VS & VC User’s Guide Version: M51003-02A3 To automatically lookup information about a DVD (text and cover) 1. Select Movies from the main menu 2. Select Options. 3. Select Edit Movies 4. Select the title for the Movie you want to get information about 5. Select Lookup this Movie… 6. Wait as the DVD is queried against the Gracenote® servers for the information about the DVD. To automatically lookup information about a CD (text and cover) 1. Select Music from the main menu 2. Select Options. 3. Select Edit Music 4. Select the album that you want to edit by navigating the list by Genre, Artist, or Album 5. Select Lookup… 6. Wait as the CD is queried against the Gracenote® servers for the correct CD cover. To manually search for information about a Movie (text and cover) 1. Select Movies from the main menu 2. Select Options. 3. Select Edit Movies 4. Select the title for the Movie you want to get information about 5. Select More Options… 6. Select Search for Movie… 7. Edit the name of the title to use for the search (this edit is not saved) 8. Wait as the DVD is queried against the Gracenote® servers for the correct information about the disc. 29 To manually search for a CD cover 1. Select Music from the main menu 2. Select Options. 3. Select Edit Music 4. Select the album that you want to edit by navigating the list by Genre, Artist, or Album 5. Select Search for Cover… 6. Edit the name of the artist and album to use for the search (this edit is not saved) 7. Wait as the CD is queried against the Gracenote® servers for the correct CD cover. To manually select an imported DVD cover 1. Select Movies from the main menu 2. Select Options. 3. Select Edit Movies 4. Select the title for the Movie you want to get information about 5. Select More Options… 6. Select Select Local Cover… 7. Select a cover that you previously imported from your PC to the COVERS share on Vision. To manually select an imported CD cover 1. Select Music from the main menu 2. Select Options. 3. Select Edit Music 4. Select the album that you want to edit by navigating the list by Genre, Artist, or Album 5. Select Select Local Cover… 6. Select a cover that you previously imported from your PC to the COVERS share on Vision. Escient Vision VS & VC User’s Guide Version: M51003-02A3 30 Tips and Troubleshooting Pre-Installation In order to achieve a smooth and trouble free installation, please make sure the following items are investigated and in place before you attempt to install a Vision system: cThere is a working broadband Internet connection. The Internet connection is required for Vision to register the unit for software updates and to retrieve information about each DVD and CD that is imported into the system. cThere is a working gigabit Ethernet switch (not a router) with enough ports for each Vision device being installed. cFor best results, we recommend using a dedicated gigabit Ethernet switch (not a router) for all Vision devices. This will ensure that you are getting the best possible network bandwidth for playing Movies over your network. cCAT5 or CAT5e cable will work, but Cat 6 is recommended for the best possible performance, especially if you have a multi-room installation. cEthernet cabling does not exceed the recommended 100-meter length between devices. If you need to go beyond 100 meters, install an additional router between the runs. cThere is a router configured to assign dynamic IP addresses (DHCP) or obtain the proper static IP address information from the person so setup the network. cIf there is a firewall on the network, make sure the Vision can get out on ports: c80 (HTTP) c443 (HTTPS) c8080 (CDDB) cMake sure there is enough ventilation at the location of each Vision device. cThe use of an uninterruptible power supply (UPS) is recommended at the location of all VS products to prevent possible data loss in the event of an unexpected power loss. Video Outputs The following chart describes which video outputs are active for each TV resolution setting: TV Resolution 480i/p* Composite S-Video Component HDMI Yes Yes Yes Yes Yes Yes 480p 720p Yes 1080p Yes 576p/i** 50Hz Yes Yes 576p 50Hz 720p 50Hz Yes Yes Yes Yes Yes 1080p 50Hz Yes * = all outputs active (HDMI = 480p, Component, S-Video, and Composite = 480i) ** = all outputs active (HDMI = 576p, Component, S-Video, and Composite = 576i) Factory default = all outputs active The following macro sequences are available by using the Vision remote control to directly reset parameters of the video output system in the event that you can not see the Vision user interface on your TV: • Macro + Movies + 0 = Set TV Resolution Defaults • Macro + Movies + 1 = Set Video to NTSC • Macro + Movies + 2 = Set Video to PAL Region Coding Most DVDs are set for use in a specific region code for different parts of the world. The Vision can play and import discs from different regions, however you can only change the region setting 5 times. The region is changed automatically each time you insert a disc that has a region that is different from the previous disc’s region. The 5th time it changes, it is locked on that region . Playing imported DVDs from Vision servers or hard drives DOES NOT increment the region setting count. Escient Vision VS & VC User’s Guide Version: M51003-02A3 31 Concurrent Operations VS Server Limits When properly installed, the Vision VS can support the following concurrent functions: • Streaming to five different VS/VC clients while playing a movie locally • Streaming to five different VS/VC clients while importing a movie from the front panel drive • Stream to one VS/VC client while importing a movie from the front panel drive • Stream to one VS/VC client while importing a movie from a remote VS/VC client • Remotely import up to two movies from VS/VC clients (no movies playing locally or streaming) VX Server Limits When properly installed, the Vision VX can support the following concurrent functions: • Streaming to ten different VS/VC clients • Remotely import up to four movies from VS/VC clients (no movies playing) • Remotely import up to two movies from VS/VC clients (two movies playing) Determining your Vision’s IP Address To view the IP network address of your Vision 1. Select Setup 2. Select Utilities 3. Select System Information 4. The IP address is located on the last line in the format 0.0.0.0 Controlling Vision from Your Computer The exact same Vision user interface that is displayed on your TV can be accessed from any computer on your local network provided that it is capable of running the Adobe Flash 9 multimedia player available for free from: http:// www.adobe.com/shockwave/download/. Connecting to Vision’s Network Shares You can access your Vision’s network shares using it’s IP address or its Server Name from any computer on your local network provided that it is capable of mounting CIFS/SMB shares. To connect to your Vision’s network shares from your PC 1. Select Start->Run and enter the IP address or Server Name of your Vision. Example: \\192.168.0.100 or \\vision-vs. 2. Vision share for your task: • CONTENT - Access Vision’s music files (read only) • COVERS - Used to import your own DVD and CD cover art for use on the Vision (read/write) • IMPORT - Used to import your music, movies, and videos into your Vision (write only) • PHOTOS - Used to import your photos onto and delete photos from your Vision (read/write) • PLAYLISTS - Access Vision’s music playlists for backup purposes (read only) Sharing Vision’s Music with FireBall Media Servers Vision’s music library can be accessed from most FireBall Media Servers on your network using the same technique that allows you to share music between two FireBall media servers. Follow the steps that came with your FireBall product for connecting to another FireBall server and select the name of your Vision from the list of available servers. Supported FireBall Media Servers include: E2 Series, DVDM Series, MP-200 Series, MX Series, AVX Series, ZP Series and FP Series. Note: Vision’s movies, photos, and Rhapsody are not available to connected FireBalls. To control to your Vision from your PC 1. Determine the IP address of your Vision (see above) 2. Open your web browser on your computer and enter the address of your Vision. Example: 192.168.0.100 3. The Vision user interface will be displayed in a few seconds, then you can control every aspect of Vision using your keyboard and mouse. Escient Vision VS & VC User’s Guide Version: M51003-02A3 32 Supported File Types Accessing your iPod Music with a Vision Media Server Vision supports the following audio and video file formats: Audio File Format Import Encode MP3 Yes Yes FLAC Yes Yes AAC (non Apple DRM) Yes No WAV Yes Yes Apple Lossless Yes No WMA Yes No Video File Format Import ISO (encrypted MPEG2 DVD) Yes ISO (Unencrypted MPEG2 DVD) Yes VOB (Unencrypted MPEG2 DVD) No TS (raw transport stream) No MP4 (MPEG4 part 2/h.263) Yes* MP4 (MPEG4 part 10/h.264) *may be included in a future software release No Sharing FireBall Music with your Vision Media Server Vision can access music stored on a FireBall Media server over your network and merge it into its local music library. To connect to a FireBall Music Server 1.Select Network 2.Select Connect to Server 3.Select the name of the FireBall Music Server that you want to connect to 4.Your FireBall music will now be merged into your local Vision music library Escient Vision VS & VC User’s Guide Version: M51003-02A3 Vision can access all of the music stored on your iPod (including DRM protected music you purchased from the iTunes Music store) by using the FireBall FP-1 Music Server (with integrated iPod dock) over your network. The iPod music gets merged with your local Vision music library so you can access all of your music together. To connect to a FireBall FP-1 Music Server with iPod connected Insert your iPod into your FP-1 and make sure your FP-1 is connected to the same network as your Vision Media Server. 1.Select Network 2.Select Connect to Server 3.Select the name of the FireBall FP-1 Music Server that you want to connect to 4.Your iPod music will now be merged into your local Vision music library Escient Early Detection Monitoring System (EDMS) The VS Series Vision Media Server includes a feature called Escient Early Detection Monitoring that monitors the condition of Vision’s internal hard drives. In the unlikely event of a problem with one of its drives, your Vision will notify Escient Tech Support and your Escient dealer, using its Internet connection. The Vision VS series actually contains a pair of identical internal had drives that are configured in what is called a “RAID 1” configuration. RAID 1 means that data is written to both drives simultaneously so that you always have an up to date backup should you encounter a problem with one of them. If Vision encounters a problem with one of your drives you should not use it any further as you don’t want to risk having a problem with the other drive. If there is a problem with both drives, all of your data could be lost. Always follow the on screen instructions if the EDMS detects a potential problem with your Vision Media Server. 33 Service and Support Finding your Vision serial number The serial number for your Vision product can be found on the back panel of the device. Contacting Escient Technical Support Escient’s award winning support staff is available to assist you should you have any questions or problems with your Vision. Phones are staffed Monday through Friday from 8:00am to 6pm Eastern Standard Time. • Phone: 800-372-4368 Press “2” for Sales, or “3” for Support • Fax: 317-616-6790 • Internet: http://www.escient.com • Email: mailto://[email protected] Please have the following information ready for the Escient Customer Support technician: • Product Serial Number (on the back of the unit or under Setup/Utilities/System Information) • Model Number (printed on the front of the unit) • Date and Place of Purchase Escient Vision VS & VC User’s Guide Version: M51003-02A3 Important Care and Cleaning Information Using Connectors and Ports Never force a connector into a port. Check for obstructions on the port. If the connector and port don’t join with reasonable ease, they probably don’t match. Make sure that the connector matches the port and that you have positioned the connector correctly in relation to the port. Keeping Vision Within Acceptable Temperatures Operate Vision in a place where the temperature is always between 0º and 40º C (32º to 104º F). Do not enclose Vision in a shelf or rack without proper ventilation. Always maintain sufficient airflow on all sides of the chassis. Keeping the Outside of Vision Clean To clean Vision, unplug the power cord and all cables. Then use a soft, slightly damp, lint-free cloth. Avoid getting moisture in openings. Don’t use window cleaners, household cleaners, aerosol sprays, solvents, alcohol, ammonia, or abrasives to clean Vision. 34 Specifications Video Specifications Analog Video • Composite and S-Video (Interlaced) • Component YPbPr (Interlaced and Progressive) • Resolution: 480 (NTSC), 575 (PAL) • NTSC-M (North America, Taiwan), • NTSC-J (Japan), • PAL-B, D, G, H, I (Europe, Asia), • PAL-M (Brazil), PAL-N (Uruguay, Paraguay) • PAL-Nc (Argentina).Audio Specifications • Macrovision 7.1.L1 or Macrovision 1.2 AGC with 525p and 625p progressive scan output Digital Video • DVI and HDMI 1.2a compliant • HDMI 1.3 switching • Scalable output bandwidth: 25-165 megapixels • HDCP 1.1 compliant • HDMI HD Audio • Resolution: from 480p to 1080p Audio Specifications • Intel High Definition Audio Specification Rev.1.0 Compliant • 44.1K/48K/96K/192KHz DAC Independent Sample Rate • 48K/192KHz Independent Sample Rate • DAC: 24-bit, 192KHz Samples - 100dB S/N Ratio • ADC: 24-bit, 192KHz Samples - 95dB S/N Ratio • 8-Channels of DAC Support 16/20/24-bit PCM Format for 7.1 Audio Solution • 16/20/24 bit S/PDIF TX Supports 24-bit, 44.1K/48K/96KHz Samples • 16/20/24 bit S/PDIF RX Supports 24-bit, 44.1K/48K/96KHz Samples Physical Specifications • VS Series = 17.375 inches (W) x 4.625 inches (H) x 11.875 inches (D) • VS Series = 43.8 cm (W) x 12.2 cm (H) x 28.6 cm (D) • VC Series = 15.313 inches (W) x 2.25 inches (H) x 13.25 inches (D) • VC Series = 39 cm (H) x 6.8 cm (H) x 34.8 cm (D) Escient Vision VS & VC User’s Guide Version: M51003-02A3 Power Consumption • VS Series: 60W max • VC Series: 35W max 3rd Party Certifications • FCC: US Part 15, Class B • NTSC Video Output: NTSC RS-170A • cETL Listing • Conforms to: UL STD 6500-2000 • Certified to: CAN/CSA STD E60065-00 • CE FCC Part 15, Subpart B Class B Note: This equipment has been tested and found to comply with the limits for a Class B digital device, pursuant to Part 15 of the FCC Rules. These limits are designed to provide reasonable protection against harmful interference in a residential installation. This equipment generates, uses, and can radiate radio frequency energy and, if not installed and used in accordance with the instructions, may cause harmful interference to radio communications. However, there is no guarantee that interference will not occur in a particular installation. If this equipment does cause harmful interference to radio or television reception, which can be determined by turning the equipment off and on, the user is encouraged to try to correct the interference by one or more of the following measures: • Reorient or relocate the receiving antenna. • Increase the separation between the equipment and receiver. • Connect the equipment into an outlet on a circuit different from that to which the receiver is connected. • Consult the dealer or an experienced radio TV technician for help. • Shielded cables must be used with this unit to ensure compliance with the Class B FCC limits. 35 Vision FAQ Movies Q&A 10. Will it support a Blu-Ray/HD-DVD changer when one is available? 1.Can you import standard DVDs? a.Yes, DVDs that you own may be imported using the front panel DVD/CD Player. a.Yes. When a Blu-Ray/HD-DVD changer that supports HDMI a/v and control connections becomes available, the Vision will support it. 2.Are DVDs converted or compressed when you import them? 11. Can I play DVDs other than Region 1 discs? a.No, the DVD is imported in its entirety and stored in its original MPEG-2 format. a.The VS and VC players are set for the region that they are sold in. 3.Can I import my home movies? 12. Can I change the MPAA rating so my kids can’t watch a movie? a.Yes. If you have created a standard DVD from your home video or movies, you can import them using the front panel DVD drive. You may also import MPEG2 video in ISO format over your home network. 4.Are there parental controls for movies? a.Yes. MPAA ratings are supported for all movies. 5.How many video streams can I play at once from a VS server to VS/ VC clients? a.Yes. All metadata for music and movies is user editable from the TV interface or from your computer using a web browser. Music Q&A 1.Can you import CDs? a.Yes, using the front panel drive of a VS or VC client. a.5 2.Can you create CD-Rs? 6.How many video streams can I play at once off of a VX server to VS/ VC clients? 3.Does Vision Support Internet Radio? a.10 7.Can you play or import HD-DVDs or Blu-Ray DVDs? a.No. 8.Can you import from the VS or VC directly onto the VX server? a.Yes, using the front panel drive. 9.How many movies does each Vision product store? a.The VS-100 stores up to 100 movies, the VS-200 stores up to 200 movies, and the VX-600 stores up to 600 movies based on an estimated average of 5GB per movie (and no stored music). The actual total number of movies stored on the Vision models will vary depending on average movie size. Escient Vision VS & VC User’s Guide Version: M51003-02A3 a.No, The Vision currently does not allow creating “mix” or custom CD-R discs. a.Internet Radio is still available on Fireball series. Rhapsody Channels (streaming radio stations) is available on the Vision series. 4.Can you connect your iPod to the Vision? a.Using the Fireball FP-1 with integrated iPod dock, the Vision VS and VC models can access anything on your iPod over your home network. 5.Can you connect iTunes to the Vision? a.Yes, iTunes can use the Vision as it’s source for music files and sync Vision music to your iPod. 6.What audio formats are supported? a.WAV, MP3, AAC, WMA, and FLAC 36 Photo Related Q&A 1.What image formats are supported? a.JPEG, GIF, and PNG 2.Why don’t individual photos imported into /Photos appear under Photos/Slideshow? a.You have to import a folder with images inside because the folder name is used for the name of the Slideshow. Without a folder, there is no Slideshow to organize the individual photos under. Networking Q&A 1.What kind of network do you recommend for Vision? a.A Gigabit switch (not a router) and Cat5e or Cat6 cabling. b.A single run of Cat5e/6 cable should never exceed 100 meters. 2.Can you sync movies and music from one Vision to another? a.No. 3.Are software updates free or is there a fee? a.Escient software updates and data lookup services remain free of charge. 4.How does the Vision work with the Fireball line of products? a.Vision VS and VC clients can connect to a Fireball server to access it’s hard drive based music content. b.FireBall products can also access music stored on the Vision servers. 5.Can I use any standard network storage device or NAS with the Vision clients to play media over my network? 6.Why does the CONTENT directory on my VX not show my imported movies? a.Vision is a closed system when it comes to storing your personal DVD movies. Once they are on the Vision system, you can not copy them off the Vision. For this reason, imported ISO movies will not appear in the CONTENT directory. Only imported Music will appear. Technical Q&A 1.What is the video bandwidth of Vision? a.Using standard DVD/MPEG-2 specifications, it is 5Mb/s and bursts to 8-9Mb/s. 2.Are there rack mount options for Vision products? a.Yes, Middle Atlantic will supply a rack adapter kits for the VS and VC series products. http://www.middleatlantic.com/ 3.What is the front panel USB port for? a.You can connect a standard USB keyboard to be used for editing text. 4.Will it output a 1080p video signal? a.Yes, it will up-convert video to 1080p over HDMI. 5.Are all video outputs active at the same time? a.Yes if you set HDMI to 480p and composite, s, and component to 480i. This is the default mode from the factory. 6.Can I add more storage space when I run out? a.Yes. The VS and VC series products can access one or more VX-600 servers on the network. Adding multiple VX-600s to your network will increase your Vision storage space. a.No, you must use the Vision VX-600 NAS because it provides RAID 5 redundancy for your music, movies, and photos, Escient Early Detection Monitoring System to alert you of possible drive failures, and runs the software which allows Vision Media Management and the ability to access multiple Vision servers to share media over the network. Escient Vision VS & VC User’s Guide Version: M51003-02A3 37 Escient End User License Agreement You have acquired Escient’s Vision System product (“Vision System”) that includes software and other items licensed by Escient, a division System of Digital Networks North America, Inc. (“Escient”) from various third parties and suppliers (collectively, “Escient’s suppliers”). Those installed products of Escient’s suppliers, as well as associated media, printed materials, and “online” or electronic documentation (“Software”) are protected by copyright laws and international copyright treaties, as well as other intellectual property laws and treaties. The Software is licensed, not sold and is owned by Escient and the respective Escient supplier. IF YOU DO NOT AGREE TO THIS END USER LICENSE AGREEMENT (“EULA”), DO NOT USE THE VISION SYSTEM. INSTEAD, PROMPTLY CONTACT THE SELLER FOR INSTRUCTIONS ON RETURN OF THE VISION SYSTEM FOR A REFUND. BY SIGNING BELOW OR BY USING THE VISION SYSTEM, YOU AGREE TO THIS EULA (OR RATIFY ANY PREVIOUS CONSENT TO THIS EULA). 1. GRANT OF LICENSE. The license granted herein is a personal, non-exclusive and non-transferable right subject to the restrictions herein. If you do not comply with the terms of this EULA, it will terminate immediately, your right to use the Vision System will end and you must return the Vision System to the Seller or destroy it. This EULA grants you the following rights to the Software and all other rights are reserved by Escient and its software suppliers. You may use the Software only on the Vision System. 2. NOT FAULT TOLERANT. THE SOFTWARE IS NOT FAULT TOLERANT. ESCIENT HAS INDEPENDENTLY DETERMINED HOW TO USE THE SOFTWARE IN THE VISION SYSTEM, AND ESCIENT’S SUPPLIERS HAVE RELIED UPON ESCIENT TO CONDUCT SUFFICIENT TESTING TO DETERMINE THAT THE SOFTWARE IS SUITABLE FOR SUCH USE. 3. NO WARRANTIES FOR THE SOFTWARE. THE SOFTWARE IS PROVIDED “AS IS” AND WITH ALL FAULTS. THE ENTIRE RISK AS TO SATISFACTORY QUALITY, PERFORMANCE, ACCURACY, AND EFFORT (INCLUDING LACK OF NEGLIGENCE) IS WITH YOU. ALSO, THERE IS NO WARRANTY AGAINST INTERFERENCE WITH YOUR ENJOYMENT OF THE SOFTWARE OR AGAINST INFRINGEMENT. IF YOU HAVE RECEIVED ANY WARRANTIES REGARDING THE VISION SYSTEM OR THE SOFTWARE, THOSE WARRANTIES DO NOT ORIGINATE FROM, AND ARE NOT BINDING ON, ESCIENT’S SUPPLIERS. 4. COPYRIGHT. The Vision System is to be used only in accordance with the law. The system and each feature of the system is designed for legitimate uses only by you, the consumer, and not designed to circumvent the law or any technological means to control access to content. You are responsible for assuring that your use of the Vision System does not violate existing state or federal laws. Escient respects the rights of copyright holders and invites you to learn about the rights of consumers, artists, copyright holders and other parties that may claim rights to digital content. If you have any questions about that subject. See, http://www. law.cornell.edu/wex/index.php/Copyright; http://fairuse.stanford.edu Copyright law is an evolving set of rules as courts interpret how they should be applied to new situations and new technologies. It is the responsibility of each user of a product, such as the Vision System, to comply with the law and, here, to use their Vision System accordingly. Copyright law comes from a number of different sources, including but not limited to, the US Copyright Act and various provision Systems that it contains, such as the Digital Millennium Copyright Act (the “DMCA”) as well as from judge-made law interpreting the U.S. Constitution, the Bill of Rights, and the various statutes applicable to each situation. Other portions of the Copyright Act such as the Audio Home Recording Act may also affect your use of the Vision System. Various court decisions impact your rights as a consumer to enjoy entertainment content, including decisions relating to “fair use,” typically applicable to certain educational, critical, and analytic uses. The fair use doctrine has also been held to apply to copying in the home under certain limited Escient Vision VS & VC User’s Guide Version: M51003-02A3 38 circumstances (as in the so-called Sony Betamax case with respect to video taping of broadcast television System programs for the purpose of time-shifting). The application of this decision as well as subsequent decisions in this area and their application to modern technology is continually evolving. Future rulings and interpretations relating to copyright law cannot be effectively predicted, but keeping abreast of these developments is advised as it is important in making informed decisions about use of your Vision System. If you have a reasonable belief that you have the right to copy and use such content under the “fair use” doctrine, that you have permission under another theory, or that you are otherwise authorized to do so, then that belief is what you will be relying on in using the Vision System and you do so at your own risk. By using the Vision System product you acknowledge and agree that it is your responsibility to comply with the law and to determine which content, and in what manner, you have the right to view, store, manage and enjoy particular content on your Vision System. For example, if you believe that you are entitled under “fair use” principles to, copy content on a DVD to the hard drive for convenient use in your home so long as the DVD is lawfully in your possession with a right to view at the time of use and such DVD is not being used on another DVD player at the same time and the content owner is not otherwise being harmed by such use, then your use of the Vision System should be made in accordance with those principles. Consistent with that belief, when you no longer have the DVD in your possession, or when some other factor that led you to believe it was “fair use” is no longer valid, then destroy the copy on the hard drive. If you do not believe that the law permits use of the Vision System to store content from a DVD (or other media) on the hard drive, then do not use the Vision System to do so. In this End User License Agreement Escient is not advocating a position on the applicability of the fair use doctrine or other theories discussed here; it is providing a tool for the user and is pointing out that it is the user’s responsibility to determine when it can use certain features on the Vision System that involve copying of content. 5. NO LIABILITY FOR CERTAIN DAMAGES. EXCEPT AS PROHIBITED BY LAW, ESCIENT AND ITS SOFTWARE SUPPLIERS SHALL HAVE NO LIABILITY FOR ANY INDIRECT, SPECIAL, CONSEQUENTIAL OR INCIDENTAL DAMAGES ARISING FROM OR IN CONNECTION WITH THE USE OR PERFORMANCE OF THE SOFTWARE. THIS LIMITATION SHALL APPLY EVEN IF ANY REMEDY FAILS OF ITS ESSENTIAL PURPOSE. EXCEPT AS MAY BE PROHIBITED BY LAW, IN NO EVENT WILL ESCIENT’S SUPPLIERS OR ESCIENT BE LIABLE TO YOU FOR ANY AMOUNTS ABOVE YOUR PURCHASE PRICE FOR THE VISION SYSTEM. EACH ESCIENT SOFTWARE SUPPLIER IS AN INTENDED CONTRACTUAL BENEFICIARY OF THIS EULA. 6. LIMITATIONS ON REVERSE ENGINEERING, DECOMPILING AND DISASSEMBLY. You may not reverse engineer, decompile, or disassemble the Vision System or Software, except and only to the extent that such activity is expressly permitted by applicable law notwithstanding this limitation. 7. SOFTWARE TRANSFER ALLOWED BUT WITH RESTRICTIONS. You may permanently transfer rights under this EULA only as part of a permanent sale or transfer of the Vision System, and only if the recipient agrees to this EULA. You may not modify, sublicense or create derivative works based on the Software and you may only use the Software in connection with the Vision System. 8. EXPORT RESTRICTIONS. You acknowledge that the Software, or any part thereof, or any process or service that is the direct product of the Software (the foregoing collectively referred to as the “Restricted Components”) are of U.S. origin. You agree to comply with all applicable international and national laws that apply to these products, including the U.S. Export Administration Regulations, as well as end-user, end-use and destination restrictions issued by U.S. and other governments. 9. DIGITAL RIGHTS MANAGEMENT/SECURITY & CHANGES TO THE VISION SYSTEM. In order to protect the integrity of certain third party content, Escient or its suppliers may provide for software security related updates that will be automatically downloaded and installed on your computer. Such security related Escient Vision VS & VC User’s Guide Version: M51003-02A3 39 updates may impair the software (and any other software on your Vision System which specifically depends on the software) including disabling your ability to copy and/or play “secure” or other designated content, i.e. content protected by digital rights management. In such an event, Escient and/or its suppliers shall use reasonable efforts to post notices on Escient’s web site explaining the security update and providing instructions to end-users for obtaining new versions or further updates of the Software. ESCIENT MAY BE REQUIRED TO, OR MAY IN ITS DISCRETION DECIDE TO, ADD, DELETE, MODIFY OR OTHERWISE CHANGE CERTAIN FEATURES OR FUNCTIONALITY OF THE VISION SYSTEM AND MAY DO SO VIA AUTOMATIC UPDATES OR OTHERWISE SO LONG AS IT IS PERMITTED TO MAKE SUCH CHANGES UNDER THE LAW. Escient Vision VS & VC User’s Guide Version: M51003-02A3 40 Third Party End User License Agreements Gracenote® End User License Agreement USE OF THIS PRODUCT IMPLIES ACCEPTANCE OF THE TERMS BELOW. This product contains technology and data from Gracenote of Emeryville, California (“Gracenote”). The technology from Gracenote (the “Gracenote Embedded Software”) enables this product to do disc identification and obtain music-related information, including name, artist, track, and title information (“Gracenote Data”), which is included on the Gracenote Database (the “Gracenote Database”). You agree that you will use Gracenote Data, the Gracenote Database, and Embedded Software for your own personal non-commercial use only. You agree that you will access Gracenote Data only by means of the standard end user functions and features of this product. You agree not to assign, copy, transfer or transmit the Embedded Software or any Gracenote Data to any third party. YOU AGREE NOT TO USE OR EXPLOIT GRACENOTE DATA, THE GRACENOTE DATABASE, OR GRACENOTE COMPONENT, EXCEPT AS EXPRESSLY PERMITTED HEREIN. You agree that your non-exclusive license to use the Gracenote Data, the Gracenote Database, and Embedded Software will terminate if you violate these restrictions. If your license terminates, you agree to cease any and all use of the Gracenote Data, the Gracenote Database, and Gracenote Embedded Software. Gracenote reserves all rights in the Gracenote Data, Gracenote Database, and Gracenote Embedded Software, including all ownership rights. You agree that Gracenote may enforce its rights under this Agreement against you directly in its own name. The Embedded Software and each item of Gracenote Data are licensed to you “AS IS.” Gracenote makes no representations or warranties, express or implied, regarding the accuracy of any Gracenote Data. Gracenote reserves the right to delete data or to change data categories in any Data updates and for any cause that Gracenote deems sufficient. No warranty is made that the Embedded Software is error-free or that functioning of Escient Vision VS & VC User’s Guide Version: M51003-02A3 the Embedded Software will be uninterrupted. Gracenote is not obligated to provide you with any new enhanced or additional data types or categories that Gracenote may choose to provide in the future. GRACENOTE DISCLAIMS ALL WARRANTIES EXPRESS OR IMPLIED, INCLUDING, BUT NOT LIMITED TO, IMPLIED WARRANTIES OF MERCHANTABILITY, FITNESS FOR A PARTICULAR PURPOSE, TITLE, AND NON-INFRINGEMENT. GRACENOTE DOES NOT WARRANT THE RESULTS THAT WILL BE OBTAINED BY YOUR USE OF THE GRACENOTE COMPONENT OR ANY GRACENOTE SERVER. IN NO CASE WILL GRACENOTE BE LIABLE FOR ANY CONSEQUENTIAL OR INCIDENTAL DAMAGES OR FOR ANY LOST PROFITS OR LOST REVENUES. Macrovision U.S. Patent Information This product incorporates copyright protection technology that is protected by U.S. patents and other intellectual property rights. Use of this copyright protection technology must be authorized by Macrovision, and is intended for home and other limited viewing uses only unless otherwise authorized by Macrovision. Revers engineering of disassebmbly is probibited. U.S. Patent Nos. 6,836,549; 6,381,747; 7,050,698; 6,516,132; and 5,583,936. 41