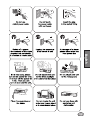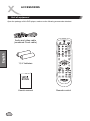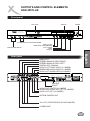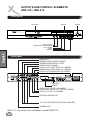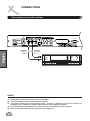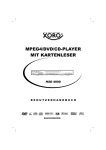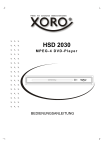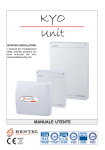
1
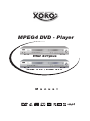
MPEG4 DVD - Player HSD 401plus HSD 310 / HSD 415 M a n u a l English CONTENTS FEATURES 57 SAFETY PRECAUTIONS 58 ACCESSORIES 60 OUTPUTS AND CONTROL ELEMENTS HSD 400 plus l DVD-Player Front panel Back panel 61 61 61 61 OUTPUTS AND CONTROL ELEMENTS HSD 310 / HSD 415 l DVD-Player Front panel Back panel Remote Control 62 62 62 62 63 QUICK START l Remote control l Battery advise 64 64 64 CONNECTIONS l Connecting to a TV l Connecting to an Audio-System l Connecting to the 5.1 Audio-System (not available on HSD 310) 65 65 66 67 PLAYBACK l Remote control functions l Buttons description l Basic playback 68 68 69 70 FUNCTIONS l Special functions l Karaoke (only model HSD 401 plus) l Special DVD functions l Multimedia playback l JPEG Picture Display l Function setup 71 71 71 71 72 72 73 DISC INFORMATION l Recommendations 75 75 NOTES ON SERVICE l Troubleshooting l Specification 76 76 77 56 FEATURES File formats compatibility list: Video: MPEG1(SVCD, VCD)/MPEG2(DVD)/MPEG4 Audio: WMA/CD/MP3 JPEG Picture CD Kodak Picture CD l Media formats compatibility list: CD-RW, DVD-R(W), DVD+R(W) l Integrated surround-decoder (Dolby Digital/MPEG 5.1) with 5.1 analog outputs (not on model HSD 310) l High quality picture provided YUV connection with Progressive Scan ability l PAL/NTSC/Multi l Wide screen and Pan&Scan options 4:3 Pan & Scan / 4:3 Letterbox for standart TV set 16:9-widescreen l Full DVD functionality l Karaoke (only on model HSD 401plus) l Wide range of connections: Coaxial and optical digital outputs (optical output not on model HSD 310) SCART S-Video VGA (not on model HSD 310) Composite video YUV Dolby Digital/MPEG 5.1 decoded analog output (not on model HSD 310) Analog stereo English l NOTES: „Dolby“ and Doppel-D-Symbol are the trademarks of Dolby Laboratories. Made with licence of Dolby Laboratories. © Dolby Laboratories Inc. All rights reserved 57 SAFETY PRECAUTIONS Marking of safety The lightning flash with an arrowhead symbol within an equilateral triangle is intended to alert the user to the presence of uninsulated "dangerous voltage" within the product's enclosure that may be of sufficient magnitude to constitute a risk of electric shock to persons. The exclamation point within an equilateral triangle is intended to alert the user to the presence of important operating and maintenance (servicing) instructions in the literature accompanying the appliance. English WARNING: DO NOT EXPOSE THIS APPLIANCE TO RAIN OR MOISTURE, DUE TO THE HIGH RISK OF FIRE OR ELECTRIC SHOCK, DO NOT OPEN THE CABINET DANGEROUS HIGH VOLTAGES ARE PRESENT INSIDE THE ENCLOSURE. ONLY QUALIFIED SERVICE PERSONNEL SHOULD ATTEMPT THIS. CAUTION: This Digital Video Disc Player employs a Laser System. To prevent direct exposure to the laser beam, do not try to open the enclosure. Visible laser radiation when open and interlocks defeated. Use of controls or adjustments or performance of procedures other than those specified herein may result in hazardous radiation exposure. DO NOT STARE INTO BEAM. To ensure proper use of this product, please read this owner’s manual carefully and retain for future reference. Should the unit require maintenance, contact an authorized service location, or contact us. Only qualified service personnel should remove the cover. Basic safety requirements Do not open the cabinet 58 Do not use the apparatus near the water Unplug the apparatus during the lightning storms or when unused for a long period English 59 ACCESSORIES Unit of equipment Open the package of this DVD player, make sure the following accessories attached: English Audio and video cable (combined Cinch cable) 1,5 V batteries Users’s manual 60 Remote control OUTPUTS AND CONTROL ELEMENTS HSD 401PLUS Front panel DISC TRAY DISPLAY POWER HSD 401 PLUS DVD/CD/MP3 PLAYER OPEN/CLOSE 1 MIC 2 MIC VOL I/P PLAY/PAUSE STOP PREV NEXT ECHO VOLUME AND HALL ADJUSTING KNOBS MICROPHONE INPUTS OPEN / CLOSE INTERLACED / PROGRESSIVE PLAY / PAUSE STOP SEARCH English Rear panel VIDEO OUT STEREO AUDIO OUTPUT RIGHT STEREO AUDIO OUTPUT LEFT DIGITAL OUT, COAXIAL AUDIO OUT FRONT RIGHT (5.1 MODE) SURROUND AUDIO RIGHT (5.1 MODE) AUDIO OUT SUBWOOFER (5.1 MODE) AV VGA OUTPUT HSD 401 PLUS VGA OUT SCART AUDIO OUT CENTER (5.1 MODE) SURROUND AUDIO OUT LEFT (5.1 MODE) AUDIO OUT LEFT (5.1 MODE) OPTICAL DIGITAL OUT YUV OUT (PROGRESSIVE SCAN ENABLED) S-VIDEO OUT 61 OUTPUTS AND CONTROL ELEMENTS HDS 310 / HSD 415 Front panel DISC TRAY DISPLAY POWER HSD 415 DVD/CD/MP3 PLAYER OPEN/CLOSE I/P PLAY/PAUSE STOP PREV NEXT English OPEN / CLOSE INTERLACED / PROGRESSIVE PLAY / PAUSE STOP SEARCH Rear panel VIDEO OUT STEREO AUDIO OUTPUT RIGHT STEREO AUDIO OUTPUT LEFT DIGITAL OUT, COAXIAL AUDIO OUT FRONT RIGHT (5.1 MODE) SURROUND AUDIO RIGHT (5.1 MODE) AUDIO OUT SUBWOOFER (5.1 MODE) AV VGA OUTPUT HSD 415 VGA OUT SCART AUDIO OUT CENTER (5.1 MODE) SURROUND AUDIO OUT LEFT (5.1 MODE) AUDIO OUT LEFT (5.1 MODE) OPTICAL DIGITAL OUT YUV OUT (PROGRESSIVE SCAN ENABLED) S-VIDEO OUT Note: 5.1 connectors not available in model HSD 310. 62 OUTPUTS AND CONTROL ELEMENTS OF THE DVD-PLAYER Remote control 1 15 2 16 3 17 18 19 1. 2. 3. 4. 5. 6. 7. 8. 9. 10. POWER MUTE NUMBER PAD TITLE AUDIO MENU STOP PLAY PAUSE/STEP A-B 11. PROG 12. REPEAT 20 5 6 21 22 23 24 25 7 26 8 27 9 10 ANGLE SHUFFLE OPEN/CLOSE SETUP PBC NTSC/PAL SEARCH 20. CLEAR 21. PHOTO MODE 28 11 12 13. 14. 15. 16. 17. 18. 19. 29 30 13 14 31 22. SUBTITLE 23. RETURN 24. LEFT, RIGHT UP, DOWN 25. ENTER 26. DISPLAY 27. SLOW 28. FAST FF/FR 29. SKIP 30. VOL +/-: 31. ZOOM 63 English 4 Stand by on/off Sound off Number buttons Title menu Audiotrack select Access to the menu of DVD Stop the playback of disc Start the playback of disc Pause the playback of disc Select and repeat segment from A poin to B Programm Repeat of the chapter / title / folder Camera angle selection Random play Open/close the tray DVD-player set up menu Playback control (VCD) TV standart selection Search on time or number of a track Clear number pad input Picture show mode for JPEG, Kodak picture CD Subtitle select Back in the menu or to PBC Moves the cursor to the selected item Choose of selected item On-screnn display Slow play Fast play Skip the chapter Volume control To zoom video and pictures QUICK START REMOTE CONTROL Remote control Insert the batteries in the remote control 1 Operating instructions Point the remote control at the IR Open the cover Within about 7 m with angle about 30 grade in the both direction 2 Remote control Put the batteries NOTES: English Do not expose the IR of the dvd player to a strong light source or direct sunlight. Make sure to match - and + NOTES ON BATTERIES: 3 Close the cover NOTES: l Direct the remote control at the infrared reciever (IR) of the player l Do not drop the remote control l Do not spill water or put anything wet on it l Do not disassemble the remote control 64 Improper use may cause battery leakage and corrosion. Please follow the instructions below: l Do not insert the batteries in the wrong direction l Do not use different types of batteries together l If you do not use the remote control for a long time, remove the batteries l If the remote control operates not correctly, replace the batteries l If battery leakage occurs, wipe the battery liquid from the battery compartment, then insert new batteries l Make sure that the used batteries are disposed properly according to you local regulations. CONNECTIONS Connecting to a TV YUV out Use this signal source to get best picture quality. AV VGA OUTPUT HSD 401 PLUS STEREO OUT LEFT STEREO OUT RIGHT S-VIDEO OUT VIDEO OUT NOTES: l l l l Turn off all devices before connecting. Select CVBS, S-Video, SCART, YUV or VGA output according to different TVs. Follow the sketch above to connect the devices with selected output. Refer to setup instructions on the page 18,19. 65 English VGA OUT (NOT ON MODEL HSD 310) SCART CONNECTIONS Connecting to an audio system AV VGA OUTPUT HSD 401 PLUS English STEREO OUTPUT RIGHT STEREO OUTPUT LEFT NOTES: l l l l l 66 Please refer to the manual of the reciver or amplyfier Turn off the power of all devices before connecting The player output has a wide dynamic range. Be sure to adjust the volume of reciever to a moderate level. Otherwise, a sudden high volume may damage the speakers Turn off the audio system before you connect or disconnect power cord of the player Refer to the setup instructions of the player on the pages 19 CONNECTIONS Connecting to the amplifier with 5.1 channel sound output* VIDEO AV VGA OUTPUT HSD 401 PLUS FRONT (L) SURROUND (L) English AV-RECIEVER CENTER SUBWOOFER SURROUND (R) FRONT (R) SUBWOOFER FRONT LEFT FRONT RIGHT CENTER SURROUND LEFT SURROUND RIGHT See notes on the page 12, see setup instructions on the page 19 * 5.1 connection not availabel on model HSD 310 67 PLAYBACK Remote control functions Direction buttons (áâßà) and ENTER Press the Direction buttons to move the cursor to the selected item, then press the ENTER l RETURN button For SVCD or VCD2.0 discs, in PBC status, press this button to return to the playback l PAUSE/STEP button l CLEAR button Press this button to clear the input digits (displays on the screen) when programming l PLAY button This button starts the playback of the CD/DVD English l Number pad When playing a VCD/SVCD disc, press the number buttons directly to play your favorite track in PBC off status. If the track number is from 1 to 9, you can directly press the number. If the track number is more than 9, you should use button 10+ and the other number buttons together to select the track, for example: for track 25, first, press the 10+ button twice, then press button 5. l STOP button When playing a DVD disc, press this button the first time during playback, the DVD player memorizes the location where you stopped (press PLAY to resume playback from the memorizedpoint). Press this button again to stop the disc (then press PLAY to start playing from the beginning of the disc). 68 Press this button for the first time to pause, then each time you press the PAUSE/STEP button, the picture advances one frame. For CD, MPEG4 or MP3, this button is only used for PAUSE function. l FAST (<< / >> ) buttons Press the FAST button during playback, the playback speed changes. Press PLAY to resume the normal speed. l SLOW button For slow motion. Press this button repeatedly to change the speed. Press PLAY to resume the normal speed. PLAYBACK Buttons description l SKIP buttons l PROG button Press SKIP to select the next (previous) chapter (for DVD)or track (for SVCD / VCD / CD / MP3 / MPEG4). (uu|) or (|tt). For VCD or SVCD discs, press this button, the program menu appears on the screen, press the number buttons to enter the chapter / track number you want to program, the programmed tracks can be up to 99 tracks. Press the PLAY to start the programmed playback.Press the CLEAR button to cancel the wrong input digits. If you want to cancel program, then press the PROG button again. l ZOOM button Press the ZOOM button during normal playback to zoom a picture,press the Direction buttons to shift the zoom point. Press this button repeatedly to change the magnification levels. l I/P button For JPG files, this button should be used with the FAST buttons to fulfill the zoom Function. Press the A-B button at the beginning of the segment (point A) you want to play repeatedly, then press it again at the end of the segment (point B), the selected segment can be played Repeatedly. Press it the third time to resume normal playback. For MP3 and JPG files, the button is invalid. l REPEAT button For DVD discs,press this button to repeat the title or chapter. For VCD or SVCD discs, press this button to repeat the track. l SEARCH button Use to go to the needed position of the disc. .l DISPLAY button Press this button to display the current playback information on the screen. 69 English l A-B button I/P button is used for switching between Progressive Scan and Interlaced display. If the player is switched to Progressive Scan by pressing I/P button, the DVD player switches to YUV or VGA output and to Progressive Scan mode. By pressing I/P key in Progressive Scan mode, the player deactivates Progressive Scan playback and switches to the output previously used. You should use the I/P button only if the DVD player is connected via YUV or VGA to a device. If the I/P button is pressed by accident and you do not get a picture, press the I/P key until you get a picture on your screen. PLAYBACK Basic playback 1. 2. 3. 4. Press the POWER button on the front panel of the player Press the OPEN/CLOSE button on the player or on the remote control Put a compatible disc in the opened tray Press OPEN/CLOSE button again. ATTENTION: Do not push the tray with the hand. You may damage it! 5. Use playback control buttons on the player to SKIP or PAUSE. Or use the buttons of the remote control to operate: English l l l l SKIP SEARCH SLOW MOTION ZOOM See more about on the pages 17, 18, 19, 20. NOTES: l l l 70 Do not move the DVD player during playback If you do not use the player for a long time unplug it For the PBC for VCD please refer to the following pages FUNCTIONS Special functions Special DVD-functions l PBC-Playback l MENU button For VCD 2.0 or SVCD discs, press this button to set the PBC functions. Press this button to enter the DVD menu. (If it is supported by the discs.) In the PBC display of the SVCD / VCD2.0, if the PLAY button is pressed, the Player will enter PBC playback status.If the PBC is turned off, the disc will be played as VCD1.0/1.1. l TITLE button When PBC is set to ON, the menu appears on the screen, press the number buttons to select and play the track you want. For DVD discs, press this button to enter the title menu, then press the Direction buttons and PLAY button to select and play. (If it is supported by the discs.) l AUDIO button l MUTE l ANGLE button To turn off the sound, press this button. One more time press the button to turn on the sound. Press this button to change the camera angle of the scene you are watching if the scene was recorded from multiple angles. l VOLUME Control Karaoke* 1. Connect the microphone to MIC jack. Turn on the microphone. 2. Adjust volume with the know VOLUME 3. Select the track l SUBTITLE button This button allows the user to select a preferred language for the subtitle and messages from those included on the disc. When playing a Karaoke disc, press the number buttons to select the track you want to play, then you can start the Karaoke * Karaoke only available on model HSD 401plus 71 English You can change the volume level. This button allows the user to select a preferred audio language from those included on the disc. This button also support language selection for the SVCD discs. FUNCTIONS Multimedia playback (MP3 / MPEG4 / JPEG etc.) l Smart Navi: Playback menu When a MP3 or MPEG4 disc is being played, the playback menu will appear on the screen, as shown in the following figure: SMART NAVI ROOT English 0 MP3 TRACK 104 1 CD 02 MP3 TRACK 105 2 CD 03 MP3 TRACK 106 3 CD 04 MP3 TRACK 107 4 CD 05 MP3 TRACK 108 5 PLAY MODE l ROOT CD 01 FOLDER R Use the á / â button to select the previous / next track. Press the SKIP buttons to turn the page up / down. Move the cursor to the track you want to play, then press the PLAY button to play the track. l You can use the Number buttons to select and play the track directly. l Use the ß / à button to switch between the selection of the playback mode and playback menu. Move the cursor to the playback mode, then press the á / â button to select the playback mode. l If you choose to cancel the menu in the SMART NAVI (navigation)item in the setup menu,the playback menu will not be displayed on the screen, and the Player will playback the tracks sequentially. JPEG Picture Display The playback menu of the JPEG picture is similar to MP3 / MPEG4 playback menu. Please refer to MP3 / MPEG4 Playback. l When playing the JPG pictures, press the direction buttons to rotate the picture. 72 WHAT IS MPEG4? MPEG-4 is an ISO/IEC standard developed by MPEG (Moving Picture Experts Group), the committee that also developed the Emmy Award winning standards known as MPEG-1 and MPEG-2 (DVD adopts this standard for video application). MPEG-4 is a very efficient digital video compression standard, which can compress MPEG-2 video into about one eighth of its original size. Most video stream medias base on this technology, such as DivX, WMV, and so on. So MPEG-4 is the most popular digital video technology in the video distribution and communication. HOW TO PLAYBACK YOUR MPEG4 CD? 1. Press OPEN/CLOSE. Place the CD on the disc tray, and press it again to close the tray. 2. Select a folder or an AV file contained on the CD. Use the direction keys to navigate among the items. 3. Press PLAY. The player will start the playback. HOW TO CREATE YOUR MPEG-4 DISC? 1. Download the files from Internet or rip from the other video source using the PC/MAC application, and save the MPEG-4 files as many formats, like *.avi, *.asf etc. 2. Place the blank CD-R/-RW disc into PC CDR/-RW driver or other record devices. 3. Burn your favorite MPEG-4 files into your CD-R/-RW using the CD burn application, like the Nero Burning , Clone CD, etc. 4. Finalize your disc and eject the CD. DIVX SUBTITLES Your Xoro DVD player can display DivX subtitles. It supports .sub, .srt and .smi. Before you start playback, the subtitle file must be activated. As soon as the player ha read the CD index, a menu shows the movie and the subtitle files. The subtitle file is displayed with a question mark, this is normal. Navigate with the arrow keys to the desired subtitle file and press SUBTITLE key on the remote control. The player propmts “DivX subtitle selected”. Now, you can start the movie and the subtitles will be displayed. You can deactivate the subtitle display simply by pressing SUBTITLE key on the remote control. Note: Subtitles are not supported in all languages. At the time this manual has been printed, English, german and polish subtitles are supported. It may be possible that other languages are supported, too due to an improved firmware. Also, other subtitle formats may be supported by newer firmware. Please note that some programs create subtitles which are not compatible with this player. This is normal and is no defect of the player. FUNCTIONS Lagerung von Cds Function Setup Press the SETUP button, the following figure will appear on the screen: SPEAKER SETUP PAGE --SPEAKER SETUP PAGE-- SETUP MENU -- MAIN PAGE DOWNMIX LT/RT GENERAL SETUP CENTER STEREO SPEAKER SETUP REAR OFF AUDIO SETUP SUBWOOFER PREFERENCES CNTR DELAY REAR DELAY EXIT SETUP TEST TONE MAIN PAGE Note: Model HSD 401plus has additional entry “KARAOKE” l DOWNMIX LT/RT, STEREO, OFF l CENTER ON, OFF l REAR ON, OFF l SUBWOOFER ON, OFF l CNTR DELAY The delaying time can be setup as: 0, 1, 2, 3, 4 and 5 MS (miliseconds). l REAR DELAY The delaying time can be setup as: 0, 3, 6, 9, 12 and 15 MS (miliseconds). English 1. Press the SETUP menu to enter the setup menu. 2. Use the áâ button to choose the menu item you want to change, then press ENTER to confirm it. 3. Use the à button to move the high light icon to the right side item. 4. Use the áâ button to change the current setup, then press the ENTER button to confirm it. 5. Use the ß button to return to the left side item. 6. Press the SETUP button to quit the setup menu. Note: Model HSD 310 only offers “DOWNMIX” GENERAL PAGE AUDIO SETUP PAGE -- GENERAL PAGE ---AUDIO PAGE-ANGLE MARK ON OSD LANG OFF CAPTIONS SCREEN SAVER SPDIF OUTPUT OFF DUAL MONO SPDIF/RAW COMPRESSION SPDIF/PCM PRO LOGIC LPCM OUTPUT MAIN PAGE MAIN PAGE AUDIO RELATED l ANGLE MARK: ON, OFF l OSD LANG (language) Select your preferred language for OSD display and messages CAPTIONS ON, OFF l SCREEN SAVER ON, OFF ! l SPDIF OUT OFF, SPDIF/RAW/SPDIF/PCM DUAL MONO STEREO,L-MONO, R-MONO, MIX-MONO COMPRESSION OFF, 1/8, 2/8, 3/8, 4/8, 5/8, 6/8, 7/8, FULL l PRO LOGIC OFF, ON, AUTO l LPCM OUTPUT LPCM 48K, LPCM 96K ! ! 73 FUNCTIONS Function Setup PREFERENCES PAGE PASSWORD --PREFERENCES PAGE-TV Display MULTI SYSTEM TV Type NTSC VIDEO OUTPUT PAL --PASSWORD CHANGE PAGE-- AUDIO OLD PASSWORD SUBTITLE NEW PASSWORD DISC MENU CONFIRM PWD PARENTAL PASSWORD DEFAULTS SMART NAVI MAIN PAGE The preferences setup should be done in completely stop status. English ! TV DISPLAY NORMAL/PS l TV TYPE MULTI.SYTEM, NTSC, PAL l VIDEO OUTPUT S-VIDEO, RGB, VGA (not HSD 310), YCBCR,YPBPR l AUDIO (audio language) Here you can select the language of the audio stream (if supported by the disc) l SUBTITLE Language Here you can select the language of the subtitles (if supported by the disc) l DISC MENU Here you can select the language of the disc menu (If it is supported by the disc) l PARENTAL 1 G, 2, 3 PG, 4 PG 13, 5, 6 PG-R, 7 NC-17, 8 ADULT, NO-PARENTAL If you want to change the setup of the item, you should enter the password. About the password, please refer to PASSWORD. The default password is 3308 ! ! 74 DEFAULTS: Here you can restore the factory default settings SMART NAVI Here you can select if the smartnavi is displayed with or without menu in filemode. When you select to change the password, PASSWORD CHANGE PAGE appears on the screen. The first line is OLD PASSWORD. The second line is NEW PASSWORD. The third line is CONFIRM PWD (password). When the new password is entered for two times, it means you have successively changed the password. The factory code (password) is 3308. DISC INFORMATION On storing discs Handling precautions l Do not touch the playback side of the disc. l Do not store discs in a place subject to direct sunlight or near heat sources. l Do not store discs in places subject to moisture and dust such as a bathroom or near a humidifier. Store discs vertically in a case. Stacking discs or placing objects on their case may warp the discs. Aufnahmeseite l Do not attach paper or tape to discs. To clean discs Просмотр JPEG картинок l Fingerprints and dust on the disc may cause picture and sound deterioration. Wipe the disc from the center outwards with a soft cloth. Always keep the disc clean. Copyright notes l It is forbidden by law to copy, broadcast, show on cable, play in public, and rent copyrighted material without permission. l DVD video discs are copy protected, and any recordings made from these discs will be distorted. l This user's manual explains the basic instruction of this DVD player. Some DVD video discs are produced in a manner that allows specific or limited operation during playback. As such, the DVD player may not respond to all operating commands. l If you cannot wipe off the dust with a soft cloth, wipe the disc lightly with a slightly moistened soft cloth and finish with a dry cloth. l Do not use any type of solvent such as thinner, benzine, commercially available cleaners or antistatic spray for vinyl Lps. It may damage the disc. Discs that can be played Disc mark Contents CD-Size Maximum playback time DVD Audio + Video 12 cm Approximately 2 hours (single sided single) Approximately 4 hours (single sided double) Approximately 4 hours (double sided single) Approximately 4 hours (double sided double) SVCD Audio + Video 12 cm Approximately 45 minutes Video CD Audio + Video 12 cm Approximately 74 minutes Audio CD Audio 12 cm Approximately 74 minutes MP3 Audio 12 cm 75 English About this manual NOTES ON SERVICE Check the following guide for the possible cause of a problem before contacting service. Technical Support of Xoro/MAS: Tel.: 040/77 11 09 17, Internet: www.xoro.de/support.htm Symptoms Cause Correction No power The power plug is disconnected Connect the power plug into the wall outlet No picture The TV is not set to receive DVD signal output Select the appropriate video input mode on the TV so the picture from the DVD player appears on the TV screen The video cable is not connected securely Connect the video cable into the jacks securely The DVD video mode is not matched with the TV Refer to Connecting to a TV (page 10) The audio cable is not connected securely Connect the audio cable into the jacks The power of the equipment connected with the audio cable is turned off Turn on the equipment connected with the audio cable No sound English The setting of output sound type is not correct. Set the audio setting correctly. The disc is dirty. The playback picture It is in fast forward or fast reverse playback. has occasional Brightness is unstable or noises are produced on playback pictures Eject the discs and clean it. Sometimes a small amount of picture distortion may appear. This is not malfunction. The copy protection’s effect. Connect the DVD player to the TV directly. No disc is inserted. Insert a disc. An unplayback disc is inserted. Check the disc type and color system. The disc is placed upside down. Place the disc with the playback side down. The disc is not placed within the guide. Place the disc on the disc tray correctly inside the guide. A menu is on the TV screen. Clean the disc. The parental lock function is set. Press the SETUP button to turn off the menu screen. Cancel the parental lock function or change the parental. Buttons do not work Power supply fluctuations or other abnormalities such as static electricity may interrupt correct Turn the power on or off with the POWER button. Or disconnect the power plug and insert it into the wall outlet again. The remote control does not work properly The remote control is not pointed at the remote sensor of the DVD player Point the remote control at the remote sensor of the DVD player The remote control is too far from the DVD player Operate the remote control within about 7 m The batteries in the remote control are exhausted Replace the batteries with new ones The DVD player does not start playback 76 SPECIFICATIONS DVD-Player 95-240V AC,50/60Hz Power consumption 20 W Weight 4 +0.5kg External dimensions 430 x 50 x 320mm (W/H/D ) Signal system PAL /NTSC Laser Semiconductor laser, wavelength 650 nm,780nm Frequency range +3dB (20Hz - 20kHz) Signal-to noise ratio >90 dB Audio dynamic range >80 dB Operating conditions Temperature Operation status English Power supply 0 - 400 C Horizontal Outputs Composite Video output 1.0 +0,2Vp-p, 75Om Audio output (analog audio) 2.0 +0.2V (rms) Supplied Accessories Audio/Video cable (3wire) 1 Remote control 1 Batteries2 User manual 1 l Designs and specifications are subject to change without notice. 77 English NOTES NOTES English XORO by MAS Elektronik AG Blohmstrasse 16/20 21079 Hamburg, Germany Tel.: +49 (040) 77 11 09 17 Fax: +49 (040) 76 73 35 15 [email protected] www.xoro.de