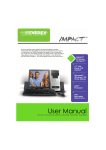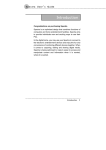
1
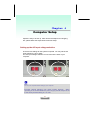
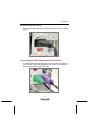
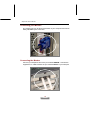
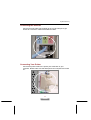
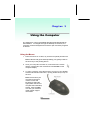
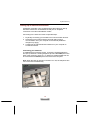
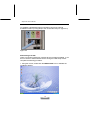
User’s Manual 1 Copyright ♦ Copyright © EVEREX Systems. Inc 2005. All rights reserved. ♦ Disclaimer: EVEREX Systems. Inc shall not be liable for technical or editorial errors or omissions contained herein; or for incidental or consequential damages resulting from furnishing this material, or the performance or use of this product. ♦ EVEREX Systems. Inc reserves the right to change product specification without prior notice; therefore, information in this document may change without notice. ♦ No part of this document may be copied, reproduced, or transmitted by any means or for any purpose without prior written permission from EVEREX Systems. Inc. Safety Instructions ♦ This computer has been tested for conformance to international safety regulations. Like any electronic device, however, the computer should be used with care. To protect yourself from possible injury and to minimize the risk of damage to the computer, read and follow all the safety instructions mentioned in this manual. ♦ A modem card is bundled with the system and installed in the extension slot. While using the system, do not touch the modem card, as this may cause an electrical shock. ♦ Except as explained elsewhere in this manual, do not attempt to service the computer yourself. Opening or removing covers that are marked “Do Not Remove” might expose you to dangerous voltage points or other risks. Refer all servicing of marked components to qualified personnel. ♦ Always disconnect all telephone lines & all power cords form the wall outlet before servicing or disassembling this from the wall outlet, and allow the internal system components to cool before touching. General Guidelines ♦ Read all of these instructions. ♦ Save these instructions for future use. ♦ Follow all warnings and instructions marked on or in the computer. Important Safety Instructions Read these instructions carefully. Save these instructions for future reference. 1. For your safety, never remove the PC’s cover without first removing the power cord and any connection to a 2. telecommunications network. Always replace the cover before switching the PC on again. Follow all warnings and instructions marked on the product. 3. Unplug this product from the wall outlet before cleaning. Do not use liquid cleaners or aerosol clears. Use a damp cloth for cleaning. 4. Avoid using this product during an electrical storm. There may be a remote risk of electric shock form lightning. 5. Do not place this product on an unstable cart, stand, or table. The product may fall, causing serious damage to the product. 6. Slots and openings in the cabinet and the back or bottom are provided for ventilation; to ensure reliable operation of the product and to protect it from overheating, these openings must not be blocked or covered. Placing the product should never be placed near or over a radiator or heat register, or in a built-in installation unless proper ventilation is provided. 7. This product should be operated from the type of power indicated on the marking label. If you are not sure of the type of power available, consult your dealer or local power company. 8. 9. Do not allow anything to rest on the power cord. Do not locate this product where persons will walk on the cord. If an extension cord is used with this product, make sure that the total ampere rating of the equipment plugged into extension cord does not exceed the extension cord ampere rating. Also, make sure that the total rating of 10. all products plugged into the wall outlet does not exceed the fuse rating. Never push objects of any kind into this product through cabinet slots as they may touch dangerous voltage points or short out parts that could resulting a fire or electronic shocks. Never spill liquid of any kind on the product. 11. To avoid electronic shock, do not open the cover. There are no user-serviceable parts inside. 12. Use minimum No 26AWG Wire for telephone cable. 13. Unplug this product from the wall outlet and refer servicing to qualified service personal under the following conditions: a. When the power cord or plug is damaged or frayed. b. If liquid has been spilled into the product. c. If the product has been exposed to rain or water. 2 d. If the product does not operate normally when the operating instructions are followed. Adjust only those controls that are covered by the operating instructions since improper adjustment of other controls may result in damage and will often require extensive work by a qualified technician to restore the product to normal condition. e. If the product has been dropped or cabinet has been damaged. f. If the product exhibits a distinct change in performance, indicating a need for service. Electrical Restrictions WARNING: This equipment is designed for connection to a grounded (earthed) outlet. The grounded type plug is an important safety feature. To reduce the risk of electrical shock, damage to your equipment, or loss of data, do not disable this feature. Power Cord Set Requirements ♦ The power cord set (appliance coupler, flexible cord, and wall plug) you received with the computer meets the requirements for use in the country where you purchased the equipment. ♦ Power cord sets for use in other counties must meet the requirements of the country where you use the computer. For more information on power cord set requirement, contact your local authorized dealer, reseller, or service provider. Laser Safety Requirement Laser Drive (CD-ROM / DVD-ROM / CD-RW / DVD-RW) Safety Warnings CLASS 1 LASER PRODUCT CAUTION: INVISIBLE LASER RADIATION WHEN OPEN. DO NOT STARE INTO BEAM. CAUTION: USE OF ANY CONTROLS OR ADJUSTMENTS OR PROCEDURES OTHER THAN THOSE SPECIFIED HEREIN MAY RESULT IN HAZARDOUS RADIATION EXPOSURE. TO PREVENT EXPOSURE TO LASER EMINATIONS (HARMFUL TO HUMAN EYES), DO NOT ATTEMPT TO DISASSEMBLE THIS UNIT. General Requirements The requirements listed below are applicable to all countries: 1. The length of the power cord set must be at least 6.0 feet (1.8 m) and a maximum of 14.76 feet (4.5 m). 2. All power cord sets must be approved by an acceptable accredited agency responsible for evaluation in the country where the power cord set will be used. 3. The power cord set must have a minimum current capacity of 10A and a normal voltage rating of 125 or 250 volts AC, as required by each country’s power system. 4. The appliance coupler must meet the mechanical configuration of an EN 60320 / IEC 320 Standard Sheet C13 connector, for mating the appliance inlet on the computer. Battery (Lithium) NOTE: The following caution statement is located in the user’s manual. 1. English CAUTION: DANGER OF EXPLOSION IF BATTERY IS INCORRECTLY REPLACED. REPLACE ONLY WITH SAME OR EQUIVALENT TYPE RECOMMENDED BY THE MANUFACTURER. DISCARD USED BATTERIES ACCORDING TO THE MANUFACTURER'S INSTRUCTIONS. 2. French IL Y A DANGER D'EXPLOSION S'IL Y A REMPLACEMENT INCORRECT DE LA BATTERIE. REMPLACER UNIQUEMENT AVEC UNE BATTERIE DU MÊME TYPE OU D'UN TYPE RECOMMANDÉ PAR LE CONSTRUCTEUR. METTER AU RÉBUT LES BATTERIES USAGÉES CONFORMÉMENT AUX INSTRUCTIONS DU FABRICANT. 3. German VORSICHT ! Explisionsgefahr bei unsachgemäßen Austausch der Batterie. Ersatz nur durch denselben oder einem vom Hersteller empfohlenem ähnlichen Typ. Entsorgung gebrauchter Batterien nach Angaben des Herstellers. 4. Swedish Explosionsfara vid felaktigt batteribyte. Använd samma batterityp eller en ekvivalent typ som rekommenderas av apparattillverkaren. Kassera använt batteri enligt fabrikantens instruktion. 3 5. Danish Lithiumbatteri- Eksplosionsfare ved fejlagtig håndtering. Udskiftning må kum ske med batteri af samme fabrikat og type. Lever det brugte batteri tilbage til leverandoren. 6. Norwegian Ekspolsjonsafe ved feilaktig skifte av batteri. Benytt samme batteritype eller en tilsvarende type anbefalt av apparatfabriknten. Brukte batterier kasseres i henhold til fabrikantens instruksjoner. 7. Finnish Paristo voi räjähtää, jos se on virheellisesti asennettu. Vaihda paristo ainostaan laitevalmistajan suosittelemaan tyyppiin. Hävitä käyteet paristo valmistajan ohjeiden mukaisesti. FCC Information This equipment has been tested and found to comply with the limits for a Class B digital device, pursuant to part 15 of FCC Regulations. These limits are designed to provide reasonable protection against harmful interference in a residential installation. This equipment generates, uses, and can radiate radio frequency energy, and if not installed and used in accordance with the instructions, may case harmful interference to radio communications. However, there is no guarantee that interference will not occur in a particular installation. If this equipment does cause harmful interference to radio or television reception, which can be determined by turning the equipment off and on, the user is encouraged to try to correct the interference by one or more of the following measures: ♦ Reorient or relocate the receiving antenna. ♦ Increase the separation between the equipment and receiver. ♦ Connect the equipment into an outlet on a circuit different from that to which the receiver is connected. ♦ Consult the dealer or an experienced radio/TV technician for help. 4 Table of Contents Chapter 1 1 Welcome to eXplora PC! 1 Placement Tips................................................................................................. 2 Chapter 2 3 Unpacking the Box 3 Selecting a Site ................................................................................................ 3 Check List......................................................................................................... 3 Chapter 3 4 System Overview 4 Front Panel....................................................................................................... 4 Chapter 4 8 Computer Setup 8 Setting up the AC Input voltage selection ........................................................ 8 Connect the Power Cord .................................................................................. 9 Connecting your PS/2 Mouse and PS/2 Keyboard .......................................... 9 Connecting your Monitor ................................................................................ 10 Connecting the Modem .................................................................................. 10 Connecting the Ethernet................................................................................. 11 Connecting Your Printer ................................................................................. 11 Chapter 5 12 Using the Computer 12 Using the Mouse ............................................................................................ 12 Setting up an Internet Connection.................................................................. 13 Chapter 6 17 Help and Support 17 System Recovery The System Recovery option is available to restore your computer’s software to its original configuration. ........................................... 18 Appendix 23 5 System Specifications 23 Product Features............................................................................................ 23 eXplora PC User’s Manual Chapter 1 Welcome to eXplora PC! Congratulations on your purchase of eXplora PC! In addition to being the latest in small form factor computers, the Everex eXplora PC offers several distinctive features:: • Performance: State-of-the-art electronics created on an industry standard platform provides unparalleled system performance and flexibility. • Function: Preinstalled with Microsoft® Windows® XP Home Edition, eXplora lets anyone easily create their own DVDs, play the latest video games, send email to friends and family or surf the Internet. • Design: eXplora's revolutionary design provides users with a compact, space saving PC, engineered to lower operating temperatures, reduce overall power consumption and minimize excessive noise. • Quality: The Everex commitment to quality for all eXplora PCs is backed by a full 1 Year Limited Warranty and Toll-Free Technical Support Number. eXplora: Attractive, Simple, Intuitive. The perfect system for all of your computing needs. Please read this USER MANUAL carefully before unpacking and setting up your eXplora PC Note: In order to set up the eXplora PC efficiently, the BIOS setup menu has been modified slightly. Please refer to the system’s BIOS setup menu on the screen. 1 eXplora PC User’s Manual Placement Tips Your eXplora PC should be set up correctly according to this user manual, and your own comfort and ergonomic needs. Please refer to the following tips to create a comfortable and healthy working environment for you: 1. Adjustable Seat: If you plan to use your eXplora PC for extended periods, select a highly adjustable office chair with a five-pronged base. The seat and chair back should be adjustable, while you’re sitting in the chair, for height and tilt, and forward/backward positioning. In addition, the lumbar area of your back should be supported by chair adjustments or a cushion. Arm rests should conform to your elbow height and shoulder width and should be used for support. For maximum comfort, vary positions frequently throughout the day, observe good posture when seated, and keep your head centered over your shoulders. 2. Suitable monitor level: Position your computer so that it is at arm's length away and the top third of the monitor viewing area is at eye level. This helps prevent eye and neck strain. To further reduce eye strain, close your eyes and/or refocus on something other than your computer screen at least twice an hour. Most monitors come standard with a detachable tilt-and-swivel base and an adjustable, rearmounted foot, which will allow you to position the monitor exactly where you want it. 3. Anti-glare coating: Some monitor screens are constructed with a special antiglare coating, which minimizes reflections that cause eyestrain and discomfort. To further reduce eyestrain, close your eyes and/or refocus on something other than your computer screen at least twice an hour. 4. Adjustable task lighting: When room lighting is dimmed, there may be insufficient light on documents or reference materials for comfortable reading. A well-lit room or a few adjustable, directional task lights will allow you to see your monitor screen and other materials clearly, causing the least amount of strain on your eyes. 5. Appropriate position for wrist rest: Keep your wrists straight and your forearms parallel to the floor while you are typing. If you use a wrist rest, use it only briefly while resting. Do not rest your hands on the table or on the wrist rest as you are typing. During long periods of typing, taking frequent breaks is recommended. 2 System Overview Chapter 2 Unpacking the Box Selecting a Site Before unpacking the eXplora PC, prepare a suitable workspace for your computer. Choose a steady, level and clean surface near an electrical outlet. Also ensure that the computer has enough space around it to allow for proper airflow, especially at the rear of the computer near the fan. If the computer does not have enough ventilation, internal components can become overheated and may become damaged. When opening the box, make sure not to damage it or the packing material, as you may need them for future shipping needs. As you unpack the box, make sure the following components are included in the box and are in good condition. If you find that any of these components are missing or appear damaged, please contact the system dealer immediately. Check List ; eXplora PC System Unit ; K/B ; AC Power Cord ; Mouse ; Speaker ; Telephone line ; User Manual ; Window® XP Manual ; Quick Start Guide ; Warranty Agreement 3 eXplora PC User’s Manual Chapter 3 System Overview Front Panel Features are shown in Figure 3.1, and are described as follows: Figure 3.1 Note: Depending on the model, your computer’s components may vary and look slightly different than those pictured. 4 System Overview 1. Power Button & Power Indicator: Use this button to turn the eXplora PC on and off. If the button is held down for one second, the system will enter Suspend mode. If held down for four seconds, system power will switch off. When lit, the Power indicator shows blue to indicate that system power is on. 2. Hard Disk Drive LED: This LED lights up to indicate that the hard drive is being accessed. 3. Optical Disc Drive: 5.25-inch optical disc drive for accessing multimedia contents. 4. Speaker Jack (light green): Connect audio devices, such as headphones or speakers, to this jack 5. Microphone-In Jack (pink): Plug the microphone into this jack for recording or voice-control functions. 6. USB Port (2): Up to two USB devices can be connected via these ports; there are four additional ports at the rear. (figure 3.2) 5 eXplora PC User’s Manual Rear Panel Features are shown in Figure 3.2, and are described as follows: Figure 3.2 1. Power Socket Voltage Toggle Switch: This toggle switch allows you to select the system voltage (115 / 230 V) appropriate to your area. 2. Power Socket: This toggle switch allows you to select the system voltage (115 / 230 V) appropriate to your area. Connect the system unit’s power cord to this socket; ensure that it is connected to a stable AC power source. ! CAUTION: Before you plug in the AC power cord, you must first check to ensure the voltage toggle switch setting is appropriate for your geographical area. 3. PS/2 Mouse Connector (green): Plug your PS/2 Mouse into this connector. 6 System Overview 4. 5. RJ45 LAN Connector (1): For connecting your LAN, allowing you to access network services or the Internet. Line-In Jack (light blue): Connect audio sources, such as external CD, players to this jack for recording on your computer or playback through the Line-Out device. 6. PS/2 Keyboard Connector (purple): Plug your PS/2 keyboard into this connector. 7. COM1 Port (turquoise): Connect serial (RS232) devices, such as a modem, to this port. 8. Parallel Port (purple): Parallel devices, such as a printer or scanner, can be connected to this port. 9. VGA Port: Connect your display monitor to this port. 10. USB Port (4): Connect USB peripheral devices to these ports to take advantage of the universal functionality and flexibility of Plug and Play (PnP) technology. 11. Microphone-In Jack (pink): Plug the microphone into this jack for recording or voice-control functions. 12. Line-Out Jack (light green): Connect audio devices, such as headphones or speakers, to this jack. 13. Expansion Slot Covers: These covers can be removed to install add-on cards, as described later. 14. Modem ports Connect your phone line in and your RJ11 cable out to the wall jack. 7 eXplora PC User’s Manual Chapter 4 Computer Setup eXplora is easy to be set up. After remove the eXplora from shipping box, please follow the steps below to finish its setup. Setting up the AC Input voltage selection There are two settings for the system to operate. You may set the AC input voltage to 115V or 230V. The AC Input Voltage Selection can be found at the back of your computer. Note: Turn off your computer before setting up your computer. Improper voltage selection may cause system damage. When operating in the United States the power supply should always be set to the factory default setting of 115 volts. 8 System Recovery Connect the Power Cord Connect the Power Cable to the computer and then plug into a power supply. Connecting your PS/2 Mouse and PS/2 Keyboard The PS/2 Mouse and PS/2 Keyboard ports are located at the back of your computer and can be identified by their colors. Plug the Mouse and Keyboard into their respective ports. 9 eXplora PC User’s Manual Connecting your Monitor The monitor port can be found at the back of your computer and can be easily identified by the color blue. Connecting the Modem Connect your telephone line to the port marked PHONE. Connect the supplied RJ11 cable between the port marked LINE and your wall jack. 10 System Recovery Connecting the Ethernet Connect an RJ45 cable (not supplied) to the 10/100 LAN port to get access to a network or external broadband modem. Connecting Your Printer Connect the printer cable to the printer port at the back of your computer. Please make sure that both printer and computer are turned off. 11 eXplora PC User’s Manual Chapter 5 Using the Computer The eXplora PC comes preinstalled with Microsoft® Windows® XP Home Edition. To navigate through the desktop environment, the computer mouse and keyboard are used to open and close programs of interest. Using the Mouse 1. Place the mouse on a clean, dry surface for optimal performance. Hint: A Mouse Pad (purchased separately) can greatly enhance the accuracy of the pointing device. 2. Once your computer is turned on, movements of the mouse directly correspond to the movements of the Pointer on the computer display. 3. To open a program, move the Pointer to an icon on your desktop. Click the left mouse button twice, quickly (double-click) on top of the icon. Hint: The first time your computer is turned on, use the mouse and keyboard to select the appropriate choices and complete the initial setup wizard. Click the Help icon with your mouse to obtain further support information. 12 System Recovery Setting up an Internet Connection All eXplora computers come equipped with a 56k modem for dial-up Internet access and a 10/100 Ethernet LAN port for simplified connection to a external broadband modem. Connecting to the Internet involves 3 separate steps. 1. Physically connecting your hardware and communication devices. 2. Subscribing to an Internet Service Provider (ISP) to allow communication from your computer to the Internet (additional charges may apply). 3. Configuring the Internet Browser software on your computer to access the Internet. Connecting your hardware To establish dial-up Internet access, connect the supplied telephone line (RJ11) between a working telephone jack and the LINE jack on the back of the computer. (figure 5.1) If desired, a standard telephone can be connected to the Phone jack on the back of the computer. Hint: When the Dial-up Internet connection is in use, the telephone line can not be used simultaneously. Figure 5.1 13 eXplora PC User’s Manual To establish a broadband Internet connection connect an external broadband modem (not supplied) to the 10/100 Ethernet port. (figure 5.2) Figure 5.2 Subscribing to an ISP There are numerous third party Internet Service Providers available. If you did not choose to install Internet Service during the initial setup wizard complete the following procedure. 1. Using the mouse, double-click the MSN Installer icon to initialize the Installation Wizard. 14 System Recovery 2. For users already subscribing to an ISP choose I’m currently connected to the Internet. To establish a new MSN Internet account choose I’m not currently connected to the Internet (credit card required for activation). Click Next to continue the installation Wizard. 3. When asked “Do you have an MSN E-mail Address?”, click the appropriate response, then click Next. 15 eXplora PC User’s Manual 4. To establish a new dial-up Internet connection choose MSN dial-up Internet Access, then click Next. 5. Complete the Installation Wizard forms by carefully following the onscreen instructions and entering the appropriate information. Configure the Internet Browser The eXplora PC comes with Microsoft® Internet Explorer preinstalled. 1. To access the Internet double-click the Internet Explorer icon. 2. Use the mouse and keyboard to navigate through the Internet. To visit a website, enter a web address (exp. www.everex.com) into the address box. When finished, click the arrow or press the Enter key on your keyboard. 16 System Recovery Chapter 6 Help and Support Your eXplora PC includes general Help and Support documentation to answer questions regarding the Windows operating system and to help you explore the many useful features of your Everex computer. Access the Help and Support Documentation 4. Using the left button on your mouse, click the Start button on your computer screen. 5. Locate and click the Help and Support section 17 eXplora PC User’s Manual 3. To search for a topic, click the left mouse button inside the Search box then type in the word or phrase you wish to explore. Click the green arrow to begin the search process. 4. Each search will yield a list of Suggested Topics, Full-text Search Matches and a Microsoft Knowledge Base. To view further information regarding your search request, click on the topic of your choice. System Recovery The System Recovery option is available to restore your computer’s software to its original configuration. Note: Use with caution. 18 System Recovery Definitions Recovery Partition (R-P): The R-P is preinstalled by the manufacturer on the hard disk drive to allow the user to restore the computer system back to its original state. This function is typically used in cases of a non-repairable computer virus or system malfunction. The R-P is hidden from the user. User Partition (U-P): The U-P stores the user data added to the original system. When the system boots the user will see the following message: If the user presses F10 or R (hot keys), the local recovery begin. The user should be aware of the Selecting Recovery Options. The following dialog will appear: The default mode is non-destructive. In this mode, the data in U-P stays intact. If the user clicks Next, the non-destructive recovery will take place. (see following screen image) 19 eXplora PC User’s Manual Following the recovery process, the user is prompted with a CRC-check request. If the user clicks Yes, the CRC verification process will run. When the verification process is completed the system will reboot. 20 System Recovery In the Selecting Recovery Options window, choosing Advance (destructive mode), will destroy the R-P and U-P. This option should be used with caution. Following CRC verification, the user will be prompted. If Yes is chosen, the CRC check process will run. 21 eXplora PC User’s Manual Following the CRC check the system will reboot as normal. Technical Support Please complete the following information before contacting Everex Technical Support: User Name : _____________________________________ Model : Everex eXplora RS2800 Serial Number : _____________________________________ . Problem Description: _____________________________________ For the latest Drivers and Support Documents or to chat with a Live Technician visit http://www.everex.com To contact Technical Support via email, send your User Name, Model, Serial Number and a Problem Description to [email protected] To speak with an Everex Technical Support Representative call our 24-hour response team at 1-866-850-8835 (toll-free) 22 eXplora PC User’s Manual Appendix System Specifications Product Features Drive bays Front Panel Back panel Expansion cards External • 5.25-inch standard optical drive x 1 • Standard Card Reader x 1 (optional) Internal • 3.5” standard HDD drive x 1 (hidden) • Switches: Power Button • Creative Window: • Front I/O USB 2.0 port x 2 Line-Out jack x 1 Microphone-In jack x 1 • LED Indicators: Power-On/Off & Suspend activity indicator HDD activity indicator • USB 2.0 port x 4 • RJ45 LAN connector x 1 • Microphone-In/Line-In/Line-Out jack x 1 • PS/2 keyboard/mouse connector x 1 • VGA port x 1 • Parallel port x 1 • Serial port x 1 • AC power connector (AC-In) x 1 • Peripheral device power socket x 1 • Low Profile PCI slots x 2 (one occupied by modem card) • Low profile AGP slot x 1 (optional) 23