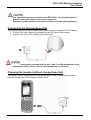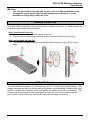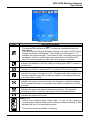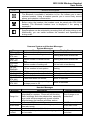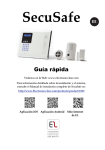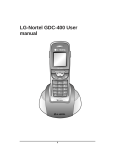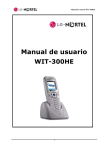
1
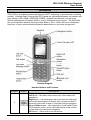
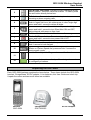
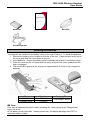
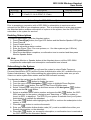
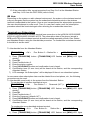
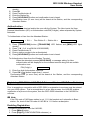
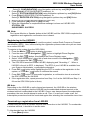
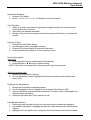
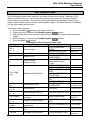
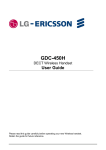
GDC-500H
DECT Wireless Handset
Quick Guide
Please read this guide carefully before operating your new Wireless handset.
Retain the guide for future reference.
GDC-500H Wireless Handset
User Guide
Important Care & Precautions:
Before connecting or using your new phone, take a moment to consider safety and reliability.
Use common sense when locating, connecting and using your GDC-500H.
• The GDC-500H uses 3.7 VDC Li-ion batteries. Replace batteries only with identical
size and type available from your local LG-Ericsson dealer. Use of a different battery
type may cause damage to the phone or charger and may cause fire or explosion.
Dispose of batteries in accordance with any local codes or regulation.
• The Charger/base unit should only be used on a dry level surface. Keep the
Charger/base away from the edges of the surface to avoid the potential of a fall.
• Avoid situations where you might drop the handset. While the GDC-500H is a rugged
mobile device, dropping it on to the floor may cause critical damage.
• Locate cables to avoid potential for damage. For example, do not place under rugs or
carpet as damage may result from foot traffic or heavy objects. Also, do not locate
cables between the desktop and walls where they may be crushed, damaging the
insulation.
• Check cables regularly, and if damage is noted, disconnect your phone. Contact your
local representative for a replacement.
• Should liquid spill on the handset, remove the batteries and dry with a soft cloth.
• Do not use during lightning storms. Lightning presents a potential shock hazard.
• Clean the GDC-500H with a soft dry cloth; do not use liquid cleaners.
• Always use caution when connecting to AC power. Use only with a properly grounded
standard AC power outlet.
What is new in this release?
Issue
Date
Change of Contents
0.1
July 2012
Temporary Release
GDC-500H Wireless Handset
User Guide
Introduction
GDC-500H is a wireless handset that employs DECT technology to provide local in-building
mobility. Wireless Radio Frequencies (RF) signals are exchanged between the handset and
base stations (GDC-400B / 600B/GDC-600BE). Multiple base stations connect to the
Wireless Management Interface (WMI) in your LG-Ericsson phone system. The WMI links
the connected base stations forming a larger Base or Zone. Within this zone, transparent
handover of active communications between base stations in the zone is supported.
Handset Diagram
Handset Buttons and Features
Number
1
Button
Description
Navigation button:
Left arrow – idle state=view missed call, other states=left
navigation
Right arrow – Idle state=place call (host intercom dial tone),
active call state=press to Transfer call, or press and hold 1
second to place call on hold, in User Menu=right navigation.
Up and Down arrows – Idle state=Up for Local redial, Down
for Phonebook menu, active call state=adjust audio volume,
in User Menu=up and down navigation.
OK Button – Same as the Left soft button
GDC-500H Wireless Handset
User Guide
Left & Right soft button: Interactive menu displayed directly
above buttons. Selection varies as needed. To select, press
the soft button directly below item.
2
Talk button: Connects handset to host system to answer
incoming or place outgoing calls.
Recall (Flash)/Clear button: active call state=register recall,
flash to regain dial tone; idle state=press to clear single digit
press and hold 1 second to delete all digits.
*/Silent Alert button: idle and dial state=press to dial ‘*’,
3
4
5
press and hold 1 second to turn Silent Alert ON and OFF;
active internal call=camp-on from host.
Call back button: Leave a call back or recall message
6
7
8
0~9
9
10
End call & Power button: Press to end a call or reject a call,
press and hold 1 second to turn power ON & OFF.
Dial Pad buttons
#/Lock button: idle and dial state=press for ‘#’, press and
hold 1 second to lock dial pad.
Speed/Program button: Host dial tone=press to access
Station or System Speed dial, press and hold 1 second for
host program mode.
Side button : Adjust the Ringer volume and Audio volume.
11
12
Emergency button : Immediately call the designation number
in emergency situations.
Unpacking the GDC-500H
Each GDC-500H package contains the items below. These items include the GDC-500H
handset, Charger/base, AC/DC adapter, Li-ion batteries, this User Guide and a belt clip.
Unpack the carton and assure all items are available.
Handset
GDC-500H
Charger/Base
GDC-450SSC
AC/DC Adapter
GDC-500H Wireless Handset
User Guide
Batteries
Quick Guide
Belt Clip
Ear-Microphone
Installing the batteries
The batteries are installed in the battery cavity in the rear of the unit. To install the batteries,
1. Remove the battery cover located on the rear of the unit. Press the latch at the top of
the cover and slide the cover down to remove.
2. Insert batteries. Assure the battery polarity matches the polarity in the battery cavity.
3. Place the cover on the unit just below the cavity and push the cover upward until the
latch is engaged.
4. The unit must be placed in the charger for approximately 6 hours to fully charge the
batteries.
Mode
Talk Mode
Standby Mode
Duration
10 hours
100 hours
Charging Time
Full charge 6 hours
Note:
Poor care of batteries limits their useful operating life. Keep phone in the Charger/base
when not in use.
At low battery levels (less than 1 battery power bar), the display backlight turns OFF to
maximize battery charge.
GDC-500H Wireless Handset
User Guide
Use only with batteries provided for the GDC-500H. Use of other types of
batteries may cause harm to the unit or explosion.
Dispose of used batteries in accordance with local codes and regulations.
Connecting the Charger/base Unit
The Charger/base unit must be connected to power using the supplied AC/DC Adapter.
1. Plug the DC output plug of the adapter into the DC input of the charger.
2. Insert the AC plug of the adapter into an AC outlet.
Use only the adapter provided with the unit. Use of a different adapter could
damage the unit or cause a fire and will invalidate your warranty.
Charging the handset without charger/base Unit
The handset can be charged without charger as below. Also it is available to charge
Handset during a call if Auto Release Mode is OFF.
GDC-500H Wireless Handset
User Guide
Note:
Use only the adapter provided with the unit. Use of a different adapter could
damage the unit or cause a fire and will invalidate your warranty. It is not
available to charge using USB port of PC.
Installing the Belt Clip
The GDC-500H comes with a belt clip that can be installed on the unit. To install the belt clip,
refer to the figure and instructions below.
When installing the belt clip:
1. Turn the screw clockwise on the back of the unit.
2. The belt clip is pulled upward until the screw is inserted into the hole securely.
When uninstalling the belt clip:
1. The belt clip is pulled down with pushing the button of the belt clip until the lock is
open.
GDC-500H Display
The GDC-500H has a large 176 x 220 pixel full-color TFT LCD (Liquid Crystal Display). The
display indicates the status of the handset and provides visual feedback for dialing and other
actions. Various icons, detailed in the chart below, are shown at the top of the display. The
central area of the display shows messages from the host LG-Ericsson system and the
phone itself. At the bottom are selections for the Left and Right soft buttons.
GDC-500H Wireless Handset
User Guide
Icon
GDC-500H Icons
Name & Description
Antenna Icon ( ) & RSSI Icon ( )
The antenna icon indicates a DECT connection is established with the
Base station.
The RSSI (Received Signal Strength Indicator) is a meter of the RF signal
strength received by the handset. The number of vertical bars (0 ~ 4)
indicates the relative strength. At less then 2 bars, call quality may not be
acceptable. When no vertical bars are present there is insufficient RF
signal to process signals and calls can not be placed or received.
Phone icon
Indicates the handset is off-hook, talking or dialing and a DECT channel is
established.
External - Internal Call icon
Indicates the call type, external (EXT) or internal (INT) the host system.
Silent Alert icon
Indicates the ringer in the phone is Off. The phone will visual notify you of
incoming calls and may alert you with the vibrator. See Images & Sounds
in the User Menu section.
Message icon
Indicates the system has at least one new message or callback message
for the wireless terminal. The message information is updated at 3 minute
intervals.
Keypad lock icon
Indicates the phone dial pad and buttons are inactive. This prevents
accidental is buttons press as may happen with a wireless handset.
Alarm clock icon
Indicates an Appointment is set.
Battery icon
Vertical lines indicate battery charge state. At one (1) bar charging is
recommended, and call quality may be affected. When low battery (1 bar),
backlight will turn off to save battery power.
The last Icon means the battery is charging.
GDC-500H Wireless Handset
User Guide
Icon
Name & Description
Bluetooth icon
The Bluetooth is available if activation is Yes. So it allows you to use a
wireless headset. Using a headset permits you to move freely around
phone and maintain a conversation.
Bluetooth headset icon
Before using the headset, the headset must be paired with GDC-500H
handset. The Bluetooth headset icon is displayed if the paring is
successful.
Speakerphone icon
Speakerphone can be activated by pressing Hook off button during a call.
Additionally, you can switch between the handset and Speakerphone
during a call.
Message
STA xxxx
CALL FROM
STA xxxx
CALL TO
STA xxxx
HOLDING
STA xxxx
LN XXX
RINGING
LN XXX
NO CHANNEL
INVALID
NO ANSWER
STA XXX
NO RESP.
STA XXX
Message
Range Out
No Channel
Silent Mode
Direct call
Keypad
Locked
Common System and Handset Messages
System Messages
Description
Display Duration
Station number
Idle state
Station number of calling internal
Alerting and active internal call
user.
Station number of called internal
Alerting and active internal call
user
Station number of waiting call.
Call on hold or transferring
CO line number in host system
Alerting
CO line number in host system
Active external call
No RF or system channel available Until a channel is available
Station dialed is not valid
About 30 seconds
Called user does not answer
About 30 seconds
Called station is not responding,
perhaps power is Off
About 30 seconds
Handset Messages
Description
Out-of-range of a base station or not yet
subscribed to a system. Phone will not function.
Walls, buildings, and other obstruction, especially
large metal surfaces negatively impact useable
range between the handset and Base station.
No available RF Channel in Base station
Alert mode is vibrate, no audible ring is provide in
silent alert mode
Handset is in a Direct call (Hotline)
The handset dial pad is locked; no outgoing calls
can be made.
Display Duration
Out-of-range or not
subscribed
All RF channels busy
Silent alert mode
Active on direct call
Until handset is
unlocked
GDC-500H Wireless Handset
User Guide
Message
0~9, *, #, P,
D, R
Description
Dialed digits and special characters.
(P -:Pause, D -:Go to DTMF, R -:Flash)
Display Duration
Dialing
Subscribing the GDC-500H to a System
Prior to accepting a connection with a GDC-500H, a subscription to services must be
entered into the WMI of your telephone system. This is accomplished in a two step process:
the Attendant station enables subscription of a phone to the system, then the GDC-500H
subscribes to the system for services.
Enabling Subscriptions
To enable a subscription, from the Attendant station;
1. Press [Trans/Pgm] button; the Pgm LED flashes and the Monitor-Speaker LED lights.
2. Press ‘0 and #’.
3. Press Flexible button 1.
4. Dial the subscribing station number.
5. Enter the Phone Type; 5 for new systems, or 1 for older systems (pre 1.0B s/w).
6. Pres [Hold/Save] button.
7. When the subscription completes, a confirmation tone is received and then press
Monitor-Speaker button.
Note:
Don’t press Monitor or Speaker button at the Attendant phone until the GDC-500H
completes the subscription and subscription confirmation tone is heard.
Subscribing to the System
When subscribing to the system you will need the system’s unique Radio Frequency
Personal Identification (RFPI) and the System Authentication code (AC, available from your
System Administrator). Also, before starting the subscription process make sure you are
close to an active system Base station and the RSSI indicator is steady.
To subscribe to the system from the GDC-500H:
1. Press the Menu (
) button to display the menu.
2. From the menu use the Navigation (
) button to highlight Phone Register.
3. Press the OK (
) button; this displays the Phone Register menu.
4. Select “Subscription” using the up and down arrows of the Navigation (
) button
and press the OK (
) button.
5. Select an available BASE station number and press the OK (
) button; the GDC500H searches for the system, displaying and “Searching..x”. When a system is
found, its RFPI, is displayed. The RFPI of your system is available from your System
Administrator, or perhaps the attendant.
6. Press OK (
) button while highlighting the RFPI to continue the subscription to the
system, or
) button to continue the search.
7. Press No (
8. Enter your subscription Authentication code (AC); code is available from either your
System Administrator, or the attendant.
9. Press OK (
) button; on successful subscription, a confirmation tone is received at
the GDC-500H and the Attendant Station.
GDC-500H Wireless Handset
User Guide
10. If the subscription fails, repeat procedure from Step 3 to 6 at the Attendant Station
and Step 1 to 8 from the GDC-500H (refer to Note).
Note:
Depending on the system or radio channel environment, the system or the wireless terminal
may not recognize that the system has the subscribed wireless terminal or the wireless
terminal is subscribed to the system. Once a user has performed the subscription procedure,
the user should attempt to make a call. Then, if a user can’t make a call, the subscription
procedure should be conducted again after selecting the unsubscribe menu item.
Terminating a Subscription
Unsubscribing will make a wireless terminal lose connection to the ipLDK-24/100/300/300E,
iPECS-50/100/300/300E/1200/MG WOTS. The subscription data of the phone (stored in
MPB and WTIB or the wireless terminal) should be erased separately at both User Station
and Attendant Station using the Unsubscribe procedure. To unsubscribe a wireless terminal,
it should be in an idle state.
To Unsubscribe from the Attendant Station:
TRANS/PGM
+ 0# +
Flex. Button 2 + Station No. +
HOLD/SAVE
1) Press [TRANS/PGM] button. ([TRANS/PGM] LED flashes and [MON] LED lights
steady.)
2) Press 0#.
3) Press Flexible button 2.
4) Enter the station number.
5) Press [HOLD/SAVE] button and confirmation tone is heard.
6) Confirmation tone (or error tone) will be heard at the Station, and the corresponding
Attendant Station.
7) LCD message “No Subscription” will be displayed if there is no subscribed system.
In rare cases when subscription data must be deleted from a lost phone, etc., the following
procedure may be used.
To Unsubscribe users locally in the system from the Attendant Station:
To unsubscribe all wireless terminals at once,
TRANS/PGM
+ 0 #+
Flex. Button 7 + Password (147*) + HOLD/SAVE
1) Press [TRANS/PGM] button ([TRANS/PGM] LED flashes and [MON] LED lights
steady).
2) Press 0#.
3) Press Flexible button 7.
4) Enter the Password (default=147*).
5) Press [HOLD/SAVE] button and confirmation tone is heard.
6) Confirmation tone (or error tone) will be heard at the Station, and the corresponding
Attendant Station.
To unsubscribe one subscribed wireless terminal,
TRANS/PGM
Flex. Button 8 +
Station No +
+0#+
HOLD/SAVE
1) Press [TRANS/PGM] button ([TRANS/PGM] LED flashes and [MON] LED lights
GDC-500H Wireless Handset
User Guide
2)
3)
4)
5)
6)
steady).
Press 0#.
Press Flexible button 8.
Enter the Station No.
Press [HOLD/SAVE] button and confirmation tone is heard.
Confirmation tone (or error tone) will be heard at the Station, and the corresponding
Attendant Station.
Authentication
Verifies the wireless terminal and/or the user with the System. The User inputs the User
Personal Identification (UPI) or Authorization code/PIN (5-digits), when requested by System
Attendant.
To Authenticate a User from the Attendant Station:
TRANS/PGM
+ 0# +
Flex. Button 5 + Station No +
HOLD/SAVE
1) Press [TRANS/PGM] button ([TRANS/PGM] LED flashes and [MON] LED lights
steady).
2) Press “0 #’ (‘0 #’ in ipLDK-24/100/300/300E).
3) Press Flexible button 5.
4) Enter a station number to be authenticated.
5) Press [HOLD/SAVE] button and confirmation tone is heard.
To Authenticate a User from the Wireless Terminal:
When the attendant presses [HOLD/SAVE], a message asking for User
authentication will be displayed on the wireless terminal along with an audible
confirmation tone.
PIN (5 digit) +
OK
1) Enter five-digit Authorization code/PIN.
2) Press OK (
) button longer than 1 second.
Confirmation tone (or error tone) will be heard at the Station, and the corresponding
Attendant Station.
Registering GDC-500H to LWS-BS (LG-Ericsson Wireless SOHO-Base Station)
Prior to accepting a connection with a GDC-500H, a registration to services must be entered
into your LWS system. This is accomplished in a two step process: the LWS-BS enables
registration of a phone to the system, then the GDC-500H subscribes to the LWS-BS for
services.
Note:
If the PIN code of LWS base station is not 1111, the handset can’t subscribe to Base
station. So, check if the PIN code of LWS BS is 1111 before subscription.
Enabling Registration
To enable a registration, from the LWS-BS;
1. Press [Menu] button.
2. Press [Digit 1] (CONFIGURATION submenu), or
GDC-500H Wireless Handset
User Guide
Select [1. CONFIGURATION] using Navigation up/down key and [OK] Button.
3. Press [Digit 4] (STATION REGISETR submenu), or
Select [1. STATION REGISTRATION] using Navigation up/down key and [OK] Button.
4. Press [Digit 1] (REGISTER STATION submenu), or
Select [1. REGISTER STATION] using Navigation up/down key and [OK] Button.
5. Select the phone type using Navigation left/right key (GDC-4XX)
6. Press Navigation [OK] button or [OK] soft key.
7. When the registration is completed below message is shown on LWS-BS LCD.
STATION: 10X
SUBSCRIBED: SUCCESS
Note:
Don’t press Monitor or Speaker button at the LWS-BS until the GDC-500H completes the
registration and registration confirmation tone is heard.
Registering to the LWS-BS
When registering to LWS-BS you will need the system’s unique Radio Frequency Personal
Identification (RFPI). Also, before starting the registration process make sure you are close
to an active LWS-BS.
To register to the system from the GDC-500H:
1. Press the Menu (
) button to display the menu.
2. From the menu use the Navigation (
) button to highlight Phone Register.
3. Press the OK (
) button; this displays the Phone Register menu.
4. Select “LWS Subscription” using the up and down arrows of the Navigation (
)
button and press the OK (
) button.
5. The GDC-500H searches for the LWS-BS, displaying and “Searching..1”. When a
LWS-BS is found, its RFPI, is displayed. The RFPI of your LWS-BS is available from
your System Administrator, or perhaps the attendant.
6. Press OK (
) button while highlighting the RFPI to continue the registration to the
system, or Press No (
) button to continue the search.
7. Press OK (
) button; on successful registration, a confirmation tone is received at
the GDC-500H and the LWS-BS.
8. If the registration fails, repeat procedure from Step 1 to 6 at the LWS-BS and Step 1 to
8 from the GDC-500H (refer to Note).
Note:
Depending on the LWS-BS or radio channel environment, the LWS-BS or the wireless
terminal may not recognize that the LWS-BS has the subscribed wireless terminal or the
wireless terminal is subscribed to the LWS-BS. Once a user has performed the subscription
procedure, the user should attempt to make a call. Then, if a user can’t make a call, the
subscription procedure should be conducted again after selecting the unsubscribe menu item.
Terminating a registration from LWS-BS
Unsubscribing will make a wireless terminal lose connection to the LWS-BS. To unsubscribe
a wireless terminal, it should be in an idle state.
To Unsubscribe from the LWS-BS:
1. Press [Menu] button.
GDC-500H Wireless Handset
User Guide
2. Press [Digit 1] (CONFIGURATION submenu), or
Select [1. CONFIGURATION] using Navigation up/down key and [OK] Button.
3. Press [Digit 4] (STATION REGISETR submenu), or
Select [2. DEREGISTER] using Navigation up/down key and [OK] Button.
4. Press [Digit 2] (DEREGISTER submenu), or
Select [2. DEREGISTER] using Navigation up/down key and [OK] Button.
5. Select phone number using Navigation left/right key (S101 ~ S107)
6. Press Navigation [OK] button or [OK] soft key.
7. When the unsubscribing is completed below message is shown on LWS-BS LCD.
STATION: 10X
UNSUBSCRIBED: SUCCESS
Note:
DEREGISTER : You want to erase registration information of both Base Station (LWSBS) and Wireless terminals (GDC-500H).
FORCED ERASE : You want to erase registration information of the relevant Wireless
Terminal.
(e.g. in case that the terminal is OFF or missed)
In this case, the registration information will be kept on the terminal
itself.
All Data ERASE : You want to erase registration information of all wireless terminals.
In this case, the registration information will be kept on the terminals
themselves.
[ Procedure of erasing the registration information on the terminal itself ]
1. Press [Menu] button.
2. Select [Phone Register] and press [OK] button.
3. Select [Reset] on the Menu and press [OK] button.
4. Enter HS PIN Code [default: 0000] using dial button and press [OK] button.
5. Select [Handset] on the menu and [OK] button.
GDC-500H User Operation
The following is provided as quick reference for commonly used features/functions.
Complete instructions are included in the User Guide.
Answering a Call while idle:
1. While handset is ringing, incoming call icon flashes and Caller ID is displayed (if
available).
2. Press Talk button to answer; phone icon and call type is displayed.
3. MUTE - press left soft button (Options), and up/down navigation to select; stops sound
on a call (press right soft button to deactivate).
4. VOL – press up/down navigation buttons to adjust sound while on a call.
Answering a Call while busy:
1. Press & hold 1sec the right arrow navigation button; the active call is placed on hold
and the call waiting is connected.
NOTE: This procedure also works for placing a call on hold in order to place another call.
The active call will hear System source music (if programmed) while on hold.
GDC-500H Wireless Handset
User Guide
Rejecting a Call while busy:
1. Press End button; all signaling will stop.
Using Do Not Disturb (DND):
1. Press the Talk button and dial DND code (refer to system admin. or attendant); a
confirmation tone is heard.
2. When finished, press the End button; the handset will return to idle state (DND OFF).
Using Camp-On:
1. When calling a busy Station, press *.
2. Wait for party to answer or press End button to leave call back request.
Pickup a Call to another Station:
1. Press the Talk button; the dial tone will be heard.
2. Dial the Directed Call Pick-up Code (refer to User Program Codes in System User
Guide).
3. Dial the number of the ringing station.
Pickup a Call from a Station in your Group:
1. Press the Talk button; the dial ton will be heard.
2. Dial Group Call Pickup code.
NOTE: In the event of a private line call back, callback, etc. you will not be permitted to pick
up a ringing call..
Join a Conference:
1. Press the Talk button; dial tone will be heard.
2. Dial conference Room Join code (refer to User Program Codes in System User Guide).
3. Enter Conference Room number (1-9).
Call Hold:
NOTE: Refer to Note in Answering a Call While Busy.
Call Forward:
1. Press the Talk button; dial tone will be heard.
2. Dial Call Forward code (refer to User Program Codes in System User Guide).
3. Dial the type of forward code (0-9).
1=Unconditional, 2=Busy, 3=No Answer, 4=Busy/No Answer, 5-9=Off-Net Forward (refer
to System Admin.), 0=Follow-me
4. Dial the destination number.
5. Press the End button.
GDC-500H Wireless Handset
User Guide
Delete Call Forward:
1. Press the Talk button.
2. Dial 5 + 5 +9 or 5+ 5 + 4 + #. (Confirmation tone will be heard)
Call Transfer:
1. While on an active call, press the right arrow navigation button; the call is placed on
hold and dial tone is received.
2. Place call to the transfer destination.
3. Remain on the line to announce the call and/or press the End button to complete the
transfer.
Using Call Log:
1. Press the left soft button (Menu).
2. Use Navigation button to highlight selection.
3. Press the OK left soft button to access the sub-menu.
4. Press right-soft button (Back) to return to previous menu.
Using Phonebook:
When idle1. Press right-soft button to access Names (Phonebook).
2. Press Navigation button to select a listing.
NOTE: Calls also can be placed from the phone book using this procedure.
When on an active call1. Press the left-soft button (Options).
2. Use the Navigation button to highlight the Phonebook selection and press left-soft
button (OK).
Dialing from Phonebook:
1. Access the Phonebook as described above.
2. Use the Navigation button to highlight Find and press left-soft button (OK).
3. Search Records by entering first few characters of Contact’s name using keypad; the
matching name will display.
4. Press the right-soft button (Call) to place the call.
Last Number Redial:
1. Press right arrow Navigation button; the last seven dialed numbers are displayed.
2. Use up/down Navigation to highlight the desired number and press the left-soft button
(Option).
3. Highlight Call in the Option menu, and press the left-soft button; the number is dialed.
GDC-500H Wireless Handset
User Guide
User Program Codes
The host system permits user control of a number of features including Temporary COS,
Wake-up Alarm Clock, etc. You access the various controls through the User Program
(Pgm) feature using codes. The various codes and features vary between systems; your
System Administrator can provide you with available codes. The table below is an example
of User Pgm codes and their use.
To access a User Program:
1. Press the Talk (
) button, you receive dial tone.
2. Press and hold, 1 second, the Speed/Program (
) button.
3. Dial the User Pgm Code and any required entry. See your System Administrator for
codes.
4. Press and hold, 1 second, the Speed/Program (
) button.
5. Press the End (
) button.
Example of User Program Code Chart
User Pgm Code
Description
Display
Remark
CALL COVERAGE
1=On, 0=Off
14 & x
MODE
Call Coverage
x=1 - 0
DELAY RING CYCLE
Dial 0-9
21
Temp COS
ICM ONLY MODE
ENTER CURRENT
22
Restore COS
PASSWORD
COS OVERRIDE CODE
COS Override
23
(User Authorization
(Walking COS)
Code)
[1] ST: STATION MSG
[2] CL: CALLER ID MSG
[3] VS: SYSTEM VOICE
MAIL
31 & x (Msg
Message Wait Retrieval
[4] VM: COMMERCIAL
Type)
VOICE MAIL
[5] US: UMS SERVER
VM
[6] SMS MESSAGE
33 & System
ENTER CURRENT
Station No.
Authorization code
PIN
PASSWORD
+ Auth Code
34 & x
DID Call Wait
DID WAIT
1=On, 0=Off
x= 1 – 0
35 & x
Select Msg alert choice
CHOICE EXE/SEC MSG 1=On, 0=Off
x=1 - 0
Create and send or resend
Resend = 1
36 & x (type)
SMS SEND MODE
message
Edit = 2
37 & x
REGISTER MOBILERegister a mobile phone
1=On, 0=Off
x=1 - 0
EXT
38 & mobile
Activate a mobile phone
ACTIVATE MOBILE-EXT Tel number
number
registrations
Register the mobile phone
1=On, 0=Off
CLI
Hh/mm,
41 & time
Set wake-up alarm time
YOUR WAKEUP TIME
24-hour
GDC-500H Wireless Handset
User Guide
User Pgm Code
Description
42
Cancel Wake-up Alarm
51 & Msg
number [xx]
Set Pre-defined Msg.
52
Create a Station User
Message
53 & Rm & Auth
Code
54 & Rm & Auth
Code
71
Set language for the display
72
Software Version
Start a Conf Room
Close a Conf Room
Display
Remark
clock
ERASED WAKEUP
TIME
MESSAGE
DEACTIVATED
[00] USER CUSTOM
MSG
[01] LUNCH RETURN
TIME
[02] VACATION TIME
[03] OUT OF OFFICE
TIME
[04] OUT OF OFFICE
DATE
[05] OUT OF OFFICE
[06] CALL TO STATION
[07] IN OFFICE
STATION
[08] IN A MEETING
TIME
[09] AT HOME
[10] AT BRANCH
OFFICE
[11-20] UN-REGISTER
MSG
MESSAGE : 00
DIAL NO (1-9) AND
PASSWD
DIAL NO (1-9) AND
PASSWD
Domestic / English
S/W VERSION /
COUNTRY
74 & Name
User name creation
NAME
75
Display IP address
DISPLAY GATEWAY IP
ADDRESS
77
Display MAC address
DISPLAY GATEWAY
MAC ADDRESS
2 digit for
each
character
IP Address
displayed
w/o dot
separator
MAC
GDC-500H Wireless Handset
User Guide
GDC-500H Wireless Handset
User Guide