1
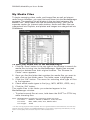
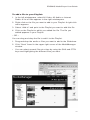
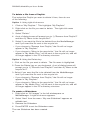
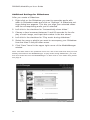
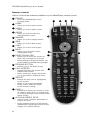
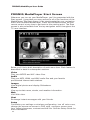
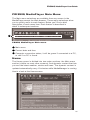
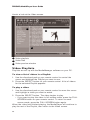
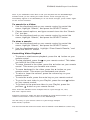
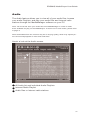
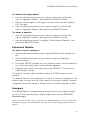
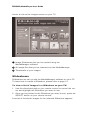
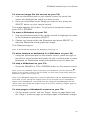
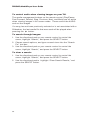
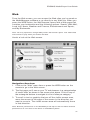
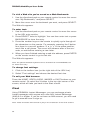
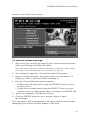
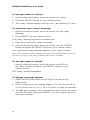
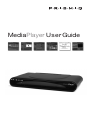
MediaPlayer User Guide
PRISMIQ MediaPlayer User Guide
PRISMIQ and the PRISMIQ logo are trademarks of PRISMIQ, Inc. in the United
States of America. Other company or product names mentioned herein may be
trademarks of their respective owners.
The example companies, organizations, products, domain names, email addresses,
logos, people, places, and events depicted herein are fictitious. No association with
any real company, organization, product, domain name, email address, logo, person,
place, or event is intended or inferred.
© 2003 PRISMIQ, Inc. All rights reserved. 330-0050-006
(888) 880-1583
2
PRISMIQ MediaPlayer User Guide
Table of Contents
PRISMIQ MediaManager Software . . . . . . . . . . . . . . . . . . . . . . . . . 4
Overview . . . . . . . . . . . . . . . . . . . . . . . . . . . . . . . . . . . . . . . . . . 4
Starting MediaManager . . . . . . . . . . . . . . . . . . . . . . . . . . . . . . . 7
My Media Files . . . . . . . . . . . . . . . . . . . . . . . . . . . . . . . . . . . . . . 8
Video and Audio Playlists and Image Slideshows . . . . . . . . . . . 10
Internet Radio (MediaManager) . . . . . . . . . . . . . . . . . . . . . . . . 15
Web Bookmarks . . . . . . . . . . . . . . . . . . . . . . . . . . . . . . . . . . . . 17
Stock Data . . . . . . . . . . . . . . . . . . . . . . . . . . . . . . . . . . . . . . . . 18
Weather Locale Information . . . . . . . . . . . . . . . . . . . . . . . . . . . 19
PRISMIQ MediaPlayer . . . . . . . . . . . . . . . . . . . . . . . . . . . . . . . . . 21
Navigating Basics . . . . . . . . . . . . . . . . . . . . . . . . . . . . . . . . . . . 21
Remote Control . . . . . . . . . . . . . . . . . . . . . . . . . . . . . . . . . . . . 22
Turning on the MediaPlayer . . . . . . . . . . . . . . . . . . . . . . . . . . . 23
PRISMIQ MediaPlayer Start Screen . . . . . . . . . . . . . . . . . . . . . 24
PRISMIQ MediaPlayer Main Menu . . . . . . . . . . . . . . . . . . . . . . 25
Home . . . . . . . . . . . . . . . . . . . . . . . . . . . . . . . . . . . . . . . . . . . . 25
Video . . . . . . . . . . . . . . . . . . . . . . . . . . . . . . . . . . . . . . . . . . . . 27
Video Playlists . . . . . . . . . . . . . . . . . . . . . . . . . . . . . . . . . . . . . 28
Advanced Video Features . . . . . . . . . . . . . . . . . . . . . . . . . . . . .30
Audio . . . . . . . . . . . . . . . . . . . . . . . . . . . . . . . . . . . . . . . . . . . . 31
Audio Playlists . . . . . . . . . . . . . . . . . . . . . . . . . . . . . . . . . . . . . 32
Internet Radio (MediaPlayer) . . . . . . . . . . . . . . . . . . . . . . . . . . 33
Images . . . . . . . . . . . . . . . . . . . . . . . . . . . . . . . . . . . . . . . . . . . 33
Slideshows . . . . . . . . . . . . . . . . . . . . . . . . . . . . . . . . . . . . . . . . 34
Web . . . . . . . . . . . . . . . . . . . . . . . . . . . . . . . . . . . . . . . . . . . . . 37
Chat . . . . . . . . . . . . . . . . . . . . . . . . . . . . . . . . . . . . . . . . . . . . . 38
Update Firmware . . . . . . . . . . . . . . . . . . . . . . . . . . . . . . . . . . . 41
Technical Specifications . . . . . . . . . . . . . . . . . . . . . . . . . . . . . . . . 43
PC Requirements for MediaManager Software . . . . . . . . . . . . . . . 44
3
PRISMIQ MediaPlayer User Guide
PRISMIQ MediaManager Software
The PRISMIQ MediaManager software installs from the PRISMIQ
CD onto your Windows-based PC and allows you to organize and
set up content for the MediaPlayer. You can manage your media files
and many other functions from this software, including: MPEG-1,
MPEG-2, MPEG-4 or AVI* video files; MP3, WMA, and WAV audio
files; Internet radio stations; and JPEG image files. You can also set
up custom information (live weather, stocks, etc.) for display on the
MediaPlayer Home screen on the TV.
This section assumes that you have already installed the PRISMIQ
MediaManager software using the instructions in the Setup Guide. If
you have not done this yet, please do so now. Then return to this section to start using the MediaManager.
Overview
Media content is organized into the following categories:
My Media Files
Contains all video, audio, image and Internet radio station files imported to the MediaManager. This is one of the two top level categories,
along with “My Custom Info.”
• All Video
A subset of “My Media Files,” containing video files.
• All Audio
A subset of “My Media Files,” containing audio files and Internet
radio station listings.
• Internet Radio
A place to add your favorite Internet radio stations (for example,
http://www.shoutcast.com). Default stations are provided.
• All Images
A subset of “My Media Files," containing JPEG digital photos.
• Playlists and Slideshows
Create, edit, and delete Playlists, which contain selected video or audio
files from ”My Media Files.” “Internet Radio” appears as a selection on
the Audio Playlist in the MediaPlayer. You can also create and edit
image Slideshows using JPEG images and adding audio.
• Watched Folders
A tool that will automatically scan and save, without user
intervention, assigned PC directories and categorize files into
Playlists and Slideshows.
* AVI is a general audio-video format designator. The PRISMIQ MediaPlayer can play Motion-JPEG (OpenDML) and
DivX® encoded video files. DivX is a registered trademark of DivX Networks. The DivX video playback technology provided in the PRISMIQ MediaPlayer is not provided or approved by DivX Networks and may result in a lower quality
video and audio output than a DivX branded solution.
4
PRISMIQ MediaPlayer User Guide
My Custom Info
Contains all customizable Web, stock, and weather information that
displays on the MediaPlayer Home screen. This is one of the two top
level categories, along with “My Media Files.”
• Web Bookmarks
Add, edit, and delete your favorite Web sites.
• Stock Data
Add and delete stock market information to display on the
MediaPlayer Home screen.
• Weather Locale
Enter your zip code, city, and state for local weather information to
display on the MediaPlayer Home screen. In Canada, enter your
postal code, city and province.
About Video, Audio, Image
and Internet Radio Station Files
To make your video, audio, image, and Internet radio station files
available for play on the MediaPlayer, you must first scan them into
MediaManager. Refer to the “My Media Files” in the MediaManager
section on page 8 for details.
Once you’ve scanned and saved your files, you can organize them
into Playlists and Slideshows. Refer to the “Video and Audio Playlists
and Image Slideshows” section on page 10 for details.
In addition to your saved playlists, you can also set up “Watched
Folders” that MediaManager will scan regularly for new and changed
media files.
Note: Image files can be organized into Slideshows. Please see “Slideshows” in the
MediaManager section on page 12 for more details.
Right-click Menus
Throughout the MediaManager software, right-clicking brings up a
context menu (or series of menus) with more options. For example,
you can right-click on “All Audio” and choose to add a new Playlist, or
right-click on a video file and choose to delete the file, or you can
right-click on an Internet radio station file to play that station.
5
PRISMIQ MediaPlayer User Guide
Double-clicking on MediaManager Content
When you double-click on a video, audio, image, or Internet radio
station file, the file will open in the Windows application that you've
associated for that type of media.
When you double-click on a Web bookmark, your Web browser will
open with the Web site you saved.
When you double-click on a stock symbol or weather location, your
Web browser will open with stock market or weather information.
Display of Media Content Information
You can change the way media content information is displayed
in the following ways:
• Column Order
Drag a column left or right past other columns to change the
order in which it appears.
• Column Size
Drag the border between columns left or right to change the
size of columns.
• Item Sort
Click on a column header to sort items in ascending or
descending order.
• Manual Sort
Drag and drop files within Playlists/Slideshows to adjust the order
of files to your liking.
Resizing the MediaManager Window
Click and drag the lower right corner of the MediaManager window
to increase or decrease its size. (Or you can select the minimize
or maximize buttons / in the top right corner of the MediaManager
window.)
6
PRISMIQ MediaPlayer User Guide
Starting MediaManager
To start MediaManager:
• Double-click the PRISMIQ MediaManager icon in the system tray
(lower right corner of desktop).
– OR –
• Use the Windows “Start” menu to locate “PRISMIQ MediaManager”
in the “Programs” menu, and click on it.
The MediaManager window appears.
2
3
4
5
6
7
8
1
9
1
Media categories.
2
Save any changes (such as new Playlists).
3
Search and scan for media files to incorporate into MediaManager.
4
Display instructions on how to use MediaManager software
(Adobe Acrobat Reader required).
5
Minimize the MediaManager window.
6
Maximize the MediaManager window.
7
Close the MediaManager window and exit the
MediaManager program.
8
Change column order, size, or item sort.
9
Items in a media category.
7
PRISMIQ MediaPlayer User Guide
My Media Files
To begin managing video, audio, and image files as well as Internet
radio source locations, you must first scan them into the MediaManager
program. The resulting list will display in the top level category “My
Media Files.” While these files are all handled similarly, you’ll find a
separate section for Internet radio stations. Audio and video files are
categorized into Playlists, and photos and images are categorized into
Slideshows.
To scan your media files to the MediaManager:
1. Click the “Scan” button in the top right of the window to search for
media files to bring into the MediaManager. Media files are not
moved or deleted from their original location. The “Browse for
Folder” menu appears.
2. Once you find the folder that contains the media files you want to
add, click on that folder name. The folder name is highlighted.
3. Click the “OK” button. The menu for selecting what type of files
to find appears.
4. Check which media types to find (e.g., MP3, MPEG, JPEG, etc.).
5. Click the “OK” button.
The media files in the folder you selected appear in the
MediaManager window.
• To select several files at once, hold down the SHIFT or CTRL key
while choosing files.
Note: MediaManager supports the following media file types:
For Video:
MPEG-1, MPEG-2, MPEG-4, VOB, and AVI*
For Audio:
MP3, WMA, WAV, AC3, MPEG audio
For Images: JPEG
* AVI files currently played are DivX ® compatible. DivX is a registered trademark of DivX Networks. The DivX video
playback technology provided in the PRISMIQ MediaPlayer is not provided or approved by DivX Networks, and may
result in a lower quality video and audio output than a Divx branded solution.
8
PRISMIQ MediaPlayer User Guide
To delete media files from “My Media Files”:
Option 1: Using right-click menus
1. Click on “My Media Files.” This highlights “My Media Files.”
2. Right-click on the media file you want to delete. The right-click
menu appears.
3. Select “Delete.”
4. A set of dialog boxes will prompt you to 1) "Remove from Playlist?"
and then 2) "Move to the recycle bin?”
5. Select if you want the file to be deleted from the MediaManager
and if you want the file sent to the recycle bin.
• If you choose to "Remove from Playlist," the file will no longer
appear in “My Media Files.”
• If you choose to "Move to the recycle bin," the file will no longer
appear in "My Media Files," will be sent to the recycle bin, and will
no longer appear in the PC’s directory structure.
Option 2: Using the Delete key
1. Click on the media file you want to delete. The file name is highlighted.
2. Press the Delete key on your keyboard. A set of dialog boxes will prompt
you to 1) "Remove from Playlist?" and then 2) "Move to the recycle bin?”
3. Select if you want the file to be deleted from the MediaManager
and if you want the file sent to the recycle bin.
• If you choose to "Remove from Playlist," the file will no longer
appear in “My Media Files.”
• If you choose to "Move to the recycle bin," the file will no longer
appear in "My Media Files," will be sent to the recycle bin, and will
no longer appear in the PC’s directory structure.
Note: Deleting a media file from “My Media Files” will also delete it from any Playlist
to which you may have added it.
• To select several files at once, hold down the SHIFT key or Ctrl key
(for multi-select) when choosing files.
9
PRISMIQ MediaPlayer User Guide
Video and Audio Playlists and Image Slideshows
You can organize your video and audio files into Playlists, and image files
into Slideshows. Once you’ve created a Playlist or Slideshow, you can add
or remove files from “My Media Files.” Playlists can contain only one media
type – either video files or audio files, but not both.
To create a new Playlist:
1. In the left windowpane, highlight either All Video or All Audio, and
right-click. The right-click menu appears.
2. Select “New” from the menu. A folder appears with “My new
playlist” as editable text.
3. Name the Playlist.
4. Press ENTER to set the Playlist name.
The new Playlist you created is highlighted.
You can also add to Playlists automatically by using the Watched
Folders feature. This function will automatically scan and save files in
particular computer folders you designate whenever new files are
added to it.
To scan a folder and create a new Playlist automatically:
1. Click “Scan.”
2. Browse for the folder you want and select it.
3. A dialog box opens allowing you to check which media file
types you want.
• Remember, only the same file types (i.e., audio or video) can
be incorporated into a Playlist; audio and video files cannot be
combined in a Playlist.
4. Select the type you want and click OK. The folders are
automatically added as a Playlist to the appropriate category (e.g.,
folders on the hard drive containing audio files will be added to the
audio Playlists designated, and folders within a folder being
scanned will be grouped into Playlists based on the Windows
folder names).
Note: You can “import” playlists from third-party programs that conform to the M3U,
M3Uextended or PLS playlist formats by right-clicking on “All Audio” and selecting
“Import.”
10
PRISMIQ MediaPlayer User Guide
To add a file to your Playlist:
1. In the left windowpane, select All Video, All Audio or Internet
Radio. A list of files appears in the right windowpane.
2. Right-click on the file you want to add to your Playlist. A right-click
menu appears.
3. Select “Add to” and point to the Playlist you want to add this file.
4. Click on the Playlist to which you added the file. The file you
added appears in your Playlist.
– OR –
You can drag and drop the file to add it to the Playlist.
1. Drag-and-drop the audio or files you want to add to the Slideshow.
2. Click “Save” found in the upper right corner of the MediaManager
window.
•
You can select several files at a time by using the Shift and CTRL
keys and highlighting the different files you want.
11
PRISMIQ MediaPlayer User Guide
To delete a file from a Playlist:
First select the Playlist you want to delete it from, then do one
of the following:
Option 1: Using right-click menus
1. Click on "My Playlists." This highlights "My Playlists."
2. Right-click on the file you want to delete. The right-click menu
appears.
3. Select "Delete."
4. A set of dialog boxes will prompt you to 1) "Remove from Playlist?"
and then 2) "Move to the recycle bin?"
5. Select if you want the file to be deleted from the MediaManager
and if you want the file sent to the recycle bin.
• If you choose to "Remove from Playlist," the file will no longer
appear in "My Playlists."
• If you choose to "Move to the recycle bin," the file will no longer
appear in "My Media Files," will be sent to the recycle bin, and will
no longer appear in the PC’s directory structure.
Option 2: Using the Delete key
1. Click on the file you want to delete. The file name is highlighted.
2. Press the Delete key on your keyboard. A set of dialog boxes will
prompt you to 1) "Remove from Playlist?" and then 2) "Move to the
recycle bin?"
3. Select if you want the file to be deleted from the MediaManager
and if you want the file sent to the recycle bin.
• If you choose to "Remove from Playlist," the file will no longer
appear in "My Playlists."
• If you choose to "Move to the recycle bin," the file will no longer
appear in "My Media Files," will be sent to the recycle bin, and will
no longer appear in the PC’s directory structure.
To create a Slideshow:
1. Right-click on “All Images” in the left windowpane on
MediaManager. A right-click menu appears.
2. Select “New” from the menu. “My new Slideshow” appears as
editable text.
3. Rename the Slideshow.
4. Press ENTER to set the Slideshow name.
The new Slideshow has been created.
12
PRISMIQ MediaPlayer User Guide
To add an Image file to a Slideshow:
1. Click on All Images. All of the image files you’ve imported into the
MediaManager appear.
2. Drag-and-drop the image files you want to add to the Slideshow.
3. Click “Save” found in the upper right corner of the MediaManager
window.
Note: Alternatively, you can right-click on an image and select “Add to” to place it in a
particular Slideshow.
To delete an Image file from a Slideshow:
First select the Slideshow from which you would like to delete an
image, and then do one of the following:
Option 1: Using right-click menus
1. Right-click on the file you want to delete. The right-click menu
appears.
2. Select “Delete.”
3. A dialog box appears, asking “Are you sure you want to delete
<filename> from the Slideshow?”
4. Select if you want the file to be deleted from the Slideshow. The
image file will still appear in “All Images.”
– OR –
Option 2: Using the Delete key
1. Click on the file you want to delete. The file name is highlighted.
2. Press the Delete key on your keyboard. A dialog box appears, asking "Are you sure you want to delete <filename> from Slideshow?"
3. Select if you want the file to be deleted from the Slideshow. The
image file will still appear in “All Images.”
13
PRISMIQ MediaPlayer User Guide
Additional Settings for Slideshows
After you create a Slideshow:
1. Right-click on the Slideshow you want to associate audio with
when in Slideshow mode and click on “Settings.” A Slideshow settings dialog box appears. This lets you align your selected slides
with the corresponding audio you’ve selected.
2. Left-click in the checkbox for “Automatically show slides.”
3. Choose a time increment between 2 and 60 seconds for the display of each image, and input that number in the box shown.
4. Left-click in the checkbox for “Play music during slideshow.”
5. Select the song or playlist you want to accompany your Slideshow
from the titles in the pull-down menu.
6. Click “Save” found in the upper right corner of the MediaManager
window.
Note: The audio titles in the pull-down menu are a list of the audio files that you have
already scanned into the MediaManager. To play audio during Slideshows, you must
first scan audio files into the MediaManager. To learn how to scan audio files, please
see page 8.
14
PRISMIQ MediaPlayer User Guide
Internet Radio
You can select radio stations from any Web site that streams MP3
files in the “Playlist” (.pls) file format or Live365’s format. They then
will appear and play on the MediaPlayer as part of the “Audio” screen.
Some examples of these Web sites are http://www.shoutcast.com;
http://www.live365.com; http://www.radio-locator.com and
http://www.somafm.com.
To add an Internet radio station:
1. Open the MediaManager and select the Internet Radio
sub-category under “My Media Files.”
2. Go to a Web site that streams MP3 files in the .pls file format and
browse through the different stations listed.
3. Select the station you want and drag-and-drop into MediaManager.
A dialog box appears asking you to enter a name for the new station in the Station Name text box. The station URL already
appears in the appropriate text box.
4. Enter a name and click OK.
– OR –
1. In the Internet radio station Web site, right-click on the station
you want and select “Copy Shortcut” or “Copy Link Location.”
2. Select the Internet Radio folder in the MediaManager and rightclick in the window. A dialog box appears asking you to enter a
name and URL for the station.
3. Type in a name in the Station Name text box, and press CTRL-V
to paste the copied URL to the Station URL text box.
4. Click OK.
The station URL appears in the MediaManager window and is now
available at the MediaPlayer user interface on the TV.
15
PRISMIQ MediaPlayer User Guide
To delete an Internet radio station:
Option 1: Using right-click menus
1. Open the MediaManager and find the Internet Radio sub-category.
2. Right-click on the station you want to delete. The right-click menu
appears.
3. Select “Delete.”
The radio station is deleted.
Option 2: Using the Delete key
1. Click on the radio station URL you want to delete. The file name
is highlighted.
2. Press the Delete key on your keyboard.
The radio station URL is deleted and it no longer appears in the
Internet Radio list.
Watched Folders
With Watched Folders, you can select specific folders on your hard
drive to be automatically scanned by MediaManager software whenever a new media file is added to those specific folders. Watched
Folders can contain audio, video, image files, or any combination of
the three. Your Playlists and/or Slideshows will appear at the
MediaPlayer user interface on the TV without having to manually
“Scan” and “Save” on MediaManager back at the PC.
To add a Watched Folder:
1. Open the MediaManager and select the Watched Folders
sub-category above “My Media Files.”
2. Right-click in the Watched Folder windowpane, and select “New.”
3. Browse to the folder you want to watch, and click OK.
4. Choose the types of media you want MediaManager to scan for
and click OK.
Note: The Watched Folders feature is only supported on Windows 2000, XP Home,
and XP Pro.
16
PRISMIQ MediaPlayer User Guide
To delete a Watched Folder:
Option 1: Using right-click menus
1. Open the MediaManager and find the Watched Folder
sub-category.
2. Right-click on the folder you want to delete. The right-click
menu appears.
3. Select “Delete.”
The Watched Folder is deleted.
Option 2: Using the Delete key
1. Click on the folder you want to delete. The folder is
highlighted.
2. Press the Delete key on your keyboard.
The Watched Folder is deleted from the Watched Folders list.
Web Bookmarks
You can enter your favorite Web sites for display under “My Bookmarks”
on the Web screen on the MediaPlayer’s TV user interface.
To add a bookmark:
1. Click on “Web Bookmarks” to highlight this media category.
2. Right-click in the area that lists your bookmarks. A right-click
menu appears.
3. Select “New” from the menu. A dialog box appears to add a new
bookmark.
4. Enter a name for your bookmark and the Web site address (URL).
5. Click OK when you are done with your entry.
Your entry appears in your Web Bookmarks and will be accessible
from the MediaPlayer’s Web screen at the TV user interface.
17
PRISMIQ MediaPlayer User Guide
To delete a bookmark:
Option 1: Using right-click menus
1. Right-click on the bookmark you want to delete.
The right-click menu appears.
2. Select “Delete.”
The bookmark is deleted.
Option 2: Using the Delete key
1. Click on the bookmark you want to delete. The file name
is highlighted.
2. Press the Delete key on your keyboard.
The bookmark is deleted.
Stock Data
Home Screen Information Entry
You can select up to 20 stock symbols to appear on the MediaPlayer
Home screen.
To add a stock:
1. Click on “Stock Data” to highlight this media category.
2. Right-click in the area that lists your stocks and select “New.”
A dialog box appears to add a new stock symbol.
3. Enter the stock name and symbol.
4. Click the OK button when you are done with your entry.
Your entry appears in your Stock Data.
18
PRISMIQ MediaPlayer User Guide
To delete a stock:
Option 1: Using right-click menus
1. Right-click on the stock you want to delete.
The right-click menu appears.
2. Select “Delete.”
The stock is deleted.
Option 2: Using the Delete key
1. Click on the stock you want to delete.
The file name is highlighted.
2. Press the Delete key on your keyboard.
The stock is deleted.
Weather Locale Information
Home Screen Information Entry
You can select one location to appear in the weather locale information
section of the MediaPlayer Home screen.
To add a weather location:
1. Click on "Weather Locale" to highlight this media category.
2. Right-click in the area that lists your locations. A dialog box
appears to add a new location.
3. Enter your zip code, city, and state (for Canada, enter your postal
code, city and province).
4. Click the OK button when you are done with your entry.
Your entry appears in your Weather Locale information.
19
PRISMIQ MediaPlayer User Guide
To customize the information within
the weather info box on the TV:
1. Right-click on “Weather Locale” under “My Custom Info.”
2. Choose “Properties” to bring up the Weather Display Properties.
3. Uncheck or check items you want displayed on the TV.
4. Click OK to close the Weather Display Properties.
5. Click “Save” on MediaManager to save your changes.
To delete the weather location:
Option 1: Using right-click menus
1. Right-click on the location listing to delete. The right-click menu
appears.
2. Select “Delete.”
The city is deleted.
Option 2: Using the Delete key
1. Click on the city you want to delete. The city name is highlighted.
2. Press the Delete key on your keyboard.
The weather location is deleted.
20
PRISMIQ MediaPlayer User Guide
PRISMIQ MediaPlayer
The PRISMIQ MediaPlayer allows you to do the following:
• Play video files from your PC
• Play audio files from your PC, listen to Internet radio stations
• View digital photos from your PC, create slideshows
• Browse the Web
• Receive dynamic personalized information
• Chat (instant message)
This section assumes that you have already set up the PRISMIQ
MediaPlayer using the instructions in the Setup Guide. If you have not
done this yet, please do so now. Then return to this section to start
using the MediaPlayer.
Navigating Basics
Note: The instructions outlined here are for use with the standard MediaPlayer
remote control. In most instances, these same instructions will also apply for the
optional wireless keyboard (which can be purchased at www.PRISMIQ.com).
To get from screen to screen on the PRISMIQ MediaPlayer interface,
do one of the following:
Getting around using the directional
pad and the SELECT button
The directional pad on your remote control allows you to move the
cursor up, down, left, and right on a screen. Depending on your
screen location, text is highlighted or changes color to indicate where
you are on the screen.
When text is highlighted or changes color, the item can be selected.
• To select an item, press the SELECT button on your remote control.
– OR –
• Press the HOME, VIDEO, AUDIO, IMAGES, WEB, or CHAT
buttons on your remote control.
Note: For best results in navigating and selecting features, be sure to point the
remote control directly at the MediaPlayer, rather than at the TV screen.
If you are ever confused as to where you are on the MediaPlayer TV
user interface, press the
button to get back to the Start screen.
21
PRISMIQ MediaPlayer User Guide
Remote Control
Here’s a look at the features available on your MediaPlayer remote control.
1
POWER
• To put the MediaPlayer in/out
of sleep mode.
2
1
2
3
4
HOME
• Takes you to the Home screen.
3
VIDEO
• Takes you to the Video screen.
4
AUDIO
• Takes you to the Audio and
Internet Radio screen.
5
7
8
IMAGES
6
• Takes you to the Images screen.
6
5
WEB
• Takes you to the Web screen.
7
CHAT
9
• Takes you to the Chat screen.
8
BACK
• Takes you to the last screen
visited (Web only).
9
DIRECTIONAL PAD
10
11
12
• Allows you to move the cursor up,
down, left, and right on a screen.
• When viewing an image full-screen, use
to move back or forward among images.
10
PRISMIQ BUTTON
• Returns you to the Start screen.
11
FULL SCREEN
13
• Toggles between full screen and
small screen modes.
• When viewing an image full-screen,
use to get back to thumbnail view.
12
SELECT
• Selects the item you’ve highlighted
on the screen.
• When in the Images thumbnail
mode, use to select an image
for full-screen viewing.
13
PAGE + • Scrolls up or down one screen in a list
of video or audio files, on a Web page,
or scrolling through news stories on the
Home screen.
14
ALPHA-NUMERIC KEYS
• Used to enter numbers and letters on
various screens.
• Press multiple times to scroll through
alphanumeric groupings (similar to the
keypad on a mobile phone).
22
14
PRISMIQ MediaPlayer User Guide
Entering text using the remote control
To enter text in the Web or Chat sections:
1. Move the cursor to the section and press SELECT.
2. Press the number keys on the remote to quickly cycle through all the
characters on the remote, just like you might enter characters
on a cell phone. For example, pressing the “2” button four times in
a row will produce “2, a, b, c” in the same position. The cursor advances
after about one or two seconds, so wait a moment after you push the
button.
3. When you have finished entering a URL, press ENTER to go that site.
Note: A wireless keyboard for the MediaPlayer is sold separately.
See www.PRISMIQ.com to order.
Turning on the MediaPlayer
You need to use the MediaPlayer remote control and your TV remote
control to start using your MediaPlayer. Depending on your setup, you may
also need your VCR remote control. To use the MediaPlayer, you need a
TV, an Internet connection (wired or wireless), and a PC with an Internet
connection. Your PC must be on and running MediaManager in order for
the MediaPlayer to play videos, listen to audio, or view images. You can still
browse the Web, chat, and listen to Internet radio on the MediaPlayer without
running MediaManager.
Note: The MediaManager does not provide an Internet connection. It uses your existing
Internet connection to browse the Web and chat. Your Internet connection must be active in
order to browse the Web or chat using the MediaPlayer.
To start using the MediaPlayer:
1. Turn on your TV.
2. Make sure your TV is set to receive the MediaPlayer’s input via the
TV’s TV/Video selection.
• For more information on how to do this, please refer to the
Setup Guide.
3. Make sure your PC is on, and the PRISMIQ MediaManager
software is running.
4. Make sure your MediaPlayer is on. Two green lights on
the MediaPlayer’s front panel (beneath the PRISMIQ
logo) indicate that it is on and connected to a PC.
If you do not see the two green lights, press the
POWER button on your MediaPlayer’s remote control to
take the MediaPlayer out of sleep mode.
The MediaPlayer Start screen appears.
23
PRISMIQ MediaPlayer User Guide
PRISMIQ MediaPlayer Start Screen
Whenever you turn on your MediaPlayer, you’ll be presented with the
Start screen. It provides you easy access to all of the functions of the
MediaPlayer. The Start screen is the starting point for your navigation
within the PRISMIQ MediaPlayer. Press the PRISMIQ button on your
remote control at any time to get back to this starting point. The Start
screen is also selectable from the top navigation menu throughout the
TV user interface.
Below you’ll find a brief description of each menu item. Each feature is
described in detail in subsequent sections.
Video
Play your MPEG and AVI* video files.
Audio
Play your MP3, WMA, and WAV audio files and your favorite
pre-selected Internet radio stations.
Images
View digital photos and display Slideshows.
Home
View up-to-date news, stocks, and weather information.
Web
Visit Web sites.
Chat
Exchange instant messages with your friends.
Setup
Customize your settings or wireless configuration, turn off voice cues,
change the mouse-on-screen to DVD style, configure screen save
time, adjust sharpness, contrast and the like. See the Setup Guide for
more information.
24
PRISMIQ MediaPlayer User Guide
PRISMIQ MediaPlayer Main Menu
The Main menu selections are available from any screen in the
MediaPlayer except the Web browser. These menu selections allow
you to quickly move to each feature. Below you’ll find a brief
description of each menu item. Each feature is described in
detail in subsequent sections.
2
1
3
PRIMIQ MediaPlayer Main menu
1
Main menu
2
Current date and time
3
Computer connection status; it will be green if connected to a PC,
or red if no PC is found.
Home
The Home screen is divided into two major sections: the Main menu
section (visible on most other screens), and dynamic content that lets
you see the latest weather, stocks and news. The dynamic content is
updated automatically every 10 minutes while MediaManager is running.
Here’s a look at the Home screen.
25
PRISMIQ MediaPlayer User Guide
Weather
View weather forecasts for your local area.
Stock Quotes
View stock market information.
You can choose your weather and stock ticker content by using the
MediaManager software on your PC. See the MediaManager section
of this User Guide for details on configuring your information.
In the News
View and read the latest news listed under categories such as: Top
News, Finance, Technology, Politics, Entertainment and Health. When
you select a news story to read, a window opens in the upper section
of the screen and displays the text.
To select a news category to see the different items available:
1. Use the directional pad to move the cursor over the Up/Down
arrows on the right-hand side of the screen and press SELECT.
2. Scroll up and down through the different categories.
3. Highlight a category and press SELECT.
Under each category a list of the of the latest headline news appears.
To select a news item to read:
1. Using the directional pad to move the cursor, highlight the item you
want and press SELECT. The news text appears in a window
above the topic selections.
2. Scroll through the text using the scroll bar on the right or the page
up and down buttons.
You can press the FULL SCREEN button on your remote, or “+/-” on
the item you’re reading to toggle between full screen and the standard
view.
To return to the default Home page, select Previous.
Note: Additional “portal modules” may become available with free future software
upgrades, enabling enhanced personalized information to be displayed in addition to
weather, stocks and news on the Home screen.
26
PRISMIQ MediaPlayer User Guide
Indicators
A green light next to “computer” on the Home screen indicates the
MediaPlayer is connected to your computer and able to receive audio,
video and image files. A red light indicates the MediaPlayer is not
connected to a PC running MediaManager.
Check your PC connection or refer to the Setup Guide for
troubleshooting tips.
Video
The Video feature allows you to view all of your videos, browse your
video Playlists, and play videos from the files that have been imported
using the MediaManager software. The MediaPlayer supports the
following formats: MPEG-1, MPEG-2, MPEG-4, and AVI*. Additional
formats may be supported in the future via software upgrades.
When viewing MPEG-4 or AVI, please be aware that your PC will use
a greater amount of your CPU and memory than usual. If you have
any difficulties when playing these video files, you may want to close
other applications.
Note: You must first scan your video files into MediaManager in order to make them
available for play on the MediaPlayer. To learn how to import videos, please refer to
page 8.
Also note that files downloaded from the Internet may be of varying quality, which
may impact picture and sound playback on the MediaPlayer.
PRISMIQ does not advocate downloading pirated/illegal content. Please ensure that
content played with the PRISMIQ MediaPlayer does not violate copyright laws.
* AVI is a general audio-video format designator. The PRISMIQ MediaPlayer can play Motion-JPEG (OpenDML) and
DivX® encoded video files. DivX is a registered trademark of DivX Networks. The DivX video playback technology provided in the PRISMIQ MediaPlayer is not provided or approved by DivX Networks and may result in a lower quality
video and audio output than a DivX branded solution.
27
PRISMIQ MediaPlayer User Guide
Here’s a look at the Video screen.
1
3
2
1
Video playlists
2
Video files
3
Video preview window
Video Playlists
Playlists are set up with the MediaManager software on your PC.
To view a list of videos in a Playlist:
1. Use the directional pad on your remote control to control the
cursor and highlight the Playlist you want to see.
2. Press the SELECT button on your remote control. A list of videos
for the selected Playlist appears.
To play a video:
1. Use the directional pad on your remote control to move the cursor
and highlight a video you want to watch.
2. Press the SELECT button. The video begins to play.
• If you want to play the video in full-screen mode, press the FULL
SCREEN button on your remote control. To return to small
screen mode, press the FULL SCREEN button again.
When the video has finished playing, the MediaPlayer will continue to
play the rest of the Playlist, then return to the Video screen.
28
PRISMIQ MediaPlayer User Guide
Note: If you add/delete video files or edit your Playlists with the MediaManager
software while you are viewing the Video screen, those changes may not
immediately appear on the MediaPlayer. To see these changes, press "Video" again
on the TV user interface.
To search for a Video:
1. Use the directional pad on your remote control to control the
cursor, highlight “Search,” and press the SELECT button.
2. Choose search options, and type a search term into the “Search
For” text box.
3. Use the directional pad on your remote control to control the
cursor, highlight “Search,” and press the SELECT button.
To clear a search:
1. Use the directional pad on your remote control to control the
cursor, highlight “Search,” and press the SELECT button.
2. Use the directional pad to highlight “Clear Search Results,” and
press the SELECT button.
Controlling Video Playback
• To pause or start/resume playback, press the button on your
remote control.
• To stop playback, press the on your remote control. This takes
you back to the Video screen.
• To move forward in the video, press the button on your remote
control. This moves you forward one minute.
• To move backward in the video, press the button on your
remote control. This moves you backward one minute.
• To raise or lower the volume, press the volume key on your
remote control.
• To mute the audio, press the mute key on your remote control.
• To go to the next video in your Playlist, press the next | button
on your remote control.
• To go back to the previous video in your Playlist, press the
previous | button on your remote control.
Note: Press the SELECT button multiple times to cycle through 4:3, 16:9,
and 2.35:1 aspect ratios
Playback controls for Video are also accessible by using these buttons on your
remote control while in other screens of the MediaPlayer.
Use the 0 key on your remote control to cycle through multiple
audio tracks, if present.
The fast-forward and rewind functions work for MPEG-1 and MPEG-2 content only.
29
PRISMIQ MediaPlayer User Guide
Controlling Video Playback Using “Jump”
While a video file is playing, selecting “Jump” will bring up a pop-up
box that allows you to jump to a particular point in the video file.
Advanced Video Features (Experts Only)
The PRISMIQ MediaManager software includes advanced features to
control the delivery of your digital content. You can adjust this setting
for playback of various types of high-quality media content, such as
MPEG-4 or AVI*.
On your PC running MediaManager software:
1. Right-click on the MediaManager icon in your system tray and
select "Show," and then select "Media Server."
2. Click on the "Configure" button.
3. Adjust the plug-in slider bar to the desired bitrate.
Note: Increasing the plug-in bitrate will cause your PC to work harder and may cause
undesired results if you have a slower system.
Click “?” on this screen to get more information and usage options.
* AVI is a general audio-video format designator. The PRISMIQ MediaPlayer can play Motion-JPEG (OpenDML) and
DivX® encoded video files. DivX is a registered trademark of DivX Networks. The DivX video playback technology provided in the PRISMIQ MediaPlayer is not provided or approved by DivX Networks and may result in a lower quality
video and audio output than a DivX branded solution.
30
PRISMIQ MediaPlayer User Guide
Audio
The Audio feature allows you to view all of your audio files, browse
your audio Playlists, and play your audio files and Internet radio
stations through the MediaManager software on your PC.
Note: You must first scan your audio files into MediaManager in order to make
them available for play on the MediaPlayer. To learn how to scan audio, please refer
to page 8.
Files downloaded from the Internet may be of varying quality, which may impact picture and sound playback of video and audio files.
Here’s a look at the Audio screen.
2
1
1
All Audio list and individual Audio Playlists
2
Internet Radio Playlist
3
Audio files or Internet radio stations
3
31
PRISMIQ MediaPlayer User Guide
Controlling Audio playback
• To pause or start/resume playback, press the button on your
remote control.
• To stop playback, press the button on your remote control.
This takes you back to the Audio screen.
• To move forward in the song, press the button on your remote
control. This moves you forward one minute.
• To move backward in the song, press the button on your
remote control. This moves you backward one minute.
• To raise or lower the volume, press the volume key on your
remote control.
• To mute the audio, press the mute key on your remote control.
• To go to the next song in your Playlist, press the next | button
on your remote control.
• To go back to the previous song in your Playlist, press the |
button on your remote control.
Note: Playback controls for Audio are also accessible by using these buttons on your
remote control while in other screens of the MediaPlayer.
Controlling Audio Playback Using “Jump”
While an audio file is playing, selecting “Jump” will bring up a pop-up
box that allows you to jump to a particular point in the audio file.
Audio Playlists
Audio Playlists are set up with the MediaManager software on your PC.
To view a list of songs in a Playlist:
1. Use the directional pad on your remote control to control the cursor
and highlight the Playlist you want to see.
2. Press the SELECT button on your remote control.
A list of songs for the selected Playlist appears.
To play an audio file:
1. Use the directional pad on your remote control to control the
cursor and highlight the song you want to hear.
2. Press the SELECT button on your remote control.
The song begins to play.
When the song has finished playing, the MediaPlayer will continue to
play the rest of the Playlist, then return to the Audio screen.
Note: If you add/delete audio files or edit your Playlists with the MediaManager software while you are viewing the Audio screen, those changes may not immediately
appear on the MediaPlayer. To see these changes, press "Audio" again on the TV
user interface.
32
PRISMIQ MediaPlayer User Guide
To search through Audio:
1. Use the directional pad on your remote control to control the
cursor, highlight “Search,” and press the SELECT button.
2. Choose search options, and type a search term into the “Search
For” text box.
3. Use the directional pad on your remote control to control the
cursor, highlight “Search,” and press the SELECT button.
To clear a search:
1. Use the directional pad on your remote control to control the
cursor, highlight “Search,” and press the SELECT button.
2. Use the directional pad to highlight “Clear Search Results,” and
press the SELECT button.
Internet Radio
To view a list of stations:
1. Select Audio from the Main menu or press AUDIO on the remote control.
2. Use the directional pad on your remote control to highlight
Internet Radio.
3. Press the SELECT button on your remote control. A list of stations
you have imported under Internet Radio appears.
4. Highlight the station you want and press SELECT. The music or
audio begins to play.
To stop the Internet radio stream, press the STOP button on your
remote.
If a station has too many players or if there is Internet congestion, the
station may not play, and you will need to try another station. Internet
congestion may also cause a station that is currently playing to abort.
Images
The MediaPlayer’s Images feature allows you to view digital images
on your TV by scanning your digital image files into the PRISMIQ
MediaManager.
Note: You must first scan your image files into MediaManager in order to make them
available to play on the MediaPlayer. To learn how to scan images, please refer to
page 8.
33
PRISMIQ MediaPlayer User Guide
Here’s a look at the Images screen on your TV.
2
3
1
1
Image Slideshows that you’ve created using the
MediaManager software.
2
All image files that you’ve scanned into the MediaManager.
3
Thumbnails of your images.
Slideshows
Slideshows are set up with the MediaManager software on your PC.
To learn how to create a Slideshow, please refer to page 12.
To view a list of images in a Slideshow on your TV:
1. Use the directional pad on your remote control to control the cursor and highlight the Slideshow you want to see.
2. Once you’ve pointed to the Slideshow you want to see, press the
SELECT button on your remote control.
A series of thumbnail images for the selected Slideshow appears.
34
PRISMIQ MediaPlayer User Guide
To view an image file full screen on your TV:
1. Use the directional pad on your remote control to control the
cursor and highlight the image you want to see.
2. Once you’ve pointed to the image you want to see, press the
SELECT button on your remote control.
The image appears full screen. To go back to thumbnail screens
press FULL SCREEN.
To start a Slideshow on your TV:
1. Use the directional pad on the remote control to highlight the name
of the Slideshow and press SELECT.
2. Choose any image within the Slideshow and press SELECT to
start the Slideshow at that particular image.
The Slideshow begins.
Note: To automatically advance the Slideshow, see page 14.
To move forward or backward in a Slideshow on your TV:
• Using the directional pad on the remote control, press the right or
top-side to move forward and press the left or bottom-side to move
backward for Slideshows where auto-advance has not been set.
To stop a Slideshow on your TV:
• Press the IMAGES or FULL SCREEN button on the remote control.
Note: if you have selected audio to play with your Slideshow, you can press the button on the remote control to stop the audio. To learn how to play audio with your
Slideshow, please refer to page 14.
Note: If you add/delete image files or edit your Slideshows with the MediaManager software while you are viewing the Images screen, those changes may not immediately
appear on the MediaPlayer. You should save the changes to MediaManager with the
"Save" button and refresh the Images screen on the TV by selecting “Images” again on
the TV user interface.
To view pages of thumbnail screens on your TV:
• On the remote control, use the “Page-” button to page down and
the “Page+” button to page up through pages of thumbnail images.
35
PRISMIQ MediaPlayer User Guide
To control audio when viewing images on your TV:
The media management buttons on the remote control (Play/Pause,
Fast-Forward, Rewind, Stop, Previous, Next, and Mute) are all active
when viewing images in full screen mode. These control the AUDIO
and not the images.
If a song has not been previously selected or is not associated with a
Slideshow, the last media file that was used will be played when
pressing the button.
To search through Images:
1. Use the directional pad on your remote control to control the
cursor, highlight “Search,” and press the SELECT button.
2. Choose search options, and type a search term into the “Search
For” text box.
3. Use the directional pad on your remote control to control the
cursor, highlight “Search,” and press the SELECT button.
To clear a search:
1. Use the directional pad on your remote control to control the
cursor, highlight “Search,” and press the SELECT button.
2. Use the directional pad to highlight “Clear Search Results,” and
press the SELECT button.
36
PRISMIQ MediaPlayer User Guide
Web
From the Web screen, you can access the Web sites you’ve saved on
the MediaManager software or go directly to any Web site. When you
press the WEB button, the Web browser opens with a Web page that
contains your bookmarks and the following options: Search; Web Mail;
Local Info; News, Weather and Finance; Entertainment and Sports;
and My Bookmarks.
Note: You may experience a slight delay before the browser opens. Your media files
will continue to play while you browse the Web.
Here’s a look at the Web screen.
Navigation Overview:
1. Click on the “Web” menu item or press the WEB button on the
remote to go to the Web screen.
2. The first page you’ll see on your TV web browser is a categorization
of useful sites, as shown in the screen shot above. Click on any of
the rectangular buttons to navigate to a list of sites per category.
3. To scroll to text or graphics that are off the visible screen area,
move the mouse to the edge of the screen in the direction you
want to move to. The visible screen area will automatically move
in that direction.
Note: Browser performance on the MediaPlayer set-top box will not match browser
performance on a PC due to the nature of embedded systems.
37
PRISMIQ MediaPlayer User Guide
To visit a Web site you’ve saved as a Web Bookmark:
1. Use the directional pad on your remote control to move the cursor
over “My Bookmarks,” and press SELECT.
2. Move the cursor over the bookmark you want, and press SELECT.
The Web site appears.
To enter text:
1. Use the directional pad on your remote control to move the cursor
to the URL entry section.
2. Press SELECT twice to highlight. You can then enter text or press
BACKSPACE to clear the entry.
3. Press the number keys on the remote to quickly cycle through all
the characters on the remote. For example, pressing the 2 button
four times in a row will produce “2, a, b, c” in the same position,
much like a cell phone. The cursor will advance after a few seconds, so wait before entering a new letter.
4. When you have finished entering a web site address, press ENTER
on the remote control to go to that site.
The Web site appears.
Note: An optional wireless keyboard can be ordered from www.PRISMIQ.com
for easier text entry.
To change font settings:
1. Click on the toolbox icon (on the right side of the URL line).
2. Select "Font settings" and choose the desired font size.
To exit your Web browser:
Press the HOME, VIDEO, AUDIO, IMAGES or CHAT buttons on your
remote control. Or select the X button in the top right corner of the
screen, which will take you back to the Start screen.
Chat
Using PRISMIQ’s Instant Messenger, you can exchange private
instant messages with anyone who uses AOL Instant Messenger
(AIM) 6.0 or higher. If you do not have an AIM account, you will need
to go to www.aol.com to sign up.
Note: Video and audio will continue to play in the media box of the Chat screens.
38
PRISMIQ MediaPlayer User Guide
Here’s a look at the Chat screen.
To send an instant message:
1. Sign on to your account by entering your screen name and password, and clicking the SIGN ON button.
Note: The “Save Password” checkbox is defaulted to checked in order to save
your screen name and password for the next time you sign on.
2. Your buddy list appears in the bottom right of the screen.
3. Use the directional pad to move the cursor over the name of a
buddy you want to send an instant message to.
4. Do one of the following to select a buddy:
• Double-click a buddy name using the SELECT button on your
remote control.
• Single-click a buddy name using the SELECT button on your
remote control to highlight the name, and press the ENTER key.
5. Type your message in the bottom left box.
6. Click the ENTER button on your remote control to send
the message.
The message is sent and appears in the upper portion of the screen.
Messages you receive will also appear in this area.
39
PRISMIQ MediaPlayer User Guide
To set your status to “away”:
1. Use the directional pad to move the cursor over “away.”
2. Press the SELECT button on your remote control.
3. The “away” window displays with the text “I am watching TV now.”
To customize your “away” message:
1. Use the directional pad to move the cursor over the “away”
message.
2. Press SELECT on your remote control.
The “away” message appears as editable text.
3. Enter your customized “away” message.
4. Use the directional pad to move the cursor over the UPDATE
button and press the SELECT button on your remote control.
Your customized away message appears in the “away” window.
Note: Your customized “away” message is saved for your current session only. The
next time you sign on, the “away” message will revert to its default.
To set your status to “back”:
• Use the directional pad to move the cursor over BACK in
the “away” window and press the SELECT button on your
remote control.
The “away” window disappears.
To change your chat options:
1. Select the OPTIONS button on the Sign On screen or the
Chat screen.
2. A list of options you can change appears. You can turn sound on
or off; set font size to 12, 14, 18 or 24 point; or allow non-buddies.
3. To make your changes, use the directional pad to move the cursor
over the OK button and press SELECT on your remote control to
save your changes.
40
PRISMIQ MediaPlayer User Guide
To sign off your account:
• Use the directional pad to move your cursor over QUIT, and
press SELECT on your remote control.
You are signed off your account, and the CHAT Sign On
screen appears.
Note: To add or remove buddies, use your PC-based AIM client.
An optional wireless keyboard can be ordered from www.PRISMIQ.com
for easier text entry.
Update Firmware
You can easily update your MediaPlayer’s firmware by receiving new
software over your home network. This software is delivered from the
PC that is running the PRISMIQ MediaManager software. To update
your MediaPlayer’s firmware, the MediaPlayer must have a connection to the PC running the MediaManager software. First you must
update the MediaManager software, then you can update the
MediaPlayer firmware.
On the Home screen on the TV, make sure the “computer” indicator
located just below the date in the top right corner has a green light
next to it, to confirm that the MediaPlayer is connected to the
MediaManager.
To update the MediaPlayer firmware:
Once you have upgraded your PC software (MediaManager) a pop-up
message will appear at the MediaPlayer’s user interface on the TV,
prompting you to update the MediaPlayer set-top firmware. Move the
cursor over “update firmware” and press select.
After a few seconds, the MediaPlayer will reset itself and begin the
firmware update process. You will see a series of messages above a status bar as the Firmware is being updated. Please wait a few minutes until
this process is complete. The MediaPlayer will reboot itself and begin
using the new firmware once the firmware update process is complete.
To manually force an update of the MediaPlayer firmware,
do the following:
1. Load the Start screen by pressing the PRISMIQ button on the
remote control.
2. Use the directional pad on your remote control to move the cursor
over “Setup,” and press SELECT on your remote control.
2. Move the cursor over “Update Firmware,” and press SELECT.
3. Move the cursor over "Update now," and press SELECT.
41
PRISMIQ MediaPlayer User Guide
After a few seconds, the MediaPlayer will reset itself and begin the
firmware update process. You will see a series of messages above a status bar as the Firmware is being updated. Please wait a few minutes until
this process is complete. The MediaPlayer will reboot itself and begin
using the new firmware once the firmware update process is complete.
Note: A pop-up message will appear in MediaManager when a new software/firmware
release is available. You can also check http://www.PRISMIQ.com for the latest software
42
PRISMIQ MediaPlayer User Guide
Technical Specifications
CPU / system board
• NEC uPD61130 32-bit MIPS microprocessor with integrated MPEG
decoder
• 16 MBytes of flash ROM
• 64 MBytes of SDRAM
Output interfaces
• 1 S-video
• 1 composite video
• 1 S/PDIF
• 2 RCA audio (L/R stereo)
Network interfaces
• 1 Ethernet interface, 10/100BaseT
• 1 CardBus/PCMCIA card slot for 802.11a/b/g
• 1 remote IR receiver
Video formats
• MPEG-1, MPEG-2, VOB (at the STB)
• MPEG-4, Motion-JPEG, AVI* (transcoded at PC)
Audio formats
• MP3, MP2, WMA, AC3-in (at the STB)
• WAV, additional (transcoded at PC)
• Shoutcast and WMA Internet radio
Graphics formats
• JPEG, GIF, PNG
• JPEG digital photos
Digital audio
• 18-bit stereo and S/PDIF
Power requirements
• AC adapter
• Input: 100-250V~47~63Hz 0.4A
• Output: 5V-2.4A
43
PRISMIQ MediaPlayer User Guide
Set-top software
• Linux 2.4 OS
• Embedded Web browser
• AOL-compatible Instant Messaging
Standards compliance
• Product safety: CSA 60950-00/UL 60950
• Electromagnetic: EN55022B, EN5502
• Compatibility: FCC Class B
Dimensions (set-top box)
• 9” x 1.5” x 5.25” (W x H x D)
• 1.5 lbs.
Optional Components
• Wireless keyboard
PC Requirements for
MediaManager Software
• 300 MHz Pentium II or faster PC (700 MHz Pentium III
or faster PC for MPEG-4 or AVI* file playback)
• Windows ® 98 SE, ME, 2000, XP operating systems
• 65 MB of available HD space (not including media files)
• 128 MB RAM (256 MB recommended)
* AVI is a general audio-video format designator. The PRISMIQ MediaPlayer can play Motion-JPEG (OpenDML) and
DivX® encoded video files. DivX is a registered trademark of DivX Networks. The DivX video playback technology provided in the PRISMIQ MediaPlayer is not provided or approved by DivX Networks and may result in a lower quality
video and audio output than a DivX branded solution.
44