1
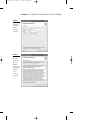
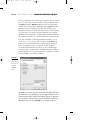
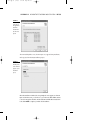
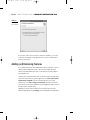
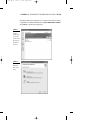
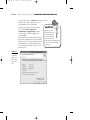
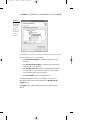
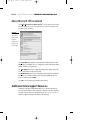
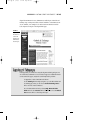
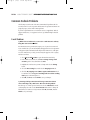
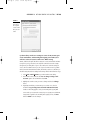
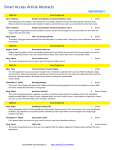
W1 9687 app ai
9/11/03
2:26 PM
Page PDF 385
In this chapter
• Understanding Microsoft Office System
2003 installation requirements.
•
Learning how to install Office 2003 and
Outlook 2003.
A
• Learning how to add and remove components and features in an Outlook 2003
installation.
Microsoft Office
Outlook 2003
Installation
New computers purchased with Microsoft Office System 2003 will
already have Microsoft Office Outlook 2003 installed as part of the
Office installation. If you purchase Office 2003 or Outlook 2003 separately from your computer, or if you are using a previous version of
Outlook and are upgrading to Outlook 2003, you will need to install
Office 2003 from the Office 2003 CD. This appendix teaches you how
to install Outlook as part of the Office 2003 installation.
If you are using Outlook in a corporate environment, in most cases your
administrator will install or upgrade to Office 2003, and you won’t have
to do any installation procedures.
W1 9687 app ai
9/11/03
PDF 386
2:26 PM
Page PDF 386
ABSOLUTE BEGINNER’S GUIDE TO MICROSOFT OFFICE OUTLOOK 2003
Outlook/Office 2003 System Requirements
Installation of Outlook 2003 and Office 2003 requires the following minimum
system configuration:
■ PC with Pentium 233MHz or higher. PIII recommended.
■ Microsoft Windows 2000 with Service Pack 3 or later, or Windows XP or later.
If you are using Windows XP, I recommend installing Service Pack 1 or later
so the Outlook options pages display correctly using Windows XP styles.
■ CD-ROM drive.
■ Super VGA (800×600) or higher resolution monitor with 256 colors. You will
have a much better viewing experience with Office 2003 if you have a
1024×768 or higher resolution monitor.
■ Microsoft mouse or compatible pointing device.
■ Minimum of 64MB RAM plus an additional 8MB RAM for each application
running at the same time. A minimum of 128MB RAM is recommended.
■ A minimum of 245MB hard drive space. Complete installation may require
699MB hard drive space or more, depending on which Office 2003 applications you are installing. Plus, you’ll need additional hard drive space for saving files and other system requirements for Windows. A practical minimum
of free hard drive space depends on how much data you will be saving from
various applications, but a minimum 2GB of free space is recommended,
including space used for Office 2003 installation.
Optional Office 2003 features may require additional hardware such as a sound
card, printer, microphone, or Tablet PC. See the instructions for the optional features
to see which additional hardware they may require.
Installing Outlook 2003
To install Outlook as part of an Office 2003 installation, insert the Office 2003 CD in
your CD-ROM drive. In most cases the Office installer will start automatically. If the
Office installer doesn’t start, open Windows Explorer and navigate to your CD-ROM
drive. Run Setup.exe in the CD’s main folder to start the Office installer.
Most installations of Outlook 2003 will be performed as part of installing Office
2003, so the references in this appendix will refer to Office 2003. If you are installing
only Outlook 2003, substitute Outlook for Office wherever it appears in this appendix.
W1 9687 app ai
9/11/03
2:26 PM
Page PDF 387
APPENDIX A
MICROSOFT OFFICE OUTLOOK 2003 INSTALLATION
PDF 387
Installation of Office 2003 and Outlook 2003 requires
certain administrative rights so the installer can write
to the Windows registry. If your current Windows
login doesn’t have administrative rights, you will
see the Install Program As Other User dialog,
shown in Figure A.1.
If you know the login and password of an administrative account on your computer, enter that information in the Install Program As Other User dialog
and then click OK to continue the installation. If
you do not have this information, click Cancel to
cancel the installation and have someone with
administrative rights on your computer perform the
Office 2003 installation.
When installation begins, the first screen, shown in
Figure A.2, prompts you to enter the 25-character
product key. Make sure to enter the product key
exactly as it appears on your Office CD, and be
absolutely sure to retain this product code in case
you need it at a later date. After entering the product key, click Next to continue to the next installation screen.
FIGURE A.1
Install Program
as Other User
dialog shown to
users without
administrative
rights.
If you purchased
Outlook 2003 as a standalone application (not with the
entire Office 2003 System), the
procedure is the same but the
choices for additional Office 2003
applications will not be available.
Different versions of Office 2003
include different Office applications, so the illustrations in this
appendix may not exactly match
what you see when you install
Office 2003.
W1 9687 app ai
9/11/03
PDF 388
2:26 PM
Page PDF 388
ABSOLUTE BEGINNER’S GUIDE TO MICROSOFT OFFICE OUTLOOK 2003
FIGURE A.2
Enter Product
Key screen.
In the User Information screen, shown in Figure A.3, enter your
name, initials, and organization. Make sure to enter
this information exactly as you want it shown in
Outlook. Changing this information later is very
difficult. If you have no organization to enter,
you can use your family name, any name you
If you lose the product
choose, or even a space character. After entering
key, there is no way to
recover it, and if you
this information, click Next to proceed to the
ever have to reinstall
next installation screen.
Office 2003, you will have
In the End-User License Agreement (EULA) screen,
to buy another copy to obtain a
shown in Figure A.4, read the license agreement
new product key.
and check the check box indicating acceptance of
the license agreement. If you do not agree to the
terms of the license, click Cancel, which will abort installation of Office 2003. You
must accept the license terms to proceed with installation. Click Next to proceed to
the next installation screen.
caution
W1 9687 app ai
9/11/03
2:26 PM
Page PDF 389
APPENDIX A
FIGURE A.3
The User
Information
screen for entering name,
initials, and
organization.
FIGURE A.4
You must check
the I accept
the terms in
the License
Agreement
checkbox on the
End-User License
Agreement
screen to
continue the
installation.
MICROSOFT OFFICE OUTLOOK 2003 INSTALLATION
PDF 389
W1 9687 app ai
9/11/03
PDF 390
2:26 PM
Page PDF 390
ABSOLUTE BEGINNER’S GUIDE TO MICROSOFT OFFICE OUTLOOK 2003
In the Type of Installation screen, shown in Figure A.5, indicate which type of installation to use. In these days of massive hard drives, I strongly recommend selecting
the Complete installation. Minimal installation provides reduced functionality,
and many features aren’t installed in a Minimal installation. Typical installation
provides most features and options, but some things aren’t installed and some
things are installed as First Use, which requires that you have your CD handy when
you use that feature for the first time. This type of installation can be a problem,
especially if you are installing Office on a laptop computer and don’t have the CD
with you when you first want to use a specific feature that was installed as First Use.
If you want to install Office to a different path than the default path, C:\Program
Files\Microsoft Office, you can select where to install it by clicking Browse and
navigating to the desired installation path. I recommend using the default path
because some applications expect to see that path to the Office installation.
You can always install additional features later if you select an installation type
other than Complete; you will learn how to install additional features in “Adding
and Removing Features” at the end of this appendix. After selecting your installation type, click Next to proceed with the installation.
FIGURE A.5
Select your
desired installation process on
the Type of
Installation
screen.
The Summary screen, shown in Figure A.6, shows which Office applications will be
installed and how they are installed. If you selected a Complete installation, all the
available applications will be installed as Run from My Computer. The applications
you see listed may be different from those shown in this illustration, depending on
which Office package you own. Click Install to proceed with the installation.
W1 9687 app ai
9/11/03
2:26 PM
Page PDF 391
APPENDIX A
MICROSOFT OFFICE OUTLOOK 2003 INSTALLATION
PDF 391
FIGURE A.6
The Summary
screen lists all
the applications
that will be
installed from
the Office 2003
System.
The Now Installing Office screen, shown in Figure A.7, appears during installation,
with a progress bar indicating installation progress.
FIGURE A.7
The Now
Installing Office
screen shows the
progress of your
installation
process.
When the installation is finished, the Setup Completed screen appears, as shown in
Figure A.8. On this screen, you can choose to go to Microsoft’s Office Online Web site
to check for any updates for Office and for additional available Office-related downloads. Click Finish to complete your Office 2003 installation.
W1 9687 app ai
9/11/03
PDF 392
2:26 PM
Page PDF 392
ABSOLUTE BEGINNER’S GUIDE TO MICROSOFT OFFICE OUTLOOK 2003
FIGURE A.8
Your installation
is now complete.
If you decide to add or remove features in your Outlook installation, you can do so
at any time. The remainder of this appendix teaches you how to add and remove
features in Outlook 2003.
Adding and Removing Features
If your Windows login doesn’t have administrative rights, you will have to log in to
Windows with an administrative login, or have someone available who has a
Windows login with administrative rights, to add and remove features in Outlook
2003 and Office 2003.
To add or remove features in Outlook 2003, use the Add or Remove Programs application in the Control Panel. To open this application, select Start, Control Panel,
Add or Remove Programs if you are using Windows XP. If you are using
Windows 2000, select Start, Settings, Control Panel. When the Control Panel
opens, start the Control Panel’s Add/Remove Programs application. Figure A.9 shows
the Add or Remove Programs dialog.
Highlight your version of Microsoft Office 2003 (or Outlook 2003) in the Add or
Remove Programs dialog and click Change. In the resulting Office 2003 Maintenance
W1 9687 app ai
9/11/03
2:26 PM
Page PDF 393
APPENDIX A
MICROSOFT OFFICE OUTLOOK 2003 INSTALLATION
PDF 393
Mode Options dialog, shown in Figure A.10, you can add or remove features, reinstall
or repair Office 2003, and uninstall Office 2003. Highlight Add or Remove Features
and click Next to open the Custom Setup dialog.
FIGURE A.9
Use the Add
or Remove
Programs dialog
if you change
your mind about
the features you
installed from
Office 2003.
FIGURE A.10
The Office 2003
Maintenance
Mode Options
dialog.
W1 9687 app ai
9/11/03
PDF 394
2:26 PM
Page PDF 394
ABSOLUTE BEGINNER’S GUIDE TO MICROSOFT OFFICE OUTLOOK 2003
To remove Office 2003, click Remove in the Add or Remove
Programs dialog; then confirm your choice of
removing Office 2003 by clicking Yes.
In the Custom Setup dialog, shown in Figure
A.11, check the Choose advanced
customization of applications checkbox
to add or remove features from Office and
then click Next.
In the Advanced Customization dialog, shown in
Figure A.12, expand the Outlook tree by clicking
the plus sign (+) next to Microsoft Office Outlook
in the application tree. Expand all Outlook features by clicking the plus sign (+) next to each
Outlook feature.
FIGURE A.11
The Custom
Setup dialog
enables you to
add or remove
features from
Office.
caution
Make sure to leave all
the applications listed in
the Custom Setup dialog checked. Any applications you uncheck in
this dialog will be uninstalled when
you proceed with the installation
customization.
W1 9687 app ai
9/11/03
2:26 PM
Page PDF 395
APPENDIX A
MICROSOFT OFFICE OUTLOOK 2003 INSTALLATION
PDF 395
FIGURE A.12
The Advanced
Customization
dialog enables
you to make
changes to specific features of
Outlook or
Office 2003.
Select each feature you want to customize and click in that feature’s icon to open the
feature drop-down. Then do one of the following:
■ Select Run from My Computer to completely install a feature on your
hard drive.
■ Select Run All from My Computer to completely install a feature and its
subsidiary features on your hard drive.
■ Select Installed on First Use to make a feature available but not install it
on your hard drive. If you select this option, make sure to have the Office
2003 CD available when you first use this feature.
■ Select Not Available to remove a feature from Outlook.
To quickly install all Outlook features on your hard drive, select the icon for
Microsoft Office Outlook, and in the drop-down, select the Run All from My
Computer option.
Click Update to proceed with installing or removing the selected features from
Outlook.
W1 9687 app ai
9/11/03
PDF 396
2:26 PM
Page PDF 396
ABSOLUTE BEGINNER’S GUIDE TO MICROSOFT OFFICE OUTLOOK 2003
Absolute Minimum
In this appendix, you learned about installing and removing features from Microsoft
Office Outlook 2003. For additional information about installing and repairing
Outlook 2003 and Office 2003:
See Appendix B, “Outlook Support and Resources.”
See Appendix C, “Outlook Problems and Solutions.”
Go to the Office Online Web site by selecting Help, Microsoft Office
Online and select the Assistance link.
W2 9687 app bi
9/11/03
2:27 PM
Page PDF 397
In this chapter
• Learning how to use the Outlook Help
menu commands.
•
Using the Outlook Help task pane for help
and support.
B
• Learning about additional Outlook support
resources.
Outlook Support
and Resources
The Help menu is the first place to go when you need help with
Outlook. It contains menu commands for opening the Outlook Help
task pane, going to the Microsoft Office Online Web site, checking for
Office updates, repairing Outlook, activating Office, providing feedback
to Microsoft, and contacting Microsoft. In this appendix, you will learn
about these menu commands and places to go on the Internet to find
Outlook Help and information.
W2 9687 app bi
9/11/03
PDF 398
2:27 PM
Page PDF 398
ABSOLUTE BEGINNER’S GUIDE TO MICROSOFT OFFICE OUTLOOK 2003
The Help Menu
In this section, you will learn about the commands in the Help menu. Many of the
commands in the Help menu are available in the Help task pane, which also contains additional options for Outlook Help. Table B.1 shows the Outlook Help menu
commands.
Table B.1
Outlook Help Menu Commands
Menu Command
Description
Microsoft Office
Outlook Help
Opens the Microsoft Outlook Help task pane. Also can be
opened by pressing the F1 key.
Show the Office
Assistant
Shows one of the Assistant characters, such as Clippit, the
animated paper clip, or Rocky, the animated dog. You can
type Help questions for the Assistant, which searches through
the Outlook Help system.
Microsoft Office Online
Opens Internet Explorer and
goes to the Microsoft Office
Online Web site.
Contact Us
Opens Internet Explorer
and goes to a Web page
with links to Microsoft
support services. From this
page you can review howto articles; search
the Microsoft
KnowledgeBase, which is
a collection of support
articles for all Microsoft
products and technologies; contact Microsoft
product support for paid
support or free online
assistance; download
updates; and send comments to Microsoft.
If you do not have additional assistants available,
you can add them by installing
them from the Office Tools feature
when adding features to Microsoft
Office 2003. See “Adding and
Removing Features” in Appendix
A, “Microsoft Office Outlook 2003
Installation,” for information about
adding features to Office 2003.
Check for Updates
Opens Internet Explorer
and goes to the Office
Update Web page. Office
Update can be used to automatically scan for updates the
same way the Windows Update Web site can scan for
Windows updates,.
Detect and Repair
Starts the repair process for Outlook. This utility runs automatically and requires access to your Office CD. It can find
and fix many Outlook and Office problems.
W2 9687 app bi
9/11/03
2:27 PM
Page PDF 399
APPENDIX B
Table B.1
OUTLOOK SUPPORT AND RESOURCES
PDF 399
(continued)
Menu Command
Description
Activate Product
Activates Office after Office is run the first time or changes
are made that require reactivation. You can activate Office
either over the Internet or by telephone. You learned about
activating Microsoft Office in Chapter 2, “Outlook from the
Beginning,.”
Customer Feedback
Options
Opens a dialog in which you can choose to participate in
Microsoft’s Customer Experience Improvement Program
and set online content settings.
About Microsoft
Office Outlook
Opens a dialog that shows the Outlook version, build
number, and license information; provides links to system
information, technical support, and a list of disabled items.
Outlook Help Task Pane
Outlook Help is provided from the Help task pane, shown in Figure B.1. You open the
Help task pane by selecting Help, Microsoft Office Outlook Help or pressing F1.
The Help task pane provides links to the Office Online Web site, news about Outlook,
Outlook training Webcasts, Outlook assistance, Outlook communities, and Office and
Outlook updates. It also provides a link to the Outlook Help table of contents and a
natural language search engine for searching in the Outlook Help system.
FIGURE B.1
The Help task
pane provides a
central location
for Outlook
resources as well
as a search
engine for the
Outlook Help
system.
W2 9687 app bi
9/11/03
PDF 400
2:27 PM
Page PDF 400
ABSOLUTE BEGINNER’S GUIDE TO MICROSOFT OFFICE OUTLOOK 2003
When there are more options on the task pane than can be shown in one window, a
See also link is provided. If you hover the mouse pointer over the down arrow below
the See also link, the task pane scrolls down to show the additional links. When the
task pane is scrolled down, an up arrow appears at the top of the task pane.
Hovering the mouse pointer over this up arrow scrolls the task pane up.
Outlook Assistance
In the Outlook Assistance section of Outlook Help, you can enter text to search for in
the Search For entry field and click the right arrow to search the Help system.
Some examples of text you can enter are reminders and command line switches. The
search can be performed using the online Help, which has the latest updated Help
information if you have a connection to the Internet, or it can be performed using
the offline Help system, which is loaded on your computer.
When the Help text search starts, the Search Results task pane is displayed, as shown
in Figure B.2. In this task pane, you can select from the returned search results, refine
your search, change the search location, or return
to the Help task pane.
FIGURE B.2
tip
The Search
Results task
pane shows the
results of your
search and
enables you to
change the
search location.
Updates to the Outlook
and Office Help files can be
downloaded from the Office
Update Web site when they
are available. Help updates
make the latest Help files
available for use when you
aren’t connected to the Internet or
if you aren’t using online content
for help. To see whether any
updates are available for Help
files, select Help, Check for
Updates to go to the Office
Update Web site.
W2 9687 app bi
9/11/03
2:27 PM
Page PDF 401
APPENDIX B
OUTLOOK SUPPORT AND RESOURCES
PDF 401
In the Search Results task pane, you can do the following:
■ To view any of the search results returned from your search, click the result
you want to see.
■ To change the search location, select the location you want to use, such as
Microsoft Office Online or Offline Help; use the location drop-down located
below Search; and select the location.
■ To change your search text and perform a new search, enter new text in the
entry field below the location drop-down and click the right arrow.
■ To get tips for more effective searching, select the Can’t Find It link.
■ To return to the Help task pane, either select the back arrow at the top of the
Search Results task pane, or click the down arrow next to the Search Results
title bar and select Help.
In the Help task pane select the Table of Contents link to show the Help table of
contents. If you are configured to search online Help, the most recently updated
table of contents is displayed from the Office Web site. If you aren’t online or are
configured only to use offline content, the table of contents for the local Outlook
Help file is displayed. Figure B.3 shows the Outlook Help table of contents with the
first entry expanded.
FIGURE B.3
Select any Help
topic in the
table of contents
to display
related subtopics
or Help information on the
selected topic.
W2 9687 app bi
9/11/03
PDF 402
2:27 PM
Page PDF 402
ABSOLUTE BEGINNER’S GUIDE TO MICROSOFT OFFICE OUTLOOK 2003
Microsoft Office Online
The Microsoft Office Online section of the Help task
pane provides the following links to connect to various parts of the Office Web site:
■ Connect to Microsoft Office Online
opens Internet Explorer and connects to the
Microsoft Office Online Web site home page.
■ Get the Latest News About Using
Outlook connects to a Web page with
Outlook news and tips.
■ Automatically Update This List from
the Web updates the list of links with any
new topics and downloads highlighted
Outlook information, such as introductory
courses on Outlook.
■ Assistance opens Internet Explorer and
goes to the online Assistance page at the
Office Web site. This page has links for featured productivity tips and for each application in the Microsoft Office System.
The text and links you
see in the Outlook Help
task pane may be different if you
are using offline content for Help.
Some menu commands may also
be different or not present when
using offline Help content.The
text and figures in this appendix
are based on the online content
available when this appendix
was written.
■ Training opens Internet Explorer and goes to
the Office Web page with links for training Webcasts for the Office programs.
■ Communities opens Internet Explorer and goes to the Microsoft Office
Newsgroups page. On this page you can learn how to use the newsgroups to
post questions and receive peer support from volunteers such as Outlook
MVPs who have been recognized by Microsoft for the technical excellence of
their answers to newsgroup posts.
■ Downloads opens Internet Explorer and goes to the Office Update Web page,
where you can use the update scanner to check for updates you can install.
See Also
The See Also section of the Outlook Help task pane provides additional links to support information and options:
■ What’s New opens a Help topic describing the new features of Outlook 2003.
■ Contact Us opens Internet Explorer and goes to the Support Web page for
Office.
W2 9687 app bi
9/11/03
2:27 PM
Page PDF 403
APPENDIX B
OUTLOOK SUPPORT AND RESOURCES
PDF 403
■ Accessibility Help opens a Help topic listing
accessibility features in Microsoft Office.
■ Online Content Settings opens the Service
Options dialog, shown in Figure B.4, where
you can select whether to show content and
links from online content or use only local
content loaded in your computer. Additional
options enable searching for online content
when you are connected to the Internet, show
help for templates, and show links that are
spotlighted on the Office Web site. Select OK
to close the Service Options dialog to save
your settings. Some setting changes only take
effect the next time you start Outlook.
FIGURE B.4
If you usually
are connected to
the Internet
while using
Outlook, the
online content
provides the latest information
from Microsoft.
Select Customer
Feedback Options at the
left of the Service Options dialog
to show a screen enabling you to
participate in the Customer
Experience Improvement Program.
This program provides anonymous
information to Microsoft about
errors you receive while working
in Outlook, the way you work
with the Office programs, and
other information to help
Microsoft improve the Office
experience. No information that
could identify you is transmitted
to Microsoft, and participation is
completely voluntary.
Detect and Repair
If you are getting errors in Outlook that can’t be solved from the information in
Appendix C, “Outlook Problems and Solutions,” the next thing you can do is run Detect
and Repair. Select Help, Detect and Repair to begin the Outlook repair process. The
repair process is self-contained and checks and restores all Outlook components from the
installation media if they are corrupted. The process is intelligent enough to restore
downloaded updates if any are present instead of the original files from the installation
media. This process requires access to the CD or network share from which Office was
installed. Follow the prompts to insert your installation media or to browse to the installation media location when it appears and select OK to finish the repair process.
W2 9687 app bi
9/11/03
PDF 404
2:27 PM
Page PDF 404
ABSOLUTE BEGINNER’S GUIDE TO MICROSOFT OFFICE OUTLOOK 2003
About Microsoft Office Outlook
Select Help, About Microsoft Office Outlook to open the dialog shown in Figure
B.5, which displays the current version and build of your Outlook installation and
your Office license information.
FIGURE B.5
About Microsoft
Office Outlook
displays version
and license
information you
need if you seek
Outlook support.
The System Info button displays a System Information dialog that provides information about your hardware resources, components, software environment, Internet
settings, and Office 2003 applications.
The Tech Support button opens a Help topic listing product support options and
ways to contact Microsoft support professionals.
The Disabled Items button opens a dialog listing add-ins that have been disabled
due to errors. To re-enable an add-in listed in this dialog, highlight the item you
want to re-enable and select Enable.
Select OK to close the About Microsoft Office Outlook dialog.
Additional Online Support Resources
In addition to the Microsoft Office Online Web site, you can find other Web sites
devoted to Outlook that are run by individuals or companies. The most comprehensive Outlook resource Web site is the Slipstick Web site, at http://www.slipstick.com,
which has complete information about Outlook and Exchange.
W2 9687 app bi
9/11/03
2:27 PM
Page PDF 405
APPENDIX B
OUTLOOK SUPPORT AND RESOURCES
PDF 405
Slipstick has information for users, administrators, and developers of Outlook and
Exchange. Tips on using various Outlook features and links to related Microsoft articles are available, as are samples of code and custom forms and lists of Outlook
books. Figure B.6 shows part of the Slipstick home page.
FIGURE B.6
Slipstick has
information for
Outlook and
Exchange users,
administrators,
and developers.
Absolute Minimum
In this appendix, you learned about using the Help menu and Help task pane. You
also learned about additional resources for Outlook support. For additional information about Outlook support, using Outlook, and fixing Outlook problems:
See Appendix C, “Outlook Problems and Solutions.”
Use the Training link in the Help task pane to go to the Office Online Web
site Training page, where you can select the Outlook training courses
link to view a list of Outlook Webcasts.
Go to the Office Online Web site by selecting Help, Microsoft Office
Online and select the Assistance link on that Web site. Select the Outlook
2003 assistance link to see Outlook-specific topics.
W2 9687 app bi
9/11/03
2:27 PM
Page PDF 406
W3 9687 app ci
9/11/03
2:28 PM
Page PDF 407
In this chapter
• Learning how to solve the most common
Outlook problems.
•
Using Outlook startup switches to fix
problems.
• Enabling e-mail logging to help diagnose
sending and receiving errors.
Outlook Problems
and Solutions
Outlook 2003 is a great program, but as with any software application,
sometimes you will have problems with it. In this appendix, you will
learn about many of the more common problems that can occur and
ways to fix those problems.
C
W3 9687 app ci
9/11/03
PDF 408
2:28 PM
Page PDF 408
ABSOLUTE BEGINNER’S GUIDE TO MICROSOFT OFFICE OUTLOOK 2003
Common Outlook Problems
The following sections list some of the more common Outlook problems and solutions in the form of a series of questions and answers. The questions and answers are
grouped by topics, such as e-mail or menu problems.
If you have a problem that isn’t covered in this section, see Appendix B, “Outlook
Support and Resources,” for suggestions on how to get additional help for Outlook
problems.
E-mail Problems
Q: When I choose Send/Receive, I can receive e-mails but can’t send anything. How can I send out e-mails?
A: Some Internet service providers (ISPs) require you to log in to their servers and
receive e-mails before you can send anything. This approach is used as a precaution
to help prevent junk e-mail senders from using the ISPs’ mail servers to send spam.
To receive e-mails before you send, you must change the properties of the outgoing
mail server as follows:
1. Select Tools, E-mail Accounts to open the E-mail Accounts dialog.
2. In the E-mail section, make sure the View or change existing e-mail
accounts option is selected and then select Next.
3. Highlight the e-mail account you want to change and select the Change
button.
4. Select the More Settings button and select the Outgoing Server tab.
5. Check the My outgoing server (SMTP) requires authentication checkbox and then select the Log on to incoming mail server before sending
mail option, as shown in Figure C.1.
6. Click OK, then Next, and then Finish to save your changes.
Q: I’m using a dial-up connection and often get connection timeout
errors connecting to my e-mail server. How can I fix this problem?
A: Follow steps 1 to 4 in the previous answer, but select the Advanced tab instead
of the Outgoing Server tab. Use the Server Timeouts slider control to change the
default timeout of 1 minute to a longer interval. Click OK, then Next, and then
Finish to save your changes.
W3 9687 app ci
9/11/03
2:28 PM
Page PDF 409
APPENDIX C
OUTLOOK PROBLEMS AND SOLUTIONS
PDF 409
FIGURE C.1
On the Outgoing
Server tab, you
can set options
to receive e-mail
before you send
e-mail.
Q: I know all my e-mail server settings are correct for my account, password, e-mail address, and incoming and outgoing server names, but I
still can’t connect to my ISP’s e-mail servers. What’s wrong?
A: First, double-check again that all the settings are correct and match the information given to you by your ISP. You can easily miss some little error in the settings
that prevents your being able to log in to the e-mail servers. If all the settings are
correct, the most common reason you can’t log in to the mail servers is a problem
with Secure Password Authentication (SPA). Check with your ISP to see whether you
should be using SPA, both for sending and receiving e-mails. Then follow these steps:
1. Select Tools, E-mail Accounts to open the E-mail Accounts dialog.
2. In the E-mail section, make sure the View or change existing e-mail
accounts option is selected and then select Next.
3. Highlight the e-mail account you want to change and select the Change
button.
4. Depending on whether your ISP wants you to use SPA or not, check or
uncheck the Log on using Secure Password Authentication (SPA)
checkbox. This setting applies to both your incoming and outgoing mail
servers unless you customize the settings for your outgoing server. If different
settings aren’t required for the incoming and outgoing servers, click Next
and then Finish to save the changes.
W3 9687 app ci
9/11/03
PDF 410
2:28 PM
Page PDF 410
ABSOLUTE BEGINNER’S GUIDE TO MICROSOFT OFFICE OUTLOOK 2003
5. If your ISP requires different settings for the incoming and outgoing servers,
set the Log on using Secure Password Authentication (SPA) checkbox
to the settings required for your incoming server.
6. Select the More Settings button and select the Outgoing Server tab.
7. Check the My outgoing server (SMTP) requires authentication checkbox and then select the Log on using option. Enter your username and
password; then check the Remember password checkbox if you want
Outlook to remember your password. Check or uncheck the Log on using
Secure Password Authentication (SPA) checkbox to match the settings
required for your outgoing server.
8. Click OK, then Next, and then Finish to save your changes.
Q: Why do e-mails I send to people who don’t use Outlook have a
attachment?
Winmail.dat
A: You are sending your e-mails to those people using Outlook Rich Text format.
These e-mails use a Winmail.dat attachment to contain all the Rich Text formatting
information for the e-mails. If someone is using an e-mail client that doesn’t understand this format, the Winmail.dat attachment remains in the e-mail and the formatting is lost. E-mail clients that understand Rich Text formatting automatically apply
the formatting information and don’t display the Winmail.dat attachment. Use either
HTML or Plain Text format when you send e-mail to people who don’t use Outlook.
Q: When I start typing a name in an e-mail address field, Outlook uses an
incorrect or old e-mail address or name for AutoCompletion. How can I
get rid of this incorrect entry in the AutoComplete list?
A: Select the entry and press the Delete key. If all the suggestions you receive are
always incorrect, close Outlook and use Windows Search to find a file with the
extension .NK2 and delete that file. To find the .NK2 file, click Start, Search to open
the Windows Search dialog. Click All files and folders and enter *.NK2 in the
search text field. Scroll down the search criteria pane until you see More advanced
options and click on the double down arrow button to open the advanced options.
Check the Search hidden files and folders and Search subfolders checkboxes;
then click Search to begin the search.
Highlight any .NK2 files that are shown in the search results and press the Delete
key to delete those files. Click Yes to confirm you want to delete those files.
W3 9687 app ci
9/11/03
2:28 PM
Page PDF 411
APPENDIX C
OUTLOOK PROBLEMS AND SOLUTIONS
PDF 411
Q: When I start typing a name in an e-mail address field, Outlook doesn’t
offer any suggestions for completing the entry. How do I fix this problem?
A: Select Tools, Options, go to the Preferences tab, and select E-mail Options,
Advanced E-mail Options. Check the Suggest Names While Completing To,
Cc, and Bcc Fields checkbox. Then click OK three times to save your changes.
If this setting was already checked or checking it doesn’t fix the problem, close
Outlook and follow the instructions in the previous answer to find .NK2 files and
delete them. Outlook will create a new nickname file used for autocompletion the
next time it starts.
Menu and Toolbar Problems
Q: When I customize toolbars or menus, the changes are gone the next
time I start Outlook. What’s wrong?
A: Use Windows Search to find a file named Outcmd.dat and delete it when Outlook
is closed. This file holds all your menu and toolbar customizations and can become
corrupted. The next time you customize your menus or toolbar, the changes should
remain. Follow the instructions in the two previous answers to find the Outcmd.dat file.
Q: Some of my menu commands are missing. How do I get them back?
A: First, right-click on the menu bar or a toolbar and select Customize. Select the
Toolbars tab and highlight the menu with the missing commands. Click the Reset
button and click OK in the dialog asking whether you want to reset the menu or
toolbar; then click Close.
If the menu commands still aren’t there, re-open the Customize dialog and select the
Commands tab. Select the name of the menu where the commands are missing in
the Categories section of the dialog, such as the File menu, and locate the missing
commands in that menu in the Commands section of the dialog. Select each missing command and drag it from the Commands section of the dialog to the Outlook
menu or toolbar from which it is missing. When the Outlook menu opens, you can
drop the command into the menu where it belongs. If you are adding the command
to a toolbar, drop it in the toolbar where you want the command to be placed. Close
the Customize dialog by selecting the Close button.
W3 9687 app ci
9/11/03
PDF 412
2:28 PM
Page PDF 412
ABSOLUTE BEGINNER’S GUIDE TO MICROSOFT OFFICE OUTLOOK 2003
Address Book Problems
Q: When I display the Address Book dialog or try to address an e-mail,
my contacts don’t show up. Where are they?
A: This problem is usually due to one of two causes. The easiest to fix is if a Contacts
folder isn’t set to display as an Outlook address book. To fix this problem, select the
Folder List for display in the Navigation Pane and right-click on the folder that isn’t
being displayed as an address book. Select Properties in the context menu and go
to the Outlook Address Book tab. Check the Show this folder as an e-mail
Address Book checkbox and click OK to save the change.
If this technique doesn’t work, and at least one contact in the contacts folder has an
e-mail address, the folder has probably become disconnected from the Outlook
Address Book service. To fix this problem, you have to remove and then add back
the Outlook Address Book service as follows:
1. Select Tools, E-mail Accounts to open the E-mail Accounts dialog.
2. In the Directory section, make sure the View or change existing directories or address books option is selected and then select Next.
3. Highlight Outlook Address Book and select the Remove button.
4. Select Yes in the Account Manager dialog to remove the Outlook address
book.
5. Select the Add button. Then select the Additional Address Books option
and select Next.
6. Highlight Outlook Address Book and select Next. Click OK in the dialog
that tells you the new e-mail account you just added won’t start until you
exit and restart Outlook.
7. Select Finish to close the E-mail Accounts dialog.
8. Exit and then restart Outlook. Your Contacts folders should now be shown in
Address Book dialogs.
Q: When I display the Address Book dialog or try to address an e-mail,
the fax numbers for my contacts are shown. I don’t want them there;
they make it hard for me to find the e-mail addresses. How do I get rid of
the fax numbers?
A: Outlook considers fax numbers to be valid electronic addresses, so they are shown
as part of your address book display. You can’t change the way Outlook regards fax
numbers, but there is a workaround that can prevent Outlook from displaying the
fax numbers in the Address Book dialog. Open each contact that has a fax number
W3 9687 app ci
9/11/03
2:28 PM
Page PDF 413
APPENDIX C
OUTLOOK PROBLEMS AND SOLUTIONS
PDF 413
and enter Fax: before each fax number. Save and close the contact, and the fax
numbers will no longer appear in the Address Book dialog. There is a downside to
this workaround: If you use fax software, the fax numbers can no longer be automatically dialed.
Q: How can I change the order in which my address books are shown
when I select e-mail addresses?
A: Open the Address Book dialog by selecting Tools, Address Book. In the Address
Book dialog, select Tools, Options to open the Addressing dialog, shown in Figure
C.2. Select the address book you want shown first in the Show this address list
first drop-down. You can set the order in which address books are shown in the bottom list in this dialog. Simply select an address book and move it up or down in the
list by using the up or down arrows. Click OK to save your changes and close the
Addressing dialog, or Apply to save your changes and leave the dialog open.
FIGURE C.2
In the Addressing
dialog, you can
set the order in
which address
books are shown.
Time and Reminder Problems
Q: Reminders for appointments are displayed at incorrect times. What’s
wrong?
A: Make sure the time zones set for Windows and Outlook match. To see the
Windows time zone, open the Control Panel by selecting Start, Control Panel.
Click on the Date, Time, Language, and Regional Options category. Open the
Date and Time Control Panel icon and select the Time Zone tab.
If you are using Windows 2000 or are displaying the Classic Start menu in Windows
XP, open the Date and Time application by selecting Start, Settings, Control
Panel. Then open the Date and Time application and select the Time Zone tab.
W3 9687 app ci
9/11/03
PDF 414
2:28 PM
Page PDF 414
ABSOLUTE BEGINNER’S GUIDE TO MICROSOFT OFFICE OUTLOOK 2003
Make sure your Windows time zone is correct for your current time zone and that
the Automatically adjust clock for daylight saving changes checkbox is set
correctly. Go to the Date & Time tab and make sure the current time is correct.
Then click OK to save your settings.
In Outlook, select Tools, Options, go to the Preferences tab, and select Calendar
Options. In the Calendar Options dialog, select Time Zone to open the Time Zone
dialog. Make sure the settings for your time zone and daylight saving time adjustment match your Windows settings. If you make any changes, click OK three times
to save them.
Q: Old reminders I’ve dismissed in the past keep popping up when I start
Outlook. How do I get rid of them?
A: Sometimes the Reminders folder becomes corrupted or confused. A few Outlook
command-line startup switches may be able to fix this problem. To start Outlook
with a command-line switch, select Start, Run. In the Run dialog, type Outlook.exe
followed by a space and then the switch you want to use. Then press Enter.
First, try starting Outlook using the /cleanreminders switch. Open the Run dialog as
just described and type Outlook.exe/ cleanreminders. If that doesn’t fix the problem,
try starting Outlook with the /cleanfreebusy switch. If neither of these switches fixes
the problem, try starting Outlook with the /resetfolders switch.
Q: Reminders aren’t firing at all, or when I dismiss my reminders, they
only snooze for a while. How do I fix this problem?
A: Reminders fire only on items that are in the default Inbox, Calendar, Tasks, and
Contacts folders. If the reminders are for items in any other folder, they do not fire;
the items turn red when the reminders are due.
If the reminders are for items in the default folders, try starting Outlook using first
the /cleanreminders switch, then the /cleanfreebusy switch if the /cleanreminders
switch doesn’t work, and finally the /resetfolders switch if the first two switches
don’t work. See the instructions for starting Outlook using a command-line switch in
the previous answer to see how to use command-line switches.
Folder and Data File Problems
Q: When I try to display one of my Outlook folders, I get an error message.
How can I view this folder?
A: This problem is usually due to a corrupted view for the folder. Start Outlook using
the /cleanviews command-line switch to fix this problem. To do so, select Start, Run.
In the Run dialog, type Outlook.exe/ cleanviews and then press Enter. All your custom
views will be lost, but you should be able to view your folder.
W3 9687 app ci
9/11/03
2:28 PM
Page PDF 415
APPENDIX C
OUTLOOK PROBLEMS AND SOLUTIONS
PDF 415
Q: One of my default folders somehow got renamed; I can’t seem to rename
it to the default name. How can I get my original folder name back?
A: Start Outlook using the / resetfoldernames command-line switch. To do so, select
Start, Run. In the Run dialog, type Outlook.exe/resetfoldernames and then press
Enter.
Q: Outlook doesn’t seem to recognize that one of my default folders is a
default folder. How can I fix this problem?
A: Start Outlook using the /resetfolders command-line switch. To do so, select Start,
Run. In the Run dialog, type Outlook.exe /resetfolders and then press Enter.
Q: When I start or close Outlook, I get an error message that my data file
is corrupt. How can I fix this problem?
A: Outlook includes utility programs that can fix a damaged PST file or a damaged
Exchange offline or local data file (OST file). The utility for PST files is named
Scanpst.exe, and the utility for OST files is named Scanost.exe.
If you aren’t using Exchange server, you are using a PST file. If you are using
Exchange, you may be using an OST file. To determine what type of file you’re
using, display the Folder List in the Navigation Pane. If you are using Exchange, the
entry at the top of the Folder List will be Mailbox. If you are using a PST file, the entry
at the top of the Folder List will be Personal Folders.
Right-click on Personal Folders or Mailbox at the top of the Folder List and click the
Properties entry on the context menu. In the General tab of the Properties dialog,
click Advanced.
If you are using a PST file, the filename and location are displayed in the Filename
field of the Personal Folders dialog. If you are using Exchange, select the Advanced
tab and then select Offline Folder Settings. The filename and location are displayed in the File field of the Offline Folder Settings dialog.
If the name and location is too long for you to see the full path for the PST or OST
file, click in the field and scroll left and right using the arrow and Home and End
keys. Write down the name and location of your PST or OST file and exit the dialogs
by clicking Cancel until they all close.
Exit Outlook and select Start, Run. In the Run dialog, type “C:\Program Files\Common
Files\System\MSMAPI\1033\Scanpst.exe“ or “C:\Program Files\Common Files\System\
MSMAPI\1033\Scanost.exe“ depending on whether you are using a PST or OST file.
Make sure you enclose the path in quotation marks because it contains spaces. Press
Enter to run the application. If you are not using U.S. English as your default language, you use some other number than 1033 because it is the code for U.S. English.
In that case, use Windows Explorer to find the Scanpst.exe or Scanost.exe file and
double-click the desired file to run it.
W3 9687 app ci
9/11/03
PDF 416
2:28 PM
Page PDF 416
ABSOLUTE BEGINNER’S GUIDE TO MICROSOFT OFFICE OUTLOOK 2003
When Scanpst starts, it prompts you for the location of the file to scan. Enter the path
you wrote down for your PST file or use the Browse button to locate your PST file.
The Options button enables you to select whether to use a new log file, append to a
previous log file, or use no log file. Select Start to begin scanning your PST file for
errors. Often, you achieve the best results from Scanpst by running it three times.
When Scanost starts, it prompts you to close Outlook before running the integrity
check. This prompt appears even if Outlook is closed. Click OK to continue. Scanost
requires you to be able to connect to your Exchange server. It prompts you for a profile to use if you have more than one profile. If you are offered the choice of connecting or working offline, always choose to connect to the server.
Scanost enables you to scan selected folders or scan all folders. You can also uncheck
the Repair Errors checkbox to only scan for errors and not attempt to repair them.
After you set up Scanost to scan or repair errors in the selected files, select Begin Scan.
Outlook Command Line Switches
You use Outlook command-line switches when starting Outlook, and some of them
are very useful when you have problems. For a complete list of all Outlook switches,
press F1 to open the Outlook Help task pane, type “command-line switches” in the
Search For entry field, and then click the arrow to the right of the field to start the
search. Select the command-line switches search result and expand the Switch
reference entry to see a complete list of Outlook command-line switches.
To start Outlook with a command-line switch, select Start, Run. In the Run dialog,
type Outlook.exe followed by a space and then the switch you want to use. If the
switch takes any arguments, such as a path and the path has spaces in it, make
sure to enclose the argument within quotation marks. After you finish typing the
command line, press Enter to execute it. The following two examples start Outlook
using command-line switches:
Outlook.exe /cleanviews
Outlook.exe /profile “My Home Profile”
Diagnostic Logging
If you are having problems logging in to your e-mail servers, with e-mail server connections, or with sending or receiving e-mails, a support technician may ask you to
turn on e-mail diagnostic logging. To enable e-mail diagnostic logging, select Tools,
Options, select the Other tab, and then select Advanced Options. Check the
Enable mail logging (troubleshooting) checkbox. E-mail logging will start after
you close and reopen Outlook.
W3 9687 app ci
9/11/03
2:28 PM
Page PDF 417
APPENDIX C
OUTLOOK PROBLEMS AND SOLUTIONS
PDF 417
The log is saved as a text file which contains the dialogs that occurred between
Outlook and your e-mail servers. These dialogs may aid the support technician
assisting you in diagnosing or understanding the problem. Make sure to turn off logging as soon as it’s not needed any longer because the size of these log files can
grow very quickly.
Where To Go From Here
In this appendix, you learned about fixing common Outlook problems. For additional information about fixing Outlook problems and repairing Outlook 2003 and
Office 2003:
■ See Appendix B, “Outlook Support and Resources.”
■ Go to the Office Online Web site by selecting Help, Microsoft Office Online
and select the Assistance link on that Web site. Select the Outlook 2003
assistance link to see Outlook-specific topics.
■ Go to the Office Online Web site by selecting Help, Microsoft Office Online
and select the Assistance link on that Web site. Select the Product Support
link in the Related Web Sites area to go to the Microsoft Product Support Services
Web page, where you will find various support options.
W3 9687 app ci
9/11/03
2:28 PM
Page PDF 418
W4 9687 app di
9/11/03
2:31 PM
Page PDF 419
In this chapter
• Learning about using Outlook with
Personal Digital Assistants.
•
Using Outlook add-ins to enhance
Outlook’s functionality.
D
• Using other tools to enhance Outlook
and provide different ways to get data
into Outlook.
Outlook Tools
Many tools and applications are available to enhance your use of
Outlook, such as Personal Digital Assistants (PDAs) and Outlook add-ins.
This appendix introduces some of these tools and applications and ways
they can enhance your use of Outlook.
W4 9687 app di
9/11/03
PDF 420
2:31 PM
Page PDF 420
ABSOLUTE BEGINNER’S GUIDE TO MICROSOFT OFFICE OUTLOOK 2003
Personal Digital Assistants
PDAs have moved from being special devices used by only a few people to becoming
mass-market devices in only a few years. PDAs are pocket-sized devices that provide
mobile access to e-mail, contacts, calendars, and other data and can be used to synchronize data in the PDA with data in Outlook.
Many PDA devices are available, such as Palm devices, Pocket PCs, Tablet PCs, and
Blackberries. These devices come in many different price ranges and with different
types of features. Some PDAs have color screens and small or detachable keyboards,
and other devices provide for pen or pointer input. All of them provide a way to
keep in touch with your Outlook data when you are away from your computer.
There are almost as many different synchronization applications available as there
are PDAs. These applications vary in features from basic programs that only synchronize your Outlook Inbox, contacts, and calendar with a PDA to advanced programs that can not only synchronize user-defined Outlook folders but also
synchronize Exchange public folders to a PDA.
Most PDAs have software for synchronizing with Outlook, and some come with a
pocket version of Outlook that displays your data in the PDA in the familiar
Outlook interface. If the software that came with your PDA doesn’t have the features
you need, you can purchase other synchronization software that will work with your
PDA and provide additional features.
Check your PDA manufacturer’s Web site for updated synchronization software and
lists of other synchronization software that is compatible with your PDA. Web sites
such as the Office Marketplace on Microsoft’s Office Online Web site and Slipstick’s
list of synchronization software at http://www.slipstick.com/addins/olpda.htm also list
synchronization software for PDAs.
Outlook Add-Ins
Outlook add-ins are software used to add new functions or enhance existing functions in Outlook. Add-ins are developed by a wide range of developers, including
Microsoft. Many add-ins add new pages to the Tools, Options dialog or to the folder
Properties dialog that are used to configure the add-in. They also can add new
menus and toolbars or submenu items to Outlook.
The many add-ins for Outlook add new or enhanced features such as the following:
■ Automatic compression of attachments in Zip files
■ Templates for responding to e-mail with predefined response forms
W4 9687 app di
9/11/03
2:31 PM
Page PDF 421
APPENDIX D
OUTLOOK TOOLS
PDF 421
■ Control of attachment security and restrictions
■ Automatic removal of attachments in incoming e-mails
■ New toolbars for searching using popular Internet search engines
■ The capability to send reminders to pagers and e-mail–enabled cell phones
■ The capability to check for duplicates among contacts
Microsoft provides links to various add-ins for Outlook and other applications in the
Microsoft Office System 2003 on the Microsoft Office Online Web site at the Office
Marketplace. Select Help, Microsoft Office Online and then select the Office
Marketplace link on the Office Web site to go to Office Marketplace.
Another place to find lists of Outlook add-ins is the Slipstick Web site at http://www.
Slipstick categorizes add-ins by function and has
comprehensive lists of add-ins for almost every Outlook function you can think of.
Another Web site that lists many Outlook and Exchange add-ins is the MAPIStore
Web site, at http://www.mapistore.com/Outlook/. This Web site also categorizes add-ins
and utilities by topic such as Attachments, Backup & Synchronize, and Calendar.
slipstick.com/addins/index.htm.
Other Useful Outlook Tools
You can add many other accessories and software tools to your computer to enhance
your work with Outlook. They include the following:
■ Computer-aware phone systems that place voice-mail messages in your
Outlook Inbox
■ Scanners and optical character recognition (OCR) software to input printed
material into your computer
■ Business card scanners that scan business cards into Outlook contacts
■ Remote control software such as LapLink and GoToMyPC to copy Outlook
data from one computer to another
■ Fax software and fax gateways that can connect to corporate fax systems
■ Microphones to use for voice control of Outlook
■ Modems for dialing phone calls to contacts from Outlook
■ Wheel mouse devices to use for easy scrolling through messages and folders
■ Removable hard drives and Universal Serial Bus (USB) hard drives to transport Outlook data from one computer to another
■ Backup devices and software such as tape drives and removable hard drives
to back up your Outlook data
W4 9687 app di
9/11/03
PDF 422
2:31 PM
Page PDF 422
ABSOLUTE BEGINNER’S GUIDE TO MICROSOFT OFFICE OUTLOOK 2003
■ Handwriting recognition and input from devices such as Tablet PCs
■ Multiple monitors or large screen monitors to provide enhanced views of
Outlook folders and data
The examples in this appendix provide only a taste of what’s available to enhance
Outlook. New hardware devices and software are constantly being released and
added to the list of enhancements for Outlook. The product lists and information at
the Microsoft Office Marketplace Web site, Slipstick, and MAPIStore are constantly
being updated to show new software products.
Web sites for online stores such as Dell (http://www.dell.com/us/en/gen/default.htm)
and BestBuy (http://www.bestbuy.com) show new and updated hardware products and
often include descriptions of how the products are used. Retail computer magazines,
such as PC Magazine and PC World, which are available in newsstands and bookstores, cover and explain these products and more, especially when they run buyers’
guide issues.
The Absolute Minimum
In this appendix, you learned about Outlook tools and add-ins. To review, you now
know
What types of tools are available to work with Outlook.
How add-ins are used to extend Outlook functionality.