1
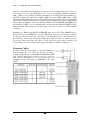
!
"
#
!!
#
$
(
!
%
!
& $
'
)
*
"
!
%
!
+
*
,
-
$.
+ /
1'
.
1
.
$ +
0
$ +
$
1
.
*
$
2
3)4',*
2
*
$
,
+
0
5
)
6
)
6
(7
7
$.
$
$$
#
$
'
2
!!
,
6
,
$$
)78
1'
(
0
"
)&
!
:
!
6
#9
#
#
1
'
)83
8)
)83
&
5
CAUTION!
The CAB 4n series of products are Ethernet (CobraNet™) network products designed to
operate on a network backbone or infrastructure. The design, implementation and maintenance of
this infrastructure is critical to the operation and performance of the CAB 4n Series products.
Peavey Electronics does not support nor service network cabling, hubs, switches, patch bays,
wall plates, connector panels or any other type of network interconnect device. Please ensure
that these components and their associated installation techniques have been properly designed
and installed for CobraNet audio applications. This manual is written specifically for the CAB 4n
Series products. Specific functionality relating to earlier firmware is not covered in this manual. In
the event that your CAB 4n includes an earlier firmware release, you should contact the Peavey
Architectural Acoustics Technical Services Group for information on how this may, or may not,
impact your installation. Installation or upgrading firmware within the CAB 4n is not covered in this
manual.
Several associated products are required to complete a working system using the CAB 4n. This
manual frequently makes reference to these other products, but does not provide specific
configuration or installation information on them. Please refer to the manuals for these products
for information. Every product, both Peavey products and third party devices, must be properly
installed for the CAB 4n to operate in accordance with its published specification. This product is
fan cooled with an intake fan on one side of the unit. The exhaust is located on the other side. Do
not block the fan or any vents when installing this product. Proper cooling is essential to maintain
proper operation and long-term stability in this product. Install this product in EIA approved
equipment racks only.
The information contained in this manual is subject to change without notice. Peavey Electronics
is not liable for improper installation or configuration. The information contained herein is intended
only as an aid to qualified personnel in the design, installation and maintenance of engineered
audio systems. The installing contractor or end user is ultimately responsible for the successful
implementation of these systems.
1
'
)83
8)
)83
&
5
Thank You!
Thank you for purchasing the CAB 4n CobraNet Audio Bridge. This product is designed to
provide years of trouble-free operation, and high quality audio performance. We sincerely hope
that you enjoy your new CAB 4n, and will find other products in the MediaMatrix product line to
supplement your new CobraNet Audio Bridge. We are confident that you will find the CAB 4n,
as well as other MediaMatrix products to be of the highest quality available. This manual was
written to provide as much information as possible for your new MediaMatrix product. It is our
sincere desire that you enjoy your purchase. We feel that the best way to fully enjoy any purchase
is to have an in-depth understanding of the product’s features, functionality and performance
characteristics. We hope that this manual, along with the manuals of our other products will
provide this. If you require additional information that this manual does not provide, please let us
know. We are always looking for better ways to provide information about our products, and your
input is always appreciated. If you have a comment about this manual, or would like to make a
suggestion, please write to: Peavey Electronics Corp., MediaMatrix Division, 711 A St., Meridian
MS, 39301. Thank you again for using MediaMatrix!
What’s In The Box?
The CAB 4n is packaged in a single container. This container
includes the following items:
1- CAB 4n CobraNet Audio Bridge
1- IEC removable power supply line cord
(120VAC Domestic, 230VAC Export)
19- Three-screw Euro connectors*
1- User Manual/Literature Package
* - MM Series i/o cards (as ordered)
* Asterisk indicates that these items are shipped pre-installed.
If any of these items are missing, please contact your Authorized Peavey MediaMatrix
contractor/dealer.
Description The CAB 4n CobraNet Audio Bridge is a professional digital audio processor
intended for fixed installation applications. This 2U rack-mount package is designed to provide
high quality audio performance and easy to use controls. Engineered from the ground up with the
commercial sound systems contractor in mind, the CAB 4n includes removable screw connectors
for easy installation and cost effective servicing, as well as front panel hidden ID assignment.
Using the CAB 4n requires a firm understanding of the accompanying software. Please refer to
the Help section of the N-Ware software available for download via the MediaMatrix web page.
1
'
)83
8)
)83
&
5
Features
• Scalable I/O Architecture
• Supports all MediaMatrix 4-channel I/O cards
• 8x8, 16x0, 0x16, 12x4 or 4x12 I/O configurations
• Supports short-loading
• RS-485 connection for Serial Bridging
• Integrated CobraNet Serial Bridging
• Configurable GPIO
• Optional DIN rail package for external control terminations
• Fan cooled 2U package with new NION cosmetics
• Front panel audio metering
• Front panel network status and fault indicators
• Word clock sync option supports MediaMatrix Buddy Link
• Universal power supply
Applications
The CAB 4n is a great audio product with hundreds of possible applications. Among the many
applications where the CAB 4n is already installed include:
Stadiums
Auditoriums
Arenas
Civic Centers
Performing arts centers
Theaters
Courts of law
Houses of worship
University campus buildings
Theme parks
Music clubs
Hotel meeting rooms
Conference centers
Schools
Cruise ships
Critical listening/recording high end audio
Teleconferencing
Distance learning
Large-scale paging systems
Multi-purpose facilities
Any facility requiring distribution of multiple mic or line-level signals
CAB 4n CobraNet Audio Bridges are designed for advanced MediaMatrix systems. It is
assumed that you have a working knowledge of MediaMatrix hardware and software as well as
computers, Windows NT and Ethernet networks. If you do not have this knowledge, please refer
the configuration and installation of this product to qualified personnel. For in-depth information
on MediaMatrix, refer to the online help. Additional resources are listed in this manual.
#
1
'
)83
8)
)83
&
5
Audio Input and Output Modules
The CAB 4n includes functionality that supports modular input and output architecture. This
architecture provides the ability to configure the CAB 4n inputs and outputs for a variety of
functions. Four internal 4-channel modular bays provide connection to factory installed
input/output modules. A combination total of four modules can be installed at the factory on the
CAB 4n. Which modules are installed is up to you!
NOTE: A CAB 4n may be ordered short loaded.
At press time, the following modules are available for the CAB 4n.
MM-Line 4
The MM-Line 4 input card includes four line level inputs. Up to 4 numbers of
such cards can be installed into the 4 available card slot bays A, B, C and/or D
within a CAB 4n. The MM-Line 4 includes full software control of input
sensitivity, user selectable per Ch. 12, 18, 24, 30 dB and analog gain from -95 to
+30dB per Ch..
MM-Mic 4
The MM-Mic 4 input card includes four mic or line level inputs. Up to 4 numbers
of such cards can be installed into the 4 available card slot bays A, B, C and/or D
within a CAB 4n. The MM-Mic 4 features studio grade microphone
preamplifiers, complete with software controllable phantom power and gain
controls for each channel up to +60 dB.
MM-AEC4
The MM-AEC4 includes 4 microphone level inputs with Acoustic Echo
Cancellation and Noise Reduction circuitry built-in. The MM-AEC4 is perfect
for teleconferencing applications or anytime you need high quality Acoustics
Echo Cancellation functionality.
The MM-AEC4 also features studio grade microphone preamplifiers, complete
with software controllable phantom power and gain controls for each channel
from -65 up to +20 dB. User selectable coarse gain control at 0, 25 & 55 dB
settings plus AEC level adjustable presets (none, soft, medium & aggressive) and
Noise Reduction filter per Ch. selectable at .-6, -9, -12 dB.
NOTE: Requires one input module bay and at least one output for Echo
Cancellation Reference
MM- Out 4
The MM- Out 4 output card includes four line level outputs. Up to 4 numbers of
such cards can be installed into the 4 available card slot bays A, B, C and/or D
within a CAB 4n. The MM-Out 4 includes full software control of output
sensitivity, user selectable per Ch. 6, 12, 18, 24 dB, and gain control from -95 to
+ 30dB per Ch.
With these modules, the CAB 4n can be configured in a variety of different ways. By making the
four (4) available card slot bays flexible to accept either input or output modular cards, the CAB
4n provides even greater flexibility and makes for much more cost-effective system design.
'
1
'
)83
8)
)83
&
5
Gain Structure
Gain structure is among the most important, often debated and misunderstood topics in the audio
industry. For years, engineers have disagreed with each other about proper levels, gain I/O,
meters and other issues that affect the way we work. When digital audio came into the
mainstream, the topic’s confusion was only compounded, and today, few fully understand the
inner workings of gain structure. This is true within MediaMatrix® as well. Although this manual
does not present an exhaustive discussion on the topic, it is important to understand the basics of
gain structure, and how it relates specifically to the CAB 4n.
In most cases the CAB 4n is shipped from the factory with “unity” gain through the unit. In other
words, if you inject a 1.23VAC 1 kHz sine wave into the input card of a CAB 4n without
adjusting any controls, you will get the same 1.23VAC sine wave on an output card when the
signal paths are directly connected and without audio processing. It is important to note, however,
that pending the modular card installed unity gain settings could differ and should be checked
before testing the unit. Because the CAB 4n has such flexible capability it is primarily intended
for larger MediaMatrix systems where the gain structure may be required to be set up differently.
For more information on gain structure with the Cab 4n and MediaMatrix systems, please refer to
the relevant User’s Manuals. Adjusting the gain structure for the CAB 4n is possible both at the
analog and digital gain stages. All controls for adjusting the input and output gain stages are
found in the respective Inputs and Outputs NWare Block Tabs for CAB devices.
Setting Full Scale Input and Output Sensitivity
To fully understand how MediaMatrix® gain structure works, you should have a clear, high level
view of how the Full-Scale Input Sensitivity and Full-Scale Output Drive settings relate to the
front panel and software-based audio meters. First and foremost, it is important to understand
what the levels mean. The Full-Scale Input Sensitivity and Full-Scale Output Drive settings refer
to separate analog circuits within the MM Modular Cards loaded into the CAB 4n. These circuits
are in addition to the fully adjustable analog input and output gain stages. Both the Full-Scale
Input Sensitivity and Full-Scale Output feature four user-definable settings. These settings
represent MAXIMUM (Full-Scale) levels, NOT nominal settings. Keep this in mind as we
progress. In a digital system, 0 dB indicates the “top” of the useable dynamic range, just below
full-scale. For the inputs, full-scale indicates the maximum level BEFORE converter clipping. On
the front panel input meter, 0 dB has been calibrated to be <1 dB below full-scale. Anything over
this level is clipping, or in digital parlance, an “OVER”. Remember that the front panel input
meter is in the digital domain, just after the analog to digital (A/D) converter. The position of the
Full-Scale Input Sensitivity switch determines how much analog input signal is required to get the
front panel input meter to read 0 dB. Or, in other words, to get the A/D converter to full-scale
maximum input level.
The CAB 4n typically provides greater than 105 dB of dynamic range. This is the range of 100%,
clean audio above the published noise floor, and below the threshold of converter clipping (FullScale). The adjustable sensitivity switches simply “shift” this dynamic range upwards or
downwards before the signal gets into the MediaMatrix DPU. This is done primarily to
accommodate the connection of third party components and to match source output levels. The
setting of the Full-Scale Input Sensitivity will determine what level is required to drive the A/D
converter to full-scale and illuminate the 0 dB front panel input meter. For example, if +18 dBu is
*
1
'
)83
8)
)83
&
5
selected, then it will take +18 dBu of level to get to a 0 dB reading (full-scale A/D) on the front
panel input meter.
The setting in the Full-Scale Input Sensitivity dialog box will determine how the front panel input
meters display audio levels coming into the CAB 4n. It is very important that these switches be
set correctly. For example, if you know that the nominal levels of your system are going to be
around 0 dBu, and you want to monitor peak levels 12 dB above that, then you will want to use
the +18 dBu setting for the Full-Scale Input Sensitivity. This will allow the front panel meter to
display +18 dBu at the 0 dB LED. Your 12 dB headroom level in this case would show up at
approximately -6 dB on the meter. In order to get the maximum performance from the analog
input modules of the CAB 4n, it is recommended that your Full-Scale Input Sensitivity settings
be properly matched to the audio source and your headroom requirements. What we are looking
at so far is front panel metering. Remember this.....the setting of the Full-Scale Input Sensitivity
switch will always equal the 0 dB LED on the front panel input meter. This is the full-scale
(maximum) level before A/D converter clipping. So, how does this relate to the meters inside of
MediaMatrix? Read on.....
Inside the DPU audio levels are represented by software based meters that can be placed into the
signal flow at any stage. They can also be found within certain devices and can be configured as
input or output meters. These meters include a bar-graph display for quick visual reference.
However, the more accurate way to monitor levels is by using the small text display included
with each meter. This display will give you exact readings with much finer resolution than the
bar-graph display. It is very important to understand that the software meters display actual levels
inside the digital domain (DPU). Even though the front panel meters are in the digital domain,
they can only display the digital signal immediately after the A/D and before the D/A converters.
In the view file, this same signal shows up at the CAB 4n input and/or output blocks/tabs. Once
the signal is processed, split or distributed by other audio devices, the only way to accurately
meter the signal is by placing software meters within the view file signal flow. The relationship of
the hardware and software meters is shown in the following illustration.
The key to understanding how the front panel and software meters relate is in the signal flow. The
levels at the CAB inputs and outputs of the view file are the same levels displayed on the CAB’s
hardware front panel meters, although they are calibrated differently. Once the signal is
processed, digital audio levels inside the DPU should be monitored exclusively within the view
file using software meters. This is because there is an additional 12 dB of headroom, or gain,
available exclusively within the DPU. This additional gain cannot be displayed on the front panel
meters. Before the signal leaves the DPU at the CAB’s output block, it should be attenuated back
to full-scale converter level, or lower, to avoid clipping the D/A converter. Refer to the above
example. The Full-Scale Input Sensitivity switch is set for +18 dBu and a +18 dBu signal is
coming into an input MM modular card in the Cab4n, or full-scale, on the front panel input meter.
The first software meter, placed at the view file input block/Tab, will indicate this level as +23.0
dB peak. The +23.0 dB represents the full-scale peak level, measured inside the DPU. Inside the
DPU, there is an additional 12 dB of headroom available for EQ, summing, etc. This headroom
level is represented by a 12 dB boost at the first Level control and the peak meter connected to it
indicating +35.0 dB (max DPU level). The signal is then attenuated by the second Level control
to avoid clipping the modular card in the CAB 4n and its peak meter again shows +23.0 dB. This
signal level could be output via a modular output card also installed into the CAB4n and the
associated output block/Tab, and returned to the same CAB at full-scale. The front panel output
meter will display 0 dB, regardless of the position of the Full-Scale Output Drive switches.
2
1
'
)83
8)
)83
&
5
This +23.0 dBu level represents 0 dB on the front panel meters. Remember, the +23.0 dB DPU
level is always the maximum fullscale level that can be received by, or sent to the CAB 4n.
Anything above +23.0 dB (DPU level) that is sent to the CAB output block, and thus, to the
CAB’s D/A will be clipped. The additional 12 dB of headroom is only available within the DPU.
What about the outputs? The outputs are easy....just set the drive level you want. The full-scale
DPU levels will be available at the output side of the MM modular card installed in a CAB 4n
and at your choice of analog levels, so you don’t take a performance loss if you need a lower
output level to match the input sensitivity of your power amplifier. Likewise, if you use the CAB
4n to drive line-level audio over long distances and need to use a higher drive level, you still get
the same, full-scale performance. Also, the setting of the Full- Scale Output Drive level does not
affect the levels coming into the Cab 4n or the levels inside the DPU. In our previous example,
we would be getting +23.0 dB at the input to the CAB’s digital to analog (D/A) converters. This
is full-scale, as determined by the input, and the DPU processing. The actual analog audio level at
the Cab’s output is determined by the position of the Full-Scale Output switch. Remember, it
doesn’t matter which output setting you choose, you still get full-scale performance. Just like the
input side, these switches allow you to “shift” your dynamic range upward or downward to match
your application. If you choose a +6 dBu setting, then the full-scale analog output level will be +
6.0 dBu. As in our example, a +18.0 dBu setting would give you unity gain and the output level
of the Cab 4n would be exactly the same as the input level of +18.0 dBu.
;
1
'
)83
8)
)83
&
5
Installation:
The CAB 4n product is designed to mount in a standard EIA electronic equipment rack. Because
the CAB 4n includes forced air cooling, adding rack mounted vent panels is not required for most
installations. However, it is recommended that common sense be applied to large installations
where multiple units are mounted in a single rack. It is generally accepted that a ratio of 2:1 is a
good rule of thumb that usually provides adequate performance. In installations where adverse
conditions exist, and room temperatures are likely to rise, additional vents should be installed.
Do not block the fan or any vents when installing the CAB 4n. Proper cooling is essential to
maintain proper operation and long-term stability in this product.
When dressing off wiring harnesses, take care with CAT 5 cables. Do not tie-wrap bundles of
CAT 5 wire too tight. Leave plenty of room for bends, allowing the cable to progress naturally
from the RJ-45 connector. Creating tightly wrapped CAT 5 wire bundles can cause loose crimp
joints and defective terminations.
To successfully install your new CAB 4n product, and perform the testing examples contained in
this manual, you will need the following components:
• A MediaMatrix MiniFrame 208nt-cn or MM™-760nt, MM™-960nt or MM™-980nt
Mainframe or Nion N3 or Nion N6.
• The latest NWare software. (Updates can be downloaded from the MediaMatrix Website)
• PC Monitor, mouse and keyboard.
• At least 1 MM™ DSP-cn CobraNet™ DPU card for MediaMatrix.
• At least 1 CAB 4n with associated MM™ I/O 4 Ch Cards loaded.
• At least 1 generic fast Ethernet 100 Base T network switch*.
• An assortment of CAT 5 cables.
• An audio source, power amplifier and loudspeaker.
In MediaMatrix, the minimum CobraNet network consists of a single MediaMatrix frame or Nion
housing at least one MM DSP-cn CobraNet DPU card, CAB 4n audio bridge with loaded MM™
I/O 4 Ch Cards and a single Ethernet switch. Of course, most systems will include many more
DSP-cn cards and CAB devices, but this is the most basic configuration.
* The selection of a proper network switch is critical for a successful implementation. Although
CobraNet is an Ethernet protocol, there are performance issues that must be considered when
selecting this switch for use in CobraNet audio systems.
For the latest list of CobraNet compliant products, please refer to Peak Audio’s website at
http://www.peak audio.com
,
1
'
)83
8)
)83
&
5
Hardware vs. Software Devices:
The CAB 4n is an integration of physical hardware and software. Within CobraNet™, there are
even further integrations, that being the network itself, and the actual piece of equipment, in this
case, the CAB 4n. In software, the equipment is represented by a “Device” within the
MediaMatrix NWare application. The CobraNet network is represented by a traditional
MediaMatrix wiring block with inputs and outputs. The “wire” between these blocks is the
configuration of audio signal flow with the MediaMatrix’s DPU. For proper operation of these
products, a thorough understanding of all of these devices is required.
There is a very basic relationship between the CAB 4n physical product and its accompanying
software device. Essentially, the software device is the “Control Panel” for the hardware. There
are no physical controls on the CAB 4n itself, so all functions for it are accessible only from its
software based control panel. This control panel is a yellow box labeled “CAB 4n”, and can be
found under the Device Menu labeled “CABs” within the MediaMatrix NWare software.
There is one for each model of CAB product within this devices menu. I like to refer to such
devices as the “Taxi”, since it’s a yellow CAB......get it?
The figure below shows the relationship between the Taxi, its control panel and the actual CAB
hardware.
Fig. 1, The CAB components and their relationships.
0
1
'
)83
8)
)83
&
5
Hardware vs. Software Devices continued:
The second half of this equation, as mentioned above, is the audio transport. This transport is the
CobraNet network that carries audio from one location to another. In the past, and if you are
familiar with MWare, this was represented by a block with “wire nodes” on it that represent the
actual input and output points for the system. Within NWare these nodes a singular identities not
blocks and are called up by accessing the Flyoffs under the specific NioNode and within the CM1 sub folder. Once these CM input and output nodes are placed into the design view they can be
re-labeled for ease of reference. “Flyoffs” are further discussed in the Nion/NWare manual. What
is very important to note is that the hardware unit, the CAB itself, and the audio transport device
DO NOT necessarily match up. For example, it is possible to have one output Flyoff wired to
multiple CAB 4n units although generally, the input side is always a one-to-one relationship. In
figure 2 following, you can see a Flyoff configuration in NWare showing the CAB 4n ID and
Bundle Assignments when you open the CAB4n block including a simple input to output path via
an audio processing block. The LEDs for Link, Transmitter and Receiver indicate that an audio
data stream is successfully being received from a distant network location.
To summarize. It is very important to understand the relationship between the CAB hardware, it’s
associated software control and the CobraNet™ network, or “audio transport”. The blocks and
Flyoffs in this example flowing receive digital audio from, and carry digital to, distant CobraNet
network locations. This audio enters and exits the MediaMatrix system at these blocks. The wires
represent the digital audio path within the MediaMatrix system. The blocks labeled CAB 4n, the
yellow “Taxi”, represent the actual CAB hardware. There must be one of these for each
corresponding hardware piece. The hardware, via its control panel, can be “assigned” to any
network audio channel, called a “bundle”. This bundle is also assigned in the CobraNet transport
block. It is this bundle assignment that gets the audio from the CAB’s analog port and onto the
network. If this is confusing to you, stop and re-read this section. It is vital to your ability to
successfully implement a CobraNet audio system using MediaMatrix products. If you understand
it....kinda, but still need help, read on....you’ll see how it all fits together as you start hooking up
CABs and passing audio from point to point.
9
1
'
)83
8)
)83
&
5
1
'
)83
8)
)83
&
5
CAB 4n Software Device Features:
LINK LED This LED will turn ON when a valid connection has been established between the
CAB 4n and the network switch. This function is duplicated on the front panel of the CAB 4n.
ID The four digit number is the user-defined Hardware Base Address. The range is hex, between
0000 and FFFF. The LED will turn ON when a valid number is entered. Each CAB 4n on the
network must have a unique ID. If there is a duplicate, or the value is zero, this LED will not
light, and communications between the CAB and network is not valid.
BUNDLE User defined number that assigns for a CAB 4n four (4) audio channels to a
CobraNet™ network “bundle”. The range is OFF to 32,767. For switched networks, the number
must be 256 or higher, (numbers below this are reserved for broadcast bundles). This number
must also be set in the CobraNet I/O device (CM-1 table for each specific Nion unit) for which
the CAB will transport audio. The LED is ON when the CAB 4n is receiving the specified
network bundle.
Each CAB 4n can receive up to four separate audio bundles of 4Ch each. GAIN Software control
of the CAB 4n’s analog gain stage is Gesturable from the knob or the digital window located just
above each knob. The range is -95 dB to +30 dB.
1
'
)83
8)
)83
&
5
#
1
'
)83
8)
)83
&
5
1. HARDWARE BASE ADDRESS SWITCHES 4-position rotary switches for setting the
hardware base address (ID). Located behind removable front panel for tamperproof
settings.
2. FAULT LED Illumination of the Fault indicator indicates detection of an unexpected
condition within the CobraNet interface. Some fault conditions will also light the RX
Error and/or TX Error indicators to give more specific indication if the unexpected
condition is in the receive or transmit processes. The errors are reported by a series of
flashes.
3. CONDUCT LED Indicates the CAB 4n is an active conductor on the CobraNet network.
Only one conductor is allowed per network.
4. LINK LED Indicates a valid control link has been established between the CAB 4n and
the network switch. This function is duplicated in the software control panel.
5. RX LED Indicates the presence of data being received into the CAB 4n from the
CobraNet network.
6. TX LED Indicates the presence of data being transmitted (sent) from the CAB 4n onto
the CobraNet™ ne twork.
7. AUDIO METERS Peak reading LED ladder displays indicating audio input/output levels
in the analog domain. Signal level is displayed after the adjustable gain stage and before
the A/D converters.
8. POWER LED Indicates that the CAB 4n is powered from an AC mains power source.
9. IEC POWER CABLE RECEPTACLE The included removable IEC power cable
connects here. Use only the supplied cable.
10. POWER SWITCH Applies mains AC power to the CAB 4n.
11. LINK OUT & IN CONNECTOR BNC(s) connector to transmit link data to other CAB
units or third party synchronization products.
12. COBRANET NETWORK I/O 2 x RJ-45 connectors for redundancy provides interface to
the CobraNet™ audio network. This connection is required to pass audio with the CAB
4n.
13. GPIO Female DB-25 connector socket used for 8 Nos. of external Digital I/O, Analog
I/O or Rotary Encoder control plus relays.
14. RS-485 PORT Two two-wire, half-duplex RS-485 connections on removable Euro
connectors. Each connector is internally wired together for convenient busing of adjacent
units.
15. AUDIO INPUT CONNECTORS Balanced, three-wire line level audio input connections
on removable Euro connectors. This illustration shows the connector header only. The
unit is shipped with matching black pluggable connectors for each audio channel.
'
1
'
)83
8)
)83
&
5
Basic CobraNet Network Connections
The CAB 4n product feature 4 different connection types. (Refer to the Rear Panel Details.) First
in priority is the CobraNet™ network port. This RJ-45 connector is designed to connect with
standard, off-the-shelf Category 5 (CAT 5) cable for use with standard Ethernet network
switches. This cabling interconnect is commonly referred to as the wiring “backbone”. This
backbone must be properly designed for each system. Ideally, this cabling and its associated
hardware would be designed, installed and certified by a competent network systems engineer.
A typical CobraNet system would include a CAT 5 cable from each CAB 4n to a network switch.
An additional CAT 5 cable would connect the switch to one or more MM-DSP-cn cards within
the MediaMatrix frame or Nion CM-1 card. The example below is the most basic configuration.
Large systems on managed networks can get very complex. Please don’t get ahead of yourself
here! You need to be able to make this configuration work first!
*
1
'
)83
8)
)83
&
5
Basic CobraNet Network Connections continued
Alternately, you can connect the CAB 4n CobraNet port directly to the CobraNet port on your
MM-DSP-cn card or Nion, bypassing the need for a switch. However, this type of direct
connection requires a "crossover" cable. (See p.18 to 19 for CAT 5 cable details.) It should be
emphasized that with this direct connection method, you cannot connect more than a single CAB
product to an MMDSP-cn card or Nion CM-1 card. This type of connection is normally used for
testing and troubleshooting and has limited advantages in actual system installations.
2
1
'
)83
8)
)83
&
5
Audio Connections
The second connection is audio input or output. Each audio connection on the CAB 4n is a single
three-wire, balanced analog circuit. The connections are identical for both microphone and line
input plus line output cards. When using an AEC card make sure there is at least one line output
card loaded in the CAB 4n for signal reference purposes.
As with any electronic connection, care should be taken to ensure that the termination is solid.
There should be no stray wire strands, kinks or nicks in the wire jacket for a proper termination.
And as always, audio connections should be made with high quality shielded wire.
RS-485 Connections
The third connection is the RS-485 Serial Port. All CAB Series products include this powerful
feature that enables you to “bridge” serial data between CAB locations on the CobraNet™
network. You can think of this as a kind of “sub-network” that travels across the CobraNet
infrastructure independently of the audio data. This feature has many uses, but is primarily used
to transport control data. The data format is Half-Duplex, two-wire, balanced. Again, care should
be taken to insure that your termination is correctly installed and high quality shielded wire
should be used.
;
1
'
)83
8)
)83
&
5
CAT 5 cable is your friend....
Well, you’ve been in the audio business for a while now....you know all about audio connections,
balanced cables, multi-pairs, SJO, TRS this and XLR that....you can dress off a wiring harness
like nobody’s business....then, the industry throws “CAT 5” at you....! So, what exactly is
Category 5 cabling, and how do I terminate it? Category 5 cable, or “CAT 5” as it is commonly
known, is a wiring standard that became popular when computer networks moved from a “bus”
topology to a “star” or...... “every box is a home run” topology. The wire itself consists of 8
conductors, identified into 4 pairs, and although only two of these pairs are actually used, all four
are terminated. It is a UTP (Unshielded Twisted Pair) configuration, in true telco, or AT&T style.
The cable is coupled to in-line RJ-45 connectors, also a Bell/AT&T standard. Special crimping
tools are required to make the termination, and are available everywhere, as are the connectors.
Oh...and before you start designing cable plants for small cities....a single CAT 5 cable run should
not exceed 100 meters. Just like telco wire, there are stranded and solid varieties of CAT 5 cable.
This is important to know, because the RJ-45 connector is different for each type of wire. The
standard “bent tyne” style connector is intended for use with solid core wire, and the “aligned
tyne” connector is for use with standard wire. There have been errors when using incorrect
cable/connector combinations, so be careful. The "bent tyne" connector will generally work on
stranded wire by the way, but not the other way around. In general, make sure your connector
matches your cable type. If you aren’t sure, use the “bent tyne” variety. When terminating CAT 5
cable, it is important that the natural twist of each pair be carried through as close as possible to
the point of termination at the connector.
The EIA standard requires no more than 1/2 inch be left untwisted. More than 1/2 inch of
untwisted cable will affect performance at high bit rates. Although only 2 of the 4 twisted pairs
are used for Ethernet, it is important that all pairs be terminated, and that the conductors be
twisted together in pairs. The illustrations should give you the basics for getting your cables, and
your audio system up and running. Although pre-made, molded style cables are preferred, they
are usually impractical, since your cabling route, distance and locations are based on the jobsite
conditions and not your test bench. Additionally, you will need rack wiring, and bulk cable is the
preferred way to dress off a wire harness, as we all know. Since this manual is printed in
grayscale, you will not be able to see the color code of the wire. We have labeled them for your
convenience, but you should get familiar with the color schemes so they are second nature to you.
An error in the cabling of your audio network is often the primary cause of system errors,
so....take your time, learn it thoroughly and DO IT RIGHT THE FIRST TIME! Although the
wiring standard used in CAT 5 cabling originates with AT&T, it is functionally different for
configuring Ethernet cabling.
The Bell System uses a series of colors to identify wire pairs. This color scheme identifies the
pair numbers, and conductor polarity, and applies to the WIRE....not the connector. It is important
to know what pairs are which, and the function of the pins on the RJ-45 connector. The colors are
BLUE, ORANGE, GREEN and BROWN for the first four pairs.
,
1
'
)83
8)
)83
&
5
The color code extends well beyond that, but since we are only dealing with 4 pairs of wire, you
don’t need to know the entire Bell System color code for terminating a 900 pair distribution
trunk...! What is often confusing is that the pair numbers do not line up with the pin numbers on
the RJ-45 connector. In other words, conductor ONE of the cable (White w/Blue Strip) is NOT
terminated to PIN ONE of the connector. The AT&T connecting standard always uses the middle
pins for the first pair. After that, they are staggered around, primarily to prevent crosstalk between
adjacent pairs. For Ethernet, and for use with the CAB 4n, only the ORANGE and GREEN pairs
are actually used. BUT...it is very important that you build the cable with ALL PAIRS properly
terminated. This will prevent any confusion later, and give your cable a solid mechanical
connection.
Remember, for Ethernet, the BLUE and BROWN pairs are not used. The ORANGE pair is
transmit (TX), and the GREEN pair is receive (RX). There is a positive and negative conductor
for each pair, indicated by the color code. Notice on the chart that the order of the wire pairs does
not follow the connector pins, as mentioned earlier. Don’t let that confuse you. The first wire of a
given pair is always the white wire with a colored stripe and is the positive conductor. The
corresponding colored wire with the white stripe is the negative conductor for that pair.
Crossover Cables
Normal CAT 5 cables are designed to connect the CAB 4n to a
network switch only. You cannot use this type of cable to
connect a CAB directly to a MediaMatrix MM-DSP-cn DPU
card or Nion CM-1 card. For that you need a “crossover”
cable. The pin assignments for a crossover cable, shown in
parentheses on the chart, apply to ONE END of the cable
ONLY!
0
1
'
)83
8)
)83
&
5
Crossover cables are used to connect switches to other switches or CABs directly to the DPU
card. Also, a crossover cable is what you would use if you were to connect a CAB to another
CAB, for use as a digital “snake”. A crossover cable is terminated the same way as a normal
cable, except that the TX and RX pins are "swapped" at one end to allow the transmit pair of
one device to connect to the receive pair of the other. Normally, this crossover action is done
within the switch, which is why you use a straight-through cable most of the time. It is very easy
to tell the difference between a crossover cable and a straight-through cable by looking at the
conductors in the RJ-45 connectors. If the wiring is identical at both ends, you are looking at a
straight-through cable. If it is different, you most likely have a crossover cable, or possibly, an
incorrectly terminated cable. Look carefully at the color of the conductors. It is important to note
that some switches include “uplink” ports. These ports are intended to serve as a connection to
another switch. As such, the uplink port is wired to use a straight-through cable instead of
requiring a crossover cable. On some switches, uplink ports share their connection with an
adjacent port, so be sure to read the manufacturer'
s instructions for proper use.
9
1
'
)83
8)
)83
&
5
Link Connections
All CAB Series products feature built-in “Buddy Link” functionality for creating backup I/O
configurations in mission critical systems. The term “Buddy Link” extends to multiple
dimensions within MediaMatrix, but in this context, we are concerned only with how the built-in
Buddy Link works with the CAB 4n Series products. For more detailed information on how
Buddy Link works with MediaMatrix and/or CobraNet™, please refer to our website, or to the
resource list at the end of this manual.
Each CAB 4n Series product features rear panel, dual BNC connectors labeled LINK IN and
LINK OUT. These connectors enable you to connect adjacent, CAB units for redundancy and
define the role of dual units. In this configuration, one CAB is declared the primary and transmits
data via its LINK OUT connector. The other CAB is the secondary, or backup, and receives data
at its LINK IN connector. A high quality, broadcast grade video cable, RG-59 with male BNC
connectors on each end is used to make the connection between the primary and secondary
CABs. A single cable is used for dual CABs in this redundant configuration. The connection is
always LINK OUT (Primary) to LINK IN (Slave). Audio input or output signals should appear at
both units, in parallel, so if one fails, the redundant unit will have the same connection. By nature
of the Buddy Link functionality, the secondary unit is always “off-line” until needed and
therefore the paralleling of the audio connections is of no consequence.
For this feature to work properly, both units must be configured to use the same Audio Bundle
numbers (p.24 to 25). As long as the primary unit is powered on, and it sees a good CobraNet
connection (Ethernet link status good), and it has not experienced a fault, it generates a signal
from its LINK OUT connector which inhibits the secondary unit from taking over until there is a
failure or fault. The action of the switch-over is different for the each type of CAB. In the case of
the CAB 4n, input audio is present simultaneously at both units and both units will pass audio
1
'
)83
8)
)83
&
5
internally. You can see this by the duplication of audio presence on the front panel meters. To
prevent confusion from duplicated audio signals in the system, the secondary CAB 4n is
prevented from transmitting onto the CobraNet network by the action of the Buddy Link.
Therefore, only one set of audio inputs is present within the system at a time in addition and for
the outputs the secondary unit’s audio output is muted. This prevents an audio “collision” of
duplicate audio output signals at the amplifiers.
The Buddy Link feature also monitors the integrity of the LINK CABLE. When using dual
CABs, a cable failure will cause the secondary unit to take over transmission onto the CobraNet
network. The Buddy Link functionality can also be placed under software control and is used in
systems where remote access to the link is required. (See the resource list at the end of this
manual for additional information on this topic.)
NOTE: Using the Link Connectors for creating redundancy is limited to “dual” CAB units.
Where additional CABs are used, additional redundant units must also be added.
1
'
)83
8)
)83
&
5
Setting the Hardware Base Address ID
Once you have a valid physical connection to the network port, you now must configure the port
on both ends of the network media to establish communications between the MediaMatrix
software and the CAB 4n. This is a critical configuration since you will not be able to pass audio
or enable communications without it. Please keep in mind that there are two separate settings for
successful communications on the CobraNet™ network. One is the Hardware Base Address, the
other is the “Bundle” which will be discussed in a separate section.
First things first.....The first step is to set your Hardware Base Address. Correctly setting this ID
will enable communications between the CAB 4n and its associated control panel, the “Taxi”
device within MediaMatrix software. On the CAB 4n front panel at the top left hand corner and
behind the decorative face plate there is a hardware base address switch. This switch, which is
actually 4 small rotary switches is used to set the CAB’s ID. Remove the screws from the CAB
4n face plate to gain access to the hardware base address switches. A Hardware Base Address has
4 digits. Acceptable values are in hex and range from 0001 to 7FFF. From left to right, the four
rotary switches represent your 4 digit Hardware Base Address number. If you look carefully,
there is a small arrow on each switch indicating the selected number. Using a small Phillips
screwdriver, carefully set each rotary switch to the desired number. You will feel a “click” as you
move between digits. Be careful, and do not force the switch.
The next step is to set the same address within the MediaMatrix software using the yellow CAB
device, or as I mentioned earlier, the “Taxi”. The Taxi device represents the actual hardware, and
there must be one Taxi for each physical CAB 4n. In addition to this hardware address setting, the
Taxi device includes the CAB 4n’s analog controls and the CobraNet “Bundle” assignment
control for the CAB’s audio network channel. More on that later.
Now, let'
s set up the hardware address within the software and establish communications between
the MediaMatrix and the CAB 4n. Refer to the picture below to set Hardware & Software
Addressing Controls. Ensure that you have the simple view shown on page 11 constructed in
NWare and compiled for these steps. (Refer to the MediaMatrix Help files for details on
MediaMatrix basics.)
Find the yellow box labeled CAB 4n the “Taxi”. Open the device by double clicking on it. Select
the CAB 4n tab, on the right hand side of this box is the Hardware Base Address “ID” Control.
This control has a 4-digit ID number
which corresponds to the 4-digit
Address ID on the actual CAB
hardware. While in Control Mode, set
the Hardware Base Address to match
(exactly) the 4-digit address you set on
the physical CAB 4n unit earlier. To do
this, click once (in Control Mode) on the
address box and type your hex based
alpha-numeric ID number. When a valid
number is entered, the green ID LED
next to the ID number should light,
indicating that the ID number you
entered is valid.
#
1
'
)83
8)
)83
&
5
Now you are ready to test your connection. If you have done everything correctly, you should
now have communications between the Nion and the CAB 4n. If so, the front panel TX and RX
LED’s will indicate traffic. You can further test the connection by testing the functions of the
CAB and verifying the response.
Setting the Audio Bundle
Now that you have established communications between the MediaMatrix software and the CAB
4n hardware, you will need to prepare the network to pass audio. CobraNet™ is a powerful
protocol that allows you to pass up to 64 channels (32 in by 32 out) of digital audio per
MediaMatrix MM-DSP-cn or Nion CM-1 Digital Audio Processing card to a practically
unlimited number of CAB Series products.
The first order of business is to plan your system out. Good system design and careful planning of
your resources, routing, processing and distribution requirements will ensure a seamless
installation of the audio network. You should have a systemic method of assigning your hardware
IDs and your Audio Bundles. For example, you may want to number all incoming audio as odd
numbered bundles, and outgoing audio as even numbered bundles. You may want to create a
numbering scheme that synchronizes the Hardware Base Address IDs with the Audio Bundles so
that there is some consistency in the way your system is identified. Remember that in CobraNet,
audio travels across the network in a Bundle*.
For a CAB 4n a Bundle is defined as four (4) digital audio channels (1 Bundle per MM 4 Ch
card). These channels get into, and out of, the MediaMatrix processing engine via the CobraNet
Input and Output Block or within NWare via individual CM-1 Flyoffs. If this is not clear to you,
please go back and review the section entitled, “Hardware & Software Devices” and “The Test
View” earlier in this manual. In order to get audio into the system, we have to set an Audio
Bundle number on a CobraNet Input Block or within the NWare NioNode CM-1 table.
The number is a normal number and the range is OFF to 32,767. For switched networks, the
number must be 256 or higher*. You do not need to be concerned with additional zeros or other
syntax. The number you set is what you get. To set the Bundle Number, place your Control Mode
cursor over the box next to the Bundle label in the CAB control device and type a number, any
'
1
'
)83
8)
)83
&
5
number, into the box. (Refer to the MediaMatrix Help for information on making this control
gesturable.)
To complete the process, this same Bundle Number must also be set on the corresponding CAB
unit for each group of four channels. In order to get audio from a given CobraNet Input or Output
Block, the numbers must match in the blocks and the CAB Taxi Device or in the case for NWare
the CM-1 table within the corresponding NioNode block. The process for setting the Bundle
Number in the Taxi Device is the same, and you must be in Control Mode. It is important to note
that there are four Bundle Numbers on a CAB 4n, one for each set of four audio channels cards
that may be loaded. (Note: short loading of a CAB4n is possible).
That is pretty much it as far as setting up the CAB 4n to communicate and pass audio on the
CobraNet network. There are many additional variables in larger systems, but this is the basic
configuration. What is very important to understand is the relationship of the CAB device, the
Taxi, and the CobraNet audio transport. If audio inputs are coming in on a CAB 4n and assigned
to CobraNet Bundle 285, then a CobraNet Input Block or CM-1 table for NWare must be set to
Audio Bundle 285 as well.
*NOTE: The Bundle Numbers referred to in this section assume the use of a switched (Unicast)
network. Although it is possible, we do not recommend the use of hub-based (Multicast)
networks with MediaMatrix systems. For more information on using a Multicast network with
CobraNet, please refer to the Peak Audio web site http://www.peakaudio.com/ .
*
1
'
)83
8)
)83
&
5
GPIO Pin-Out Details
The CAB4n Series include a versatile GPIO (General Purpose Input Output) system for
terminating external logic, controls, relays and other external systems. Each control pin is
supported by NWare for configuration, control and monitoring. Any combination of control pins
may be used simultaneously, regardless of the configuration. For information on the GPIO
configuration options, please refer to the NWare Help, included with the software.
The GPIO system provides the following features:
Configurable General Purpose ports (8 Control Pins)
These ports represent the bulk of the CAB4n GPIO functionality. Each of these ports can be
configured as follows via the *NWare software CAB4n properties block:
-
Digital In (3.0V TTL logic - Low: 0VDC - 0.8VDC; High: 2.0VDC - 24VDC)
Digital Out (3.0V TTL logic - Low: 0VDC - 0.4VDC; High: 2.4VDC - 3.3VDC)
Analog In, self powered (pin feeds required voltage through pot or switch to common)
Rotary Encoder (requires 2 pins and a common)
NC & NO relays (4 Sets)
4 sets of normally open or
normally closed relays are
available for general purpose
usage. User configurable within
the *NWare design program
file.
Fault relay
A single system relay is
configured
for supervising
project faults. This Form C
relay provides 1A contacts and
is activated when the front panel
fault LED is illuminated, which
indicates a muted condition.
* Not discussed in this document. Please see the NWare help file.
2
1
'
)83
8)
)83
&
5
Connection
The rear panel of the CAB4n includes a 25-pin DSub connector (DB-25) for accessing the GPIO
functions. Although it is possible to terminate GPIO functions directly to the DB-25 connector,
we recommend that you use the optional breakout accessory (GPIO-25: Peavey Part# 00510490).
The GPIO-25 is a convenient way to access each pin and facilitates easy rack wiring and
troubleshooting. The GPIO-25 is a DIN rail package and includes removable Euro connectors for
terminating the pins.
The illustration on the following page shows the pin assignments for the GPIO system. If you
are using the GPIO-25, use the screened pin numbers to identify the functions available for the
associated captive wire terminal.
;
1
'
)83
8)
)83
&
5
Technical Support
MediaMatrix has an extensive Technical Services Group that provides tech support, repair and
implementation services. If you require assistance with your new CAB 4n, you can get help from
several sources. There are many technical documents, white papers and application notes on our
website and Peak Audio’s website. (See the Additional Resources section on the next page for
details.) There are also brochures, data sheets and our newsletter, “Audio Interactive”, published
monthly. Also on our website are message board forums that include questions and answers on all
audio topics. This forum is a great way to learn more about audio, Peavey products and system
design from other audio professionals around the world. You can also get help by sending us an
e-mail or posting a request on the message board. Finally, if you still cannot get the information
you need, don’t hesitate to call us. We have extensive phone support services and will be happy
to assist you. The contact information for the MediaMatrix Division is shown below:
Peavey Electronics Corp.
MediaMatrix Division
711 “A” St.
Meridian, MS 39301 USA
Phone: 601-483-5376
Fax: 601-486-1678
Website: http://mediamatrix.peavey.com/home.cfm
Warranty Registration
Please take a few minutes and fill out the warranty registration card for your CAB 4n. Although
your warranty is valid without the registration, the information you provide with the form is
crucial to our support group. It enables us to provide better service and customer support, and to
keep you informed of new product updates. Refer to the warranty statement in the rear of this
manual for details about what your warranty includes and what the limitations are.
,
1
'
)83
8)
)83
&
5
Additional Resources
The use of the CAB™ 4n Series products, as well as MediaMatrix and networking technology
require a thorough understanding of several advanced topics. It is highly recommended that the
designer acquire an understanding of these topics so that the process of systems work is efficient
and cost-effective. There are several excellent sources for obtaining information regarding these
topics. The resource list below represents the most current documentation on the state-of-the-art
as of the date of this printing. Additional information not listed below is also available. As in any
high technology environment, this information is constantly under a state of flux. It is important
to know what you are reading, the vintage of your hardware and software and the application for
which it is intended. Good documentation will almost always ensure this, provided that it is read,
comprehended and retained. We sincerely hope that you enjoy your new CAB Series product
and that you learn a lot in the process. Enjoy!
Tech Notes and General Audio &
MediaMatrix product line::
http://mediamatrix.peavey.com/home.cfm
CobraNet Technology
Richard Zweibel & Kevin Gross:
http://peakaudio.com/cobranet/papers/techn
ology.htm
White Paper: Digital Audio Distribution
Systems
Kevin
Gross,
Peak
Audio
Inc.:
http://peakaudio.com/cobranet/papers/digital
_audio_distribution.htm
Digital Synchronization in CobraNet
Systems:
http://peakaudio.com/cobranet/papers/sync.h
tml
Common CobraNet Problems & Solutions:
http://peakaudio.com/cobranet/problems.htm
Switched Network Design & Configuration:
http://peakaudio.com/cobranet/examples.ht
mhttp://peakaudio.com/cobranet/examples.h
tm
Network Cabling, A Primer:
http://peakaudio.com/cobranet/network_cabl
ing.htm
CobraNet on Switched Networks:
http://peakaudio.com/cobranet/switched.htm
Bundle Assignments in CobraNet Systems
Ray
Rayburn,
Peak
Audio
Inc.:
http://peakaudio.com/cobranet/papers/bundl
e_assignments.htm
Cobra Net Frequently Asked Questions
(FAQ):
http://peakaudio.com/cobranet/faq.htm
CobraNet and MediaConverters:
http://peakaudio.com/cobranet/papers/media
_converters.htm
Glossary Of Terms:
http://www.peakaudio.com/cobranet/termino
logy.htm
Error Reporting in CobraNet Systems:
http://peakaudio.com/cobranet/developer/er
ors.htm
CobraNet Repeater Network Examples:
http://peakaudio.com/cobranet/repeater.htm
0
1
'
)83
8)
)83
&
5
Specifications
MECHANICAL
of
AC
Dimensions (H x W x D)
19" W x 12-7/8" D x 3-1/2" H (48.26 x 29.71 x 8.78 cm)
Weight
9.5 lbs. (4.3 kg)
Mounting
Double EIA Space Rack Mount (2U)
Connections
Removable “Euro” Connectors for each single channel
audio inputs/outputs and RS-485 bus. RJ-45 for
CobraNet™ interface, BNC for link. IEC receptacle for
power.
#9
1
'
)83
8)
)83
&
5
CAB 4n PERFORMANCE
Frequency Response:
+0 / -0.3 dB, 20 ~ 20 kHz, referenced @ 1 kHz
THD + Noise:
Line Level: 0.006%, Mic Level: < 0.01%
Dynamic Range:
106 dB
Equivalent Input Noise (EIN):
Mic Level: < -126 dBu
Common Mode Rejection Ratio:
55 dB
Crosstalk:
90 dB
Full-Scale
Line Level: +30, +24, +18, or +12 dBu
Input Sensitivity Settings:
Mic Level: -42 dBu at +63 dB gain
Full-Scale Output Settings:
settings
+24, +18, +12, +6 dBu, Less than 0.5 dB error between
Analog Gain Range:
Line Level: -95.5 dB to +30.5 dB, Mic Level: 0 to 63 dB
Input Impedance:
Line Level: 9.5 k Ohms, Mic Level: 4 k Ohms
Output Impedance:
102 Ohms
Minimum Load Impedance:
600 Ohms
Audio I/O:
16 inputs/outputs, line or mic level modular inputs,
configurable in groups of four.
LED Metering:
16 peak-reading headroom LED meters Zero LED
indicates level <1 dB below full-scale
#
1
'
)83
8)
)83
&
5
GENERAL SPECIFICATIONS
A/D, D/A Quantization:
24-bit
Audio Transmission Quantization:
On CobraNet: 20 or 24-bit, CobraNet truncates to 20 bits
unless used in reduced channel mode
Sample Rate (Fs):
32, 44.1 or 48 kHz (user selectable)
Master Clock Speed (256 Fs):
12.888 Mhz
Digital Audio Channels per unit:
16 inputs/outputs at 24-bit
Digital Audio Interface:
CobraNet I/O: 100 BaseT Ethernet, Uses standard 8conductor RJ-45 jack
RS-485:
3-conductor half-duplex, 1 port with 2 multi-drop
connections
Word-Clock Ports:
2 BNC I/O ports, 1 port with 2 multidrop connections
AC Power Range:
100 ~ 240 VAC, 47 to 63 Hz Universal Power Supply
AC Line Current:
450 mA (rms)
Power Consumption:
32 W
Power Dissipation:
108 BTU (27 kcal)
Finish:
Grey powder coat, painted steel and brushed aluminum
face plate
Agency Compliance Listings
(as of press time):
UL, CUL, CE, and FCC part 15, Class A
#
1
'
)83
8)
)83
&
5
##