1
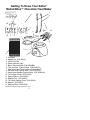
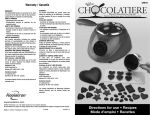
OWNER’S MANUAL
Model No. SGCM1
Melted Bliss™
CH O C O L A T E
TREAT
MAKER
IMPORTANT SAFEGUARDS
When using electrical appliances, basic safety precautions should
always be followed, including the following:
1. Read all instructions.
2. Do not touch hot surfaces. Use handles or knobs.
3. To protect against electrical shock, do not immerse cord,
plugs or Heating Body (appliance) in water or other liquid.
4. Close supervision is necessary when any appliance is used
by or near children.
5. Unplug from outlet when not in use and before cleaning. Allow
to cool before putting on or taking off parts.
6. Do not operate any appliance with a damaged cord or plug or
after the appliance malfunctions, or has been damaged in any
manner. Contact Consumer Service for examination, repair or
adjustment.
7. The use of accessory attachments not recommended by the
appliance manufacturer may cause injuries.
8. Do not use outdoors.
9. Do not let cord hang over edge of table or counter, or touch
hot surfaces.
10. Do not place on or near a hot gas or electric burner, or in a
heated oven.
11. Extreme caution must be used when moving an appliance
containing hot oil or other hot liquids.
12. To disconnect, turn Dial to OFF position, then remove the
plug from wall outlet.
13. Do not use appliance for other than intended use.
SAVE THESE INSTRUCTIONS
FOR HOUSEHOLD USE ONLY
1
Additional Important Safeguards
CAUTION HOT SURFACES: This appliance generates heat
during use. Proper precautions must be taken to prevent the
risk of burns, fires, or other injury to persons or damage to
property.
1. A person who has not read and understood all operating and
safety instructions is not qualified to operate this appliance. All
users of this appliance must read and understand this Owner’s
Manual before operating or cleaning this appliance.
2. If this appliance falls or accidentally becomes immersed in
water, unplug it from the wall outlet immediately. Do not reach
into the water!
3. When using this appliance, provide adequate air space above
and on all sides for air circulation. Do not operate this
appliance while it is touching or near curtains, wall coverings,
clothing, dishtowels or other flammable materials.
4. To reduce the risk of fire, do not leave this appliance
unattended during use.
5. If this appliance begins to malfunction during use, immediately
unplug the cord. Do not use or attempt to repair the
malfunctioning appliance!
6. The cord to this appliance should only be plugged into a 120V
AC electrical wall outlet.
7. Do not use this appliance in an unstable position.
8. Never plug in the Chocolate Treat Maker without first placing
the Melting Pot inside the Base of the unit.
9. To avoid burns wait for the Chocolate Treat Maker to cool
down completely before touching or cleaning.
10. Never use the Chocolate Treat Maker on a gas or electric
cooktop or on an open flame.
11. Do not leave the plastic Dipping Forks in the Melting Pot while
the Chocolate treat Maker is ON and in use.
12. The Chocolate Treat Maker is designed solely for melting
chocolate. It is absolutely not for sterilization or cooking.
13. Heat Chocolate only in Melting Pot.
14. Do not attempt to heat up in unit’s Base alone.
2
Polarized Plug
This appliance has a polarized plug (one blade is wider than the
other). To reduce the risk of electric shock, this plug is intended
to fit into a polarized outlet only one way. If the plug does not fit
fully in the outlet, reverse the plug. If it still does not fit, contact a
qualified electrician. Do not attempt to modify the plug in any way.
Short Cord Instructions
A short power-supply cord is provided to reduce the risk resulting
from becoming entangled in or tripping over a longer cord.
Do not use an extension cord with this product.
Plasticizer Warning
CAUTION: To prevent Plasticizers from migrating from the
finish of the counter top or table top or other furniture, place
NON-PLASTIC coasters or place mats between the appliance
and the finish of the counter top or table top.
Failure to do so may cause the finish to darken, permanent
blemishes may occur or stains can appear.
3
Getting To Know Your Salton®
Melted Bliss™ Chocolate Treat Maker
11.
9.
12.
10.
5.
14.
6.
7.
8.
2.
13.
15.
3.
1.
4.
1. Unit Base
2. Melting Pot (P/N 22601)
3. OFF/LO/HI Dial
4. Power Indicator Light
5. Bunny Figurine Mold (P/N 22602BN)
6. Tree and Leaf Figurine Mold (P/N 22602TL)
7. Heart and Cake Figurine Mold (P/N 22602HC)
8. Sun and Shell Figurine Mold (P/N 22602SS)
9. Large Heart-Shaped Figurine Mold (P/N 22602LH)
10. Ten Lollipop Sticks (P/N 22603)
11. Dipping Spoon (P/N 22604)
12. Dipping Fork (P/N 22605)
13. Ten Small Dipping Forks (P/N 22606)
14. Spatula (P/N 22607)
15. Draining Rack (P/N 22608)
(NOTE: All replacement parts are black in color.)
4
Before Using For The First Time
Clean the Melted Bliss™ Chocolate Treat Maker following the
Cleaning Instructions described in this Manual.
DO NOT IMMERSE THE BASE UNIT OR CORD OF THE
MELTED BLISS™ CHOCOLATE TREAT MAKER IN WATER OR
ANY OTHER LIQUID!
Important Information
READ BEFORE USING YOUR Salton® MELTED BLISS™
CHOCOLATE TREAT MAKER FOR THE FIRST TIME.
• Read all instructions.
• Your Melted Bliss™ Chocolate Treat Maker is only designed
to keep the chocolate warm (Position LO) or to melt down
finely chopped dark, milk or white chocolate up to the MAX
line approximately 8 ounces (Position HI). It is not designed
for cooking.
• If the melted chocolate is to be further processed, always use
another vessel and allow the chocolate to cool down a little.
• Both the Melted Bliss™ Chocolate Treat Maker, the Molds
and the chocolate must be completely dry and be at room
temperature.
• Never add water to the chocolate. If the mass is too thick,
reheat it in the Melted Bliss™ Chocolate Treat Maker and add
1/2 teaspoon of vegetable shortening and stir well. If it is too
thin (runny) or too hot, add a little more of the finely chopped
chocolate.
• To obtain a nice shine on chocolate icing, add (1/2 tsp) cocoa
butter or coconut butter to the mass.
• Some recipes call for the addition of sugar or honey. Use
sparingly.
• Never wash any removable parts of the Melted Bliss™
Chocolate Treat Maker in the dishwasher.
• Save these instructions and refer to them often.
5
Instructions For Use
1. Place the appliance on an even surface and lower the Melting
Pot into the recess of the Base Unit.
2. Plug the Power Cord into a 120V AC outlet.
3. Fill the Melting Pot to the MAX fill line with chocolate pieces,
which is approximately 8 ounces of chocolate. Turn the Dial
on the front of the appliance to the HI Setting Position. Do not
use finished chocolate candy! Only baking chocolate, candy
melts, almond bark, chocolate chips and chocolate couverture
(high-quality chocolate) will properly work in this machine.
4. The chocolate should be finely chopped to shorten the melting
time. Stir occasionally during the melting process with a
plastic or wooden stirrer.
5. The LO Setting Position is used to keep the melted chocolate
warm for dipping food into.
6. Turn to the Dial to the OFF position after using the unit.
Unplug Power Cord from the 120V AC outlet.
INSTRUCTIONS FOR USING THE FIGURINE MOLD
1. The Mold must be dry and at room temperature. Melt the
chopped chocolate or chocolate couverture in the Chocolate
Treat Maker according to the Instructions in this manual.
2. Stir until the mixture is completely melted and pour the
chocolate mass as precisely as possible into the Molds.
3. You may also spoon the chocolate into the Molds for greater
control of the chocolate's flow.
4. Spread the chocolate around the Mold with the spatula or a
decorating brush and remove excess chocolate. Lightly tap
Mold on the counter several times to eliminate air
bubbles.The Bunny Figurine Mold give you the option of
turning your finished treat into a snack on a stick. Insert one
of the Lollipop Sticks into the groove on the mold and make
sure it is covered by a layer of chocolate.
5. Allow to dry and cool in the refrigerator (several hours) or
freezer (15-60 minutes) or until the chocolate is really hard.
6. There should be no dark areas on the bottom of the mold and
the mold should have a frosted appearance when the
chocolate is ready.
7. Gently press the chocolate shapes out of the Mold.
6
INSTRUCTIONS FOR USING THE LARGE HEART-SHAPED MOLD
1. The Mold must be dry and at room temperature. Melt the
chopped chocolate or chocolate couverture in the Chocolate
Treat Maker according to the Instructions in this manual. Stir
until the mixture is completely melted.
2. To ensure that the consistency of the melted chocolate is
thick, add some of the chopped chocolate later, stirring
continually and then pour into the Large Heart-shaped Mold.
You may also spoon the chocolate into the Mold for greater
control of the chocolate's flow.
3. The entire Large Heart-Shaped Mold should be thickly coated.
Use a nylon tipped decorating brush, a pastry brush, a spatula
or the back of a teaspoon to spread the chocolate around in
the mold, smoothing the surface until the chocolate begins to
set. Allow to cool for several hours until the chocolate shell is
really hard.
4. Gently press the chocolate Heart out of the Mold
INSTRUCTIONS FOR MAKING TREATS WITH TASTY FILLINGS
1. The Mold must be dry and at room temperature. Melt the
chopped chocolate or chocolate couverture in the Chocolate
Treat Maker according to the Instructions in this manual. Stir
until the mixture is completely melted.
2. Turn the Dial to LO.
3. Using a nylon tipped decorating brush, paint the chocolate
mixture into the Mold. Paint enough chocolate into the Molds
so that you cannot see through the chocolate when you hold
up to the light.
4. Place Mold in refrigerator until hard. Remove Mold from
refrigerator and fill with the desired filling (see filling recipes
listed in the Recipe Section of this manual) then return to
refrigerator until filling is firm.
5. Remove Mold from refrigerator and brush on a final of melted
chocolate. Smooth off excess chocolate with the spatula and
lightly tap Mold on counter several times to eliminate air
bubbles.
6. Refrigerate until hard.
7. Press gently to release the filled chocolates from the Mold.
7
RECIPE SECTION
FILLINGS
BUTTERCREAM FILLING
1/2 cup butter
1/3 cup white corn syrup
1 teaspoon vanilla
3 cups confectioners (icing) sugar
Mix well until all the ingredients are combined. Refrigerate until ready
to use.
FILLING VARIATIONS
• COCONUT BUTTERCREAM FILLING
Add three tablespoons of grated desiccated coconut to the
Buttercream Filling.
• COFFEE BUTTERCREAM FILLING
Add one tablespoons of instant coffee powder to the
Buttercream Filling.
• RUM BUTTERCREAM FILLING
Add two tablespoons of rum or rum extract to the
Buttercream Filling.
• MINT BUTTERCREAM FILLING
Add ½ teaspoon of mint flavor extract to the Buttercream
Filling.
• PEANUT BUTTER FILLING
Use smooth peanut butter to fill the chocolates.
8
TREATS
CHOCOLATE DIP FOR FRUIT AND NUTS
8 ounces cooking/melting chocolate
The following fruits can be used: grapes, strawberries, blueberries,
blackberries, raspberries, gooseberries, banana slices, pieces of
apple or pear, dried fruits like dates, figs, apricots, prunes,
cranberries, raisins, and nuts.
Note: The fruit used should be at room temperature.
1. Melt the chopped chocolate in the Melting Pot on HI. Stir until fully
melted.
2. Once the chocolate has melted to the desired consistency, turn
the Dial to LO.
3. The fruit must always be ripe, clean and dry.
4. Spear the individual pieces of fruit onto the Small Forks, then dip
into the chocolate.
5. Place each piece of fruit onto the Draining Rack and refrigerate
until the chocolate is hard or if you are having a Fondue Party,
eat and enjoy.
6. For the nuts, use the Dipping Spoon to dip the nuts into the
chocolate. Place onto wax paper, refrigerate to set.
NOUGAT CREAM (use as topping for fruit or ice-cream)
8 ounces cooking/melting chocolate
2 tablespoons soft butter
1 cup and 1 tablespoon Hazelnut Fat-Free Creamer
1 teaspoon of honey (optional)
1. On HI, melt the chopped chocolate in the Melting Pot.
2. Turn off the unit and pour the melted chocolate into a ceramic
bowl.
3. Add the hazelnut cream and soft butter to the melted chocolate
and mix well until the mixture takes on the consistency of cream.
4. Add a little honey if necessary.
5. Pour the mixture into a clean jar, close the lid and store in the
refrigerator.
9
CHOCOLATE COATED FRUIT OR WAFERS
8 ounces dark (or white) chocolate couverture (you can use Almond
Bark instead) fruit or wafers.
The following whole fresh fruits can be used: grapes, strawberries,
blueberries, blackberries, raspberries, gooseberries, apple bananas,
fresh figs, kumquats and dried fruits like dates, figs, dried apricots,
prunes,cranberries, raisins, and nuts.
Note: The fruit should be at room temperature.
The fruit must always be ripe, clean and absolutely dry otherwise the
chocolate coating will not hold. The fruit can be dusted with a light
coating of cornmeal to reduce the effects of escaping moisture.
1. Melt the chopped chocolate couverture in Melting Pot on the HI
setting then turn to LO to allow it to cool a little.
2. After 10 minutes, turn the unit on HI again and reheat the
chocolate for 10 minutes. This process gives the chocolate
coating a beautiful shine.
3. Dip the pieces of fruit or wafers halfway into the liquid chocolate
couverture and allow them to dry well on a draining rack or cool in
the refrigerator. Use up quickly!
4. Chocolate coated fruit is also most suitable for the decoration of
cakes.
CHOCOLATE ICING AND FILLING
8 ounces cooking/melting chocolate
1/2 cup soft butter
2 cups confectioners sugar
¼ cup whipping cream
1. Melt the chopped cooking chocolate in the Chocolate Treat
Maker.
2. In a separate vessel, mix the soft butter, confectioners sugar and
the whipping cream with the melted chocolate.
3. Allow to cool down before icing your cake.
10
MOCHA-RUM TRUFFLES
8 ounces bakers semi-sweet chocolate
1 tablespoon butter
2 cups confectioners sugar
2 tablespoons instant coffee powder
2 tablespoons rum
2 tablespoons mocha coffee liqueur
8 ounces bakers German chocolate squares (for dipping truffles in)
1. Melt the chopped semi-sweet chocolate in the Chocolate
Treat Maker.
2. In a separate bowl, cream the soft butter, confectioners sugar,
instant coffee powder, rum, mocha coffee liqueur. Add the
melted chocolate and combine thoroughly. Roll into 1-inch
balls.
3. Refrigerate until firm enough to dip in warm chocolate.
4. Melt the German chocolate squares in the Chocolate Treat
Maker. Turn the Dial to Lo for dipping. Dip truffle balls in
melted chocolate coating thoroughly.
5. Place onto a baking sheet being sure to allow a little space
between each truffle.
6. Refrigerate until chocolate is hard. Store in a cool place and
use up quickly!
CLUSTERS
8 ounces semi sweet chocolate chips
¼ cup mini marshmallows
¼ cup flaked coconut
¼ cup raisins
¼ cup chopped walnuts.
1. Cover a baking sheet in wax paper.
2. Melt the chopped chocolate in the Melting Pot on HI. Stir until fully
melted. Turn Dial to LO.
3. In a separate bowl mix the remainder of the ingredients. Add the
melted chocolate and stir.
4. Using a tablespoon, drop a spoonful of the mixture onto the baking
sheet being sure to allow a little space in between each cluster.
Refrigerate until hard.
11
User Maintenance Instructions
This appliance contains no user serviceable parts. Do not
try to repair it yourself. Any servicing requiring disassembly
other than cleaning must be performed by a qualified appliance
repair technician.
Cleaning Instructions
• This appliance should be cleaned after every use. Unplug the
unit from the wall outlet. NEVER immerse Heating Body or
Power Cord in water. Allow the unit to cool before cleaning.
• Let the Chocolate Treat Maker cool. Wipe it with a damp
cloth. Rinse the Melting Pot and the Molds with warm water.
Wipe dry with a soft cloth.
• Melting Pot and plastic Molds are NOT dishwasher safe!
• Do not use soap or detergent on the Molds. They can cause
the Mold to dry out and crack.
• Do not use any sharp instruments to clean the appliance or
the moulds.
Storing Instructions
Unplug the unit from the wall outlet and clean all parts. Be sure all
parts are dry before storing. Store appliance in its box or in a
clean, dry place. Never store it while it is hot, wet or still plugged
in. Never wrap Power Cord around the appliance.
To avoid damage to the Molds, place tissues between stacked
Molds to prevent scratches.
12
LIMITED ONE YEAR WARRANTY
Warranty: This product is warranted by Salton, Inc. to be free from defects in materials or workmanship for a period of
(1) year from the original purchase date. This product warranty covers only the original consumer purchaser of the
product.
Warranty Coverage: This warranty is void if the product has been damaged by accident in shipment, unreasonable
use, misuse, neglect, improper service, commercial use, repairs by unauthorized personnel, normal wear and tear,
improper assembly, installation or maintenance abuse or other causes not arising out of defects in materials or
workmanship. This warranty is effective only if the product is purchased and operated in the USA, and does not extend
to any units which have been used in violation of written instructions furnished with the product or to units which have
been altered or modified or to damage to products or parts thereof which have had the serial number removed, altered,
defaced or rendered illegible.
Implied Warranties: ANY IMPLIED WARRANTIES WHICH THE PURCHASER MAY HAVE ARE LIMITED IN DURATION
TO ONE (1) YEAR FROM THE DATE OF PURCHASE. Some states do not allow limitations on how long an implied
warranty lasts, so the above limitation may not apply to you.
Warranty Performance: During the above one-year warranty period, a product with a defect will be either repaired or
replaced with a reconditioned comparable model (at our option) when the product is returned to the Repair Center, or
the purchase price refunded. The repaired or replacement product will be in warranty for the balance of the one-year
warranty period and an additional one-month period. No charge will be made for such repair or replacement.
Service and Repair: Should the appliance malfunction, you should first call toll-free 1 (800) 233-9054 between the
hours of 9:00 am and 5:00 pm Central Standard Time and ask for CONSUMER SERVICE stating that you are a
consumer with a problem. Please refer to model number SGCM1 when you call.
In-Warranty Service (USA): For an appliance covered under the warranty period, no charge is made for service or
postage. Call for return authorization 1 (800) 233-9054.
Out-of Warranty Service: A flat rate charge by model is made for out-of-warranty service. Include $8.00 (U.S.) for
return shipping and handling. We will notify you by mail of the amount of the charge for service and require you to pay
in advance for the repair or replacement.
For Products Purchased in the USA, but Used in Canada: You may return the product insured, packaged with
sufficient protection, and postage and insurance prepaid to the USA address listed below. Please note that all customs
duty / brokerage fees, if any, must be paid by you and we will require you to pay the cost of customs duty / brokerage
fees to us in advance of our performing any service.
Risk During Shipment: We cannot assume responsibility for loss or damage during incoming shipment. For your
protection, carefully package the product for shipment and insure it with the carrier. Be sure to enclose the following
items with your appliance: any accessories related to your problem, your full return address and daytime phone
number, a note describing the problem you experienced, a copy of your sales receipt or other proof of purchase to
determine warranty status. C.O.D. shipments cannot be accepted.
To return the appliance, ship to:
ATTN: Repair Center
Salton, Inc.
708 South Missouri Street
Macon, MO 63552
To contact us, please write to, call, or email:
Salton, Inc.
P.O. Box 7366
Columbia, MO 65205-7366
1-800-233-9054
E-mail: [email protected]
Limitation of Remedies: No representative or person is authorized to assume for Salton, Inc. any other liability in
connection with the sale of our products. There shall be no claims for defects or failure of performance or product
failure under any theory of tort, contract or commercial law including, but not limited to negligence, gross negligence,
strict liability, breach of warranty and breach of contract. Repair, replacement or refund shall be the sole remedy of the
purchaser under this warranty, and in no event shall Salton be liable for any incidental or consequential damages,
losses or expenses. Some states do not allow the exclusion or limitation of incidental or consequential damages, so
the above limitation or exclusion may not apply to you.
Legal Rights: This warranty gives you specific legal rights, and you may also have other rights which vary from state to
state.
For more information on Salton products: visit our website: www.eSalton.com
©2004 Salton, Inc. All rights reserved.
P/N 61591
Made in China
07/04