1
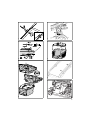
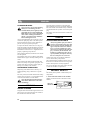
DEUTSCH
Mountfield
M Series Lawnmower
Owner’s Manual
8211-0401-01
D
S
SVENSKA
B
1.
2.
3.
4.
D
E
5.
6.
7.
3
S
SVENSKA
FULL
FULL
ADD
ADD
FULL/MAX
ADD/MIN
8. Briggs & Stratton
9. Honda
3x
10. Briggs & Stratton
11. Honda
G
I*
B*
12.
13.
14.
15. Left
4
16. Right
S
SVENSKA
17. Briggs & Stratton
18. Honda GCV
Briggs & Stratton : 0,76 mm
0,75 mm
Honda: 0,7-0,8 mm
S
S
19.
20.
T
40 Nm
21.
23 A. M4, M6
22.
S
23 B. M2
5
GB
ENGLISH
SAFETY REGULATIONS
SYMBOLS
The following symbols can be found on the machine to remind you of the care and attention that
are required during use.
The symbols mean:
Warning! Read the Instruction Book and
Safety Manual before using the machine.
Warning! Keep onlookers away. Beware
of objects being flung out.
Warning! Keep hands and feet clear of the
cutting deck when the machine is running.
• Do not use the machine while under the influence of alcohol, drugs or medicines, or when
you are tired or unwell.
PREPARATIONS
• Always wear strong shoes and long trousers
when mowing. Do not operate the machine in
bare feet or when wearing sandals.
• Always use hearing protectors (earplugs or
muffs).
• Check the area to be cut thoroughly and remove
any stones, sticks, steel wire or other objects.
• Replace the silencer if defective.
• Before use, always check to make sure that the
blades and their fixing components are not
worn or damaged. Replace worn or damaged
components in complete sets to ensure that the
correct balance is maintained.
WARNING - Petrol is highly inflammable:
Warning! Before starting any repair work,
remove the spark plug cable from the
spark plug.
GENERAL
• Always store petrol in containers specially
made for the purpose.
• Only refill with petrol outdoors. Never smoke
while refilling.
• Fill with petrol before starting the engine. Never remove the filler cap or refill with petrol
while the engine is running or still hot.
This symbol indicates a WARNING. Personal injury and/or damage to property
may result if the instructions are not followed carefully.
• If any petrol is spilt, do not try to start the engine. Move the mower from the place where the
petrol was spilt and avoid any form of sparking
until the petrol fumes have evaporated.
• Read the instructions carefully. Familiarise
yourself with all the controls and correct operation of the machine.
• Do not forget to replace the petrol filler cap and
storage container cap after refuelling.
• This machine is only intended for mowing
lawns. Any other type of usage, e.g. the cutting
of bushes, hedges or climbing plants, is forbidden due to the risk of personal injury.
• Never let children or any person not acquainted
with these regulations use the mower. Local
regulations may include restrictions concerning
the minimum age of the driver (operator).
• Never use the machine if other people, particularly children, or animals are in the vicinity.
• Remember that the driver (operator) will be
held responsible for any accidents involving
other persons or their property.
6
OPERATION
• Do not run the engine in confined spaces in
which dangerous carbon monoxide gas can accumulate.
• Use the machine only in daylight or where there
is good illumination.
• Avoid cutting wet grass if possible.
• Ensure that you can walk steadily when working on slopes.
• Never run, always walk.
• When using mowers fitted with wheels, always
cut across the slope, never in an up or down direction.
GB
ENGLISH
• Great care is required when changing direction
on a slope.
• Do not use the machine on slopes of more than
15°.
• Great care is required when reversing or when
pulling the mower towards you.
• Switch off the engine if the mower must be tilted when being transported over surfaces other
than grass, and also when the mower is being
transported to and from the area to be cut.
• Never operate the mower with inadequate protection or without safety equipment, e.g. deflectors and/or the grass collector, in place.
MAINTENANCE AND STORAGE
• Check that all nuts and bolts are tightened so
that the machine is in a safe operating condition.
• Never keep the machine, with petrol in the tank,
inside buildings where fumes can come into
contact with naked flames or sparks.
• Allow the engine to cool before putting the machine away.
• To reduce the risk of fire, keep the engine, silencer and fuel tank free from grass, leaves and
excess oil.
• Do not change the setting of the engine regulator and never rev the engine.
• If the machine is fitted with a grass collector, it
should be checked regularly for signs of wear or
damage.
• Start the engine carefully according to the instructions given. Keep your feet well away from
the blades.
• To ensure safe operation, replace any worn or
damaged parts.
• Do not tilt the mower when starting the engine
unless the mower must be tilted for starting. If
this is the case, it should not be tilted more than
necessary, and the part furthest away from the
operator should be tilted.
• Store the machine where children cannot gain
access to it.
• Keep hands and feet away from the rotating
blade and other rotating parts. If the mower has
a grass ejector opening, never put you hand into
it.
• Never lift or carry the mower while the engine
is running.
• If it becomes necessary to empty the fuel tank,
this must be done out of doors.
THE ENVIRONMENT
In order to protect the environment, we recommend that the following points should be given
special consideration:
• Always use pure unleaded petrol.
• Close the throttle before stopping the engine. If
the engine is fitted with a petrol tap, it should be
turned off on completion of cutting.
• Always use a funnel and/or a petrol can with a
level control to avoid spillage when refilling the
fuel tank.
Shut off the engine and detach the spark plug
lead:
• Do not fill the fuel tank completely.
• When leaving the mower unattended.
• When removing sticks and other rubbish, or
when the grass ejector has become clogged.
• During inspection, cleaning, or when servicing
the mower.
• When checking for damage and performing any
repairs after running over a foreign object, before restarting the mower.
• When checking the machine if it starts to vibrate excessively. (Check immediately.)
• Before refilling with petrol.
• Do not overfill with engine and/or transmission
oil (see ‘Instructions for Use’ for correct quantities).
• When changing the oil, ensure that all the used
oil is collected. Avoid spillage. Take the used
oil to a recycling unit.
• Do not dispose of the used oil filter in a rubbish
bin. Take it to a recycling unit.
• Replace the silencer if faulty. When carrying
out repairs, always use original spare parts.
• If the machine was originally equipped with a
catalyser which is now faulty, a new one must
be fitted when the silencer is replaced.
7
GB
ENGLISH
• Always seek professional help when the carburettor requires adjustment.
• Clean the air filter according to the directions.
• When, after many years of service, your machine needs to be replaced or is no longer required, we recommend that the machine is
returned to your distributor for recycling.
IMPORTANT
Equipment which is marked with an asterisk (*)
comes as standard in certain models.
3. Then tighten the locking wheels onto the lower
part of the handle. When these have been tightened, the height of the handle can be adjusted by
tightening the screws B with the wrench provided. (fig. 2)
ENGINE BRAKE CABLE
Secure the engine brake cable to the engine brake
(fig. 3). Note that the cable should be installed in
the direction of the handle.
CABLE HOLDER
Secure the cables in the cable holders (fig. 5):
Certain models do not have throttle control. The
engine’s speed is set for optimal function and minimal exhaust emissions.
D: Start/Stop cable + Clutch cable (*)
E: Throttle cable (*) + Clutch cable (*)
INTRODUCTION
Raise the collector flap and attach the two brackets
to the grass collector with the screws provided.
The brackets are marked with L and R and should
be installed at the corresponding mark on the rear
of the mower (fig. 7).
3
2
GRASS COLLECTOR
STOP
Fabric grass collector (*): Fit the fabric bag over
the steel frame and then snap the bag onto the plastic lid (fig. 6).
1*
1. Throttle control (*)
2. Clutch loop (*)
3. Start/Stop loop
INSTALLATION
LOOSE PARTS IN THE BOX
2 brackets for the grass collector
4 screws for the brackets
1 Allen key
1 socket wrench
+ Instruction books
HANDLE
1. Fold up the lower part of the handle.
2. Install the upper part of the handle mounts using
screws, washers and locking wheels. A lug is
installed on the right hand side for the starter
handle (fig. 1).
8
Plastic grass collector (*): Snap together both
halves and then the upper part (fig. 4).
Open the flap on the machine and attach the grass
collector to the brackets.
NOTE! The lawnmower can be operated without
the grass collector. The grass is then left in a line
behind the machine.
USING THE MOWER
COMBI
Your new lawnmower combines two different
functions in the same machine:
1. “MULTICLIP“
The machine comes equipped with a plug installed
in the ejector opening (fig. 23). The machine can
be used for ‘Multiclip’ i.e. the blade finely cuts up
the grass during mowing. The grass then falls into
the lawn where it is allowed to rot. This provides
the lawn with nourishment.
GB
ENGLISH
To remove the plug, press in the catch (S). On reinstalling the plug ensure that both pins are pressed
firmly into the holes so that the plug snaps in place.
M2 Combi:
To remove the plug, unscrew the wing nut.
2. COLLECTION
Assemble the grass collector provided (fig. 4, 6).
Open the flap, remove the plug and instead hook
the collector onto the rear of the machine.
When mowing, the grass is collected in the collector. Empty the grass onto the compost heap or
spread it over borders as fertiliser. The machine is
also ideal for collecting up leaves in the autumn.
BEFORE STARTING
FILL THE CRANKCASE WITH OIL
The lawnmower is delivered without
any oil in the engine crankcase. The
crankcase must be filled with oil before
the engine is started for the first time.
Remove the oil dipstick (fig. 8, 9). Fill the engine’s crankcase with approx. 0.55 litres of good
quality oil (service class SE, SF or SG). Use SAE
30 or SAE 10W-30 oil.
Slowly fill to ‘FULL/MAX’. Do not overfill.
CHECK THE OIL LEVEL
Check before using the machine that the oil level is
between ‘FULL/MAX’ and ‘ADD/MIN’ on the
dipstick.
Remove and wipe off the dipstick (fig. 8, 9). Slide
it down completely and tighten it. Unscrew and
pull it up again. Read off the oil level. If the oil level is low, fill with oil up to the ‘FULL/MAX’ mark.
FILL UP THE PETROL TANK
Never remove the filler cap or fill with
petrol while the engine is running or still
warm.
Never completely fill the petrol tank. Allow a little room for the petrol to expand
if necessary.
Preferably use environmentally friendly petrol, i.e.
alkylate petrol. This type of petrol has a composition that is less harmful to people and nature. It has
e.g. no lead additives, no oxygenators (alcohols
and ethers), no alkenes and no benzene.
NOTE! If you change to environmentally friendly petrol in an engine previously
run on ordinary lead-free petrol (95),
the petrol manufacturer’s recommendations must be followed carefully.
Ordinary lead-free 95 octane petrol can also be
used. You must never use 2-stroke petrol mixed
with oil. NOTE! Bear in mind that lead-free petrol
is a perishable; do not purchase more petrol than
can be used within thirty days.
STARTING THE ENGINE
(Briggs & Stratton)
1. Place the lawnmower on flat, firm ground. Do
not start in long grass.
2. Make sure the spark plug cable is connected to
the spark plug.
3. When starting a cold engine: Press down the
primer fully 6 times (fig. 10).
When starting a warm engine, the primer does
not need to be used. If the engine stops due to a
lack of petrol, refill and press down the primer
3 times.
4. Press in the Start/Stop loopG towards the handle. NOTE! The Start/Stop loopG must be kept
pressed in to prevent the engine stopping (fig.
12).
5 Grasp the starter handle and start the engine by
pulling briskly on the starter cord.
For ease of starting, press down the handle so
that the front wheels lift slightly from the
ground. Do not start in thick grass.
Keep hands and feet away from the rotating blade(s). Never put your hand or
foot under the blade casing or in the
grass ejector while the engine is running.
STARTING THE ENGINE (Honda)
1. Place the lawnmower on flat, firm ground. Do
not start in long grass.
2. Make sure the spark plug cable is connected to
the spark plug.
3. Open the fuel tap (fig. 11).
9
GB
ENGLISH
4. Set the throttle control B in the choke position . NOTE! It is not necessary to use the
choke position when the engine is warm (fig.
12).
5. Press the Start/Stop loop G towards the handle.
NOTE! The Start/Stop loop G must be kept
pressed in to prevent the engine stopping (fig.
12).
6. Grasp the starter handle and start the engine by
pulling briskly on the starter cord.
7. When the engine starts, move the throttle control backwards until max. revs are obtained.
NOTE! The engine should always be run at
maximum revs to avoid abnormal machine vibrations.
Keep hands and feet away from the rotating blade(s). Never put your hand or
foot under the blade casing or in the
grass ejector while the engine is running.
STOPPING THE ENGINE
The engine may be very warm immediately after it is shut off. Do not touch the
silencer, cylinder or cooling flanges.
This can cause burn injuries.
1. Release the Start/Stop loop G (fig. 12) to stop
the engine. This loop must not be disengaged
(e.g. by setting it in the depressed position
against the handle), as it will not be possible to
stop the engine.
Honda: Close the fuel tap.
2. If the lawnmower is left unattended, remove the
spark plug cable from the spark plug.
If the start/stop loop ceases to work, stop
the engine by removing the spark plug
cable from the spark plug. Immediately
take the lawn mower to an authorised
workshop for repair.
REAR WHEEL DRIVE (*)
Engage the drive by pressing the clutch loop I towards the handle. Disengage the drive by releasing
the clutch loop I (fig. 12).
10
CUTTING HEIGHT
Shut off the engine before adjusting the
cutting height.
Do not set the cutting height so low that
the blade come into contact with uneven
ground.
The mower has single-lever control for adjusting
the cutting height. Pull the lever out, and set the
cutting height to one of the nine positions best suited to your lawn (fig. 13).
MAINTENANCE
No servicing may be carried out on the
engine or lawnmower without first removing the spark plug cable from the
spark plug.
Stop the engine and remove the spark
plug cable if the mower is to be lifted,
e.g. during transportation.
If the lawnmower needs to be tilted, it
must be tilted so that the engine’s spark
plug faces upwards. Tilt the lawnmower
when the fuel tank is empty.
CLEANING
After each use the mower should be cleaned. This
is particularly important on the underside of the
mower casing. Rinse clean with the garden hose.
The mower will then last longer and work better.
High-pressure washers should not be used.
If grass has dried on to the mower casing, it can be
scraped clean. If necessary, touch up the underside
with paint to prevent rust damage.
Clean the silencer and the surrounding
area regularly to remove grass, dirt and
flammable waste products.
Remove the transmission cover by removing the
screws S (fig. 20) and clean around the transmission (*) and drive belts (*) with a brush or compressed air once or twice a year.
Once every season, the drive wheels (*) should be
cleaned internally. Remove both wheels. Clean the
gear wheel and the wheel gear rim of grass and dirt
using a brush or compressed air (fig. 14). Replace
the wheel.
GB
ENGLISH
COOLING SYSTEM
Before each use, the engine’s cooling system must
be cleaned. Clean the cylinder’s cooling flanges
and air intake of grass remains, dirt, etc.
LUBRICATING DRIVE SHAFT (*)
Once per season, the wedge on the drive shaft
should be greased. Remove the wheel (wheel cap,
screw and washer). Then remove the circlip and
washer so that the gear wheel can be removed from
the shaft. Lubricate the wedge with universal
grease.
Reinstall the wedge (the wedge is installed differently on the right and left side, fig. 15-16). Install
the gear wheel so that the L faces out on the left
side and the R faces out on the right side (machine
viewed from the rear).
OIL CHANGE
Replace the oil when the engine is warm
and the fuel tank is empty. In order to
prevent burns, take care while draining
as the oil is hot.
Change the oil the first time after 5 hours of operation, and subsequently every 50 hours of operation or once a season. Remove the dipstick, tilt the
mower and let the oil run out into a container. Be
careful not to let any oil run on to the grass.
Fill with new oil: Use SAE 30 or SAE 10W-30 oil.
The crankcase holds approx. 0.55 litre. Fill until
the oil reaches the “FULL/MAX“ mark on the dipstick.
AIR FILTER
A dirty and blocked air filter reduces the engine
output and increases engine wear.
Briggs & Stratton (fig. 17): Carefully remove the
air cleaner so that no dirt falls down into the carburettor. Remove the expanded plastic filter and
wash it in liquid detergent and water. Dry the filter.
Pour a little oil on the filter and squeeze it in. Reinstall the air cleaner.
Clean the filter every three months or after every
25 hours of use, whichever occurs first. More frequently if the engine is working on dusty ground.
To remove dirt, carefully knock the filter several
times against a hard surface or use compressed air
from the back of the filter to blow-clean. Do not try
to brush the filter clean as this forces dirt down into
the fibres. A very dirty filter should be replaced.
Clean the air filter after every 25 hours of use or
once a season. More frequently if the engine is
working on dusty ground.
SPARK PLUG
Never remove the spark plug or spark
plug cable when checking to see if there
is a spark. Always use an approved test
instrument.
Clean the spark plug regularly (every 100 hours of
run time). Use a wire brush for cleaning.
Change the spark plug if the electrodes are excessively burnt or if the plug is damaged. The engine
manufacturers recommendations are as follows:
(fig. 19):
Briggs & Stratton: Champion J19LM (RJ19LM),
spark gap 0.76 mm.
Honda: NGK BPR6ES,
Spark gap 0.7-0.8 mm.
ADJUSTING CLUTCH CABLE (*)
If the drive does not engage when the clutch loop
is pressed against the handle, or if the lawnmower
feels cumbersome or slow, this may be because the
clutch in the transmission is slipping. To rectify
this situation, adjust the clutch cable as follows:
1. When the clutch loop is released, it should be
possible to push the mower without any resistance. If this is not the case, screw in the nipple
T until the mower can be pushed (fig. 21).
2. When the clutch loop is
pressed in approx. 2 cm (position 1), there should be some
resistance when pushing the
lawnmower. With the clutch
loop fully pressed in (position
2) it should not be possible to
push the mower. Unscrew the
nipple T until this position is
achieved.
Honda (fig. 18): Remove the cover and take out the
filter. Carefully check the filter for holes or other
damage. A broken or damaged filter must be replaced.
11
GB
ENGLISH
CHANGING BLADES
Wear protective gloves when changing
blade(s) to avoid cutting yourself.
Check the blade system regularly. Check
particularly the curved area behind the
blade edge for traces of wear. If the blade
shows traces of damage it should be replaced. A worn blade creates imbalance
and can damage the mower.
Always check the blades after a collision. First disconnect the spark plug cable. If the blade system
has been damaged, defective parts should be replaced. Always use genuine spare parts.
To replace the blade, slacken the screw (fig. 22).
Fit the new blade so that the stamped logo is turned
up facing the blade holder (not facing the grass).
Reinstall the washer and screw. Tighten the screw
properly. Tightening torque 40 Nm.
When replacing the blade, the blade screw should
also be replaced.
The guarantee does not cover damage to the blade,
blade holder or engine caused by running into obstacles.
When replacing the blade, the blade holder and
blade screw, always use genuine spare parts. Nongenuine spare parts can entail a risk of injury or
damage, even if they fit the machine.
SHARPENING THE BLADES
Sharpening of the blades must be done by wet
method grinding, using a whetstone or a grindstone.
For safety reasons, the blades should not be sharpened on an emery wheel. A very high temperature
could cause the blades to become brittle.
Once the blade has been sharpened, it
must then be balanced to avoid vibration damage.
STORAGE
WINTER STORAGE
Empty the fuel tank. Start the engine and let it run
until it stops. The same petrol must not remain in
the tank for more than one month.
12
Tip up the mower and unscrew the spark plug.
Pour a tablespoon of engine oil into the spark plug
hole. Pull out the starter handle slowly so that the
oil is distributed in the cylinder. Screw in the spark
plug.
Thoroughly clean the mower and store it indoors in
a dry place.
SERVICE
ACCESSORIES/SPARE PARTS
Always use genuine spare parts and accessories. Non-genuine spare parts and
accessories have not been checked and
approved by the lawnmower manufacturer. Use of non-genuine spare parts
and accessories can lead to the risk of injury, even if they fit the machine. The
lawnmower manufacturer does not accept any liability for injuries caused by
the use of such parts or accessories.
Genuine spare parts are stocked by authorised
service centres and by many dealers.
We recommend that you take the machine to an authorised service station for annual servicing, maintenance and inspection of safety equipment.
For service and spare parts, please contact the dealer where the machine was purchased.
PRODUCT IDENTITY
The identity of the product is determined by two
components:
1. Article and serial number of the machine:
Appears on this label fixed to the chassis of the
machine.
TYP
ART. NR
SERIE NR
S461
XX-XXXX-XX
ART. NR.
SERIE NR.
XXXXXXXX
22 Kg
S
1,6 kW
230 V 50 Hz
2850 min
Nätsäkring 10 A
TÜV Rheinland
L WA
geprü fte
Sicherheit
86
N D FI
TM:HYKVÄKSYMA
maahantuoja STIGA OY
R
ENGLISH
2. Model, type and serial number of the engine:
Appears on the engine fan housing as shown:
Briggs & Stratton
GB
al laws. The rights to which the purchaser is entitled with the support of these laws are not
restricted by this guarantee.
Honda
Use this identification whenever you contact a
service workshop or buy replacement parts.
As soon as possible after buying the machine,
write the above numbers on the back page of this
booklet.
The manufacturer reserves the right to make
changes to the product without prior notice.
PURCHASE TERMS
A full guarantee is issued against manufacturing
and material defects. The user must carefully follow the instructions given in the enclosed documentation.
Guarantee period
For consumer use: two years from the purchase
date.
For professional use: three months from the purchase date.
Exceptions
The guarantee does not cover damage due to:
- neglect of the user to acquaint himself with accompanying documentation
- carelessness
- incorrect and non-permitted use or assembly
- the use of non-genuine spare parts
- the use of accessories not supplied or approved
by the manufacturer
Neither does the guarantee cover:
- wearing components such as blades, belts,
wheels and cables
- normal wear
- engines. These are covered by the appropriate
manufacturer’s guarantees with separate terms
and conditions.
The purchaser is covered by each country’s nation13
EC conformity declaration
1.Category
Lawnmower with petrol engine
8.Make
Mountfield
2.Type
E431, E481, E531
9.Cutting width
1-2.
3-4.
5.
3.Item no
1. 12-1581, 2. 12-1681, 3. 12-5503, 4. 12-5603,
5. 12-9604
4.Manufacturer
STIGA Produktion AB
P.O. Box 1006
SE-573 28 Tranås
Sweden
5.Vibration
10.Serial number
43 cm
48 cm
53 cm
See label on chassis
11. Engine
2
1-2. 9,0 m/s
3-5. 8,0 m/s2
Make
1-2. Briggs & Stratton
3-5. Honda
Model
1-2. LS 45
3-4. GCV 135
5.
GCV 160
STOP
(ISO 5349)
1-4. 96 dB(A)
5.
100 dB(A)
6A.Guaranteed sound power level
(LWA)
12.Rotation speed
6B.Measured sound power level
1-4.
5.
7.Notified body
ITS Testing &
Certification Ltd
1-2. 3000 rpm
3-5. 2900 rpm
95 dB(A)
97 dB(A)
Notified Body representative 0359
This product conforms to
- Electromagnetic Compatibility Directive 89/336/EEC
- Machinery Directive 98/37/EEC with special reference to
appendix 1 of the directive regarding essential health and
safety requirements in conjunction with manufacturing
- Noise Emission Directive 2000/14/EC
Mats Antonsson
Managing Director
Issued in Tranås 2001-12-05
M a n u f a c t u r e d b y St i g a A B , S w e d e n
w w w. s t i g a . c o m