1
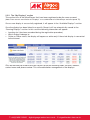
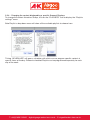
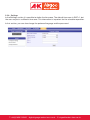
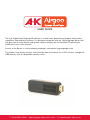
USER GUIDE
The A+K Airgoo Digital Signage MicroPlayer is a totally new generation of product with wireless
capabilities and innovative features. It is designed to operate with our Digital Signage Server that
will allow you to easily display and update content remotely on any flat panel TV featuring an
HDMI port in just a few seconds.
Access to the Server is via the following webpage: www.admin.airgoosignage.co.uk
This product can display pictures and video files from the Internet via its WiFi access, through the
USB memory stick or compatible memory cards.
T: +44(0)1638 510900
digitalsignage.anders-kern.co.uk
E: [email protected]
REGISTRATION
To register your A+K Airgoo Digital Signage HDMI MicroPlayer, go to:
www.admin.airgoosignage.co.uk and enter your username and password
Recommendations of Use and Safety Warnings
Do not install your Airgoo MicroPlayer close to a water source (minimum 1.5m away from a water
source) or in a humid environment (such as a bathroom, laundry or kitchen).
This product has been designed to work inside a building and cannot be used outside. Avoid
using the product in a dusty environment.
This product must be used in temperatures between 10°C and 35°C.
You can use the USB port of the TV set to power the MicroPlayer. Where there is no USB port
available, use the power adapter provided.
The CE mark indicates that the product is in compliance with the main requirements of the
European parliament and council directive 2002/96/EC for telecommunications terminals, user
health and safety and for electromagnetic disturbance.
This terminal has been designed for indoor use (CPE customer premises equipment) within the
European Union. It has been tested according to the technical dispositions for radio equipment
(EN 300328). The manufacturer therefore declines all responsibility in case of non-compliance
with the current regulations in the country of installation.
The declaration of conformity and the warranty are available under request by sending an
email to: [email protected]
T: +44(0)1638 510900
digitalsignage.anders-kern.co.uk
E: [email protected]
1. Description of the Digital Signage HDMI MicroPlayer
1.1. Description
The MicroPlayer comes with the following accessories:
• USB to micro USB cable (for power up)
• HDMI extension cable
• Mains Power Adaptor for USB
The MicroPlayer features the following elements:
• Micro USB port for power
- When powered, a blue light appears inside the MicroPlayer
• USB port for a mouse
- The mouse is not provided
- It is possible also to use a Wireless 2.4GHz mouse for greater comfort
• Micro SD Card slot
1.2. First power up and WiFi setting
• Plug the Micro USB end of the cable to the Micro USB socket of the MicroPlayer and the
other end of the cable to the USB socket of the TV. If the TV has no USB socket use the USB
power adaptor supplied
• Insert the USB plug of the mouse (not supplied) into the USB socket at the end of the
MicroPlayer. The mouse is only used during setup to achieve connection to the local WiFi LAN
The following window should appear:
• Click on “HOME” > “SETTINGS” > “WiFi” to connect to your LAN
• Select the chosen LAN network and new window will enable the entering of the password
• Click *CONNECT” once the password is entered
• Once the connection is confirmed, click on the “HOME” icon
• Click on the right and side icon “Spheris” and the Digital Signage App will start
T: +44(0)1638 510900
digitalsignage.anders-kern.co.uk
E: [email protected]
2. Decription of the Digital Signage Content Management Server
2.1 Login to the Digital Signage Server and register your MicroPlayer
In order to register a new MicroPlayer you will need to know its MAC address, this is how the
server can identify the MicroPlayer.
2.1.1 Identification of the MicroPlayer’s MAC address
How to find the MAC address of your MicroPlayer:
• Click “HOME” > “SETTINGS” >
• Click “ADVANCED” to see the the MAC address (example: 00.E0.4C.81.92.B3), which you will
register without the dots (example: 00E04C8192B3)
2.1.2 Login to the Content Management Server
• Go to: www.admin.airgoosignage.co.uk
• Enter the username and password you were provided with
2.1.3 Registration of a new display or MicroPlayer
• Select the “My Displays” tab and click on “Register a New Display” to open the registration
window
• Enter the MAC address in the Serial Number box
T: +44(0)1638 510900
digitalsignage.anders-kern.co.uk
E: [email protected]
2.2. Presentation of the Digital Signage Server
2.2.1 Functionalities of the Digital Signage Content Management Server
• Register MicroPlayer(s)
• Organise MicroPlayer(s) into Groups (by product, location, etc.)
• Upload and organise photos or videos in content Playlists
• Link groups to specific content playlists.
(Note: All MicroPlayers within a group will show the same content wherever they are located)
• Link a Group to a new content Playlist when the displayed information needs to be changed
• Schedule certain content to appear at certain times of the day
Once a link between a Group of displays or MicroPlayers and a content Playlist is established,
the content is downloaded into the internal memory of the MicroPlayer (max size 4GB). Once
downloaded, the new content is displayed on the screen.
(Note: The change should take place between 30 seconds and 2 minutes depending on the speed of the
network.)
T: +44(0)1638 510900
digitalsignage.anders-kern.co.uk
E: [email protected]
2.2.2. The “My Displays” section
This section lists all the MicroPlayers that have been registered under the same account.
(Note: From now on we will refer to “Displays” as a combination of a MicroPlayer and a flat panel TV.)
Once a new display is successfully registered, it will appear in the “Available Displays” section.
Once the display has been linked to a specific Group it will be automatically moved to the
“Running Displays” section. In this case the following information will appear:
• Location (as it has been recorded during the registration procedure)
• Which Group it belongs to
• Online or Offline status; the display will appear as online only if the actual display is connected
to the Internet
Click on the blue pen under the action column to edit the following fields: location, address,
contact name and phone number. This will enable better management of the displays.
T: +44(0)1638 510900
digitalsignage.anders-kern.co.uk
E: [email protected]
2.2.3. The “My Groups” section
This section lists all the Groups that have been created under an account. Users can organise
Groups by different criteria, such as location, product category, advertising campaign, etc.
A Group can be linked to only one playlist at a time, but a Playlist can be linked to several
Groups.
(Note: Clicking on the red cross in front of a Group under the “Actions” column will delete the Group.
Ticking the box in front of a Group and then selecting “Delete Selected Group” will have the same effect.)
Click on the blue pen to edit the name of the display.
By clicking on one Group name we display the serial number of all the Displays within that Group.
Clicking on the Playlists icon opens a new menu with the possibility of either programming a
link to a specific content photo or video Playlist (solo Playlist) or of launching a scheduler which
will enable a timed display of various contents throughout the day for each day of the week (see
section 12.4).
Click on the Group name to display the serial number of all the Displays within that Group: e.g. for
Group “shop2” below.
T: +44(0)1638 510900
digitalsignage.anders-kern.co.uk
E: [email protected]
2.2.4 : Changing the content displayed by a specific Group of Displays
To change the content linked to a Group, click on the “PLAYLISTS” icon to display the “Playlists
settings” menu.
Solo Playlist: a drop down menu will show all the available playlists to choose from.
Ticking “SCHEDULED” will open a scheduler with which we can program specific content at
specific times of the day. Different scheduled Playlists can be programmed separately for each
day of the week.
T: +44(0)1638 510900
digitalsignage.anders-kern.co.uk
E: [email protected]
2.2.5. The “My Playlist” section
The first page in the “My Playlist” section lists all the pictures or videos contained in each Playlist;
by clicking on the box we will see to which Groups the Playlist is linked to.
By selecting a specific Playlist we can then see the photos or the name of the videos in that
Group. We can can also modify the content of that Playlist by uploading or deleting pictures or
videos.
T: +44(0)1638 510900
digitalsignage.anders-kern.co.uk
E: [email protected]
2.2.6. Settings
In the Settings section it is possible to define the time zone. The default time zone is GMT+1, but
the user may be in a different time zone. This information is important for the scheduler operation.
In this section, you can also change the preferred language and the password.
T: +44(0)1638 510900
digitalsignage.anders-kern.co.uk
E: [email protected]
2.3. Warranty
The warranty does not cover damage caused if you (or any unauthorised person) tries to repair
the MicroPlayer.
If the MicroPlayer is emitting smoke, noise, or an unusual smell, immediately unplug it. If you do
not use the MicroPlayer for a while, make sure to unplug the power cord.
The warranty concerns the MicroPlayer and the following accessories: Power Converter. In case
of any of these accessories stop working you may contact the following email address for a
diagnostic and to replace them: [email protected].
• Warranty period
This MicroPlayer is under warranty for 12 months. The warranty period begins on the date the
display is purchased. The warranty must be proven by presenting the original invoice or receipt
on which the date and model purchased appear.
• Coverage
A defective MicroPlayer must be returned complete to your distributor with an explanation.
If this MicroPlayer presents a defect during the warranty period, the authorised Aftersales Service
will replace any defective component. The Aftersales Service will unilaterally decide whether to
repair or replace the MicroPlayer, in part or in whole.
The initial purchase date will determine the starting date for the warranty period. If the
MicroPlayer is repaired or exchanged by our Aftersales Service, the warranty period is not
extended.
• Exclusions
Damage or defects caused by the improper use or handling of the MicroPlayer, or by the use of
accessories, which are not original or not recommended in these instructions, are not covered by
the warranty.
The warranty does not cover damage caused by outside elements, such as lightning, water, fire,
or any other damage caused during transport.
No warranty coverage may be claimed if the MicroPlayer’s serial number has been modified,
removed, erased, or made illegible.
No warranty coverage may be claimed if the MicroPlayer has been repaired, altered, or modified
by the buyer or any repair personnel not officially qualified and authorised.
The manufacturer does not guarantee the technical properties described in this manual. The
hardware and accessories described in this manual are subject to change without advance
notice. For this reason, the manufacturer reserves the right to change the related documents,
components, options, and characteristics without advance notice.
T: +44(0)1638 510900
digitalsignage.anders-kern.co.uk
E: [email protected]
FCC WARNING STATEMENT
FCC Note:
THE MANUFACTURER IS NOT RESPONSIBLE FOR ANY RADIO OR TV INTERFERENCE
CAUSED BY UNAUTHORISED MODIFICATIONS TO THIS EQUIPMENT. SUCH
MODIFICATIONS COULD VOID THE USER’S AUTHORITY TO OPERATE THE EQUIPMENT.
This device complies with Part 15 of the FCC Rules. Operation is subject to the following two
conditions:
1. This device may not cause harmful interference, and
2. This device must accept any interference received, including interference that may cause
undesired operation.
(Note: This equipment has been tested and found to comply with the limits for a Class B digital
device, pursuant to part 15 of the FCC Rules.)
This device has been evaluated to meet general RF exposure requirement. The device can be
used in portable exposure condition without restriction.
These limits are designed to provide reasonable protection against harmful interference in a
residential installation. This equipment generates, uses and can radiate radio frequency energy
and, if not installed and used in accordance with the instructions, may cause harmful interference
to radio communications.
However, there is no guarantee that interference will not occur in a particular installation. If
this equipment does cause harmful interference to radio or television reception, which can be
determined by turning the equipment off and on, the user is encouraged to try to correct the
interference by one or more of the following measures:
• Reorient or relocate the receiving antenna
• Increase the separation between the equipment and receiver
• Connect the equipment into an outlet on a circuit different from that to which the receiver is
connected
• Consult the dealer or an experienced radio/TV technician for help
T: +44(0)1638 510900
digitalsignage.anders-kern.co.uk
E: [email protected]